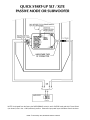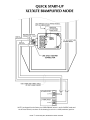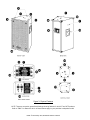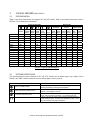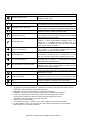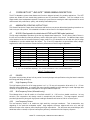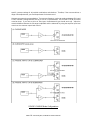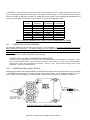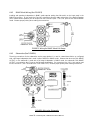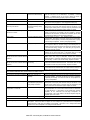
1
XLT / XLTE
FULL-RANGE SYSTEMS
AND
SUBWOOFERS
Owner’s Manual
COMMUNITY PROFESSIONAL LOUDSPEAKERS
A TRADITION OF EXCELLENCE AND INNOVATION FOR OVER 30 YEARS
Before 1967, most sound reinforcement systems were made up of components designed for use in movie theaters.
Although these components worked well in theaters, the enclosures were large, bulky, heavy, and lacked output
capability in the critical midrange portion of the audio spectrum. This was very evident to a young audio engineer
named Bruce Howze, who was already involved in the fledgling touring sound industry, working with various rock
groups. He had a vision for a better way and, as a result, founded Community Light & Sound in 1967.
His concept was simple – design and build products that meet the needs of sound reinforcement with consistently
better products at a fair price. He also felt loudspeaker performance should be described in real-world terms.
Community is now well known as one of the only loudspeaker manufacturers to publish accurate, detailed, and
essentially raw performance data on its products using TEF™ measurements at realistic listening distances.
Community’s first product, dubbed the "LMF", was a fiberglass mid-bass horn for a 12 in. / 305 mm driver. It was
efficient, amazingly light, yet strong, making it ideal for touring use. Since then, Community has been distinctively
associated with fiberglass and with paying close attention to efficiency in converting electrical into acoustic energy.
Community continued to develop other unique products. The M4™ driver hit the market in 1981. This high power,
midrange compression driver covers the most critical portion of the audio spectrum – 200 Hz to 2000 Hz. This
removed the need for the usual crossover point right in the middle of the speech range. In keeping with not
designing “me too” products, the M4 diaphragm was made of thin aluminum skins sandwiching a structural foam
core – a fabrication technique still unique to Community. Recently the M4 has evolved with the development of a
nonpareil carbon fiber diaphragm virtually eliminating diaphragm failure. The M200™ midrange driver appeared 2
years after the M4 with an innovative diaphragm of aluminized mylar. Community has also demonstrated to the
world that big sound can come from small boxes, with the RS/VBS™ Series of electronically-controlled loudspeaker
systems that has now evolved into the Community Solutions™ series.
Most recently, Community has captured the audio world’s attention again with a number of innovative products: the
Leviathan II full-range horn system, the VHF100™ high frequency compression driver, the EM280™ and EM282™
extended midrange, carbon fiber diaphragm compression drivers. The EM282, M4, and VHF100 are the drivers used
in the revolutionary, forced-air cooled AirForce Concert System. With AirForce Community has, in a sense, come full
circle from the LMF, but this time with incomparable performance and hardware for a complete touring system.
Community’s History of Technological Firsts Include:
•
•
•
•
•
•
•
•
•
•
•
•
•
•
•
•
•
•
•
•
•
First successful fiberglass MF / HF horns and giant fiberglass bass horns.
First compression loaded midrange horn for touring systems – The LMF.
First suspensionless diaphragm HF driver – VHF100.
First midrange decade (200 Hz to 2 kHz) high power compression driver – M4.
First carbon fiber diaphragm compression drivers – M4, EM280, EM282.
First Ferrofluid-cooled professional woofers – VBS Series.
First product series with all drivers Ferrofluid-cooled – SLS/SBS Series.
First forced-air cooled drivers for touring system loudspeakers – AirForce.
First passive loudspeakers with internal multi-band and multi-level processing – CSX-S2.
First triaxial full-range horn system – Leviathan II.
First sound reinforcement application of TDS (Time Delay Spectrometry) for signal-alignment – RS440.
First integral signal-aligned 3-way sound reinforcement systems – RS Series.
First TEF/TDS documented loudspeaker line – RS/VBS.
First 3-way cinema systems – Paramount Exec. Theatre, Warner Bros. screening theatre/dubbing rooms.
First electro-acoustic system to equal the sound level of pneumatic warning sirens.
First to provide loudspeakers for sound coverage of an entire country – Denmark Emergency System.
First comprehensive calibrated testing of sound reinforcement products.
First to publish AudioCAD data on CD-ROM.
First professional audio company with an Internet web site – http://www.loudspeakers.net
First compact, weather-resistant, full-range horn systems - R2 Series.
First custom configurable outdoor systems - WET Series
PAGE 1 Community XLT / XLTE Series Owner’s Manual
EC STATEMENT OF CONFORMITY
This document confirms that the range of products of Community Professional Loudspeakers bearing the CE label meet
all the requirements in the EMC directive 89/336/EEC laid down by the Member States Council for adjustment of legal
requirements, furthermore the products comply to the rules and regulations referring to the electromagnetic
compatibility of devices from 30 August 1995.
The Community Professional Loudspeaker products bearing the CE label comply with the following harmonized or
national standards:
DIN EN 55013:08-1991
DIN EN 55020:05-1995
DIN EN 50082-1:03-1993
The authorized declaration and compatibility certification resides with the manufacturer and can be viewed upon
request. The responsible manufacturer is the company:
Community Light & Sound, Inc.
333 East 5th Street
Chester, PA 19013
USA
Tel: 610 876-3400
Fax: 610 874-0190
e-mail: [email protected]
Chester, PA USA Oct 1999
PAGE 2 Community XLT / XLTE Series Owner’s Manual
TABLE OF CONTENTS
CHAPTER
PAGE
Community Professional Loudspeakers..................................................................................................................... 1
EC Statement of Conformity ..................................................................................................................................... 2
1.
Introduction and Safety Information ........................................................................................................... 4
1.2
Model Number Usage In This Manual ........................................................................................................ 4
2.
Unpacking and Inspection .......................................................................................................................... 5
!
Quick Start-up -- PASSIVE Mode or Subwoofer ....................................................................................... 6
!
Quick Start-up -- BIAMP Mode................................................................................................................. 7
3.
Physical Features........................................................................................................................................ 9
4.
Community XLT and XLTE Series General Description ................................................................................11
4.1
Abbreviated Instructions.............................................................................................................................11
5.
Setup and Operation ..................................................................................................................................16
5.1
Choosing Power Amplification....................................................................................................................16
5.2
System Configurations ...............................................................................................................................17
6.
Electrical Installation ..................................................................................................................................20
6.4
Connection Diagrams ................................................................................................................................23
7.
Physical Installation....................................................................................................................................24
7.3
Mounting and Rigging ................................................................................................................................25
7.6
Stacking Enclosures....................................................................................................................................28
8.
Acoustical Adjustments ..............................................................................................................................29
9.
Operating Precautions................................................................................................................................32
10.
Servicing the Loudspeaker..........................................................................................................................35
11.
Technical Specifications .............................................................................................................................36
12.
In Case of Difficulty....................................................................................................................................38
13.
Warranty Information.................................................................................................................................41
Appendix..................................................................................................................................................................43
Index
..................................................................................................................................................................44
DIAGRAMS and TABLES
Fig 1:
Fig 2:
Fig 3:
Fig 4:
Fig 5:
Fig 6:
Fig 7:
Fig 8:
Fig 9:
Fig 10:
Fig 11:
Fig 12:
Table 1:
Table 2:
Table 3:
Table 4:
Table 5:
Table 6:
Table 7:
PAGE
Physical Features........................................................................................................................................8
PASSIVE Mode Configurations....................................................................................................................18
BIAMP Mode Configurations ......................................................................................................................19
Wiring for PASSIVE Mode...........................................................................................................................22
Wiring for BIAMP Mode .............................................................................................................................23
Wiring for Subwoofers ...............................................................................................................................23
Mounting Point Detail – Pull Direction .......................................................................................................26
XLT Mounting Points ..................................................................................................................................26
XLTE Mounting Points ................................................................................................................................27
XLTE Mounting / Rigging Point Detail..........................................................................................................28
Effects of Amplifier Clipping .......................................................................................................................33
Sound Exposure Limits ...............................................................................................................................34
Physical Features Matrix.............................................................................................................................9
Product Listing ...........................................................................................................................................11
Recommended Amplifier Power for Full-Range in PASSIVE Mode ...............................................................17
Recommended Amplifier Power for Full-Range in BIAMP Mode..................................................................17
Recommended Amplifier Power for Subwoofers .........................................................................................17
Loudspeaker Wire Selection .......................................................................................................................20
Minimum Impedance for two XLT or XLTE Loudspeakers in Parallel............................................................22
(Front Cover L to R: 51, 42, 41, 46, 47, 43, 55, 48. XLTE models shown.)
PAGE 3 Community XLT / XLTE Series Owner’s Manual
COMMUNITY XLT™ AND XLTE™ SERIES OWNER’S MANUAL
1
INTRODUCTION
Welcome! You’ve joined the group of people that have chosen high quality Community loudspeaker systems and
components for over 30 years. We’re gratified you did and we will do our best to make sure you are satisfied with
your new loudspeaker system.
In order for you to get the most effective use of this product, please take some time to read this manual. If you are in
a hurry and can’t wait, you can use the QUICK START-UP diagrams to connect your loudspeakers and be operating
them in few minutes. However, we have included a great deal of other useful information in this manual that will
help you to realize the best performance, operation, sound quality, and reliability from your new loudspeaker.
1.1
COMMUNITY XLT AND XLTE SERIES LOUDSPEAKER SYSTEMS
This manual contains information for the proper setup and operation of the Community XLT and XLTE full-range
loudspeaker systems and subwoofers. While every attempt has been made to ensure this information is correct and
up to date, Community continuously incorporates worthwhile improvements to each product that may include
changes and/or modifications not contained in this manual.
1.2
MODEL NUMBER USAGE IN THIS MANUAL
Within this manual XLT and XLTE models are generally referred to only by their numerical suffixes. For example,
model ‘43’ refers to both the XLT43 and XLT43E. Where information applies only to a specific model, such as only to
the XLT46 but not the XLT46E, the complete model number is used.
1.3
IMPORTANT SAFETY INFORMATION
The terms “Caution,” “Warning,” and “Danger” are used throughout this manual to alert the reader to important
safety considerations. If you have any questions about any aspects of these cautions, contact your local dealer,
distributor, or Community.
CAUTION: describes an equipment operating condition or user action that may expose the equipment or user
to potential damage or danger.
WARNING: describes an operating condition or user action that will likely cause damage to the equipment or
injure the user.
DANGER: describes an operating condition or user action that will immediately damage the equipment or be
extremely dangerous or possibly life-threatening to the user.
PAGE 4 Community XLT / XLTE Series Owner’s Manual
2
UNPACKING AND INSPECTION
The Community XLT and XLTE loudspeakers are inherently rugged and are carefully packed in well-designed cartons.
It is a good idea to inspect the unit carefully after it has been removed from the packaging, as sometimes there is
hidden damage due to some unfortunate incident in shipment.
Please note that once the shipment has left Community, the responsibility for damage is borne by the freight
company. This means that if there is damage, you must file a claim with the freight company. Each freight company
has its own set of regulations that must be followed and forms that must be filled out. Therefore, the freight
company must be contacted as soon as a shipping damage problem is discovered. Save the carton and packing
material because many damage claims will be considered invalid if these are thrown away. The Community dealer
and the factory will try to help in any way possible. Remember, though, it is up to the party receiving the shipment
to file a damage claim.
It is always a good idea to keep the carton and packing material in case the unit must be shipped back to your dealer
or distributor.
The shipping carton contains the following items:
(1)
(1)
(1)
(1)
Loudspeaker system
Owner’s manual
Warranty card
Feet Kit (XLT41E only)
PAGE 5 Community XLT / XLTE Series Owner’s Manual
NOTES: As shipped from the factory the PASSIVE/BIAMP switch is set for PASSIVE mode and the HF Level Switch
(not shown) is set in the +4 dB (maximum) position. Subwoofer input panel layout is different from that shown.
PAGE 6 Community XLT / XLTE Series Owner’s Manual
NOTE: As shipped from the factory the PASSIVE/BIAMP switch is set for PASSIVE mode and
the HF Level Switch (not shown in this drawing) is set in the +4 dB (maximum) position.
PAGE 7 Community XLT / XLTE Series Owner’s Manual
Figure 1: Physical Features
NOTE: These are composite, generalized drawings showing features for both XLT and XLTE products.
Refer to TABLE 1 to determine which of these features apply to your particular loudspeaker model.
PAGE 8 Community XLT / XLTE Series Owner’s Manual
3
PHYSICAL FEATURES (See FIGURE 1)
3.1
FEATURES MATRIX
TABLE 1 lists various features that vary between XLT and XLTE models. Refer to the Features Descriptions chart in
SECTION 3.2 for details about each feature.
PHYSICAL FEATURES
ENCLOSURE
MATERIAL
Mounting Stand
ProtecPoints Adapter Rigging Stand
tive
Points Points Socket Corners
"
"
XLT41
XLT43
XLT46
XLT47
XLT48
XLT51
XLT55
"
"
"
"
"
"
"
"
"
"
"
"
XLT41E
XLT42E
XLT43E
"
XLT46E
XLT47E
XLT48E
"
"
"
"
"
"
"
"
XLT51E
XLT55E
"
Feet
"
"
"
"
"
"
"
OSB
Wood
13-ply
Baltic Carpet
Birch Finish
"
"
"
"
"
"
"
"
"
"
"
"
"
"
FINISH
Paint
Finish
"
"
"
"
"
"
"
"
"
"
"
"
"
"
GRILLE STYLE
Flat Beveled
Grille Grille
"
"
"
"
"
"
"
"
"
"
"
"
"
"
"
"
"
"
"
"
"
"
Table 1: Physical Features Matrix
3.2
FEATURES DESCRIPTIONS
This chart describes the physical features for XLT and XLTE. Because not all features apply to all models, refer to
FIGURE 1 and TABLE 1 Matrix to determine which features apply to which products.
MOUNTING POINTS
DESCRIPTION
T-NUT MOUNTING POINTS
1 each on top, 2 sides, and bottom. 5/16-18 threaded inserts.
Used for permanently mounting the loudspeaker. 1
STAND ADAPTER MOUNTING POINTS
2 on bottom. 5/16-18 threaded inserts that mate with Ultimate
Support™ stand adapter or similar. 2
3 on top and 3 on bottom. 3/8-16 captive nuts. WLL per point =
150 lb. / 68 kg vertical pull and 60 lb. / 27.2 kg horizontal pull. 3
1-3/8 in. / 35 mm I.D. stand / pole socket for Ultimate Support or
similar stands or poles. On XLT51 and XLT51E the socket is used
for pole mounting a full-range loudspeaker.
MOUNTING / RIGGING POINTS
STAND SOCKET
PAGE 9 Community XLT / XLTE Series Owner’s Manual
OTHER MOUNTING POINTS
GRILLE MOUNTING POINTS
The grille is fastened to the enclosure with 1-1/2 in. / 38 mm #6
Phillips pan-head screws.
INPUT PANELS
INPUT PANEL
POWERSENSE™ DDP 4 INDICATOR
HF LEVEL SWITCH
PASSIVE / BIAMP SWITCH
NEUTRIK SPEAKONS 5
11
DUAL 1/4 in. PHONE JACKS 5
12
NEUTRIK SPEAKONS 5
13
DUAL 1/4 in. PHONE JACKS 5
1/4 in. PHONE JACK – HIGH PASS OUTPUT
For connecting the power amplifier to the loudspeaker. Also has
user adjustable controls and PowerSense protection indicator.
This LED indicator lights red whenever the PowerSense DDP
circuitry operates. It indicates the loudspeaker is being overdriven.
A 2-position switch used to adjust the volume level of the high
frequencies for more (+4 dB) or less (FLAT) output.
Used to select the loudspeaker’s operating mode. Down position
is for PASSIVE mode (single amplifier) and up position is for BIAMP
mode (separate LF and HF amplifiers).
Signal Input: 4 terminal NL4MP jacks. Accept NL4FC in-line
connectors. Used for both PASSIVE and BIAMP modes. Use
terminals #1 +/- for PASSIVE mode or for BIAMP LF input. Use
terminals #2 +/- for BIAMP HF input (not used for PASSIVE
mode). The two jacks are in parallel. 6
Signal Input. Accepts 1/4 in. tip/sleeve (2 conductor) phone plug.
Tip = +, Sleeve = -. Use either jack for PASSIVE mode. Not used
for BIAMP mode. The two jacks are in parallel. 6
Subwoofer signal input. Neutrik NL4MP jacks accept NL4FC inline connectors. Use terminals #1 +/-. Terminals #2 +/- are not
used. The 2 jacks are in parallel and in parallel with 1/4 in. jacks. 6
Subwoofer signal input. Accepts 1/4 in. tip/sleeve (2 conductor)
phone plug. Tip = +, Sleeve = -. The two jacks are in parallel
and in parallel with the Neutrik jacks. 6
High-pass output (150 Hz and above) for connecting a full-range
loudspeaker when using a single amplifier to power both the
subwoofer and full-range loudspeaker.
OTHER FEATURES
HANDLES
Use only for carrying and handling - DO NOT USE for mounting or
suspending the enclosure.
PROTECTIVE CORNERS
Protect the corners from damage, act as feet when the enclosure is
freestanding, and mesh with corners on other enclosures when
stacking so as to position and help stabilize the enclosure on top.
FEET
Heavy-duty rubber feet. Installed by user on the XLT41E.
LOGO
Community logo recessed into grille.
Footnotes for Physical Features
1 Use ONLY for a horizontal pull direction, i.e. parallel to the enclosure surface where the insert is located.
CAUTION: Refer to SECTION 7.4 for further information.
2 These points are ONLY for supporting the loudspeaker from the bottom.
DANGER: These points are not intended nor load rated for suspending the loudspeaker.
3 Vertical pull is perpendicular to the enclosure surface where the rigging point is located.
Horizontal pull is parallel to the enclosure surface where the rigging point is located.
CAUTION: Refer to SECTION 7.5 for further information.
4 DDP = Dynamic Driver Protection
5 Use either type of input jack - Neutrik or 1/4 in. Refer to SECTION 6.2 for further information.
6 An unused Neutrik or 1/4 in. jack can be used as a signal output for paralleling to a 2nd loudspeaker.
Refer to SECTION 6.3 for further information.
PAGE 10 Community XLT / XLTE Series Owner’s Manual
4
COMMUNITY XLT™ AND XLTE™ SERIES GENERAL DESCRIPTION
The XLT loudspeaker systems have features and functions designed primarily for portable applications. The XLTE
systems are suitable for both heavier-duty portable use and for permanent installation. From the smallest to the
largest model, these loudspeakers represent Community’s commitment to meeting the audio requirements for sound
reinforcement with performance, quality, and reliability at affordable prices.
4.1
ABBREVIATED OPERATING INSTRUCTIONS
This General Description Chapter about the features and functions can serve as abbreviated operating instructions on
how to use your new product. More detailed information can be found in the chapters that follow.
4.2
MODELS (See Appendix for details about XLT41E and XLT48E model variations)
The full-range loudspeakers reproduce all but the very deepest bass frequencies. The HF drivers (and MF driver in
the 46) are horn-loaded for maximum efficiency and for directional control of the sound. For additional bass output
at the extreme low end of the audio frequency range, model 51 or 55 subwoofers can be used with the full-range
loudspeakers to produce added depth and impact. The 51 and 55 subwoofers are ported (bass reflex) designs,
engineered to match the enclosure sizes and acoustic performance of the full-range loudspeakers.
TYPE
41
2-way floor monitor / PA
(1) 12 in. / 305 mm
N/A
(1) 1 in. / 25 mm Titanium
2-way full-range
(1) 12 in. / 305 mm
N/A
(1) 1 in. / 25 mm Titanium
42
43
1
LOW FREQUENCY
MID FREQUENCY
HIGH FREQUENCY 2
MODEL
2-way full-range
(1) 15 in. / 381 mm
N/A
(1) 1 in. / 25 mm Titanium
46
3-way full-range
(1) 15 in. / 381 mm
(1) 6.5 in. / 165 mm)
(1) 1 in. / 25 mm Titanium
47
2-way full-range
(2) 15 in. / 381 mm
N/A
(1) 1 in. / 25 mm Titanium
48
2-way floor monitor
(1) 15 in. / 381 mm
N/A
(1) 1 in. / 25 mm Titanium
51
Ported subwoofer
(1) 15 in. / 381 mm
N/A
N/A
55
Ported subwoofer
(2) 15 in. / 381 mm
N/A
N/A
1 This model is only part of the XLTE Series.
2 2 in. / 51 mm diameter diaphragm , 1 in. / 25 mm exit driver on a 1 in. / 25 mm entrance horn
Table 2: Product Listing
4.3
DRIVERS
All systems use proprietary drivers built to precise Community designs and specifications using the latest in materials
technology and design philosophy.
4.3.1
High Frequency Driver
The high frequency driver for all full-range systems is a 1 in. / 25 mm exit compression driver with a 2 in. / 51 mm
diameter titanium diaphragm. It provides high power handling capabilities while retaining the small diaphragm area
necessary to reproduce the small wavelengths of the highest audible frequencies.
4.3.2
Mid Frequency Driver (46 models only)
The midrange driver in the 46 models is a Ferrofluid cooled 6.5 in. / 165 mm horn loaded cone driver. Its long
excursion, low compression ratio design results in exceptionally low distortion. The large magnetic structure
provides high sensitivity along with high power handling that extends well below its 500 Hz crossover point.
4.3.3
Low Frequency Drivers
The low frequency drivers in all models are high sensitivity cone-type transducers. Their characteristics vary
depending on the particular loudspeaker model. Large magnetic structures, edge-wound voice coils, and high
stiffness-to-mass cones enhance power handling and clean reproduction. The enclosures are ported designs (also
called bass-reflex or vented) to improve low frequency efficiency and extend the low frequency response.
PAGE 11 Community XLT / XLTE Series Owner’s Manual
4.3.4
Ferrofluid Cooling
All XLT and XLTE low frequency drivers and the 46 mid frequency driver are specifically designed to be Ferrofluidcooled. Ferrofluid is a viscous liquid that is attracted by magnetic fields. The liquid is injected into the voice coil gap
during manufacturing and is permanently retained by the magnetism in the gap. Precise Ferrofluid formulations are
used to match the particular physics of each driver’s operation. Ferrofluid provides several important benefits. It
transfers heat away from the voice coil to maximize power handling and improve reliability. Lower voice coil
operating temperatures also minimize power compression. (Power Compression: As voice coils heat up with higher
power input, their impedance goes up. The higher impedance means less power is delivered to the loudspeaker,
thus "compressing” its output.) Ferrofluid also provides additional mechanical damping for the moving assembly,
thus lowering distortion, and helps keep the voice coil centered in its gap to prevent it from rubbing against the
magnet at high power inputs.
4.4
PATTERN CONTROL HORNS
The horn loading for the HF driver in all models and the model 46 MF driver is accomplished using precision molded
Pattern Control designs. In addition to providing high sensitivity, this ensures well-controlled, predictable horizontal
and vertical coverage throughout the driver’s operating range. Pattern Control technology projects articulate
transient response and high intelligibility over long distances. This is particularly true in difficult acoustic conditions
where focused sound helps prevent energizing room reverberation and the generation of unwanted sound
reflections.
4.5
INPUT PANEL
The steel signal-input panel on the rear of the enclosure (side on 41 and 48 models) has two Neutrik Speakon and
two 1/4 in. input jacks. All jacks are wired in parallel in PASSIVE mode, thus any one of them may be used to
connect to the amplifier. The panels also contain important printed information about the particular loudspeaker
including power rating, impedance, frequency response, and connector wiring. A PowerSense indicator is also
located on the input panel that will flash when the PowerSense DDP circuitry senses excessive power to the
loudspeaker.
4.6
INTERNAL CROSSOVER
The internal crossover is constructed of high quality components such as 250-Volt film capacitors, precision wound
inductors, high power resistors, and high-grade glass-epoxy circuit boards. The crossover and physical alignment of
the drivers within the enclosure ensures that the acoustic outputs of the individual drivers combine smoothly.
4.6.1
PASSIVE / BIAMP Switch
A switch on the full-range loudspeaker input panel selects between two operating modes: PASSIVE mode (single
amplifier) or BIAMP mode (separate low and high frequency amplifiers). In both PASSIVE and BIAMP mode, the
internal crossover divides the audio signal into the separate frequency ranges for each of the drivers.
In PASSIVE mode one amplifier is used to power the entire loudspeaker. In BIAMP mode one amplifier is used to
power the low frequency section and another is used to power the high frequency section. The separation of high
and low frequencies is done internally in the loudspeaker, so no electronic crossover is required. Simply run
full-range signals into the amplifiers and connect the outputs to the appropriate HF and LF terminals on one of the
Neutrik input jacks. Use the amplifier input level controls to balance the HF to LF acoustic outputs. Note the 1/4 in.
jacks are not used in BIAMP mode.
4.6.2
HF-Level Switch
A switch on the full-range loudspeaker input panels selects between two different high frequency output levels. This
is used to adjust the voicing of the loudspeaker to optimize the audio quality for different performers, types of
program material, or acoustic environments. This switch is active in both PASSIVE and BIAMP modes.
PAGE 12 Community XLT / XLTE Series Owner’s Manual
4.6.3
Subwoofer Full-Range Output
The subwoofers have a FULL-RANGE OUTPUT designed to connect to a full-range loudspeaker. This output
functions as a high pass filter. The signal from the power amplifier connected to the subwoofer passes through this
output that filters out the subwoofer frequencies below 150 Hz, and provides the signal for powering the full-range
loudspeaker. This is so a single amplifier channel can be used to power both the subwoofer and full-range
loudspeaker. (See SECTION 5.1.2 for amplifier load impedances.) For more exacting control of the volume balance
between the subwoofer and full-range loudspeaker, separate amplifier channels can be used to power each
individually.
4.6.4
PowerSense™ DDP Circuit
All crossovers have PowerSense DDP (Dynamic Driver Protection) circuitry that automatically provides thermal and
over-current protection for the both the HF driver and the overall loudspeaker. This circuitry senses the power
delivered to the loudspeaker. If it exceeds a point that could damage any of the drivers, PowerSense automatically
reduces the power to the driver or to the overall loudspeaker. Assuming an amplifier of appropriate size is used, the
PowerSense DDP circuit provides a high degree of protection against loudspeaker damage. This proprietary circuitry
helps ensure that your loudspeaker will not only keep on performing but keep on performing at its best. PowerSense
is active in both PASSIVE and BIAMP modes.
4.6.5
PowerSense Indicators
A red PowerSense LED located on the input panel in the back of the loudspeaker will flash anytime the PowerSense
DDP circuitry senses excessive power to the loudspeaker. In BIAMP mode the LED will only indicate excessive
power for the HF. Light flashes will also be seen through the bass ports from the front of the loudspeaker for either
HF or LF overdrive in both PASSIVE and BIAMP modes.
4.7
POWER HANDLING
The power ratings in the specifications define the maximum power that can be used for each model. The Program
Power rating is the recommended size of the power amplifier to be used with the loudspeaker. The Program rating
takes into account that there are momentary transient or peak sounds in the audio signal, such as from percussion
instruments. Normally, the loudspeaker can easily handle these peaks so an amplifier equal to the Program rating
provides the extra power needed to reproduce them. The RMS (or continuous) rating is the safe amount of sustained
power that the loudspeaker can handle, such as might occur with a sustained single note or chord from a synthesizer.
4.8
ENCLOSURES
XLT: These enclosures are constructed of OSB (Oriented Strand Board). This wood is a type of composite board
specially constructed with the wood grains oriented in one direction. This results in a much stronger material for a
given weight than other types of composite wood materials.
XLTE: These enclosures are constructed of 13-ply Baltic birch plywood. Although more expensive than composite
woods, various types of birch plywood are used for the enclosures of almost all top-quality professional loudspeakers
because of its strength, toughness, and inert acoustic properties.
All XLT and XLTE models have extensive internal bracing, making an extremely strong enclosure that will not resonate
or flex, even at maximum bass output. Except for the 41, 48, and 51, all enclosures are trapezoidal. The trapezoidal
shape facilitates arraying of multiple enclosures. This shape also allows placement in tight spaces often encountered
in both portable situations and permanent installations.
PAGE 13 Community XLT / XLTE Series Owner’s Manual
4.8.1
Permanent Mounting
Each enclosure has provisions for permanently installing it.
XLT: These models have four 5/16-18 threaded T-nuts - one each in the top, sides, and bottom. The XLT48 has two
mounting points - one on each of the two sides. These points are designed to be used with Community’s optional
CSSUPKIT or WB1 mounting kits for permanent installations. The XLT41E has no provisions for permanent mounting
or rigging.
XLTE: These models have six engineered, load-rated 3/8-16 mounting rigging points - three each on the top and
bottom of the enclosures. The XLT48E has the same provision as the XLT48 - two mounting points - one on each of
the two sides. The XLT41E has no provision for permanent mounting or rigging
4.8.2
Corner Protectors and Stacking (XLT only)
The XLT enclosures have eight corner protectors on the corners of the enclosures. They serve as feet for the
enclosure as well as providing protection from physical damage. They are designed with ridges in them that mesh
with the corners of other XLT enclosures with the same footprint so that they can be easily stacked.
4.8.3
Feet (XLTE only)
Each XLTE enclosure, except the XLT41E, comes with four heavy-duty rubber feet attached into slight recesses in the
enclosure. The XLT55E also has recesses in the top of its enclosure that mate with the feet of the XLTE full-range
enclosures when stacking.
The feet on the XLT41E are supplied unattached. They can be attached to either of the rear surfaces or the bottom of
the enclosure depending upon the application. Pilot holes for locating and attaching the feet are provided on the rear
surfaces, for monitor applications, and on the bottom, for upright PA use.
WARNING:
Refer to SECTION 7.6 for information on stacking enclosures.
4.8.4
Carrying Handles
Each enclosure has recessed bar handles mounted near the center of gravity for easier lifting. The handles are an allsteel construction to help prevent breakage. The XLT41E has a steel spring handle.
DANGER:
Do not use the handles for mounting or hanging (suspending) the loudspeaker. The handles are not designed for nor
load rated for these purposes.
4.8.5
Stand / Pole Mounting
The 41, 42, and 43 models have a 1-3/8 in. / 51 mm socket in the bottom that mates to appropriate Ultimate Support
or similar stands or poles. The 46 and 48 models have 5/16-18 T-nuts for attaching an external stand / pole mount
adapter. The 51 has a pole socket in its top for pole mounting a full-range loudspeaker above it such as an XLT41,
XLT41E or XLT42E. The Community SB5 pole accessory can be used for this purpose. (See SECTION 4.9.1)
PAGE 14 Community XLT / XLTE Series Owner’s Manual
4.8.6
41 Positioning and Horn Rotation
The 41 can be positioned in several ways. When used as a floor monitor either of the two backs may be placed on
the floor to vary the aiming angle. One provides an up-angle of 30 degrees from the floor and the other an up-angle
of 45 degrees from the floor. The 41 may also be used upright as a PA loudspeaker.
The 41 is shipped from the factory oriented for floor monitor use so that, in a horizontal position, its HF coverage is
90 degrees horizontal by 40 degrees vertical. For operating it in an upright position as a PA loudspeaker, normally
the horn should be rotated so its horizontal coverage pattern will be 90 degrees. (See SECTION 7.3)
4.8.7
Front Grille
The front grille is powder coated, 16 gauge perforated steel, held in place with screws. This provides a secure
fastening while allowing easy removal for service.
4.8.8
Enclosure Finish
XLT: The XLT enclosures are finished with a dense, black carpet material held in place with an industrial strength
adhesive backing.
XLTE: The XLTE enclosures are finished with a black, high durability urethane coating.
4.9
OPTIONAL ACCESSORIES
Various accessories are available from Community and third party sources for mounting, supporting, or protecting
the loudspeakers.
4.9.1
Community Accessories
SB5 – Five foot long, 1-/3/8 in. / 35 mm O.D., black-painted steel pole for pole mounting a full-range loudspeaker on
another loudspeaker such as an XLT42E on an XLT51E, or an XLT41 on an XLT51.
CSSUPKIT – Suspension kit with two steel straps that attach to the threaded inserts (T-nuts) on XLT and XLT48E
models. The straps have a series of 3/8 in. / 9.5 mm diameter holes for attachment to rigging.
WB1 – Two steel brackets that can be attached to the T-nuts on XLT and XLT48E models. Used for mounting to walls
or ceilings. Not usable with the XLT41E.
EYBLTKIT – Four forged steel eyebolts and four steel, locking, cup-washers for the mounting-rigging points on XLTE
models (except XLT41E and XLT48E).
4.9.2
3rd Party Accessories
The following are some US companies that make accessories that may be used with Community Products. Outside
the US, contact your Community Distributor for similar companies in your specific country or region.
Suspension Hardware / Systems
ATM Fly-Ware™
21000 South Wilmington Avenue
Carson, CA 90810-1247
Tel: (310) 834-5914 Fax: (310) 834- 3042
Mounting Brackets
Omnimount™ Systems
1501 West 17th Street
Tempe, AZ 85281
Tel: (602) 829-8000 Fax: (602) 796-5000
Road Cases
Art*Tec, Inc.
330 Pusey Avenue
Collingdale, PA 19023
Tel: (800) 952-4107 Fax: (610) 461-5720
Stands and Stand Sockets
Ultimate Support™ Systems, Inc.
2506 Zurich Drive
Ft. Collins, CO 80524
Tel: (303) 493-4488 Fax: (303) 221-2274
Star Case manufacturing Co., Inc.
648 Superior Avenue
Munster, IN 46321
Tel: (219) 922-4446 Fax: (219) 922-4442
Atlas/Soundolier
1859 Intertech Drive
Fenton, MO 63026
Tel: (314) 349-3110 Fax: (314) 349-1251
PAGE 15 Community XLT / XLTE Series Owner’s Manual
5
SETUP AND OPERATION
A variety of topics are covered in these sections concerning the use of the loudspeakers. Please read them
thoroughly to ensure proper set-up, operation, and the best performance, sound quality, and reliability from your
loudspeakers.
5.1
CHOOSING A POWER AMPLIFIER
5.1.1
Power Amplifier Choice (Refer to SECTION 9.2 Using Lower Power Amplifiers)
It is important to select the proper power amplifier output for the loudspeaker. To avoid the potential for damage
and less than optimum performance you need to have enough amplifier power but not too much. Note that
maximum ratings for many loudspeakers do not consider distortion. Community’s maximum power ratings are
realistically usable because they are based on keeping distortion well within acceptable limits.
Assuming the correct loudspeakers have been chosen for your application, the best choice of power amplifier is a
simple consideration:
A POWER AMPLIFIER WHOSE RATED POWER APPROXIMATELY MATCHES THE PROGRAM POWER RATING
OF YOUR COMMUNITY LOUDSPEAKER IS RECOMMENDED. This will provide two important benefits:
1.
2.
5.1.2
The PowerSense protection circuitry can operate properly to help protect the loudspeaker.
When average power outputs are near the RMS rating of the loudspeaker, peak power outputs of 7 dB to
10 dB will be available for the transient (or peak) content of audio signals without clipping the amplifier.
Power Amplifier Load Impedance
The nominal impedance of the loudspeaker (e.g. 8 Ohm or 4 Ohm) must be used as the load impedance when
determining an amplifier’s output specification from its manufacturer.
The impedances to use when using a full-range loudspeaker driven off a 51 or 55 FULL-RANGE OUTPUT, will be the
nominal impedance of the subwoofer at low frequencies and the nominal impedance of the full-range loudspeaker at
high frequencies. For example, using a 43 connected to the FULL-RANGE OUTPUT on a 55, the amplifier will
operate at 4 ohms driving the 55 and at 8 ohms driving the 43. This is because each amplifier “sees” only one
loudspeaker in each frequency range. Thus, an amplifier rated for 600W at 4 ohms and 400W at 8 ohms will deliver
up to 600W to the 55 but only up to 400W to the 43. (See to SECTION 5.2.1 for using the FULL-RANGE OUTPUT on
the 51 and 55 subwoofers.)
This is similar to what happens with a full-range loudspeaker such as the 43. Although the individual LF and HF
drivers are 8 Ohms, the impedance of the overall system is 8 Ohms because the amplifier “sees” only one driver in
each frequency range.
5.1.3
Recommended Amplifier Power for Specific Models
TABLES 3, 4, and 5 list the recommended amplifier power for all of the XLT and XLTE models. The power figures
listed indicate amplifier RMS ratings and assume this a 20 Hz – 20 kHz power rating per amplifier channel.
Specifying an exact power output is simply overly precise for the purposes of powering a loudspeaker. In addition, it
might be difficult to find an amplifier that exactly matches a precise number. Therefore, a REC. POWER AMP RANGE
(Recommended Power Amplifier Range) is listed. Choose an amplifier with a power output per channel that is within
this range at the listed POWER AMP LOAD IMPEDANCE. Example: an amplifier for a model 46 (either an XLT46 or
XLT46E) should be rated for anywhere between 400W RMS and 600W RMS per channel at 4 ohms.
PAGE 16 Community XLT / XLTE Series Owner’s Manual
MODEL
LOUDSPEAKER
PROGRAM RATING
REC. POWER AMP
RANGE
POWER AMP
LOAD IMPEDANCE
41, 42, 43, and 48
46
47
500W
500W
1000W
420W to 600W
420W to 600W
830W to 1200W
8 Ohm
4 Ohm
4 Ohm
Table 3: Recommended Amplifier Power for Full-Range in PASSIVE Mode
MODEL
LF PROGRAM
RATING
REC. LF POWER
AMP RANGE
POWER AMP
LF LOAD
IMPEDANCE
HF PROGRAM
RATING
REC. HF POWER
AMP RANGE
POWER AMP
HF LOAD
IMPEDANCE
41, 42, 43, and 48
46
47
500W
500W
1000W
420W to 600W
420W to 600W
830W to 1200W
8 Ohm
4 Ohm
4 Ohm
125W
200W
125W
100W to 150W
150W to 250W
100W to 150W
8 Ohm
8 Ohm
8 Ohm
Table 4: Recommended Amplifier Power for Full-Range in BIAMP Mode
MODEL
SUBWOOFER
PROGRAM RATING
REC. POWER AMP
RANGE
POWER AMP
LOAD IMPEDANCE
51
55
300W
750W
240W to 360W
630W to 900W
8 Ohm
4 Ohm
Table 5: Recommended Amplifier Power for Subwoofer
5.2
SYSTEM CONFIGURATIONS
FIGURE 2 and FIGURE 3 show the possible configurations for the XLT and XLTE loudspeakers and subwoofers.
FIGURE 2 shows the possible configurations when your full-range system is operated in PASSIVE mode both with and
without an XLT or XLTE subwoofer. FIGURE 3 shows the possible configurations when your full-range system is
operated in BIAMP mode both with and without an XLT or XLTE subwoofer.
NOTE: The figures show only basic system components needed for connecting the loudspeakers.
Refer to SECTION 6.4 for exact details about wiring the connectors. You will also find this information listed on the
input panel label of the loudspeaker.
5.2.1
Configuring a Full-Range System with a 51 or 55 Subwoofer
In each figure there are two methods shown for configuring a subwoofer with a full-range loudspeaker. These are
shown in FIGURES 2C & 2D and in FIGURES 3B & 3C. The difference is whether a separate amplifier channel is used
to power the subwoofer. While both methods are acceptable to use, the following points should be considered.
1. Using one amplifier channel for both the full-range loudspeaker and subwoofer (as shown in FIGURE 2C
and FIGURE 3B) means you need fewer amplifier channels for the overall system. However, the acoustical
balance between the full-range loudspeaker and the subwoofer will be determined by the inherent efficiencies of
the full-range loudspeaker and the subwoofer. Refer to SECTION 5.1.2 for load impedance considerations when
using this feature.
2. Using separate amplifier channels for the full-range loudspeaker and subwoofer (as shown in FIGURE 2D
and FIGURE 3C) means more amplifier channels are required for the overall system. However, the acoustical
balance between the full-range loudspeaker and the subwoofer can be adjusted to suit your personal taste by
using the input level controls on your amplifiers.
3. Using an electronic crossover will allow more precise division of the audio frequencies, when using
separate amplifier channels for the full-range loudspeaker and subwoofer. Community cannot provide
PAGE 17 Community XLT / XLTE Series Owner’s Manual
specific crossover settings for all possible combinations and situations. Therefore, if the crossover allows a
range of filter adjustments, you should experiment for the best sound.
Here are some general recommendations: The crossover frequency can be set anywhere between 80 Hz and
175Hz, however a setting between 100 Hz to 150 Hz is recommended. Use a 12 dB or 18 dB per octave
crossover slope. If you have a choice of filter types, the Butterworth type should work well. Adjust the
acoustical balance between the full-range loudspeaker and the subwoofer by using the amplifier input level
controls or the crossover output level controls.
FIGURE 2: PASSIVE Mode Configurations
PAGE 18 Community XLT / XLTE Series Owner’s Manual
FIGURE 3: BIAMP Mode Configurations
PAGE 19 Community XLT / XLTE Series Owner’s Manual
6
ELECTRICAL INSTALLATION
6.1
LOUDSPEAKER CABLE
6.1.1
Loudspeaker Wire Gauge
To get the maximum performance from your loudspeaker, copper wire and good quality connectors must be used.
The most important factor in selecting loudspeaker cable is its resistance, which is a function of the wire gauge and
length. You want to keep the total resistance of the cable under 0.2 Ohms. Doing so will maximize electrical
damping (which maximizes the transient performance) and minimize power losses. However, for lengths over 100
feet, the wire gauges needed to meet this requirement are usually not practical to use for both physical and cost
reasons. Therefore, #10 AWG is recommended as the most practical gauge for those situations. TABLE 8 shows the
minimum wire gauges to use for various loudspeaker cable lengths. A larger gauge (lower number) than the
minimum listed is always acceptable. For each cable length both wires in the cable have been figured into the total
resistance.
Cable Length
10 ft (3 m)
25 ft (8 m)
50 ft (15 m)
75 ft (25 m)
100 ft (30 m)
200 ft (60 m)
300 ft (90 m)
400 ft (120 m)
500 ft (150 m)
Minimum Wire
Gauge (AWG) Total Resistance
#16
0.08 Ohm
#14
0.13 Ohm
#12
0.16 Ohm
#10
0.15 Ohm
#10
0.20 Ohm
#10
0.40 Ohm
#10
0.60 Ohm
#10
0.80 Ohm
#10
1.00 Ohm
Note - Metric length conversions are approximate
Table 6: Loudspeaker Wire Gauge Selection
6.1.2
Loudspeaker Cable Selection
For portable applications use two conductor cable made with stranded copper wire having rubber or rubberized,
plastic insulation. Cable that is round will lay flatter, coil up easier, mate with in-line connectors better, and usually
last longer. Cables of various lengths with in-line connectors already attached are available from your musical
instrument dealer. Make sure it is at least the minimum wire gauge for its length as shown in TABLE 5.
If you chose to make your own cables, 2 conductor electrical cable, such as that used for heavy-duty extension cords,
works well. Flat-type cables such as zip or lamp cord are not recommended as they quickly end up badly twisted,
have less rugged insulation, poorer mechanical properties, and do not mate well with in-line loudspeaker connectors.
For loudspeakers, exotic (and usually expensive) audio cable is usually no better than standard electrical cable of the
same wire gauge.
For permanent installations, where speaker wire is permanently fixed in place, it is not necessary nor economical to
use cable intended to be flexed such as for portable use. PVC jacketed or similar, multi-conductor cable is easy to
work with and more economical. An excellent and probably the most economical wire is electrical wire such as
stranded THHN or THWN available in hardware stores and electrical supply houses.
6.2
INPUT JACKS (See SECTION 6.4 for proper wiring of the connectors)
The XLT and XLTE loudspeakers have jacks that accept two types of connectors: Neutrik Speakons and 1/4 in.
tip/sleeve plugs.
PAGE 20 Community XLT / XLTE Series Owner’s Manual
6.2.1
Choosing an Input Jack
The 1/4 in. connector has been adopted for use as a loudspeaker connector primarily because of its low cost and
ready availability. It has relatively low current handling and low mechanical contact force. This can result in a
connection failure over time even if it is left undisturbed in a fixed installation. The jack and connector are subject to
deterioration over time with repeated plugging and unplugging. As such, they may not always provide optimum
signal transfer to the loudspeaker. Soldering is normally required to make a good connection from the wire to the inline 1/4 in. plug.
The Neutrik Speakon jacks are specifically designed to provide excellent mechanical and electrical connection for
loudspeakers. They can carry high amounts of current, have self-cleaning contacts, and securely lock with the mating
cable connector. They will provide the maximum reliability and performance over time. Community recommends
you use these connectors to connect your loudspeakers.
IMPORTANT: After plugging in a Neutrik connector be sure to rotate the connector about 1/4 turn before
engaging the locking ring. Otherwise the electrical contacts will not make a good connection.
6.2.2
Internal Input Jack Wiring
Both the Neutrik Speakon and the 1/4 in. input jacks on all loudspeaker models are internally wired in parallel when
the loudspeaker is in PASSIVE mode.
Technical Note: When using the full-range loudspeakers In BIAMP mode both 1/4 in. jacks remain wired in parallel
with pins 1+ and 1- on the Neutrik jacks. Therefore, either could be used in place of pins 1+ and 1- on the Neutrik
jacks as the input from the LF amplifier. This may be convenient when driving the LF input from a subwoofer FULLRANGE OUTPUT that is also a 1/4 in. jack. When using the Neutrik Speakon for the BIAMP input, either 1/4 in. jack
can also function as an LF output for paralleling a second loudspeaker. This information may be useful in certain
other situations to solve specific application problems.
6.3
PARALLELING OR DAISY-CHAINING TWO LOUDSPEAKERS
Two of the same model of loudspeakers may be connected together to operate from a single amplifier channel. This
includes paralleling the LF or HF sections of two of the same model loudspeakers in BIAMP mode.
6.3.1
Parallel Connector Wiring
The Neutrik Speakon and 1/4 in. input jacks for all loudspeakers are internally wired in parallel. Therefore, an unused
input jack can be used to parallel (also called daisy-chaining) a second loudspeaker of the same model with the first
using a jumper cable. Both loudspeakers will then operate from the same amplifier channel. A Neutrik Speakon or
1/4 in. jumper cable should be wired at both ends for the appropriate operating mode according to SECTION 6.4.
The capability for paralleling functions for both the PASSIVE and BIAMP modes on full-range models except that when
in BIAMP mode the 1/4 in. jacks cannot be used.
6.3.2
Load Impedance When Paralleling Loudspeakers
When paralleling or daisy-chaining two loudspeakers, the total load impedance will be one-half that of a single
loudspeaker. For example, if the impedance of a single loudspeaker is 8 Ohms, two in parallel will be 4 Ohms. The
power output for the amplifier will then be as specified by the manufacturer at a 4 Ohm load.
Paralleling also means you must double the recommended power amplifier rating range listed in SECTION 5.1.3 for
the loudspeakers you intend to operate in parallel. For example, the recommended power amplifier range for one
model 43 is 420W to 600W at 8 Ohms. For two model 43s in parallel the recommended range would be 840W to
1200W at 4 Ohms. This is also true in BIAMP mode for the HF and LF sections you intend to operate in parallel.
The following table lists the nominal impedance for two of the various models loudspeakers operated in parallel. The
amplifier must be rated to drive this impedance. If you examine the minimum impedances listed in the specifications
PAGE 21 Community XLT / XLTE Series Owner’s Manual
in CHAPTER 11, they indicate the load will be below 3 ohms (except for the 51 models). Because this occurs only
over a small range of frequencies and because of the nature of audio signals, a 4 Ohm amplifier should be able to
drive this load with no problems. However, for models that have a nominal 2 Ohm impedance when paralleled, use
caution by ensuring that your amplifier is both rated for 2 Ohms and has adequate cooling.
PARALLELED
MODELS
PASSIVE MODE
IMPEDANCE
BIAMP MODE
LF IMPEDANCE
BIAMP MODE
HF IMPEDANCE
2 x 41
2 x 42
2 x 43
2 x 46
2 x 47
2 x 48
2 x 51
2 x 55
4 Ohms
4 Ohms
4 Ohms
2 Ohms
2 Ohms
4 Ohms
4 Ohms
2 Ohms
4 Ohms
4 Ohms
4 Ohms
2 Ohms
2 Ohms
4 Ohms
N/A
N/A
4 Ohms
4 Ohms
4 Ohms
4 Ohms
4 Ohms
4 Ohms
N/A
N/A
Table 7: Nominal Impedances for Two XLT or XLTE Loudspeakers In Parallel
6.4
CONNECTING THE LOUDSPEAKERS
The following diagrams show the wiring connections for the loudspeakers. Be sure to observe proper polarity
when making the connections. This means making sure the positive (+) on the amplifier connects to the
positive (+) on the loudspeaker and negative (–) on the amplifier connects to the negative (–) on the
loudspeaker. Failure to do this when using two or more loudspeakers or full-range loudspeakers combined with
subwoofers will result in weak bass and poor sound coverage.
POLARITY CHECK FOR TWO LOUDSPEAKERS OR SUBWOOFERS:
A simple check for proper polarity is to stand in front of and exactly between two loudspeakers or subwoofers. Play a
mono source through the system. If the sound does not appear to come solidly from a point between the loudspeakers
and/or the bass is weak, they are probably out of polarity. Check the + and - wiring for the entire signal chain to each
loudspeaker. The wiring should be identical.
6.4.1
PASSIVE Mode Wiring (See FIGURE 4)
Installing and operating a full-range loudspeaker in PASSIVE mode requires putting the slide switch on the input panel
in the PASSIVE (down) position. The input connections are made either to one of the Neutrik Speakon or 1/4 in.
jacks, however the Neutrik Speakon is recommended. Observe proper polarity when making the connections.
FIGURE 4: Wiring for PASSIVE Mode Full-Range
PAGE 22 Community XLT / XLTE Series Owner’s Manual
6.4.2
BIAMP Mode Wiring (See FIGURE 5)
Installing and operating loudspeakers in BIAMP mode requires putting the slide switch on the input panel in the
BIAMP (up) position. In this mode the LF and HF connections must be made using either of the Neutrik Speakon
jacks. Note that each Speakon jack can accept both the LF and HF inputs. The 1/4 in. jacks are not used for BIAMP
mode. Observe proper polarity when making the connections.
FIGURE 5: Wiring for BIAMP Mode Full-Range
6.4.3
Subwoofers (See FIGURE 6)
The wiring connections for the subwoofers are the same whether it is used in a stand-alone fashion or configured
with a full-range loudspeaker that is used in either PASSIVE or BIAMP mode. Observe that when the FULL-RANGE
OUTPUT on the subwoofer is used with a full-range loudspeaker in BIAMP mode, the subwoofer FULL-RANGE
OUTPUT is connected to the LF input on the full-range loudspeaker. For convenience, the 1/4 in. jack may be used
for this connection. (See “Technical Note” in SECTION 6.2.2). Observe proper polarity when making connections.
FIGURE 6: Wiring for Subwoofer
PAGE 23 Community XLT / XLTE Series Owner’s Manual
7
PHYSICAL INSTALLATION
7.1
FRONT GRILLE
The grille is painted using a powder coating process that bonds the paint to the steel. This prevents the paint from
easily chipping and the resulting matte finish reduces reflection of ambient light sources. If desired for cosmetic
purposes, the grille may be painted another color using a non-bridging enamel paint such as Krylon™. In any case,
spray painting is recommended.
7.1.1
Removing and Re-installing the Grille
To remove the grille, unscrew the small mounting screws pulling the grille away from the face of the enclosure. You
may have to hook the grille through one of the perforations with a small tool to aid in pulling it away from its recess.
The grille is purposely tight fitting to prevent the metal from resonating so it may require some force to pull it away.
Be careful not to catch the carpet pile with the edges on the XLT models. Do not loose any of the grille standsoffs
To reinstall the grille, make sure that the grille is correctly oriented so that holes in the grille line up with all of the
standoffs that should be positioned in their recesses. Refasten it to the enclosure using the original screws: 1-1/2 in. /
38 mm #6 sheet- metal, Phillips pan-head. Insure that the screws go through rather than around them. Do not over
tighten as you may strip the screw hole in the front enclosure front panel.
CAUTION:
The grille has sharp points along its edge so use care when handling the grille edges to avoid injury. The grille is
shear-cut to size and because of the arrangement of the perforations, it is impossible to avoid cutting through
some of the holes. This makes sharp points out of the land area between the holes.
7.1.2
Custom Grille Cloth
Because of the way the grille is retained, putting a grille cloth over the grille is somewhat difficult as it could cover
access to the retainer screws. The most feasible method is to screw directly through the grille cloth after it is
installed on the grille.
If you do choose to use a custom grille cloth for cosmetic purposes, high frequency losses can be avoided by using
only a synthetic (inorganic) material. It must have at least a 50% open weave. A simple test is to hold the cloth about
4 inches (10 cm) in front of your eyes. If you can easily identify objects 3 feet (1 m) or more away when looking
through the cloth, it is probably OK to use. Because of the tight fit of the grille, use only a thin material.
7.2
ENCLOSURE FINISHES
XLT: The XLT enclosures are finished with dense-pile black carpet. It is held in place by an industrial-strength
adhesive backing. It is designed to withstand the typical handling associated with portable applications
XLTE: The XLTE enclosures are finished with a water-based paint. This paint is quite durable. However, should you
need to touch up scratches, any water-based paint may be applied. Spray painting is recommended.
7.3
MODEL 41, 42, AND 46 ORIENTATION
The nominal coverage patterns for these models is 90 degrees by 40 degrees. The HF horns (MF/HF horn assembly
for the 46) can be rotated by 90 degrees to change the coverage pattern in relation to the position of the enclosure.
To rotate the horn, lay the loudspeaker on its back, remove the grille, and unscrew the screws holding the horn.
Carefully lift it out the horn enough to rotate it and then reseat it in the baffle cutout. Be sure to replace all screws.
PAGE 24 Community XLT / XLTE Series Owner’s Manual
7.3.1
Model 41 Horn Orientation
The 41 is shipped from the factory for monitor use meaning that when in a horizontal position its HF pattern is 90
degrees horizontal by 40 degrees vertical. For operating it in an upright position as a PA loudspeaker, rotate the horn
so its coverage pattern will remain at 90 degrees horizontal.
7.3.2
Model 42 and 46
For these models, one reason for rotating the horn is for operating the speaker in a horizontal position so that the
coverage pattern will be wide horizontally. Another is for operating in the normal upright position so the coverage
will be narrow horizontally. This is useful when two or more loudspeakers are arrayed and splayed because it
reduces coverage pattern overlap. This helps reduce high frequency acoustic interaction between them (comb
filtering and level variations).
7.4
MOUNTING AND RIGGING
WARNING:
Mounting or rigging loudspeakers is a serious endeavor and requires an experienced professional. Improper
installations may result in equipment damage, personal injury, or death. For this reason, no loudspeaker
should be mounted or suspended overhead unless the method has been approved by a registered
Professional Structural Engineer.
DANGER:
Under no circumstances should the handles be used for mounting or suspending the loudspeaker. They are
not designed for this purpose and such use may result in equipment damage, personal injury, or death.
WARNING:
Under no circumstances should an XLT loudspeaker be mounted or suspended overhead when exposed in
the out-of-doors, or in high humidity conditions using the T-nut mounting points on the loudspeaker. The
wood material used to manufacture the loudspeakers, while strong and durable for normal use, is not
impervious to moisture. For this reason, the T-nut mounting points could fail after a period of time if the
enclosure is exposed to high moisture intermittently or continuously. If it is to be mounted in such
conditions an alternate method must be used and approved by a registered Professional Structural Engineer.
CAUTION:
All fixed hardware used for overhead mounting or suspension should be designed, tested, and/or certified for
its intended use with a minimum design factor of 5:1. A minimum design factor of 8:1 should be used for
any component subject to movement, continuous wear, or friction, such as moving wire rope. The design
factor is the ratio between the structural failure point and the load to be applied to the component.
CAUTION:
Routine inspections and maintenance should be performed on any mounting or rigging system. Any parts
found to have deterioration, excessive fatigue, or excessive wear should be removed from service
immediately and replaced.
IMPORTANT NOTE: Mounting/Rigging Point Holes
All mounting/rigging points, T-nut mounting points, and stand adapter points for all XLT and XLTE loudspeakers must
either be used for mounting hardware or remain plugged with the supplied screws. If they are not plugged up, these
points can create air leaks in the enclosure that will compromise the LF performance with reduced output and/or
distortion.
7.4.1
XLT Mounting Points (XLT Series and XLT48E)
(Refer to FIGURE 7 and FIGURE 8)
All XLT loudspeakers and the XLT48E have internal, captive, 5/16-18 threaded inserts (T-nuts) for suspension or
permanent mounting located on the enclosure top, sides and bottom (sides only for the XLT48 and XLT48E). While
PAGE 25 Community XLT / XLTE Series Owner’s Manual
quite strong, these points do NOT have a WLL (Working Load Limit) rating. For this reason always take the following
precautions:
ALWAYS use at least two mounting points on opposite sides of the enclosure.
ALWAYS pull in a direction parallel to the surface of the enclosure in which the mounting point is located.
ALWAYS use hardware that is attached so that it is flush to the surface of the enclosure.
ALWAYS use hardware that is long enough to screw all the way into the mounting point.
ALWAYS use steel hardware rated for the intended load.
FIGURE 7: Mounting Point Detail - Pull Direction
DANGER:
The pull direction on the T-nut mounting points must always be at 90 degrees to the hole (i.e. pull is parallel to
the surface of the enclosure in which the mounting point is located) as shown in the FIGURE 7. If a load is
applied in any other direction, the strength of the mounting point is significantly compromised and therefore
creates a dangerous mounting condition that could cause serious damage, injury, or death.
FIGURE 8: XLT Mounting Points
7.4.2
Using the Community CSSUPKIT Suspension Kit
The CSSUPKIT consists of two 12 in. / 305 mm long steel straps with a series of 3/8 in. / 9.5 mm diameter holes
spaced on 1-3/8 in. / 51 mm centers. Using machine screws supplied with the kit, the straps can be attached to the
mounting points. The straps then provide convenient points with which to attach rigging or other mounting
attachments for suspending or mounting the loudspeaker. Refer to the instructions packed with the CSSUPKIT for
proper application and use.
PAGE 26 Community XLT / XLTE Series Owner’s Manual
7.4.3
Using the Community WB1 Mounting Accessory
The WB1 mounting bracket kit consists of two steel brackets that can be attached to the mounting points for
permanent attachment of the loudspeaker to architectural structures. Because of the angled sides on the enclosures,
the WB1 will not mate flat to a surface behind the loudspeaker without bending the bracket. It is therefore
recommended that the WB1 be used ONLY on the top and bottom of the enclosure. Refer to instructions packed
with the WB1 for proper application and use.
7.4.4
Stand Bracket Inserts (46 and 48 only)
For pole or stand mounting, XLT and XLTE models 46 and 48 have two 5/16-18 threaded inserts (T-nuts) on the
bottom of the 46 and top of the 48. They are spaced 5.5 in. / 140 mm apart to mate with an Ultimate Support BMB200K stand bracket or similar hardware. Because of their size and weight, other XLT loudspeakers must be not be
used for this type of mounting. For this reason, they do not have provisions for it. Community cannot provide
specific technical support about the use of Ultimate Support or similar mounting products. For further information
about such products see contact information in SECTION 4.9.
CAUTION:
Use stands and brackets only as instructed by the manufacturer. Misuse of such hardware can result in damage,
injury, or death.
7.5
XLTE MOUNTING/RIGGING POINTS (Except XLT41E and XLT48E)
(Refer to FIGURE 9 and FIGURE 10)
The XLTE loudspeakers have six captive 3/8-16 mounting/rigging points - three on the top and three on the bottom of
the enclosures. These points are intended for mounting or suspending the loudspeaker using external hardware,
such as the Community EYBLTKIT, appropriately rated for the purpose. The WLL (Working Load Limit) for each point
is 150 lb. / 68 kg vertical pull and 60 lb. / 27.2 kg horizontal pull. The WLL for angles between the vertical and
horizontal pull directions can be interpolated. See FIGURE 10 for the pull directions.
DANGER: (See FIGURE 10)
The retainer bolts permanently secure the mounting/rigging points to the enclosure. Do not try to unscrew,
remove, or otherwise disturb any of these bolts. Doing so will damage the mounting/rigging points and make
them unsafe to use for mounting or rigging the enclosure.
FIGURE 9: XLTE Mounting / Rigging Points
PAGE 27 Community XLT / XLTE Series Owner’s Manual
7.5.1
Using the Community EYBLTKIT
The Community EYBLTKIT has four drop-forged, load-rated, 3/8-16 eyebolts with locking washers. They are designed
for use in the mounting/rigging points on the XLTE loudspeakers. Refer to the instructions that are included with the
EYBLTKIT accessory for proper use.
FIGURE 10: XLTE Mounting / Rigging Point Detail
7.6
STACKING ENCLOSURES
XLT and XLTE enclosures may be temporarily stacked to provide greater height. This is particularly useful when
stacking a full-range loudspeaker on top of a subwoofer. This can put the full-range loudspeaker at or above the
audience’s ear level to provide greater projection of sound to the rear of the audience. Both the XLT and XLTE
enclosures have provisions to help prevent the top enclosure from moving around due to sound vibrations or from
sliding off if accidentally bumped.
CAUTION:
Stack enclosures only on level, solid surfaces, so that the stack will not sit at an angle and is stable. Ensure the
top enclosure will not shift position and possibly fall off. Locate the stack where it will not be bumped nor
knocked over. Do not stack more than two enclosures high. Failure to observe these guidelines can result in
damage, injury, or death.
7.6.1
Stacking XLT Enclosures (XLT43, XLT46, XLT47, and XLT55)
The XLT enclosures have corner protectors with integral ridges that are designed to nest into one another when
stacking two XLT enclosures of the same width and depth. When the enclosures are aligned side-to-side and front-toback, the ridges on the corner protectors will line up to help link the enclosures together.
7.6.2
Stacking XLTE Enclosures (XLT43E, XLT46E, XLT47E, and XLT55E)
The XLTE enclosures have four heavy-duty rubber feet that facilitate stacking. The XLT55E subwoofer has four
recesses in its top. They are located so that the four feet of another XLTE enclosure of the same width and depth will
nest into them when the enclosures are aligned side-to-side and front-to-back. If stacking two full-range enclosures,
carefully align the enclosures side-to-side and front-to-back so that all four feet on the top enclosure are completely
on the lower enclosure. The rubber feet on the top enclosure provide friction to help keep it in place.
PAGE 28 Community XLT / XLTE Series Owner’s Manual
8
ACOUSTICAL ADJUSTMENTS
Once the loudspeaker has been connected according to your configuration, it is ready for acoustical adjustments.
This is normally a one-time procedure. Once set, you should not need to change these adjustments. However,
when using a system in different environments or for different types of programs you may want to change some
adjustments as needed to maximize sound quality.
8.1
INITIAL TESTING
The following procedures are designed to prevent damage to the loudspeaker during initial testing of the system.
1. Before powering up any equipment, turn down the input volume controls on the power amplifier and set other
volume controls in the system to their normal operating positions. If you don’t know what those positions are,
setting sliders about half-way up and rotary controls to their 12 o’clock or half-way position is usually a safe bet.
2. Turn on all the electronics for the system in signal chain order starting with the input equipment and continuing in
order through the chain turning on the power amplifiers last. This avoids electronic start-up transients or spikes that
some equipment generates. These spikes can cause instantaneous and permanent damage to the loudspeakers. This
procedure should be followed EVERY TIME the system is turned on.
NOTE: When turning off a system, do it in the reverse order, beginning with the power amplifiers first.
3. Apply an input signal to the system. This could be a test signal or program material from a tape, CD, or tuner.
Using equipment signal level indicators, a voltmeter, and/or a test headset verify that the signal chain is operating
properly up to the input of the power amplifier. You may have to re-adjust controls as set in step 2 to get a normal
signal level through to the amplifier input(s).
4. If the signal chain tests OK, slowly turn up the input volume control on the amplifier(s) and you should hear the
input signal reproduced through the loudspeaker. It should be clean and clear. If using BIAMP mode and/or
subwoofers, the sound may not be balanced between the high and low frequencies. You will correct this when
making the final adjustments (see SECTION 8.2.3).
5. If all is well, you are ready for the final adjustments to the system.
8.2
FINAL ADJUSTMENTS
There are two primary things to consider when making final adjustments on a system: electronic gain structure and
loudspeaker volume level balancing. The gain structure of a system will determine the dynamic range of a system or
the ratio of the softest to loudest usable sounds. The softest sounds will be limited by the amount of system noise
and the loudest sounds by noticeable distortion or clipping. Loudspeaker volume level balancing includes primarily
those systems where a subwoofer is used and/or a full-range loudspeaker is used in BIAMP mode. It also includes
permanent installations where different models and multiple loudspeakers, such as delayed units, are used.
8.2.1
Electronic Gain Structure
Detailed instructions on how to set electronic gain structure are beyond the scope of this manual. However, the
following general guidelines may be helpful.
1. The preferable tool is an oscilloscope that can be used to observe the signal directly. You can use a voltmeter if
you know the maximum voltage output specifications. If neither of these is available, you can use clipping indicators
on each piece of equipment in the signal chain. As a last resort, you could use high impedance earphones (600
Ohms or higher) or a piezo-electric tweeter and listen for noticeable distortion at the output of each piece of
equipment. This point will be just above the maximum output. Without some method of determining the maximum
output on each piece of equipment, you cannot expect to optimize the gain structure.
PAGE 29 Community XLT / XLTE Series Owner’s Manual
WARNING:
Before setting gain structure, disconnect the loudspeaker(s) from the amplifier(s).
2. The basic procedure is to use a test signal and set the first piece of equipment in the signal chain (usually the
mixer) so it is just below its maximum voltage output from its specifications as read on the voltmeter, or on
equipment’s output meter, or just below clipping as observed on the oscilloscope, or just starting to audibly distort.
Without changing the volume of the test signal or mixer, adjust the volume level control on each piece of equipment
following, including the power amplifiers, so that each is just below its maximum output. If everything is set
properly, you will find that the input volume level controls on the power amplifier will end up being set at something
other than maximum. This is normal for a well gain-structured system.
Notes:
A. Due to differences in the capabilities of equipment in the signal chain, it may not be possible to get results
exactly as stated.
B. For each device, make sure it is the output and not the input that is clipping.
C. If you are in doubt about this procedure, a good compromise is to set all devices in the signal chain to their 0
dB gain (also called ‘unity gain’) position on the input and output level controls. Then adjust your amplifier
input level controls to reduce any residual noise to tolerable levels (See SECTION 8.2.2).
3. Remove the test signal, turn off all equipment, and reconnect the loudspeaker(s). The system is now ready for
volume level balancing, assuming you have more than one loudspeaker. If you have only one loudspeaker or a
left/right stereo configuration, the system should be ready for use.
8.2.2
Residual Noise
XLT and XLTE loudspeakers have high sensitivities. This means that they produce a relatively high volume of sound
for a given electrical input. This also includes the residual electronic noise of an audio system. By setting gain
structure properly and using high quality, professional electronics with balanced connections, this noise should be at
or near inaudibility. Even if less expensive equipment is used, the general quality of today’s electronics should result
in a quiet system if the gain structure is set correctly. If residual noise is a problem, gain structure is the culprit - not
the loudspeakers. The exception is humming or buzzing. This is usually a problem with ground loops in the system's
electronic wiring, particularly with unbalanced equipment. Correcting this type of problem is beyond the scope of
this manual.
8.2.3
Volume Level Balancing
NOTE: If you are simply using one full-range loudspeaker or a simple left/right setup, this step can be skipped.
IMPORTANT: For these adjustments, you want to maintain the system’s dynamic range that was maximized by
setting the gain structure. Therefore, DO NOT TURN UP THE INPUT VOLUME CONTROLS OF ANY OF THE
AMPLIFIERS. For example, if you decide that a subwoofer is not loud enough, do not turn up the input volume
control of its amplifier. Instead, turn down the input volume control of the amplifier for the full-range loudspeaker.
Once the system gain structure is set, you can adjust the volume level balances. This may mean balancing the
volume levels between: HF and LF sections of a loudspeaker in BIAMP mode, a full-range loudspeaker to a
subwoofer, multiple loudspeakers, or between main and delayed loudspeaker arrays. The idea is to make the system
sound the best it can without using any equalization. This may also be done using acoustic test equipment such as
an RTA (real-time analyzer), TEF™ analyzer, or something similar. Always determine the final volume level balance by
listening to a variety of known program material. Balancing can also be done entirely by ear if acoustic test
equipment is not available. In any case, the preferred method of adjusting volume levels for balancing loudspeakers
is to make adjustments using the input level controls (also called sensitivity controls) on the amplifier(s). Alternately if
the system has one or more electronic crossovers, their output level controls can be used.
PAGE 30 Community XLT / XLTE Series Owner’s Manual
8.3
EQUALIZATION
Once volume level balances are set, you can then equalize the loudspeaker, if desired, using the loudspeaker’s HF
Level switch and/or a graphic or parametric equalizer or tone controls on the mixer. Bear in mind that Community
loudspeakers are optimized for good performance out-of-the-box in most typical PA applications and environments.
8.3.1
HF-Level Switch
This two-position switch (FLAT and +4 dB), located on the input panel of the full-range loudspeakers, is used for
adjusting the acoustic level of the high frequencies. Use this switch to voice the loudspeaker for different
performers, types of program material, or acoustic environments. Here are some general suggestions for using it.
Use the FLAT position:
In reverberant (hard surfaced) rooms that over-accentuate high frequencies.
For background music to make it less obtrusive to listeners.
When most listeners are close to the loudspeakers.
When feedback is a potential problem because microphones are close to the loudspeaker.
Use the +4 dB position:
In noisy environments to cut through to the listener better.
In absorptive environments that soak up high frequencies.
To project vocals and/or lead instruments over other back-line instruments.
To better project high frequency sound over longer distances.
8.3.2
Equalization Tips
Equalization should primarily be used to eliminate problem feedback frequencies or to adapt the system to different
acoustic environments. You should not need more than a few dB of boost or cut equalization for any particular range
of frequencies. The best equalization techniques involve cutting rather than boosting frequencies.
Equalizing the loudspeakers may not provide good results if this is done while listening at a close distance or in an
acoustical environment significantly different from where the loudspeakers will be used.
Our hearing is much more tolerant of dips than it is of peaks in the frequency response of an audio system.
Therefore, reducing a peak is more important than filling a hole in the frequency response.
Equalization boosts can easily cause overloads and clipping in the electronic signal chain. They also create peaks in
the frequency response that can dramatically reduce gain before feedback when using microphones. By contrast,
cutting specific frequencies, even a couple of dB, can often dramatically improve gain before feedback.
The equalization for the individual input channels on a mixer is very effective to use as these adapt the sound of each
input to the loudspeaker. Overall equalization changes the sound of the loudspeaker for all inputs.
The power handling of loudspeakers is lowest at their extreme low and high frequencies. This is also where they are
producing less output leading to a temptation to apply EQ boosts at those points. Doing this can compromise the
power handling of the loudspeaker. In addition, it does little good for the performance or the reliability of a
loudspeaker to boost frequencies that are beyond the specified operating range of the loudspeaker.
8.4
FINAL RESULTS
Once the above procedures are followed, your loudspeaker should reproduce audio cleanly, clearly and with all
frequencies in good balance. Noise should not be audible and you should be able to drive the amplifier to its
maximum output on normal program material with no significant distortion or other undesirable sounds.
PAGE 31 Community XLT / XLTE Series Owner’s Manual
9
OPERATING PRECAUTIONS
The following sections detail certain operating precautions for the loudspeaker that will aid in achieving and
maintaining its maximum performance and reliability. They also include important information for situations and
usage outside the basic set-up and operation described in the previous sections.
9.1
POWERSENSE DDP
All XLT and XLTE loudspeakers and subwoofers incorporate PowerSense DDP (Dynamic Driver Protection) circuitry
that automatically provides thermal and over-current protection for the individual drivers. This provides significant
but not absolute protection from damage. Neither the PowerSense circuitry nor electronic limiting can provide
protection from continual overdriving or from too small an amplifier being driven into heavy clipping. (Refer to
FIGURE 11 and SECTION 9.2.)
9.1.1
Operating Modes and PowerSense™ DDP
The PowerSense DDP circuitry functions in both the PASSIVE and BIAMP modes for all full-range loudspeakers. This
means that in BIAMP mode, both the HF and LF sections have their own PowerSense protection. The PowerSense
DDP circuitry is also fully functional for the subwoofers whether or not the FULL-RANGE OUTPUT is being used.
9.1.2
PowerSense™ DDP Circuit Operation
The PowerSense circuit has two levels of protection. For short-term, excessive power inputs, the DDP circuit
absorbs excess power using HPCCRs (High Positive Current Coefficient Resistors). Also, these excessive power
peaks will cause the rear input panel POWERSENSE LED indicator to flash red. Flashes of light from the HPCCRs can
also be seen from the front through the bass ports of the loudspeaker. Thus, whether the system is operated from
the rear or from the front, the operator will be alerted to the excessive power input. Very occasional flashing is OK.
If this happens more than occasionally, it indicates that the power to the loudspeaker is excessive and the volume
should be reduced.
For longer-term excessive power inputs, current-sensitive relays will automatically reduce the power input to the
system. This will reduce the output volume by about one-half or 6 to 8 dB. The rear panel POWERSENSE indicator
will glow red. The relays will reset themselves after several seconds and the volume will return to normal. However,
if the excessive power condition still exists, they will quickly reduce the power and volume again. This will have the
effect of the system cutting in and out. This cycle will continue until the power input is reduced to safe operating
volume levels.
WARNING:
Continued operation of the over-current relays can result in the system locking up in the reduced volume mode
and will likely result in damage to the loudspeakers or crossover components. When either the short-term
power protection or over-current relays are activated it means they are protecting the loudspeaker but can do so
only to a point. Therefore, these conditions should be considered an immediate warning that the power input is
excessive and the volume level of the sound system should be reduced.
9.2
USING LOWER POWER AMPLIFIERS (Refer to SECTION 5.1 and FIGURE 11)
When using an amplifier whose rated power output is below that recommended for the loudspeaker in SECTION 5.1,
the following precautions should be observed.
Driver damage and failures occur most often when a loudspeaker is used with too small an amplifier. The amplifier is
overdriven before the loudspeaker limit is reached and/or the PowerSense DDP protection circuitry in the
loudspeaker is activated. The result is that the loudspeaker receives a badly distorted signal known as amplifier
clipping. (See FIGURE 11). The characteristics of a clipped signal are such that it easily can damage any speaker
component even if the power output is below the power rating of the loudspeaker. THE POWERSENSE DDP
CANNOT NORMALLY PROTECT THE LOUDSPEAKER FROM DAMAGE DUE TO POWER AMPLIFIER CLIPPING.
PAGE 32 Community XLT / XLTE Series Owner’s Manual
When operating a full-range loudspeaker or subwoofer with a lower power amplifier and without any sort of
electronic limiting protection, ensure that the amplifier’s limits are not exceeded. Most amplifiers have some type of
indicator that shows when it is clipping. Keeping the signal volume level below this point will usually prevent
loudspeaker damage or failure. High frequency drivers are very intolerant of clipping.
WARNING:
Be aware that clipping from ANY piece of equipment that is clipping in the system can cause damage to the
drivers. In this case, it does not matter that the amplifier is operating below its maximum output.
FIGURE 11: Amplifier Clipping
9.3
ACOUSTIC VOLUME LEVEL PRECAUTIONS
Various studies have shown that acoustic volume levels in excess of 100 dB SPL can be damaging to human hearing.
The higher the volume level above this point, the shorter the time human ears can tolerate it. Volume levels near or
above 120 dB SPL are physically painful and can, after a very short exposure time measured in minutes, permanently
damage hearing. FIGURE 12 shows the maximum exposure times at volume levels from 90 to 115 dBA SPL from two
different authorities. Although they differ at lower volume levels, at 110 dBA they (and others) agree that the
maximum acceptable exposure time is only a few minutes.
Community loudspeakers are capable of producing volume levels in excess of potentially dangerous volume levels
close to the enclosure. In normal operation it is intended that the listener will be somewhat distant from the
enclosure and that the listener will therefore experience volume levels that are within tolerable limits. If you must be
near the loudspeaker when in operation, use adequate hearing protection. It is recommended that a sound level
meter be used to verify listening volume levels. Relatively inexpensive meters are available that provide adequate
accuracy for this purpose.
Avoid operating the loudspeaker systems at volume levels that exceed 100 dB SPL (C or flat weighting) in the
listening area for more than short periods. Rather than turning up the volume, one way to achieve greater apparent
volume for musical performances is to provide some moderate boost at the low, and to a lesser extent, at high
frequencies. Traditional bass and treble controls are ideal for this although these can be simulated on a graphic
equalizer. Judicious application of this type of equalization can make a loudspeaker sound significantly louder than it
actually is. Both your listeners and your loudspeakers will thank you.
PAGE 33 Community XLT / XLTE Series Owner’s Manual
FIGURE 12: Sound Exposure Limits
9.4
TESTING AND TEST SIGNALS
(Refer to CHAPTER 12 for troubleshooting methods)
To test a full-range loudspeaker or subwoofer or to reproduce test signals or tones through it for other purposes,
certain precautions must be followed to avoid damage to the loudspeakers. Generally sine waves, swept tones, pink
noise, white noise, and other constant volume test signals are much harder on a loudspeaker than normal program
material and therefore the potential for damage is much greater.
When using any of the test signals mentioned or similar test signals, never use power inputs that exceed 25% of the
loudspeaker’s RMS rating and do not test at this 25% level for more than a few moments. If test signals must be used
for extended periods of time, the power input to the loudspeaker should be kept below 10% of the loudspeaker’s
RMS rating to ensure the loudspeaker will not be damaged.
PAGE 34 Community XLT / XLTE Series Owner’s Manual
10
SERVICING THE LOUDSPEAKER
10.1
ACCESSING THE DRIVERS
The drivers (LF, MF, or HF) are accessed by removing the grille (See SECTION 7.1.1). This is done by removing all
the screws that hold the grille to the enclosure then carefully pulling the grille out of its recess. The grille is
purposely tight fitting so some force may be required. Use a small screwdriver to pry it up near one corner or an
Allen wrench or similar tool to hook it through one of the perforations to assist in removing it.
CAUTION:
The grille has sharp points along its edge so use caution when handling the grille edges to avoid injury. The
grille is shear-cut to size and because of the arrangement of the perforations, it is impossible to avoid cutting
through some of the holes. Consequently, some of the land areas between the holes form sharp points.
10.1.1
LF Drivers
Once the grille is removed, the LF driver(s) may be taken out by removing the eight screws that secure the outer edge
of its frame to the enclosure baffle. Once the screws are removed, a small screwdriver may be needed as a lever
under the outer rim of the driver’s frame to help lift it up. Carefully lift it out far enough to access the connections.
Note which wire color goes to which terminal so that the driver can be reinstalled with the correct polarity. Remove
the wires to uninstall the driver.
To reinstall, reverse the process. Firmly tighten, but do not over tighten any of the screws to avoid stripping the
holes. Be sure to reinstall each wire on its correct terminal. Failure to do this will result in uneven frequency
response.
10.1.2
MF and HF Drivers
Once the grille is removed, the MF (on the model 46) and HF driver is accessed by removing the screws around the
mounting flange of the horn that secures it to the enclosure baffle. Carefully lift out the horn far enough to access the
connections to the HF driver. Note which wire color goes to which terminal so that the driver can be reinstalled with
the correct polarity. Remove the wires, then unfasten the driver from the horn by undoing the nuts on the threaded
driver studs to uninstall the driver.
To reinstall, reverse the process. To avoid stripping the holes, firmly tighten, but do not over tighten, any of the
screws that hold the horn and grille. Be sure to reinstall each wire on its correct terminal. Failure to do this will
result in uneven frequency response.
10.2
SERVICING THE CROSSOVER
Should the crossover need service, it is completely removable from the rear of the enclosure (side on monitors).
Remove the screws around the outside flange and carefully lift out the crossover. To disconnect the crossover from
the loudspeaker, pull out the Molex plug used to connect the crossover to the driver wiring harness. When
re-installing the crossover, the Molex plug is keyed so it can be inserted only in one direction. It will plug in easily
when properly oriented. Ensure that it is fully seated into the receptacle on the crossover board.
PAGE 35 Community XLT / XLTE Series Owner’s Manual
11
TECHNICAL SPECIFICATIONS
(Note: Specifications subject to change without notice)
11.1
FULL-RANGE MODELS
Model:
System Type
Frequency Response
Sensitivity (1W / 1m SPL)
Max. Power (RMS / Program)
Passive Mode
Biamp Mode LF
HF
Impedance
Passive Mode
Biamp Mode: LF
HF
Nominal Coverage H x V
Type
Frequency
Passive/Biamp Switch
HF Level Switch
PowerSense™ DDP 2
With Front / Rear Indication
HF 3
MF
LF
Input Connectors
Neutrik NL4MP (Passive / Biamp)
1/4” Jack (Passive Mode only)
XLT Enclosure Material
XLT
XLTE
Mounting Points
XLT(5/16-18 threaded inserts)
XLTE (3/8-16 rig points)
Stand / Pole Socket
All-Steel Handles
XLT Corner Protectors
XLTE Rubber Feet
Enclosure Finishes
XLT
XLTE
Grille
Material
Finish
Dimensions
4
Height
Width (front)
Width (rear)
Depth
Pitch between sides
Weight
XLT
XLTE
1
2
3
4
43
46
47
2-Way Trapezoidal
50 Hz - 18 kHz
98 dB
3-Way Trapezoidal
50 Hz - 18 kHz
99 dB
2-Way Trapezoidal
50 Hz - 18 kHz
101 dB
200 W / 500 W
200 W / 500 W
50 W / 125 W
200 W / 500 W
200 W / 500 W
50 W / 125 W
200 W / 500 W
200 W / 500 W
80 W / 200 W
400 W / 1000 W
400 W / 1000 W
50 W / 125 W
8 Ohms (min 5.6)
8 Ohms (min 5.6)
8 Ohms
8 Ohms (min 5.3)
8 Ohms (min 5.3)
8 Ohms
90° x 40°
4 Ohms (min 5.1)
4 Ohms (min 5.1)
8 Ohms
4 Ohms (min 3.2)
4 Ohms (min 3.2)
8 Ohms
80° x 40°
90° x 40° 1
12 dB/octave
2 kHz
Yes
+4 dB / Flat
Crossover:
Drivers
42
2-Way Trapezoidal
70 Hz - 18 kHz
97 dB
12 dB/octave
2 kHz
Yes
+4 dB / Flat
60° x 40° 1
12 dB/octave
500 Hz / 2.5 kHz
Yes
+4 dB / Flat
Yes
Yes
Yes
Yes
1" / 25 mm Titanium
N/A
12" / 305 mm
1" / 25 mm Titanium
N/A
15" / 381 mm
1" / 25 mm Titanium
6.5" / 165 mm Cone
15" / 381 mm
1" / 25 mm Titanium
N/A
2 x 15" / 381 mm
(2) In parallel
(2) In parallel
(2) In parallel
(2) In parallel
(2) In parallel
(2) In parallel
(2) In parallel
(2) In parallel
N/A
13-ply Baltic birch
12 dB/octave
1.8 kHz
Yes
+4 dB / Flat
Oriented strand board Oriented strand board Oriented strand board
13-ply Baltic birch
13-ply Baltic birch
13-ply Baltic birch
N/A
3 top, 3 bottom
1-3/8” / 35 mm
diameter
One on end
N/A
Yes
Sides/top/bottom
3 top, 3 bottom
1-3/8” / 35 mm
diameter
One on each side
Yes
Yes
Sides/top/bottom
3 top, 3 bottom
Attachment points
for external socket
One on each side
Yes
Yes
Sides/top/bottom
3 top, 3 bottom
None
One on each side
Yes
Yes
N/A
Black Paint
16 Gauge perf steel
Black paint
23.4" / 618 mm
14.6" / 371 mm
9.2" / 234 mm
14.75" / 375 mm
Black Carpet
Black Paint
16 Gauge perf steel
Black paint
26.9" / 684 mm
20.3" / 515 mm
13.7" / 347 mm
18.2" / 463 mm
Black Carpet
Black Paint
16 Gauge perf steel
Black paint
33.9" / 862 mm
20.3" / 515 mm
13.7" / 347 mm
18.2" / 463 mm
Black Carpet
Black Paint
16 Gauge perf steel
Black paint
41.9" / 1065 mm
20.3" / 515 mm
13.7" / 347 mm
18.2" / 463 mm
22 degrees
N/A
53.5 lb. / 24.3 kg
22 degrees
68.5 lb. / 31.1 kg
68.5 lb. / 31.1 kg
22 degrees
86.5 lb. / 39.2 kg
85 lb. / 38.6 kg
22 degrees
102 lb. / 46.3 kg
95 lb. / 43.1 kg
Horn can be rotated 90 degrees to reverse horizontal and vertical coverage pattern.
DDP = Dynamic Driver Protection.
Driver has as 2” diameter diaphragm and 1” exit.
Dimensions are for XLT models including corners. XLTE dimensions will vary up to approximately +/- 0.5 in. (+/- 13 mm)
from those listed. Model 42 is correct because it is only available as part of the XLTE Series.
PAGE 36 Community XLT / XLTE Series Owner’s Manual
11.2
MONITOR SPEAKERS AND SUBWOOFERS 1
Model:
System Type
Frequency Response
Sensitivity (1W / 1m SPL)
Max. Power (RMS / Program)
Passive Mode
Biamp Mode LF
HF
Impedance
Passive Mode
Biamp Mode LF
HF
Nominal Coverage H x V
Type
Frequency
Passive/Biamp Switch
HF Level Switch
PowerSense™ DDP 3
With Front / Rear Indication
HF 4
LF
Input Connectors
Neutrik NL4MP (Passive/Biamp)
1/4” Jack (Passive only)
XLT Enclosure Material
XLT
XLTE
Mounting Points
XLT (5/16-18 T-nuts)
XLTE(3/8-16 rig points)
Stand / Pole Socket
All-Steel Handles
XLT Corner Protectors
XLTE Rubber Feet
Enclosure Finishes
XLT
XLTE
Grille
Material
Finish
Dimensions 5
Height
Width (front)
Width (rear)
Depth
Pitch between sides
Weight
XLT
XLTE
48
51
55
2-Way Monitor
wedge
50 Hz - 18 kHz
98 dB
Trapezoidal
Subwoofer
40 Hz - 250 Hz
98 dB
Trapezoidal
Subwoofer
40 Hz - 150 Hz
98 dB
200 W / 500 W
200 W / 500 W
50 W / 125 W
200 W / 500 W
200 W / 500 W
50 W / 125 W
125 W / 300 W
N/A
N/A
300 W / 750 W
N/A
N/A
8 Ohms (min 5.2)
8 Ohms (min 5.2)
8 Ohms
8 Ohms (min 5.5)
8 Ohms (min 5.5)
8 Ohms
90° x 40°
8 Ohms (min 7.8)
N/A
N/A
Omni
4 Ohms (min 4.4)
N/A
N/A
Omni
12 dB/octave
2 kHz
Yes
+4 dB / Flat
High-pass output
150 Hz
N/A
N/A
High-pass output
150 Hz
N/A
N/A
Yes
Yes
Yes
Yes
1" / 25 mm titanium
12" / 305 mm
1" / 25 mm titanium
15" / 381 mm
N/A
1 x 15" / 381 mm
N/A
2 x 15" / 381 mm
(2) In parallel
(2) In parallel
(2) In parallel
(2) In parallel
(2) In parallel
(2) In parallel
(2) In parallel
(2) In parallel
90° x 40° 2
12 dB/octave
2 kHz
Yes
+4 dB / Flat
Crossover:
Drivers
41
2-Way Monitor wedge
and upright PA
70 Hz - 18 kHz
97 dB
N/A
13-ply Baltic birch
Oriented strand board Oriented strand board Oriented strand board
13-ply Baltic birch
13-ply Baltic birch
13-ply Baltic birch
N/A
Nono
1-3/8” / 35 mm
diameter
One on end
N/A
Yes
Sides
Sides (5/16-18 T-nuts)
Attachment points
for external socket
One on each side
Yes
Yes
Sides/top/bottom
3 top, 3 bottom
1-3/8” / 35 mm
diameter
One on each side
Yes
Yes
One on each side
Yes
Yes
N/A
Black Paint 1
16 Gauge perf steel 1
Black paint 1
Black Carpet
Black Paint 1
16 Gauge perf steel 1
Black paint 1
14.9" / 379 mm 6
24.4" / 620 mm 6
24.4" / 620 mm 6
15.6" / 395 mm 6
19.3" / 483 mm 6
20.3" / 515 mm 6
20.3" / 515 mm 6
31.5" / 800 mm 6
30 or 45 degrees 7
52 lb. / 23.6 kg
49.5 lb. / 22.5 kg
30 degrees 7
62.5 lb. / 28.4 kg
60 lb. / 27.2 kg
Black Carpet
Black Paint
16 Gauge perf steel
Black paint
27" / 686 mm
20" / 507 mm
20" / 507 mm
18.4" / 468 mm
0 degrees
Black Carpet
Black Paint
16 Gauge perf steel
Black paint
41.9" / 1065 mm
20.3" / 515 mm
13.7" / 337 mm
18.2" / 457 mm
22 degrees
59 lb. / 26.8 kg
66.5 lb. / 30.2 kg
89 lb. / 40.4 kg
89 lb. / 40.4 kg
1
2
3
4
5
Sides/top/bottom
3 top, 3 bottom
None
See APPENDIX for additional specifications for XLT41E and XLT48E.
Horn can be rotated 90 degrees to reverse horizontal and vertical coverage pattern.
DDP = Dynamic Driver Protection.
Driver has as 2” diameter diaphragm and 1” exit.
Dimensions are for XLT models including corners. XLTE dimensions will vary up to approximately +/- 0.5 in. (+/- 13 mm)
from the listed dimensions.
6 Dimensions are for normal operating position as a floor monitor.
7 For monitors: pitch = Slant angle of front from horizontal in normal operating position.
PAGE 37 Community XLT / XLTE Series Owner’s Manual
12
IN CASE OF DIFFICULTY
Should you have a problem with your Community loudspeaker, find the symptom and follow the associated “What
To Do” instructions. Be aware that a particular symptom may have several possible causes. Please refer to
appropriate sections in this manual if you need more detailed information.
SYMPTOMS FULL-RANGE LOUDSPEAKERS
No sound.
PROBABLE CAUSE
No sound.
Amplifier is not on or
loudspeaker is disconnected.
Signal not reaching amplifier.
No sound using Neutrik connector
Neutrik connector not seated
No sound in PASSIVE mode.
Wrong Neutrik pins used.
No sound or very low volume.
No audio signal.
WHAT TO DO
Check that amplifier is turned on and that loudspeaker is properly
connected to the amplifier.
Check that all equipment in the system is turned on and that the audio
signal is going through the equipment.
Make sure Neutrik connector is fully seated by twisting it clockwise
about 1/4 turn after plugging it. Then engage the locking ring.
Make sure you are using connector pins #1 + / -
Check that all the audio equipment in the signal chain is powered on
and that all volume controls are turned up at least somewhat.
Low volume level.
System electronic gain is too
Check to make sure that the audio signal to the amplifier is high
low.
enough to drive it properly. Check all volume/level controls and gain
switches in the system including the amplifier input attenuator.
Low volume level.
Signal or speaker wire
Make sure the wiring inside all system connectors is not shorted. Even
connection is shorted.
one wire strand shorting the +/- signal terminals either before or after
the amplifier can cause this problem.
Lights flash on and off inside the The crossover PowerSense
The lights are part of the PowerSense protection circuitry. Flashing
loudspeaker and/or the PowerSense protection circuits are working. means there are excessive power peaks. This is a warning to reduce the
LED on the input panel is flashing.
power and is a normal action under these conditions.
During high output operation the The crossover PowerSense
This usually means that the loudspeaker is being overdriven for a
volume drops suddenly and then protection circuits are working. more extended period. The protection circuit is reducing the signal
comes back. (Sound cuts in and out.)
level to protect the drivers. It resets itself when the signal level is
reduced. This a normal action under these conditions but must be
corrected. Reduce the volume level to the loudspeaker.
During high output operation the The crossover protection
This usually means that the loudspeaker was continually overdriven for
volume drops suddenly and does not circuits have ‘given up’.
an extended period and the protection circuitry has ‘fused’ in the
come back.
protect mode. The crossover must be repaired.
Sound cuts in and out.
Bad connection.
Check all connections and cabling for shorts or loose connections.
Even one wire strand shorting the +/- signal terminals either before or
after the amplifier can cause this problem.
Distortion, low volume, or no volume Cold/open solder joint on the
Using an ohmmeter, check the continuity of the crimp connectors, all
from any or all drivers.
crossover or faulty wiring
solder joints on the crossover and the wiring to the drivers. Also
connection.
visually inspect solder joints as cold joints may only malfunction with
higher current than the ohmmeter supplies. Repair as needed.
Distortion from the loudspeaker at Too little amplifier power.
If the power rating of the amplifier(s) being used is too low, it will clip
higher volume levels.
at higher volume levels before the controller limiting is active. Reduce
the volume level or use a more powerful amplifier.
Distortion from the loudspeaker at any Driver is malfunctioning.
At low, medium, and high levels use a sine wave oscillator to ‘sweep’
volume level
the loudspeaker or use wide range program. Listen to each driver to
isolate the problem. Replace as needed.
Noises from the loudspeaker (buzzes Hardware is loose.
Make sure the front grille is securely seated and fastened, that screw-in
or rattles).
mounting hardware is tight, and that any external mounting hardware is
tightened or secured from vibrating.
Noises when playing loudly (buzzes or External objects are vibrating. Things in the room may be vibrating from the loudspeaker energy.
rattles).
Check carefully to determine if this is the case. Suspended ceilings,
light fixtures, ductwork, conduit, and even wall paneling are all
common architectural sources of this. Loose objects simply lying
around near the loudspeaker can be a source of this also.
Noises from the loudspeaker (buzzes Driver is malfunctioning.
At low, medium, and high levels use a sine wave oscillator to ‘sweep’
or rattles).
the loudspeaker or use wide range program. Listen to each driver to
isolate the problem. Replace as needed.
Low or no volume for the low Low frequency driver(s) or Listen at low level to the low frequency driver(s). If some sound is
frequencies.
crossover is malfunctioning.
heard from each and it is not distorted, it is probably a crossover
problem. If distorted or no sound is heard from either or both drivers,
either the drivers or crossover may not be working properly. Replace
as needed.
PAGE 38 Community XLT / XLTE Series Owner’s Manual
No bass.
Low frequency driver is not
(Note: Model 47 has 2 LF drivers wired functioning.
in parallel.)
Bass is weak on model 47.
One LF driver is not
(Note: Model 47 has 2 LF drivers wired functioning.
in parallel.)
Low or no volume for the midrange. Mid frequency driver or
(Model 46 only)
crossover is malfunctioning.
High frequencies are too weak or too High Frequency Level switch
bright.
needs adjustment
No high frequencies.
PASSIVE / BIAMP switch in the
wrong position.
No midrange and highs on model 46.
PASSIVE / BIAMP switch in the
wrong position.
No high frequencies.
High frequency driver or
crossover is malfunctioning.
SYMPTOMS - BIAMP MODE
PROBABLE CAUSE
Disconnect the 2 wires from the amplifier, switch the loudspeaker to
BIAMP mode, and, using an ohmmeter, measure the resistance
between the wires. If the meter reads an open circuit, the LF driver
may not be working. For the model 47 both drivers may not be
working. Replace as needed.
Disconnect the 2 wires from the amplifier, switch the loudspeaker to
BIAMP mode, and, using an ohmmeter, measure the resistance
between the wires. If the meter reads 6 Ohms, one LF driver may not
be working. 3 Ohms is the normal reading. Replace as needed.
Listen at low level to the mid-range driver located in the middle of the
enclosure. If some sound is heard from the driver and it is not
distorted, it is probably a crossover problem. If distorted sound or no
sound is heard, either the crossover or the driver may not be working
properly. Repair or replace as needed.
The High Frequency Level switch on the input panel has 2 positions.
The +4 dB position provides more highs and the Flat less highs.
Move the switch on the input panel to the PASSIVE (up) position.
Move the switch on the input panel to the PASSIVE (up) position.
Listen at low levels, to the high frequency driver. If some sound is
heard from this area and it is not distorted, it is probably a crossover
problem. If distorted sound or no sound is heard, the driver or
crossover may not be working properly. Replace as needed.
WHAT TO DO
Bass is distorted and highs are muffled. 1/4 in. jacks instead of Neutrik
jack is being used.
Using an electronic crossover, bass is
weak and highs are muffled.
Using an electronic crossover, bass is
weak and highs are muffled.
Poor sound quality.
Sound OK but HF amplifier level
cannot be adjusted.
Bass is weak.
Bass is weak on model 47.
No sound or no bass or no highs using
Neutrik connector
No bass.
No bass.
No bass.
No bass.
Midrange and highs are weak.
No midrange or highs.
No high frequencies.
For BIAMP mode a Neutrik input jack must be used. One of the 1/4 in.
jacks can function as the LF input but if both the HF and LF amplifiers
are plugged into the 1/4 in. jacks, this will short the amplifiers together
and no signal will be fed to the HF. This can also damage your
amplifiers.
The wiring for LF and HF
Check wiring to the loudspeaker and make sure the LF is going to pins
sections is reversed.
1+ / 1- and the HF is going to pins 2+ / 2- on the Neutrik connector.
The wiring for LF and HF
Check wiring from crossover to amplifiers and amplifiers to
sections is reversed.
loudspeaker. Make sure the LF signal connects to the loudspeaker’s LF
input and the HF signal connects to the loudspeaker’s HF input.
Incorrect polarity connections. Check the connections to the LF and HF sections. Verify the polarity is
correct.: + and - amplifier outputs connect to corresponding + and on loudspeaker’s LF and HF inputs on the Neutrik connector.
PASSIVE / BIAMP switch in the Move the switch to the BIAMP (down) position.
wrong position.
LF and HF amplifiers are not
Either turn up the LF amplifier or turn down the HF amplifier to get
properly adjusted.
more lows.
LF driver is not functioning.
Disconnect the 2 wires from the LF amplifier and, using an ohmmeter,
measure the resistance between the wires. If the meter reads 6 Ohms
one LF driver may not be working. 3 Ohms is the normal reading.
Replace as needed.
Neutrik connector not seated
Make sure Neutrik connector is fully seated by twisting it clockwise
about 1/4 turn after plugging it in. Then engage the locking ring.
Wrong connection.
Make sure LF amplifier is either wired to pins 1+ /1- on the Neutrik
connector or is connected to one of the 1/4 in. jacks.
LF driver is not functioning.
Disconnect the 2 wires from the LF amplifier and, using an ohmmeter,
measure the resistance between the wires. If it reads an open circuit,
the LF driver may not be working. Replace as needed.
LF amplifier is not on or
Check that the LF amplifier is turned on and that the loudspeaker is
loudspeaker disconnected.
properly connected to the amplifier.
LF section of electronic
Check that the electronic crossover has LF output and that it is
crossover is not working.
properly connected to the amplifier.
HF and LF amplifiers are not
Either turn up the HF amplifier or turn down the LF amplifier to get
properly adjusted.
more highs.
HF amplifier is not on or
Check that the HF amplifier is turned on and that it is properly
loudspeaker disconnected.
connected to the loudspeaker pins 1+ / 1- on the Neutrik connector.
HF amplifier is not on or
Check that the HF amplifier is turned on and that loudspeaker is
loudspeaker disconnected.
properly connected to the amplifier.
PAGE 39 Community XLT / XLTE Series Owner’s Manual
No high frequencies.
High frequency driver or
crossover is malfunctioning.
Listen at low level to the high frequency driver. If some sound is heard
from this area and it is not distorted, it is probably a crossover
problem. If distorted sound or no sound is heard, the driver or
crossover may not be working properly. Replace as needed.
SYMPTOM - SUBWOOFER
PROBABLE CAUSE
WHAT TO DO
No bass using Neutrik connector
Neutrik connector not seated
Make sure Neutrik connector is fully seated by twisting it clockwise
about 1/4 turn after plugging it in. Then engage the locking ring.
Using an ohmmeter, check the continuity of the crimp connectors, all
solder joints on the input panel and the wiring to the drivers. Also
visually inspect solder joints as cold joints may only malfunction with
higher current than the ohmmeter supplies. Repair as needed.
Check that the electronic crossover has subwoofer output, that it is
properly connected to the amplifier, that the amplifier is properly
connected to the subwoofer, and that there is sufficient gain to drive
the subwoofer in relation to the full-range loudspeakers.
Verify the polarity is correct: + and - amplifier outputs go to + and on loudspeaker. Note that in some cases, due to physical loudspeaker
placement, a reversed polarity connection will provide better coupling
to the full-range loudspeaker. Check by changing the polarity.
Note that in some cases, the physical placement of a subwoofer can
have a significant effect on the bass energy in the listening area. If
possible, move the subwoofer at least 10 feet from its present location
to see if the bass energy changes. If it does than you may have to
change the subwoofer location.
Disconnect the amplifier and, using an ohmmeter, measure the
resistance at one of the input jacks. If the meter reads as an open
circuit, the LF drivers may not be working. Replace as needed.
Disconnect the 2 wires from the amplifier, switch the loudspeaker to
BIAMP mode, and, using an ohmmeter, measure the resistance
between the wires. If the meter reads about 6 Ohms one LF driver may
not be working. 3 Ohms is the normal reading. Replace as needed.
Disconnect the 2 wires from the amplifier and, using an ohmmeter,
measure the resistance between the wires. If the meter reads an open
circuit, both LF drivers may not be working. Replace as needed.
Assuming all cabling and connections for the amplifiers are OK, listen
to the subwoofer at moderate levels for output from the driver(s). If
there is none the driver(s) may be malfunctioning and need repair.
Distortion, low volume, or no volume Cold/open solder joint on the
from any or all drivers.
input panel or faulty wiring
connection.
No bass or bass is weak using an
electronic crossover.
No signal to the subwoofer.
Bass is weak.
Incorrect subwoofer polarity.
Bass is weak.
Poor physical placement.
No bass from 51.
Driver is not functioning.
Bass is weak on model 55.
One driver not functioning.
(Note: The 55 has 2 LF drivers wired in
parallel.)
No bass from 55.
Both drivers may not be
(Note: The 55 has 2 LF drivers wired in functioning.
parallel.)
No bass or bass is weak in system.
Subwoofer is not functioning.
FULL-RANGE OPERATED FROM SUBWOOFER FULL-RANGE OUTPUT
SYMPTOM
PROBABLE CAUSE
No sound from full-range loudspeaker.
High pass crossover not
working.
No sound from full-range loudspeaker.
Low volume from full-range
loudspeaker or subwoofer.
No sound from subwoofer.
WHAT TO DO
Disconnect subwoofer and connect full-range loudspeaker directly to
the power amplifier. If it works OK then the crossover in subwoofer
is probably not working. If it does not work OK, see symptoms for
full-range loudspeakers.
Cold or open solder joint on
Using an ohmmeter, check the continuity of the crimp connectors, all
the subwoofer input panel or
solder joints on the input panel and the wiring to the drivers. Also
faulty wiring connection.
visually inspect solder joints as cold joints may only malfunction with
higher current than the ohmmeter supplies. Repair as needed.
Acoustic balance not optimum. When using the FULL-RANGE output on the subwoofer to feed a fullrange loudspeaker, the acoustic balance between them is determined
by their efficiencies. If this balance is not suitable then separate
amplifiers for the subwoofer and full-range loudspeaker are
recommended. The acoustic balance can then be adjusted using the
amplifier input level controls.
Subwoofer not working.
See symptoms for subwoofers.
POLARITY CHECK FOR TWO LOUDSPEAKERS OR SUBWOOFERS
Sound image is poor and bass weak
Stand in front of and exactly between the loudspeakers or subwoofers. Play a mono source through
the system. If the sound does not appear to come solidly from a point between the loudspeakers
and/or the bass is weak, they are probably out of polarity. Check the + and - wiring for the entire
signal chain to each loudspeaker. The wiring should be identical.
PAGE 40 Community XLT / XLTE Series Owner’s Manual
13
WARRANTY INFORMATION AND SERVICE
Transferable Limited Warranty
Community products are guaranteed to be free from defects in manufacturing materials and factory workmanship for a specified
period as noted, by product group, below:
CSX-S2 Loudspeaker Systems are covered by this warranty for a period of ten years in the USA, five years worldwide.
XLT, XLTE, CPL, and CSV Loudspeaker Systems, fiberglass components and all mounting kits are covered by this warranty
for a period of five years.
AirForce, SLS and SBS Series Electronically Controlled Loudspeaker Systems are warranted for a period of five years when
used with the appropriate System Controller. Use without the appropriate System Controller is considered abuse and voids
the warranty.
Component loudspeakers, compression drivers (not used in Community loudspeakers systems) and electronics are
covered by this warranty for a period of two years.
The warranty period is determined by one of the following two methods, whichever is longer:
1. Starting from the date of retail purchase, as noted on the sales receipt from an authorized Community Dealer,
OR
2. Starting from the date of manufacture, which is coded in the serial number, if the sales receipt is not available.
This warranty applies to the product; therefore, the remainder of the warranty period will be automatically transferred to any
subsequent owner.
This warranty applies only to failure of Community products caused by defects in the original materials and workmanship during
the stated warranty period. It does not apply to normal wear and tear, nor to products that have been subjected to abuse,
accident, modification, improper handling/installation, or repairs made without factory authorization or by anyone other than
authorized Community Field Service Stations and Export Distributors. This warranty is void if the serial number has been defaced,
altered or removed.
Products covered by this warranty will be repaired or replaced at the option of Community, without charge for materials or labor,
provided all the terms of this warranty have been met.
Obtaining Warranty Service: Warranty service may be handled by the factory, factory authorized Field Service Stations, or Export
Distributors.
To obtain factory or field warranty service for products purchased in the United States, return the product for inspection to the
following address, freight prepaid, in the original packaging. If the original packaging is not available, call or write Community
factory service to obtain proper packaging materials or hand carry the product to your nearest Field Service Station.
For factory service, please call 800-523-4934 or (610) 876-3400 for a Return Authorization (R/A) number before shipping.
Factory Service Center:
Community Warranty Service
333 East 5th Street
Chester, PA. 19013-4511
Field Service Station:
Call 800-523-4934 or (610) 876-3400
for the nearest Authorized Field Service center
If you ship your product, be sure to include the following information:
1. Your complete name, daytime phone number, return street address and return authorization number..
2. The serial number of the product you are returning and retail sales receipt, if possible.
3. A complete description of the problem(s) you have been experiencing including a brief description of how the equipment
is being used and with what type/size of amplifier.
Upon receipt, the service center will determine if the problem is covered under warranty. If covered under this warranty, the
product will be repaired or replaced, at Community’s option, and returned to you freight prepaid. If the problem is not covered
under this warranty, you will be notified of the problem with an estimate of the repair costs.
For warranty service outside the United States, contact your authorized Community Export Distributor.
Consequential and Incidental Damages: Community shall not be liable for any consequential or incidental damages including,
without limitation, injury to persons, property or loss of use. Some states do not allow the exclusion or limitations of
consequential or incidental damages, so the above limitations and exclusions may not apply to you.
This Community warranty is not extended by the length of time which you are deprived of the use of the new product. Repairs
and replacement parts provided under the terms of this warranty shall carry only the remaining portion of the warranty.
PAGE 41 Community XLT / XLTE Series Owner’s Manual
Community reserves the right to change the design of any product from time to time without notice and with no obligation to
make corresponding changes in products previously manufactured.
This warranty gives you specific legal rights, you may also have other rights that vary from state to state.
No action to enforce this warranty shall be started later than ninety days after expiration of the warranty period.
THIS STATEMENT OF WARRANTY SUPERSEDES ANY OTHERSFOR COMMUNITY PRODUCTS.
9907007F
WARRANTY INFORMATION AND SERVICE FOR COUNTRIES OTHER THAN THE USA
To obtain specific warranty information and available service locations for countries other than the United States of America,
contact the authorized Community Distributor for your specific country or region.
PAGE 42 Community XLT / XLTE Series Owner’s Manual
APPENDIX - XLT41E and XLT48E
The XLT41E and XLT48E, in addition to being part of the XLTE Series, are available to Community Contractors and
Distributors as part of Community’s CPL Loudspeaker Series. Their function as part of this series is to provide
portable monitor systems compatible with permanent installations using CPL full-range loudspeakers and
subwoofers. Because of certain more demanding requirements for permanent installations, additional XLT41E and
XLT48E models are offered in the CPL Series with features that match those of other CPL products.
A. XLT41E and XLT48E Additional Models
The additional models are identical to the base model XLT41E-94B and XLT48E-94B in all respects, except for the
availability of a 60° x 40° degree horn option, different enclosure finishes, and cloth covering on the grille, depending
on enclosure finish.
Each XLT41E and XLT48E model has a suffix that defines the configuration of these features as listed in TABLE 8.
MODEL
NOMINAL COVERAGE 1
ENCLOSURE FINISH
GRILLE CLOTH 2
Black Paint
None
XLT41E-94B
XLT48E-94B
90° x 40°
XLT41E-94W
XLT48E-94W
90° x 40°
White Paint
White
XLT41E-94U
XLT48E-94U
90° x 40°
Unfinished 3
Brown
XLT41E-64B
XLT48E-64B
60° x 40°
Black Paint
None
XLT41E-64W
XLT48E-64W
60° x 40°
White Paint
White
60° x 40°
3
Brown
XLT41E-64U
1
2
3
XLT48E-64U
Unfinished
The XLT41E horn can be rotated 90 degrees to reverse horizontal and vertical coverage patterns.
The grille cloth is removable or can be replaced with a custom color cloth (See SECTION 7.1).
Unfinished enclosures are filled and sanded, ready for painting or staining.
Table 8: Additional Model Specifications
B. Operating Instructions
All instructions contained in this manual for the base models XLT41E-94B and XLT48E-94B apply in all respects to the
additional models listed in TABLE 8. The only exceptions are in SECTIONS 4.8.6, 7.3, and 7.3.1 where “60 degrees”
must be substituted for “90 degrees” when referring to coverage for XLT41E-64 and XLT48E-64 models.
C. Specifications
The specifications, listed in SECTION 11.2 (and where referred to elsewhere in this manual) for models 41 and 48,
apply in all respects to the additional models listed in TABLE 8, except for the Nominal Coverage, Enclosure Finish,
and Grille cloth. For these items the specifications listed in TABLE 8 apply to the additional models.
PAGE 43 Community XLT / XLTE Series Owner’s Manual
INDEX
A
G
Abbreviated Operating Instructions ......................................... 11
Accessories .............................................................................. 15
Acoustic Level Precautions...................................................... 33
Acoustical Adjustments ........................................................... 29
Amplifier Clipping................................................................... 32
Amplifier Power, Recommended............................................. 16
Amplifiers .......................................................................... 16, 32
Appendix ................................................................................. 43
Gain Structure ..........................................................................29
General Description..................................................................11
Grille ..................................................................................15, 24
Grille Cloth...............................................................................24
B
Biamp Mode ........................................................................ 7, 32
Biamp Mode ............................................................................ 12
Biamp Mode Amplifier............................................................ 17
Biamp Mode Configurations.................................................... 19
Biamp Mode Wiring ................................................................ 23
C
Cable Selection ........................................................................ 20
Choosing A Power Amplifier .................................................. 16
Choosing an Input Jack............................................................ 21
Clipping ................................................................................... 32
Connecting the Loudspeakers .................................................. 22
Connector Wiring .................................................................... 22
Corner Protectors..................................................................... 14
Crossover ................................................................................. 12
CSSUPKIT Accessory ............................................................. 26
Custom Grille Cloth................................................................. 24
D
Daisy-chaining Loudspeakers .................................................. 21
Description............................................................................... 11
Drivers ..................................................................................... 11
Dynamic Range........................................................................ 29
E
EC Statement Of Conformity..................................................... 2
Electrical Installation ............................................................... 20
Electronic Crossover................................................................ 17
Enclosure Finish ...................................................................... 15
Enclosure Finishes ................................................................... 24
Enclosures................................................................................ 13
Equalization ............................................................................. 31
Equalization Tips ..................................................................... 31
EYBLTKIT Accessory............................................................. 28
F
Features Descriptions................................................................. 9
Features Matrix.......................................................................... 9
Feet .......................................................................................... 14
Ferrofluid Cooling ................................................................... 12
Final Adjustments .................................................................... 29
Final Results ............................................................................ 31
Front Grille ........................................................................ 15, 24
Full-Range Models .................................................................. 36
Full-Range Output ................................................................... 13
Full-Range System with Subwoofer ........................................ 17
H
Handles.....................................................................................14
Handles, Danger .......................................................................25
HF-Level Switch ................................................................12, 31
High Frequency Driver.............................................................11
Horn Orientation 41,42,46 .......................................................24
I
Impedances for Parallel Loudspeakers .....................................22
In case Of Difficulty.................................................................38
Initial Testing ...........................................................................29
Input Jack Wiring .....................................................................21
Input Jacks................................................................................20
Input Panels..............................................................................12
Internal Crossover ....................................................................12
Introduction................................................................................4
L
LED ..........................................................................................13
Level Balancing........................................................................30
Level Precautions .....................................................................33
Load Impedance .......................................................................16
Loudspeaker Cable Selection ...................................................20
Low Frequency Drivers ............................................................11
Low Power Amplifiers .............................................................32
M
Mid Frequency Driver ..............................................................11
Model Number Usage.................................................................4
Model Numbers........................................................................11
Monitor Speakers .....................................................................37
Mounting and Rigging .............................................................25
Mounting And Rigging ............................................................14
Mounting Brackets ...................................................................27
Mounting Point Holes ..............................................................25
Mounting Points.......................................................................25
N
Neutrik Speakon Input Jacks ....................................................21
Noise ........................................................................................30
O
Operating Precautions ..............................................................32
Optional Accessories ................................................................15
P
Parallel Load Impedances.........................................................21
Paralleling Loudspeakers..........................................................21
Passive / Biamp Switch ............................................................12
Passive Mode ...........................................................................32
Passive Mode .......................................................................6, 12
PAGE 44 Community XLT / XLTE Series Owner’s Manual
Passive Mode Amplifier ........................................................... 17
Passive Mode Configurations................................................... 18
Passive Mode Wiring ............................................................... 22
Pattern Control Horns .............................................................. 12
Permanent Mounting ................................................................ 14
Physical Features.................................................................... 8, 9
Physical Features Matrix ............................................................ 9
Physical Installation ................................................................. 24
Polarity Check.................................................................... 22, 40
Pole Mounting.......................................................................... 14
Power Amplification ................................................................ 16
Power Amplifier Choice........................................................... 16
Power Amplifier Load Impedance............................................ 16
Power Handling Specifications ................................................ 13
PowerSense LED...................................................................... 13
PowerSense™ DDP ................................................................. 32
PowerSense™ DDP Circuit ..................................................... 13
PowerSense™ Operation ......................................................... 32
Product Listing................................................................... 11, 43
Stands....................................................................................... 27
Subwoofer Amplifier ............................................................... 17
Subwoofer Electronic Crossover.............................................. 17
Subwoofer Full-Range Output ................................................. 13
Subwoofer Wiring.................................................................... 23
Subwoofers .............................................................................. 37
System Configurations............................................................. 17
Q
V
Quick Start-Up Diagram - PASSIVE Mode............................... 6
Quick Start-Up Diagram- BIAMP Mode ................................... 7
Volume Level Balancing ......................................................... 30
T
Table of Contents....................................................................... 3
Technical Specifications .......................................................... 36
Test Signals.............................................................................. 34
Testing ..................................................................................... 34
Transferable Limited Warranty ................................................ 41
Troubleshooting....................................................................... 38
U
Unpacking And Inspection ........................................................ 5
Using Low Power Amplifiers .................................................. 32
W
R
Residual Noise ......................................................................... 30
Rigging Points.......................................................................... 25
S
Safety Information...................................................................... 4
Service...................................................................................... 41
Servicing The Loudspeaker ...................................................... 35
Setup and Operation ................................................................. 16
Sound Exposure Limits ............................................................ 34
Speaker Cable........................................................................... 20
Specifications ........................................................................... 36
Specifications - XLT41 and XLT48......................................... 43
SPL Precautions ....................................................................... 33
Stacking.................................................................................... 14
Stacking Enclosures ................................................................. 28
Stacking XLT Enclosures......................................................... 28
Stacking XLTE Enclosures ...................................................... 28
Stand / Pole Mounting.............................................................. 14
Stand And Mounting Bracket Inserts ....................................... 27
Warranty Information .............................................................. 41
Warranty Information / Service Outside the USA.................... 42
Warranty Service...................................................................... 41
WB1 Accessory........................................................................ 27
Wire Gauge .............................................................................. 20
Wire Gauge Selection .............................................................. 20
Wiring...................................................................................... 20
X
XLT Mounting Points.............................................................. 25
XLT41E Additional Models .................................................... 43
XLT41E Horn Orientation....................................................... 25
XLT41E Horn Position............................................................ 15
XLT42E Horn Orientation....................................................... 25
XLT46 / XLT46E Midrange .................................................... 11
XLT46 / XLT46E Horn Orientation ........................................ 25
XLT48E Additional Models .................................................... 43
XLTE Feet ............................................................................... 14
XLTE Mounting/Rigging Points.............................................. 27
PAGE 45 Community XLT / XLTE Series Owner’s Manual
333 East 5th Street, Chester, PA 19013-4511
Phone (610) 876-3400 Fax (610) 874-0190
http://www.loudspeakers.net
© 1999 Community Light & Sound, Inc. 991015Cm