1
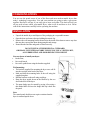
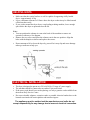
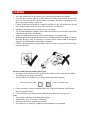
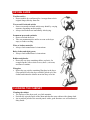
Owner’s
Manual
AUTODRY 600
CONTENTS
2
3
3
4
5
5
6
6
6
7
7
8
8
www.defy.co.za
Installation
Helpful Hints
Electrical Installation
Loading the Machine
Dryer Safety
Operating the Dryer
Safety Reset
Cleaning the Filter
Accessories
Drying Guide
Cleaning the Cabinet
Service
Technical Specifications
CONGRATULATIONS
You are now the proud owner of one of the finest and most modern tumble dryers that
today’s technology can produce. You and your machine are going to make a great team
together. But first it will pay if you really get to know each other. This book will tell you
all you need to know about your tumble dryer, what it will do and how to do it. Please
read all the instructions carefully before operating the machine.
INSTALLATION
•
•
•
•
Unpack the tumble dryer and dispose of the packaging in a responsible manner.
Open the door and remove the tape holding the transit clip.
Remove the wall mounting bracket kit and wipe the inside of the drum to remove any dust
that may have entered the drum during transport and storage.
Ensure that the lint filter and guard are fitted correctly.
DO NOT INSTALL THE DRYER IN A CUPBOARD
OR SMALL UNVENTED LAUNDRY UNLESS YOU USE A VENTING KIT,
AS OVERHEATING AND POOR DRYING WILL RESULT
You can choose to install your dryer:
On the floor,
On a work bench,
On a wall, upside down using the brackets supplied.
•
•
•
Wall mounting:
• The brackets supplied for mounting the dryer on a wall fit
into the two slots at the back of the dryer.
• Mark and drill the mounting holes in the wall using the
supplied template.
• Bolt the brackets on the wall using rawlplugs
• Hang the dryer upside down on the brackets by the two
slots at the back of the dryer.
• The name badge may be rotated by prying it free using a
thin bladed knife. Reverse the badge and clip it back into
the panel.
Note:
The control panel decal does not require rotation when the
dryer is mounted upside down
HELPFUL HINTS
•
•
•
Make sure that the vertical surface or wall is capable of supporting a fully loaded
dryer—approximately 45 kg.
Leave a minimum clearance of 15mm. above the dryer so that it may be lifted on and
off the brackets easily.
If you wish to mount the dryer above a top loading washing machine, leave enough
space below the dryer to open and close the lid.
Note:
• You can position the exhaust air vent at the back of the machine to remove air
upwards or sideways. See diagram.
• Remove the two screws and place the exhaust vent in the new position. Align the
holes with the dimples as shown and replace the screws.
•
Do not attempt to lift or lower the dryer by yourself as it may slip and cause damage
rather get someone to help you.
ELECTRICAL INSTALLATION
•
•
•
•
The dryer is designed to operate on a 230 volt, 50 Hz, 15 Amp, AC power supply.
The machine should be connected to an earthed 3 pin wall socket.
If the power cord should ever need replacing, use only a genuine cord available from
the nearest Defy Service Centre.
Do not use double adaptors, extension cords or portable electrical outlets due to the
hazards associated with water splashes and moisture ingress.
The appliance must be earthed and the manufacturer and seller do not
accept responsibility for any damage due to incorrect electrical connection.
LOADING
•
•
•
•
•
•
•
•
Save time and money by spin drying your wash load thoroughly beforehand.
Load the dryer loosely until it is about half full. Clothes must tumble freely in the
dryer. Do not cram them in. Overloading will increase the risk of creasing, increase
the drying time and reduce efficiency.
Clothes should not be loaded in a tangled condition as this will prolong the drying
time. When loading, shake out each article and place it in the drum.
Mix small and large articles for faster more even drying.
It is recommended that synthetic whites and coloured articles are not mixed until their
colourfastness has been established.
Add a few hand towels to act as buffers when drying a very small load.
Blankets and other large items tend to retain a certain position in the drum. To ensure
thorough drying it may be necessary to remove these articles midway during the
drying cycle and reposition them before continuing
Clothes containing sand or grit should be rinsed to remove the particles before being
placed in the dryer.
For best results sort the load by fabric types.
• Sort heavy items which may take longer to dry, such as towels, from the ones which
dry quickly such as poly/cotton shirts.
• Always follow the manufacturer’s drying instructions on the garment.
SAFE TO TUMBLE DRY
DO NOT TUMBLE DRY
Check and empty pockets, remember that coins, clips, nails and pins could damage
the dryer and the clothes.
• Close all hooks, eyes and zips which could snag on other articles in the load.
Note
• Some articles will attract lint from other articles.
• Separate lint “givers” from lint “collectors”.
• Lint givers are towels, nappies and chenille.
• Lint collectors are corduroy, synthetics and permanent press garments.
•
DRYER SAFETY
•
•
•
•
•
•
The dryer has been designed for drying clothes, towels and linen at home. Do not use
it for any other purpose.
Make sure that the lint filter and guard are correctly fitted and clean whenever you
use the dryer.
Do not dry articles in the dryer which have been washed, soaked or spotted with
combustible substances such as petrol, degreasers, drycleaning fluids, vegetable or
cooking oils etc. as a fire or explosion might result.
Always keep the airflow clear at the inlet and outlet points to stop the dryer from
overheating.
Ensure there is adequate ventilation in the laundry. i.e. Open a window when the
dryer is operating.
Young children should not play with or operate the appliance without supervision.
OPERATING YOUR TUMBLE DRYER
To dry the articles, proceed as follows
• Load the articles into the tumble dryer.
• Press the ON / OFF button to ON.
• The pilot light will flash on and off.
• Press the START / PAUSE pad.
• The pilot light will remain on and
the machine will start the drying cycle.
• The dryer has been designed so that the drum rotates
for one minute in one direction then one minute in the
other. This reduces tangling, gives more even drying and shortens the drying time.
• The dryer is fitted with sensors which allow accurate monitoring of the moisture
content of the load.
• At the end of the drying cycle the machine will stop automatically.
• The pilot light will flash until the ON / OFF button is pressed.
• Thereafter open the door and remove the dry articles.
If you wish to add or remove articles from the dryer after it has started, press the
START/PAUSE pad and open the door. The dryer will stop and the pilot light will flash.
To restart the dryer, close the door and press the START / PAUSE pad once more.
To stop the drying cycle completely, press the ON / OFF button
Note
At the end of the drying cycle there is a 10 minute cool down period during which time
the load is aired and cooled thereby reducing creasing.
SAFETY RESET
The dryer has a safety cut out switch which is activated by temperature.
The safety reset button is located near the door latch.
• If the dryer overheats, press the red reset button until you feel
the reset click.
• Then press the START / STOP pad
• You may have to wait ten minutes for cooling to occur.
The most common reason for overheating is a blocked filter.
Clean the filter after each load to prevent overheating.
Other reasons may be: A blocked exhaust outlet, a poorly
ventilated laundry room or a lightweight article which has been
sucked over the lint filter.
CLEANING THE LINT FILTER
The micromesh lint filter is located at the rear of the drum inside the dryer.
The filter should be cleaned after the completion of each drying cycle.
A dirty filter will result in poor, inefficient drying performance and could cause the dryer
to overheat and switch off.
To clean the filter:
• Pull out the plastic filter guard and filter from the back of the
dryer drum. Use the finger holes which are there to help you.
• Unsnap the micromesh filter from the filter guard as shown
in the diagram.
• You may now easily wipe or peel away the accumulated lint
from the filter.
To re-fit the lint filter:
• Make sure that the “fingers” at the centre of the filter point
towards the filter guard.
• Snap the lint filter onto the guard making sure it is pushed on
all the way
• Re-fit the guard ( with filter attached) to the back of the
dryer drum. If fitted correctly it will snap into place.
ACCESSORIES
Clothes dryers remove a lot of moisture from a full load of
washing. This moisture is carried away by the warm air which
leaves the dryer.
This moist, hot air can be directed outdoors by a special
venting kit available from all Defy Service Centres
DRYING GUIDE
Woollen articles
• Do not tumble dry woollen articles. Arrange them to their
original shape, then dry them flat.
Woven and Crocheted articles
• Some woven and crocheted articles may shrink by varying
amounts, depending on their quality.
• Always stretch them out immediately after drying.
Permanent press and synthetics
• Do not overload the dryer.
• Take out permanent press articles as soon as the dryer
stops, to reduce creasing.
Fibre or leather materials
• Always check manufacturer’s instructions.
Baby clothes and night gowns
• Always check manufacturer’s instructions
Rubber and plastics
• Do not dry any item containing rubber or plastic, for
example aprons, bibs or chair covers, shoes , rain coats,
and shower curtains.
Fibreglass
• Do not dry any articles containing fibreglass in the dryer.
Glass particles left in the dryer could be picked up by the
clothes and irritate the skin the next time they are worn.
CLEANING THE CABINET
Cleaning the cabinet
• The surfaces of the dryer need very little attention.
• Periodically wipe the inside of the drum and then the outer cabinet with a damp cloth.
• An occasional polish of the outside panels with a good furniture wax will maintain a
shiny finish.
SERVICE
If the machine appears to be inoperative, check the following points:
1. Make sure that you have followed the dryer safety considerations.
2. Check that there is power to the wall socket. Check with a small appliance such as a
kettle or iron.
3. Check if the safety cut out has operated.
4. Check if there is a build up of lint on the filter or if it is obstructed by a small
lightweight article.
5. Check that the air inlet and exhaust at the back of the machine are not obstructed.
6. Wait 10 minutes for cooling to occur before pressing the re set button.
7. Check to see that the door has been closed correctly.
8. Check that the dryer has not been overloaded.
If you have followed the instructions and still have a problem, contact the nearest
Defy Service Centre. They will be able to advise you on any aspect of the machine or
send a qualified technician to repair it.
TECHNICAL SPECIFICATIONS
Capacity ( dry clothes)
6kg
Voltage
230v 50 Hz
Maximum absorbed power
1950 w
DIMENSIONS
Height
710mm
Depth
480mm
Width
595mm
Net weight
24kg
The Manufacturer strives for continuous improvements. For this reason, the text and
illustrations in this book are subject to change without notice.