1
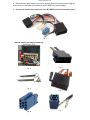
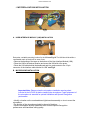
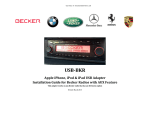
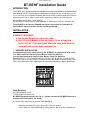
Discountcarstereo.com
BT-BEHF Installation Guide
INTRODUCTION
The BT-BEHF plug-n-play Bluetooth harness is designed exclusively for the installation of select Motorola and
Parrot Bluetooth Car Kits. These Bluetooth Car Kit solutions will change the way you talk while you are
in your car. Using your compatible Bluetooth "Hands-Free Profile" enabled mobile phone) with the
Bluetooth car kit, your in-vehicle communication experience is about to go to the next level.
Why purchase the BT-BEHF1 or BT-BEHF2?
The BT-BEHF1 harness allows for quick installation of: Motorola IHF1000, IHF1700 and T605
The BT-BEHF2 kit includes the PPAPAR sub-harness which allows the installation of
Parrot CK3100, CK3200, CK3300, CK3400, CK3500 and MK6100.
INSTALLATION
WARNING!! WARNING!!!
a. Locate and Record the radio safe code.
b. Most if not all Becker radios are coded. Do not attempt to
install this kit if you don’t have the radio code, otherwise the
radio will not operate upon reconnection.
1. HARNESS INSTALLATON
For illustration purposes we will be using the BT-BEHF1 to install the IHF1000 car kit
in a 2004 Land Rover Discovery II with Becker Traffic Pro (BE4775).
You may also follow these steps on other Becker Traffic Pro Radios in:
BMW with BE4771, 4773, Porsche Traffic Pro, CR-22, CDR-22, CR-220, CDR-220, CDR210, Ferrari with 6101.6103.6104 4372, Mercedes Benz with BE4602 Harman Kardon 7881,
7880, and/or an Becker radio matching the wiring harness and diagram below (See Fig 0)
Fig. 0
Parts Required:
IHF1000 Bluetooth Car Kit
TL-RRG Radio Removal Tools
BT-BEHF1 Bluetooth harness (see Fig. 1) —please note that the BT-BEHF2 harness is
available for Parrot Installs. See below.
A. Remove the radio using the removal tools See Fig. 4
Push each the radio tool into the slots until it locks into position
Pull the radio out of the dashboard by holding onto the grip rings of the release tool
Discountcarstereo.com
B. Disconnect the radio Female 8-pin Power harness (bottom connector shown in Fig. 2 )
And connect it to the Male 8-pin harness of the BT-BEHF1 as shown in Fig 3.
C. Connect the female 8-pin connector of the BT-BEHF1 to the slot vacated in step 3
Fig. 1
BECKER TRAFFIC PRO RADIO CONNECTOR
Land Rover 4775
Fig. 2
Fig. 3
Fig. 4
Fig. 5
Fig. 6
Fig. 7
Discountcarstereo.com
Locate the two wires with pins on the ends (See Fig. 1) these are the audio cables that
connects to pin 13 and 14 of the 20-pin radio connector. See Fig 0
This 8-pin slot is reserved for the factory CD Changer.
- For vehicles with Becker CD Changer:
in most if not all applications, pins 13 and 14 (on the 8-pin blue plug) are empty – If
that is the case insert the purple wired pin into location 13 until it clicks and the gray
wired pin into location 14 (See Fig. 7) the included blue plug (See Fig. 6) is not used.
- For vehicles with Auxiliary/iPod adapters (no cd changer):
follow the procedure outlined above
- For vehicles without CD Changer and without Auxiliary/iPod adapters (empty
slot)
use the included blue plug and insert the purple wired pin into location13 and the
gray wired pin into location 14 (push all the way in until they click). Push the blue
plug with release tab on right in to the radio.
- For vehicles with Alpine CD Changer (i.e. Land Rover) these two pin locations
are usually occupied:
Cut the pins off the purple and gray wires and use the included T-Taps to tap into the
existing wires. Note that the purple wire taps into pin 13 and the gray wire to pin 14—
the included blue plug in not used.
Important Notes:
Installing this Bluetooth kit retains the CD Changer.
Installing this Bluetooth kit retains aftermarket Auxiliary input or iPod Adapter.
Installing an aftermarket Auxiliary input or iPod adapter requires disconnecting the
factory CD Changer. In other words simultaneous CD Changer and Auxiliary input or
iPod adapter connection is not possible. You may have one or the other not both,
however Bluetooth installation does not interfere with the factory CD Changer (if present)
or aftermarket iPod or Auxiliary input adapter.
Open the Motorola iHF1000 kit and remove the main harness. See Fig 9. Connect the 8pin white connector on the main harness to the 8-pin Molex plug on PX-BEHF1 -- See Fig. 8
Important Note: ParrotCK3100, CK3200, CK3300, CK3400, CK3500 & MK6100 installations
require the PX-BEFH2 harness which is also plug-n-play.
This concludes the BT-BEHF1 installation/connection.
Proceed to the next page for details on how to install the IHF1000 or consult the Motorola or
Parrot installation manual.
Fig.8
Discountcarstereo.com
2. MOTOROLA IHF1000 INSTALLATION
Fig.9
A. USER INTERFACE MODULE (UIM) INSTALLATION
Fig. 10
Determine a suitable mounting location for the UIM see Fig.10. The UIM should be within a
comfortable reach of the driver for ease of use.
• Remove the backing of the tape on the bottom of the User Interface Module (UIM).
• Place the UIM in the desired location and mount the UIM with a firm press.
• Route the UIM cable behind the dashboard and trim, and connect to the 12-pin
connector of the Interface cable labeled “to UIM” see Fig 9
B. MICROPHONE INSTALLATION
Fig. 11
Important Note: Please review the microphone installation warning sheet
included in the IHF1000 kit before installing the microphone. Proper placement of
the microphone is essential for optimal Handsfree and Speech Recognition
performance.
• Identify a location on the overhead dome light/console assembly or visor to mount the
microphone.
•The position of the microphone should be ahead of the driver
• Aim the microphone directly toward the driver for best Speech Recognition
performance and Handsfree calling quality.
Discountcarstereo.com
• Attach 1 side of the provided Velcro tape to the bottom side of the microphone and
mount
Important Notes:
The front of the microphone should point toward the driver; the wire comes out
the back of the microphone.
Microphone placement is about function, not esthetics.
• Route the microphone cables across the top of the windshield towards the Apillar. Make sure to route the cable behind the corner of the headliner, and give a
slight tug to insure that the cable sits up in the headliner, away from the
windshield.
• Continue the cable down the inside of the A-pillar and its trim, above and out of
the away of any curtain airbag lines or equipment. Removal of the A-pillar trim
may be, but is not always necessary to achieve proper routing. Insure the cable
is completely hidden behind the A-pillar trim piece.
• Pass the cable in through the side of the dashboard, then across to the desired
Handsfree Module mounting position. Connect microphone to the interface cable
labeled “To Mic”
C. HANDSFREE MODULE INSTALLATION
Fig. 12
Choose a suitable point for mounting the Handsfree module based on the locations
chosen for the microphone, UIM and the length of the IHF1000 harness
Hint: Mounting the Handsfree module behind the carpet at the firewall in from of the
passenger foot area works for many vehicles. For larger vehicles, large spaces behind
the dashboard will also make good mounting location.
After all components are installed make sure to:
• Connect the 32-pin Handsfree module connector from the main Bluetooth system
harness see Fig 9 to the Handsfree Module. See Fig 12
• Connect the 2-pin Microphone connector from the main Bluetooth system harness to
the microphone cable connector
• Connect the 12-pin UIM connector from the main Bluetooth system harness to the UIM
cable connector.
• Insure that the 8-pin white connector is secure to its mate on the PX-BEHF1 Harness
See Fig. 8
D. TESTING
• Reconnect the battery negative terminal
• Enter Radio Code
• Turn the key to the ignition ON or Accessory position
• Pair a phone (see Bluetooth kit manual for to complete this step)
• Verify functionality
Discountcarstereo.com
When a phone call is received or placed your Becker radio will automatically mute the
audio source that is currently playing (i.e. Radio), the radio display will change to
“PHONE” and once the call is connected the caller’s voice is heard on the car speaker.
Once the call ends, the radio display will return to the original program or source.
Attention:
1. Select radios allow the Handsfree system volume to be adjusted by the radio. Please
insure that the volume setting chosen on the IHF1000 UIM is not at a level that causes
distortion when the radio’s Phone volume level is set to maximum. If distortion is heard,
adjust the IHF1000 volume down via the UIM. This check is necessary for both
Handsfree conversation audio, as well as Speech Recognition prompt audio.
2. The speaker included with the IHF1000 is not used.
OPTIONS
May customers have asked for a Bluetooth harness and an iPod adapter that plays and
charges their iPods/iPhones?
They are a few ways to accomplish this:
1. For customers who want to install Bluetooth, Auxiliary input or iPod Adapter and
do not have or do not care to retain the CD Changer—
Purchase the BT-BEHF1 (Motorola) or BT-BEHF2 (Parrot) and applicable Bluetooth Car
kit and the BLAU/8-POD (does not play/charge new iPods that require =5V USB
Charging voltage) OR BLAU/8-POD2 (charges/plays all iPod/iPhones).
2. For customer who want to install Bluetooth and already have an iPod or Auxiliary
input adapter connected to the radio—
Purchase the BT-BEHF1 (Motorola) or BT-FEHF2 (Parrot) and applicable Bluetooth Car
Kit
3. For customer who want to install Bluetooth and already have a CD Changer
connected to the radio—
Purchase the BT-BEHF1 (Motorola) or BT-BEHF2 (Parrot) and applicable Bluetooth Car
Kit
The only limitation is with the CD Changer:
If a CD Changer is already connected to the radio it must be disconnected when
installing an iPod adapter (i.e. BLAU/8-POD) OR an Auxiliary input adapter (i.e. BLAU/83.5).
Factory CD Changer is retained when installing these Bluetooth kits.
The only instance in which the cd changer must be disconnected is when an
auxiliary input adapter or iPod adapter is desired.
Revised: December 22, 2010
© 1995-10 Discount Car Stereo, Inc. All rights reserved© Information contained in this document is based of the latest
information available at the time of printing and is subject to the copyright and other intellectual property rights of Discount
Car Stereo Inc., its affiliated companies and its licensors. All rights are reserved to make changes as any time without
notice. No part of this document may be reproduced, stored in a retrieval system, or transmitted in any form or by any
means, electronic, mechanical, photocopy, recording or otherwise, nor may these materials be modified or reposted to
other internet sites, without expressed written permission of the publisher.