1
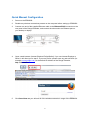
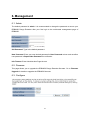
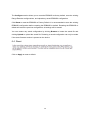
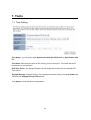
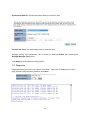
EnGenius ERB9250 300M Range Extender
User Manual
ERB9250 User Manual
TABLE OF CONTENTS
1. Introduction ........................................................................................................ 4
1.1. Package Contents.............................................................................................. 5
1.2. Product Layout ................................................................................................... 5
2. Installation .......................................................................................................... 8
Getting Started......................................................................................................... 8
Placing Your Range Extender in an Optimal Location ....................................... 13
3. System............................................................................................................... 16
3.1. Operation Mode ............................................................................................... 16
3.2. Status............................................................................................................... 17
3.3. Event Log......................................................................................................... 18
3.4. Monitor ............................................................................................................. 19
4. Wireless............................................................................................................. 20
4.1. Status............................................................................................................... 20
The Status screen displays the repeater connection status, WLAN setting, and SSID
detail information.............................................................................................. 20
4.2. Basic ................................................................................................................ 20
If you prefer the manual setup, you can choose Site Survey to search for the target
router to connect with the ERB9250. ................................................................ 20
4.3. Advanced ......................................................................................................... 22
4.4. Security ............................................................................................................ 23
4.5. Filter................................................................................................................. 24
4.6. WPS................................................................................................................. 25
4.7. Client List ......................................................................................................... 25
5. Network ............................................................................................................. 26
5.1. Status............................................................................................................... 26
5.2. LAN.................................................................................................................. 26
2
ERB9250 User Manual
6. Management ..................................................................................................... 27
6.1. Admin............................................................................................................... 27
6.2. Firmware .......................................................................................................... 27
6.3. Configure ......................................................................................................... 27
6.4. Reset ............................................................................................................... 28
7. Tools.................................................................................................................. 29
7.1. Time Setting..................................................................................................... 29
7.2. Diagnosis ......................................................................................................... 30
8. Logout ............................................................................................................... 31
Troubleshooting .................................................................................................... 32
Cannot access the Internet after successfully setup ERB9250 with your router....... 32
3
ERB9250 User Manual
1. Introduction
ERB9250 is a 2.4GHz 802.11b/g/n Range Extender. You can extend the reach of your
wireless network to areas with poor signal reception or dead spots by adding an ERB9250 for
greater coverage.
The Range Extender works as a bridge to connect and extend your existing wireless network.
It receives the signal from a wireless router and rebroadcasts the signal outside of the router’s
wireless coverage area. The ERB9250 can only re-boost strong or good signals received from a
wireless router. Thus, placing the ERB9250 in a location where a good signal (at least 3 bars) is
still available and which is in clear line of sight with your router (as few obstructions as possible)
will ensure that your wireless coverage can be expanded, minimizing areas prone to weak or no
signal coverage.
While the ERB9250 Range Extender can benefit users when they are in a weak spot or dead
zone in the existing wireless network, the best performance will be obtained by connecting to the
original wireless network when possible. Because the Range Extender relays the wireless signal,
it is inherently slower than traffic which is on the original wireless network.
Consequently,
EnGenius recommends that users connect to the Range Extender only when they are not able to
receive good signal strength from the original wireless network.
The ERB9250 Range Extender supports WEP, WPA, and WPA2 encryption standards to
ensure compatibility with a majority of routers. To ensure optimum performance, it is highly
recommended to utilize an EnGenius 802.11b/g/n router to pair with the ERB9250. The following
EnGenius routers have been tested to operate better with the ERB9250: ESR9752, ESR9753,
ESR9850, ESR9855G, ESR1221N, and ESR1221N2.
4
ERB9250 User Manual
1.1. Package Contents
Open the package carefully, and make sure that none of the items which are listed below are
missing. Do not discard the packing materials. In case of return, the unit must be shipped back
in its original packaging.
ERB9250 802.11b/g/n Range Extender
Power Adapter
2dBi 2.4GHz SMA Detachable Antennas
Quick Install Guide
CD (User’s Manual)
1.2. Product Layout
WLAN LED
WPS Button
Power LED
LAN LED
Top View: LED Layout
5
ERB9250 User Manual
RP-SMA Antenna Connections
6
LED Description Table
LED
Description
LAN : (1) Blue
Link solid, Traffic blinking
WLAN : (1) Blue
Link solid, Traffic blinking
Power/Status : (1) Red
On solid, Reset blinking
2. Installation
Getting Started
1. Confirm that your Internet and the wireless network are active before powering on your
Range Extender.
2. Connect the two antennas to the antenna connectors on the rear panel of your Range
Extender.
3. Decide whether to use the Range Extender’s Quick Manual Configuration or WPS
Configuration:
–
Quick Manual Configuration – It is highly recommended to use this user friendly
configuration method.
–
WPS Configuration. You can use this configuration method if your router supports
WPS.
4. After configuring the ERB9250 Range Extender with your router, you can move the
ERB9250 to the place where a good signal (at least 3 bars) is available and which is
preferably in line of sight of your router (as few obstructions as possible). Please see
“Placing Your Range Extender in an Optimal Location” for how to find an optimal
location for the ERB9250 Range Extender.
8
Quick Manual Configuration
1.
Power on the ERB9250.
2.
Disable any wireless connections present on the computer before setting up ERB9250.
3.
Connect one end of the supplied Ethernet cable to the Ethernet/RJ45 connector on the
rear panel of the Range Extender, and connect the other end to an Ethernet port on
your desktop or laptop.
4.
Open a web browser (Internet Explorer/Firefox/Safari). If you use Internet Explorer or
Safari, it will direct you to step 5. If you use Firefox, please enter any web site URL (for
example: www.google.com) or the default IP Address of the Range Extender,
http://192.168.1.2.
5.
Click Scan Now and you will see all of the wireless networks in range of the ERB9250.
9
6.
Select the target router and click Connect
7.
Enter the passwords in the Pre-shared Key column if the target router is encrypted
with passwords. Click Connect.
10
8.
The connection is established successfully between your router and ERB9250. Now the
ERB9250’s SSID is identical with the router’s SSID.
9.
After successfully completing the set up of the ERB9250, remove the Ethernet cable
from the ERB9250 and the computer. Now, please enable your wireless connection.
11
WPS Configuration
1. Enable WPS on your router and ensure it is activated (some routers may require you to
press a WPS button and hold it down for a few second to enable WPS).
2. Press the WPS button on the front panel of your ERB9250 Range Extender once. The
orange LAN LED ( ) will begin blinking.
Note:
•
It takes up to 60 seconds for ERB9250 to clone your router. Once the orange LAN
LED stops blinking and stays ON, the setup is complete.
•
If the orange LAN LED does not stay ON, the configuration was not successful. In
this case:
⇒ Move the Range Extender closer to your router.
⇒ Ensure the antennas are connected securely to the Range Extender rear
panel.
⇒ Repeat steps 1 and 2.
⇒ Alternatively, consider Quick Manual Configuration if WPS configuration is not
functioning properly.
This completes the WPS setup for your ERB9250 Range Extender. Please proceed to
“Placing Your Range Extender in an Optimal Location”.
12
Placing Your Range Extender in an Optimal
Location
After configuring your Range Extender, place it in the location that best suits your needs to
ensure optimum performance.
1. Remove the Ethernet cable from the Range Extender and from your computer.
2. Using your PC’s wireless utility software, find a location that receives a good signal (at
least 3 bars of signal strength) from your router. Avoid dead zones or weak spots where
signal strength is 2 bars or less and areas outside your router’s coverage area.
3. Place your Range Extender in the location found in the previous step and plug it into the
closest power source.
13
Firmware Upgrade
You can check for the latest ERB9250 firmware on EnGenius’ website at
http://www.engeniustech.com/index.php/home-networking/routers/3384-300-mbpswireless-n-range-expander. Select the Resources tab to download the latest firmware, and
save it locally to your computer.
EnGenius recommends that you use an Ethernet connection between the ERB9250 and
your computer to upgrade firmware in order to prevent unexpected failures during the
firmware upgrade process.
1. Connect one end of the Ethernet cable to the Ethernet/RJ45 connector on the rear panel
of the Range Extender, and connect the other end to an Ethernet port on your desktop or
laptop.
2. Open a web browser and enter http://erb9250 in the address field. (Note: You can
access ERB9250 web-based management page to change settings by entering
http://erb9250)
3. The login box will appear. Please enter the login credentials. The default credentials are
admin for User Name and admin for Password.
14
4. Click Management on the left menu and select Firmware. Click Browse and upload the
firmware files. Then Click Apply.
You can see the firmware version in the Status screen under System on the left after the
firmware has been upgraded successfully.
Logging in to the Range Extender
After setting up the ERB9250 with a wireless router, you can access the web-based
management page to modify settings by entering http://erb9250 in the address field of the
web browser.
15
3. System
3.1. Operation Mode
This page allows you to change the device operation mode. The ERB9250 supports
Universal Repeater (Range Extender) and Client Bridge mode. By default it is configured as
Universal Repeater.
If you are not familiar with Client Bridge function, it is recommended to not select this mode.
Client Bridge is not an AP extender but an “Ethernet Wireless Extender”. Client Bridge
serves as a bridge between wired network and wireless network. Once enabled, you can
only access the device through an Ethernet cable.
If you select Client Bridge mode, you can enable or disable router mode. Router mode will
enable NAT and DHCP functionality on the device. Please disable router mode if you are not
an advanced user or do not wish to use these functions.
16
3.2. Status
This page allows you to monitor the current status of your router.
17
3.3. Event Log
The View Operation Event Log page shows the current system log of the Range Extender.
It displays any event which occurred after the system started.
You can click Save to save the system log for further processing. Click Clear to erase the
system log. You can always click Refresh to get the most updated information. When the
system is powered down, the system log will be cleared from the device.
18
3.4. Monitor
This shows histograms for network connections on WAN, LAN & WLAN. Auto refresh keeps
information updated periodically.
19
4. Wireless
4.1. Status
The Status screen displays the repeater connection status, WLAN setting, and SSID detail
information.
4.2. Basic
If you prefer the manual setup, you can choose Site Survey to search for the target router to
connect with the ERB9250.
Radio: You can turn on/off wireless broadcast. If the wireless Radio is off, you cannot
associate with the Range Extender through a wireless connection.
20
Mode: Universal Repeater mode and Client Bridge mode are available for ERB9250.
Band: You can select the wireless spectrum in use.
2.4 GHz(B): select this option if all your clients are 802.11b
2.4 GHz(N): select this option if all your clients are 802.11n.
2.4 GHz(B+G): select this option when you both have 802.11b and/or 802.11g wireless
devices
2.4 GHz(G): select this option if all your clients are 802.11g.
2.4 GHz(B+G+N): select this option when you have 802.11b, 802.11g, and/or 802.11n
wireless devices.
Channel: It shows the wireless channel number of the target router.
Site Survey: Scan for current existing routers.
Select the target router and click Connect. You can click Refresh to scan for wireless
networks within range.
21
4.3. Advanced
Fragment Threshold: This specifies the maximum size of a packet during the fragmentation
of data which is to be transmitted. If this value is set too low, it will result in bad performance.
RTS Threshold: When the packet size is smaller than the RTS threshold, the Range
Extender will not use the RTS/CTS mechanism to send this packet.
Beacon Interval: This is the interval of time that the Range Extender broadcasts a beacon.
A Beacon is used to synchronize the wireless network.
DTIM Period: Enter a value between 1 and 255 for the Delivery Traffic Indication Message
(DTIM). A DTIM is a countdown informing clients of the next window for listening to
broadcast and multicast messages.
Data Rate: The Data Rate is the rate that the Range Extender uses to transmit packets. The
Range Extender will use the highest possible selected transmission rate to transmit the
packets.
N Data Rate: The “N Data Rate” is the rate that this Range Extender uses to transmit
packets for N compliant wireless nodes. Highest to lowest data rate can be fixed.
Channel Bandwidth: This is the range of frequencies that will be used.
Preamble Type: The Long Preamble can provide better wireless LAN compatibility while
the Short Preamble can provide better wireless LAN performance.
22
CTS Protection: It is recommended to enable the protection mechanism. This mechanism
can decrease the rate of data collision between 802.11b and 802.11g wireless devices.
When this mode is enabled, the throughput of the Range Extender will be slightly reduced
due to frame-network packets that are transmitted.
TX Power: This can be set to a bare minimum or to maximum power, whether the need is to
provide minimal or maximum additional wireless coverage.
4.4. Security
This Range Extender provides the industry level security levels including WEP, WPA, and
WPA2 to prevent intrusions from unauthorized users. Please make sure the encryption and
the passwords (Pre-shared Key) of the ERB9250 match those of the target router.
ESSID Selection: This Range Extender supports multiple ESSIDs.
Broadcast ESSID: The SSID of the Range Extender will show on the wireless network list
of your computer when Broadcast ESSID is enabled. Disabling Broadcast ESSID can
provide better security because the SSID of the wireless network will be hidden.
WMM: Enable Wi-Fi MultiMedia (WMM) to support QoS for improved video and voice, and
media streaming.
23
4.5. Filter
This Range Extender supports MAC Address Control, which prevents unauthorized clients
from accessing your wireless network.
Enable wireless access control: Enable the wireless access control function
Add MAC address to the list
Enter the Description and MAC Address of the wireless devices and click Add to process
the entry for filtering.
Remove an address from the list
You can remove a MAC address from the MAC Address Filtering Table by selecting the
MAC address that you want to remove in the list and then click Delete Selected. Select
Delete All to remove all the MAC addresses from the list. Clicking Reset will clear your
current selections.
Click Apply at the bottom of the screen to save the above configurations.
24
4.6. WPS
WPS allows you to activate client WPS and synchronize with other routers. Click Start to
Process to initiate WPS process. It works like the WPS button on the device.
4.7. Client List
The Client List screen shows all the connected current wireless client users.
Click on Refresh to get the latest user list and information.
25
5. Network
5.1. Status
IP address: Current IP address of the Range Extender
IP Subnet Mask: 255.255.255.0 is the default Subnet Mask of ERB9250.
MAC Address: MAC address of the device Ethernet port
5.2. LAN
IP address: 192.168.1.2 is the default address of ERB9250.
IP Subnet Mask: 255.255.255.0 is the default Subnet Mask of ERB9250.
Default Gateway: Please specify a gateway IP if any. Leave it blank if you are not an
advanced user.
802.1d Spanning Tree: This is disabled by default. When 802.1d Spanning Tree function is
enabled, the spanning tree protocol is applied to prevent network loops.
26
6. Management
6.1. Admin
The default password is admin. It is recommended to change the password to secure your
ERB9250 Range Extender after your first login to the web-based management page of
ERB9250.
Old Password: Type in the default password.
New Password: Enter your new desired password in New Password column and reconfirm
new password in Repeat New Password for verification.
Idle Timeout: Enter Administration Page timeout.
6.2. Firmware
This page allows you to upgrade the ERB9250 Range Extender firmware. Go to Firmware
Upgrade for details to upgrade the ERB9250 firmware
6.3. Configure
27
The Configure section allows you to reset the ERB9250 to factory default, save the existing
Range Extender configurations, and upload any saved ERB9250 configuration.
Click Reset to reset the ERB9250 to Factory Default. It is recommended to save the existing
ERB9250 configuration before resetting the ERB9250 to default. Resetting the ERB9250 to
default will erase the previous configuration; all settings will be erased.
You can restore any saved configuration by clicking Browse to locate the saved file and
clicking Upload to upload the saved file. Restoring a saved configuration can only be made
if the same firmware version is present on the device.
6.4. Reset
Click on Apply to reset to default.
28
7. Tools
7.1. Time Setting
Time Setup: You can select either Synchronize with the NTP Server or Synchronize with
PC.
Time Zone: Select the time zone of the country you are currently in. The router will set its
time based on your selection.
NTP Time Server: The Range Extender can be configured to connect to an external NTP
Time Server.
Daylight Savings: Daylight Savings Time adjustment can be done by checking Enable and
selecting the Daylight Savings Time period.
Click Apply to save the above configurations.
29
Synchronize with PC: Synchronizes timer with your Local PC time.
PC Date and Time: This field displays the PC date and time.
Daylight Saving Time adjustment can be done by checking Enable and selecting the
Daylight Savings Time period.
Click Apply to save the above configurations.
7.2. Diagnosis
Diagnosis allows you to test your network connection. Type in the IP address you wish to
ping, select the ping frequency and then click Start.
30
8. Logout
Click on Logout button to logout.
31
Troubleshooting
Cannot access the Internet after successfully setup
ERB9250 with your router
After you have set up the ERB9250 with your router, moved the ERB9250 to the optimal
location, and found that you could not access the Internet with your wireless device even
though the signal is strong, potentially your ERB9250 is not configured correctly.
1. You can begin troubleshooting by disabling your wireless network adapter/card, then
connecting one end of the supplied Ethernet cable to the Ethernet/RJ45 connector on the
rear panel of the Range Extender, and connecting the other end to an Ethernet port on
your desktop or laptop. Now ERB9250 acts as a wireless network adapter. If you cannot
access the Internet, ERB9250 is not setup successfully, please restart the set up for
ERB9250 by following the Quick Manual Configuration on Page 2.
2. Or you can login ERB9250 Range Extender and look under Status. It should state you
have a successful connection. If not, please restart the setup for ERB9250.