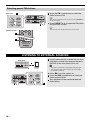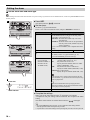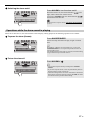
1
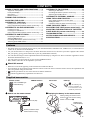
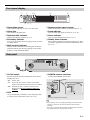
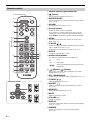
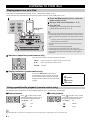
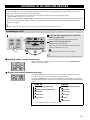
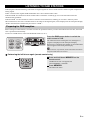
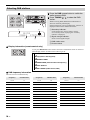
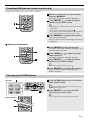
AB DESKTOP AUDIO SYSTEM TSX-132 16 May OWNER’S MANUAL CAUTION: READ THIS BEFORE OPERATING YOUR UNIT. 1 To assure the finest performance, please read this manual carefully. Keep it in a safe place for future reference. 2 Install this unit in a well ventilated, cool, dry, clean place away from direct sunlight, heat sources, vibration, dust, moisture and cold. For proper ventilation, allow the following minimum clearances. Top: 15 cm (6 in) Rear: 10 cm (4 in) Sides: 10 cm (4 in) 3 Locate this unit away from other electrical appliances, motors, or transformers to avoid humming sounds. 4 Do not expose this unit to sudden temperature changes from cold to hot, and do not locate this unit in an environment with high humidity (i.e. a room with a humidifier) to prevent condensation inside this unit, which may cause an electrical shock, fire, damage to this unit, and/or personal injury. 5 Avoid installing this unit where foreign object may fall onto this unit and/or this unit may be exposed to liquid dripping or splashing. On the top of this unit, do not place: – Other components, as they may cause damage and/or discoloration on the surface of this unit. – Burning objects (i.e. candles), as they may cause fire, damage to this unit, and/or personal injury. – Containers with liquid in them, as they may fall and liquid may cause electrical shock to the user and/or damage to this unit. 6 Do not cover this unit with a newspaper, tablecloth, curtain, etc. in order not to obstruct heat radiation. If the temperature inside this unit rises, it may cause fire, damage to this unit, and/or personal injury. 7 Do not plug in this unit to a wall outlet until all connections are complete. 8 Do not operate this unit upside-down. It may overheat, possibly causing damage. 9 Do not use force on switches, knobs and/or cords. 10 When disconnecting the power cable from the wall outlet, grasp the plug; do not pull the cable. 11 Do not clean this unit with chemical solvents; this might damage the finish. Use a clean, dry cloth. 12 Only voltage specified on this unit must be used. Using this unit with a higher voltage than specified is dangerous and may cause fire, damage to this unit, and/or personal injury. Yamaha will not be held responsible for any damage resulting from use of this unit with a voltage other than specified. 13 To prevent damage by lightning, keep the power cable disconnected from a wall outlet or this unit during a lightning storm. 14 Do not attempt to modify or fix this unit. Contact qualified Yamaha service personnel when any service is needed. The cabinet should never be opened for any reasons. 15 When not planning to use this unit for long periods of time (i.e. vacation), disconnect the AC power plug from the wall outlet. 16 Be sure to read the “TROUBLESHOOTING” section on common operating errors before concluding that this unit is faulty. 17 Before moving this unit, press to set the system to off, and disconnect the AC power plug from the wall outlet. i En 18 Condensation will form when the surrounding temperature changes suddenly. Disconnect the power cable from the outlet, then leave this unit alone. 19 When using this unit for a long time, this unit may become warm. Turn the system off, then leave this unit alone for cooling. 20 Install this unit near the wall outlet and where the AC power plug can be reached easily. 21 The batteries shall not be exposed to excessive heat such as sunshine, fire or the like. When you dispose of batteries, follow your regional regulations. – Keep the batteries in a location out of reach of children. Batteries can be dangerous if a child were to put in his or her mouth. – If the batteries grow old, the effective operation range of the remote control decreases considerably. If this happens, replace the batteries with new one as soon as possible. – Do not use old batteries together with new ones. – Do not use different types of batteries (such as alkaline and manganese batteries) together. Read the packaging carefully as these different types of batteries may have the same shape and color. – Exhausted batteries may leak. If the batteries have leaked, dispose of them immediately. Avoid touching the leaked material or letting it come into contact with clothing, etc. Clean the battery compartment thoroughly before installing new batteries. – If you plan not to use the unit for a long period of time, remove the batteries from the unit. Otherwise, the batteries will wear out, possibly resulting in a leakage of battery liquid that may damage the unit. – Do not throw away batteries with general house waste. Dispose of them correctly in accordance with your local regulations. 22 Excessive sound pressure from earphones and headphones can cause hearing loss. This unit is not disconnected from the AC power source as long as it is connected to the wall outlet, even if this unit itself is turned off by . In this state, this unit is designed to consume a very small quantity of power. WARNING TO REDUCE THE RISK OF FIRE OR ELECTRIC SHOCK, DO NOT EXPOSE THIS UNIT TO RAIN OR MOISTURE. CAUTION Danger of explosion if battery is incorrectly replaced. Replace only with the same or equivalent type. There is a chance that placing this unit too close to a CRTbased (Braun tube) TV set might impair picture color. Should this happen, move this unit away from the TV set. CONTENTS LISTENING TO FM STATIONS ..............................12 Top panel / Front panel ..................................................2 Front panel display.........................................................3 Rear panel......................................................................3 Remote control...............................................................4 Selecting an FM station................................................12 Presetting FM stations (remote control only) ...............13 Selecting preset FM stations ........................................14 TURNING THE SYSTEM ON ....................................5 ADJUSTING THE CLOCK ........................................5 LISTENING TO YOUR iPod......................................6 Playing music from your iPod.........................................6 Using repeat/shuffle playback (remote control only) ......6 LISTENING TO CD AND USB DEVICES .................7 Listening to a CD............................................................7 Listening to a USB device ..............................................8 Using repeat/shuffle playback (remote control only) ......8 LISTENING TO DAB STATIONS ..............................9 Preparing for DAB reception ..........................................9 Selecting DAB stations.................................................10 Presetting DAB stations (remote control only) .............11 Selecting preset DAB stations......................................11 LISTENING TO EXTERNAL SOURCES ................14 USING THE ALARM FUNCTION............................15 Using “DTA Controller” to set the alarm .......................15 Setting the alarm ..........................................................16 Operations while the alarm sound is playing................17 USING THE SLEEP TIMER ....................................18 ADJUSTING THE TONE (remote control only) ....18 ADJUSTING THE BRIGHTNESS OF THE FRONT PANEL DISPLAY (remote control only) ...............18 TROUBLESHOOTING ............................................19 NOTES ON DISCS AND USB DEVICES ................22 SPECIFICATIONS...................................................23 Features • Play back music from external devices such as your iPod/iPhone/iPad, audio/data CDs, USB devices, or external devices via the AUX, and listen to the DAB/FM. • Use your favorite music or a beep tone as an alarm. When the set time arrives, the music you select is played at the volume that you specify, giving you the ideal start to your day (IntelliAlarm function). • You can take advantage of more sophisticated alarm functionality by using the free “DTA Controller” application for the iPod touch/iPhone/iPad (☞ P. 15). • You can easily store and recall 30 of your favorite DAB/FM stations. • Bass, middle, and treble can be adjusted to your taste. About this manual • References to the iPod appearing in this manual also include the iPhone. • If an operation can be performed using either the buttons on the unit itself or from the remote control, the explanation will focus on operation using the main unit. • indicates precautions for use of the unit and its feature limitations. • indicates supplementary explanations for better use. Supplied accessories Remote control DAB/FM antenna (uses a CR2032 type Lithium Battery) Dock cover USB cap Keep the USB cap out of reach of children so as to ensure that it is not mistakenly swallowed. How to use the remote control Replacing the battery in the remote control While pushing the release tab in direction , slide out the battery holder in direction . Within 6 m (20') CR2032 type Lithium Battery Battery insulation sheet: Remove before using. 1 En English NAMES OF PARTS AND THEIR FUNCTIONS ........2 NAMES OF PARTS AND THEIR FUNCTIONS Top panel / Front panel 12 q 3 p 4 5 6 7 o a VOLUME – / + n mlk j h PRESET Adjust the volume. b (Power) c Source buttons Switch the audio source to be played. If you press one of these while the system is off, the system will turn on and then switch the audio source. i TUNING Connect your iPod here (refer to “Placing your iPod in the iPod dock” below). j Front panel display The clock and other information is displayed here (☞ P. 3). Confirm a selected item or value. l Disc slot Insert a CD here (☞ P. 7). e Audio control buttons Use these to operate the iPod/CD/USB device. / / Tune the DAB/FM (☞ P. 12). k ENTER d iPod dock : / Use these buttons to select a DAB/FM station (preset) that you’ve stored (☞ P. 14). Press to turn the system on/off (☞ P. 5). : 89 Stop Play/Pause : Skip, Search backward/forward (press and hold down) f SNOOZE/SLEEP Set the sleep timer or switch the alarm to snooze mode (☞ P. 17, 18). g USB port Connect your USB device/iPod/ iPhone/ iPad here (☞ P. 8). m EJECT Eject the CD. n –/+ Select an item or value when setting the clock or the alarm. o SET Set the alarm (☞ P. 16). p ALARM Switch the alarm on/off (☞ P. 17). q (Headphone jack) Connect headphones here. When the USB device is not in use, put the USB cover in place to protect the connector. Placing your iPod in the iPod dock Your iPod will be recharged while it is connected to the dock. However if USB is selected as the source, the iPod will not be recharged. Dock adaptor 2 En • Be sure to use a dock adaptor that is compatible with your iPod. If you do not use the adaptor or the adaptor is not compatible, the connection could be loose or poor, which could cause damage to the connector. For details on dock adaptor information, please visit Apple’s official website. • If an iPod in a protective case is forcibly connected, the connector may be damaged. Remove the protective case before connection. • When the iPod is not in use, put the iPod dock cover in place to protect the connector. NAMES OF PARTS AND THEIR FUNCTIONS Front panel display 2 34 5 6 English 1 ~~~~~~ ~~~~~~ 9 8 7 a Illumination sensor Detect ambient lighting. Do not cover this sensor. b Alarm time This indicates the alarm time. c Repeat/shuffle indicator Display the playback mode (☞ P. 6, 8). d Secondary indicator Turn on if a secondary station is playing when you listen to a DAB station. e Multi-function indicator f Remote control signal receiver Make sure that this sensor is not obstructed (☞ P. 1). g Sleep indicator Turn on if the sleep timer has been set (☞ P. 18). h Alarm indicator Turn on if the alarm has been set (☞ P. 17). i Weekly alarm indicator Shows alarm information specified using the free “DTA Controller” application for the iPod touch/iPhone/iPad (☞ P. 15) Display various information, including the clock time, information about the currently-playing track, and the frequency of the DAB/FM station. Rear panel 1 2 a CLOCK switch Sets the clock and specifies whether the clock will be displayed (☞ P. 5). SET: Set the clock. ON: Even when the system is off, the clock will be displayed and the alarm function will be available. 3 c DAB/FM antenna connector Connect the DAB/FM antenna here. OFF: When the system is off, the clock will not be displayed and the alarm function will not be available. b AUX Use a commercially available 3.5 mm mini-plug cable to connect your external device here (☞ P. 14). Be sure to stretch out the antenna. • If reception is poor, try changing the height or direction of the antenna, or move the unit to find a location that has better reception. • If you use a commercially available outdoor antenna instead of the supplied antenna, reception may be better. 3 En NAMES OF PARTS AND THEIR FUNCTIONS Remote control a Remote control signal transmitter 1 b (Power) Press to turn the system on/off (☞ P. 5). 2 c SNOOZE/SLEEP Set the sleep timer or switch the alarm to snooze mode (☞ P. 17, 18). 3 4 r d ALARM Switch the alarm on/off (☞ P. 17). e Source buttons Switch the audio source to be played. If you press one of these while the system is off, the system will turn on and then switch the audio source. Press RADIO repeatedly to switch between DAB/FM. 5 6 f MENU Switch the iPod menu item / Return to the previous menu (☞ P. 6). 7 8 g FOLDER / 9 j Switch the playback folder when playing music on data CDs or USB devices (☞ P. 7, 8). Select items or edit numerical values (☞ P. 6, 18). q p o h ENTER Confirm a selected item or value. i Audio control buttons Use these to operate the iPod/CD/USB device. : k / l m n Stop : j Play/Pause : Skip, Search backward/forward (press and hold down) (Repeat)/ (Shuffle) Play music on an iPod, CD or USB device in repeat/ shuffle mode (☞ P. 6, 8). k EQ: LOW/MID/HIGH Adjust the bass, middle or treble sound quality (☞ P. 18). l TUNING iPod control buttons / Tune the DAB/FM (☞ P. 12). m PRESET / Select a DAB/FM station (preset) that you’ve stored (☞ P. 14). n MEMORY Store a DAB/FM station (☞ P. 13). o MUTE Mute or unmute the sound. p VOLUME + / – Adjust the volume. q DISPLAY Switch the information shown in the front panel display (☞ P. 6, 7, 8, 12). r DIMMER Adjusts the brightness of the front panel display (☞ P. 18). 4 En TURNING THE SYSTEM ON The system will turn on, and will be ready to play audio sources. To turn the system off, press once again. If you set the rear panel CLOCK switch to the OFF position (☞ P. 3), the clock will not be displayed when the system is off, reducing the power consumption. Display (24-hour) when the system is on Clock display when the system is off Alarm Recharging your iPod in the iPod dock 15:30 iPod CLOCK switch: ON Yes Enabled Yes Display (24-hour) when the system is off (CLOCK switch: ON) CLOCK switch: OFF (power-saving) No Disabled Yes 26 Apr ADJUSTING THE CLOCK 1 Set the rear panel CLOCK switch to the SET position. Rear panel 1 CLOCK ON SET AUX The display will indicate “CLOCK YEAR,” and the numerical value to be set will blink. OFF 2 Set the date and time. Front panel 2 Press the front panel – / + buttons to edit the values, and press ENTER to confirm the settings. Set the items in the order of year month day hour minute. When clock setting has finished, the display will indicate “Completed!” • On step 2 , you can copy the time of iPod instead of setting time manually by setting the iPod to the iPod dock. The time will not be copied if the iPod is already connected. • On step 2 , by pressing SNOOZE/SLEEP you can select the time format (12-hour / 24-hour). 3 When you’ve finished making settings, set the CLOCK switch to the ON position. The moment you set the switch to the ON position, the clock will start from 0 second. Rear panel 3 CLOCK ON SET AUX OFF The time settings will be reset if the unit remains unpowered for more than one week. (24-hour) 26 Apr Jan Feb Mar Apr May Jun January February March April May June Jul Aug Sep Oct Nov Dec July August September October November December 5 En English Connect the power cable to an AC outlet, and press . 操操 LISTENING TO YOUR iPod Playing music from your iPod • For details on compatible iPod models, refer to “SPECIFICATIONS” (P. 23). • Your iPod can also play back music and recharge while connected to the USB port (☞ P. 8). 1 1 Press the iPod source button to switch the audio source to iPod. 2 2 Set your iPod in the iPod dock (☞ P. 2). 3 Play the iPod. Dock adaptor (☞ P. 2) Playback can be controlled with either the remote control, iPod or the unit (☞ P. 2, 4). • If you’ve selected an audio source other than USB, performing the following operations will automatically switch the audio source to iPod and start playback even if this system is turned off. − Connect your iPod in the playback state to the iPod dock. − Play back the connected iPod. • If USB is selected as the audio source, the iPod will not be charged. • You can remove the iPod during playback. • If iPod is selected as the audio source, the system will automatically turn off when 60 minutes have elapsed without a device being connected to the iPod dock nor any operation performed. iPod menu operations (remote control only) You can use the remote control to operate your iPod. MENU: Switch menu items / Return to the previous menu ▲/▼: Move between items in the menu ENTER: Confirm Display information (remote control only) If you press DISPLAY on the remote control while a song is playing or paused, the information shown on the front panel display will be switched in the order shown at right. Elapsed song playback time Song name Album name Artist name Using repeat/shuffle playback (remote control only) The playback status is shown by the repeat/shuffle indicator (☞ P. 3) in the front panel display. Repeat playback Shuffle playback Press (repeat) on the remote control repeatedly to select one of the following playback modes. Press (shuffle) on the remote control repeatedly to select one of the following playback modes. No display: Off No display: : One : Albums : All : Songs Repeat/shuffle may not operate or be displayed correctly as shown above depending on the type of iPod used. 6 En Off LISTENING TO CD AND USB DEVICES − Audio CD: Play from the first track of the CD. − Data CD (a CD containing MP3/WMA files) or USB: Play from the first track in the folder containing the song that you last stopped. • This unit automatically turns off the system if no operation has been performed for 60 minutes after CD/USB device playback is stopped. For details on playable discs and files, refer to “NOTES ON DISCS AND USB DEVICES” (P. 22). Listening to a CD 1 Press the CD source button to switch the audio source to CD. 1 If a CD is already inserted, playback will start. 2 Insert a CD into the disc slot. Playback starts automatically. Playback can be controlled with either the remote control or the unit (☞ P. 2, 4). Insert the CD with the label side facing upward. 2 Folders and files on a data CD are played in alphabetical order. Skipping folders (remote control only) While a data CD is playing, you can use the remote control’s FOLDER ▲/▼ buttons to select the folder. Display information (remote control only) The folder number (only for a data CD) or the song/file number is shown for several seconds when starting playback or skipping tracks. If you press DISPLAY on the remote control while a song is playing or paused, the information shown on the front panel display will be switched in the following order. Audio CD Data CD Elapsed song playback time Elapsed song playback time Remaining song playback time Song name* Song name* Album name* Album name* Artist name* Artist name* File name Folder name * Shown only if this data is included in the song. 7 En English The unit will operate as follows when playing back tracks/files on CD/USB devices. • If the CD/USB device being played back is stopped, the track that was being played back will start playing from the beginning of the track the next time playback begins. • If you press while playback is stopped, tracks will play as follows the next time playback begins: LISTENING TO CD AND USB DEVICES Listening to a USB device 1 2 1 Press the USB source button to switch the audio source to USB. If a USB device is already connected, playback will start. 2 Connect a USB device to the USB port. Playback starts automatically. Playback can be controlled using either the remote control, the unit, or the USB device (☞ P. 2, 4). Folders and files will play in the order in which they were written. Your iPod/iPhone/iPad can also play back music and recharge while connected to the USB port (☞ P. 6). Stop playback before disconnecting the USB device. Skipping folders (remote control only) While a USB device is playing, you can use the remote control’s FOLDER ▲/▼ buttons to select the folder. Display information (remote control only) The folder/file number is shown for several seconds when starting playback or skipping tracks. If you press DISPLAY on the remote control while a song is playing or paused, the information shown on the front panel display will be switched in the order shown at right. * Shown only if this data is included in the song. Elapsed song playback time Song name* Album name* Artist name* File name Folder name Using repeat/shuffle playback (remote control only) The playback status is shown by the repeat/shuffle indicator (☞ P. 3) in the front panel display. Repeat playback Shuffle playback Press (repeat) on the remote control repeatedly to select one of the following playback modes. No display: : : 1 track All tracks within the folder (data CD/ USB device only) : 8 En Repeat mode off All tracks Press (shuffle) on the remote control repeatedly to select one of the following playback modes. No display: Shuffle mode off : All tracks within the folder (data CD/ USB device only) : All tracks LISTENING TO DAB STATIONS Preparing for DAB reception Before tuning into DAB stations, an initial scan must be performed. When you select the DAB for the first time, the initial scan is performed automatically. To listen to a DAB station, connect the DAB/FM antenna (☞ P. 3). Press the DAB source button to switch the audio source to DAB. The initial scan starts. During the scan, the degree of progress is displayed on the front panel display. When scan is completed, the number of receivable DAB stations appear on the front panel display. If the initial scan is performed, stored DAB station information and preset DAB stations are cleared. Performing the initial scan again (remote control only) 1 2 1 Press and hold down MEMORY on the remote control. “DAB INIT SCAN” will appear and “Press MEMORY” will blink. 2 Press MEMORY. The initial scan starts. 9 En English DAB (Digital Audio Broadcasting) and DAB+ use digital signals for clearer sound and more stable reception compared to analog signals. DAB+ is based on the original DAB standard but uses a more efficient audio codec. DAB and DAB+ are broadcast in blocks of data called “ensembles” containing up to several radio stations that are simultaneously broadcast. DAB and DAB+ can also include an extensive amount of text information, enabling you to select a station by name. Other information, such as the ensemble name or the status of the digital signal, can be displayed on the front panel display. “DAB” described in this manual may also refer to “DAB+”. LISTENING TO DAB STATIONS Selecting DAB stations 1 Press the DAB source button to switch the audio source to DAB. 1 2 Press TUNING station. a Secondary indicator: 2 Some stations have sub (secondary) stations. If a secondary station is playing, the secondary indicator is displayed. 10:30 DAB01STATION1 4 to select the DAB While receiving DAB, DAB station information is shown on the front panel display. If the unit does not receive a DAB signal, “Off Air” is displayed instead of the DAB station name. 2 1 / b Signal strength indicator: 3 Shows current signal strength. c DAB station name d Preset number Display information (remote control only) If you press DISPLAY on the remote control, the information shown on the front panel display will be switched in the following order. STATION LABEL, PRESET NUMBER DLS (Dynamic Label Segment) ENSEMBLE LABEL CHANNEL/FREQ (Channel label and frequency) SIGNAL QUALITY AUDIO FORMAT (Audio format, DRC) DAB frequency information This unit can receive Band III only. Frequency Channel label Frequency Channel label Frequency 174.928 5A 197.648 8B 220.352 11C 176.640 5B 199.360 8C 222.064 11D 178.352 5C 201.072 8D 223.936 12A 180.064 5D 202.928 9A 225.648 12B 181.936 6A 204.640 9B 227.360 12C 183.648 6B 206.352 9C 229.072 12D 185.360 6C 208.064 9D 230.784 13A 187.072 6D 209.936 10A 232.496 13B 188.928 7A 211.648 10B 234.208 13C 190.640 7B 213.360 10C 235.776 13D 192.352 7C 215.072 10D 237.488 13E 194.064 7D 216.928 11A 239.200 13F 195.936 8A 218.640 11B 10 En Channel label LISTENING TO DAB STATIONS Presetting DAB stations (remote control only) Use the preset function to store your favorite 30 stations. The display will indicate “PRESET MEMORY”. 2 Press PRESET / to select the preset number that you want to store. 1 3 • The lowest preset number that has not been stored will be selected first. • If you want to cancel the presetting, press . • If you select a preset number in which a station has already been stored, it will be overwritten by the new station. 2 3 Press MEMORY to complete the operation. This stores the DAB station. The preset will be stored, and the display will indicate “Completed!”. Deleting a stored preset 1 Press MEMORY on the remote control. The display will indicate “PRESET MEMORY,” and the preset number will blink. 2 2 Press TUNING / delete operation. 1 4 to select the preset The display will indicate “PRESET DELETE”. 3 3 Press PRESET / to select the preset number that you want to delete. If you want to cancel the deleting, press . 4 Press MEMORY to complete the operation. The preset will be deleted, and the display will indicate “Deleted!”. Selecting preset DAB stations Main unit 1 Press the DAB source button to switch the audio source to DAB. 1 You can also switch the audio source to DAB by pressing RADIO on the remote control. 2 Remote control 2 Press PRESET / to select the DAB station that you want to listen. You can only select the presets that have been stored. 1 2 11 En English 1 Select the station that you want to preset, and press MEMORY. LISTENING TO FM STATIONS Selecting an FM station Connect the antenna if you want to listen to the FM (☞ P. 3). 1 Press the FM source button to switch the audio source to FM. 1 2 Tuning FM stations. Automatic tuning: Press and hold TUNING / . Manual tuning: Press TUNING / repeatedly. 2 If you tune to a station manually while receiving FM, the sound will be monaural. Display information If you press DISPLAY on the remote control, the information shown on the front panel display will be switched in the following order. Preset number and frequency Reception status* * Examples of reception status indication. TUNED/STEREO: TUNED/MONO: Not TUNED: A strong FM stereo broadcast is being received. Receiving an FM broadcast in monaural (even if the FM broadcast is stereo, reception will be monaural if the signal is weak). No broadcast is being received. Displaying Radio Data System information (U.K. model only) If you press DISPLAY on the remote control while Radio Data System information is being received, the information shown on the front panel display will be switched in the order shown at right. If the signal transmission of the Radio Data System station is too weak, this unit may not be able to receive Radio Data System information completely. In particular, RT (Radio Text) information uses a lot of bandwidth, so it may be less available compared to other types of information. PS (Program Service) PTY (Program Type) RT (Radio Text) CT (Clock Time) Reception status Preset number and frequency 12 En LISTENING TO FM STATIONS Presetting FM stations (remote control only) Use the preset function to store your favorite 30 stations. English Auto preset This method tunes automatically, and automatically presets only the stations that have good reception. 1 Press and hold down MEMORY on the remote control. “AUTO PRESET” will appear and “Press MEMORY” will blink. 1 2 2 Press MEMORY. Auto preset will begin. When presetting has finished, the display will indicate “Completed!”. When you perform auto preset, all stored stations are cleared and the new stations are stored. If you want to stop auto preset before it is completed, press . Manual preset 1 Select the station that you want to preset, and press MEMORY. The display will indicate “PRESET MEMORY.” 2 Press PRESET / to select the preset number that you want to store. 1 3 • The lowest preset number that has not been stored will be selected first. • If you want to cancel the presetting, press . • If you select a preset number in which a station has already been stored, it will be overwritten by the new station. 2 3 Press MEMORY to complete the operation. The preset will be stored, and the display will indicate “Completed!”. Deleting a stored preset 1 Press MEMORY on the remote control. 2 1 4 The display will indicate “PRESET MEMORY,” and the preset number will blink. 2 Press TUNING / delete operation. to select the preset The display will indicate “PRESET DELETE”. 3 3 Press PRESET / to select the preset number that you want to delete. If you want to cancel the deleting, press . 4 Press MEMORY to complete the operation. The preset will be deleted, and the display will indicate “Deleted!”. 13 En LISTENING TO EXTERNAL SOURCES Selecting preset FM stations Main unit 1 Press the FM source button to switch the audio source to FM. 1 You can also switch the audio source by pressing RADIO on the remote control. 2 Press PRESET / to select the FM station that you want to listen. 2 You can only select the presets that have been stored. Remote control 1 2 LISTENING TO EXTERNAL SOURCES 1 Using a commercially available 3.5 mm miniplug cable, connect your external device to the AUX on the rear panel of this unit. Rear panel CLOCK ON SET AUX 1 OFF • Turn off the system before connecting the mini-plug cable. • Turn down the volume of the unit and your external audio device before connection. 2 Press to turn the system on. 3 Press the AUX source button to switch the audio source to AUX. 4 Start playback on the connected external audio device. 2 14 En 3 USING THE ALARM FUNCTION The unit includes an alarm function (IntelliAlarm) that plays back audio sources or a set of beep (internal alarm sound) at the set time using a variety of different methods. The alarm function has the following features. Select from 3 alarm types, combining music and beep sounds. SOURCE+BEEP The selected audio source and beep sound are played at the set time. This mode is recommended for the best possible start to the day. 3 minutes before the set time: the source music begins to fade in and the volume gradually increases as the alarm time approaches. Alarm time: a beeping sound also begins playing. SOURCE The selected audio source is played at the set time. The volume fades in gradually and increases to the set volume. BEEP The beep sound is played at the set time. Various audio sources The iPod, audio CD, data CD, USB device and radio can be selected. The following playback methods can also be selected depending on the audio source: Source Playback method Playlist* Resume If the “ALARM Yamaha DTA” playlist cannot be found within the iPod, the unit resumes play from the last track you played. Selected track The selected track is played repeatedly. Resume The track you listened to last time is played back. Folder The selected folder is played repeatedly. Resume The track you listened to last time is played back. iPod Audio CD Data CD/USB device DAB/FM Function A specific playlist stored on the iPod is played back repeatedly. To play a playlist, create a playlist with the name “ALARM Yamaha DTA” in advance. When entering the playlist name, use single-byte spaces to separate words, and enter single-byte characters, taking care that uppercase/lowercase letters are used correctly. Preset station The selected preset station is played. Resume The DAB/FM station you listened to last time is played back. * For information on creating a playlist, refer to the instructions for your iPod or iTunes. Snooze The snooze function can be enabled to replay the alarm after 5 minutes (☞ P. 17). Using “DTA Controller” to set the alarm By using the free “DTA Controller” application for the iPod touch/iPhone/iPad, you can make detailed alarm settings that cannot be made using this unit by itself. For each day of the week, you can specify the alarm time (Weekly Alarm) and adjust the IntelliAlarm as desired. The front panel display shows information for the Weekly Alarm you’ve set. MON TUE WED THU FRI SAT SUN Monday Tuesday Wednesday Thursday Friday Saturday Sunday For details of “DTA Controller”, refer to the product information in the Yamaha website. 15 En English 3 types of alarms USING THE ALARM FUNCTION Setting the alarm Set the alarm time and alarm type Alarm settings cannot be made when the unit is in power saving. If you want to use the alarm function, set the rear panel CLOCK switch to the ON position. 1 Press SET. 1 The alarm indicator ( ) will blink. 2 Set the alarm. Set items 1-5 described below. Press – / + to select a numerical value, and press ENTER to confirm it. Items Setting or range 1 ALARM SELECT * This can be selected after you’ve used “DTA Controller” to set the alarm (☞ P. 15). If you’re not using “DTA Controller,” proceed to item 2. ONE DAY: An alarm that sounds only once at the specified time. WEEKLY: An alarm whose time can be specified for each day of the week (settable only using “DTA Controller”) If you’ve chosen WEEKLY, this completes the alarm setting. 2 2 ALARM TIME Make settings in the order of hours 3 ALARM TYPE Select from SOURCE+BEEP, SOURCE or BEEP. For details, refer to “3 types of alarms” (P. 15). If you selected BEEP, proceed to item 5. minutes. 4 ALARM SOURCE iPod: (If you selected SOURCE+BEEP or SOURCE as the ALARM TYPE) Play back music from your iPod (Refer to “Various audio sources” (P. 15).) CD: Play back music from a CD. Specify the track number (data CD: folder number) (RESUME, 1-99). USB: Play back music from a USB device. Specify the folder number (RESUME, 1-999). DAB/FM: Play a radio station. Specify the preset number (RESUME, 1-30). If the selected source cannot be played back at the time set for the alarm (e.g., the iPod is not connected), the beep sound is played back. 3 Alarm time 9:12 Completed! If you choose RESUME when specifying the track/ folder/preset number, the last-played track/folder/station will be played (resume playback). 5 ALARM VOLUME Specifies the volume (5-60) of the alarm. Alarm indicator 3 Complete the settings. When you set the VOLUME for item 5, the display will indicate “Completed!” and your settings will be confirmed. This completes the alarm setting. The alarm will be turned on and the alarm indicator ( ) will light. • By pressing SET during this procedure, you can confirm the alarm settings with the currently-specified values and complete the procedure. • If you decide to cancel alarm settings mid-way through the procedure, turn the system off. 16 En USING THE ALARM FUNCTION Switching the alarm on/off Press ALARM to turn the alarm on/off. When the unit is in power saving, the alarm will not function (☞ P. 5). Operations while the alarm sound is playing When the set time arrives, the selected alarm sound will play. During playback, the following operations are available. To pause the alarm (Snooze) Press SNOOZE/SLEEP. Snooze will stop the alarm and play it again 5 minutes later. If SOURCE + BEEP is set as the alarm type, you can press SNOOZE/SLEEP once to stop the beep sound, and twice to stop the audio source. Five minutes after the audio source is stopped, it will start fading in again and the beep sound will resume. To turn the alarm off Press ALARM or . • You can also stop the alarm by holding down SNOOZE/ SLEEP. • If you don’t stop the alarm, it will stop automatically after 60 minutes and the system will turn off. • The alarm setting will be saved even if the alarm is turned off. If the alarm is turned on again by pressing ALARM, the alarm will sound with the previous alarm settings. 17 En English When the alarm is on, the alarm indicator ( ) will light, and the alarm time will be shown. If you press ALARM again, the alarm indicator ( ) and the alarm will turn off. USING THE SLEEP TIMER When the specified time has elapsed, the system will turn off automatically. Press SNOOZE/SLEEP repeatedly to specify the time after which the system will turn off. Press repeatedly You can specify 30, 60, 90 or 120 minutes. When you select a time, the sleep timer is turned on, and the sleep indicator ( ) is shown in the front panel display. If you press SNOOZE/SLEEP while the sleep timer is activated, the sleep timer setting will be canceled. ADJUSTING THE TONE (remote control only) 2 1 During playback, press the LOW, MID, or HIGH EQ button on the remote control. Select the tone to be adjusted (LOW, MID, HIGH). 2 Press / to adjust the tone. 3 3 Press ENTER on the remote control to complete the operation. You can also press the EQ button that you pressed in Step 1 to complete the settings. If you want to adjust another frequency band, return to step 1 and press the EQ button for the frequency band that you want to adjust. 1 ADJUSTING THE BRIGHTNESS OF THE FRONT PANEL DISPLAY (remote control only) Press repeatedly Press DIMMER repeatedly on the remote control. The brightness of the front panel display will change in the order shown below. AUTO 1 (bright) 2 (medium) 3 (dim) back to AUTO When AUTO is set, the brightness of the front panel display is adjusted automatically with the Illumination sensor (☞ P. 3). Ensure that the sensor is not covered. 18 En TROUBLESHOOTING General Problem The speakers make no sound. Cause Solution The volume might be set to the minimum level, or muted. Adjust the volume level. The source may be incorrect. Select the correct source. The headphones are connected. Remove the headphones. The volume of a connected external device is not loud enough. Raise the volume of the external device. Sound suddenly turns off. The sleep timer (☞ P. 18) may be set. Turn the system on and play the source again. Sound is cracked/distorted or there is abnormal noise. Input source volume is excessive, or volume of this unit is excessive (especially Bass). Adjust volume with VOLUME, or adjust Bass with EQ (☞ P. 18). If an external device is playing back, lower the volume of the external device. The unit does not operate properly. The unit may have received a strong electrical shock such as lightning or excessive static electricity, or power supply may have dropped. Turn the system off, and disconnect the power cable. Wait about 30 seconds, reconnect the power cable, and turn on the system. A digital or high-frequency equipment produces noises. The unit may be placed too close to the digital or high-frequency equipment. Place the unit farther away from the equipment. The clock setting has been cleared. The unit remained unpowered for more than one week. If the power supply is interrupted for about one week, the time setting may be reset. If this occurs, please reset the clock (☞ P. 5). The iPod does not play back at the alarm time even if the alarm source is set to iPod. The iPod is not set in the iPod dock. Set the iPod in the iPod dock (☞ P. 2). Clock flashes and the unit cannot be operated. The CLOCK switch is in the SET position, and the clock settings are in progress. Set the CLOCK switch to the ON or OFF position. Alarm does not sound. The CLOCK switch is in the OFF or SET position. Set the CLOCK switch to the ON position. The system turns on but immediately shuts off. The front panel display indicates “ALARM not work” and can’t set the alarm. The unit turns the system off unexpectedly. The automatic system-off function may have operated. Front panel display becomes dim. The front panel display’s brightness setting is set to AUTO. This unit will turn the system off when 60 minutes have elapsed without any operation being performed after stopping playback of the USB device or the CD, or if the system has been on for 12 hours or more without any operation being performed. Change the brightness setting to something other than AUTO (☞ P. 18). Alternatively, ensure that the illumination sensor (☞ P. 3) is not obscured. 19 En English If there is a problem with the unit, check the following list first. If you cannot resolve the problem with the suggested solutions or if the problem is not listed below, turn off and unplug the system, and consult the nearest authorized Yamaha dealer or service center. TROUBLESHOOTING iPod Problem No sound. Cause Solution The iPod is not set in the iPod dock firmly. Remove the iPod from the unit, and then set it in the iPod dock again (☞ P. 2). The headphones of the iPod are connected. Remove the headphones. The iPod software version has not been updated. Download the latest iTunes software to update the iPod software version to the latest. The iPod does not charge up. The iPod is not set in the iPod dock firmly. Remove the iPod from the unit, and then set it in the iPod dock again (☞ P. 2). USB is selected as the audio source. Select something other than USB as the audio source. The front panel display indicates “iPod Unknown” when you connect the iPod. The iPod being used is not supported by the unit. Use a supported iPod (☞ P. 23). CD playback Problem CD cannot be inserted. Cause Solution Another disc is already inserted. Unload the disc with You are attempting to insert a disc that cannot be used by this unit. Use a disc supported by the unit (☞ P. 22). Some button operations do not work. The disc loaded into the unit may not be compatible. Use a disc supported by the unit (☞ P. 22). Playback does not start immediately after pressing (playback stops immediately.). The disc may be dirty. Wipe the disc clean. If the unit was moved from a cold to warm place, condensation may have formed on the disc reading lens. Wait for an hour or two until the unit adjusts to the room temperature, and try again. When you insert a disc, the front panel display indicates “No Disc” or “CD Unknown.” The disc loaded into the unit may not be compatible. Use a disc supported by the unit (☞ P. 22). The disc may be dirty, or a foreign object may have adhered to it. Wipe the disc clean. Alternatively, remove any foreign object that has adhered to the disc. The disc does not contain playable files. Use a disc containing playable files (☞ P. 22). The disc was inserted upside down. Insert the disc with the label facing upward. The clock/alarm/tone settings are in progress. Alternatively, the alarm is playing. Complete the clock/alarm/tone settings. Alternatively, stop the alarm. The front panel display indicates “no operation”, and a disc cannot be inserted or unloaded. EJECT. The disc loaded into the unit may not be compatible. Use a disc supported by the unit (☞ P. 22). USB device playback Problem Cause Solution MP3/WMA file on the USB device does not play. The USB device is not recognized. Turn the system off and disconnect the USB device. Then turn the system on and reconnect the USB device to the unit. If the solutions above do not resolve the problem, the USB device is not playable on the unit (☞ P. 22). The USB device does not contain playable files. Use a USB device contains playable files (☞ P. 22). When you connect a USB device, the front panel display indicates “USB OverCurrent,” and then the front panel display goes blank. An incompatible USB device is connected to the unit. Alternatively, the USB device is not connect firmly to the unit. Turn the system off and disconnect the USB device. Then turn the system on and reconnect the USB device to the unit. If the solutions above do not resolve the problem, the USB device is not playable on the unit (☞ P. 22). 20 En TROUBLESHOOTING DAB reception Problem The initial scan operations are not successful and “Not Found” appears on the front panel display. The DAB station reception is weak. Cause Solution The antenna may be connected improperly. Make sure the antenna is connected properly (☞ P. 3). The initial scan operations were not performed. Perform the initial scan operations (☞ P. 9). There is no DAB coverage in your area. Check with your dealer or WorldDMB Online at “http://www.worlddab.org” for a listing of the DAB coverage in your area. The DAB signals are too weak. Change the height, direction, or placement of the antenna. The antenna may be connected improperly. Make sure the antenna is connected properly (☞ P. 3). The DAB signals are too weak. Change the height, direction, or placement of the antenna. There is no DAB coverage in your area. Check with your dealer or WorldDMB Online at “http://www.worlddab.org” for a listing of the DAB coverage in your area. The antenna may be connected improperly. Make sure the antenna is connected properly (☞ P. 3). The DAB signals are too weak. Change the height, direction, or placement of the antenna. There is noise interference (e.g. hiss, crackle, or jitter). The antenna needs to be repositioned. The DAB station information does not appear or is inaccurate. The DAB station may be temporarily out of service, or the DAB station information is not provided by the DAB broadcaster. The DAB signals are too weak. Contact the DAB broadcaster. FM reception Problem Too much noise. Cause Solution The antenna may be connected improperly. Make sure the antenna is connected properly (☞ P. 3) or use a commercially available outdoor antenna. The antenna is too close to the unit or to an electronic device. Position the antenna as far away as possible from the unit or the electronic device. Too much noise during stereo broadcast. The radio station you selected may be far from your area, or the radio wave reception is weak in your area. Try manual tuning to improve the signal quality (☞ P. 12) or use a commercially available outdoor antenna. Even with an outdoor antenna, radio wave reception is weak. (Sound is distorted.) Multipath reflection or other radio interferences may have occurred. Change the height, direction, or placement of the antenna. Remote control Problem Cause The remote control does not work The remote control may be operated outside its properly. operation range. The remote control signal receiver on the unit (☞ P. 3) may be exposed to direct sunlight or lighting (inverted fluorescent lamps). Solution For information on the remote control operation range, refer to “How to use the remote control” (P. 1). Change the lighting or orientation of the unit. The battery may be worn out. Replace the battery with new one (☞ P. 1). There are obstacles between the remote control signal receiver on the unit (☞ P. 3) and the remote control. Remove the obstacles. 21 En English Cannot tune into any DAB stations. NOTES ON DISCS AND USB DEVICES CD information This unit is designed for use with audio CD, CD-R*, and CD-RW* with the logos followings. * ISO 9660 format CD-R/RW This unit can play back discs bearing any of the logo marks above. A disc logo mark is printed on the disc and the disc jacket. • Do not load any other type of disc into this unit. Doing so may damage this unit. • CD-R/RW cannot be played back unless finalized. • Some discs cannot be played back depending on the disc characteristics or recording conditions. • Do not use any non-standard shaped discs such as a heart-shaped disc. • Do not use discs with many scratches on their surface. • Do not load a cracked, warped, or glued disc. • Do not use 8-cm discs. Handling a disc • Do not touch the surface of the disc. Hold a disc by its edge (and the center hole). • Do not use a pencil or pointed marker to write on the disc. • Do not put a tape, seal, glue, etc., on a disc. • Do not use a protective cover to prevent scratches. • Do not load more than one disc into this unit at one time. This can cause damage to both this unit and the discs. • Do not insert any foreign objects into the disc slot. • Do not expose a disc to direct sunlight, high temperature, high humidity, or a lot of dust. Caution • If a disc becomes dirty, wipe it with a clean, dry cloth from the center out to the edge. Do not use record cleaner or paint thinner. • To avoid malfunction, do not use a commercially available lens cleaner. 22 En USB device information This unit supports USB mass storage class devices (e.g., flash memories or portable audio players) using FAT16 or FAT32 format. • Some devices may not work properly even if they meet the requirements. • Do not connect devices other than USB mass storage class devices (such as USB chargers or USB hubs), PCs, card readers, an external HDD, etc. • Yamaha will not be held responsible for any damage to or data loss on the USB device occurring while the device is connected to this unit. • Playability of and power supply to all kind of USB devices are not guaranteed. • USB devices with encryption cannot be used. About MP3 or WMA files • The unit can play back: File Bitrate (kbps) Sampling frequency (kHz) MP3 8-320** 16-48 WMA 16-320** 22.05-48 ** Both constant and variable bitrates are supported. • The maximum numbers of files/folders that can be played on the unit are as follows. Data CD USB Maximum total number of file 512 9999 Maximum folder number 255 999 Maximum file number per folder 511 255 • Copyright-protected files cannot be played back. SPECIFICATIONS PLAYER SECTION AMPLIFIER SECTION • Maximum output power ......... 15 W + 15 W (6 Ω 1 kHz, 10 % THD) • Compatible iPod models ........................................ iPod touch (1st, 2nd, 3rd and 4th generations) iPod nano (2nd, 3rd, 4th, 5th and 6th generations) • Headphones ...... 3.5 mm STEREO mini jack (Impedance 16 to 32 Ω) • Compatible iPhone models ............................ iPhone 4S, iPhone 4, iPhone 3GS, iPhone 3G, iPhone Tuning range • Compatible iPad models .............. iPad (3rd generation), iPad 2, iPad • DAB/DAB+ ...............................................174 to 240 MHz (Band III) An iPod may not be detected by the unit or some features may not be compatible, depending on the model or software version of the iPod. • FM ......................................................................87.50 to 108.00 MHz CD • Media............................................................................ CD, CD-R/RW • Audio format ..................................................Audio CD, MP3, WMA LASER • Type.............................................Semiconductor laser GaAS/GaAlAs • Wave length.............................................................................. 790 nm • Output Power ..............................................................................7 mW USB TUNER SECTION GENERAL • Power supply ................................................. AC 230 to 240 V, 50 Hz • Power consumption ..................................................................... 30 W • System off consumption ......................................... 3.0 W or less/0.5 W or less (Power saving) • Dimensions (W × H × D) ................................ 370 (14-5/8 in) × 110 (4-3/8 in) × 230 (9 in) mm • Weight..........................................................................3.8 kg (8.4 lbs.) Specifications are subject to change without notice. • Audio format .................................................................... MP3, WMA AUX • Input connector............................ 3.5 mm (1/8 in) STEREO mini jack iPod, iPhone, iPad “Made for iPod”, “Made for iPhone” and “Made for iPad” mean that an electronic accessory has been designed to connect specifically to iPod, iPhone or iPad, respectively, and has been certified by the developer to meet Apple performance standards. Apple is not responsible for the operation of this device or its compliance with safety and regulatory standards. Please note that the use of this accessory with iPod, iPhone or iPad may affect wireless performance. iPad, iPhone, iPod, iPod nano, iPod touch and iTunes are trademarks of Apple Inc., registered in the U.S. and other countries. Information for Users on Collection and Disposal of Old Equipment and Used Batteries These symbols on the products, packaging, and/or accompanying documents mean that used electrical and electronic products and batteries should not be mixed with general household waste. For proper treatment, recovery and recycling of old products and used batteries, please take them to applicable collection points, in accordance with your national legislation and the Directives 2002/96/EC and 2006/66/EC. By disposing of these products and batteries correctly, you will help to save valuable resources and prevent any potential negative effects on human health and the environment which could otherwise arise from inappropriate waste handling. For more information about collection and recycling of old products and batteries, please contact your local municipality, your waste disposal service or the point of sale where you purchased the items. [Information on Disposal in other Countries outside the European Union] These symbols are only valid in the European Union. If you wish to discard these items, please contact your local authorities or dealer and ask for the correct method of disposal. Note for the battery symbol (bottom two symbol examples): This symbol might be used in combination with a chemical symbol. In this case it complies with the requirement set by the Directive for the chemical involved. 23 En English [As of July, 2012] iPod (Digital connection) ■ For U.K. customers If the socket outlets in the home are not suitable for the plug supplied with this appliance, it should be cut off and an appropriate 3 pin plug fitted. For details, refer to the instructions described below. The plug severed from the mains lead must be destroyed, as a plug with bared flexible cord is hazardous if engaged in a live socket outlet. ■ Special Instructions for U.K. Model LASER SAFETY This unit employs a laser. Due to possible eye injury, only a qualified service person should remove the cover or attempt to service this device. DANGER This unit emits visible laser radiation when open. Avoid direct eye exposure to beam. When this unit is plugged into the wall outlet, do not place your eyes close to the opening of the disc tray and other openings to look into inside. The laser component in this product is capable of emitting radiation exceeding the limit for Class 1. IMPORTANT THE WIRES IN MAINS LEAD ARE COLOURED IN ACCORDANCE WITH THE FOLLOWING CODE: Blue: NEUTRAL Brown: LIVE As the colours of the wires in the mains lead of this apparatus may not correspond with the coloured markings identifying the terminals in your plug, proceed as follows: The wire which is coloured BLUE must be connected to the terminal which is marked with the letter N or coloured BLACK. The wire which is coloured BROWN must be connected to the terminal which is marked with the letter L or coloured RED. Make sure that neither core is connected to the earth terminal of the three pin plug. CAUTION Use of controls or adjustments or performance of procedures other than those specified herein may result in hazardous radiation exposure. i SI The name plate is located on the bottom of the unit. © 2012 Yamaha Corporation Printed in Malaysia ZD83520