1
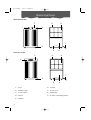
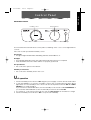
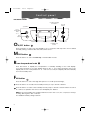
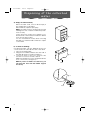
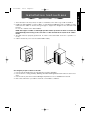
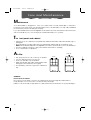
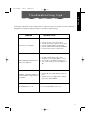
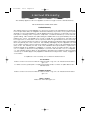
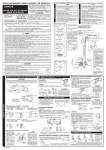
INTRO
12-12-2003
16:14
Pagina 1
DDH 30 DDE 40E DDE 50E DDE 65E
• Use and maintenance manual . . . . pag.
3
• Mode d’emploi et d’entretien . . . . . pag.
13
• Instrucciones de uso . . . . . . . . . . pag.
23
• Manual de instruções . . . . . . . . . . pag.
33
• Istruzioni per l’uso . . . . . . . . . . . . pag.
43
Register this product on-line and receive a free trial issue of Cook's Illustrated.
Visit www.prodregister.com/delonghi.
Visit www.delonghi.com for a list of service centers near you. (U.S. Only).
Veuillez enregistrer ce produit on-line et Vous recevrez une copie gratuite du magazine
illustré Cooks.
Visitez www.prodregister.com/delonghi.
Visitez www.delonghi.com pour trouver le centre d'assistance le plus proche de chez vous.
Registre su producto en nuestra web y reciba una muestra de prueba de cook’s illustrated.
visite www.prodregister.com/delonghi.
Visite www.delonghi.com para consultar la lista de nuestros centros de asistencia más
cercanos (solo ee. uu.).
Registrando este produto on-line, voces receberão gratuito a revista ilustrada Cook's.
Visite www.prodregister.com/delonghi.
Visite o nosso site www.delonghi.com onde poderao encontrar a autorizada tecnica mais
conveniente (sólo U.S.).
Registrate questo prodotto on-line e riceverete una copia gratuita della rivista illustrata
Cook's.
Visitate www.prodregister.com/delonghi.
Visitate il sito www.delonghi.com per trovare il centro assistenza autorizzato a Voi più
vicino (solo U.S.).
12-12-2003
16:15
Pagina 3
Introduction and Warning
T
hank you for choosing this appliance to provide you and your family with all of the requirements for your home, or office. This Owner's Manual will provide you with valuable information necessary for the proper care and maintenance of your new appliance. If properly
maintained, your appliance will give you many years of trouble free operation. Please take a
few moments and read the instructions thoroughly and familiarize yourself with all of the operational aspects of this appliance.
This unit can be conveniently moved from room to room within your home and set-up in just
minutes.
CAUTION
1. Observe all local codes and ordinances. Electrical ground is required on this unit in accordance with the national wiring regulation.
Do not , under any circumstances, remove the power supply cord ground prong.
Do not use an extension cord. Otherwise, it could cause electrical shock or fire.
2. Disconnect power cord from receptacle before servicing or cleaning.
Otherwise, it could cause electrical shock or fire.
3. Do not damage or use an unspecified power cord. If the power cord is damaged, it must
be replaced by the manufacturer or its service agent or a similarly qualified person in order
to avoid a hazard.
Otherwise, it could cause electrical shock or fire.
4. Do not plug the unit in until outside of the unit is completely dry.
Otherwise, it could cause electrical shock and personal injury hazard.
5. Do not use water collected in the tank for drinking purposes.
It is not sanitary and could cause illness or personal injury hazard.
6. Do not clean the unit while it is plugged in, especially if it is wet.
It may cause electrical shock or fire.
7. Be sure to replace tank properly after emptying to prevent water from collecting on the
floor.
8. Make sure the unit is the correct size for the area you want to dehumidify.
9. Do not operate switches with wet hands. Otherwise it may cause electrical shock.
10. Install the unit properly on a floor, table, or shelf that is level and strong enough to support
it with a full tank.
11. Do not install the unit in an area where temperatures will fall below 44°F (7°C), for models
DDH 30 - DDE 40E - DDE 50E and 64°F (18°C) for model DDE 65E , because low temperatures could cause coils to freeze and the unit may not start.
12. Do not sit down or stand on the unit.
13. When the unit is to be cleaned, please switch off.
Otherwise it may cause electrical shock or fire.
14. When the air filter is to be removed, do not touch the fin of the unit. Otherwise it may cause
an injury.
SAVE THESE INSTRUCTIONS
THIS PRODUCT IS FOR HOUSEHOLD ONLY
3
ENGLISH
GB
GB
12-12-2003
16:15
Pagina 4
De s c r i p t i o n
Mechanical model
5
2
6
3
1
7
4
9
8
Electronic model
5
3
6
2
7
4
9
4
8
1.
Knob
6.
Air Filter
2.
Indicator Light
7.
Power Cord
3.
Control panel
8.
Water Tank
4.
Wheels
9.
Continuous Draining Outlet
5.
Cabinet
12-12-2003
16:15
Pagina 5
C o n t r o l Pa n e l
ENGLISH
GB
MECHANICAL MODEL
Humidity Control
Fan Speed knob
Control light
The mechanical model unit has a control panel containing a two colors control light and two
controls:
Auto shut-off, Fan speed and Humidity control
Green light
• The green light will illuminates indicating that the dehumidifier is on.
Red light
• The red light illuminates when the water tank is full and needs to be emptied.
• It also illuminate when the water tank is not properly positioned.
Fan speed knob
• This controls the speed of the airflow.
Humidity Control knob
• This controls the humidity level in the room.
U
nit operation
1. Turn the Humidity Control knob to OFF. Plug the power supply cord into an electrical outlet.
2. To turn the appliance on, turn the humidity control in the clockwise direction till the green
light will be on. The Humidity Control knob can be set anywhere between OFF and CONTINUOUS for normal operation.
If you need more dehumidification, turn the Humidity Control knob toward CONTINUOUS. If
you need less dehumidification, turn the Humidity Control knob toward OFF.
3. If you want to control the speed of air flow, turn the Fan Speed knob toward Low or High.
4. Turn the Humidity Control knob to OFF to stop the unit manually.
5
GB
12-12-2003
16:15
Pagina 6
Control panel
ELECTRONIC MODEL
Increase humidity
level button
Operation
ON/OFF
button
Room
temperature
knob
°F/ °C
FAN
button
Full Tank light
O
N/OFF button
Display
Decrease
humidity level
button
MODE button
Press this button to start /stop the appliance. The compressor will respond to the modified
humidity setting 3 minutes after the unit is switched on.
M
ODE button
Press this button to select the Fan only or Dehumidifier modes.
R
oom temperature knob
Press this button to display the Temperature or Humidity reading on the LCD display.
If you press the button once the display will show the °F . If you press the button twice, the
display will show the temperature in °C. After few seconds, the display will automatically
show the humidity level.
F
AN button
Press this button to select the High Fan Speed or Low Fan Speed settings.,
Press this button to increase the humidity level by 5% up to a limit of 80%RH.
Press this button to reduce the humidity level by 5%up to a limit of 30%RH. When the unit is
in continuous operation the LCD screen will display two dashes.
NOTE: If the set humidity level is higher than the level in the room, the compressor will stop
working, although the fan continues.
The default humidity setting is 60%RH
6
12-12-2003
16:15
Pagina 7
Display lights
G
reen light
When ON/OFF button is pressed to start the unit, a green light will come on automatically.
The light will go off again when the unit is switched off.
NOTE: After a power outage, the unit will not switch itself on again automatically. When the
power supply has been reestablished, please press the ON/OFF button to start the unit
again.
R
ed light FULL TANK
If the water tank is full, or if it is not correctly positioned, the red light will flash.
NOTE: When the unit is operating in Fan Only mode, the red light will still flash whether the
water tank is full or not correctly positioned.
However, this will not affect the working of the unit.
An alarm will sound until the tank is either emptied or correctly slotted into place.
Display screen
The unit has a LCD display screen. By default, the screen will display the relative atmospheric
humidity level. If you want to see the room temperature, press
button and the temperature will be displayed for few seconds, after that the screen will return to default mode.
7
ENGLISH
GB
GB
12-12-2003
16:15
Pagina 8
Disposing of the collected
water
A) Empty the tank manually.
When the tank is full, remove and empty it
into a large sink or tub (fig.1).
When finished, replace it properly.
NOTE: The tank must be positioned properly
making sure slots on back of tank are positioned correctly.
For the electronic model, if you hear the continual sound of the buzzer, it means the tank is
not in the proper position.
For the mechanical model, after removing
the tank, you must first wait 3 minutes to replace the tank.
fig. 1
B) Continuous draining.
Condensed water can be drained via a hose
connected to an outlet at the rear of the tank:
1. remove the water tank.
2. Using a 5 mm drill bit, drill a hole in the rear of
the tank along the torus like in figure 2.
3. connect a hose to the hose connector. Be
sure the hose does not kink or bend.
Make sure that the hose is not higher than the
hose connection (see figure 3).
NOTE: If you do not want to use the hose, you
can plug the hole with the rubber stopper
accessory.
fig. 2
Drill
fig. 3
Hose
Drain
8
12-12-2003
16:15
Pagina 9
Installation Instructions
1. Allow at least 12 inches (30cm) of space on all sides of the unit for good air circulation.
2. Install your dehumidifier on a floor, table, or shelf. When installing the unit on a table or shelf,
make sure the table or shelf is strong enough to support the weight of the unit with a full
bucket.
Do not sit or stand on the dehumidifier.
NOTE: The height of a table or shelf might provide a better position from which to handle the
tank and help prevent icing of the coils due to colder air near the floor(such as in a basement).
3. The tank must be properly positioned in order for the automatic shut-off to operate correctly.
4. Castor wheels let you move the dehumidifier easily.
in.
1 20 c m )
(3
in. )
1 20 c m
3
(
Choosing the proper location for the unit
1. Use the unit in a basement to help prevent moisture damage.
2. Use the unit in cooking, laundry, bathing, and dishwashing areas which have excessive moisture.
3. Use the unit to prevent moisture damage anywhere books or valuables are stored.
4. Place the unit where you want to have a comfortable conditions.
9
ENGLISH
GB
GB
12-12-2003
16:15
Pagina 10
C a re a n d M a i n t e n a n c e
M
aintenance
Your dehumidifier is designed to serve you year-round. It needs practically no attention.
However, you should check your unit and inspect the coils annually. You may call a qualified
professional to perform this annual checkup.
If you are familiar with electrical appliances and their functions, listed below are instructions
which would allow you to do the inspection and maintenance for yourself.
T
he front panel and cabinet
• Using a soft cloth, clean the front panel and cabinet with warm water and a mild soap or
detergent.
• Rinse and dry thoroughly. Wipe the front panel and cabinet with a soft and dry cloth.
NOTE: Never sprinkle water into the appliance in order to prevent risk of short-circuit and fire.
• Never use gasoline, thinner or any other similar chemicals for cleaning.
• Do not use bleach or abrasives.
A
Pull out
ir filter
•
•
•
•
First, press the two hooks on the top of air filter.
Second, slide the bottom to the top.
Then you can take out the air filter.
Wash the air filter with warm water and a mild
detergent. Rinse and dry it thoroughly.
• The assembly order is the opposite of disassembly.
Press
WARNING
Electrical Shock Hazard
Disconnect power supply cord from receptacle before performing any maintenance.
keep attention not to touch the coil’s fins as these are sharp.
Failure to follow the above precautions could result in the electrical shock or personal injury.s
10
12-12-2003
16:15
Pagina 11
Tr o u b l e s h o o t i n g t i p s
ENGLISH
GB
Frequently, a problem is minor and a service call may not be necessary. Use this troubleshooting guide to identify possible problems you may be experiencing.
PROBLEM
Unit does not operate
POSSIBLE CAUSE
•
•
•
•
•
•
•
Dehumidifying capacity (moi- •
•
sture removal) low
Check
Check
Check
Check
Check
power cord connection.
electrical outlet for blown fuse.
if water tank is full (empty).
water tank is properly installed.
if the unit is not turned on.
Air filter is dirty and /or blocked.
Ambient room temperature too low.
Poor airflow circulation/obstruction
The control may not be set high enough
• Check all doors and windows are cloRelative Humidity setting not
sed
reached after long period of
• Area/room is too large for the capaoperation
city of the dehumidifier
Frost appears on coils
• Room temperature is too low
11
GB
12-12-2003
16:15
Pagina 12
L i m i t e d W a r ra n t y
This warranty applies to all home appliances with De’Longhi or Kenwood brand names.
FOR CONTIGUOUS UNITED STATES ONLY
Limited Warranty
We warrant each De’Longhi appliance to be free from defects in material and workmanship.
From the purchase date, our obligation under this warranty is to provide one (1) year free parts
and labor on the entire appliance, with an additional four (4) years free on any part of the sealed system consisting of the compressor, evaporator, condenser and factory connected refrigerant tubing. Labor and all other parts during the additional four (4) year warranty are to be
paid by the owner. All appliances in need of repair are to be shipped to an authorized
De’Longhi service center at the owner’s expense, and De’Longhi will then incur the return shipping costs. After the first five (5) years of ownership, all expenses (all parts, labor and shipping)
are to be paid by the owner of the unit. This warranty shall apply only if the appliance is used
in accordance with the factory directions that accompany it, and on an Alternating Current
(AC) circuit. This warranty is in lieu of all other warranties and representations, expressed or
implied, and all other obligations or liabilities on our part. We do not authorize any other person or company to assume for us any liability in connection with the sale or use of our appliance. This warranty shall not apply to any appliance that has been repaired or altered outside
our factory nor shall it apply to any appliance that has been subjected to misuse, negligence
or accidents.
If repairs become necessary, see contact information below:
U.S. Residents:
Please contact our toll free hotline at 1-800-322-3848 or log onto our website at www.delonghi.com.
For all accessories, spare parts or replacement parts, please contact our parts division at 1800-865-6330.
CANADA Residents:
Please contact our toll free hotline at 1-888-335-6644 or log onto our website at www.delonghi.com.
Other countries:
Please visit: www.delonghi.com.
12