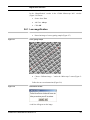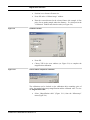
1
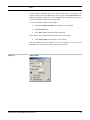
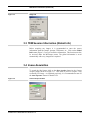
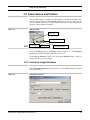
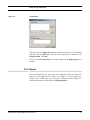
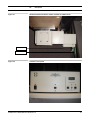
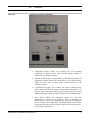
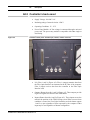
UltraScan User’s Guide
Reference Series
Gatan, Inc.
5933 Coronado Lane
Pleasanton, CA 94588
Tel
(925) 463-0200
FAX (925) 463-0204
May 2004
895.MANUAL
Revision 2.0
Preface
About this Guide
This UltraScan Reference Series User’s Guide is written to provide a brief
description of the camera’s operating principles, instructions on how to install
the camera, and an introduction to imaging in DigitalMicrograph. For
additional discussion of image processing, refer to the DigitalMicrograph
User’s Guide.
Preview of this Guide
The UltraScan Reference Series User’s Guide includes the following chapters:
Chapter 1, “Introduction,” summarizes the features of the UltraScan family
cameras.
Chapter 2, “Getting Started,” shows the first steps necessary to start the
DigitalMicrograph software and prepare for the acquisition of an image (Gain
Normalization and Magnification Calibration).
Chapter 3, “Image Acquisition,” shows the user the most often used floating
windows in DigitalMicrograph and a brief description on how to use them to
view, acquire and save an image.
Chapter 4, “Quick Reference,” is a brief summary of the steps necessary to
operate a Gatan CCD camera.
Chapter 5, “Care and Maintenance,” contains some general tips on the care
and maintenance of the UltraScan camera. It also contains a list of questions
that are often asked by users.
Appendix
- Hardware description provides the system requirements and a checklist. A
brief description of the basic working principles of a CCD camera is also given.
The pictures of different parts of the camera (camera head, back and front of the
controller, etc.) are shown.
- CE Declaration of Conformity.
UltraScan User’s Guide Reference Series Rev 1.0
i
Disclaimer
Gatan, Inc., makes no express or implied representations or warranties with
respect to the contents or use of this manual, and specifically disclaims any
implied warranties of merchantability or fitness for a particular purpose. Gatan,
Inc., further reserves the right to revise this manual and to make changes to its
contents at any time, without obligation to notify any person or entity of such
revisions or changes.
Copyright and Trademarks
© 2002. All rights reserved.
DigitalMicrograph ® is a registered trademark of Gatan. Inc., registered in the
United States.
UltraScan User’s Guide Reference Series Rev 1.0
ii
Support
Contacting Gatan Technical Support
Gatan, Inc., provides free technical support via voice, Fax, and electronic mail.
To reach Gatan technical support, call or Fax the facility nearest you or contact
by electronic mail:
• Gatan, USA (West Coast)
Tel: (925) 463 0200
Fax: (925) 463 0204
• Gatan, USA (East Coast)
Tel (724) 776 5260
Fax: (724) 776 3360
• Gatan, Germany
Tel: 089 352 374
Fax: 089 359 1642
• Gatan, UK
Tel: 01865 253630
Fax: 01865 253639
• Gatan, Japan
Tel: 0424 38 7230
Fax: 0424 38 7228
• Gatan, France
Tel: 33 (0) 1 30 59 59 29
Fax: 33 (0) 1 30 59 59 39
• Gatan, Singapore
Tel: 65 6293 3160
Fax: 65 6293 3307
• Gatan Online
http://www.gatan.com/
[email protected]
[email protected]
UltraScan User’s Guide Reference Series Rev 1.0
iii
Table of Contents
ULTRASCAN USER’S GUIDE REFERENCE SERIES ................................................................................................... 1
PREFACE................................................................................................................................................................................I
ABOUT THIS GUIDE ............................................................................................................................................................I
PREVIEW OF THIS GUIDE.................................................................................................................................................I
DISCLAIMER....................................................................................................................................................................... II
COPYRIGHT AND TRADEMARKS ................................................................................................................................. II
SUPPORT .............................................................................................................................................................................III
CONTACTING GATAN TECHNICAL SUPPORT ........................................................................................................III
1
INTRODUCTION ..................................................................................................................................................... 1-1
2
GETTING STARTED............................................................................................................................................... 2-1
2.1
2.2
2.3
2.4
2.5
2.6
2.6.1
2.6.2
3
IMAGE ACQUISITION ........................................................................................................................................... 3-1
3.1
3.2
3.3
3.4
3.5
3.5.1
3.5.2
3.5.3
3.5.4
3.5.5
4
THE WORKPLACE ................................................................................................................................................ 2-2
CAMERA CONFIGURATION................................................................................................................................... 2-3
SET BIAS LEVELS ................................................................................................................................................ 2-5
QUADRANT CORRECTION REFERENCE ................................................................................................................. 2-6
GAIN NORMALIZATION ....................................................................................................................................... 2-7
MAGNIFICATION CALIBRATION........................................................................................................................... 2-7
Low magnification ......................................................................................................................................... 2-9
“High” magnification ................................................................................................................................. 2-11
VIEW ................................................................................................................................................................... 3-1
IMAGE NOTES ..................................................................................................................................................... 3-3
TEM SESSION INFORMATION (GLOBAL INFO) .................................................................................................... 3-4
IMAGE ACQUISITION ........................................................................................................................................... 3-4
IMAGE SAVING AND PRINTING ............................................................................................................................ 3-5
Choosing directory ........................................................................................................................................ 3-5
Construct Image File Name........................................................................................................................... 3-5
Report Options .............................................................................................................................................. 3-6
Report ............................................................................................................................................................ 3-7
Printing dimensions....................................................................................................................................... 3-8
QUICK REFERENCE .............................................................................................................................................. 4-1
UltraScan User’s Guide Reference Series Rev 1.0
1-1
5
CARE AND MAINTENANCE................................................................................................................................. 5-1
5.1
GENERAL PRECAUTIONS ..................................................................................................................................... 5-1
5.1.1
Peltier cooler maintenance............................................................................................................................ 5-1
5.1.2
Scintillator maintenance and precautions ..................................................................................................... 5-2
5.1.3
Fan Filter ...................................................................................................................................................... 5-3
5.2
MOST OFTEN ASKED QUESTIONS........................................................................................................................ 5-4
APPENDIX 1 ...........................................................................................................................................................................I
HARDWARE DESCRIPTION ..............................................................................................................................................I
A1 SYSTEM REQUIREMENTS ................................................................................................................................................. I
A2
DESCRIPTION .........................................................................................................................................................II
A2.1
FRONT PANEL CONTROLS ..................................................................................................................................... IV
A2.2
CONTROLLER’S BACK PANEL ............................................................................................................................... VI
A3 INSTALLATION .............................................................................................................................................................. IX
A3.1 Pressure lines ......................................................................................................................................................... X
A3.2 Mounting the camera........................................................................................................................................... XII
A3.3 Water lines.......................................................................................................................................................... XIII
A3.4 Electrical connections ......................................................................................................................................... XV
A3.5
Shutter-control output .................................................................................................................................. XVI
A3.6
Shutter-override output ................................................................................................................................ XVI
APPENDIX 2 ....................................................................................................................................................................XVII
CE CERTIFICATION.....................................................................................................................................................XVII
DECLARATION OF CONFORMITY ........................................................................................................................XVIII
INDEX................................................................................................................................................................................ XIX
UltraScan User’s Guide Reference Series Rev 1.0
1-2
List of Figures
FIGURE 2-1
FIGURE 2-2
FIGURE 2-3
FIGURE 2-4
FIGURE 2-5
FIGURE 2-6
FIGURE 2-7
FIGURE 2-8
FIGURE 2-9
FIGURE 2-10
FIGURE 2-11
FIGURE 2-12
FIGURE 2-13
FIGURE 2-14
FIGURE 2-15
FIGURE 3-1
FIGURE 3-2
FIGURE 3-3
FIGURE 3-4
FIGURE 3-5
FIGURE 3-6
FIGURE 3-7
FIGURE 3-8
FIGURE 3-9
FIGURE 3-10
FIGURE A 1
FIGURE A 2
FIGURE A 3
FIGURE A 4
FIGURE A 5
FIGURE A 6
FIGURE A 7
FIGURE A 8
FIGURE A 9
FIGURE A 10
FIGURE A 11
CAMERA CONTROLLER ................................................................................................................................... 2-2
DIGITALMICROGRAPH WORKPLACE .............................................................................................................. 2-3
(A) CAMERA MENU (B) CAMERA CONFIGURATION ........................................................................................ 2-4
SET THE TARGET INTENSITY ........................................................................................................................... 2-6
GLOBAL MICROSCOPE INFO WINDOW ............................................................................................................ 2-8
MICROSCOPE MENU ........................................................................................................................................ 2-8
CROSS GRATING SAMPLE ................................................................................................................................ 2-9
INSTRUCTIONS WINDOW ................................................................................................................................. 2-9
CALIBRATION WINDOW ................................................................................................................................ 2-10
CHOOSE YES TO COMPLETE THE CALIBRATION............................................................................................ 2-10
MAGNIFICATION TABLE ................................................................................................................................ 2-11
HIGH-RESOLUTION IMAGE OF A CRYSTALLINE SAMPLE ................................................................................ 2-11
DIFFRACTOGRAM ......................................................................................................................................... 2-12
HIGH MAGNIFICATION CALIBRATION INSTRUCTIONS .................................................................................... 2-12
CALIBRATION WINDOW ................................................................................................................................ 2-13
IMAGE WINDOW ............................................................................................................................................. 3-2
FOCUS LOUPE ................................................................................................................................................. 3-3
IMAGE INFO .................................................................................................................................................... 3-4
CAMERA ACQUIRE WINDOW........................................................................................................................... 3-4
SAVING WINDOW ............................................................................................................................................ 3-5
SAVING SET-UP WINDOW ............................................................................................................................... 3-5
SAVING DATA BAR ........................................................................................................................................ 3-6
CUSTOM ITEMS............................................................................................................................................... 3-7
(A) REPORT VIEW (B) IMAGE VIEW .............................................................................................................. 3-8
CONTROL PALETTE ......................................................................................................................................... 3-9
ULTRASCANTM REFERENCE SERIES CAMERA MOUNTED ON A TEM COLUMN.................................................. III
CONTROLLER’S FRONT PANEL ......................................................................................................................... III
CONTROLLER’S FRONT PANEL: SHUTTER CONTROL ......................................................................................... IV
CONTROLLER’S FRONT PANEL: TEMPERATURE ................................................................................................ V
CONTROLLER’S BACK PANEL: I/O FIBER OPTIC, SHUTTER, CAMERA CONNECTOR ........................................... VI
CONTROLLER’S BACK PANEL: AIR CONNECTIONS ...........................................................................................VII
CONTROLLER’S BACK PANEL ........................................................................................................................ VIII
US 4000 SP BLOCK DIAGRAM......................................................................................................................... IX
CAMERA INTERFACE DETAILS. ........................................................................................................................ XI
WATER LINES ............................................................................................................................................... XIV
ELECTRICAL DIAGRAM...................................................................................................................................XV
UltraScan User’s Guide Reference Series Rev 1.0
1-3
1 Introduction
The Gatan UltraScan™ family of cameras is designed to deliver the ultimate
quality in transmission electron microscope images. It is the first digital camera
system with the potential to replace film as a recording medium in the TEM.
New technology has been introduced at every stage of the imaging process to
improve resolution, sensitivity, dynamic range, linearity and speed of operation.
The UltraScan™ family shares a compact mechanical design for bottom mount
CCD (charged-coupled device) cameras with full retraction capability and
complete compatibility with GIF and ENFINA™ spectrometers.
The UltraScan™ family of cameras is available in two series, Reference and
Standard series. The common feature to these two series is the utilization of the
patented High-Contrast Resolution (HCR™) optical technology. HCR™
technology results in images with higher resolution and higher contrast than
images acquired with traditional optics and takes digital imaging resolution to a
level that challenges film. The Reference Series UltraScan™ cameras
incorporate the First Light™ readout electronics which reads out all four CCD
output channels in parallel for increased speed while maintaining low-noise
performance. The Standard Series UltraScan™ cameras read the CCD through
a single low-noise channel. The Reference series features 2k x 2k and 4k x 4k
CCD format and the Standard series features only the 4k x 4k format.
This user guide is written for the Reference series, Model 894 US1000 (2k x
2k) and Model 895 US4000 (4k x 4k).
The intent of this guide is to:
•
Help the user become proficient with the Gatan DigitalMicrograph
software to correctly acquire images from the CCD camera.
•
Give the user a brief understanding of the working principles of the
camera.
•
Allow easy troubleshooting.
UltraScan User’s Guide Reference Series Rev 1.0
1-1
2 Getting Started
The following steps will enable the first-time user to switch on the digital
camera, launch DigitalMicrograph and prepare for the acquisition of an image.
•
Make sure that the viewing chamber is at the proper vacuum.
•
Make sure the water and the three color-coded pressure lines are
correctly connected to the camera and proper water pressure is
maintained.
•
Switch on the CCD camera controller (Fig. 2-1), the LED will turn
green.
•
Flip the Shutter switch to AUTO.
•
Flip the Peltier Cooler switch to the COOL position. For best results it
is recommended waiting (2 hours or more) for the system to stabilize.
•
Turn the computer on (if it is not on yet) and double click on the
DigitalMicrograph icon to launch the application.
UltraScan User’s Guide Reference Series Rev 1.0
2-1
The Workplace
Figure 2-1
Camera controller
Power switch
Shutter switch
Peltier switch
2.1 The Workplace
When DigitalMicrograph is launched, you will see the commonly used tools
(left side), the Image Acquisition and Saving tools (right side), and the Result
window as shown in Figure 2-1. These tools are composed by “floating”
windows fully stackable to allow customization.
UltraScan User’s Guide Reference Series Rev 1.0
2-2
Camera Configuration
Figure 2-2
DigitalMicrograph Workplace
Commonly used tools
Image display
Image acquisition and saving tools
Results window
2.2 Camera Configuration
If the camera is already configured by a Gatan service engineer, this section can
be ignored.
Before starting acquiring images, it is necessary to configure the camera. This
process is shown in Figure 2-3.
UltraScan User’s Guide Reference Series Rev 1.0
2-3
Camera Configuration
Figure 2-3
(a) Camera Menu
(b) Camera configuration
•
Select Configure Camera in the Camera menu (Figure (2-3a).
•
In the Camera configuration dialog box (Figure 2-3b), you can change
the name of the camera by typing in the Name field.
•
Image rotation can be specified in the Rotation pull-down menu.
•
The coordinates for column defect correction are entered in the Defects
field. For example, entering the following:
r0-8, r4088-4095, c0-8,c4088-4095
(r and c indicates row and columns respectively) corrects for the 8
pixels wide edge which does not contain active CCD pixels in the case
of the UltraScan 4000.
•
It is important to specify the Primary and Alternate (if there is one set
up) shutter available to the camera.
•
Finally you should specify the shutter status, i.e. the state of the shutter
when the CCD camera is not acquiring any images. Shutter Normally
Closed is the default setting.
UltraScan User’s Guide Reference Series Rev 1.0
2-4
Set Bias Levels
2.3 Set Bias Levels
In 4-channel CCD readout, the entire CCD sensor is divided into 4 sectors
(called quadrants). It is common that each quadrant has a different bias level.
This can result in CCD images with visible quadrant (like a chess board
pattern).
Under the Camera menu (Figure 2-3), Set Bias Levels routine automatically
measures and sets the bias for each quadrant. The bias setting is written to the
First Light Controller. This will remove the majority of the image contrast from
quadrant to quadrant in an evenly illuminated flat field image and maximize the
dynamic range.
The Set Bias Levels should be run before the linearization procedure (next
section) and after the camera is cooled. It is not necessary to run Set Bias
Levels again.
When running this routine, it does not matter if the viewing screen is raised or
not since the automatic procedure blanks the beam on the CCD as needed.
UltraScan User’s Guide Reference Series Rev 1.0
2-5
Quadrant Correction Reference
Figure 2-4
Set the target intensity
2.4 Quadrant Correction Reference
The above Set Bias Levels routine removes gross contrast variation from
quadrant to quadrant. The remaining variation can be removed by the Prepare
Quadrant Correction Reference routine.
Before running the Prepare Quadrant Correction Reference routine, make
sure the CCD has reached its stable temperature (reading from the front panel
of the First Light controller).
Remove the sample from the field of view and spread the illumination evenly
across the CCD sensor (similar to “prepare gain reference” image).
Under Camera menu (Figure 2-3a), run the Prepare Quadrant Correction
Reference routine. Set the target intensity so the center of the intensity
indicator is in the green region (Figure 2-4). Follow the instructions on the
screen. This is a time consuming procedure as images with various exposures
are recorded to cover full intensity range. It typically takes about 50 and 75
UltraScan User’s Guide Reference Series Rev 1.0
2-6
Gain Normalization
minutes for US1000 (2k x 2k) and US4000 (4k x 4k) respectively. Once the
procedure completes, a reference image is stored in DigitalMicrograph
“Reference Images” folder for later use.
Typically it is not required to run this routine frequently.
It is important to run Gain normalization routine (next section) after Prepare
Quadrant Correction Reference in order to activate the linearization
correction routine, so that it is applied to all the future acquired images.
2.5 Gain Normalization
It is important to prepare a new gain reference image after the CCD has reached
the equilibrium temperature (normally this takes about 1-2 hours). The gain
reference image should be checked regularly.
To prepare gain reference image, remove specimen from the field of view,
evenly spread the illumination across the CCD sensor.
Under the Camera menu (Figure 2-3), choose Prepare Gain Reference. Set
the target intensity to the value of 10,000-20,000 (for US4000, it may be
necessary to set the target intensity close to 10,000 counts since the CCD may
saturate around 20,000 counts. See the “Most Often Asked Questions” in
section 5 for details). Normally it is sufficient to set the frames to average to 4.
Then simply follow the instructions on the screen.
It is recommended to perform this operation when
•
The camera temperature is stable (check the temperature display on the
controller front panel),
•
Every time the camera is switched on,
•
Once a week if the camera is always on, or
•
Before acquiring any important images.
2.6 Magnification Calibration
The displayed nominal magnification on TEM is for photographic film and has
an accuracy of 5-10%. The CCD camera is located on a different plane (height
wise) respect to the film camera. As a consequence, the magnification must be
calibrated. The calibration is done using Reference calibration samples.
At “Low” magnifications:
•
Use “cross grating sample” or any sample having known spacing
At “High” magnifications:
UltraScan User’s Guide Reference Series Rev 1.0
2-7
Magnification Calibration
•
Use “graphite” or any crystalline samples having known lattice spacing
•
Use the FFT method.
It is very important to make sure DigitalMicrograph software correctly reads
the TEM magnification. If the communication between the computer and the
TEM is established, the magnification is read automatically. Otherwise, please
make sure DigitalMicrograph is set to prompt the user to enter a value for TEM
magnification every time an image is to be acquired. This can be set by
choosing the “Global Microscope Info” window shown in Figure 2-5 under the
Microscope menu (Figure 2-6).
Figure 2-5
Global Microscope Info window
Figure 2-6
Microscope menu
UltraScan User’s Guide Reference Series Rev 1.0
2-8
Magnification Calibration
In the “Magnification” section in the “Global Microscope Info” window
(Figure 2-4) choose:
•
Source from: User
•
Ask User: Always
•
Click OK
2.6.1 Low magnification
•
Figure 2-7
Record an image of a cross grating sample (Figure 2-7)
Cross grating sample
•
Choose “Calibrate image…” under the “Microscope” menu (Figure 26).
Follow the on screen instructions (Figure 2-8)
Figure 2-8
Instructions window
A red line will appear on the image.
UltraScan User’s Guide Reference Series Rev 1.0
2-9
Magnification Calibration
Figure 2-9
Figure 2-10
•
Position it on a feature of known size.
•
Press OK on the “Calibrate image” window.
•
Enter the correct distance for the selected feature (for example 10 line
pairs of cross grating sample where the distance = 10 x 0.463µm) in the
“Calibration” window and select the units (see Figure 2-9).
Calibration window
•
Press OK.
•
Choose YES in the next window (see Figure 2-9) to complete the
magnification calibration.
Choose YES to complete the calibration
The calibration can be checked on the calibration table containing pairs of
value: the nominal microscope magnification and the calibrated value. To view
the magnification table:
•
Select “Magnification table” (Figure 2-11) from the “Microscope”
menu (Figure 2-6).
UltraScan User’s Guide Reference Series Rev 1.0
2-10
Magnification Calibration
Figure 2-11
Magnification table
The first column represents the nominal TEM magnification and the second
column is the actual magnification at the CCD.
2.6.2 “High” magnification
•
Figure 2-12
Record a lattice image of the crystalline sample (Figure 2-12).
High-resolution image of a crystalline sample
•
Choose “Calibrate image from
“Microscope” menu (Figure 2-6).
UltraScan User’s Guide Reference Series Rev 1.0
Diffractogram…”
under
the
2-11
Magnification Calibration
A diffractogram will be calculated (Figure 2-13).
Figure 2-13
Diffractogram
•
Follow the on screen instructions (Figure 2-14)
A red line will appear on the diffractogram.
Figure 2-14
•
Position the endpoints of the red line on two symmetrical diffraction
peaks (Figure 2-13).
•
Press OK to specify the reciprocal unit and the d-spacing (in the
corresponding real units) in the next window (Figure 2-15).
High magnification calibration instructions
UltraScan User’s Guide Reference Series Rev 1.0
2-12
Magnification Calibration
Figure 2-15
Calibration window
UltraScan User’s Guide Reference Series Rev 1.0
2-13
3 Image Acquisition
This chapter contains some instructions on how to acquire an image and a
description of the most frequently used floating windows.
Now you are ready to:
•
Insert the sample,
•
Find a region of interest
•
Start using the CCD camera to view your specimen.
3.1 View
The view mode (shown in Figure 3-1) allows user to observe Live (continuous)
images on the monitor. The setup has two operation modes which are preset for
easy use:
•
The Search mode displays a continuous (low resolution) image with
the entire CCD field of view. This is to allow the user to quickly
conduct a sample search using the CCD camera.
•
The Focus mode displays a continuous image at higher resolution than
the Search image. Fine adjustment of focus setting can be done with
this operation mode.
In addition, there is another way to adjust the image focus. Click on the Focus
Loupe. This allows the user to focus the image by using a small image area
with high speed. The size of the box can be resized by dragging its corner and
its location can be easily changed by putting the pointer inside the box and
dragging it. The Auto Survey option adjusts the brightness and the contrast in
real time for optimal image quality.
Auto Exposure is enabled and disabled by clicking on the Auto Exposure
selection box. Since a test exposure must be made regularly to ensure proper
exposure time for the beam intensity on the CCD and for 4kx4k CCD, this
means 16million pixels must be read out each time, it is recommended to turn
UltraScan User’s Guide Reference Series Rev 1.0
3-1
View
off this feature. When the box is not selected the user is in control of the
exposure time that can be changed by either typing in the exposure time box
and then pressing the Enter key, or by hitting the up and down arrow keys to
respectively double or halves the exposure time.
To view a continuous image of the sample:
•
Select the Camera inserted box or make sure it is selected.
•
Setup: Search mode
•
Press Start View to start the image acquisition
If you need to better adjust the microscope focus on the sample:
•
Click Focus Loupe in the Camera View window.
Only the selected area (see Figure 3-2) will be imaged at a very fast rate
allowing to set a more precise focus on the area of interest.
Figure 3-1
Image window
UltraScan User’s Guide Reference Series Rev 1.0
3-2
Image Notes
Figure 3-2
Focus Loupe
The acquisition can be stopped by:
•
Pressing Stop View, or
•
Pressing the Spacebar.
3.2 Image Notes
The user can type in notes in the Image Info window shown in Figure 3-3.
Saving an image will automatically save the image notes with the image file.
The Up/down arrows allow user to browse through the images saved in a
session when using the AutoSave function (Section 3.5 below).
UltraScan User’s Guide Reference Series Rev 1.0
3-3
TEM Session Information (Global Info)
Figure 3-3
Image Info
3.3 TEM Session Information (Global Info)
Before acquiring any images, it is recommended to enter the correct
information about the sample, operator, TEM name, etc. Click on the Global
Info button (Figure 3-3) to type in all these information. This function can also
be accessed under the Microscope menu. The global information is saved
automatically with every image that is acquired.
3.4 Image Acquisition
To record the final image, click on the Start Acquire button in the Camera
Acquire palette shown in Figure 3-4. This mode is preset to acquire a full
resolution CCD image. As explained previously, it is recommended to turn off
the Auto Exposure feature for 4kx4k CCD.
Figure 3-4
Camera Acquire window
UltraScan User’s Guide Reference Series Rev 1.0
3-4
Image Saving and Printing
3.5 Image Saving and Printing
The recorded images are displayed on the monitor. Pressing on the floppy disk
icon or on the printer icon in the Saving palette (Figure 3-5) the image can be
saved or printed respectively. Images can be easily saved in any user specified
directory with a common root name.
Figure 3-5
Saving window
Report view
Saving Set-up button
Print image
Save image
3.5.1 Choosing
directory
Reset image counter
Click on the Set up button in the Saving window (Figure 3-5). The Saving Set
up dialog box will be displayed as shown in Figure 3-6.
In the Save in directory (Figure 3-6), click on the Browse button. Select or
create a directory for saving images.
3.5.2 Construct Image File Name
In the File Name Options field, specify the way you want the image file name
to be constructed.
Figure 3-6
Saving Set-up window
UltraScan User’s Guide Reference Series Rev 1.0
3-5
Image Saving and Printing
3.5.3 Report Options
Click on the Report Options button to view the dialog box shown in Figure 37. You can choose to have any parameters listed to be included in your report.
You can also add a logo file and image notes to the report.
Figure 3-7
Saving Data Bar
Custom item allows user to add text information to every report page. This
feature is useful to add the name of your institution, or the name of your TEM
lab. Click Edit to get the Custom items dialog box as shown below (Figure 38).
UltraScan User’s Guide Reference Series Rev 1.0
3-6
Image Saving and Printing
Figure 3-8
Custom Items
Type the text in the Single line item (for example the name of your TEM lab)
and then click the Add button. Now the text is entered in the window of the
Single line item. Click OK.
The style of the Custom item can be easily changed in the Report page (next
section).
3.5.4 Report
The report button (the one with a page and a magnifier on the Save palette in
Figure 3-5) will toggle between report view (Figure 3-8 a) and image view
(Figure 3-8 b). In the report view, an image is displayed of the print preview
mode with parameters as specified in the Report Options.
UltraScan User’s Guide Reference Series Rev 1.0
3-7
Image Saving and Printing
Figure 3-9
(a) Report view
(b) Image view
Users can customize the layout and selection of parameters on the page (for
example, using pointer to move the text around) and then save the setting as a
report template. This is done by clicking the Save As Default Layout button in
the Save setup dialog.
The Custom item on the page can be changed to different text style to make it
more visible. First position it on the Report page and then choose the font and
size of your liking. Click
3.5.5 Printing dimensions
Digital images can not be magnified “indefinitely” since “Pixelation” may
occur. To print non-pixelated images, ppi (pixel per inch) must be at least 144.
For 1k x 1k CCD images, 144ppi means the images will be printed ~ 7 x 7 inch.
To find out the good printing dimensions for your image, use the Control
palette in DigitalMicrograph (Figure 3-10).
•
Select the image (click on it).
•
Read the printing dimensions on the Control palette.
•
Click on the printer icon in the Saving window (Figure 3-5) to print.
UltraScan User’s Guide Reference Series Rev 1.0
3-8
Image Saving and Printing
Figure 3-10
Control palette
UltraScan User’s Guide Reference Series Rev 1.0
3-9
4 Quick Reference
The steps necessary for operating Gatan CCD camera are summarized here.
•
Make sure that the viewing chamber is at the proper vacuum.
•
Make sure the water and the three color-coded pressure lines are
correctly connected to the camera and proper water pressure is
maintained.
•
Switch on the CCD camera controller.
•
Flip the Peltier Cooler switch to the COOL position. For best results it
is recommended waiting (2 hours or more) for the system to stabilize.
•
Flip the shutter switch to AUTO.
•
Turn the computer on (if it is not on yet) and double click in the
DigitalMicrograph icon to launch the application.
•
Check the TEM session information by clicking on the Global Info
button on the Image Info palette (Figure 3-3).
•
Run the Set Bias Levels routine by selecting the Set Bias Levels button
under the Camera menu.
•
Prepare a quadrant correction reference by choosing Prepare
Quadrant Correction Reference under the Camera menu (Figure 23).
•
Prepare a gain reference image by choosing Preparing Gain
Reference under the Camera menu (Figure 2-3).
UltraScan User’s Guide Reference Series Rev 1.0
4-1
Image Saving and Printing
•
Click on “Start View” on the View palette in Search mode (Figure 31) to position sample area of interest. (disable Auto Exposure).
•
Click on Focus Loupe on the View palette (Figure 3-1) to check the
final focus. Make sure Auto Survey is checked.
•
Click on Start Acquire button in the Image Acquire palette (Figure 34). (disable Auto Exposure).
•
Click on Report View button on the Saving window (Figure 3-5) to
view image in print preview mode.
•
Click on Save button (diskette icon on the Saving window) (Figure 35) to save image in the designated folder.
•
Click on Print (Figure 3-5) button (printer icon on the Saving window)
to send image to printer.
UltraScan User’s Guide Reference Series Rev 1.0
4-2
5 Care and Maintenance
This chapter contains some general tips on the care and maintenance of your
UltraScan camera. It also contains a list of questions that are often asked by
users.
5.1
General Precautions
The following are some general precautions users should adhere to in the care
and maintenance of their camera.
5.1.1 Peltier cooler maintenance
•
In standard operation conditions the temperature display is set to a
temperature of -25ºC. The temperature should never exceed 50ºC. A
LED above the reset switch is illuminated when an over-temperature
condition is detected.
The first light controller monitors the temperature of the Peltier heat sink. If the
temperature exceeds 50ºC an automatic protection will shut down the cooler.
Cooling can be restarted by pressing the reset button on the First Light
controller or by powering the controller off and on. The temperature of the
Peltier heat sink can be checked by pressing the “Heatsink” switch.
•
The Peltier cooler should not be switched on if the cooling water is not
flowing.
The Peltier cooler consumes about 20 W of power. If this heat is not removed
by the cooling water, an over-temperature condition will be detected and the
automatic protection will shut down the cooler.
•
Check the flow of cooling water periodically.
UltraScan User’s Guide Reference Series Rev 1.0
5-1
General Precautions
If the flow rate of the cooling water deviates significantly from the value
originally set, make sure the lines are not obstructed and adjust the pressure
regulator to bring the flow back to the original level. Remember, if the water
flow stops while the Peltier cooler is on, an over-temperature condition will be
detected and the automatic protection will shut down the cooler.
•
The Peltier cooler should not be left on when the TEM cooling water is
turned off or fails.
The Peltier cooler is cooled by water from the TEM chiller. If the Chiller is
turned off or fails for a long period, an over-temperature condition will be
detected and the automatic protection will shut down the cooler. Be aware that
for some microscopes the cooling system turns off in the Stand By mode. Be
sure the cooler of the camera is also turned off in that situation.
•
Turn off the Peltier cooler if the microscope viewing chamber is to
remain at air pressure for a long period (more than 30 minutes to an
hour).
When isolated by the gate valve, the CCD vacuum is good for about half an
hour, after which some frosting on the CCD may occur if the CCD is kept cold.
A small amount of ice will sublimate away once high vacuum is restored in the
viewing chamber and the CCD gate valve opens. Removing large amounts of
condensation will require the electronics to be switched off for about 30
minutes after the vacuum in the viewing chamber is restored, so that the CCD
warms up while it is in a good vacuum.
5.1.2 Scintillator maintenance and precautions
•
Minimize exposing the scintillator to the electron beam when the
camera is not in use.
It is particularly important to protect the camera from being unnecessarily
exposed to an intense unscattered beam. As a general rule, if you avoid
conditions which would saturate any part of the sensor area in less than 0.1 sec
(about 10 nA cm 2 at the sensor), the scintillator lifetime will probably exceed
the lifetime of the rest of the system. On the other hand, each time any CCD
pixels are intensely saturated, the scintillator efficiency may be permanently
impaired for those pixels, resulting in a variation of the scintillator efficiency
across the image field. If you are not using the camera, keep the viewing screen
down or retract the camera to protect the scintillator from beam damage. Also, a
retracted camera will not collect debris or abrasive particles that may fall down
from the TEM’s film-transport mechanism.
•
Minimize exposing the scintillator/CCD to high beam intensity when
acquiring diffraction patterns.
UltraScan User’s Guide Reference Series Rev 1.0
5-2
General Precautions
There is no defined cutoff where the scintillator will be damaged. Rather,
damage can result from prolonged exposure of the scintillator to a very high
beam intensity (above 30,000 counts in binned by 1 mode and 60,000 counts in
binned by 2 and higher modes). If you have no saturation with a short exposure,
then there is no danger. You can then increase the exposure time and still not
harm the scintillator as it is the beam intensity on the scintillator that causes the
problem and not the accumulated signal in the CCD.
It is recommended to use beam stop to block the central spot when acquiring
SAED diffraction patterns.
If you think you have damaged the scintillator, take an unprocessed image of
uniform illumination. If the spot turns out dark, you have damaged the
scintillator! If it is bright, spread out the beam and set the illumination so you
have about 10,000 counts/sec (in binned by 2 mode) and switch the shutter
switch on the controller to Open. Expose the scintillator for 3 min, switch back
to Auto, and take another picture. The bright area should be gone and the
scintillator should operate normally.
•
Warm the scintillator if oil contaminated.
Some microscopes have a significant vapor pressure of diffusion pump oil in
the viewing chamber. Since the camera is maintained at temperatures below
-20ºC during use, it can act as a cold trap and accumulate an oil film. While thin
this film does not affect imaging, but if it becomes thicker or coalesces into
droplets, stronger and stronger gain correction will become necessary. Other
problems caused by the oil film are charging and the sticking of dirt which
could otherwise be blown off easily. If left for too long, the hydrocarbons
chains in the oil will be cracked by the electron beam making them non-volatile
and un-dissolvable. Then it is necessary to send the camera back to have the
scintillator serviced by Gatan. Fortunately, these problems can be avoided by
adhering to the practice described below.
If you have a clean vacuum in the camera chamber area, warm the scintillator
once or twice a month. But if you have backstreaming from your diffusion
pump, you will need to do it once a week. The camera should only be warmed
for 15 hours or overnight, but not longer. If the camera is used sufficiently
without warming, the electron beam can harden the trapped oil making the
scintillator difficult to clean.
Switch the Peltier cooler to the “Warm” position.
It is OK to run the Peltier cooler in the warm position overnight,
but do not run it when the camera is at air pressure or if the cooling
water is not flowing.
Check the vacuum system.
If oil accumulates even with regular warming of the scintillator, it
is recommended that the vacuum system be checked. Note that the
oil will not be imaged as soon at 120 kV as at a lower voltage (40
kV), so that a problem can exist for some time before it is noticed,
UltraScan User’s Guide Reference Series Rev 1.0
5-3
Most Often Asked Questions
by which time the beam might already have hardened the film.
That fact can be used to diagnose the presence of oil if the user
takes an image at a low kV periodically to check for the presence
of oil.
Examine the surface of the scintillator.
If the surface of the scintillator becomes dirty or scratched, ship the
camera to Gatan for service. Do not attempt to clean the scintillator
yourself as damage can result.
5.1.3 Fan Filter
The controller’s fan filter (see Figure A7 in Appendix 1) needs to be washed
every six months.
To clean the filter:
5.2
•
Remove the plastic filter frame located on the back panel of the
controller.
•
Remove the filter materiel from the frame.
•
Rinse the filter in warm water and pat dry between paper towels.
•
Insert the filter materiel into the frame and reinstall.
Most Often Asked Questions
The following are some of the questions most frequently asked by camera
users. If you are having a problem with your camera, check and see if the tips
listed below are helpful.
1. Why does the US4000 camera saturate far below the 64,000
value (16-bit dynamic range) in 1x binning mode?
For US4000 camera, the saturation of 2x binning readout is set to 16-bit,
i.e. 64,000 value. The higher resolution 1x binning readout mode does not
make full use of the full range of the output amplifier because of the
smaller pixel size. The US4000 saturates at roughly 1/3 of the full
digitization range by intent.
2. There is no image on the CCD, what should I do?
Check if the cable from the UltraScan controller to the camera is properly
connected. Make sure the power is off when plugging cables in.
UltraScan User’s Guide Reference Series Rev 1.0
5-4
Most Often Asked Questions
Check if the shutter cables are properly connected.
Run the Set Bias routine.
Check the “Camera View” floating window to see if the “Camera Inserted”
box is checked (camera inserted).
Check if the Shutter switch on the UltraScan controller is set to AUTO.
Check if the beam has drifted.
Check if the TEM viewing screen is lifted.
Check if you have a film plate stuck above the camera in the TEM.
You may have an image and not being able to see it. Move the pointer
around to get an idea of the counts. If the value is over 4,000 counts (in 1x
binning mode) the CCD is saturated. Reduce the beam intensity or shorten
the exposure time.
3. Why do I have to blank the beam when the CCD is reading
out?
You do not want to expose the CCD to a signal when it is reading out. It is
like continuing to expose the film during its retraction. Blanking the beam
will prevent any electrons from reaching the CCD.
4. How often do I have to acquire a gain reference?
Whenever the image quality seems to be deteriorating. The most reliable
way to see if a new gain reference is advisable is to take a gain normalized
image of uniform illumination with no specimen in the beam and look for
any spurious pattern. If you see one, update the gain reference.
5. What is the shortest and/or the longest exposure time I can
use?
The shortest time is actually determined by the shutter speed of the TEM
shutter (about 0.025 sec). Exposures over 1 minute are unusual.
6. My images are noisy, what can I do?
Try increasing the exposure or current density of the beam.
7. My images are slowly deteriorating, what should I do?
Determine if the CCD is warming up. Check the temperature display on the
controller. Check that the water lines are not clogged. Check the water
temperature of the chiller- should be approximately 20-23 °C. Be sure to
acquire a new gain-reference image.
8. The image is brighter (or darker) on the top than on the
bottom, what should I do?
Check that the CCD has been cooled for at least 2 hours.
UltraScan User’s Guide Reference Series Rev 1.0
5-5
Most Often Asked Questions
Check that the shutter switch on the controller is set to AUTO.
It could be a bad reference image. Retake another one.
Check that the shutter is functioning correctly. If it is, the shutter indicator
light on the controller would go on and off as you take an image.
9. When viewing, the image sometimes gets suddenly
bright/dark, what is happening?
Sudden changes in the contrast may be due to stray x-ray photons that
saturate some of the pixels.
10. How long is the lifetime of the CCD?
None of Gatan’s CCDs has failed due to old age so it is hard to answer. So
far, there are no known mechanisms for aging.
11. How often and for how long should the camera be warmed?
If you have a clean vacuum in the camera chamber area, between once or
twice a month is enough. But if you have backstreaming from your
diffusion pump, you will need to do it more frequently. The camera should
only be warmed for several hours or overnight, but not longer. A quick
way to see if oil is accumulating is to take a uniform illuminated image at
40 or 60 kV.
12. The camera takes a long time to insert/retract, what should I
do?
Check your compressed-air pressure. It should be between 30-60 N cm 2 .
Then the pressure regulator on the red (retract) line should be adjusted so
that insert and retract times are equal.
13. Why can’t I expose photographic film with the camera on
and inserted?
When the camera is on and inserted, the TEM shutter is controlled by the
CCD camera software. In order to protect the CCD, the software (default
setting “shutter normally closed”) closes the TEM shutter if the CCD is not
set to acquire any images. In this case, one cannot expose the photographic
film.
To expose the film, one should (1) simply retract the CCD camera, or (2)
force the shutter open with the switch on the front panel, or (3) set the
shutter configuration to “shutter normally open”.
14. I see a ghost image that won’t go away, what should I do?
It is possible that the dark or gain reference has a ghost image. Try clearing
and re-acquiring the reference images. You can remove the dark reference
image by choosing Remove dark references under the Camera menu.
If the ghost image still exists, it is likely caused by exposing intense beam
on the CCD. Spread out the beam and set the illumination so you have
UltraScan User’s Guide Reference Series Rev 1.0
5-6
Most Often Asked Questions
about 10,000 counts/sec ( in 2 times binned mode) and switch the shutter
switch on the controller to Open. Expose the scintillator for 2-3 min,
switch
back
to
Auto,
and
take
another
image.
UltraScan User’s Guide Reference Series Rev 1.0
5-7
Appendix 1
Hardware description
A1 System Requirements
To use the UltraScan Reference series CCD cameras, the following hardware
and software systems are required:
Windows 2000 Professional or Windows XP Professional
Minimum 512 MB RAM (1GB RAM preferred)
40GB, 1GHz Hard-drive or better
Pentium III or later
Available microscope’s bottom port
Water connections
Air connections
Gatan Microscopy Suite (GMS) software 1.1 or later
UltraScan User’s Guide Reference Series Rev 1.0
I
A2
Description
FireWire capability
A2 Description
An UltraScanTM Reference Series camera acquires an electron microscope
image into a computer in four stages. First a scintillator converts the electron
image into a high-resolution light image. Then a fused fiber-optic plate captures
the light from each point in the image and channels it to the CCD. The CCD
then converts the transferred light image into a second electron image. Finally,
the CCD shifts that image charge row by row to the low-noise output amplifier,
readout electronics and digitizer.
Sensitivity is achieved by maintaining high efficiency at each stage of the
image signal chain: light generation in the scintillator, optical coupling by the
fiber optic plate, image detection by the CCD pixel and also by cooling and
low-noise readout. Resolution is achieved by minimizing light scatter in the
scintillator and light leakage amongst fibers in the fiber optic plate and by
optimized proximity focus at the end of the fiber plate through ultra-thin
bonding technology. In addition, since the signal chain contains no moving or
flexible parts the detection efficiency has very high stability over time. These
techniques together constitute the HCRTM technology, which is at the heart of
the UltraScanTM family.
Figure A1 shows the placement of an UltraScanTM Reference Series camera on
a TEM column. The camera is mounted below the viewing and film chamber.
The camera controller shown in Figure A2 (front panel view) and Figure A7
(back panel view) and an image-acquisition computer are linked to the camera
by supplied cables. Compressed air for controlling the camera insertion and
retraction is taken from the microscope as is the cooling water.
UltraScan User’s Guide Reference Series Rev 1.0
II
A2
Description
TM
Figure A 1
UltraScan
Reference Series camera mounted on a TEM column.
Water line
Air lines
Figure A 2
Controller’s front panel
UltraScan User’s Guide Reference Series Rev 1.0
III
A2
Description
A2.1 Front panel controls
•
Figure A 3
Power switch: A green LED indicates when the power is ON.
Controller’s front panel: shutter control
•
Shutter Control (Figure A3): LEDs 1 and 2 indicate the state of shutters
1 and 2 respectively. An illuminated LED corresponds to a shutter
Open state.
•
AUTO/OPEN Switch (Figure A3): When set to AUTO, the state of
shutters 1 and 2 is controlled by the computer. When set to OPEN,
shutters 1 and 2 are in the open state regardless of the state requested
by the computer.
UltraScan User’s Guide Reference Series Rev 1.0
IV
A2
Figure A 4
Description
Controller’s front panel: Temperature
•
Temperature display (Figure A4): Displays the CCD operating
temperature in degrees Celsius when the First Light Controller is
connected to an UltraScan Camera.
•
Heatsink Switch (Figure A4): Momentary switch. When depressed, the
temperature display monitors the temperature of the thermo-electric
cooler heat sink. Used to check water cooling efficiency of the
UltraScan camera.
•
Cool/Off/Warm (Figure A4): Controls the camera’s thermo-electric
cooler. In the Cool mode the camera will maintain a temperature of -25
degrees Celsius. The warm setting is used to quickly warm the camera
should venting the TEM be necessary and also for oil decontamination.
•
Reset Switch (Figure A4): momentary switch. If a heat sink
temperature in excess of 50 degrees Celsius is detected, the
thermoelectric cooler will automatically shut down and the LED above
the reset switch will be illuminated. The thermoelectric cooler will not
start again until either the reset switch is depressed or the controller is
powered down and back up.
UltraScan User’s Guide Reference Series Rev 1.0
V
A2
Description
A2.2 Controller’s back panel
Figure A 5
•
Supply Voltage: 100-240 V AC
•
Insulating rating of external circuits: 1500 V
•
Operating Conditions: 15 – 25 C
•
Power Entry Module: AC line voltage is connected through a universal
power cord. The power entry module is compatible with either single or
dual fusing.
Controller’s back panel: I/O fiber optic, shutter, camera connector
•
I/O (Fiber 1 and 2) (Figure A5): Fiber 1 (output) transmits data from
the Fiber Optic Interface card mounted in the PCI bus of the computer.
Fiber 2 (input) receives data from the controller to the Fiber Optic
Interface card.
•
Outputs (Shutter Override 1 and 2) (Figure A5): These outputs provide
logic-level signals for control of the TEM shutter.
•
Inputs (Shutter Override 1 and 2) (Figure A5): These inputs are used to
monitor the position of the TEM viewing screen. When a screen down
condition is sensed, the First Light Controller sets both shutter outputs
1 and 2 to open regardless of state requested by the computer. Either
input may be used regardless of shutter configuration.
UltraScan User’s Guide Reference Series Rev 1.0
VI
A2
Description
•
Figure A 6
Camera Connector (Figure A5): Connections to the UltraScan camera
are via a 62 pin connector located on the rear of the controller.
Controller’s back panel: air connections
•
Air Connections (Figure A6): The microscope air line at 60 PSI is
connected to the AIR “IN” connection located on the rear panel. The
camera insertion air line is connected to the AIR IN port. If an “inserted
camera” state is requested by the user, an electronic air valve connects
AIR IN to AIR OUT. If a “retract camera” state is requested or if the
controller is powered down, the AIR OUT port is connected to the
AUX port. No connections to the AUX port are necessary.
UltraScan User’s Guide Reference Series Rev 1.0
VII
A2
Figure A 7
Description
Controller’s back panel
UltraScan User’s Guide Reference Series Rev 1.0
VIII
A3 Installation
Figure A 8
US 4000 SP block diagram.
text
UltraScan System
1.
2.
3.
4.
5.
6.
7.
8.
9.
10.
11.
12.
13.
14.
15.
16.
17.
18.
19.
20.
21.
22.
1
Computer
TEM-interface cable (optional)
Controller
Camera-interface cable
Shutter-interface cable
Camera-interface cable
UltraScan vacuum chamber
Drive assembly
Pneumatic inlets
Preamp assembly
UltraScan camera module
Coolant connections
X-ray shielding
Blanking flange
Accessory port
Charge-coupled device
Fiber optic plate
Electron scintillator
Peltier cooler
Electron microscope
Microscope vacuum
UltraScan flange
4
3
2
UltraScan Camera
Model US4000 SP
20
5
18
7
21 22
6
13
9
15
16
14
12
10
8
19
17
11
A3 Installation
The following steps will enable the first-time users to install the camera with
ease and safety:
•
Unpack the camera, the camera electronics, and the computer.
•
Place the controller within 10ft. (3m) of the column.
•
Place the computer anywhere that is convenient.
UltraScan User’s Guide Reference Series Rev 1.0
IX
A3 Installation
•
Place the black camera cable between the controller and the knee well
of the microscope.
Place with the male end towards the camera.
•
Connect the female end of the camera cable to the controller.
•
Connect the controller line cord to the power strip.
•
Make sure that the controller is set to OFF.
•
Connect the male end of the camera cable to the camera.
Warning: Do not connect or disconnect the camera cable with the controller
power on. Damage may occur.
A3.1 Pressure lines
The camera needs to be connected to the microscope’s pneumatic system
(Figure A9). This will allow controlling the insertion and retraction of the
camera. The camera head can be:
- Fully inserted with the scintillator exposed to the electron beam and the CCD
inside the microscope vacuum.
- Partially retracted with the scintillator out of the beam but the CCD still
under the microscope vacuum.
- Fully retracted with both the scintillator and the CCD sealed inside a
separate vacuum enclosure.
The air kit, supplied with the camera, consists of three sets of tubes (two per
set), numbered 1 through 6 in Figure A9. Tubes 1 and 4 are green, 2 and 5 are
yellow, and 3 and 6 are red. Tubes 1 through 3 are thinner than tubes 4 through
6. All tubes have male quick-disconnect fittings except for 5 and 6, which have
female quick-disconnect fittings. Tube 6 has a pressure regulator along its
length. Three Ts are used to attach the tubes to the microscope’s pneumatic
system.
•
Attach tubes 1 through 3 to the pneumatic inlets on the camera head.
(Going clockwise, the order of the tubes is 1,2, and 3).
•
Cut the compressed-air line going to the diffusion pump gate valve of
the microscope pneumatic system.
The cut must be made as cleanly as possible. It can be made anywhere
along the compressed air line.
•
Connect the two parts of the compressed-air line together in series with
a T.
UltraScan User’s Guide Reference Series Rev 1.0
X
A3 Installation
The two inline fittings of the T must be of a compatible size to the air line.
As the lines of different microscopes may have different diameters, it is a
good idea for the installer to have his own Ts at hand in case the supplied
Ts do not fit. The perpendicular fittings of the supplied Ts fit tubes 4
through 6. If the installer’s Ts are used, their perpendicular fittings must
also fit tubes 4 through 6.
•
Connect tube 6 to the perpendicular fitting of the T along the
compressed-air line.
•
Cut the open line to the diffusion pump gate valve of the microscope’s
pneumatic system in two places.
The cuts must be made as cleanly as possible. They can be made anywhere
along the Open air line, but it is ideal for the first cut to be made one third
of the line’s length from the diffusion pump gate valve and the other cut
two thirds of the line’s length away from the valve.
•
Figure A 9
Connect the three sections of the Open line together in series with two
Ts.
Camera Interface details.
Diffusion pump
gate valve
To viewing
chamber
Diffusion
pump
Diffusion pump gate valve
pneumatic solenoid
Drive
assembly
Unswitched
air
Preamp
assembly
Pressure
regulator
(red) 6
(red) 3
Pneumatic
inlets
1 (green)
2 (yellow)
5
(yellow)
Compressed
air line
4 (green)
UltraScan User’s Guide Reference Series Rev 1.0
XI
A3 Installation
•
Connect tubes 4 and 5 to the remaining two fittings on the Ts along the
open line.
•
Connect tubes 2 and 3 to tube 5 and 6 respectively through their quickdisconnect fittings.
•
Connect the male quick-disconnect fitting of tube 1 to the outlet on the
backside of the controller labeled Air Out (Figure A6).
•
Snap the male quick-disconnect fitting of tube 4 into the inlet on the
backside of the controller labeled Air In (Figure A6).
The quick disconnect fittings automatically seal the lines off when not
connected to anything, so that they may be connected and disconnected from
the controller or the microscope without affecting the operation of the
microscope.
A3.2 Mounting the camera
If you are mounting the camera to the microscope:
•
Vent the microscope’s viewing chamber following the microscope
manufacturer’s instructions.
•
Remove the blanking flange on the microscope’s on-axis camera port
beneath the film chamber. Follow the instructions given by the
microscope manufacturer.
•
Inspect the o-ring seal to the microscope for dust and fibers.
The seal must be clean in order to maintain the vacuum. If necessary, clean
and lightly coat the o-ring with vacuum grease.
•
Mount the camera to the microscope.
Make sure that the sealing surfaces are clean.
•
Reverse the end-point connections for tubes 1 and 3 from the normal
configuration shown in figure A9.
Plug tube 3 into the Air Out outlet on the backside of the controller
(Figure A6) and plug tube 1 into tube 6 (pressure-regulator line). This is a
reversal of the normal configuration but will ensure that when the diffusion
pump gate valve is closed during the rough pump-down, the camera will be
in the inserted, open position.
•
Start the evacuation of the viewing chamber.
Follow the instructions given by the manufacturer.
UltraScan User’s Guide Reference Series Rev 1.0
XII
A3 Installation
•
When the pump-down cycle is complete, restore the configuration of
the pressure lines to the normal configuration as shown in figure A9.
Plug tube 1 into Air Out on the backside of the controller and tube 3 into
tube 6.
A3.3 Water lines
Figure A10 shows how the camera is connected to the microscope’s watercooling system. The line used to expel used cooling water from the camera is
called the water-exhaust line and the line used to intake cooling water into the
camera is called the water-intake line. Lines 1, 2, and 3 are in series and take
cooling water to the camera. Lines 4 and 5 return the water to the microscope
water chiller.
•
Cut the water-chiller hose that runs from the water chiller to the
microscope.
The cut must be made before any pressure regulation or flow restriction in
the microscope plumbing. This will insure that once the water-intake line is
installed, the cooling water will be pushed into the water-intake line so that
the water can cool the camera.
•
Insert a supplied T into the previously cut hose.
Choose the size of T that best fits the water-chiller hose. Screw-type hose
clamps can be used to secure the T to the two ends of the hose.
•
Cut the water-chiller hose that runs from the microscope to the water
chiller.
The cut must be made after any pressure regulation or flow restriction in
the microscope plumbing. This will insure that once the water exhaust line
is installed, the thermally degraded cooling water will be pushed out of the
water-exhaust line so that the water will not return to the camera.
•
Insert a supplied T into the water-chiller hose that runs from the
microscope to the water chiller.
Choose the size of T that best fits the water-chiller hose. Screw-type hose
clamps can be used to secure the T to the two ends of the hose.
•
Connect line 5 to the inserted T.
A screw-type hose clamp can be used to secure the line to the hose.
•
Set the pressure regulator to obtain a flow of 10-12 L/hr within the
limits imposed by the microscope water chiller and the flow needed by
the diffusion pump.
•
Set the chiller temperature regulator around 20-23 °C.
UltraScan User’s Guide Reference Series Rev 1.0
XIII
A3 Installation
Note that temperatures lower than 20 °C may result in condensation
accumulating in the CCD camera head electronics. This may interfere with
normal functioning of the camera.
•
Connect line 1 to the pressure regulator end of line 2.
•
Connect line 2 (flow meter end) to line 3 and the other end of line 3 to
the water inlet on the camera head.
•
Connect one end of line 4 to the water outlet on the camera head and
the other end to line 5 to complete the loop.
The quick disconnect fittings automatically seal the lines off when not
connected to anything, so that they may be connected and disconnected from
the camera without affecting the flow of cooling water to the diffusion pump.
Figure A 10
Water lines
UltraScan User’s Guide Reference Series Rev 1.0
XIV
A3 Installation
A3.4 Electrical connections
The diagram in Figure A11 shows the electrical connections in the system.
Figure A 11
Electrical diagram.
Red LED goes out
whenever cable
#1 is connected
correctly
Power cord
1
CAMERA
IN
FIBER OPTIC
OUT
Connect green
ground wire to
microscope
ground
2
SHUTTER OVERRIDE
1
2
1
2
AUX
Power cord
Shutter
override
interface
Shutter
interface
•
Connect the controller to the multiple outlet strip. The computer should
not be plugged into the outlet strip.
•
Run the camera cable between the camera and the controller.
Always make sure that the controller is switched off when installing or
removing this cable.
UltraScan User’s Guide Reference Series Rev 1.0
XV
A3 Installation
A3.5
•
Connect the green ground wire on the outlet strip to the microscope
ground.
•
Run the Fiber Optic cables between the controller and the computer.
Shutter-control output
The Shutter-Control output (shown in figure A11) is on a BNC connector on
the back panel of the controller (Figure A7).
A3.6
•
Connect one end of the Shutter-Interface cable to the Shutter-Control
output on the controller.
•
Connect the other end to the Shutter-Interface provided by Gatan (or
microscope vendor).
Shutter-override output
The shutter-override output (shown in figure A11) is on a BNC connector on
the back panel of the controller (Figure A7).
•
Connect one end of the shutter override interface cable to the shutter
override output on the controller.
•
Connect the other end to the shutter-override interface provided by
Gatan (or microscope vendor).
UltraScan User’s Guide Reference Series Rev 1.0
XVI
Appendix 2
CE certification
UltraScan User’s Guide Reference Series Rev 1.0
XVII
DECLARATION OF CONFORMITY
DECLARATION OF CONFORMITY
(According to ISO/IEC GUIDE 22 and EN 45014)
Manufacturer’s name:
Gatan Inc.
Manufacturer’s Address:
5933 Coronado Lane
Pleasanton, CA 94588 U.S.A
DECLARES THAT THE PRODUCT
Products name:
UltraScan 4000, UltraScan 1000
Model Number:
895, 894
CONFORMS TO THE FOLLOWING EUROPEAN DIRECTIVES
Low voltage Directive 73/23/EEC
EMC Directive 89/336/EEC
As modified by Directive 93/68/EEC
Supplementary Information:
Safety:
EN 61010-1:1991/A2:1995
EMC:
EN 55022: Class A
EN 55082-1:1992
EN 55081-1:1992
I, the undersigned, hereby declare that the equipment specified above conforms to the above Directives
and Standards.
Place:
Pleasanton, CA
Signature:
Date:
November 2002
Full Name: Robert Buchanan
UltraScan User’s Guide Reference Series Rev 1.0
XVIII
DECLARATION OF CONFORMITY
Position:
President and CEO
Index
A
arrows, 3-3
Auto Exposure, 3-1, 3-4, 4-2
Auto Survey, 3-1, 4-2
B
F
FFT, 2-7
fiber-optic plate, II
film, 1-1, 2-7, 5-2, 5-4, 5-5, 5-6, II
Focus Loupe, 3-1, 3-2, 3-3, 4-2
Focus mode, 3-1
binning, 5-4, 5-5
G
C
Calibrate image, 2-8, 2-9, 2-11
calibration, 2-7, 2-9, 2-10, 2-12
Camera menu, 2-4, 2-6, 4-1, 5-6
CCD, i, 1-1, 2-1, 2-4, 2-6, 2-7, 2-10, 3-1, 3-4, 3-8, 4-1, 5-2, 5-3,
5-4, 5-5, 5-6, I, II
CE certification, XVII, XIX
Configure Camera, 2-4
Custom item, 3-6, 3-7, 3-8
customization, 2-2
D
defect correction, 2-4
diffraction patterns, 5-2, 5-3
digital camera, 1-1, 2-1
DigitalMicrograph, i, ii, 1-1, 2-1, 2-2, 2-3, 2-7, 3-8, 4-1
dynamic range, 1-1, 5-4
E
exposure time, 3-1, 5-3, 5-5
UltraScan User’s Guide Reference Series Rev 1.0
gain reference, 2-6, 4-1, 5-5, 5-6
ghost image, 5-6
Global Info, 3-4, 4-1
Global Microscope Info, 2-7, 2-8
H
hardware, I
I
Image Acquisition, i, 2-2, 3-1, 3-4
Image Info, 3-3, 4-1
Image rotation, 2-4
insert/retract, 5-6
L
linearity, 1-1
M
magnification, 2-7, 2-8, 2-9, 2-10, 2-12
Magnification, i, 2-7, 2-8, 2-10
magnification table, 2-10
Microscope menu, 2-7, 2-8, 3-4
XIX
DECLARATION OF CONFORMITY
N
Name field, 2-4
noise, 1-1, II
P
Peltier, 2-1, 4-1, 5-1, 5-2, 5-3
print, 3-7, 3-8, 4-2
R
Reference, i, 1-1, 2-6, 4-1
region of interest, 3-1
Report Options, 3-5, 3-7
resolution, 1-1, 2-11, 3-1, 3-4, 5-4, II
retraction, 1-1, 5-5, II
S
scintillator, 5-2, 5-3, 5-6, II
Search mode, 3-1, 3-2, 4-2
sensitivity, 1-1
Set up, 3-5
shutter, 2-4, 5-3, 5-5, 5-6
speed of operation, 1-1
Standard, 1, 1-1, I, II, III
Start Acquire, 3-4, 4-2
Start View, 3-2, 4-2
T
TEM, 1-1, 2-7, 2-10, 3-4, 3-6, 3-7, 4-1, 5-2, 5-4, 5-5, 5-6, II, III
transmission electron microscope, 1-1
V
vacuum, 2-1, 4-1, 5-2, 5-3, 5-6
view mode, 3-1
saturation, 5-3, 5-4
Saving, 2-2, 3-3, 3-4, 3-5, 3-6, 3-8, 4-2
UltraScan User’s Guide Reference Series Rev 1.0
XX