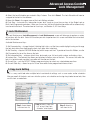
1
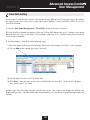
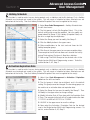
Software User Guide
For use with ResortLock and LockState Locks
www.ResortLock.com
www.LockState.com
Table of Contents
SECTION 1
General Overview
1. Foreword .................................................................
2. Important Information ............................................
3. Software Installation
.............................................
4. New Users / Operators ...........................................
3
3
3
4
SECTION 2
Menu Overview
1. Menu Overview
.....................................................
5
SECTION 3
Initial Lock & User Setup
1. Lock Setup ............................................................
2. User Setup – Issuing Permanent Codes & iButtons .....
3. Temporary Remote Code Generation .........................
6
8
10
SECTION 4
Advanced Access Control – Lock Management
1. Lock Schedule
.....................................................
2. Lock Maintenance ....................................................
3. Copy Lock Setting ....................................................
12
13
13
SECTION 5
Advanced Access Control – User Management
1. Time Shift Setting ....................................................
2. Holiday Schedule ....................................................
3. Activation/Expiration Date ....................................................
14
15
15
Audit Trail
1. Retrieving an Audit Trail ....................................................
2. Audit Trail History ....................................................
2
16
16
General Overview
Section 1
1. Foreword
About This Manual
This manual is designed for users of the ResortLock RL2000, RL4000 or the LockState 1500. This
manual only covers software installation, setup, and use of the software with the lock. Lock installation
and anual lock operation can be found in the Installation & User Manual provided with the lock.
Technical Support
If you experience any difficulty installing or operating this software, please contact LockState at
1-877-670-5625 or email [email protected] /[email protected].
2. Important Information
Manufacture Default Settings:
1. Default User Name / Password for Login is: dallas / ibutton
2. Operator Password: The default operator password is 00000000 (8 digit Zeros)
3. System Password (Facility Code): The default System password is 000000 (6 digit Zeros)
Lights and Sounds
1.
2.
3.
4.
5.
6.
Programing Mode Success: GREEN LED, two beeps
Programing Mode Failure: RED LED, one beep
Valid User Code Entry: GREEN LED, two beeps
Invalid User Code Entry: Red LED, one beep
Unlock Mode: GREEN flashing LED, lock is in unlock mode (if lock is set to Blink)
Lock Mode: RED flashing LED, lock is in lock mode (if lock is set to Blink)
3. Software Installation
Operating System
This software is comparable with Microsoft Windows 98/2000/XP/Vista/Windows 7 32-bit and 64-bit.
All software must be installed using the Windows administrator account, but all levels of Windows users
can use the program.
Step 1: Install 1-Wire USB Driver First
This driver will allow use of the iWire (the connector for the iButton).
1. Download driver from http://www.resortlock.com/Downloads.asp
2. After downloading the driver, open the installation file. The Setup
Wizard will guide you through the installation steps.
3. Plug the 1-Wire into the blue USB adapter and then the USB
adapter into your computer’s USB port.
Step 2: Install the ResortLock Software
1. Insert the ResortLock Software Management disk included with your lock.
2. The installation wizard will automatically pop up. If the Autorun function is
disabled on your system, run SETUP.exe in the root directory of the CD to launch
the software installer.
3. The Auto installer will guide you through the steps and create a shortcut on your
desktop.
3
General Overview
Section 1
Step 3: Opening Lock Management Software
1. Make sure you have plugged in the 1-Wire to the USB adaptor and
the USB adaptor into your computer before starting the software.
2. Double Click on the new icon on your desktop.
3. Login – Default User Name: dallas, Password: ibutton
To create a new User Name and Password after you are logged in go to 4. New Users / Operators below.
Step 3: Install 1-Wire USB Driver First
The default system password is 000000(6 Zeros). It is mandatory to
enter a new system password upon installing the software. This new
password can be any 6 digits you choose.
The system password will ensure that only you can program your lock.
When first programming the lock (in Section 2 below), this password will
be passed along to the lock’s memory. After that, only ibuttons with the
system password will be able to interact with the lock.
If you get a 1-Wire Error…
If you get an error reading “Please check your 1-wire adapter”, it means
your 1-wire is not plugged into the USB port OR the driver installation
was not completed. Please select OK to continue with opening the
software. Then shutdown the software and plug in the 1-Wire. If the
computer shows that new hardware is found, follow the installation
wizard & restart the software.
4. New Users / Operators
New users and passwords can be created by going to the upper menu and selecting Other > Operator
Information > Operator Setting or Change Operator Password.
Step 1:
1. Go to Other > Operator Information
> Operator Setting
2. Click on Add in the top menu
3. Enter User Name and select User
Level
4. Click Save
Step 2:
1. Go to Other > Operator Information > Change Operator Password
2. Enter User Name created in Step 1 above
3. Enter Old Password: Default is 00000000 (eight zeros)
4. Enter New Password, Confirm and click OK
5. You can now use your new user name and password the next time you
log in.
4
Menu Overview
Section 2
The left-hand menu provides options for programming the lock, managing user access, retrieving audit trails
and generating remote codes. Below is a quick overview of the menu and description of each section.
Add locks manually, change lock
names & settings.
Setup a new lock with the ibutton
programming key.
Lock Management Menu
View locks, add new locks,
program lock behavior &
perform lock maintenance.
Set auto lock or unlock times &
passage modes.
Set date & time, check lock info or
issue lockout key.
Quickly apply settings from one lock
to another.
View, Add or Delete user codes from
the software.
Create time shifts for users (M-F,
8-5)
Exclude user access during
specified dates.
Set codes to activate or expire on
specific dates.
Lock Management Menu
Add user codes & control
user access.
Single-Lock Programming
Use when transferring information such as user codes or lock settings to one
lock.
Multi-Lock Programming
Use when transferring information such as user codes or lock settings to up to
25 locks in one trip.
Get Audit Trail
Instruct an ibutton programming key to get Audit Trail (access history) from one
or several locks in one trip.
Read Key
After gathering information from lock(s), plug programming key into 1-wire
reader and Read Key to display information.
Remote Code
Generate temporary access codes for guests.
5
Initial Lock & User Setup
Section 3
1. Lock Setup
First you’ll need to add the lock’s information, such as the serial number, name & address to the software.
This will synchronize the software to the lock and allow programming of access codes, lock functionality and
remote code generation.
New Lock Setup will accomplish the following:
• Retrieve the lock’s serial number
• Sets the lock back to the manufacture default setting
• Sets the system password
• Sets the current date & time on the lock
• Set Daylight Saving enable or disable (unless you live in an area that does not observe Daylight Saving
Time, this should be enabled. The time will automatically roll forward in the spring and back in the fall.
• Set Lock Mode to Classroom or Storehouse. In Classroom mode, the lock will remain unlocked after
opening. In Storehouse mode, the lock will relock automatically after unlocked.
• Set LED Blinking or idle. Blinking mode will set the light to blink red when locked and green when open.
This does take extra battery power.
Step 1: Go to New Lock Setup
Upon first opening the ResortLock software, you will be taken to the New Lock Setup Screen. This section can
also be found by selecting Lock Management > Setup New Lock. Follow the instructions provided in the text
box at the top of the screen.
1. Choose the following settings for your lock:
• Blink – This will set the light on the lock to flash green when unlocked and red when locked. Please note
this will use extra battery power.
• Daylight Saving – Select if you live in an area that observes Daylight Saving Time. This will trigger the clock
to move forward or backward automatically on the appropriate dates. This will not affect the current time.
• Classroom (Passage) Mode – This mode leaves the lock unlocked after opening. To relock, enter your code
again (or press the lock button on the RL4000/LS1500).
• Storehouse (Auto Lock) Mode - This will cause the lock to relock automatically shortly after being unlocked.
6
Initial Lock & User Setup
Section 3
2. Plug your blue iButton programming key into the 1-Wire iButton
reader plugged into your USP port if you haven’t done so already.
3. Click on the Issue Key button below the settings. You will see an alert warning that this will
erase any information currently on the lock. Press OK to continue. Once you see the message
“Write System Setup Key OK”, remove the blue iButton programming key from the reader.
(RL 2000 Reset Button)
(RL4000/LS1500 Reset Button)
4. Bring the blue iButton programming over to
your lock. Tap the reset button located below
the batteries on the inside of the lock. You do
not need to hold the reset button down, just
quickly depress. You will hear 2 quick beeps
and the green light in the iButton reader on the
front of the lock will light up.
5. While the green light on the iButton reader is lit, hold the iButton
programming key to the iButton reader on the front of your lock. You
should hear two confirmation beeps after which you can remove the
iButton from the lock.
6. Return the iButton programming key to the 1-Wire iButton reader attached to your computer. Then click
on the Read Key icon in the left-hand menu of your ResortLock software. You will see your lock’s Serial ID
and that it does not yet exist in the database.
7. Click the Add Lock button. Then enter a name for your lock (eg. “Front Door”) and the address. The Lock
Status will show what you selected on the Setup New Lock Screen. Lock Type should be iButton as you will
be programming this lock with an iButton.
8. Click the Save button and your lock will be saved to your software.
7
Initial Lock & User Setup
Section 3
2. User Setup – Issuing Permanent User Codes and iButtons
This section will explain how to enroll new user codes and ibuttons. This is a two step process. First add the
codes and iButtons to the software. Then, transfer this information to the lock.
Step 1 – Add Codes/iButtons to RL Management Software
1. Go to the User Code Management > User Settings
2. Add User Code or iButton:
Click the Add User button
in the upper menu, and
following screen will pop
up:
Select either iButton User (to add iButton) or Key Code User (to add code) depending upon the type of access
you want to provide.
To Add iButton User:
1. Select iButton User radial button in pop-up window
2. Click OK and snap the user iButton (black key) key into the 1-Wire iButton reader. This should be the only
iButton plugged into the 1-Wire reader if you have two ports.
3. Double Click in the empty field of “Serial ID”. The iButton serial ID will be detected by the system and
automatically entered.
4. Enter the First and Last Name of the user. Leave the Key Code field blank.
5. Click Save in the top menu.
To Add Key Code User:
1. Select Key Code User radial button in pop-up window
2. Enter the first and last name of the user.
3. Type in the user pin code under Key Code field.
4. Click Save in the top menu.
8
Initial Lock & User Setup
Section 3
3. Enter the remaining User profile information as follow:
• Status: Active or Inactive (reserve for future use) User.
• Department (Optional): User can either select the pre-input Department name from the pull down list, or
input a new name in the field. The new name will be saved to the Department list once the data is saved.
• Title, Address (Optional): Can be entered if desired.
4. After you enter all desired user information, click the Save button at the top of the screen.
Step 2 - Assign iButtons & User Codes to Lock
Now that you’ve set up users in the software, the next step is to transfer that information over to the lock.
1. Select Single-Lock Programming from the left-hand menu.
2. Select the lock you wish to program from the Lock Name drop-down menu. This is important if you
have more than one lock!
3. Select Time Shift. Default is No Limit meaning there are no restrictions to access. (see Section 5:
Advanced Access Control - User Management, #1 for more information on setting up Time Shifts)
4. Set Activation/Expiration. If you want the code to be active and expire on specific dates, enter those
dates in the Activation From and Expiration To boxes. Otherwise leave blank.
5. Select Holiday Schedule/Exception Data. If you want access for certain users to be excluded during
certain dates like holidays or vacations, then select the checkbox for Exception Data. Exception data
can be created in the Holiday Schedule section (see Section 5: Advanced Access Control - User
Management, #2 for more information on Holiday Schedules)
6. Check the Selected box for each KeyCode or iButton you want to assign to the lock
7. Snap the programming key into 1-Wire.
8. Click “Issue Key”
9. Complete the mission by touching the programming key to the iButton reader on the lock. Once you
hear a double beep the operation is complete. Test the user codes or iButtons that were transferred to
ensure programming was successful.
To delete users from lock, simply un-select the users you wish to remove. Then re-issue key and touch
to the lock. Only the users that were selected will have access.
Step 3: Using iButtons & User Codes
• To use an iButton, simply touch it to the iButton reader on the lock.
• To use a User Code, enter the code and then press #.
9
Initial Lock & User Setup
Section 3
3. Temporary Remote Code Generator / ResortLock ONLY
With the ResortLock, remote codes can be given to guests that last anywhere between 1 hour and 364 days.
These are codes that do not need to be programmed into the lock but instead can be generated remotely from
the lock. These codes can be set to activate and expire whenever you chose. For more information on how
ResortLock’s remote code system works, visit www.ResortLock.com. To generate remote temporary codes,
do the following:
1. Click on the Remote Code menu icon at the bottom of the left-hand menu.
2. Click in the Lock Name field to select your lock. The lock select window will pop-up.
3. Click the Search button to view a list of your locks.
4. Highlight your lock and then hit the Select button.
10
Initial Lock & User Setup
Section 3
5. Fill in Guest Information
• Fill in the guest first and last name. This is required.
• For Code Type specify whether the code is a one time service code (to be used only once and then
locked out) or temporary code.
6. Select the Start Date & time and End Date & time that you want to provide access to the property.
7. Finally, click the Create Code button to generate your temporary code.
The 10 digit (for 30 days or less) or 12 digit (for 31 days or more) Access Code will be generated and displayed
in the Results section. Your guest will then enter the access code followed by the # key to unlock the door.
Sub-Access Codes
Your guest can enter a sub-access code (short code) during their stay. Here are the steps to set the
sub-access code:
• Press the “*” key until a solid green light appears on the iButton reader.
• Enter the Access code followed by the # key on the lock keypad. The green light will start flashing.
• While the light is flashing, enter the desired code (3 to 6 digits) followed by the # key. You should hear a
double confirmation beep and see a green light if successful. Up to 10 sub-access codes can be added to
each temporary remote code.
One Time Service code
Up to 16 one-time service codes can be generated within the same time window. To issue one-time service
codes, select “One Time Service Code” in the Code Type drop down box within the remote code window.
11
Advanced Access Control
Lock Management
Section 4
1. Lock Schedule
This function is used to set the lock to automatically lock, unlock, change to storehouse mode, or classroom
mode at specific time. For example, you could set the lock to automatically unlock at 8AM then relock at 5PM
Monday through Friday.
Step 1: Create Lock Schedule in Software
1. Go to the Lock Management > Lock Schedule window on the left-hand menu.
2. There are 16 Timed Operation Groups in total, and up to 16 settings in each group. The first setting by
default is No Limit Classroom Mode (The lock will stay unlocked after opening). The second setting by default
is No Limit Storehouse Mode (the lock will relock after being opened). These two groups cannot be modified.
3. To set up a new Lock Status group, select a lock group (like Lock Status 3)
4. Click the Add button to add a new setting for the group.
5. Select the Begin Time. Then select the Lock Status and the days of the week you want this status to apply.
There are four lock statuses you can choose:
•
•
•
•
Storehouse Mode: the Lock will lock back in few seconds (0.1-25.5 seconds) after unlocked.
Classroom Mode: the lock will remain unlocked after unlocking.
Lock Mode: the lock will automatically lock at the desired time.
Unlock Mode: the lock will automatically unlock at the desired time.
Here is an example for Lock Status 3: This company wants to set the lock to Classroom Mode at 8AM, then
change to Storehouse Mode at 6PM and then also lock automatically at 6PM Monday through Friday.
Step 2: Assign the Lock Schedule to Lock
1. Go to the Lock Management > Lock Settings section on the left-hand navigation.
2. Select the lock you wish to assign the new Lock Schedule.
3. Click on Modify. Then click Lock Status.
12
Advanced Access Control
Lock Management
Section 4
4. Select the Lock Schedule you created in Step 1 above. Then click Select. The Lock Schedule will now be
assigned to the lock in the software.
5. Now click Save in the upper menu of the Lock Settings window.
6. Final Step – to transfer this information to your lock, simply re-issue the user keys in the Single-Lock or
Multi-Lock Programming windows. When you issue a key, the Lock Schedule information will be automatically
transferred to the lock. To review how to issue keys, see Section 3, #2: User Setup.
2. Lock Maintenance
The Lock Maintenance (Lock Management > Lock Maintenance) screen will allow you to perform a variety
of functions with the lock. Select the function you wish to perform on this screen and follow the instructions
within the text box.
Available Maintenance Keys:
1. Set Parameter Key – change the lock’s blinking light status, set the time, enable daylight saving and change
the lock back delay time (how long the lock stays open after unlocking).
2. Set Time Key – requires DS1904 iButton key which keeps real time. If you do not have this iButton, use the
Set Parameter Key to set the time on the lock.
3. Get Information Key – retrieves date & time, lock mode, user list, lock serial number and battery status.
4. Lockout Key - The Lockout Key allows you to lockout all other users of the lock. This means that while the
lock is in lockout mode, no other user codes will function on the lock.
5. One-off Key – sets the DS1977 iButton programming key to unlock any selected door one time.
6. One-off Code Key – allows for up to 10 one-time codes to be programmed into each lock.
3. Copy Lock Setting
This is a very useful tool when multiple locks have identical settings such as user codes and/or schedules.
After you enroll all the locks and users into the system, set schedules and assign keys/codes to one lock, then
use this lock as model lock.
Step1: Select Model
Lock from lock list
Step 2: Select “Copy User
List” or/and “Copy Lock
Schedule” to be copied
13
Step 3: Select the
Lock from the list
Advanced Access Control
User Management
Section 5
1. Time Shift Setting
This function is used to restrict certain users/personnel from gaining access during off-hours. For example,
you could set up a user so that they can only gain access Monday – Friday from 8AM to 5PM. To set up a
Time Shift Schedule:
1. Go to the User Code Management > Time Shifts section on the left-hand menu.
2. In the Time Shifts window that appears, there are 16 Time Shift Groups with up to 7 settings in each group
(because there are 7 days in the week). The first group is No Limit. This is a default setting for each new key
and it cannot be modified.
3. To add or modify a Time Shift, do the following steps:
i. Select the group number you wish to modify from the left side window (Time Shift 2 in this example)
ii. Click on Add to add a group (day) to the Time Shift.
iii. Set the Begin, End Time, and Day of the week.
iv. Click Save – Now you have set one day’s schedule within the Time Shift. To set the shift for more
days, repeat steps ii & iii above.
4. Now assign Time Shift Groups to each user you have set up. This is done in the Single-Lock or Multi-Lock
Programming sections. For more information, review Section 3, #2: User Setup: Issuing Permanent Codes and
iButtons.
14
Advanced Access Control
User Management
Section 5
2. Holiday Schedule
This function is used to restrict access during periods such as holidays and facility closings. First a Holiday
Schedule must entered and saved in the system. This will create a schedule for when selected users are
locked out of the facility. Then that Holiday Schedule/Exception Data must be applied to the user(s).
1. Select User Code Management > Holiday Schedule from
the left-hand menu.
2. The first group is blank (No Exception Dates). This is the
default setting and cannot be modified. You can modify any
group below that (Group 2–16). Holidays (Exception Dates) can
be set as a single day or multiple days.
3. Select the Group you want to modify, like Group 2.
4. Click the Modify button in the upper menu.
5. Make modifications to the start and end times for this
holiday/exception group.
6. Click Save in the upper menu to save your exception dates.
The example to the left will not allow users to enter the facility
during Thanksgiving, Christmas & New Years holidays.
7. Now assign Time Shift Groups to the desired users in the
Single-Lock or Multi-Lock Programming screens. To do this,
review Section 3, #2, Setp 2.
2. Activation Expiration Date
This function is used to restrict access during periods such as holidays and facility closings. First a Holiday
Schedule must entered and saved in the system. This will create a schedule for when selected users are
locked out of the facility. Then that Holiday Schedule/Exception Data must be applied to the user(s).
1. Select User Code Management > Activation / Expiration
Date from the left-hand menu.
2. The first group is blank (no restrictions) and is the default
setting. This group cannot be changed. The remaining groups can
be used to set an activation date and expiration date.
3. Select the Group that you want to modify, like Group 2. Then
hit Modify in the upper menu to change settings.
4. Modify Activation Date & Time along with the Expiration Date
& Time. The example to the left will set a code to be active from
1/11/2010 at 8AM to 3/31/2010 at 7:00PM.
5. Hit SAVE in the upper menu to save the settings.
6. Now select the Activation / Expiration Date for the desired
user in the Single-Lock or Multi-Lock Programming screens. To
do this, review Section 3, #2, Step 2.
15
Audit Trail
Section 6
1. Retrieving an Audit Trail
Up to 4000 access events (Audit Trail) can be recorded and stored on the lock. When 4000 records have been
stored, the oldest records will be overwritten. The Audit Trail will show both successful and unsuccessful
access attempts. Information can be pulled from one lock or several locks at one time. Getting the Audit Trail
from the lock(s) is a 3 step process including programming the iButton programming key to retrieve an Audit
Trail, downloading information from the lock(s) you with to get information from, and then reading the iButton
to display the Audit Trail in the software.
1. Snap the program key to the 1-Wire.
2. Select the number of records that you wish to
view from each lock. Notice that they more records
you choose reduces the number of locks you can
audit in one trip.
3. Click Issue Key. The message “Write Get Audit
Trail key OK” will pop up. Click OK to close the screen.
4. Unplug the program key and touch the lock’s
iButton reader, you will hear a long series of chirps
followed by two confirmation beeps.
5. Snap the program key back to the encoder and click the “Read Key” button. The audit trail records will then
be displayed on the screen. Please note that if several records are present it may take a little longer for them
to be displayed on the screen.
6. Click the “Save Data” button to save the Audit Trail records in the database.
2. Audit Trail History
Once you save an Audit Trail (step 6 in section 2 above), you can view that information in the Lock Audit History
window. Go to History > Lock Audit History in the upper menu.
To view the saved data:
1. To view all Audit Trail history, simply click on the Search tab. This will show all events saved to the database.
2. You can also narrow your search by multiple parameters such as
a. Start and End Date
b. Lock Name
c. Lock Location
d. Who created a code
e. Guest First or Last name
f. Code Type
16