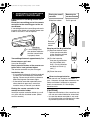
1
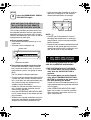
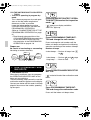
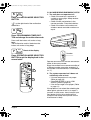
00_CV_3P302565-1_1.fm Page 1 Tuesday, January 31, 2012 3:14 PM OPERATION MANUAL Wireless Remote Controller Kit MODELS: BRC7EB518 English BRC7EB519 Deutsch Thank you for purchasing this Daikin air conditioner. Carefully read this operation manual before using the air conditioner. It will tell you how to use the unit properly and help you if any trouble occurs. After reading the manual, file it away for future reference. Vielen Dank für den Kauf einer Klimaanlage von Daikin. Bitte lesen Sie diese Bedienungsanleitung vor der Inbetriebnahme des Gerätes gründlich durch. Hier wird erklärt, wie das Gerät richtig eingesetzt wird und was bei Störungen zu tun ist. In dieser Anleitung wird nur das Innenaggregat beschrieben. Verwenden Sie diese Anleitung zusammen mit der Bedienungsanleitung des Außenaggregats. Nach dem Lesen der Anleitung legen Sie diese griffbereit zum Nachschlagen auf. Nous vous remercions pour votre acquisition de ce climatiseur Daikin. Lisez attentivement ce manuel avant d’utiliser le climatiseur. Il vous expliquera comment vous servir correctement de l’appareil et vous guidera en cas de problème. Lorsque vous aurez lu le manuel, rangez-le afin de pouvoir vous y référer ultérieurement. Le agradecemos la compra de este acondicionador de aire Daikin. Lea cuidadosamente el manual de funcionamiento antes de utilizar el acondicionador de aire. Dicho manual le indicará cómo utilizar adecuadamente la máquina y le ayudará en caso de avería. Después de leer el manual, consérvelo para consultas futuras. Français Español Italiano ÅëëçíéêÜ Nederlands Portugues La ringraziamo di aver acquistato questo condizionatore d’aria Daikin. Leggere attentamente questo manuale prima di avviare il condizionatore. Ciò permetterà di usare correttamente l’unità e di ottenere un aiuto in caso di anomalia di funzionamento. Dopo aver letto il manuale, conservarlo in un luogo accessibile per una futura necessità. Σαò εuχαριστοýìε που αγορÜσατε τη συσκευÞ κλιìατισìοý. ÄιαβÜστε προσεκτικÜ αυτÝò τιò οδηγßεò χρÞσηò πριν να χρησιìοποιÞσετε τη συσκευÞ κλιìατισìοý. Θα σαò πουν πωò θα χρησιìοποιÞσετε σωστÜ τη ìονÜδα και θα σαò βοηθÞσουν αν εìφανιστοýν προβλÞìατα. Αφοý διαβÜσετε τιò οδηγßεò, ΒÜλτε τιò στσ αρχεßο σαò για ìελλοντικÞ αναφορÜ. Ðóññêèé 00_CV_3P302565-1_2.fm Page 1 Tuesday, January 31, 2012 3:15 PM Wij danken u voor de aankoop van deze Daikin airconditioner. Lees deze bedrijfshandleiding aandachtig door voordat u de airconditioner gebruikt. Het omvat uitleg over het correcte gebruik van de unit en biedt hulp in geval een storing mocht optreden. Gebruik deze handleding voor verdere raadpleging. Obrigado pela sua compra deste aparelho de ar condicionado Daikin. Leia com atenção este manual de operação antes de proceder à utilização do aparelho de ar condicionado. Este indicar-lhe-á como deverá utilizar a unidade correctamente e ajudá-lo-á no caso de surgir qualquer problema. Depois de ler o manual, guarde-o num local seguro a fim de o poder consultar caso venha a ser preciso. Спасибо за поêóпêó данноãо êондиционера фирмы Daikin. До начала работы с êондиционером внимательно изóчите данное рóêоводство по эêсплóатации. В нем излаãаются правила надлежащеãо пользования óстройством и приводятся реêомендации пользователю по поисêó и óстранению неисправностей. После изóчения рóêоводства сохраните еãо для обращений в бóдóщем. Daikin klima satýn aldýðýnýz için teþekkür ederiz. Klimanýzý kullanmadan önce bu kullanma kýlavuzunu dikkatlice okuyunuz. Bu kýlavuz ünitenin nasýl uygun olarak kullanýlacaðýný anlatýr ve herhangi bir problem olduðunda size yardým eder. Bu kýlavuzda yalnýzca iç ünite ile ilgili bilgiler verilmektedir. Bu dökümaný dýþ ünite ile ilgili kullaným kýlavuzu ile birlikte kullanýnýz. Kullanma kýlavuzunu okuduktan sonra ilerde tekrar faydalanmak üzere saklayýnýz. 00_CV_3P302565-1_2.fm Page 2 Tuesday, January 31, 2012 3:15 PM Fig. 1-1 11 1 ON OFF 3 8 Fig. 1-2 H M L DOWN 10 C ON OFF UP 6 TEMP FAN H 4 12 C hr. 2 L TIME M UP 9 hr. FAN DOWN 14 RESERVE CANCEL hr. 5 TIMER 13 MODE 16 hr. TEST 7 SWING 17 TEST TEST 1 Fig. 2 21 22 20 19 24 2 [1] 23 15 18 00_CV_3P302565-1_3.fm Page 13 Tuesday, January 31, 2012 3:15 PM PRIOR TO USE This operation manual is exclusively for instructions on how to use the wireless remote controller. Read also the operation manual attached to the indoor unit and to the outdoor unit for safe usage of the system and maintenance. VOR DER INBETRIEBNAHME Diese Betriebsanleitung enthält ausschließlich Anweisungen über den Gebrauch der drahtlosen Fernbedienung. Über die sichere Anwendung und Wartung des Systems, lesen Sie auch die dem lnnenaggregat beiliegende Bedienungsanleitung. AVANT LA MISE EN SERVICE Ce mode d’emploi ne concerne que les instructions d’utilisation de la télécommande sans câble. Lire également le mode d’emploi joint à l’unité intérieure pour une utilisation et un entretien du système en toute sécurité. ANTES DE LA UTILIZACIÓN Este manual de instrucciones contiene sólo las instrucciones para el uso del control remoto sin cables. Lea también el manual de instrucciones que viene con la unidad interior para un uso seguro del sistema y para su mantenimiento. PRIMA DELL’USO Il presente manuale d’uso fornisce esclusivamente istruzioni per l’uso del telecomando via radio. Per un uso sicuro del sistema e per la sua manutenzione leggere inoltre il manuale d’uso in dotazione all’unità interna. ΠΡΙΝ ΑΠΟ ΤΗ ΧΡΗΣΗ Αυτü το εγχειρßδιο λειτουργßαò περιÝχει ìüνο οδηγßεò για τη χρÞση του ασýρìατου τηλεχειριστηρßου. ÄιαβÜστε επßσηò το εγχειρßδιο λειτουργßαò που συνοδεýει την εσωτερικÞ ìονÜδα για την ασφαλÞ χρÞση του συστÞìατοò και για τη συντÞρηση. VOOR GEBRUIK Deze bedieningshandleiding is uitsluitend bedoeld voor gebruik tijdens de instructie over de werking van de afstandsbediening. Lees ook de bedieningshandleiding die werd meegeleverd bij de binnenunit voor een veilig gebruik van het systeem en het onderhoud ervan. ANTES DE UTILIZAR O presente manual de funcionamento destina-se exclusivamente para explicar o modo de utilização do controlo remoto sem fio. Leia igualmente o manual de funcionamento fornecido com a unidade interior para uma utilização e manutenção segura do sistema. ПОДГОТОВКА К ИСПОЛЬЗОВАНИЮ Данное рóêоводство по эêсплóатации посвящено исêлючительно инстрóêтированию работе с беспроводным óдаленным êонтроллером. Для безопасноãо использования и техничесêоãо обслóживания системы ознаêомьтесь таêже с рóêоводством по эêсплóатации, прилаãаемом ê êомнатномó блоêó. KULLANMADAN ÖNCE Bu kullaným kýlavuzu yalnýzca kablosuz uzaktan kumandanýn kullanýmýna iliþkin talimatlarý içermektedir. Sistemin güvenli kullanýmý ve bakýmý için iç ünite ve dýþ ünite ile birlikte gelen kullaným kýlavuzunu da okuyunuz. [2] 00_CV_3P302565-1_4.fm Page 1 Tuesday, January 31, 2012 3:15 PM GB Disposal requirements Your air conditioning product is marked with this symbol. This means that electrical and electronic products shall not be mixed with unsorted household waste. Do not try to dismantle the system yourself: the dismantling of the air conditioning system, treatment of the refrigerant, of oil and of other parts must be done by a qualified installer in accordance with relevant local and national legislation. Air conditioners must be treated at a specialized treatment facility for re-use, recycling and recovery. By ensuring this product is disposed of correctly, you will help to prevent potential negative consequences for the environment and human health. Please contact the installer or local authority for more information. Batteries must be removed from the remote controller and disposed of separately in accordance with relevant local and national legislation. D Vorschriften zur Entsorgung Ihre Klimaanlage ist mit diesem Symbol gekennzeichnet. Das bedeutet, dass elektrische und elektronische Produkte nicht mit unsortiertem Haushaltsabfall entsorgt werden dürfen. Versuchen Sie auf keinen Fall das System selbst zu demontieren. Die Demontage des Klimaanlagensystems sowie die Handhabung von Kältemittel, Öl und möglichen weiteren Teilen muss von einem qualifizierten Monteur gemäß den entsprechenden örtlichen und staatlichen Bestimmungen vorgenommen werden. Klimaanlagen müssen bei einer fachkundigen Einrichtung für Wiederverwendung, Recycling und Wiedergewinnung aufbereitet werden. Indem Sie dieses Produkt korrekt entsorgen, helfen Sie potenzielle negative Folgen für die Umwelt und die Gesundheit der Menschen zu vermeiden. Nehmen Sie bitte hinsichtlich weiterer Informationen Kontakt auf mit dem Monteur oder den örtlichen Behörden. Die Batterien müssen aus der Fernbedienung entfernt werden und gemäß den entsprechenden örtlichen und staatlichen Vorschriften separat entsorgt werden. F Instructions d’élimination Cet appareil de conditionnement d’air porte le symbole ci-joint. Ce symbole signifie que les appareils électriques et électroniques doivent être éliminés séparément des ordures ménagères non triées. N’essayez pas de démonter vous-même l’appareil : le démontage de l’appareil de conditionnement d’air ainsi que le traitement du réfrigérant, de l’huile et d’autres composants doivent être effectués par un installateur qualifié, en accord avec les réglementations locales et nationales en vigueur. Les appareils de conditionnement d’air doivent être traités dans des installations spécialisées de dépannage, réutilisation ou recyclage. En vous assurant que cet appareil est éliminé correctement, vous contribuez à éviter les conséquences potentiellement néfastes sur l’environnement et la santé. Veuillez contacter votre installateur ou les autorités locales pour plus d’information. Les piles de la télécommande doivent être enlevées et éliminées séparément, conformément aux réglementations locales et nationales en vigueur. E Requisitos para la eliminación Su acondicionador de aire está marcado con este símbolo. Esto significa que los productos eléctricos y electrónicos no deben mezclarse con el resto de residuos domésticos no clasificados. No intente desmontar el sistema usted mismo: El desmantelamiento del acondicionador de aire, así como el tratamiento del refrigerante, aceite y otros componentes, debe ser efectuado por un instalador competente de acuerdo con las normas locales y nacionales aplicables. Los acondicionadores de aire deben ser tratados en instalaciones especializadas para su reutilización, reciclaje y recuperación. Al asegurarse de desechar este producto de la forma correcta, está contribuyendo a evitar posibles consecuencias negativas para el entorno y para la salud de las personas. Contacte, por favor, con el instalador o con las autoridades locales para obtener más información. Las pilas del control remoto deben extraerse y eliminarse por separado y de acuerdo con la normativa local y nacional aplicable. I Specifiche di smaltimento Il climatizzatore è contrassegnato con questo simbolo, ciò significa che i prodotti elettrici ed elettronici non possono essere smaltiti insieme ai rifiuti domestici non differenziati. Non cercare di demolire il sistema da soli: la demolizione del sistema di condizionamento, nonché il recupero del refrigerante, dell’olio e di qualsiasi altra parte devono essere eseguiti da un installatore qualificato in conformità alla legislazione locale e nazionale vigente in materia. I climatizzatori devono essere trattati presso una struttura specializzata nel riutilizzo, riciclaggio e recupero dei materiali. Il corretto smaltimento del prodotto eviterà le possibili conseguenze negative all’ambiente e alla salute dell’uomo. Per maggiori informazioni contattare l’installatore o le autorità locali. Le batterie devono essere tolte dal telecomando e smaltite separatamente conformemente alla legislazione locale e nazionale vigente in materia. GR ȆȡȠȨʌȠșȑıİȚȢ ĮʌȩȡȡȚȥȘȢ ȉȠ țȜȚȝĮIJȚıIJȚțȩ ıĮȢ İʌȚıȘȝĮȓȞİIJĮȚ ȝİ ĮȣIJȩ IJȠ ıȪȝȕȠȜȠ. ǹȣIJȩ ıȘȝĮȓȞİȚ ȩIJȚ ȠȚ ȘȜİțIJȡȚțȑȢ țĮȚ ȘȜİțIJȡȠȞȚțȑȢ ıȣıțİȣȑȢ ʌȡȑʌİȚ ȞĮ ĮʌȠȡȡȓʌIJȠȞIJĮȚ ȤȦȡȚıIJȐ Įʌȩ IJĮ ȠȚțȚĮțȐ ĮʌȠȡȡȓȝȝĮIJĮ. ȂȘȞ ʌȡȠıʌĮșȒıİIJİ ȞĮ ĮʌȠıȣȞĮȡȝȠȜȠȖȒıİIJİ ȝȩȞȠȚ ıĮȢ IJȠ ıȪıIJȘȝĮ: Ǿ ĮʌȠıȣȞĮȡȝȠȜȩȖȘıȘ IJȘȢ ȝȠȞȐįĮȢ țȜȚȝĮIJȚıȝȠȪ, Ƞ ȤİȚȡȚıȝȩȢ IJȠȣ ȥȣțIJȚțȠȪ ȝȑıȠȣ, IJȠȣ ȜĮįȚȠȪ țĮȚ IJȦȞ ȐȜȜȦȞ ȝİȡȫȞ șĮ ʌȡȑʌİȚ ȞĮ ȖȓȞİIJĮȚ Įʌȩ țȐʌȠȚȠ İȚįȚțİȣȝȑȞȠ IJİȤȞȚțȩ, ıȪȝijȦȞĮ ȝİ IJȘ ıȤİIJȚțȒ IJȠʌȚțȒ țĮȚ İșȞȚțȒ ȞȠȝȠșİıȓĮ. īȚĮ IJȘȞ İț ȞȑȠȣ ȤȡȒıȘ, IJȘȞ ĮȞĮțȪțȜȦıȘ țĮȚ IJȘȞ İʌȚıțİȣȒ, ȠȚ ȝȠȞȐįİȢ țȜȚȝĮIJȚıȝȠȪ șĮ ʌȡȑʌİȚ ȞĮ ȣijȓıIJĮȞIJĮȚ İʌİȟİȡȖĮıȓĮ ıİ İȚįȚțȑȢ İȖțĮIJĮıIJȐıİȚȢ. ǼʌȚȕİȕĮȚȫȞȠȞIJĮȢ ȩIJȚ ĮȣIJȩ IJȠ ʌȡȠȧȩȞ ĮʌȠȡȡȓʌIJİIJĮȚ ıȦıIJȐ, șĮ ĮʌȠijȪȖİIJİ İȞįİȤȩȝİȞİȢ ĮȡȞȘIJȚțȑȢ ıȣȞȑʌİȚİȢ ȖȚĮ IJȠ ʌİȡȚȕȐȜȜȠȞ țĮȚ IJȘȞ ȣȖİȓĮ. ȆĮȡĮțĮȜȫ İʌȚțȠȚȞȦȞȒıIJİ ȝİ IJȠȞ IJİȤȞȚțȩ İȖțĮIJȐıIJĮıȘȢ Ȓ IJȚȢ IJȠʌȚțȑȢ ĮȡȤȑȢ ȖȚĮ ʌİȡȚııȩIJİȡİȢ ʌȜȘȡȠijȠȡȓİȢ. ȅȚ ȝʌĮIJĮȡȓİȢ șĮ ʌȡȑʌİȚ ȞĮ ĮijĮȚȡȠȪȞIJĮȚ Įʌȩ IJȠ IJȘȜİȤİȚȡȚıIJȒȡȚȠ țĮȚ ȞĮ ĮʌȠȡȡȓʌIJȠȞIJĮȚ ȟİȤȦȡȚıIJȐ, ıȪȝijȦȞĮ ȝİ IJȘ ıȤİIJȚțȒ IJȠʌȚțȒ țĮȚ İșȞȚțȒ ȞȠȝȠșİıȓĮ. NL Vereisten voor het opruimen Uw airconditioningproduct draagt dit symbool. Dit betekent dat u geen elektrische en elektronische producten mag mengen met niet-gesorteerd huishoudelijk afval. Probeer niet zelf het systeem te ontmantelen: het ontmantelen van het airconditioningsysteem, behandelen van het koelmiddel, olie en andere onderdelen moet worden uitgevoerd door een bevoegd installateur in overeenstemming met de relevante lokale en nationale reglementeringen. Airconditioners moeten bij een gespecialiseerd behandelingsbedrijf worden behandeld voor hergebruik, recyclage en terugwinning. Door ervoor te zorgen dat dit product op de correcte manier wordt opgeruimd, helpt u potentiële negatieve gevolgen voor het milieu en de gezondheid te voorkomen. Voor meer informatie, gelieve contact op te nemen met de installateur of de lokale overheid. De batterijen moeten uit de afstandsbediening worden verwijderd en afzonderlijk opgeruimd in overeenstemming met de relevante lokale en nationale reglementeringen. P Requisitos para a eliminação O equipamento de ar condicionado que possui está marcado com este símbolo. Significa que os produtos eléctricos e electrónicos não devem ser misturados com o lixo doméstico indiferenciado. Não tente desmontar pessoalmente o sistema: o desmantelamento do sistema de ar condicionado e o tratamento do líquido de refrigeração, do óleo e de outros componentes têm de ser feitos por um instalador qualificado, cumprindo a legislação nacional relevante e regulamentos locais aplicáveis. Os equipamentos de ar condicionado têm de ser processados numa estação de tratamento especializada, para reutilização, reciclagem ou recuperação. Ao certificar-se de que este produto é eliminado correctamente, está a contribuir para evitar as potenciais consequências negativas para o ambiente e para a saúde humana. Contacte o seu instalador ou as autoridades locais, para obter mais informações. As pilhas do controlo remoto têm de ser retiradas e eliminadas separadamente, cumprindo a legislação nacional e os regulamentos locais aplicáveis. RUS Ɍɪɟɛɨɜɚɧɢɹ ɤ ɭɬɢɥɢɡɚɰɢɢ ȼɚɲ ɤɨɧɞɢɰɢɨɧɟɪ ɩɨɦɟɱɟɧ ɷɬɢɦ ɫɢɦɜɨɥɨɦ. ɗɬɨ ɡɧɚɱɢɬ, ɱɬɨ ɷɥɟɤɬɪɢɱɟɫɤɢɟ ɢ ɷɥɟɤɬɪɨɧɧɵɟ ɢɡɞɟɥɢɹ ɧɟ ɫɥɟɞɭɟɬ ɫɦɟɲɢɜɚɬɶ ɫ ɧɟɫɨɪɬɢɪɨɜɚɧɧɵɦ ɛɵɬɨɜɵɦ ɦɭɫɨɪɨɦ. ɇɟ ɩɵɬɚɣɬɟɫɶ ɞɟɦɨɧɬɢɪɨɜɚɬɶ ɫɢɫɬɟɦɭ ɫɚɦɨɫɬɨɹɬɟɥɶɧɨ: ɞɟɦɨɧɬɚɠ ɫɢɫɬɟɦɵ, ɭɞɚɥɟɧɢɟ ɯɨɥɨɞɢɥɶɧɨɝɨ ɚɝɟɧɬɚ, ɦɚɫɥɚ ɢ ɞɪɭɝɢɯ ɱɚɫɬɟɣ ɞɨɥɠɧɵ ɩɪɨɜɨɞɢɬɶɫɹ ɤɜɚɥɢɮɢɰɢɪɨɜɚɧɧɵɦ ɦɨɧɬɚɠɧɢɤɨɦ ɜ ɫɨɨɬɜɟɬɫɬɜɢɢ ɫ ɦɟɫɬɧɵɦ ɢ ɨɛɳɟɝɨɫɭɞɚɪɫɬɜɟɧɧɵɦ ɡɚɤɨɧɨɞɚɬɟɥɶɫɬɜɨɦ. Ʉɨɧɞɢɰɢɨɧɟɪɵ ɧɟɨɛɯɨɞɢɦɨ ɫɞɚɜɚɬɶ ɧɚ ɫɩɟɰɢɚɥɶɧɭɸ ɩɟɪɟɪɚɛɚɬɵɜɚɸɳɭɸ ɫɬɚɧɰɢɸ ɞɥɹ ɭɬɢɥɢɡɚɰɢɢ, ɩɟɪɟɪɚɛɨɬɤɢ ɢ ɜɬɨɪɢɱɧɨɝɨ ɢɫɩɨɥɶɡɨɜɚɧɢɹ. Ɉɛɟɫɩɟɱɢɜɚɹ ɧɚɞɥɟɠɚɳɭɸ ɭɬɢɥɢɡɚɰɢɸ ɧɚɫɬɨɹɳɟɝɨ ɢɡɞɟɥɢɹ, ɜɵ ɫɩɨɫɨɛɫɬɜɭɟɬɟ ɩɪɟɞɨɬɜɪɚɳɟɧɢɸ ɧɚɫɬɭɩɥɟɧɢɹ ɜɨɡɦɨɠɧɵɯ ɧɟɝɚɬɢɜɧɵɯ ɩɨɫɥɟɞɫɬɜɢɣ ɞɥɹ ɨɤɪɭɠɚɸɳɟɣ ɫɪɟɞɵ ɢ ɡɞɨɪɨɜɶɹ ɥɸɞɟɣ. Ɂɚ ɛɨɥɟɟ ɩɨɞɪɨɛɧɨɣ ɢɧɮɨɪɦɚɰɢɟɣ ɨɛɪɚɳɚɣɬɟɫɶ ɤ ɦɨɧɬɚɠɧɢɤɭ ɢɥɢ ɜ ɦɟɫɬɧɵɟ ɨɪɝɚɧɵ ɜɥɚɫɬɢ. Ⱥɤɤɭɦɭɥɹɬɨɪɧɵɟ ɛɚɬɚɪɟɢ ɧɟɨɛɯɨɞɢɦɨ ɢɡɜɥɟɱɶ ɢɡ ɩɭɥɶɬɚ ɞɢɫɬɚɧɰɢɨɧɧɨɝɨ ɭɩɪɚɜɥɟɧɢɹ ɢ ɭɬɢɥɢɡɨɜɚɬɶ ɨɬɞɟɥɶɧɨ ɜ ɫɨɨɬɜɟɬɫɬɜɢɢ ɫ ɞɟɣɫɬɜɭɸɳɢɦ ɦɟɫɬɧɵɦ ɢ ɨɛɳɟɝɨɫɭɞɚɪɫɬɜɟɧɧɵɦ ɡɚɤɨɧɨɞɚɬɟɥɶɫɬɜɨɦ. TR Bertaraf gereksinimleri Klimanız bu sembolle iúaretlenmiútir. Bu da elektrikli ve elektronik ürünlerin, ayrılmamıú evsel atıklarla karıútırılmaması gerekti÷i anlamına gelir. Sistemi kendi kendinize sökmeye çalıúmayın: klima sisteminin sökülmesi ve so÷utucu akıúkan, ya÷ ve di÷er parçalarla ilgili iúlemler yerel ve ulusal mevzuata uygun olarak bir montaj görevlisi tarafından gerçekleútirilmelidir. Klimalar yeniden kullanım, geri dönüútürme ve kazanım için özel bir iúleme tesisine gönderilmelidir. Bu ürünün do÷ru úekilde bertaraf edilmesini sa÷layarak, çevre ve insan sa÷lı÷ı için olası olumsuz sonuçların önlenmesine yardımcı olursunuz. Lütfen, daha fazla bilgi için montaj görevlisi veya ilgili kurum ile irtibata geçin. Uzaktan kumandadaki piller çıkartılmalı ve ilgili yerel ve ulusal mevzuat uyarınca ayrı olarak bertaraf edilmelidir. 01_EN_3P302565-1.fm Page 1 Monday, February 13, 2012 4:09 PM CONTENTS ILLUSTRATION.....................................[1] PRIOR TO USE ....................................[2] 1. SAFETY PRECAUTIONS..................1 2. NAMES AND FUNCTIONS OF THE OPERATING SECTION ............4 3. HANDLING FOR WIRELESS REMOTE CONTROLLER..................6 4. OPERATION RANGE........................7 5. OPERATION PROCEDURE .............7 6. NOT MALFUNCTION OF THE AIR CONDITIONER ........................13 7. HOW TO DIAGNOSE TROUBLE SPOTS ............................................15 The English text is the original instruction. Other languages are translations of the original instructions. 1. SAFETY PRECAUTIONS To gain full advantage of the air conditioner’s functions and to avoid malfunction due to mishandling, we recommend that you read this instruction manual carefully before use. This air conditioner is classified under “appliances not accessible to the general public”. The precautions described herein are classified as WARNING and CAUTION. They both contain important information regarding safety. Be sure to observe all precautions without fail. WARNING ....... Failure to follow these instructions properly may result in personal injury or loss of life. CAUTION ........ Failure to observe these instructions properly may result in property damage or personal injury, which may be serious depending on the circumstances. 1 After reading, keep this manual in a convenient place so that you can refer to it whenever necessary. If the equipment is transferred to a new user, be sure also to hand over the manual. WARNING Be aware that prolonged, direct exposure to cool or warm air from the air conditioner, or to air that is too cool or too warm can be harmful to your physical condition and health. When the air conditioner is malfunctioning (giving off a burning odor, etc.) turn off power to the unit and contact your local dealer. Continued operation under such circumstances may result in a failure, electric shocks or fire hazards. Consult your local dealer about installation work. Doing the work yourself may result in water leakage, electric shocks or fire hazards. Consult your local dealer regarding modification, repair and maintenance of the air conditioner or the remote controller. Improper workmanship may result in water leakage, electric shocks or fire hazards. Do not place objects, including rods, your fingers, etc., in the air inlet or outlet. Injury may result due to contact with the air conditioner’s high-speed fan blades. Beware of fire in case of refrigerant leakage. If the air conditioner is not operating correctly, i.e. not generating cool or warm air, refrigerant leakage could be the cause. Consult your dealer for assistance. The refrigerant used for the air conditioner is safe and normally does not leak. However, if the refrigerant leaks and gets in contact with a naked burner, heater or cooker, it may generate hazardous compounds. Turn off the air conditioner and call the dealer. Make sure to turn on the air conditioner after the qualified service person confirms that the leakage is repaired. English 01_EN_3P302565-1.fm Page 2 Monday, February 13, 2012 4:09 PM Consult your local dealer regarding what to do in case of refrigerant leakage. When the air conditioner is to be installed in a small room, it is necessary to take proper measures so that the amount of any leaked refrigerant does not exceed the concentration limit in the event of a leakage. Otherwise, this may lead to an accident due to oxygen depletion. Contact professional personnel about attachment of accessories and be sure to use only accessories specified by the manufacturer. If a defect results from your own workmanship, it may result in water leaks, electric shock or fire. Consult your local dealer regarding relocation and reinstallation of the air conditioner. Improper installation work may result in leakage, electric shocks or fire hazards. Be sure to use fuses with the correct ampere reading. Do not use improper fuses, copper or other wires as a substitute, as this may result in electric shock, fire, injury or damage to the unit. Be sure to install an earth leakage breaker. Failure to install an earth leakage breaker may result in electric shocks or fire. Be sure to earth the unit. Do not earth the unit to a utility pipe, lightning conductor or telephone earth lead. Imperfect earthing may result in electric shocks or fire. A high surge current from lightning or other sources may cause damage to the air conditioner. Consult the dealer if the air conditioner submerges owing to a natural disaster, such as a flood or typhoon. Do not operate the air conditioner in that case, or otherwise a malfunction, electric shock, or fire may result. English Start or stop the air conditioner with the remote controller. Never use the power supply breaker for this purpose. Otherwise, it may cause fire or water leakage. Furthermore, if an automatic reset control is provided against power failure and the power is recovered, the fan will rotate suddenly and may cause injury. Do not use the product in the atmosphere contaminated with oil vapor, such as cooking oil or machine oil vapor. Oil vapor may cause crack damage, electric shocks, or fire. Do not use the product in places with excessive oily smoke, such as cooking rooms, or in places with flammable gas, corrosive gas, or metal dust. Using the product in such places may cause fire or product failures. Do not use flammable materials (e.g., hairspray or insecticide) near the product. Do not clean the product with organic solvents such as paint thinner. The use of organic solvents may cause crack damage to the product, electric shocks, or fire. Be sure to use a dedicated power supply for the air conditioner. The use of any other power supply may cause heat generation, fire, or product failures. Consult your dealer regarding cleaning the inside of the air conditioner. Improper cleaning may cause breakage of plastic parts, water leakage and other damage as well as electric shocks. CAUTION Do not use the air conditioner for purposes other than those for which it is intended. Do not use the air conditioner for cooling precision instruments, food, plants, animals or works of art as this may adversely affect the performance, quality and/or longevity of the object concerned. 2 01_EN_3P302565-1.fm Page 3 Monday, February 13, 2012 4:09 PM Do not remove the outdoor unit’s fan guard. The guard protects against the unit’s high speed fan, which may cause injury. Do not place objects that are susceptible to moisture directly beneath the indoor or outdoor units. Under certain conditions, condensation on the main unit or refrigerant pipes, air filter dirt or drain blockage may cause dripping, resulting in fouling or failure of the object concerned. To avoid oxygen deficiency, ensure that the room is adequately ventilated if equipment such as a burner is used together with the air conditioner. After prolonged use, check the unit stand and its mounts for damage. If left in a damaged condition, the unit may fall and cause injury. Do not place flammable sprays or operate spray containers near the unit as this may result in fire. Before cleaning, be sure to stop unit operation, turn the power circuit breaker off or remove the power cord. Otherwise, an electric shock and injury may result. To avoid electric shocks, do not operate with wet hands. Do not place appliances that produce naked flames in places exposed to the airflow from the unit as this may impair combustion of the burner. Do not place heaters directly below the unit, as resulting heat can cause deformation. Do not allow a child to mount on the outdoor unit or avoid placing any object on it. Falling or tumbling may result in injury. Do not block air inlets nor outlets. Impaired airflow may result in insufficient performance or trouble. Be sure that children, plants or animals are not exposed directly to airflow from the unit, as adverse effects may ensue. 3 Do not wash the air conditioner or the remote controller with water, as this may result in electric shocks or fire. Do not place water containers (flower vases, etc.) on the unit, as this may result in electric shocks or fire. Do not install the air conditioner at any place where there is a danger of flammable gas leakage. In the event of a gas leakage, build-up of gas near the air conditioner may result in fire hazards. Do not put flammable containers, such as spray cans, within 1 m from the blow-off mouth. The containers may explode because the warm air output of the indoor or outdoor unit will affect them. The batteries must be removed from the appliance before it is scrapped and they are disposed of safely. Carry out drain piping properly to ensure complete drainage. If drain piping is not carried out properly, drain will not flow out. Then, dirt and debris may be accumulated in the drain pipe and may cause water leakage. If it occurs, stop the air conditioner and call your dealer for assistance. The appliance is not intended for use by unattended young children or persons who are incompetent to operate air conditioners. It may result in injury or electric shock. Children should be watched so that they do not play with the unit or its remote controller. Accidental operation by a child may result in injury or electric shock. Do not let children play on or around the outdoor unit. If they touch the unit carelessly, injury may be caused. To avoid injury, do not touch the air inlet or aluminum fins of the unit. English 01_EN_3P302565-1.fm Page 4 Monday, February 13, 2012 4:09 PM Do not place objects in direct proximity of the outdoor unit and do not let leaves and other debris accumulate around the unit. Leaves are a hotbed for small animals which can enter the unit. Once in the unit, such animals can cause malfunctions, smoke or fire when making contact with electrical parts. Turn off the power when the unit is not to be used for long periods of time. Otherwise, the unit may get hot or catch on fire due to dust accumulation. Never touch the internal parts of the controller. Do not remove the front panel. Touching certain internal parts will cause electric shocks and damage to the unit. Please consult your dealer about checking and adjustment of internal parts. Do not leave the remote controller wherever there is a risk of wetting. If water gets into the remote controller there is a risk of electrical leakage and damage to electronic components. When using the wireless remote controller, do not put a strong light beam or install an inverter fluorescent lamp near the receiving section on the main unit. A malfunction may occur. Watch your steps at the time of air filter cleaning or inspection. High-place work is required, to which utmost attention must be paid. If the scaffold is unstable, you may fall or topple down, thus causing injury. English 2. NAMES AND FUNCTIONS OF THE OPERATING SECTION (Refer to Fig. 1-1, 1-2, 2 on page [1]) DISPLAY “ ” (SIGNAL TRANSMISSION) 1 This lights up when a signal is being transmitted. DISPLAY “ ” “ ” “ ”“ “ ” (OPERATION MODE) ” 2 This display shows the current OPERATION MODE. For cooling only type, “ ” (AUTOMATIC) and “ ” (HEATING) are not installed. DISPLAY “ H M L C ” (SET TEMPERA- 3 TURE) This display shows the set temperature. hr. DISPLAY “ hr. ” 4 (PROGRAMMED TIME) This display shows PROGRAMMED TIME of the system start or stop. 5 DISPLAY “ ” (AIRFLOW FLAP) Refer to page 10. DISPLAY “ ” “ ” “ ” (FAN 6 SPEED) The display shows the set fan speed. TEST ” DISPLAY “ (INSPECTION/ TEST OPERATION) When the INSPECTION/TEST OPER7 ATION BUTTON is pressed, the display shows the system mode is in. Do not operate this button during normal use. ON/OFF BUTTON 8 Press the button and the system will start. Press the button again and the system will stop. 4 01_EN_3P302565-1.fm Page 5 Monday, February 13, 2012 4:09 PM FAN SPEED CONTROL BUTTON 9 Press this button to select the fan speed, Low or Middle or High, of your choice. TEMPERATURE SETTING BUTTON 10 Use this button for SETTING TEMPERATURE (Operates with the front cover of the remote controller closed.) SIGNAL TRANSMITTER 11 This sends the signals to the indoor unit. TEMPERATURE ADJUSTMENT/ PROGRAMMING TIMER BUTTON 12 Use this button for temperature setting and programming “START and/or STOP” time. (Operates with the front cover of the remote controller opened.) TIMER MODE START/STOP BUT13 TON Refer to page 12. TIMER RESERVE/CANCEL BUTTON 14 Refer to page 12. AIRFLOW DIRECTION ADJUST 15 BUTTON Refer to page 10. OPERATION MODE SELECTOR BUTTON Press this button to select OPERA16 TION MODE. “ ” (COOLING), “ ” (HEATING), “ ” (AUTOMATIC), “ ” (FAN), “ ” (PROGRAM DRY). FILTER SIGN RESET BUTTON 17 Refer to the section of MAINTENANCE in the operation manual attached to the indoor unit. INSPECTION/TEST OPERATION BUTTON 18 This button is used only by qualified service persons for maintenance purposes. Do not operate this button during normal use. EMERGENCY OPERATION SWITCH 19 This switch is readily used if the remote controller does not work. 5 RECEIVER 20 This receives the signals from the remote controller. OPERATING INDICATOR LAMP (Red) 21 This lamp stays lit while the air conditioner runs. It flashes when the unit is in trouble. TIMER INDICATOR LAMP (Green) 22 This lamp stays lit while the timer is set. AIR FILTER CLEANING TIME INDICATOR LAMP (Red) 23 Lights up when it is time to clean the air filter. DEFROST OPERATION LAMP (Orange) 24 Lights up when the defrosting operation has started. (For cooling only type this lamp does not turn on.) NOTES • For the sake of explanation, all indications are shown on the display in Figure 1 contrary to actual running situations. • Fig. 1-2 shows the remote controller with the front cover opened. • If the AIR FILTER CLEANING TIME INDICATOR LAMP lights up, clean the air filter as explained in the operation manual provided with the indoor unit. After cleaning and reinstalling the air filter, press the FILTER SIGN RESET BUTTON on the remote controller. The AIR FILTER CLEANING TIME INDICATOR LAMP on the receiver will go out. • The DEFROST OPERATION LAMP will flash when the power is turned on. This is not a malfunction. • Do not place the remote controller where subject to direct sunlight. LCD will get discolored and may fail to display information. [CAUTIONS] Before cleaning, be sure to press the ON/ OFF BUTTON to shut OFF the power for safety. English 01_EN_3P302565-1.fm Page 6 Monday, February 13, 2012 4:09 PM 3. HANDLING FOR WIRELESS REMOTE CONTROLLER Precautions in handling remote controller Placing the remote controller Removing the remote controller Slide from above Pull it upward Direct the transmitting part of the remote controller to the receiving part of the air conditioner. If something blocks the transmitting and receiving path of the indoor unit and the remote controller as curtains, it will not operate. Receiver 2 short beeps from the receiver indicates that the transmission is properly done. Transmitting distance is approximately 7 m. Do not drop or get it wet. It may be damaged. Never press the button of the remote controller with a hard, pointed object. The remote controller may be damaged. Installation site • It is possible that signals will not be received in rooms that have electronic fluorescent lighting. Please consult with the salesman before buying new fluorescent lights. • If the remote controller operated some other electrical apparatus, move that machine away or consult your dealer. Placing the remote controller in the remote controller holder Install the remote controller holder to a wall or a pillar with the attached screw. (Make sure it transmits) English Remote controller holder How to put the dry batteries (1) Remove the back cover of the remote controller to the direction pointed by the arrow mark. (2) Put the batteries Use two dry cell batteries (AAA.LR03 (alkaline)). Put dry batteries correctly to fit their (+) and (–). (3) Close the cover When to change batteries Under normal use, batteries last about a year. However, change them whenever the indoor unit doesn’t respond or responds slowly to commands, or if the display becomes dark. [CAUTIONS] • Replace all batteries at the same time, do not use new and old batteries intermixed. • In case the remote controller is not used for a long time take out all batteries in order to prevent liquid leak of the battery. 6 01_EN_3P302565-1.fm Page 7 Monday, February 13, 2012 4:09 PM IN THE CASE OF CENTRALIZED CONTROL SYSTEM 5. OPERATION PROCEDURE If the indoor unit is under centralized control, it is necessary to switch the remote controller’s setting. In this case, contact your DAIKIN dealer. 4. OPERATION RANGE If the temperature or the humidity is beyond the following conditions, safety devices may work and the air conditioner may not operate, or sometimes, water may drop from the indoor unit. COOLING [°C] OUTDOOR INDOOR OUTDOOR TEMPERAUNIT TEMPERATURE HUMIDITY TURE DB 18 to 37 80% or RZQG DB –15 to 50 WB 12 to 28 below RZQSG71· DB 21 to 37 80% or DB –10 to 43 100·140 WB 14 to 28 below DB 21 to 37 80% or RZQ200 DB –5 to 46 WB 14 to 28 below HEATING [°C] OUTDOOR INDOOR TEMPERATURE TEMPERATURE DB –19.5 to 21 RZQG DB 10 to 27 WB –20 to 15.5 DB –14 to 21 RZQSG71 DB 10 to 30 WB –15 to 15.5 RZQSG DB 10 to 28 DB –14 to 21 100·140 WB –15 to 15.5 DB –14 to 21 RZQ200 DB 10 to 27 WB –15 to 15 OUTDOOR UNIT DB: Dry bulb temperature WB: Wet bulb temperature The setting temperature range of the remote controller is 16°C to 32°C. 7 Refer to figure 1 on page [1] • Operating procedure varies with heat pump type and cooling only type. Contact your Daikin dealer to confirm your system type. • To protect the unit, turn on the main power switch 6 hours before operation. • Do not shut OFF the power during seasonal use of the unit. This is required in order to activate the unit smoothly. • If the main power supply is turned off during operation, operation will restart automatically after the power turns back on again. COOLING, HEATING, AUTOMATIC, FAN, AND PROGRAM DRY OPERATION Operate in the following order. • AUTOMATIC OPERATION can be selected only by Heat pump split system. • For cooling only type, “COOLING”, and “FAN” and “PROGRAM DRY” operation are able to select. Refer to figure 1-1, 2 on page [1] 1 MODE OPERATION MODE SELECTOR Press OPERATION MODE SELECTOR BUTTON several times and select the OPERATION MODE of your choice as follows. COOLING OPERATION ....................... “ ” The recommended temperature setting is 26 to 28°C. HEATING OPERATION ........................ “ ” The recommended temperature setting is 18 to 23°C. English 01_EN_3P302565-1.fm Page 8 Monday, February 13, 2012 4:09 PM AUTOMATIC OPERATION ................“ ” • In this operation mode, COOLING/ HEATING changeover is automatically conducted. • The AUTOMATIC OPERATION controls the temperature based on the temperature setting, so it maintains a comfortable temperature throughout the year, and enables energy-saving operation. <Example> When the indoor temperature decreases to 25°C or less when the temperature setting is at 27°C in the AUTOMATIC COOLING OPERATION, the operation is changed over to the AUTOMATIC HEATING OPERATION. When the indoor temperature reaches 29°C or more, the operation is changed over to the AUTOMATIC COOLING OPERATION. FAN OPERATION..............................“ ” Air in the room is circulated. PROGRAM DRY OPERATION..........“ ” • The function of this program is to decrease the humidity in your room with the minimum temperature decrease. • Micro computer automatically determines TEMPERATURE and FAN SPEED. • This system does not go into operation if the room temperature is below 16°C. 2 ON OFF ON/OFF Press ON/OFF BUTTON OPERATING INDICATOR LAMP (Red) lights up or goes off and the system starts or stops OPERATION. • When the HEATING OPERATION is stopped, FAN OPERATION is performed for 1 minute to remove heat in the indoor unit. English NOTE • Do not turn OFF power immediately after the unit stops. Then, wait no less than 5 minutes. Water is leaking or there is something else wrong with the unit. • After settings are changed or operation is turned ON/OFF, make sure that the receiving tone of the indoor unit makes a beeping sound. [CHARACTERISTICS OF THE COOLING OPERATION (COOLING OPERATION AND AUTOMATIC COOLING OPERATION)] • After continued operation at a downward airflow direction, operate the air conditioner using a different direction setting for a period of time to prevent condensation on the airflow flaps. (The remote controller displays the airflow direction that is set.) • If the COOLING OPERATION is used when the indoor temperature is low, frost adheres to the heat exchanger of the indoor unit. This can decrease the cooling capacity. In this case, the system automatically switches to DEFROST OPERATION for a while. During DEFROST OPERATION, the low airflow rate is used to prevent the discharge of melt water. (The remote controller displays the airflow rate that is set.) • When the outside temperature is high, it takes some time until the outside temperature reaches the set temperature. [CHARACTERISTICS OF THE HEATING OPERATION (HEATING OPERATION AND AUTOMATIC HEATING OPERATION)] START OF OPERATION • It generally takes a longer time for HEATING OPERATION to reach the set temperature compared to COOLING OPERATION. It is advisable to start operation in advance using TIMER OPERATION. 8 01_EN_3P302565-1.fm Page 9 Monday, February 13, 2012 4:09 PM Perform the following operation to prevent heating capacity decrease and discharge of cool air. AT THE START OF OPERATION AND AFTER DEFROST OPERATION • A warm air circulating system is employed, and therefore it takes some time until the entire room is warmed up after the start of operation. • The indoor fan runs to discharge a gentle wind automatically until the temperature inside the air conditioner reaches a certain level. At this time, the DEFROST OPERATION LAMP for the light receiving unit indicator lights. Leave it as it stands and wait for a while. (The remote controller displays the airflow rate that is set.) • The air discharge direction becomes horizontal to prevent a draft of cool air to the inhabitants (The remote controller will display the set air discharge direction) DEFROST OPERATION (Frost removal operation for the outdoor unit) • As the frost on the coil of an outdoor unit increase, heating effect decreases and the system goes into DEFROST OPERATION. • The warm air stops, and the DEFROST OPERATION LAMP for the light receiving unit indicator lights. (The remote controller displays the airflow rate that is set.) • After 6 to 8 minutes (maximum 10 minutes) of DEFROST OPERATION, the system returns to HEATING OPERATION. • The air discharge direction becomes horizontal. (The remote controller displays the airflow direction that is set.) • When the operation is switched to the HEATING OPERATION during or after the DEFROST OPERATION, white mist comes out from the air outlet of the outdoor unit. • A hissing and “Shuh” sound may be heard during this particular operation. 9 Regarding outside air temperature and heating capacity • The heating capacity of the air conditioner declines as the outside air temperature falls. In such a case, use the air conditioner in combination with other heating systems. (When a combustion appliance is used, ventilate the room regularly.) Do not use the combustion appliance where the air from the air conditioner is blown directly toward it. • When the warm air stays under the ceiling and your feet are cold, we recommend that you use a circulator (a fan to circulate the air inside the room). For details, consult your dealer. • When the indoor temperature exceeds the set temperature, the air conditioner discharges a gentle breeze (switches to whisper mode). The air discharge direction becomes horizontal. (The remote controller displays the airflow rate and airflow direction that are being set.) [CHARACTERISTICS OF THE PROGRAM DRY OPERATION] • This operation lowers the humidity without lowering the indoor temperature. The indoor temperature when the operation button is pressed will be the set temperature. At this time, the airflow rate and humidity are set automatically, so the remote controller does not display the airflow rate and set temperature. To efficiently lower the indoor temperature and humidity, first lower the indoor temperature using the COOLING OPERATION, and then use PROGRAM DRY OPERATION. When the indoor temperature is lowered, air discharge from the air conditioner may stop. • After continued operation at a downward airflow direction, operate the air conditioner using a different direction setting for a period of time to prevent condensation on the airflow flaps. (The remote controller displays the airflow direction that is set.) English 01_EN_3P302565-1.fm Page 10 Monday, February 13, 2012 4:09 PM • If the PROGRAM DRY OPERATION is used when the indoor temperature is low, frost forms on the heat exchanger of the indoor unit. In this case, the system automatically switches to DEFROST OPERATION for a while. ADJUSTMENT For programming TEMPERATURE, FAN SPEED and AIRFLOW DIRECTION, follow the procedure shown below. DOWN TEMPERATURE SETTING UP Press TEMPERATURE SETTING BUTTON and program the setting temperature. UP DOWN Each time this button is pressed, setting temperature rises 1°C. Each time this button is pressed, setting temperature lowers 1°C. • Temperature can not be set in the FAN operation. FAN FAN SPEED CONTROL Press FAN SPEED CONTROL BUTTON. Low, Middle or High fan speed can be selected. • The microchip may sometimes control the fan speed in order to protect the unit. • The airflow rate may be changed automatically depending on the indoor temperature. The fan may be stopped, but this is normal. • It may take some time until the airflow switch is completed, but this is normal. • The airflow rate cannot be set to “automatic”. SWING AIRFLOW DIRECTION ADJUST • There are 2 ways of adjusting the airflow direction. (When the operation stops, the airflow flaps at the air outlet (vertical airflow direction adjustment flaps) close automatically.) In case of automatic operation UP DOWN Each time this button is pressed, setting temperature shifts to “H” side. Each time this button is pressed, setting temperature shifts to “L” side. B. Left and right direction A. Up and down direction [°C] Setting temperature H M L 25 23 22 21 19 • The setting is impossible for fan operation. NOTE • The setting temperature range of the remote controller is 16°C to 32°C. • After settings are changed or operation is turned ON/OFF, make sure that the receiving tone of the indoor unit makes a beeping sound. English 10 01_EN_3P302565-1.fm Page 11 Monday, February 13, 2012 4:09 PM A. UP AND DOWN DIRECTION B. LEFT AND RIGHT DIRECTION Press the AIRFLOW DIRECTION ADJUST BUTTON to select the air direction as shown below. Hold the tabs on edge louvers (horizontal airflow direction adjustment flaps) down slightly and adjust left and right to match the room conditions or your preference. DISPLAY appears and the airflow direction continuously varies. (Automatic swing setting) Press AIRFLOW DIRECTION ADJUST BUTTON to select the air direction of your choice. DISPLAY vanishes the airflow direction is fixed (Fixed airflow direction setting). MOVEMENT OF THE AIRFLOW FLAP For the following conditions, micro computer controls the airflow direction so it may be different from the display. Operation mode Vertical airflow 11 • COOLING • AUTOMATIC COOLING • PROGRAM DRY • When operating continuously at downward airflow direction (Air blows in the automatically set direction for a period of time to prevent condensation on the airflow flaps.) • HEATING • AUTOMATIC HEATING • When room temperature is higher than the set temperature • When the HEATING OPERATION starts or during DEFROST OPERATION (if frost forms on the outdoor unit) (The air discharge direction becomes horizontal so that it does not blow directly toward your body.) Stop the horizontal flaps at a position where you can hold the tabs and adjust it left and right. NOTE • Only make adjustments after you have stopped the airflow direction swing in a position where adjustments are possible. Your hand may get caught if you attempt to make adjustments while the unit is swinging. PROGRAM TIMER OPERATION Operate in the following order. • The timer is operated in the following two ways. Programming the stop time ( ) .... The system stops operating after the set time has elapsed. Programming the start time ( ) .... The system starts operating after the set time has elapsed. • The start and the stop time can be simultaneously programmed. • The timer setting is effective only once. When using the TIMER operation every day, the setting is required before each use. English 01_EN_3P302565-1.fm Page 12 Monday, February 13, 2012 4:09 PM 1 TIMER TIMER MODE START/ STOP For example. ON OFF TEMP TIME Press the TIMER MODE START/STOP BUTTON several times and select the mode on the display. The display flashes. For setting the timer stop .... “ For setting the timer start .... “ ” ” C UP FAN DOWN RESERVE CANCEL hr. TIMER hr. MODE 2 PROGRAMMING TIMER UP DOWN Press the PROGRAMMING TIMER BUTTON and set the time for stopping or starting the system. UP DOWN When this button is pressed, the time advances by 1 hour. When this button is pressed, the time goes backward by 1 hour. • Keep pressing the button to change the setting time continuously. • The timer can be programmed a maximum of 72 hours. 3 RESERVE TIMER RESERVE Press the TIMER RESERVE BUTTON. The timer setting procedure ends. The display changes from flashing light to a constant light. 4 CANCEL NOTE • After the timer is programmed, the display shows the remaining time. EMERGENCY OPERATION When the remote controller does not work due to battery failure or the absence thereof, use this switch which is located beside the discharge grille on the main unit. When the remote controller does not work, but the battery low indicator on it is not lit, contact your dealer. [START] 1 Press the EMERGENCY OPERATION SWITCH. • The machine runs in the previous mode. • The system operates with the previously set fan speed. TIMER CANCEL Press the TIMER CANCEL BUTTON to cancel programming. The display vanishes. • Make sure that the receiving tone of the indoor unit makes a beeping sound. If the receiving tone does not sound, set the timer using steps 1 to 3 , and then press the TIMER CANCEL BUTTON. English When the timer is programmed to stop the system after 3 hours and start the system after 4 hours, the system will stop after 3 hours and then 1 hour later the system will start. 1 2 This display is located next to the air outlet of the indoor unit. (Refer to Fig. 2 on page [1]) 12 01_EN_3P302565-1.fm Page 13 Monday, February 13, 2012 4:09 PM [STOP] 2 Press the EMERGENCY OPERATION SWITCH again. • If the wired remote controller is used for operation, the display on the wireless remote controller does not change. Indoor unit PRECAUTIONS FOR GROUP CONTROL SYSTEM OR TWO REMOTE CONTROLLER CONTROL SYSTEM This system provides two other control systems beside individual control (one remote controller controls one indoor unit) system. Confirm the following if your unit is of the following control system type. Group control system • One remote controller controls up to 16 indoor units. • All indoor units are equally set. Indoor unit Remote controller NOTE • Contact your Daikin dealer in case of changing the combination or setting of group control and two remote controller control systems. • Please do not change the combination and settings for the group operation and two remote controller control systems by yourself, but be sure to ask your dealer. 6. NOT MALFUNCTION OF THE AIR CONDITIONER Remote controller Two remote controller control system Two remote controllers (wired and wireless) control one indoor unit. (In case of group control system, one group of indoor units) The unit follows individual operation. • Cannot have two remote controller control system with only wireless remote controllers. (It will be a two remote controller control system having one wired and one wireless remote controllers.) • Under two remote controller control system, wireless remote controller cannot control timer operation. • Only the OPERATING INDICATOR LAMP out of 3 other lamps on the indoor unit display functions. • While the two remote controllers control is operating, the wireless remote controller displays the OPERATION MODE only. 13 The following symptoms do not indicate air conditioner malfunction I. THE SYSTEM DOES NOT OPERATE • The system does not restart immediately after the ON/OFF BUTTON is pressed. • The system does not restart immediately when TEMPERATURE SETTING BUTTON is returned to the former position after pushing the button. It does not restart immediately because a safety device operates to prevent overload of the system. If the OPERATING INDICATOR LAMP lights, the system is in normal condition. After 3 minutes, the system will turn on again automatically. English 01_EN_3P302565-1.fm Page 14 Monday, February 13, 2012 4:09 PM • The receiving tone of the indoor unit makes a triple beeping sound (normally, “beep-beep”). This is because the system is under centralized control. • The outdoor unit is stopped. This is because the room temperature has reached the set temperature. The indoor unit switches to FAN OPERATION. COOLING OPERATION (AUTOMATIC COOLING OPERATION): Lower the set temperature. HEATING OPERATION (AUTOMATIC HEATING OPERATION): Raise the set temperature. The operation starts after a while when the system is in normal condition. • After the HEAT OPERATION is started, the DEFROST OPERATION LAMP located on the indoor unit display lights up. This is because the system automatically switches to DEFROST OPERATION to prevent a decrease in heating capacity when frost on the outdoor unit increases. After 6 to 8 minutes (maximum 10 minutes), the system returns to its original operation. II. THE OPERATION SOMETIMES STOPS • The remote controller displays “U4” and “U5”, and the operation stops. However, it will restart in a few minutes. This is because communication between the units is shut off and stopped due to noise caused by devices other than the air conditioner. When the electrical noise decreases, the system automatically restarts. III. COOLING AND HEATING OPERATIONS CAN NOT BE SWITCHED • The receiving tone of the indoor unit makes a long beeping sound. An unavailable mode was set for the indoor unit during operation changeover control. English IV. THE FAN SPEED IS DIFFERENT FROM THE SETTING • Even if the FAN SPEED CONTROL BUTTON is pressed, the fan speed does not change. For the DEFROST OPERATION during the COOLING OPERATION, the airflow rate is lowered to prevent the carryover of melted water. After a while, the airflow rate can be changed. (The airflow rate cannot be set for the PROGRAM DRY OPERATION.) When the room temperature exceeds the set temperature the indoor unit goes into whisper mode. It takes some time until the airflow rate changes. Raise the set temperature. After a while, the airflow rate changes. V. AIR BLOW DIRECTION IS NOT AS SPECIFIED • Actual air blow direction is not as shown on the remote controller. • Automatic swing setting does not work. This is because the airflow rate is automatically controlled. After a while, the airflow direction can be changed. Refer to “AIRFLOW DIRECTION ADJUST” on page 10. VI. ONLY A PART OF INDICATION SHOWS • Even if the unit is operated, only the operation indication shows, or even if the indication shows, soon after, the indication other than that for operation disappears. The corresponding indoor unit is that for multi-system and the remote controller is set to the multi-system. VII. THERE IS NO DISPLAY OR ALL PARTS ARE DISPLAYED • When a button on the remote controller is pressed. The batteries have run out. 14 01_EN_3P302565-1.fm Page 15 Monday, February 13, 2012 4:09 PM VIII. THE UNIT DOES NOT COOL EFFECTIVELY. • The unit is operating in program dry mode. This is because program dry mode operates so that the indoor temperature decreases as little as possible. Lower the indoor temperature using COOLING OPERATION, and then use PROGRAM DRY OPERATION. (Refer to “CHARACTERISTICS OF THE PROGRAM DRY OPERATION” on page 9.) • Read through characteristics of the COOLING OPERATION, characteristics of the HEATING OPERATION, and characteristics of the PROGRAM DRY OPERATION on page 8~10. Proper use Be careful of overheating or overcooling. Not doing so wastes electricity. Set at 26 to 28˚C for the COOLING OPERATION. Set at 18 to 23˚C for the HEATING OPERATION. 7. HOW TO DIAGNOSE TROUBLE SPOTS I. EMERGENCY STOP When the air conditioner stops in emergency, the OPERATING INDICATOR LAMP on the indoor unit starts blinking. Take the following steps yourself to read the malfunction code that appears on the display. Contact your dealer with this code. It will help pinpoint the cause of the trouble, speeding up the repair. TEST 1 Press the INSPECTION/TEST OPERATION BUTTON to select the inspection mode “ ”. “ ” appears on display and blinks. “UNIT No.” lights up. 2 UP DOWN Press PROGRAMMING TIMER BUTTON and change the unit number. Press to change the unit number until the indoor unit beeps and perform the following operation according to the number of beeps. Number of beeps 3 short beeps .....Perform all steps from 3 to 6 . 1 short beep .......Perform 3 and 6 steps 1 long beep ........Normal state 3 MODE Press OPERATION MODE SELECTOR BUTTON “ ” on the left-hand of the malfunction code blinks. 4 UP DOWN Press PROGRAMMING TIMER BUTTON and change the malfunction code. Press until the indoor unit beeps twice. 15 English 01_EN_3P302565-1.fm Page 16 Monday, February 13, 2012 4:09 PM 5 MODE Press OPERATION MODE SELECTOR BUTTON “ ” on the right-hand of the malfunction code blinks. 6 II. IN CASE BESIDES EMERGENCY STOP 1. The unit does not operate at all. • Check if the receiver is exposed of sunlight or strong light. Keep receiver away from light. • Check if there are batteries in the remote controller. Place the batteries. • Check if the indoor unit number and wireless remote controller number are equal. UP DOWN Press PROGRAMMING TIMER BUTTON and change the malfunction code. Press until the indoor unit makes a long beep. The malfunction code is fixed when the indoor unit makes a long beep. Number 7 MODE Reset of the display Press OPERATION MODE SELECTOR BUTTON to get the display back to the normal state. ON OFF 24 6 TEMP TIME UP CODE FAN UNIT NO. DOWN 24 6 RESERVE CANCEL TIMER MODE 35 7 SWING /TEST 1 English Number Operate the indoor unit with the remote controller of the same number. Signal transmitted from a remote controller of a different number cannot be accepted. (If the number is not mentioned, it is considered as “1”) 2. The system operates but it does not sufficiently cool or heat. • If the set temperature is not proper. (Refer to page 10) • If the FAN SPEED is set to LOW SPEED. (Refer to page 10) • If the airflow angle is not proper. (Refer to page 11) If the problem is not solved after checking the above points, please do not try to repair it yourself. In such cases, always consult your local dealer. At this time, please tell the symptom and model name (written on the manufacturer’s label). 16 01_EN_3P302565-1.fm Page 17 Monday, February 13, 2012 4:09 PM Contact the place of purchase in the following case. WARNING When you detect a burning odor, shut OFF power immediately and contact the place of purchase. Using the equipment in anything but proper working condition can result in equipment damage, electric shock and/or fire. [Trouble] The OPERATING INDICATOR LAMP of the indoor unit is flashing and the unit does not work at all. (Refer to page 5) Malfunction Code Unit No. which sensed trouble ON OFF TEMP TIME UP CODE FAN UNIT NO. DOWN RESERVE CANCEL TIMER MODE SWING /TEST INSPECTION display [Remedial action] Check the malfunction code (A1 - UF) on the remote controller and contact the place of purchase. (Refer to page 15) 17 English 00_CV_3P302565-1_1.fm Page 2 Tuesday, January 31, 2012 3:14 PM 3P302565-1 EM11A054 (1111) HT