1
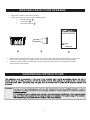
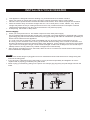
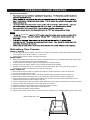
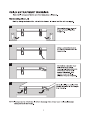
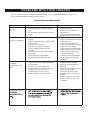
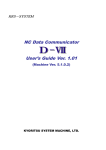
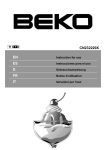
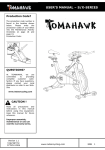
freezer
freezer
freezer.
lid
freezer
lid
or when not in use.
freezer
freezer.
freezer
freezer
freezer
freezer lid.
freezer
the freezer or freezer lid;
freezer
freezer
freezer
PROPER D ISPOSA L
freezer
freezer
lid.
basket
freezer
freezer.
BEFORE USING YOUR FREEZER
•
•
Remove the exterior and interior packing.
Check to be sure you have all of the following parts:
•
1 Storage Basket 1
1 Ice Scraper 2
•
•
1 Instruction Manual 3
1
•
•
2
3
Before connecting the freezer to the power source, let it stand upright for approximately 2 hours. This
will reduce the possibility of a malfunction in the cooling system from handling during transportation.
Clean the interior surface with lukewarm water using a soft cloth and allow to completely dry before
closing the lid of the freezer.
GROUNDING INSTRUCTIONS
WARNING:
2
INSTALLING YOUR FREEZER
•
•
•
•
•
This appliance is designed to be free standing only, and should not be recessed or built-in.
Place your freezer on a floor that is strong enough to support the freezer when it is fully loaded.
Allow 6 inches of space between the back and sides of the freezer, which allows the proper air circulation.
Place the freezer away from direct sunlight and sour ces of heat (stove, heater, radiator, etc.). Direct
sunlight may affect the acrylic coating and heat sources may increase electrical consumption. Extreme
cold ambient temperatures may also cause the freezer to not perform properly.
Avoid placing the freezer in damp areas.
Power supply:
• Check your local power source. This freezer requires a 120V, 60Hz power supply.
• Use a receptacle that will accept the ground prong. The power cord of this appliance is equipped with a 3-prong
(grounding) plug which mates with a standard 3-prong (grounding) wall outlet to minimize the possibility of
electric shock hazard from this appliance.
A. Longer cord sets or extension cords are available and may be used if care is exercised in their use.
B. If a long cord or extension cord is used, (1) the marked electrical rating of the cord set or extension cord
should be at least as great as the electrical rating of the appliance, (2) the extension cord must be a grounding
-type 3-wire cord, and (3) the longer cord should be arranged so that it will not drape over the counter top or
tabletop where it can be pulled on by children or tripped over unintentionally.
• After plugging the appliance into a wall outlet, allow the unit to cool down for at least 2 hours before placing
food in the freezer compartment.
NOTES:
• The freezer should always be plugged into its own individual electrical outlet which has a voltage rating that
matches the rating plate.
• If you have only a standard 2-prong wall outlet, it is your personal responsibility and obligation to have it
replaced with a properly grounded 3-prong wall outlet.
• Never unplug your freezer by pulling on the power cord. Always grip plug firmly and pull straight out from the
outlet.
3
LOCATION OF CONTROLS
LID OPENED
Lid
Lid Gasket
Hinges
Storage Basket
Thermostat Control
Exterior Water Drain Outlet
Rollers
Ice Scraper
4
OPERATING YOUR FREEZER
Thermostat Control
NOTE
thermostat
Defrosting Your Freezer
When to Defrost
• For the most efficient operation and minimum energy consumption, defrost the freezer when the frost
on the freezer walls is excessive or 1/4 inch thick.
• Chose a time when the stock of frozen food is low.
Helpful Hints
• Defrosting usually takes a few hours, give yourself enough time to complete the process and be able
to keep the frozen food at the correct temperature.
• Leaving the lid of the freezer open will help speed the melting process.
• Pouring warm (not boiling) water on the ice/frost will help speed melting.
• Use the ice scraper only when necessary and exercise caution when using as it is very easy to
damage the freezer compartment and void your warranty.
Steps to Defrost
1. Remove all frozen food from the freezer and place in another freezer or cooler to keep cold.
2. Turn the thermostat knob to “OFF”.
3. Unplug the freezer from the outlet. The power indicator light should be off (green light out).
4. Remove the interior water drain cap on the inside floor of the freezer by pulling straight out.
5. During defrosting the ice melts into the cabinet and will drain out of the interior water drain to the
exterior drain located on the left side of the unit.
6. Place a shallow pan under the exterior drain outlet and ensure that it is positioned to collect the water.
7. Check the drain pan frequently so the water does not overflow.
8. Clean the interior of the freezer as directed in the cleaning section.
9. Replace the interior water drain cap on the inside floor.
10. Reset the thermostat to desired setting.
11. Operate the freezer without food for at least 2 hours to allow it to cool before placing food back inside.
Interior Water Drain Cap
5
CARE
ANDFREEZER
MAINTENANCE
OPERATING
YOUR
(CONTINUED)
CAUTION
The Freezer Compartment
•
•
•
Avoid putting large quantities of fresh or hot food into the freezer at the same time as the freezing
of these items could lower the efficiency of the freezer and drop the temperature of the interior
cabinet. Always allow hot food to fully cool before placing in the freezer.
Improper storage of food can alter the foods’ taste and texture. Always properly pack food in air
tight containers, heavy duty aluminum foil, plastic wrap or sealed plastic bags.
A storage basket is provided for the organization of smaller items. If storage basket is not
needed it can be removed from the unit. To access food below the basket, simply slide the basket
to one side or lift it out.
NOTE
•
The freezer lid is susceptible to breaking due to excessive ice buildup. Be sure to defrost when
the ice reaches ¼ inch thick.
CAUTION:
•
Once the freezer is operational, avoid direct contact with the freezer compartment wall and
surfaces, especially when skin is damp or wet as skin could adhere to these extremely cold
surfaces.
6
1
2
3
4
7
CARE AND MAINTENANCE
Cleaning Your Freezer
Upon installation of your new appliance, it is recommended that it be cleaned thoroughly.
Turn the thermostat control to "OFF", unplug the freezer, remove the food and storage basket.
Wash the inside with a damp warm cloth containing a water and baking soda solution. The solution
should be about 2 tablespoons of baking soda to a quart of water.
Wash the storage basket with a mild detergent solution.
Be sure to keep the lid gasket (seal) clean to keep the unit running efficiently.
The outside of the freezer should be cleaned with mild detergent and warm water.
Dry the interior and exterior with a soft cloth.
It is recommended that the unit be cleaned each time it is defrosted to help keep the unit odor free and
running efficiently.
Extended Vacation
Remove all the food.
Unplug the freezer.
Clean the freezer.
Leave the lid open slightly to avoid possible formation of condensation, mold or odors.
Use extreme caution in the case of children. The unit should not be accessible for children to play with.
If the appliance will not be used for several months, remove all food and unplug the power cord.
Clean and dry the interior thoroughly. To prevent odor and mold growth, leave the lid
open slightly: blocking it open if necessary or have the lid removed.
Moving Your Freezer
Remove all the food.
Securely tape freezer accessories (basket and ice scraper) inside your freezer.
Tape the lid shut.
Be sure the freezer stays in the upright position during transportation. Do not tilt freezer more than
a 45-degree angle as this could damage the compressor system.
Energy Saving Tips
• The freezer should be located in the coolest area of the room, away from heat producing appliances or
heating ducts, and out of the direct sunlight.
• Let hot foods cool to room temperature before placing in the freezer.Overloading the freezer forces
the compressor to run longer.Foods that freeze too slowly may lose quality or spoil.
• Be sure to wrap foods properly and wipe containers dry before placing them in the freezer.This cuts
down on frost build-up inside the freezer.
• Freezer storage bin should not be lined with aluminum foil, wax paper or paper towels.Liners
interfere with cold air circulation, making the freezer less efficient.
• Organize and label food to reduce lid openings and extended searches.Remove as many items as
needed at one time, and close the lid as soon as possible.
8
PROBLEMS WITH YOUR FREEZER
You can solve many common freezer problems easily. Try the suggestions below to see if you can
solve the problem before calling customer service.
TROUBLESHOOTING GUIDE
PROBLEM
Freezer does not
operate.
•
•
•
Compressor turns
on and off frequently.
•
•
•
•
•
•
•
Temperature inside
the freezer
compartment is too
high.
•
•
•
•
•
POSSIBLE CAUSE
Not plugged in.
The circuit breaker tripped or blew a
fuse.
The freezer thermostat control is set at
"OFF".
•
•
•
The room temperature is hotter than
normal.
A large amount of food has been added
to the freezer.
The lid is open too often.
The lid is not closed completely.
The thermostat control is not set
correctly.
The freezer does not have the correct
clearances.
The freezer has recently been
disconnected for a period of time.
•
•
Thermostat control is set too warm.
Lid is kept open too long or is opened
too frequently.
The lid is not closed completely.
A large amount of warm or hot food
has been placed in the freezer.
The freezer has recently been
disconnected for a period of time.
•
•
•
•
•
•
•
•
•
9
SOLUTION
Check whether the plug is
properly inserted.
Reset the circuit breaker or
replace fuse.
The thermostat control should
be set to 3/4 of the way to MAX.
Increase air circulation in room.
Remove excess food to increase
freezer efficiency.
Always keep lid closed and
check to see if gasket is properly
sealed when lid is closed.
Check to see if the thermostat
control is set 3/4 of the way to MAX.
Clean freezer according to
manual instructions.
At least 2 hours are required
for the freezer to cool down
completely.
Turn the control to a cooler
setting and allow several
hours for the temperature to
stabilize.
Ensure the lid is closed properly.
Check the lid gasket.
Allow food to cool to room
temperature before placing in
freezer.
At least 2 hours are required
for the freezer to cool down
completely.
TROUBLESHOOTING GUIDE (CONTINUED)
PROBLEM
POSSIBLE CAUSE
SOLUTION
A popping or cracking
sound is heard when
compressor turns on.
• Metal parts like the copper pipes
undergo expansion and contraction,
just like hot water pipes.
• This is normal.Sound wil
disappear as freezer
continues to run.
A bubbling or gurgling
sound is heard
(sounds like water
boiling).
• Refrigerant gas (used to cool
freezer) is circulating throughout the
system.
• This is normal.
Vibrations occur
when unit is on.
• Check to assure that the freezer is
level.
• The floor is uneven. Freezer rocks
on the floor when it is moved slightly.
• The freezer is touching the wall.
• Ensure freezer is level.
• Level the freezer by putting
wood or metal shims under
part of the freezer.
• Leave spacing between the
freezer and the wall.
• See “Installation Instructions”.
Moisture forms on
outside of freezer.
• Lid is slightly open.
• Lid is kept open too long, or is
opened too frequently.
• The lid is not sealed properly.
• Keep the lid close.
• Check the lid gasket and
close lid properly.
The lid does not
close properly.
• The lid gasket is dirty.
• The storage basket is out of position
or not installed properly.
• Clean the lid gasket.
• Adjust positon of storage
basket.
TECHNICAL SPECIFICATION
Unit Dimension (WxDxH) (Inches)
23.58” x 21.06” x 33.86”
Power Supply
AC 115V, 60Hz, 105W
Current
1.3 A
Power consumption per year
212 kwh
10
LIMTED WARRANTY
CF450
11
CF450-03062010-01