1
HDS-600RS
User Guide
IMPORTANT SAFETY INFORMATION!
Read these instructions carefully before using the product.
Install Safely
Place the unit on its feet on a firm, stable, horizontal surface.
Unplug the equipment from the power socket during installation and follow
all connection instructions.
The mains plug must remain easy to unplug from the power socket once
the equipment is installed.
DO NOT place heavy objects on the equipment.
Keep plastic packaging away from babies and children.
Protect from water
DO NOT expose the equipment to rain, moisture, dripping or splashing.
DO NOT place objects filled with liquids, such as vases or drinks, on or
near the equipment.
Prevent overheating
Locate the equipment in an open, well ventilated area away from heat
sources such as heaters, other electrical equipment or direct sunlight.
DO NOT block any of the ventilation openings, for example with
magazines, curtains or tablecloths.
General Precautions
DO NOT place naked flames such as lighted candles on or near the
equipment.
Whenever it is plugged into a live power socket, this equipment is still
connected to the mains even if the equipment is turned off.
DO NOT remove the cover due to risk of electric shock from live parts
inside.
DO NOT allow objects to drop or be pushed inside the equipment, for
example by children.
DO NOT expose the remote control batteries to excessive heat such as fire
or sunshine.
1
Equipment Care
Unplug the equipment from the power socket before cleaning. Clean with a
dry or slightly damp cloth.
If the equipment is damaged, unplug it from the power socket and have it
checked by qualified personnel before operating it any further.
Hard Drive
DO NOT move the receiver whilst the power is on.
DO NOT expose the receiver to intense vibration or magnetic objects, such
as loud speakers, transformers etc.
Disposal
The crossed-out wheeled bin symbol indicates that the
equipment should not be disposed of with other household
waste at the end of its working life and should be dealt with
separately - contact the place of purchase or local
authorities for details.
Uncontrolled disposal of such waste can harm the environment and human
health due to the presence of hazardous substances, so your role in
preventing this is important.
2
Contents
IMPORTANT SAFETY INFORMATION! ......................................... 1
1.
Introduction....................................................................6
Unpacking the Box........................................................................ 7
Controls and Connectors ............................................................. 8
Front View.................................................................................... 8
Rear View .................................................................................... 8
Remote Control ............................................................................ 9
2.
Putting It All Together..................................................10
Satellite Inputs ............................................................................ 10
Connecting to the Internet.......................................................... 10
Remote Control ........................................................................... 11
HDMI-TV Connections................................................................. 12
SCART-based Connections........................................................ 13
Audio Connections ..................................................................... 14
3.
Getting Started.............................................................15
Switching on for the First Time .................................................. 15
STEP 1: Enter your Postcode ..................................................... 16
STEP 2: Set the PIN (optional) ................................................... 17
STEP 3: Search for Services ...................................................... 18
STEP 4: Watching TV................................................................. 19
Tuner Issues................................................................................ 20
Single Tuner Mode ..................................................................... 21
Checking the Signals.................................................................. 22
Controlling your TV..................................................................... 23
Viewing........................................................................................ 24
Changing Channel...................................................................... 24
Sound Controls........................................................................... 24
3
The Information Bar.................................................................... 25
Subtitles ..................................................................................... 26
Text and Interactive Services...................................................... 26
Watching freesat On Demand TV ............................................... 27
Pause, Rewind and Fast Forward .............................................. 28
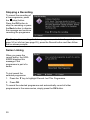
Recording Programmes.............................................................. 29
Stopping a Recording ................................................................. 30
Series Linking............................................................................. 30
4.
Moving On ....................................................................31
The Main Menu............................................................................ 31
Using the Guide .......................................................................... 32
Setting Reminders...................................................................... 32
The Guide’s Genres ................................................................... 33
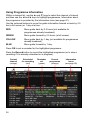
Using Programme Information .................................................... 34
Creating a Favourites List .......................................................... 35
Editing a Favourites List ............................................................. 36
Renaming a Favourites List ........................................................ 36
Using the Library ........................................................................ 37
Managing Scheduled Recordings ............................................... 39
Using Apps.................................................................................. 41
Internet Connection Information.................................................. 41
5.
Using TV anywhere......................................................42
Accessing your TV anywhere on a Mobile Device .................... 42
Your HDS-600RS Sling Settings................................................. 43
Sling Client Connections Settings ............................................... 44
Rename your HDS-600RS ......................................................... 44
Change Password ...................................................................... 44
Sling ‘Activity Light’ Settings ....................................................... 45
6.
Settings.........................................................................46
Languages................................................................................... 46
TV, Audio & Library Setup.......................................................... 47
4
Sling ............................................................................................ 49
Parental Control .......................................................................... 49
Menu Preferences ....................................................................... 50
Network Setup............................................................................. 50
Power Options ............................................................................ 51
Technical Information................................................................. 51
Tuning Preferences..................................................................... 51
Factory Reset .............................................................................. 51
7.
Getting Help .................................................................52
Updates ....................................................................................... 52
Over the Air Updates .................................................................. 52
Internet Software Updates .......................................................... 52
Manual Software Update ............................................................ 52
FAQs............................................................................................ 53
Contacting Customer Support ................................................... 55
8.
Remote Control TV Codes ..........................................56
Programming the Remote with Control Codes.......................... 56
Scanning through Control Codes .............................................. 56
TV Manufacturers’ Control Codes.............................................. 57
9.
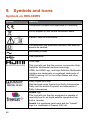
Symbols and Icons ......................................................66
Symbols on HDS-600RS ............................................................. 66
Information Icons........................................................................ 67
5
1. Introduction
‚
Thank you for purchasing your EchoStar SlingLoaded HDS-600RS freesat+
set-top box.
The HDS-600RS is a state-of-the-art high definition digital video recorder
(DVR) combining dual channel freesat satellite television reception with the
flexibility of personal video recording.
6
‚
SlingLoaded – watch your TV anywhere and control the HDS-600RS
from a PC, MAC or suitable mobile device over the Internet or via your
broadband mobile network.
Receives over 150 subscription-free freesat channels.
HDMI-enabled – watch high definition TV (when connected to a HDTV
via HDMI).
Pause and rewind live TV.
Record two channels simultaneously or watch one channel while
recording another.
Integrated 500GB hard disk drive.
Optical digital audio output for high quality audio, e.g. Dolby‚ Digital.
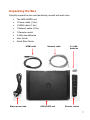
Unpacking the Box
Carefully unpack the box and familiarise yourself with each item:
The HDS-600RS unit
1 Power cable (1.8m)
1 HDMI cable (1.5m)
1 Network cable (2.0m)
1 Remote control
2 AAA size batteries
User Guide
Quick Start Guide
HDMI cable
Mains power lead
Network cable
HDS-600RS unit
2 x AAA
batteries
Remote control
7
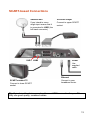
Controls and Connectors
This section shows the main features of your HDS-600RS unit.
Front View
Sling Activity Light
LEDs flash to indicate
remote access to unit via
SlingPlayer.
Status Display
Shows current channel and other information.
USB socket
(USB 2.0)
Power button
Menu and navigation controls
Rear View
Satellite
Signal inputs
SCART socket
VCR
Stereo Audio Out
L/R channels
Digital Audio Out
Optical S/PDIF
LNB1 | LNB2
Ethernet
(10/100 BASE-T)
SCART socket
TV
8
HDMI output
USB
TV
(USB 2.0)
230VAC
Mains power
connection
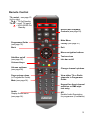
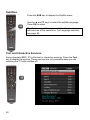
Remote Control
TV control - see page 23
(left to right)
TV
: TV On/Standby
TV AV : scroll TV inputs
: HDS-600RS On/
Standby
Record and Playback
Controls (see page 28)
Main Menu
Programme Guide
(see page 32)
Library (see page 37)
Back
Exit
Menu navigation buttons
Subtitles on/off
(see page 26)
Text services
Info bar on/off
Coloured keys
Volume up/down
(see page 24)
Page up/page down
(in Programme Guide)
Mute (see page 24)
Change channel up/down
View either TV or Radio
channels in Programme
Guide
Keypad for direct channel
selection or SMS-style
text entry
Audio
Display Audio menu
(see page 24)
AD
Enable Audio Description
for programme (if available)
9
2. Putting It All Together
This section describes the basic connections you need to operate your set-top
box. Your HDS-600RS rear panel has connections for many types of audio
and video equipment as well as two Satellite LNB inputs. In particular, there
are connections for two types of video output:
TV with HDMI input
TV, Video and DVD appliances with SCART connectors
There are also connections for two types of audio output and USB ports for
connecting memory sticks.
Satellite Inputs
The HDS-600RS is designed to use two satellite LNB inputs. It will operate
with a single input but many of the advanced functions will not be available. If
you intend to use a single input ensure that it is connected to LNB1 (see
page 8). We strongly advise that two feeds are connected.
Your satellite dish should be aligned to the Astra 2 satellite at 28.2„E.
Connecting to the Internet
The HDS-600RS is designed to work with a wired Ethernet connection. If your
router is not in the same room as your HDS-600RS you can used a pair of
‘Power-line’ devices (for example: Sling Link, see www.myechostar.com for
details) which use the home electrical wiring to carry the Ethernet signal.
Before connecting an Ethernet cable to the HDS-600RS, unplug the HDS600RS from the mains. With the connection to your network in place,
reconnect your HDS-600RS to the mains. It may take the HDS-600RS a few
minutes to start up the first time it is connected to the router.
To check your internet connection, see page 41.
10
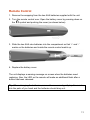
Remote Control
1. Remove the wrapping from the two AAA batteries supplied with the unit.
2. Turn the remote control over. Open the battery cover by pressing down on
the
symbol and pushing the cover (as shown below).
3. Slide the two AAA size batteries into the compartment so that ‘+’ and ’-‘
marks on the batteries and inside the remote control match up.
4. Replace the battery cover.
The unit displays a warning message on screen when the batteries need
replacing. Also, the LED on the remote will make an additional flash after a
button has been released.
Tip. When changing the batteries, remove the cover and gently tap the remote
into the palm of you hand and the batteries should drop out.
11
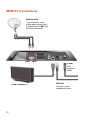
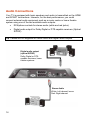
HDMI-TV Connections
Satellite dish
If you intend to use a
single input ensure that it
is connected to LNB1 (the
left-hand connector).
LNB1 LNB2
Power
Use
supplied
cable.
Ethernet
HDMI-enabled TV
12
Connect to your
broadband router.
SCART-based Connections
Satellite dish
VCR/DVD Player
If you intend to use a
single input ensure that it
is connected to LNB1 (the
left-hand connector).
Connect to upper SCART
socket.
LNB1 LNB2
Power
Use
supplied
cable.
Ethernet
SCART-enabled TV
Connect to lower SCART
socket.
Connect to your
broadband router.
Tip. If you have the choice, you should use a HDMI connection for your TV.
Only use good quality, screened cables.
13
Audio Connections
Your TV is equipped with basic speakers and audio is transmitted on the HDMI
and SCART connections. However, for the best performance, you could
connect external audio equipment such as a music centre or home theatre
system using one of the two available audio outputs:
RCA/phono sockets for stereo audio (white and red jacks).
Digital audio output for Dolby Digital or DTS-capable receivers (Optical
S/PDIF).
Tip. Cables are not supplied for stereo audio and digital audio outputs.
Digital audio output
(optical S/PDIF)
Dolby Digital or DTScapable receivers, home
theatre systems.
Stereo Audio
White: Left channel /mono
Red: Right channel
14
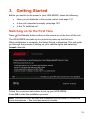
3. Getting Started
Before you switch on the power to your HDS-600RS, check the following:
Have you put batteries in the remote control (see page 11)?
Is the unit connected correctly (see page 10)?
Is the TV switched on?
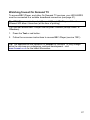
Switching on for the First Time
Press
(On/Standby button) either on the remote or on the front of the unit.
The HDS-600RS may take up to a minute to power up the first time.
When initialisation is complete, the Setup Wizard is displayed. This will guide
you through the process of setting up your satellite signal and detecting
freesat channels.
Follow the on-screen instructions to set up your HDS-600RS.
Press OK to start the installation process.
Note. The HDS-600RS will start the installation process when it locates the
home transponder – this may take several minutes
15
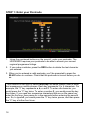
STEP 1: Enter your Postcode
1. Using the numbered buttons on the remote*, enter your postcode. The
HDS-600RS requires your postcode to be able to access your correct
regional programme listings.
2. If you make a mistake, press the RED button to delete the last character
you entered.
3. When you’ve entered a valid postcode, you’ll be prompted to press the
BLUE button to continue. Check that the postcode is correct before you do
so.
*This method of text input is called multi-tap: the same system used to enter
text messages on mobile phones. Each key represents 3 or 4 characters. For
example, the “2” key represents a, b, c and 2. To enter a b character, you
would press the “2” key twice. To enter a number 2, you would press the key
four times. If you need two successive characters that are on the same key,
enter the first one, then pause for a few seconds before entering the second
one. So, to type b2, you would press the “2” key twice, pause, and then press
the “2” key a further four times.
16
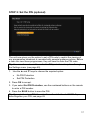
STEP 2: Set the PIN (optional)
The unit now gives you the option to set a PIN code to restrict the viewing of
any programmes broadcast or recorded with parental guidance advice. Before
a user can view these programmes, they will need to enter the PIN code.
Tip. You can choose to enable or disable PIN protection at any time through
the Settings menu (see page 49).
1. Use the ▲ and ▼ keys to choose the required option:
No PIN Protection
Set PIN Protection
2. Press OK to accept.
3. If you select Set PIN Protection, use the numbered buttons on the remote
to enter a PIN number.
4. Press the BLUE button to save the PIN.
Tip. If you don’t enter a PIN, the unit will use the default code “0000”. If you
have forgotten your PIN, see page 49.
17
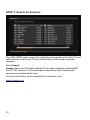
STEP 3: Search for Services
The HDS-600RS starts a search for channels and compiles a list of the TV and
radio services it has found. The bar at the bottom of the screen indicates
progress.
About freesat
freesat offers over 150 digital satellite TV and radio channels including BBC
and ITV HD channels. It is a subscription-free service with channels and
services being added all the time.
For more information, and a complete list of channels, visit:
www.freesat.co.uk
18
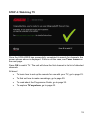
STEP 4: Watching TV
Once the HDS-600RS has successfully completed its search for channels, the
screen shown above is displayed. If this is not the case, see Tuner Issues on
the next page.
Press OK to watch TV. The unit will show the first channel in its list of detected
channels.
All done!
To learn how to set up the remote for use with your TV, go to page 23.
To find out how to make recordings, go to page 29.
To read about the Programme Guide, go to page 32.
To explore TV anywhere, go to page 42.
19
Tuner Issues
Your HDS-600RS will display one of the following screens if it discovers a
problem with your satellite reception:
One input OK, problem with other input (in this example, LNB2):
Problem with both inputs:
20
If you see one of these screens, check your satellite input connections.
The unit offers you some or all of the following options:
Press the RED button to run the wizard again. Choose this option if
you have found and rectified a problem with your satellite connections.
If you have not identified the cause of the problem yet, press the
BLUE button (see Checking the Signals on the next page).
Press the GREEN button if you have only connected a single input
from your dish and this has been detected successfully by the unit
(see Single Tuner Mode, below).
Press the BLUE button to check your input signals (see Checking the
Signals on the next page).
Single Tuner Mode
If you have only connected a single input from your dish, and it has been
detected successfully by the unit, press the GREEN button to set the unit to
Single Tuner Mode.
Note. Functionality will be limited if only one signal used. We strongly advise
that 2 feeds are connected. If you do use a single feed, ensure you have
connected it to LNB1 – see page 8.
Note. If your satellite dish only has a single LNB do not attempt to split this to
create two inputs for the HDS-600RS. This approach does not work. You will
need to install a multiple-LNB.
Upgrading from Single Tuner Mode
If you upgrade your satellite receiver from a single to a dual system, you will
need to perform a factory reset to allow the unit’s second tuner to operate (see
page 51). This action will delete your timed recording schedules but will not
delete existing recordings.
21
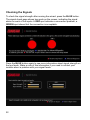
Checking the Signals
To check the signal strength after running the wizard, press the BLUE button.
The signal check page shows two spots on the screen, indicating the signal
status on each of the inputs. A RED spot indicates a connection problem; a
GREEN spot shows that the connection is acceptable.
Press the BLUE button again to see more information about signal strength on
the two feeds. Make a note of this information if you need to contact your
installer about a problem with your signal feeds.
22
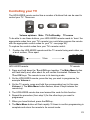
Controlling your TV
The HDS-600RS remote control has a number of buttons that can be used to
control your TV. These are:
TV
Volume up/down Mute TV On/Standby
TV AV
TV source
To be able to use these buttons, your HDS-600RS remote needs to ‘learn’ the
appropriate codes from your TV’s remote (you could also program the remote
with the appropriate control codes for your TV - see page 56).
To capture the control codes from your TV’s remote control:
1. Position the HDS-600RS remote and the TV remote facing each other, on
a level surface, 10cm apart.
10cm
HDS-600RS remote
TV remote
2. Press and hold down the ▼and OK keys together. The Main Menu button
will flash briefly and, after about 5s, will remain illuminated. Release the
▼and OK keys. The remote is now in its learning mode.
3. On the HDS-600RS remote, press the key you want to programme, for
example Volume +.
4. On the TV remote, press and hold the corresponding key (in this case,
Volume +). The Main Menu button flashes; when it stops release the
remote key.
5. The HDS-600RS remote has now learned the code for this function.
6. Repeat the procedure (from step 3) for the other keys you want to
programme.
7. When you have finished, press the OK key.
8. The Main Menu button will flash rapidly 10 times to confirm programming is
complete and return the remote to its normal mode.
23
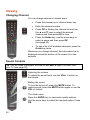
Viewing
Changing Channel
You can change channel in several ways:
Press the channel up or channel down key.
Enter the channel number.
Press OK to display the channel list and use
the ▲ and ▼ keys to select the desired
channel and then press OK to view.
Press the Guide key, use the arrow keys to
select a genre and then press OK
(see page 32).
To see a list of all available channels, press the
Guide key twice.
Whenever you change channel, the information bar is
displayed across the bottom of the screen for a few
seconds.
Sound Controls
Tip. You will need to program the VOL+/- and MUTE keys to function with
your TV (see page 23).
Adjusting the volume
To adjust the sound level, use the VOL+ /- button on
the remote.
Muting the sound
To turn the sound off, press the MUTE button. To
restore sound, press the MUTE button again or use the
VOL +/- button.
The Audio menu
Press the AUDIO key to view audio quality options.
Use the arrow keys to select the required option. Press
OK.
24
The Information Bar
The Information Bar is displayed across the bottom
of the screen for a few seconds whenever you
change channel. It shows details about the current
channel and programme.
You can also view it at any time by pressing the i
key.
Use the ▲ and ▼ keys to view different channels.
Use the ◄ and ► to browse across the
programmes scheduled for transmission on this
channel.
Press the GREEN key to set a reminder; the unit
will alert you when the program is about to start
(see page 32).
Press the BLUE key to change the picture size (the
current resolution is shown in the top right corner of
the info bar’s symbol area.
Press the Record button to record the highlighted programme (or stop the
recording if it is already in progress).
Tip. The information icons on the right hand side give you additional
information about the programme (see page 67). For example the type of
transmission (HD or SD), the resolution, the availability of subtitles, text or
interactive services.
25
Subtitles
Press the SUB key to display the Subtitle menu.
Use the ▲ and ▼ keys to select the subtitle language.
Press OK to select.
Tip. If you use subtitles, you won’t be able to access
text services at the same time. For Language selection,
see page 46.
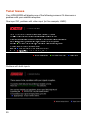
Text and Interactive Services
Some channels (BBC, ITV) offer text or interactive services. Press the Text
key to display the service. These services are only available when you are
watching live TV with subtitles off.
26
Watching freesat On Demand TV
To access BBC iPlayer, and other On Demand TV services, your HDS-600RS
must be connected to a suitable broadband connection (see page 41).
Tip. BBC iPlayer can be found at Channel 901 and ITV Player will be at
Channel 903 when it launches (at the time of printing)
You can also access BBC iPlayer from any BBC channel (except CBBC or
CBeebies).
1. Press the Text or red button.
2. Follow the on-screen instructions to access BBC iPlayer (service 7001).
Tip. The appearance and operation of freesat On Demand TV may change
since the services are undergoing continual development - visit
www.freesat.co.uk for the latest information.
27
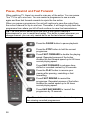
Pause, Rewind and Fast Forward
When watching TV, there’s no need to miss any of the action. You can pause
“live” TV for up to one hour. You can rewind a programme to see a scene
again and then fast forward onwards to rejoin the live action.
When you pause a programme, the unit will continue to save the output from
the current channel for up to one hour. Thereafter, it will begin to play back the
programme from where you left off and continue to save live transmissions.
Tip. The HDS-600RS saves up to one hour of the current channel’s
transmissions for you to rewind and replay. This buffer is reset whenever you
change channel: you can only rewind as far as the last channel change.
Press the PAUSE button to pause playback.
Press the STOP button to halt the current
programme.
Press FAST FORWARD to double the playing
speed. Repeated presses of the button
doubles the fast forward speed up to 64 times
normal playing speed.
Press SKIP FORWARD to advance timeshifted or recorded content by 30 seconds.
Press the PLAY button to resume your
viewing after pausing, rewinding or fast
forwarding.
Press FAST REWIND to rewind the
programme. Repeated presses of the button
doubles the rewind speed up to 64 times
normal playing speed.
Press SKIP BACKWARD to ‘rewind’ the
programme by 10 seconds.
Tip. These buttons have the same functions when you
are viewing recorded programmes.
28
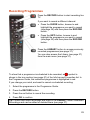
Recording Programmes
Press the RECORD button to start recording live
TV.
If you want to record a different channel:
Press the GUIDE button, browse to and
highlight the programme you want to record
(see page 34) and then press the RECORD
button.
Press the INFO button, browse to and
highlight the programme you want to record
(see page 25) and then press the RECORD
button.
Press the LIBRARY button to access previously
recorded programmes (see page 37).
You can also access the Library (see page 37)
from the main menu (see page 31).
To show that a programme is scheduled to be recorded, a
symbol is
shown in the icon section (see page 67) of the Info bar and Favourites list. In
the Programme Guide, the scheduled programme is highlighted in red.
If you change your mind, and want to cancel a scheduled recording:
1. Select the programme in the Programme Guide.
2. Press the RECORD button.
3. Press the red button to cancel the recording.
4. Press OK to confirm.
Tip. Current and future recordings are listed in the LIBRARY under Scheduled
Recordings and can be edited or deleted there (see page 37).
29
Stopping a Recording
To cancel the recording of
a live programme, press
the (stop) button.
Press the OK button to
stop the recording or press
the Back button to dismiss
the message and continue
recording the programme.
Tip. To stop the recording of a future programme, select it in the guide (see
page 34) or info bar (see page 25), press the Record button and then follow
the on-screen prompts.
Series Linking
When you press the
record button, the HDS600RS displays this
message if the
programme is part of a
series.
To just record the
selected programme:
1. Press the ▼ key to highlight Record Just This Programme.
2. Press OK.
To record the selected programme and automatically record all other
programmes in the same series, simply press the OK button.
30
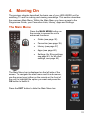
4. Moving On
The previous chapter described the basic use of your HDS-600RS unit for
watching TV and for making and viewing recordings. This section describes
the onscreen Main Menu. Within the Main Menu you have access to the
Programme Guide, your Favourites Lists, Library, Apps and Settings.
The Main Menu
Press the MAIN MENU button on
the remote to access the unit’s
advanced functions:
Guide (see page 32)
Favourites (see page 35)
Library (see page 37)
Apps (see page 40)
Settings (for Sling settings,
see page 43; for all other
settings, see page 46)
The Main Menu bar is displayed on the left side of the
screen. To navigate the main menu and its sub-menus,
use the arrow keys (either on the remote or the front of
the unit) to highlight the option you want and press the
OK button to select it.
Press the EXIT button to hide the Main Menu bar.
31
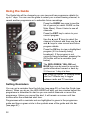
Using the Guide
The Guide lists all the channels you can view and has programme details for
up to 7 days. You can use the guide to select your current viewing channel, to
record another programme or to schedule future recordings.
Press the GUIDE key once to see the
list of genres (or select GUIDE on the
Main Menu). Press it twice to see all
channels.
Press the EXIT key to return to your
current program.
Use the ▲ and ▼ keys to select the
channel of interest and then use the ◄
and ► keys to view current and future
program details.
Press the OK key to view a highlighted
program (if it is currently being
broadcast). If the program is not
currently being broadcast, pressing the
OK button will set a reminder (see
below).
The RED, GREEN, YELLOW and
BLUE keys can be used to move the
guide information forward or back by
2.5 hours or 1 day at a time.
Tip. When in normal TV viewing mode,
use the TV/Radio key to toggle
between radio and TV services.
Setting Reminders
You can set a reminder from the Info bar (see page 25) or from the Guide (see
above). When you do so, the HDS-600RS will alert you two minutes before the
programme is scheduled to start so you can switch channels or record the
programme. Unless you cancel the alert, it will remain on screen until two
minutes after the scheduled start time.
Programmes with a reminder set are highlighted in green in the programme
guide and have a green circle in the symbols area of the guide and info bar
(see page 67).
32
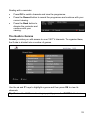
Dealing with a reminder
Press OK to switch channels and view the programme.
Press the Record button to record the programme and continue with your
current viewing.
Press the Back button to
dismiss the reminder and
continue with your
viewing.
The Guide’s Genres
freesat provides you with access to over 150 TV channels. To organise these,
the Guide is divided into a number of genres.
Use the ▲ and ▼ keys to highlight a genre and then press OK to view its
channels.
Tip. To view the All Channels category quickly, press the GUIDE button twice.
33
Using Programme Information
Within a channel list, use the ▲ and ▼ keys to select the channel of interest
and then use the ◄ and ► keys to highlight programmes. Information about
the programme is provided by the information icons (see page 67).
Use the coloured buttons to move the guide information forward or back by 2.5
hrs (a full screen) or 1 day at a time:
RED
Move guide back by 2.5 hours (not available for
programmes already broadcast).
GREEN
Move guide forward by 2.5 hours (a full screen).
YELLOW
Move guide back by 1 day (not available for programmes
already broadcast).
BLUE
Move guide forward by 1 day.
Press OK to set a reminder for the highlighted programme.
Press the Record button to record the highlighted programme (or to stop a
recording if it is already scheduled or in progress).
Current
channel
(orange)
34
Scheduled
for recording
(red)
Reminder
set
(green)
Current
programme
(orange)
Information
icons
(see page 68)
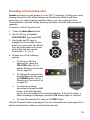
Creating a Favourites List
freesat provides you with access to over 150 TV channels. Finding your usual
viewing channels in the Guide listings can therefore be difficult and timeconsuming. To make channel selection easier, you can create up to four
Favourites lists: reduced listings showing just those channels that you watch
regularly.
To select or edit a Favourites list:
1. Press the Main Menu button.
2. Use the ▼ key to highlight
FAVOURITES, then press OK.
3. Use the ► and ▼ keys to
highlight the Favourites list you
want to set up or edit. By default,
the Favourites feature is turned
off and the lists are named
Favourites 1, 2, 3 or 4.
4. Choose one of the following
options:
To set-up or edit the
selected list, press the
YELLOW button. Go to
section Editing a Favourites
List on page 36.
To change the name of the
selected favourite list, press
the GREEN button. Go to
Renaming a Favourites List
on page 36.
To select an existing
favourites list press the OK
button. If the list has been
set up, the unit enables it for channel selection. If the list is empty, a
status message is displayed; press the OK button again to continue.
To clear the selected list, click on the RED button.
Use the Channel buttons (see page 24) or the Information bar (see page 25) to
select channels from within an active Favourites list.
35
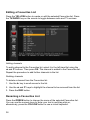
Editing a Favourites List
Press the YELLOW button to create or edit the selected Favourites list. Press
the TV/RADIO key on the remote to toggle between radio and TV services.
Adding channels
To add a channel to the Favourites list, select it in the left-hand list using the
▲ and ▼ buttons. Then press OK. The channel is added to the Favourites list.
Repeat the procedure to add further channels to the list.
Deleting channels
To delete a channel from the Favourites list:
1. Use the ► key to scroll across to the list.
2. Use the ▲ and ▼ keys to highlight the channel to be removed from the list.
3. Press the RED button.
Renaming a Favourites List
Press the GREEN button to change the name of the selected Favourites list.
You can use the numeric keys to enter your text in multi-tap style or,
alternatively, press the YELLOW button to use a virtual keyboard.
36
In multi-tap style, press the BLUE button to switch to capital letters.
In virtual keyboard mode, press the BLUE button to switch to symbols.
Press the GREEN button to save the new name or the Back button to discard
any changes and revert to the original name.
Using the Library
The Library stores your recorded programmes. You can access the Library
from the Main Menu or directly by pressing the LIB key on the remote control.
Tip. Your HDS-600RS is fitted with a 500GB hard drive with a capacity to
record about 120 hours of HD programmes or 300 hours of SD programmes.
In the lower left corner of the Library screen the HDS-600RS displays the
percentage of the drive currently occupied by recorded programmes.
Playing a recorded programme
Use the ▲ and ▼ buttons to highlight the recording you want to view and
press OK. If you have viewed the recorded programme previously you can
choose to resume viewing or restart from the beginning of the recording.
At the end of the recording the Library menu is re-displayed.
37
Deleting a recording immediately
1. Select the recording you want to delete using the ▲ and ▼ buttons.
2. Press the RED key to delete the selected recording immediately.
Deleting a recording after a specified period
1. Select the recording in the Library list.
2. Press the GREEN key to change the protection options on the recording.
3. To save the recording for a specified period, press the ► key and choose
from the following options:
Save Forever (the default option)
Save for 1 week.
Save for 2 weeks.
Save for 1 month.
Save for 2 months.
Delete now.
Tip. Recordings may be manually deleted at any time if there is insufficient
space on the hard disk drive for a new recording.
Renaming a recording
1. Select the recording in the Library list and press the GREEN key.
2. Press the ▼ key to select the Rename menu option.
3. Press the ► key and use the multi-tap entry method screen to enter a new
name.
4. Press the GREEN button to save the new name or the Back key to discard
any changes and revert to the original name.
Password-protecting recordings
1. Select the recording in the Library list.
2. Press the BLUE key to change the protection options on the recording. If
the recording has previously been locked, you will need to enter the
password to unlock it.
38
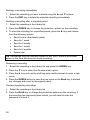
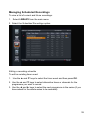
Managing Scheduled Recordings
To view a list of current and future recordings:
1. Select LIBRARY from the main menu.
2. Select the Scheduled Recordings option.
Editing a recording schedule
To edit an existing timer event:
1. Use the ▲ and ▼ keys to select the timer event and then press OK.
2. Use the ▲ and ▼ keys to select alternative times or channels for the
programme you want to record.
3. Use the ◄ and ► keys to select the next programme in the series (if you
have asked for the whole series to be recorded).
39
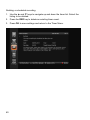
Deleting a scheduled recording
1. Use the ▲ and ▼ keys to navigate up and down the timer list. Select the
listing to be deleted.
2. Press the RED key to delete an existing timer event.
3. Press OK to save settings and return to the Timer Menu.
40
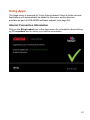
Using Apps
The Apps menu is reserved for future Internet-based Video & Audio services.
Applications will automatically be added to this menu as they become
available as part of HDS-600RS software updates (see page 52).
Internet Connection Information
Click on the SlingLoaded icon in the Apps menu for information about setting
up TV anywhere and to check your internet connection.
41
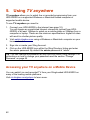
5. Using TV anywhere
TV anywhere allows you to watch live or recorded programming from your
HDS-600RS on a supported Windows or Macintosh based computer or
supported mobile device.
To use TV anywhere you need to:
1. Connect your HDS-600RS to the internet (see page 10).
You will require an unrestricted Internet connection (upload from HDS600RS) of at least 150kbps to watch on a mobile phone or 256kbps from a
computer or laptop. These are the minimum specifications: higher bit rates
will result in a better picture quality.
2. Visit watch.slingbox.com using a Windows or Macintosh computer on your
home network.
3. Sign into or create your Sling Account.
4. Click on the HDS-600RS icon within the Sling Directory listing and enter
the admin password. By default the admin password is “admin”.
Tip. You can change this password at any time from within Sling Settings. For
instructions on how to change your password read the section ‘Change
Password’ on page 44
Accessing your TV anywhere on a Mobile Device
You can watch Live and recorded TV from your SlingLoaded HDS-600RS on
many of the leading mobile platforms.
Visit uk.slingbox.com/go/spm to learn more.
42
Your HDS-600RS Sling Settings
Press the Main Menu button.
Use the ▲ and ▼ keys to highlight Settings option. Press OK.
Use the ▲ and ▼ keys to highlight the Sling menu option. Press OK.
The Sling menu is PIN-protected. The default is “0000”. Please change this to
a more secure code as soon as possible (see page 49).
43
Sling Client Connections Settings
Enable All
This setting allows you to access your HDS-600RS from
both inside and outside of the home. This is the default
setting.
Disable All
This disables all SlingPlayer functionality. No connections
will be permitted if this option is selected.
Enable Local Only This setting only allows connections from within the home.
Connections originating from clients outside the local
network (such as over the internet) will be refused.
Rename your HDS-600RS
The default name is ‘HDS-600RS’.
You can use the 0-9 & A-Z keys to rename your HDS-600RS. The
SlingLoaded name helps identify your HDS-600RS device within your Sling
Account.
Tip. It is recommended to choose a ‘friendly’ name if you have other
Slingboxes or SlingLoaded devices within your Sling Account.
Change Password
The default password is “admin”. It is strongly recommended that you change
the password.
You can use the 0-9 & A-Z keys to change the Sling password.
Tip. You will need this password to gain access to your SlingLoaded HDS600RS when using SlingPlayer from a supported computer or mobile device.
44
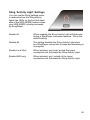
Sling ‘Activity Light’ Settings
You can use the Sling Settings menu
to determine how the Sling activity
lights (the LEDs on the front left-hand
side of the HDS-600RS) behave when
your HDS-600RS is being accessed
by SlingPlayer.
Enable All
When enabled, the Sling Activity Light will illuminate
during a SlingPlayer connection session. This is the
default setting.
Disable All
This setting disables the Sling Activity Light when
any SlingPlayer connection is made and streaming is
in progress.
Enable Local Only
When selected, only local ‘around the home’
connections will illuminate the Sling Activity Light.
Enable WAN only
When selected, only ‘outside of the home’
connections will illuminate the Sling Activity Light.
45
6. Settings
The Settings menu allows you to configure the unit and to set personal
preferences. Navigate the menus using the ▲ ▼ ◄ and ► keys. Press the
OK key to choose an option.
Note. In the following tables, a setting marked by a * symbol is the default
factory setting.
The main menu categories are:
Languages
TV, Audio & Library Setup
Sling – see the previous chapter
Parental Control
Menu Preferences
Network Setup
Power Options
Technical Info
Tuning
Factory Reset
Languages
The Languages menu allows you to choose the primary options for Subtitles,
Data Services (digital interactive services) & Primary Audio:
Subtitles
Off*
English
Welsh
Gaelic
Data Service
Off
English*
Welsh
Gaelic
Primary Audio
English*
Welsh
Gaelic
Audio Description
Off*
On
46
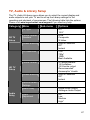
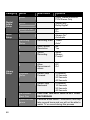
TV, Audio & Library Setup
The TV, Audio & Library menu allows you to select the correct display and
audio outputs to suit your TV and to set up the Library settings for the
recording and playback of programmes. The following table lists the options.
Please visit www.myechostar.com/support if you need any help.
Category Menu
SD TV
Setup
Sub-menu
Options
TV Type
4:3
16:9*
Picture Format:
Standard
RGB*
Composite
S-Video
Screen Blanking
Wait 60 Seconds
Off*
Instant
HD Resolution
576i
720p*
1080i
Best Available
Picture Format
4.3 deep pillarbox
14.9 pillarbox
16.9 centre cutout
Recommended*
Anamorphic “stretch
Screen Blanking
Wait 60 Seconds
Off*
Instant
HD TV
Setup
Restore Default
Settings
Audio
Delay
Audio Delay
Digital Audio Output
Analogue Audio Output
Audio
Adjustment
Off
Low
Medium
High*
47
Category Menu
Digital
Audio
Setup
Sub-menu
HDMI
{Auto} Stereo/Surround*
PCM Stereo Only
SPDIF
Stereo only
Dolby Digital*
Midnight mode
Off*
On
HDCP
Setup
Always On*
Automatic
Recording
Setup
Library
Setup
48
Options
Playback
Setup
Recording Start:
Timed
Auto*
Auto Conflict
Resolution
No*
Yes
Series
Recording
Never
Always
Prompt*
Allow
Recommendations
Off
On*
Default Skip
Forward
5 Seconds*
10 Seconds
20 Seconds
40 Seconds
Default Skip
Backward
5 Seconds*
10 Seconds
20 Seconds
40 Seconds
Re-Initialise
Hard Disk
CAUTION! THIS WILL DELETE ALL YOUR
RECORDINGS
Check for disk
errors
Performs a disk check – WARNING, this may
take several hours and you will not be able to
watch TV or record during this process
Sling
See TV anywhere (page 42)
Parental Control
This menu allows you to safeguard your children from unsuitable programmes
by restricting their access to certain channels, content or features. Parental
Control relies on you creating and applying a secure PIN code to channels or
programmes. It should be memorable for you, but not for your children, and
you should change it regularly.
Tip: If you forget your PIN then use “2846” to gain access and set a new PIN
immediately.
The Parental Control menu options are as follows:
Change PIN
Choose this option to enter and confirm a new PIN.
Note. This PIN also protects access to TV anywhere
(see page 42).
Apply PIN protection to one or more channels.
Use the arrow keys to highlight the channel you want
to lock; then press the OK button.
Service Locks
Tip: use the Page Up/Page Down keys to step
through the guide.
If you want to watch a locked channel, press the RED
button and enter the PIN code.
Pin Protection
Protect all recorded programmes which carry a
guidance notice. If an attempt is made to play such a
recording before the 9pm watershed, the viewer is
prompted to enter the PIN code.
PIN Required
PIN Not Required*
Choose PIN protection settings for content accessed
via the Internet
IP Pin Protection
Required for everything
Guidance programmes only
Not Required*
49
Adult Channels
Hide all adult channels on the guide, information bar
and favourites lists. This will also hide recordings
taken from adult channels and delete any timers set
for recording programmes from adult channels.
Show
Hide*
Menu Preferences
Use this menu to change the appearance of text in the settings menus.
Transparency
Solid (Menu background is opaque but clearer)
Low
Medium*
High (Menu backgrounds are fully transparent)
Guide Font Size
Normal
Large
Automatic*
Network Setup
This menu can be used to view and configure network settings. In most cases,
Auto Setup will correctly configure your network and internet connection via a
local DHCP server or DHCP-enable router. If you encounter any networking
problems, visit www.myechostar.com/support. It may be necessary to disable
Auto Setup to configure the connection manually. Unless this is the case, or
you are an experienced with network configurations, you are not
recommended to change this setting.
Auto Setup
Enable*
Disable
Tip. For more information about this or any other the menu settings, visit
www.myechostar.com/support.
50
Power Options
Power-saving settings can be configured using this menu. Options allow you to
select the power consumption in standby mode.
Ultra low power mode
Power Mode
Power saving mode
used when unit enters
standby:
Lowest power consumption but the receiver will
take longer to switch to the active or ON state
(Sling features will not be available).
Normal low power mode*
In this mode, library functionality and Sling
features will be available.
Inactivity Standby
Define time period before the receiver goes into
standby if no remote control or front panel keys are
operated: Off, 4 Hours*, 5 Hours, 6 Hours
Technical Information
This menu displays software version and other technical information.
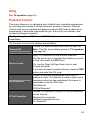
Tuning Preferences
Services
Choose the channel to be displayed when the HDS600RS is powered up.
Manual scan
Carry out a manual scan for services by setting Set
Frequency, Symbol Rate and LNB Polarisation
(advanced users only)
Regional channel
customisation
Choose different regional channels to those assigned
during setup.
Viewing Mode
freesat*
Non freesat
Factory Reset
Choose this option to restore the default configuration settings.
Note. In addition to removing all your personal settings, this will cancel any
scheduled recordings. Existing recordings are not affected and previously
saved content will not be deleted.
51
7. Getting Help
Updates
Your HDS-600RS can be updated in three ways:
Automatically, over the air via the Satellite signal.
Automatically, over your Internet connection.
Manually: download the update from www.myechostar.com/support,
saving it onto a memory stick and then applying it yourself.
Over the Air Updates
Over the Air (OTA) updates, with new channel and transmission information,
are provided by freesat from time to time. The HDS-600RS receives these
automatically. A pop-up message will be displayed on screen when an update
is available.
Internet Software Updates
From time to time, Echostar will issue software updates. When a new version
of the HDS-600RS software is available, a pop-up message is displayed on
screen. Follow the instructions to download and install the update (requires an
active Internet connection).
Manual Software Update
You can manually update the HDS-600RS by following the steps below:
1. Visit www.myechostar.com/support to locate the latest software.
2. Copy the update file to an empty USB memory stick.
3. Insert the USB memory stick into either the front or rear USB ports (see
page 8). The screen will display a message confirming that the USB
memory stick has been detected and shows the version number of the
software update.
4. The HDS-600RS will reset and the front panel then displays “Loading…”
followed by “Please wait”.
5. The updating process may take up to 5 minutes. When it is complete, the
HDS-600RS will automatically restart.
52
FAQs
If you can’t find a solution to a problem here, please visit
www.myechostar.com/support
No lights on HDS-600RS; it doesn’t switch on
-
Check that the mains lead is plugged in to the power socket and the power socket
is switched ON.
-
Try a different power socket.
-
Try a different power lead or check the fuse.
No TV picture
-
Check that the HDS-600RS is plugged in, switched on and has had sufficient time
to warm up.
-
Make sure the HDS-600RS is not in Standby (you can bring the unit out of standby
by pressing the standby button on the front of the unit).
-
Ensure the AV cable (either HDMI or SCART) is firmly connected to the unit and to
the TV.
-
Ensure that the antenna cables are firmly connected to the unit and are in good
condition.
-
Ensure that the TV is set up with the HDS-600RS and is not configured to receive
input from an external device such as a DVD Player.
-
Check that the TV is switched on and that the brightness level is set correctly.
-
Try changing channel: the selected channel may be off air.
No sound
-
Ensure the AV cable (either HDMI or SCART) is firmly connected to the unit and to
the TV.
-
Check the volume level of your TV or Audio/Theatre System (if connected).
-
Check that the HDS-600RS, TV or Audio/Theatre System are not set to MUTE.
Poor picture or sound quality
-
Ensure that the satellite dish is installed correctly (away from trees or other
obstacles) and is providing a good quality signal (see page 20).
-
Picture quality may be temporarily affected by bad weather (heavy rain, snow).
Check the signal level coming from your dish (see page 20).
-
If you have poor signal strength you may wish to consider changing the satellite
dish for a larger one as this will increase the signal levels received.
-
Check the LNB for damage as moisture inside the LNB will affect signal strength
53
and quality.
Note. Newer LNBs will have a lower noise factor which will improve noise reduction.
-
Check that the satellite input cables are connected properly.
-
Try another channel; the problem may be due to a transmission fault.
The remote control doesn’t work
-
Does the Main Menu button light up on the remote when you press any buttons on
the remote?
-
Ensure that you are holding the remote control correctly with the lens at the top of
the control pointing at the HDS-600RS.
-
Ensure that the receiver on the HDS-600RS is not covered by, for example, papers
and that the remote is within range.
-
Check that the batteries have charge and are in good condition. Try removing and
replacing the batteries making sure they are inserted in the correct orientation.
-
Replace the batteries with a new set.
The remote doesn’t control the TV or change the volume
-
You need to ensure your remote control is set-up correctly to control your TV. – see
page 11. This will be necessary whenever you change the batteries.
The HDS-600RS didn’t record a programme
-
Check that both antenna cables are connected.
-
Check that your hard disk has sufficient space for further recordings (see page 37).
To make space, delete some old recordings that you have already viewed.
-
The unit should tell you if your scheduled recordings use more resources than the
product can support – check the scheduled recording (see page 39) and make
changes if necessary.
-
Did the unit have power when the programme is scheduled to be transmitted? The
HDS-600RS will wake from standby to record a programme but it must have power
to be able to do this.
iPlayer isn’t available
-
Check that your HDS-600RS is connected to your router and that the Ethernet
cables are firmly inserted at both ends.
-
Check there is a broadband connection available (see page 41). Can you access
the Internet from other devices?
-
Check to make sure you are meeting the system requirements to use iPlayer by
visiting the help section at www.bbc.co.uk/iplayer/ .
-
If you are experiencing issues with connecting and using BBC iPlayer, visit
www.myechostar.com/support.
54
TV anywhere doesn’t work
-
Check that your HDS-600RS is connected to your router and that the Ethernet
cables are firmly inserted at both ends.
-
Check there is a broadband connection available (see page 41). Can you access
the Internet from other devices? Contact your Internet Service Provider if there is a
problem.
-
Try accessing the BBC iPlayer on your HDS-600RS to verify your internet
connection.
-
Make sure you are meeting the system requirements to use the TV anywhere
features. Is there adequate data bandwidth available on your Local Area Network?
-
Ensure you are using the correct password (see page 44).
-
If you continue to experience issues with connecting and using TV anywhere,
please refer to the support section on www.myechostar.com.
No channels found during installation
-
As instructed by the Setup Wizard, press the Blue button to check the signal
reception (see page 20). If there is no signal on one or both inputs, check the
connections. Contact your satellite dish installer if there is no signal on either input
and you are satisfied that the connection to the unit is sound.
Contacting Customer Support
For the latest product information, technical support, downloads and updates
please visit:
www.myechostar.com/support
55
8. Remote Control TV Codes
Programming the Remote with Control Codes
Search the table in this section for your TV manufacturer. Make a note of the
control code (or codes) used by the manufacturer. Use the following procedure
to program your remote control:
1. Press and hold both the TV
and OK keys on the remote control for at
least 5 seconds. The Main Menu button will illuminate.
2. Using the numbered keys, enter the 3 digit code listed for your make of
TV.
3. The Main Menu button will flash once and remain lit.
4. Press the OK button.
5. The Main Menu button will flash 3 times and then turn off to confirm
programming is complete.
6. Press the TV
button to test if your TV can be switched on and off.
If the manufacturer uses several codes, you may need to repeat the sequence
until you find the right code.
Scanning through Control Codes
If the manufacturer of your TV is not listed, or the specified code does not work
use the following procedure to scan through all programmed remote codes.
1. Press and hold both the TV
and OK keys on the remote control for at
least 5 seconds. The Main Menu button will illuminate.
2. Press CH+ or CH- until your TV turns on.
3. When your TV switches off, press OK to store the code.
Tip. If neither of these methods is successful, please try the learning mode
(see page 23).
56
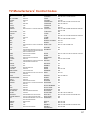
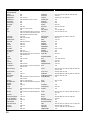
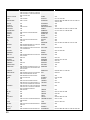
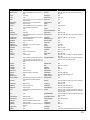
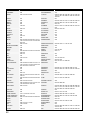
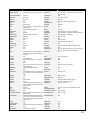
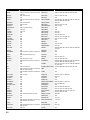
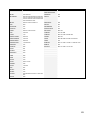
TV Manufacturers’ Control Codes
TV Manufacturer
Control Codes
TV Manufacturer
Control Codes
3M
A.R. SYSTEMS
ACCENT
ACEC
ACER
ACURA
ADCOM
ADMIRAL
006
049 152
049 152
112
484 329
195
015
065 076 163 171 190 307 324 369
ATLANTIC
ATORI
AUCHAN
AUDIOSONIC
AUDIOTON
AUDIOVOX
AUSIND
AUTOVOX
ADVENTURA
ADYSON
AEG
AGASHI
AGAZI
AGB
AGEF
AIKO
022
379
044
076 379
027
028
324
049 076 102 141 152 172 195 225
379
377 459
049 050 055 066 076 102 107 123
139 141 150 152 172 182 195 209
225 379 428 433 437
049 123 152 378 380
049 106 152
049 076 123 195 378 426
042 379
018 049 050 107 123 134 163 168
195 225 232 379 421 457
371
407
050 094 236 379
049 152
113 379 421 425
004 049 076 123 131 152 172 195
225 426
049 152 195
049 152
076 195
049 076 152 195 407
045 049 107 112 152 195 210 226
391 421
032 034
036 037
038 039
074 182 186 424 453 463
379 424
049 050 065 079 112 152 160
107 127 136 139 153 307 425
020 065 078 080 091 146 171 197
307 324 375 408 449
049 152 407
195
195
050 076 123 378 379
AVENTURA
AVION
AWA
AYOMI
BAIRD
BANG & OLUFSEN
BARCO
BASIC LINE
049 050 071 113 152 236 379
195
107 425
049 074 076 152 182 195 213 379 421
050 076 379 421
051
090 407
050 071 078 079 080 083 090 156 236 324
379 407 449
056
058
018 049 131 152 195 226 320 379 426 433
411
074 102 182 209 218 379 409
324 319
107 371
049 107 123 195 226 378
BASTIDE
BAUMATIC
379
097
BAUR
BAZIN
BEAUMARK
BEKO
BELSON
049 107 150 152 172 247 249 357 414 454
337
350
152 241 421 433 460
044
BELSTAR
BENNET
BENQ
BEON
BERKENP
BEST
115
214
017
049 152 163
338
213 421
BESTAR
BIAZET
BIFONIC
BIGSTON
BINATONE
049 152 226 421
388
401
401
379
BLACK DIAMOND
BLACK STAR
BLACKTRON
BLACKWAY
BLAUPUNKT
BLUE SKY
BLUE STAR
BONDSTEC
114
062
378
378
057 060 113 247 249 454
049 123 152 195 217 232 378 380 457
378
063
BOOTS
BPL
BRANDT
BRANDT
ELECTRONIC
050 106 379
049 152 378
008 074 182 186 218 424 436 452 462
074 453 463
AIWA
AKAI
AKIBA
AKITO
AKURA
ALARON
ALBA
ALBIRAL
ALCYON
ALLORGAN
ALLSTAR
AMPLIVISION
AMSTRAD
ANAM
ANAM NATIONAL
ANGLO
ANITECH
ANSONIC
AOC
APEX
APEX DIGITAL
ARC EN CIEL
ARCAM
ARISTONA
ARTHUR MARTIN
ASA
ASBERG
ASORA
ASTRA
ASUKA
57
TV Manufacturer
Control Codes
TV Manufacturer
Control Codes
BRANDT
ELECTRONIQUE
BRAUN
BRENDSTAR
BRINKMANN
BRIONVEGA
BRITANNIA
BROKSONIC
BROTHER
BRUNS
BSR
BTC
BUSH
074 182 186 453
DAENYK
042
084
087
049 152 163
049 065 083 152 167 172 324
379
095
076
065 324
094 107 110 139 168
123
018 049 076 094 106 107 123 134
139 142 172 193 195 209 217 225
226 232 307 378 379 457 458
107 168
049 076 152 380
018 177
049 064 152 195
049 152
049 152
152 379
021
049 152
065 163 324 411
002 090 093 094 107 139 142 163
168 369 407 421
217
123 134 195
195
030
049 125 163
045 049 076 113 123 152 195 225
379 407 421
379
DAEWOO
DAINICHI
DANSAI
DANSETTE
DANTAX
DATSURA
DAWA
DAYTON
DCE
DE GRAAF
DECCA
049 123 152 193 195 226 379 456 464
123 379
049 076 141 152 195 379
426
421
209
049 152
049 152 195 226
117
107 139 209 307
049 102 106 120 217
DECCA(UK)
DEITRON
DELL
DENKO
DENON
DENVER
DERWENT
DESMET
DIBOSS
DIGATRON
DIGILINE
046 049 050 102 106 131 152 379
049 152
118 119
076
126
121
105
049 113 152
122
049
049 152
DISHNETWORK
DIXI
DORIC
DREAN
DREAMVISION
DTS
130
049 152 195 379
104 105
049 152
132 133
195
DUAL
101
125 217
195
045 049 050 113 152 163 195 210
378 379 421
018 131 195 320 379
008 074 182 186 232 424 453 462
463
195 213
111
065 090 093 094 104 107 139 324
407
049 152 163 170 195 209 232 407
421
115
123 379
045
126 190
123
195
076 378
159
049 152
DUAL TEC
DUMONT
DUMONT-FINLUX
DURABRAND
049 050 107 139 152 156 168 182 243 379
414 417 424
040 050 168 195 379
045 065 080 102 139 146 324 375 379 449
020 045 078 091 104
135
DUX
DWIN
049 112 152
137
DYNAMIC
DYNATRON
DYNEX
138
049 152
140
ELBE
049 107 123 152 172 210 243 369 391 411
421 435
217
045 046 065 104 107 150 168 324
076 378
157
158
049 102 104 107 120 152 171 172 307 379
046 050 102 107 150 162
104 107 139 168 171 195 226 307
176
BUSH(UK)
CAPSONIC
CARREFOUR
CASCADE
CASIO
CATHAY
CCE 049
CENTREX
CENTURION
CENTURY
CGE
CIHAN
CIMLINE
CITY
CLARITY
CLARIVOX
CLATRONIC
CMS HIGHTEC
COMPUTRON
COMTEL
CONCORDE
CONDOR
CONTEC
CONTINENTAL
EDISON
COSMEL
CRAIG
CROSLEY
CROWN
CRYSTAL
CS ELECTRONICS
CTC CLATRONIC
CURTIS MATHES
CYBERTRON
ELECTRO TECH
ELEKTA
ELEMENT
ELG
58
ELBIT
ELCIT
ELECTA
ELECTROGRAPH
ELECTROHOME
GEC
GEC(UK)
GELOSO
GEMSOUND
TV Manufacturer
Control Codes
TV Manufacturer
Control Codes
ELIN
ELITE
ELMAN
ELTA
EMERSON
020 049 107 139 152 172 195 379
049 123 152
045 168
195 076 379
004 042 049 065 113 152 225 324
378
049 112 152
164
049 152
049 107 139 152 195
GENERAL
GENERAL TECHNIC
GENEXXA
GERICOM
GM
064 074 182
195
049 123 152 307 426
031 043
178
GMG
GOLDHAND
GOLDLINE
GRANADA
045 046 049 050 068 107 120 152
168 379
071 107 236 425
GOLDSTAR(LG)
GRANADA(UK)
GRANDIN
GRENADIER
GRONIC
GRUNDIG
179
379
213
013 018 033 041 049 102 104 105 112 120
152 171 172 198 209 218 238 241 307 379
407 425
049 050 055 107 139 152 168 172 182 195
379 414 421 460 011
018 042 049 076 102 134 139 141 152 182
193 195 218 225 226 232 379 428 450 456
464
421
123
049 152 170 177
049 090 104 136 139 152 153 162 171 172
198 225 307
046 050 090 107 139 162 307
049 107 113 123 152 195 378 380 425 435
181
045 379
049 080 090 152 232 247 249 407 454 455
HAIER
327
HALIFAX
076 379
HAMPTON
HANIMEX
HANNS-G
379
094
022 029
HANSEATIC
018 049 050 094 104 107 113 152 172 195
241 324 378 379 391 421 455
045 046 049 152 195
049 152
042
049 152 195 426
049 152
190
049 076 123 152 163 195 378 379 426
195 379
150
074 182 186 424 453 463
050
049 076 152
123
188
004 018 042 049 066 094 107 123 134 139
195 209 232 307
214
049 050 123 152 195 378 379 380
050
ERRES
ESA
ESC
ETRON
EURO-FEEL
EXPERT
EXQUISIT
FAMILY LIFE
FENNER
FERGUSON
GOODMANS
049 152
049 152
152 195 226
049 050 074 076 080 082 102 103
182 218 247 409 411 436 452
FIDELIS
165
FIDELITY
049 050 076 107 152 225 307 379
FILSAI
050 379
FINLANDIA
033 139 172 197 209 307 375
FINLUX
020 042 045 049 078 080 090 091
102 104 107 139 146 152 163 197
210 324 375 379 407 408 428 429
437 449
FIRST LINE
045 049 094 102 107 134 139 152
191 195 209 210 226 379 411 457
FISHER
018 041 050 065 069 102 104 107
139 156 172 209 320 324 379 408
414 421
FLINT
049 102 123 152 380
FNR
045
FORMENTI
049 090 107 113 139 307 324 379
407
FORMENTI-PHOENIX 050 104 113 307
GORENJE
GPM
GRADIENTE
GRAETZ
FORTRESS
FRABA
FRIAC
FRONTECH
FUJITSU
FUJITSU GENERAL
FUNAI
GALAXI
GALAXIS
GALERIA
GATEWAY
GBC
GE
GEANT CASINO
GEBER
190 324
049 152 421
045 049 152 195
066 076 139 195 307 379
042 045 071 102 107 195 236 379
195 379
042 076 094
045 049 152
045 049 152 163 421
169
173
104 107 139 168 195 226
074 182 218 378
107 425
175
HANTAREX
HANTOR
HARLEY DAVIDSON
HARWOOD
HAUPPAUGE
HAVERMY
HCM
HEMA
HEMMERMANN
HIFIVOX
HIGASHI
HIGHLINE
HIKONA
HILINE
HINARI
HISAWA
HISENSE
HIT
123 378 380 425
009 326 025
324
KAISER
KAISUI
KAMOSONIC
59
TV Manufacturer
Control Codes
TV Manufacturer
Control Codes
HITACHI
018 020 033 049 050 074 086 099
102 104 107 110 126 127 139 150
152 162 168 171 182 186 218 238
307 379 014 309
013
123 195 380
049 112 152
KAMBROOK
215
KAMP
KAPSCH
KARCHER
017
379
168 195 379
192
172
049 076 217 378 379 380 425
194
049 152
196
049 076 123 152 195 225 379
123 379
199
002 049 090 093 094 107 142 152
163 168 307 369 407 421
049 152 090 104 136 139 153 162
171 198 232 435
200
195
046 049 050 066 102 123 152 195
217 379 407
049 152
201
210
076 195
202
049 065 067 074 090 104 107 112
139 150 152 153 172 182 307 324
421 453 463
049 152
045 049 055 076 107 123 152 225
232 378 379 380 421 ITL 203
049 066 090 123 152 195 407
049 123 152 378
379
049 076 123 152 225 378 379
042 090 107 134 139 150 162 171
172 193 197 198 209 307 375 428
042 090 104 107 134 136 139 150
153 162 171 172 193 197 198 209
307 375 428 433 435 437
076 049 152
207
018
141
365
018 103 123 170 182 225 409 433
439 465 007
212
049 076 123 152 195 226 440 441
443 444
195
035 049 089 120 152 324 391 421
KATHREIN
KAWASHO
KB ARISTOCRAT
KENDO
KENNEDY
KENWOOD
KINGSLEY
KIOTA
KLARMAX
KLEGG
KLH
KNEISSEL
KOBIC
379
071 107 172 236
020 045 049 050 068 076 107 152 195 217
378 421 435
455
379
107
045 049 055 134 152 172 210 421 435
071 079 104 107 139 236 369
219
379
221
371
222
223
049 152 210 243 369 391 411 421 435
227
KOLSTER
045 049 152
KONKA
KONIG
KONTAKT
049 123 152 225
228
232
KORPEL
KORTING
KOSMOS
KOTRON
KOYODA
KRAKING
049 152
065 094 113 324 421
049 152
076 426
195
411
KRIESLER
KTV
050 065 079 112 152 160
050 379
KURO
KYOSHU
KYOTO
LEADER
LECSON
445
076 163 426
107
231
049 152
LEGEND
054
LEMAIR
LENCO
LENOIR
LESA
LEYCO
LIESENK & TTER
210
049 107 152 195 226
050 195
233
049 076 094 102 152
049 112 152
LIFE
MINTEK
440 441 443 444
246
MISAKAI
MITSUBISHI
248
013 018 049 065 105 131 152 190 247 324
HITACHI FUJIAN
HITSU
HORNYPHON
HOSHAI
HYGASHI
HYPER 050
HYPERION
HYPERSONIC
HYPSON
HYUNDAI
IBERIA
IBERVISAO
ICE
ICES
ILO
IMPERIAL
INDIANA
INFOCUS
INGERSOLL
INNO HIT
INNOVATION
INSIGNIA
INTERACTIVE
INTERBUY
INTERECORD
INTERFUNK
INTERNAL
INTERVISION
IRRADIO
ISUKAI
ITC
ITS
ITT
ITT-NOKIA
ITV
JINLIPU
JEAN
JEC
JET POINT
JVC
KAIDO
LIFETEC
LLOYD_S
LOEWE
60
TV Manufacturer
Control Codes
001
035 046 049 065 120 144 152 213
324
131 225
195
071 107 110 152 171 172 195 210
226 236 307
049 076 107 152 172 236 379
049 152 195
042 050 090 107 127 139 150 172
197 209 307 375 428 429
076
371
049 152
045 046 065 104 107 120 139 150
168 324
045 046 050 068 090 120 379 407
018 042 049 152
440 441 443 444
076
076 094 113 134 141 152 379
049 195
049 152 455
324
049 152 195 226 379
239
123 195 225
TV Manufacturer
004 018 041 049 050 094 100 102
106 107 131 134 141 150 152 171
195 209 218 225 232 247 307 379
380
240
242
139
371
049 112 152
049 152 195 217 457 328
435
126
020 049 074 152 182 193 195 197
210 226 375 379 408 428 429
425
NECKERMANN
MEMOREX
MEMPHIS
MERCURY
METZ
099 195 217
102 125 195 213
049 152 195
049 065 067 070 092 247 324 412
420 454
NOBLEX
NOBLIKO
NOGAMATIC
NOKIA
MGA
244
NORDMENDE
MICROMAXX
MICROSTAR
MINERVA
MINOKA
OCEANIC
049 152 195
440 441 443 444
080 090 232 247 249 407 454
049 152 426
086 094 104 107 108 109 139 172
209 425
150
076
LOEWE OPTA
LOGIK
LOGIX
LUMA
LUMATRON
LUX MAY
LUXOR
LYCO
MAAZ
MADISON
MAGNADYNE
MAGNAFON
MAGNAVOX
MAGNUM
MANDOR
MANESTH
MANHATTAN
MARANTZ
MARELLI
MARK
MASCOT
MASUDA
MATSUI
MAXAM
MAXENT
MAXIMAL
MAXWELL
MEDIATOR
MEDION
MEGAS
MEGATRON
MELECTRONIC
MELVOX
OCEANIC(F)
ODEON
MONACO
MORGAN_S
MOTION
Control Codes
454 053
046 050 072 081 090 120 379 391 407 414
421 434
195
049 152
407
MOTOROLA
MOXI
MTC
190
251
152 379 421
MTEC
MULTISTANDARD
MULTITEC
MULTITECH
106
045
049 152 195
045 046 049 050 120 152 195 379 407 421
MURPHY
MURPHY(UK)
MUSIKLAND
MYRYAD
NAD
NAIKO
NAKIMURA
NAONIS
NAT
NATIONAL
NEC
102 104 105 107 171 307 379
162
123
455
172 209
049 152
049 152 226
040 071 079 110 171
085 151
033 085 104
018 049 113 131 152 177 195 226 379 380
010 025
002 049 050 065 107 139 152 163 210 247
249 307 324 357 379 421 455
MIVAR
NEDIATOR
NEI
NESCO
NETSAT
NETWORK
NEUFUNK
NEW TECH
NEW WORLD
NICAMAGIC
152
049 125 152 225
042
049 152
213
049 152 195 435
049 050 152 182 195 379
123
379
NIKKAI
NOTHERN STAR
NOVATRONIC
NOVA
NUVISION
PERFEKT
018 049 076 102 123 125 139 141 152 195
213 379 066
049 076 152
045 050 080 090 379 407
074 182 186 424 453 463
090 104 107 134 136 139 150 153 162 171
172 193 197 198 209 226 307 375 428 429
433 437 465
049 074 083 150 152 182 186 218 247 307
424 453 463
255
020 049 152 226
303
310
049 152
PERSHIN
PHILCO
425
002 016 049 065 090 093 094 104 107 126
61
TV Manufacturer
Control Codes
TV Manufacturer
O GENERAL
OKANO
330
049 076 102 152 421
PHILHARMONIC
PHILIPS
OLEVIA
OLYMPIC
OMEGA
ONCEAS
ONWA
331
332
076
050
123 225
PHOCUS
PHOENIX
PHONOLA
PILOT
PIONEER
OPERA
OPTIMUS
OPTOMA
OPTONICA
ORBIT
ORIENT
ORION
PLANTRON
PLAYSONIC
POLAROID
POLICOM
POPPY
PORTLAND
POWERPOINT
PRANDONI-PRINCE
PRECISION
PREMIER
PRIMA
PRINCE
046 090 120 171 172 307 407
379
142
076 195 307
046 171
PRINCESS
PRINZ
PROFEX
PROFI-TRONIC
PROLINE
PROSCAN
344
102
107 139 195 407
045 049 152
049 102 112 191 366 436
345
PROSONIC
PROTECH
PROTON
PROVISION
PYE
049 085 151 152 195 225 226 379 421
045 049 076 125 139 152 163 195 379 457
346
049 152
050 065 079 112 152 160 226 324
PYMI
049 112 152 195 226 324
QUADRA VISION
QUASAR
425
045 046 068 099
PANAVISION
049 152
099
333
190
049 152
336
004 042 045 049 076 094 113 131
134 139 150 152 191 195 216 366
367 426
049 123 152
104
195
066
049 066 076 102 106 123 152 226
379 426
049 152
123
018 102 123
450
337
018 049 050 074 094 104 107 113
134 139 152 172 190 218 247 249
357 362 379 414 454 455
338
217
316
050 379
049 107 152 163 210 247 324 357
379 421
049 055 076 152 379 426 019 023
052
049 076 152 195 379
016 049 099 104 107 139 151 152
172 396 420 461 304 305
049 152 210
Control Codes
142 152 163 168 324 369 407 421
379
008 049 050 065 079 089 112 152 160 182
193 216 217 220 226 247 249 324 427 455
482 025
047
049 050 102 104 107 113 152 324 379 421
049 050 065 079 112 152 160 324 379
049 152
049 074 152 172 182 209 218 307 421 427
003
049 076 152 195
379
343
074
195
226
232
QUELLE
PANAVOX
PANORAMIC
PATHE CINEMA
PATHE CINEMA(F)
PATHE MARCONI
PAUSA
PAUZA
PERDIO
RCA
REALISTIC
339
340
107 113 379 391 411 425
050 168
008 074 182 186 424 453 462 463
195
195
049 102 107 113 152
190 218 436
350
QUESTA
RADIALVA
RADIOLA
RADIOMARELLI
RADIONETTE
RADIOSHACK
RADIOTONE
RANK ARENA
SEARS
SEG
RECOR
049 152
SEI
018 020 049 050 074 076 078 080 090 091
094 113 131 139 146 150 152 153 172 195
247 249 320 357 379 408 449 454
018
049 074 107 123 152
008 049 050 065 079 112 152 160
045 046 065 104 105 150 152 168 324
020 150
049 152
049 076 152 163 195 421 426
018
042
018 045 049 050 076 107 152 172 195 232
379 407 457
004 045 049 094 107 139 152 236 324 357
ORLINE
ORMENTI-PHOENIX
ORMOND
OSAKA
OSAKI
OSIO
OSO
OSUME
OTAKE
OTHER LINE
OTTO VERSAND
OVP
P.T ACTRON
PACIFIC
PAEL
PALLADIUM
PALSONIC
PANAMA
PANASONIC
62
TV Manufacturer
Control Codes
TV Manufacturer
Control Codes
RECTILIGNE
REDIFFUSION
049 152
018 059 104 105 139 171 172 307
SEI SINUDYNE
SELECO
REDIFFUSION(UK)
REDSTAR
REFLEX
REGENTE
REOC
REVOX
REX
150 162
049 152
049 152
351
460
049 152 421
040 071 079 107 110 152 171 210
236 243 307
076 102 241 324 391 421
379
049 152
049 076 123 152 163 195
065 324
049 152
354
458
050
421 426
356
065
SENCORA
SENTRA
SERINO
SHARP
SHERWOOD
SHORAI
SHOW
446
040 071 079 107 110 152 171 172 210 236
243 307 369
195
123 139 141 195
380 435
018 094 170 190 320 362 308
374
042 094
376
046 065 074 077 107 120 139 172
182 186 218 307 324 424 436 452
453 463
411
378 380 435 311
004 050 076 107 131 134 195 307
379
359
033 107 127 136 139 150 153 171
172 198 209 307
045 046 068 090 120 407
360
049 050 066 076 102 152 195 209
217 365 379 414 421 455 486 488
318
379
411
049 152 225
195
018 020 041 049 050 065 102 107
131 152 195 198 209 320 379 391
408 421 314
049 152
049 112 152
372
090 104 136 139 153 162 171 198
307 433 005
008 040 049 050 065 069 079 104
107 112 123 139 152 156 160 168
172 182 195 225 243 307 379 382
414 417 457
042
195
049 050 113 123 152 195 226 379
388
049 076 107 152 195
SKANTIC
049 152
045 046 065 104 107 120 139 324
018 049 066 113 152 247 249 307 320 454
050 065 079 112 152 160
049 112 152
421
049 152 379
018 042 049 076 152 172
381
045 049 065 104 152 195 324 369 425
383
004 045 065 094 104 107 134 139 150 152
172 210 216 236 324 357 366 367
307
SKY
SKYWORTH
SMARAGD
049 152 487 490
448
384
SOGERA
SOLAVOX
113
066 102 107 139 172 307
SOLE
SONAWA
SONIQ
386
123
322 323 325
SONITRON
SONNECLAIR
SONOKO
SONOLOR
SONTEC
209 379 421
049 152
049 050 076 152 195 378 379
107 139 172 209 357 425
049 094 152 421
SONY
SOUNDMASTER
SOUND & VISION
SOUND WAVE
018 045 131 211 357 358 370 301 302
387
045 123 226
049 113 163
SOUNDESIGN
042
SPECTRA
TEDELEX
TEIRON
TEKNANT
TEKNIKA
195
379
195
400
042
RFT
RHAPSODY
R-LINE
ROADSTAR
ROBOTRON
RODEX
ROSITA
ROWA
ROWSONIC
ROYAL LUX
RUNCO
RTF
SABA
SACCS
SAGEM
SAISHO
SAKURA
SALORA
SAMBERS
SAMPO
SAMSUNG
SANDRA
SANELA
SANSUI
SANTON
SANYO
SAVE
SBR
SCEPTRE
SCHAUB LORENZ
SCHNEIDER
SCOTT
SSANGYONG
STANDARD
STAR
STARLIGHT
SIAM
SIAREM
SIEMENS
SIERA
SIERRA
SIESTA
SILVA
SILVER
SIM2
SINGER
SINOTEC
SINUDYNE
63
TV Manufacturer
Control Codes
TV Manufacturer
Control Codes
STENWAY
STERN
123 378
040 071 079 107 110 152 171 236
243 307
049 076 152 195
312
049 094 123 134 152 191 232 367
380
049 152 195 225
049 152 195
379
049 123 152 195 379
195 226
123 218
195
48
379
392
393
049
379
106
394
TEKON
TELEAVIA
401
008 074 182 186 218 424 453 462 463
TELECOR
TELEFAC
TELEFUNKEN
395
065 074 078 172 182 210 213 420
449
050 102 123 190 307 379
397
018 050 107 177 379
049 050 102 106 120 131 152 217
379
398
TENSON
TESMET
049 107 123 152 379
402
049 064 074 082 152 182 186 187 218 230
424 436 452 453 463 489
049 152
049 076 107 123 152
049 113 152
404
405
049 152
049 152
049 152 195 213
018 067 071 107 236 379
050 104 107 113 379
425
094
049 152 195
049 152
020 050 055 094 113 123 152 195 225 226
379 450
413
439
440 441 443 444
049 076 152 163 195 217 378 380
426 457 458 012 010
040 050 064 168 195 213 218 243
379
049 152 195
061
399
123
113
099
042
419
422
379
123
004 046 049 128 152 197 375
430
431
049 069 071 080 090 113 152 163
226 236 307 407 414 421
409
THORN-FERGUSON
TMK
046
049 152 195 313
050 123 195 226 379
008 024 026 049 064 074 134 152 182 186
218 230 424 436 453 462 463 321
049 102 103 106 141 152 218 226 408 409
411 454 464
074 076 080 082 103 218 357 358 375
416
TOBO
418
TOKAI BA
TOWADA
TOYODA
TRAKTON
TRANS CONTINENS
TRANSONIC
TRANSTEC
WALTHAM
WATSON
WATT RADIO
WEGA
WEGA COLOR
WEGAVOX
WELTBLICK
WESTINGHOUSE
018 045 128 141 369 379
045 379
195
076
046 049 152 171 307 379
049 152 380 458
379
049 152 163 182 307 379
049 107 113 123 152 195 247
045 050 068 104 107 139 150 379
018 049 139 152 324
065 088
195
113 152
094 152
WESTON
168
045 049 050 065 104 107 139 152
226 324 379
049 152
WHARFEDALE
049 152
WHITE
045
STRATO
STRONG
SUNKAI
SUNSTAR
SUNWOOD
SUPERLA
SUPERTECH
SUPRA
SUSUMU
SUTRON
SWISSTEC
SYDNEY
SYLVANIA
SYMPHONIC
SYSLINE
SYTONG
TACTUS
TADISTAR
TALENT
TANDBERG
TANDY
TARGA
TASHIKO
TATUNG
TCL
TCM
TEAC
TEC
TECH LINE
TECHNISAT
TECHNOL
TECHICA
TECHNEMA
TECHNICS
TECHNOL ACE
TREVI
TRIAD
TRIDENT
TRISTAR
TRIUMPH
TRIVISION
TRUTEK
UHER
ULTRA
ULTRAVOX
UNIC LINE
64
TELEFUSION
TELEGAZI
TELEMEISTER
TELEOPTA
TELERENT
TELESONIC
TELESTAR
TELETECH
TELETON
TELEVIDEON
TELEVISO
TEMCO
TEMPEST
TENNESSEE
TENSAI
TETUNG
TEVION
TEXET
THOMSON
THORN
TV Manufacturer
Control Codes
TV Manufacturer
Control Codes
UNIC RADIO
438
WHITE
WESTINGHOUSE
WINBOOK
049 050 113 152 213 379
UNITED
049 152 491
UNIVERSUM
002 004 018 020 049 074 076 094
107 131 152 163 172 195 197 210
213 247 320 357 375 379 407 408
421 428 429 437 454
WINCO
426
UNIVOX
049 107 152 213 324 411
WINDSTAR
378
UTAX
050
WINTAL
315
VANGUARD
447
WINTERNITZ
471
VEGAVOX
163
WORLD-TECH
473
VESTEL
049 107 125 152 379
XRYPTON
049 152
VEXA
152 195
YAMAHA
474 075 096
VICTOR
170
YAMISHI
049 123 152 378 379 380
VIDEO SYSTEM
049 152
YOKAN
049 152
VIDEOLOGIQUE
123 379
YOKO
049 050 076 123 152 195 379 421
VIDEOSYSTEM
049 152
YORX
123
VIDEOTECHNIC
113 226 379
ZANUSSI
040 071 079 110 152 171 236 307 379
VIDEOTON
107
ZENITH
475
VIDIKRON
045
ZOPPAS
040 071 079 110 171 307
VIDION
451
VIDTECH
018
VIEWSONIC
073
VIORE
466
VIPER
213
VISIOLA
379
VISION
049 113 152
VISOREX
442
VISTAR
172 236
VIZIO
467
VOLTEC
074
VORTEC
152
VOXSON
049 065 090 152 163 171 307 324
407
469
WALKIE
470
65
9. Symbols and Icons
Symbols on HDS-600RS
Symbol
Meaning
The product complies with applicable EU directives.
Do not dispose of with normal household waste.
Caution, read the instructions.
The equipment has additional insulation and does not
need to be earthed.
Alternating Current.
USB connector.
HDMI logo.
This logo tells you that the receiver incorporates HighDefinition Multimedia Interface technology.
HDMI, the HDMI Logo, and High-Definition Multimedia
Interface are trademarks or registered trademarks of
HDMI Licensing LLC in the United States and other
countries.
Dolby Digital Plus logo.
Manufactured under license from Dolby Laboratories.
Dolby and the double-D symbol are trademarks of
Dolby Laboratories.
freesat logo
This logo tells you that this equipment is capable of
receiving free-to- air digital satellite signals and has
built in recorder.
freesat is a registered trade mark and the “freesat”
logo is a trademark of Freesat (UK) Ltd.
66
Symbol
Meaning
Sling logo.
This logo tells you the receiver is capable of place
shifting your TV content.
HD logo
This logo tells you the receiver is capable of receiving
and displaying HD content.
Information Icons
Icon
When displayed (programme guide or info bar)
Contains one or more subtitle components.
Does not contain any subtitles.
Contains a Dolby Digital Plus audio component.
Contains a Dolby Digital audio component, but not Dolby Digital
Plus.
Contains an Audio Description component.
Does not contain an Audio Description component.
Contains more than one audio language component.
Contains only one audio language component.
Broadcast in more than one discreet part with one or more other
programmes between the parts.
The current output resolution on HDMI is 576p .
The current output resolution on HDMI is 720p .
The current output resolution on HDMI is 1080i .
The programme is broadcast in SD. An HD version of the
programme is also available at the same, or at an earlier, or at a
later, time on a different channel.
67
Programme has an associated recommendation.
This is a radio service (audio only).
This is a text only (i.e. MHEG) service.
A future recording has been scheduled for this programme.
This programme is currently being recorded.
A Reminder has been set for this programme.
Channel N/A.
This is a TV service (audio and video).
This recording is subject to parental guidance.
This recording is locked
or
This channel is locked
This recording was not completed successfully.
This event is broadcast in HD (720p, 1080i, or 1080p).
This programme is part of a series.
Text service available on this channel.
Text service unavailable on this channel.
68
Visit Us
You can register your product and
receive the latest news on updates
and support by visiting us at:
www.myechostar.com
For further information on freesat please go to www.freesat.co.uk
Follow freesat on twitter.com/freesat_TV
Like freesat on facebook.com/freesat
Dolby and the double-D symbol are registered trademarks of Dolby laboratories.
HDMI, the HDMI Logo and High-Definition Multimedia Interface are trademarks
or registered trademarks of HDMI Licensing LLC.
Copyright ‹ 2011 EchoStar Technologies L.L.C. Sling Media, SlingLoaded and
SlingPlayer are the registered or unregistered trademarks of Sling Media, Inc.
All other brand and product names are or may be trademarks of, and are used to
identify products or services of, their respective owners.
EchoStar Europe, Beckside Design Centre, Millennium Business Park,
Station Road, Steeton, Keighley, West Yorkshire BD20 6QW.
Part No: 172852 Rev01