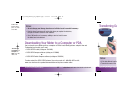
1
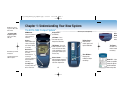
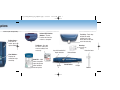
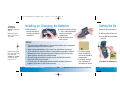
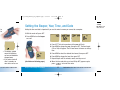
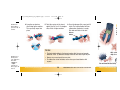
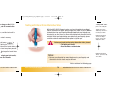
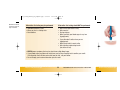
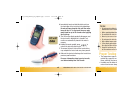
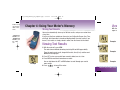
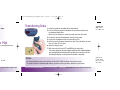
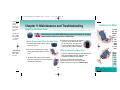
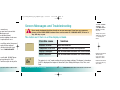
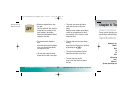
361_26758_Manual_AC_Compact.qxp
6/27/05
11:35 AM
Page A
All images are
4/c throughout.
Color breaks do
not print.
All unspecified
print black
throughout.
“Compact ”
prints 100c,
47y, 30k.
Roche logo
prints 100C,
52M.
NOTE: This file
may not view or
print at actual
size.
Owner’s Booklet
361_26758_Manual_AC_Compact.qxp
Inside front
cover
6/27/05
11:35 AM
Page B
Dear ACCU-CHEK M
Thank you for choosing the
Congratulations on your de
ACCU-CHEK Compact syste
living with diabetes a little
This booklet will help you g
you to visit www.accu-ch
help you manage your diab
To start testing quickly, you
If you have questions, we’r
center toll-free at 1-800-8
Spanish and many other la
Thanks again for choosing
361_26758_Manual_AC_Compact.qxp
6/27/05
11:35 AM
Page 1
Dear ACCU-CHEK Meter Owner,
Thank you for choosing the ACCU-CHEK Compact meter!
Congratulations on your decision to take control of your diabetes. We’ve designed your new
ACCU-CHEK Compact system with comfort, convenience, and control in mind – to help make
living with diabetes a little easier.
This booklet will help you get the most from your ACCU-CHEK Compact meter. We also invite
you to visit www.accu-chek.com to find out about services, tools, and information that can
help you manage your diabetes.
To start testing quickly, you can also refer to the First Time Guide or the Quick Reference Guide.
If you have questions, we’re here to help. Just call the ACCU-CHEK Customer Care service
center toll-free at 1-800-858-8072. We offer assistance 24 hours a day, 365 days a year, in
Spanish and many other languages.
Thanks again for choosing an ACCU-CHEK system.
361_26758_Manual_AC_Compact.qxp
6/27/05
11:35 AM
Page 2
“The ACCUCHEK...System ” and
bullets on page 2
print 100c, 47y, 15k.
The ACCU-CHEK Compact System
Gradient bar at
bottom of pages 2–5
print 100c, 47y, 15k
to white with
“Contents”
reversed-out white
on pages 4 and 5
only.
• ACCU-CHEK Compact Meter
• Batteries
• ACCU-CHEK Compact Control Solution*
Your new ACCU-CHEK Compact meter and accessories work together to measure the amount of sugar
(glucose) in your blood to help you and your doctor control your diabetes. The system includes:
• ACCU-CHEK Compact Test Drum (17 tests)*
• ACCU-CHEK Softclix Lancet Device*
• ACCU-CHEK Softclix Lancets*
Why Regular Blood Sugar Testing Is Important
Checking your blood sugar can make a big difference in how well you can manage your diabetes on a daily
basis. We’ve made it as simple and comfortable as possible. ACCU-CHEK meters are easy to use, and you can
adjust the ACCU-CHEK Softclix lancet device to make testing more comfortable.
Need Help?
Just call the ACCU-CHEK Customer Care service center, 24 hours a day, 365 days a year, at 1-800-858-8072.
You can also visit www.accu-chek.com for diabetes management tools and product demonstrations.
To make sure you receive the best customer service possible and news about product updates, please
complete and mail your warranty card.
*Items may be sold separately.
2
ACCU-CHEK Customer Care Service Center 1-800-858-8072
Important Informatio
• Your new blood glucose m
(like blood taken from fing
used to diagnose diabetes
• Be sure to use only ACCU
inaccurate results.
• Do the control tests expla
• Carefully dispose of used
Health-Related Infor
• Being severely dehydrated
suffering from dehydration
• If you have followed all th
your test results – or if yo
361_26758_Manual_AC_Compact.qxp
6/27/05
11:35 AM
Page 3
Important Information About Your New Meter
he amount of sugar
em includes:
est Drum (17 tests)*
ncet Device*
ncets*
e your diabetes on a daily
re easy to use, and you can
a year, at 1-800-858-8072.
uct demonstrations.
duct updates, please
are Service Center 1-800-858-8072
• Your new blood glucose meter is designed and approved for testing fresh capillary whole blood samples
(like blood taken from fingertips or forearm) outside the body (in vitro diagnostic use). It should not be
used to diagnose diabetes.
• Be sure to use only ACCU-CHEK Compact test drums with the meter. Other test strips may produce
inaccurate results.
• Do the control tests explained in this booklet to make sure your system is working properly.
• Carefully dispose of used test strips and lancets.
Health-Related Information
• Being severely dehydrated or losing a lot of water may give you false (low) test results. If you think you’re
suffering from dehydration, call your doctor right away.
• If you have followed all the instructions in this booklet and still have symptoms that don’t seem to match
your test results – or if you have questions – talk to your doctor.
3
ACCU-CHEK Customer Care Service Center 1-800-858-8072
361_26758_Manual_AC_Compact.qxp
“Contents” at top prints
100c, 47y, 15k.
6/27/05
11:35 AM
Page 4
Contents
“Chapter 1...System ”
reverses-out white of a
gradient bar that prints
100c, 30m, 6k to white.
Chapter 4: Using Y
Storing Test Res
Viewing Test Res
Viewing Trend In
Downloading Yo
Chapter 5: Mainten
Attaching the No
Cleaning Your M
Maintenance an
Screen Message
Chapter 6: Technic
Product Limitatio
Specifications ...
Product Safety I
Warranty ..........
Money-Back Gu
Additional Suppl
Information for P
Index ................
Chapter 1: Understanding Your New System ..........................................................................6
The ACCU-CHEK Compact System ...............................................................................................6
Installing the Test Drum ...............................................................................................................8
Installing (or Changing) the Batteries .........................................................................................10
Setting the Beeper, Year, Time, and Date....................................................................................11
Chapter 2: Control Testing .....................................................................................................13
Why Run Control Tests? .............................................................................................................13
About the Control Solution .........................................................................................................13
Running a Control Test...............................................................................................................14
Understanding Control Test Results............................................................................................17
Chapter 3: Testing Your Blood Sugar .....................................................................................19
Preparing the ACCU-CHEK Softclix Lancet Device ......................................................................19
Running a Blood Sugar Test.......................................................................................................21
Testing with Blood from Alternative Sites...................................................................................23
Proper Testing Conditions ..........................................................................................................27
Recording Your Results ..............................................................................................................28
Storing Your Supplies.................................................................................................................28
Understanding Your Test Results ................................................................................................28
“Chapter 2...Testing ”
reverses-out white of a
gradient bar that prints
100m, 43m, 18k to white.
“Chapter 3...Sugar ”
reverses-out white of a
gradient bar that prints
27m, 100y, 6k to white.
Contents
4
ACCU-CHEK Customer Care Service Center 1-800-858-8072
Contents
361_26758_Manual_AC_Compact.qxp
11:35 AM
Page 5
Chapter 4: Using Your Meter’s Memory .................................................................................30
Storing Test Results ...................................................................................................................30
Viewing Test Results ..................................................................................................................30
Viewing Trend Information .........................................................................................................31
Downloading Your Meter to a Computer or PDA .........................................................................32
Chapter 5: Maintenance and Troubleshooting ......................................................................34
Attaching the Nose Cover ..........................................................................................................34
Cleaning Your Meter...................................................................................................................35
Maintenance and Testing ...........................................................................................................36
Screen Messages and Troubleshooting ......................................................................................37
Chapter 6: Technical Information ..........................................................................................43
Product Limitations....................................................................................................................43
Specifications ............................................................................................................................43
Product Safety Information ........................................................................................................44
Warranty ...................................................................................................................................45
Money-Back Guarantee .............................................................................................................46
Additional Supplies ....................................................................................................................48
Information for Professional Caregivers .....................................................................................49
Index .........................................................................................................................................50
..................................6
....................................6
....................................8
..................................10
..................................11
................................13
..................................13
..................................13
..................................14
..................................17
................................19
..................................19
..................................21
..................................23
..................................27
..................................28
..................................28
..................................28
are Service Center 1-800-858-8072
6/27/05
Contents
5
ACCU-CHEK Customer Care Service Center 1-800-858-8072
“Chapter 4...Memory ”
reverses-out white of a
gradient bar that prints
65c, 100m, 15k to white.
“Chapter
5...Troubleshooting ”
reverses-out white of a
gradient bar that prints
100c, 47m, 15k to white.
“Chapter
6...Information”
reverses-out white of a
gradient bar that prints
44k to white.
361_26758_Manual_AC_Compact.qxp
Gradient bar across
top prints 100c, 30m,
6k to white.
“The ACCU-CHEK
Compact System”
prints prints 100c,
30m, 6k.
Lead line/arrows print
50k throughout.
11:35 AM
Page 6
Chapter 1: Understanding Your New System
The ACCU-CHEK Compact System*
MEM Button –
Press this button to
review values in
memory.
Display –
Shows blood sugar
results, messages,
and results stored
in memory.
Dotted rules print 20k
throughout.
6/27/05
Nose Cover –
Covers the optics of
the meter.
Removable for
cleaning, if
necessary. (Must be
attached to test
correctly.)
Test Strip Slot –
Test strip comes out
of the meter here.
Display Cover –
(Removable)
SET Button – Press
this button to set the
Beeper/Year/Time/Date.
TEST Button – Press this
button to perform a test or
to turn the meter off. Also,
at the completion of a test,
pressing this button ejects
the test strip.
Release Button –
Slide this button toward the
display window to open the
test drum compartment.
6
*Items may be sold separately.
Battery Cover –
Slide cover to
unlock, open, and
replace batteries.
View Window –
Displays the
number of strips
remaining.
Infra
Wind
trans
mete
Top
Test Drum –
on label is re
meter so cod
necessary.
Drum Vial – Labe
shows acceptable
ranges for glucos
control solutions
and use-by date.
361_26758_Manual_AC_Compact.qxp
6/27/05
11:35 AM
Page 7
ystem
*Items may be sold separately.
Battery Cover –
Slide cover to
unlock, open, and
replace batteries.
View Window –
Displays the
number of strips
remaining.
Infrared (IR) Interface
Window – Used to
transfer data from the
meter to a computer.
Test Strip – Touch drop
of blood or control
solution here at the
black notch on the front
end of the test strip.
Top
Test Drum – Bar code
on label is read by the
meter so coding is not
necessary.
Drum Vial – Label
shows acceptable
ranges for glucose
control solutions
and use-by date.
Clear Cap
(for alternative site
testing)
Cap with Comfort Dial
Depth Selection
Protective Cover
Release Button
Lancet Device
Ejector
7
Plunger
Lancet
361_26758_Manual_AC_Compact.qxp
“Installing the Test
Drum” prints 100c, 30m,
6k.
Gradient box behind
“Notes” prints 20c, 6m,
1k to white.
6/27/05
11:35 AM
Page 8
Installing the Test Drum
Notes:
• Once you remove a test
the strips.
• Don’t open the drum com
so causes the test drum
by date” warning invalid
• If you do take out a part
meter, “CTRL” flashes in
a control test. For more
• Keep the test drum vial
test drum. You’ll need to
a control test.
• When a test drum is em
back of the meter, “End”
display.
• Store your test drum and
(2-30°C). Do not freeze.
1. With the meter off, slide the release button
toward the display to open the test drum
compartment.
2. If there is a used drum in the compartment,
hold the meter upright to remove the used
test drum. The empty drum drops out.
3. Remove a new test drum from its vial.
4. Slide the new test drum onto the plastic
post inside the compartment. It can only be
inserted in one direction.
Gradient bar at bottom
prints prints 100c, 30m,
6k to white with
“Chapter 1: ...System”
reversed-out white;
pages 8 thru 12.
5. Close the compartment door until it snaps.
(See Notes on following page.)
Chapter 1: Understanding Your New Meter
8
ACCU-CHEK Customer Care Service Center 1-800-858-8072
Chapter 1: Understanding Your New M
361_26758_Manual_AC_Compact.qxp
6/27/05
11:35 AM
Page 9
Notes:
• Once you remove a test drum from its vial, you have 90 days to use up all
the strips.
• Don’t open the drum compartment until you’ve used all the strips. Doing
so causes the test drum symbol
to flash and makes the 90-day “use
by date” warning invalid.
• If you do take out a partially used test drum and put it back in the
meter, “CTRL” flashes in the display, meaning you should perform
a control test. For more information, see Control Testing, Chapter 2.
• Keep the test drum vial or the vial label until you are finished with the
test drum. You’ll need to refer to the numbers on the label when you run
a control test.
• When a test drum is empty, the dot reappears in the view window on the
back of the meter, “End”, and the test drum symbol
flash on the
display.
• Store your test drum and meter in a cool, dry place – between 36-86°F
(2-30°C). Do not freeze.
are Service Center 1-800-858-8072
Chapter 1: Understanding Your New Meter
9
ACCU-CHEK Customer Care Service Center 1-800-858-8072
361_26758_Manual_AC_Compact.qxp
“Installing (or
Changing) the
Batteries” prints 100c,
30m, 6k.
Gradient box behind
“Notes” prints 20c, 6m,
1k to white.
6/27/05
11:35 AM
Page 10
Installing (or Changing) the Batteries
Setting the Be
1. Slide the battery
cover on the back of
the meter to unlock it
and open it.
Setting the time and date is i
2. Insert the batteries with the
+ and – ends matching the
marks in the battery
compartment.
3. Slide the battery cover
back in place.
1. With the meter off, press S
2. Press MEM to turn the bee
on or off.
Notes:
Gradient bar at bottom
prints prints 100c, 30m,
6k to white with
“Chapter 1: ...System”
reversed-out white;
pages 8 thru 12.
• The meter uses two AAA batteries. Use long-lasting alkaline (not rechargeable)
batteries and keep an extra pair on hand.
• Always replace both batteries at the same time and with the same brand.
• Try to wait until the current test drum is empty before replacing the batteries.
Otherwise, the meter may take some time to advance to the next test strip
and may give an incorrect use-by date warning.
• After you change the batteries, you will have to reset the time and date,
but all test results stay in memory.
• The meter turns off automatically after five minutes of nonuse. When this
happens, test results are still saved in memory.
Chapter 1: Understanding Your New Meter
10
• The battery symbol
means the batteries
are low and should be
changed soon.
• If the meter shuts off
after 3 seconds, no
more tests can be run.
ACCU-CHEK Customer Care Service Center 1-800-858-8072
(See Notes on following pa
Chapter 1: Understanding Your New M
361_26758_Manual_AC_Compact.qxp
6/27/05
11:35 AM
Page 11
Setting the Beeper, Year, Time, and Date
Setting the time and date is important if you use the meter’s memory or connect to a computer.
he
he
1. With the meter off, press SET.
2. Press MEM to turn the beeper
on or off.
3. Press SET. The last two numbers of the year will flash.
• The battery symbol
means the batteries
are low and should be
changed soon.
• If the meter shuts off
after 3 seconds, no
more tests can be run.
are Service Center 1-800-858-8072
4. Press MEM to change the year, then press SET. The time format
(12h or 24h) will appear. The 24-hour format is known as military
time.
5. Press MEM to select the desired time format, then press SET.
6. Press MEM to change the hour, then press SET.
7. Repeat Step 6 until the minutes, month, and day are set.
(See Notes on following page.)
Chapter 1: Understanding Your New Meter
8. When the time and date are set and ON (or OFF) appears again,
press
to turn off the meter.
11
ACCU-CHEK Customer Care Service Center 1-800-858-8072
“Setting
the...Date” prints
100c, 30m, 6k.
361_26758_Manual_AC_Compact.qxp
Gradient box behind
“Notes” prints 20c,
6m, 1k to white.
6/27/05
11:35 AM
Page 12
Chapter 2: Co
Notes:
• The beeper is designed to make the ACCU-CHEK Compact meter easier to
use, but you can turn it off and not affect your test results in any way.
• When you first get your meter, the beeper is set to “On” and sounds
whenever:
• A strip is ready for blood or control
solution
• Sufficient blood or control solution
is applied to a strip
• A result or message is
displayed
• An error occurs while testing
Why Run Control Te
Control tests ensure that bot
You should run a control test
• The meter is new.
• You open a new box of tes
• You leave the cap off the t
using the drum.
• You want to check the per
and test drum.
About the Control So
• Make sure you use ACCUsolution.*
• When you first open the bo
the label – the solution is
from that date or until the
bottle, whichever comes fi
Chapter 1: Understanding Your New Meter
12
ACCU-CHEK Customer Care Service Center 1-800-858-8072
361_26758_Manual_AC_Compact.qxp
6/27/05
11:35 AM
Page 13
Gradient bar at top prints
100m, 43y, 18k to white.
Chapter 2: Control Testing
Why Run Control Tests?
Control tests ensure that both the meter and the test strips are working properly and giving reliable results.
You should run a control test when:
• The meter is new.
• You drop the meter.
• You open a new box of test strips.
• CTRL flashes in the meter display window.
• You leave the cap off the test drum vial before
• Your test results don’t agree with the way you feel.
using the drum.
• You want to make sure you’re performing tests
• You want to check the performance of the meter
correctly.
and test drum.
About the Control Solution
• Make sure you use ACCU-CHEK Compact control
solution.*
• When you first open the bottle, write the date on
the label – the solution is good for three months
from that date or until the expiration date on the
bottle, whichever comes first.
are Service Center 1-800-858-8072
• Never use control solution that has expired.
• Always close the control solution bottle tightly.
• Store at 36-86°F (2-30°C). Do not freeze.
*ACCU-CHEK Compact Blue control solution
may not be available in all countries.
13
“Why Run ... Tests?”,
“About the ...Solution ”
and bullets print 100m,
43y, 18k.
361_26758_Manual_AC_Compact.qxp
“Running a Control
Test” prints100m, 43y,
18k.
6/27/05
11:35 AM
Page 14
Running a Control Test
For control testing, you’ll need your meter (with a test drum inserted), a bottle of
ACCU-CHEK Compact control solution, and a napkin or paper towel.
1. With a test drum inserted,
press
.
2. The time, date, and test strip
appear on the display. Next,
the flashing blood drop and
hand appear on the display.
Then, press SET to mark the
test as a control test.
Gradient bar at bottom
prints 100m, 43y, 18k to
white with “Chapter 2:
...Testing” reversed-out
white; pages 14 thru 18.
Chapter 2: Control Testing
4. Hold the meter so the test
downward.
Only a small
drop of control
solution is
required.
CTRL is displayed on the
screen and stored in
memory to show that this
result is from a control test.
When marked as CTRL, the
result is not included in the
average and other trend
information (see Viewing
Trend Information).
3. For accurate results, befor
drop of solution to a test s
bottle, squeeze one drop o
towel, then wipe the bottle
D
5. Gently touch and hold t
one drop of solution
against the black notch on
Do not operate without the nose cover attached.
For more information, see Chapter 5: Maintenance
and Troubleshooting.
14
ACCU-CHEK Customer Care Service Center 1-800-858-8072
The test begins when the
enough solution. If the bee
on, the meter will beep wh
begins.
Chapter 1: Your New Meter
Chapter 2: Control Testing
361_26758_Manual_AC_Compact.qxp
e of
6/27/05
11:35 AM
3. For accurate results, before you apply a
drop of solution to a test strip, roll the
bottle, squeeze one drop onto a paper
towel, then wipe the bottle tip clean.
4. Hold the meter so the test strip points
downward.
Only a small
drop of control
solution is
required.
Do not bend
the test strip.
5. Gently touch and hold
one drop of solution
against the black notch on the strip.
nose cover attached.
Chapter 5: Maintenance
are Service Center 1-800-858-8072
The test begins when the test strip has
enough solution. If the beeper is turned
on, the meter will beep when the test
begins.
Chapter 1: Your New Meter
Chapter 2: Control Testing
Page 15
Do not pull the bottle
away until the meter
beeps or 000 is displayed.
The 000 on the display
gradually disappears during the test.
The test result appears and is stored in the Range (mg/dL)
Low 34–64
meter’s memory automatically.
High 314–424
6. Check that the result is within the
acceptable range on the test drum vial or
the vial label. (Use the range – low or high
– that matches the type of solution you
have.)
If the result is not in the acceptable
range, see Understanding Control Test
Results.
7. Holding the meter upright, press
to release the test strip and
turn the meter off.
8. Dispose of the used test strip in a proper waste container.
(See Notes on following page.)
15
ACCU-CHEK Customer Care Service Center 1-800-858-8072
Gradient box behind
“Range (mg/dL)”
chart prints 27m,
100y, 6k to white.
361_26758_Manual_AC_Compact.qxp
6/27/05
11:35 AM
Page 16
Understanding
Notes:
Gradient box behind
“Notes” prints 20c,
6m, 1k to white.
• Do not operate without the nose cover attached. For more
information, see Chapter 5: Maintenance and Troubleshooting.
• When applying control solution, do not flood the test strip. Only apply
a small drop to the end of the test strip.
• Do not bend the test strip.
• Use only ACCU-CHEK Compact control solution with your ACCU-CHEK
Compact system or your test results may be inaccurate.
• Never try to reuse a test strip that has been released from the meter.
• Do not open the test drum compartment when the motor is running.
• After a result has been displayed for 60 seconds, the meter turns off
automatically.
• If the display goes blank before the test strip is released, press
to release the strip and turn off the meter.
• If you don’t press the SET button before running a control test, the
meter will store the result as a normal blood test. This will include it
with your average blood sugar results and other trend information.
(This could be confusing for you and your healthcare provider.)
Chapter 2: Control Testing
16
ACCU-CHEK Customer Care Service Center 1-800-858-8072
Low
High
Range
33–
311–
Low
High
43–
321–
Example
Chapter 2:
1: Control
Your New
Meter
Chapter
Testing
361_26758_Manual_AC_Compact.qxp
6/27/05
11:35 AM
Page 17
Understanding Control Test Results
Low
High
Range (mg/dL)
33–63
311–421
Low
High
43–73
321–431
The label on your test drum vial shows the acceptable ranges for
low and high test solutions. Your control test results should be
within the listed range. Make sure you compare the result to the
range for the level of control solution you used (Low or High).
Example
When a control test result is within the acceptable range, your test
drum and meter are working properly.
are Service Center 1-800-858-8072
Chapter 2:
1: Control
Your New
Meter
Chapter
Testing
“Understanding
Control Test
Results” prints
100m, 43y, 18k.
17
ACCU-CHEK
Customer
ACCU-CHEK
Customer
Care Service
Service Center
Center 1-800-858-8072
1-800-858-8072
Gradient box behind
“Range (mg/dL)”
chart prints 27m,
100y, 6k to white.
361_26758_Manual_AC_Compact.qxp
6/27/05
11:35 AM
Page 18
When a control test isn’t within the acceptable range, there could be several reasons.
Follow these steps to find out why:
Gradient box behind
chart prints 20m,
9y, 4k to white.
Troubleshooting Checks
Action
1. Check the expiration dates of the test drum
and control solution.
Replace solution or drums that have expired, or solution
you opened more than three months ago.
2. Make sure the caps were tight on the test
drum vial and control solution bottles.
If either has been open for a while, replace the test drum
or control solution.
3. Make sure the test drum has not been in the
meter more than 90 days.
If the drum symbol (with or without CTRL) is flashing,
the drum has been in the meter more than 90 days or the
drum door has been opened and closed so the 90-day
timer is not valid. Replace the test drum.
4. Make sure you followed all the testing steps.
Reread Running a Control Test and test again or ask your
healthcare provider for help.
5. Make sure the temperature was between 50104 ° F (10-40 °C) when you did the test.
Repeat the test in the appropriate temperature range.
6. If none of the above apply...
Repeat the control test with a new test strip. If the result
still isn’t within the acceptable range, contact the ACCUCHEK Customer Care service center at 1-800-858-8072.
Chapter 2: Control Testing
18
ACCU-CHEK Customer Care Service Center 1-800-858-8072
Chapter 3: Tes
Preparing the ACCU
With the ACCU-CHEK Comp
site instead of your fingert
1. Pull off the cap.
Note: You can refer to the F
361_26758_Manual_AC_Compact.qxp
6/27/05
11:35 AM
Page 19
Gradient bar at top
prints 27m, 100y, 6k
to white.
ns.
Chapter 3: Testing Your Blood Sugar
at have expired, or solution
months ago.
while, replace the test drum
Preparing the ACCU-CHEK Softclix Lancet Device
With the ACCU-CHEK Compact meter, you have a choice of 6 test sites. To test using an alternative
site instead of your fingertip, see Testing with Blood from Alternative Sites.
1. Pull off the cap.
without CTRL) is flashing,
ter more than 90 days or the
and closed so the 90-day
e test drum.
2. Insert a lancet until
it clicks.
3. Twist off the lancet‘s
protective cover.
st and test again or ask your
riate temperature range.
a new test strip. If the result
le range, contact the ACCUcenter at 1-800-858-8072.
Note: You can refer to the First Time Guide or the Quick Reference Guide for a simple testing summary.
are Service Center 1-800-858-8072
19
“Preparing the
...Device ” prints
27m, 100y, 6k.
361_26758_Manual_AC_Compact.qxp
Gradient box
behind “Notes”
prints 5m, 20y, 1k
to white.
4. Snap the cap back on
after lining up the notches.
The cap easily snaps into
place.
6/27/05
11:35 AM
Page 20
5. Twist the cap to set the lancet
6. Press the plunger (like a pen) until it
depth. Start at 2 or 3. For tougher clicks. The release button will turn
skin, dial to a higher number.
yellow when the device is ready.
Set aside until later in the test.
Release
button
Notes:
Gradient bar at
bottom prints
27m, 100y, 6k to
white with
“Chapter 3:
...Sugar”
reversed-out
white; pages 20
thru 29.
• The best depth setting is the lowest number that lets you get enough
blood for a test. Try different settings to find the one that’s right for you.
• Always use a new lancet for every test.
• To reduce the risk of infection, never share your lancet device with
anyone.
R
B
r
D
C
Only a sm
drop is re
Do not bend the test strip.
Chapter 3: Testing Your Blood Sugar
20
ACCU-CHEK Customer Care Service Center 1-800-858-8072
1: Testing
Your New
Meter
Chapter 3:
Your
Blood Sugar
361_26758_Manual_AC_Compact.qxp
plunger (like a pen) until it
e release button will turn
hen the device is ready.
until later in the test.
hat lets you get enough
e one that’s right for you.
ur lancet device with
are Service Center 1-800-858-8072
6/27/05
11:35 AM
Page 21
Running a Blood Sugar Test
Before running your first test, make sure you set up your meter properly and
run a control test. See Chapters 1 and 2 for details.
Do not operate without the nose cover attached. For more information, see
Chapter 5: Maintenance and Troubleshooting.
1. Wash and dry your hands.
2. Open the display cover.
3. Press
and the time, date, and test strip appear on the
display. Next, the flashing blood drop and hand appear on the
display. Set the meter down until Step 6. (You have five minutes
after the strip appears to perform the test.)
4. Hold the lancet device against the side of your fingertip and
press the release button.
Only a small blood
5. Gently squeeze your fingertip to get a small drop of blood.
drop is required.
6. Hold the meter so the test strip points downward.
7. Touch and hold the blood drop to the black notch on the front
edge of the strip. The blood is drawn into the test strip
automatically.
Do not bend the test strip.
1: Testing
Your New
Meter
Chapter 3:
Your
Blood Sugar
21
ACCU-CHEK
Customer
ACCU-CHEK
Customer
Care Service Center 1-800-858-8072
“Running a Blood
Sugar Test ” prints
27m, 100y, 6k.
361_26758_Manual_AC_Compact.qxp
6/27/05
11:35 AM
Page 22
Do not pull your finger away until the meter beeps or the 000 is
displayed. You may apply more blood for up to 25 seconds after
applying the first drop.
Testing with Blood f
8. The 000 on the display gradually disappears, and the test result is
displayed in 8 seconds.
Test results are automatically stored in the meter’s memory.
9. Holding the meter upright, press
to
release the test strip and turn the meter off.
10. To remove the lancet, take off the lancet device
cap and point the lancet end away from yourself.
11. Slide out the ejector to discharge the lancet into a
puncture-proof container.
For more information about your test results,
see Understanding Your Test Results.
Chapter 3: Testing Your Blood Sugar
22
ACCU-CHEK Customer Care Service Center 1-800-858-8072
Chapter 3:
1: Testing
Your New
Meter
Chapter
Your
Blood Sugar
361_26758_Manual_AC_Compact.qxp
er beeps or the 000 is
p to 25 seconds after
6/27/05
11:35 AM
Page 23
“Testing with... Sites”
prints 27m, 100y, 6k.
Testing with Blood from Alternative Sites
With the ACCU-CHEK Compact system, you have the option to use blood
from an alternative site (palm, forearm, upper arm, thigh, or calf) in addition
to blood taken from your fingertip. Although blood from your fingertip may
be tested at any time, there are times when testing from alternative sites is
not ideal. Before you begin testing areas other than your fingertip, please
read this section to understand which option is right for you.
rs, and the test result is
meter’s memory.
▲
!
ght, press
to
nd turn the meter off.
take off the lancet device
et end away from yourself.
discharge the lancet into a
er.
• Because your fingertip has more blood vessels, your fingertip and
alternative site test results may be different.
Notes continued on following page
are Service Center 1-800-858-8072
Chapter 3:
1: Testing
Your New
Meter
Chapter
Your
Blood Sugar
Gradient box behind
“Before You Begin...
please:” prints 27m,
100y, 6k to white.
Before you begin testing using alternative sites, please:
• Talk with your doctor
• Read the Notes section below
Notes:
about your test results,
our Test Results.
Triangle icon prints
100m,43y, 18k with “!”
reversing-out white.
23
ACCU-CHEK
Customer
Service Center
Center 1-800-858-8072
1-800-858-8072
ACCU-CHEK
Customer
Care Service
Gradient box behind
“Notes” prints 5m, 20y,
1k to white.
361_26758_Manual_AC_Compact.qxp
Gradient box behind
text prints prints 5m,
20y, 1k to white.
6/27/05
11:35 AM
Alternative site testing may be performed:
• Immediately before a meal
• When you are in a fasting state
• Near bedtime
Page 24
Alternative site testing should NOT be performed:
• After a meal (two hours or less)
• After exercise
• During sickness
• When you think your blood sugar is very low
(hypoglycemic)
• If you often don’t notice when you are
hypoglycemic
• When basal insulin is most active
• After injecting rapid-acting insulin
(two hours or less)
• NEVER ignore symptoms that may be due to low or high blood sugar.
• If your blood sugar result does not match how you feel, do a fingertip test to confirm your result.
If the fingertip result still does not match how you feel, call your doctor.
• Do not change your treatment based on just one result.
Chapter 3: Testing Your Blood Sugar
24
ACCU-CHEK Customer Care Service Center 1-800-858-8072
Chapter 3:
1: Testing
Your New
Meter
Chapter
Your
Blood Sugar
361_26758_Manual_AC_Compact.qxp
6/27/05
11:35 AM
Page 25
Follow Steps 1 through 3 in the section, Running a
Blood Sugar Test, then:
1. Make sure you are using the clear cap specially
designed for alternative site testing with the
ACCU-CHEK Softclix lancet device.
2. Adjust the clear cap to the highest setting.
3. Press and hold the lancet device against a fleshy
area on the alternative site. Press the release button
and continue to apply steady pressure to the site.
Don’t be afraid to apply pressure to the area with
the lancet device to get a good blood drop.
hould NOT be performed:
or less)
od sugar is very low
when you are
ost active
ng insulin
onfirm your result.
are Service Center 1-800-858-8072
Chapter 3:
1: Testing
Your New
Meter
Chapter
Your
Blood Sugar
25
ACCU-CHEK
Customer
Service Center
Center 1-800-858-8072
1-800-858-8072
ACCU-CHEK
Customer
Care Service
361_26758_Manual_AC_Compact.qxp
6/27/05
11:35 AM
Page 26
4. Immediately touch and hold the black notch on
the front edge of the test strip to the blood drop.
Do not pull away from the site until the meter
beeps or the 000 is displayed. You may apply
more blood for up to 25 seconds after applying
the first drop.
5. The 000 on the display gradually disappears and
the test result is displayed in 8 seconds. Test
results are automatically stored in the meter’s
memory.
6. Holding the meter upright, press
to
release the test strip and turn the meter off.
7. To remove the lancet, take off the lancet device
cap and point the lancet end away from yourself.
8. Slide out the ejector to discharge the lancet into a
puncture-proof container.
For more information about your test results,
see Understanding Your Test Results.
Chapter 3: Testing Your Blood Sugar
26
ACCU-CHEK Customer Care Service Center 1-800-858-8072
Notes:
• Do not operate without t
Maintenance and Trouble
• When applying blood, do
• Do not bend the test stri
• Never try to reuse a test
• Do not open the test dru
• After a blood sugar result
• If the display goes blank
the strip and turn off the
• Keep the test drum vial
to the numbers on the la
Proper Testing
• The temperature range m
outside this range, the me
Never artificially heat or co
• Humidity must be below 8
meter return to room temp
Chapter 3:
1: Testing
Your New
Meter
Chapter
Your
Blood Sugar
361_26758_Manual_AC_Compact.qxp
hold the black notch on
st strip to the blood drop.
m the site until the meter
splayed. You may apply
25 seconds after applying
gradually disappears and
yed in 8 seconds. Test
y stored in the meter’s
ght, press
to
nd turn the meter off.
ake off the lancet device
et end away from yourself.
discharge the lancet into a
er.
about your test results,
ur Test Results.
are Service Center 1-800-858-8072
6/27/05
11:35 AM
Page 27
Notes:
• Do not operate without the nose cover attached. For more information, see Chapter 5:
Maintenance and Troubleshooting.
• When applying blood, do not flood the test trip. Only a small blood drop is required.
• Do not bend the test strip.
• Never try to reuse a test strip that has been released from the meter.
• Do not open the test drum compartment when the motor is running.
• After a blood sugar result has been displayed for 60 seconds, the meter turns off automatically.
• If the display goes blank before the test strip is released, press
to release
the strip and turn off the meter.
• Keep the test drum vial until you are finished with the test drum. You’ll need to refer
to the numbers on the label when you run a control test.
Proper Testing Conditions
• The temperature range must be between 50-104°F (10-40°C) for accurate results. At temperatures
outside this range, the meter turns off or results are displayed with a thermometer symbol.
Never artificially heat or cool the meter.
• Humidity must be below 85% so that moisture doesn’t condense on or inside the meter. If it does, let the
meter return to room temperature and thoroughly dry before turning it on.
Chapter 3:
1: Testing
Your New
Meter
Chapter
Your
Blood Sugar
27
ACCU-CHEK
Customer
Service Center
Center 1-800-858-8072
1-800-858-8072
ACCU-CHEK
Customer
Care Service
Gradient box behind
“Notes” prints 5m,
20y, 1k to white.
“Proper Testing
Conditions ” prints
27m, 100y, 6k.
361_26758_Manual_AC_Compact.qxp
“Recording Your
Results ”,“Storing
Your Supplies”, and
“Understanding
Your Test Results ”
print 27m, 100y, 6k.
6/27/05
11:35 AM
Page 28
Recording Your Results
Symptoms of H
Always record your blood sugar results after testing. This will help you and your healthcare professional find
patterns in your blood sugar results. This information will help you better manage your diabetes, reducing
your chances for complications. Record your results in the self-test diary included in your kit, the meter’s
memory, or on your computer.
Being aware of the symptom
decide what to do if they see
High blood sugar (hyperglyce
headache, or general aching
Low blood sugar (hypoglycem
around mouth or fingertips.
If you are experiencing any
displayed as LO or HI, cont
Storing Your Supplies
Keep the test drum vial tightly closed until you install the drum in the meter. Make sure you close the control
solution bottles tightly after each use.
You can keep all your testing supplies in the carrying case. Store the carrying case (and everything in it)
where it won’t be exposed to heat or moisture. Your bedroom may be a good place.
Triangle icon prints
100m,43y, 18k with
“!” reversing-out
white.
Gradient box behind
“Never store...
them” prints 27m,
100y, 6k to white.
▲
!
Never store test strips in areas of high heat and moisture, such as the kitchen, bathroom
or laundry room—heat and moisture can damage them.
Understanding Your Test Results
Unusual Test R
If your blood sugar result doe
1. Run a control test (refer to
2. Repeat a blood sugar test
3. If your blood sugar results
Normal Blood Sugar Ranges
The fasting adult blood glucose range for a nondiabetic is between 74 mg/dL and less than 106 mg/dL.1
Two hours after meals, the blood glucose level for a nondiabetic is less than 140 mg/dL.2 Your doctor will
determine the range that is best for you.
Chapter 3: Testing Your Blood Sugar
28
ACCU-CHEK Customer Care Service Center 1-800-858-8072
Chapter 3: Testing Your Blood Sugar
361_26758_Manual_AC_Compact.qxp
6/27/05
11:35 AM
Page 29
Symptoms of High or Low Blood Sugar
ealthcare professional find
your diabetes, reducing
in your kit, the meter’s
sure you close the control
e (and everything in it)
e.
s the kitchen, bathroom
Being aware of the symptoms of high or low blood sugar can help you understand your test results and
decide what to do if they seem unusual. Here are the most common symptoms.
High blood sugar (hyperglycemia): fatigue, increased appetite or thirst, frequent urination, blurred vision,
headache, or general aching.
Low blood sugar (hypoglycemia): sweating, trembling, blurred vision, rapid heartbeat, tingling or numbness
around mouth or fingertips.
If you are experiencing any of these symptoms, test your blood sugar. If your blood sugar result is
displayed as LO or HI, contact your doctor immediately.
Unusual Test Results
If your blood sugar result doesn’t match the way you feel, follow these steps:
1. Run a control test (refer to Chapter 2: Control Testing).
2. Repeat a blood sugar test (refer to Chapter 3: Testing Your Blood Sugar).
3. If your blood sugar results still don’t reflect the way you feel call your doctor immediately.
ess than 106 mg/dL.1
mg/dL.2 Your doctor will
are Service Center 1-800-858-8072
Chapter 3: Testing Your Blood Sugar
29
ACCU-CHEK Customer Care Service Center 1-800-858-8072
“Symptoms of
HIgh or Low
Blood Sugar ”,
and “Unusual
Test Results ”
print 27m, 100y,
6k.
361_26758_Manual_AC_Compact.qxp
Gradient bar at
top prints 65c,
100m, 15k to
white.
6/27/05
11:35 AM
Page 30
Chapter 4: Using Your Meter’s Memory
Storing Test Results
Your meter automatically stores up to 100 test results, and you can review them
at any time.
If you’ve set the time and date on the meter (see Setting the Beeper, Year, Time,
and Date), this information is stored and displayed with your test results. If you
haven’t, test results are simply stored in order, from the newest to the oldest.
“Storing Test
Results”, and
“Viewing Test
Results ” print
65c, 100m,
15k.
View
With the
sugar re
Example
Viewing Test Results
1. With the meter off, press MEM.
The meter turns on without advancing a test strip. ON and 888 appear briefly.
Then, the most recent result, along with the date, time (if set), and the word
MEMO will be displayed.
2. Press SET to view your results from newest to oldest, one at a time.
3. Press MEM to move back toward newer results.
Example
You can hold down the SET or MEM buttons to scroll through your results
more quickly.
4. Press
to turn off the meter.
30
Example
Example
Chapter 4:
1: Using
Your New
Chapter
YourMeter
Meter’s Memo
361_26758_Manual_AC_Compact.qxp
y
6/27/05
11:35 AM
Page 31
Viewing Trend Information
With the ACCU-CHEK Compact meter, you can see your highest, lowest, and average blood
sugar results for the last seven days (if you’ve set the date and time on the meter).
“Viewing Trend
Information ”
prints 65c,
100m, 15k.
, and you can review them
ng the Beeper, Year, Time,
h your test results. If you
he newest to the oldest.
and 888 appear briefly.
me (if set), and the word
Example
Example
st, one at a time.
ll through your results
Example
Chapter 4:
1: Using
Your New
Chapter
YourMeter
Meter’s Memory
1. With the meter off, press MEM.
Wait for the most recent result and MEMO to be displayed.
2. Press MEM and SET at the same time.
The average result and the letter “A” are displayed.
3. Press MEM.
The highest stored result is displayed with the date and time.
4. Press MEM.
The lowest stored result is displayed with the date and time.
5. Press
to turn off the meter or press MEM to return to
the average result and repeat the sequence.
(See Notes on following page.)
31
ACCU-CHEK
Customer
ACCU-CHEK
Customer
Care Service
Service Center
Center 1-800-858-8072
1-800-858-8072
Gradient bar at
bottom prints
65c, 100m, 15k.
to white with
“Chapter 4: ...
Memory”
reversed-out
white; pages 31
thru 33.
361_26758_Manual_AC_Compact.qxp
Gradient box
behind “Notes”
prints 13c, 20m,
3k to white.
6/27/05
11:35 AM
Page 32
Transferring Da
Notes:
• Do not change your therapy based on an individual result recorded in memory.
• Results stored in memory will not be lost when you replace the batteries,
but you will need to reset the time and date.
• Once 100 results are in memory, adding a new test result causes
the oldest one to be deleted.
Downloading Your Meter to a Computer or PDA
“Downloading
Your Meter to a
Computer or
PDA ” prints 65c,
100m, 15k.
You can transfer your stored results to a computer or PDA to track, identify patterns and print them out.
To download your results, you’ll need:
• ACCU-CHEK IR cable (catalog no. 3183408)
• ACCU-CHEK Compass software (catalog no. 3134008)
or
• ACCU-CHEK Pocket Compass software (catalog no. 3266184)
Notes:
To order, contact the ACCU-CHEK Customer Care sevice center at 1-800-858-8072 or visit
www.accu-chek.com for a product demonstration and to place an order online.
Chapter 4: Using Your Meter’s Memory
32
ACCU-CHEK Customer Care Service Center 1-800-858-8072
• If the data did not transfe
• To make the most of the
Chapter 4: Using Your Meter’s Memo
361_26758_Manual_AC_Compact.qxp
6/27/05
11:35 AM
Page 33
Transferring Data
1. Install the software according to the instructions.
2. Run the software program and follow the instructions about how
to download information.
Make sure the software is ready to accept data from the meter.
3. Locate the infrared (IR) window on the top of the meter.
4. Locate the IR window on the infrared cable or PDA.
5. Point the two IR windows toward each other. They should be no more
than 4 inches (10 cm) apart.
6. Open the display cover.
7. With the meter off, press SET and MEM at the same time.
mory.
or PDA
s and print them out.
“Transferring
Data ” prints
65c, 100m, 15k.
Two arrows appear on the meter display while the data is downloading to
your computer. When the download is complete, the meter turns off and
the computer displays a message that the transfer is complete.
Notes:
or visit
are Service Center 1-800-858-8072
• If the data did not transfer successfully, call the ACCU-CHEK Customer Care service center.
• To make the most of the download feature, you must set the year, date, and time in your meter.
Chapter 4: Using Your Meter’s Memory
33
ACCU-CHEK Customer Service Center 1-800-858-8072
Gradient box
behind “Notes”
prints 13c, 20m,
3k to white.
361_26758_Manual_AC_Compact.qxp
Gradient bar
at top and
behind
Triangle Icon
prints 100c,
47y, 15k to
white.
Triangle icon
prints 100m,
43y, 18k with
“!” reversingout white.
6/27/05
11:35 AM
Page 34
Chapter 5: Maintenance and Troubleshooting
Attaching the Nose Cover
!
▲
The nose cover of the ACCU-CHEK Compact meter must always be attached
when running a blood sugar test or a control test.
How to Remove and Attach the Nose Cover
1. The ACCU-CHEK Compact meter with the
nose cover in place.
“Attaching the
Nose Cover”
prints 100c,
47y, 15k.
2. Take off the removable nose cover by
gently squeezing both sides and lifting
it up.
4. Put the nose cover back on by snapping
down one side at a time. Make sure
you hear two clicks. The nose cover
must be snapped down completely or
the test strip won’t advance properly.
Cleaning Your Meter
Caring fo
dirty, wip
alcohol
If there i
these st
1. Take
2. Gentl
(ethy
imme
3. Put th
cove
When to Remove the Nose Cover
• If there is any blood in the test strip opening or if
your meter displays the OFF message, see
Cleaning Your Meter, in this chapter.
3. The ACCU-CHEK Compact meter with the
nose cover removed. The small measurement
window can now be seen.
If you have questions about removing or
attaching the nose cover, call the ACCU-CHEK
Customer Care service center at 1-800-858-8072.
34
Note
Some
• Use
and
• Spra
• Put
• Pou
Chapter 5: Maintenance and Troubles
361_26758_Manual_AC_Compact.qxp
hooting
must always be attached
on by snapping
. Make sure
nose cover
completely or
nce properly.
6/27/05
11:35 AM
Page 35
Cleaning Your Meter
Caring for your ACCU-CHEK Compact meter is easy. If the display or the outside of the meter is
dirty, wipe it off with a slightly damp cloth or cotton swab. You may use water, 10% bleach, 70%
alcohol (ethyl alcohol) or 70% rubbing alcohol (isopropyl alcohol).
If there is any blood in the test strip opening or if your meter displays the OFF message, follow
these steps to clean it:
1. Take off the removable nose cover by gently squeezing both sides and lifting it up.
2. Gently wipe the small measurement window. You may use water, 10% bleach, 70% alcohol
(ethyl alcohol) or 70% rubbing alcohol (isopropyl alcohol). Wipe these fluids off
immediately after application.
3. Put the cover back on by snapping down one side at a time. Make sure you hear two clicks. The
cover must be snapped down completely or the strip won’t advance properly.
he Nose Cover
n the test strip opening or if
he OFF message, see
n this chapter.
t removing or
all the ACCU-CHEK
nter at 1-800-858-8072.
Notes:
Some cleaning methods can damage your meter. To protect it, DO NOT:
• Use vinegar or scouring agents to clean the meter because they can harm the display
and measurement window
• Spray any cleaning solution directly onto the meter
• Put the meter under water (or any liquid)
• Pour liquid into the meter
Chapter 5: Maintenance and Troubleshooting
35
ACCU-CHEK Customer Care Service Center 1-800-858-8072
Gradient box
behind “Notes”
prints 20c, 9y,
3k to white.
361_26758_Manual_AC_Compact.qxp
“Maintenance
and Testing ”, and
“Cleaning Your
Lancet Device ”
print 100c, 47y,
15k.
6/27/05
11:35 AM
Page 36
Maintenance and Testing
Screen Messa
Your meter needs little or no maintenance with normal use.
It automatically tests its own systems every time you turn it on and lets
you know if something is wrong. (See Screen Messages and
Troubleshooting for error messages and what to do about them.)
If you drop the meter or think it’s not giving accurate readings, make sure
that your test drum and control solution haven’t expired, then run a
control test.
To make sure the display is working properly, turn off the meter, then press
and hold down
to see the complete display. All the sections
should be clear and should look exactly like the picture to the left. If not,
call the ACCU-CHEK Customer Care service center at 1-800-858-8072.
!
▲
Never make trea
please call the A
day, 365 days a y
The meter won’t tur
Pos
Batte
Temp
Displ
Cleaning Your Lancet Device
Gradient bar at
bottom prints
100c, 47y, 15k to
white with
“Chapter 5: ...
Troubleshooting”
reversed-out
white; pages 35
thru 42.
Mete
To clean the ACCU-CHEK Softclix lancet device, use a mild dishwashing liquid and a soft cloth. DO NOT place
the entire device under water. At least once a week, disinfect the cap after cleaning by placing it in 70%
alcohol (ethyl alcohol) or 70% rubbing alcohol (isopropyl alcohol) for 10 minutes. Allow the cap to air-dry after
disinfecting.
New Meter
Chapter 1:
5: Your
Maintenance
and Troubleshooting
36
ACCU-CHEK
Customer
ACCU-CHEK
Customer
Care Service Center 1-800-858-8072
The me
(If OFF
Date.
Chapter 1:
New Meter
Chapter
5: Your
Maintenance
and Troubles
361_26758_Manual_AC_Compact.qxp
6/27/05
11:35 AM
Page 37
Screen Messages and Troubleshooting
normal use.
me you turn it on and lets
Messages and
o do about them.)
curate readings, make sure
t expired, then run a
rn off the meter, then press
splay. All the sections
picture to the left. If not,
er at 1-800-858-8072.
a soft cloth. DO NOT place
g by placing it in 70%
low the cap to air-dry after
mer
are Service Center 1-800-858-8072
!
▲
Never make treatment decisions based on an error message. If you have any concerns,
please call the ACCU-CHEK Customer Care service center at 1-800-858-8072, 24 hours a
day, 365 days a year.
The meter won’t turn on or the display is blank.
Possible cause
Triangle icon prints
100m,43y, 18k with
“!” reversing-out
white.
Solution
Batteries are dead.
Insert new batteries.
Temperature is too cold.
Move somewhere warmer and repeat test.
Display is damaged.
Call the ACCU-CHEK Customer Care service center.
Meter is defective.
Call the ACCU-CHEK Customer Care service center.
The meter is in “set” mode, waiting for you to change settings. The beeper is turned on.
(If OFF is displayed, the beeper is turned off.) See Setting the Beeper, Year, Time, and
Date.
Chapter 1:
New Meter
Chapter
5: Your
Maintenance
and Troubleshooting
“Screen... Troubleshooting ”, and
“The Meter won’t...
blank” print 100c,
47y, 15k.
37
ACCU-CHEK
Customer
ACCU-CHEK
Customer
Care Service
Service Center
Center 1-800-858-8072
1-800-858-8072
Gradient box behind
“Never make...
year” prints 27m,
100y, 6k to white.
Gradient box behind
chart prints 20c, 9y,
3k to white.
361_26758_Manual_AC_Compact.qxp
6/27/05
11:35 AM
Page 38
The meter is ready for a drop of
blood to be put on the strip.
This is a display check. If any parts
or number segments are missing or
unclear, call the ACCU-CHEK
Customer Care service center at
1-800-858-8072.
The temperature is above or below
the limits of the meter (below 41
or above 113°F). Move to an area
between 50 and 104°F, wait 30
minutes or more and repeat the
test after the meter has reached
the new temperature. Do not
artificially heat or cool the meter.
All screen shots in
Chapter 5 are 4/C
Battery power is low. Change
the batteries soon. OR batteries
are almost out of power. Change
them now.
Blood sugar is higher than the
measuring range of the system
(600 mg/dL). See Symptoms of
High or Low Blood Sugar.
This reading may not be accurate
because the test was performed
outside the best operating
temperature range of the system
(50-104°F). Results are displayed
at temperatures within 41 and 113°F.
Blood sugar is lower than the
measuring range of the system
(10 mg/dL). See Symptoms of
High or Low Blood Sugar.
New Meter
Chapter 1:
5: Your
Maintenance
and Troubleshooting
38
ACCU-CHEK
Customer
ACCU-CHEK
Customer
Care Service Center 1-800-858-8072
The test dr
empty. Inse
message i
the ACCUservice ce
1-800-858
Note: A do
the view w
of the met
There was
the test str
Repeat the
drop of blo
A test erro
Repeat the
again, plea
CHEK Cus
at 1-800-
New Meter
Chapter 1:
5: Your
Maintenance
and Troubles
361_26758_Manual_AC_Compact.qxp
display check. If any parts
er segments are missing or
call the ACCU-CHEK
r Care service center at
58-8072.
perature is above or below
s of the meter (below 41
113°F). Move to an area
50 and 104°F, wait 30
or more and repeat the
r the meter has reached
temperature. Do not
y heat or cool the meter.
ding may not be accurate
the test was performed
he best operating
ture range of the system
°F). Results are displayed
ratures within 41 and 113°F.
mer
are Service Center 1-800-858-8072
6/27/05
11:35 AM
Page 39
The door was opened and closed
with a partly used test drum inside,
or a partly used test drum was
inserted.
You should run a control test (see
Why Run Control Tests?) to verify
that the test drum is useable. The
flashing test drum symbol will still
be displayed until you insert a new
test drum.
The test drum in the meter is
empty. Insert a new drum. If the
message is still displayed, call
the ACCU-CHEK Customer Care
service center at
1-800-858-8072.
Note: A dot also appears in
the view window on the back
of the meter.
There was not enough blood on
the test strip to start the test.
Repeat the test with a larger
drop of blood.
A test error has occurred.
Repeat the test. If
occurs
again, please contact the ACCUCHEK Customer Care service center
at 1-800-858-8072.
New Meter
Chapter 1:
5: Your
Maintenance
and Troubleshooting
39
ACCU-CHEK
Customer
ACCU-CHEK
Customer
Care Service Center 1-800-858-8072
All screen shots in
Chapter 5 are 4/C
361_26758_Manual_AC_Compact.qxp
All screen shots in
Chapter 5 are 4/C
6/27/05
11:35 AM
Page 40
The test drum 90-day use-by
period has expired. If the correct
time and date were set on the
meter and the door has not been
opened since the installation of
the test drum, then discard the
old test drum and insert a new
test drum.
The bar code information stored
in the meter is lost or unusable.
Open and close the test drum
compartment. Make sure a test
drum is loaded in the meter.
There is no test drum in the
meter, or the bar code on the
drum is damaged.
Insert a new test drum.
The test s
removed d
measurem
not on cor
Make sure
on tightly
Meter), the
the results
the strip b
The test s
guide.
Pull the st
and disca
test drum
(Remembe
counter in
longer be
symbol wi
a new dru
New Meter
Chapter 1:
5: Your
Maintenance
and Troubleshooting
40
ACCU-CHEK
Customer
ACCU-CHEK
Customer
Care Service Center 1-800-858-8072
Chapter 1:
New Meter
Chapter
5: Your
Maintenance
and Troubles
361_26758_Manual_AC_Compact.qxp
st drum 90-day use-by
has expired. If the correct
nd date were set on the
and the door has not been
d since the installation of
t drum, then discard the
t drum and insert a new
um.
6/27/05
11:35 AM
Page 41
The test strip was bent or
removed during testing, or the
measurement window cover is
not on correctly.
Make sure the cover is snapped
on tightly (see Cleaning Your
Meter), then repeat the test. After
the results are displayed, release
the strip by pressing the
.
The meter is defective.
Call the ACCU-CHEK Customer Care
service center at 1-800-858-8072.
The test strip is stuck in the
guide.
Pull the strip out of the meter,
and discard it. Then, take the
test drum out and reinsert it.
(Remember the 90-day use-by
counter in the meter will no
longer be correct. The drum
symbol will flash until you install
a new drum.)
mer
are Service Center 1-800-858-8072
Chapter 1:
New Meter
Chapter
5: Your
Maintenance
and Troubleshooting
41
ACCU-CHEK
Customer
ACCU-CHEK
Customer
Care Service
Service Center
Center 1-800-858-8072
1-800-858-8072
All screen shots in
Chapter 5 are 4/C
361_26758_Manual_AC_Compact.qxp
All screen shots in
Chapter 5 are 4/C
6/27/05
11:35 AM
Page 42
• Blood was applied to the strip
too soon.
Turn the meter off, then back on.
Repeat the test, waiting for the
hand symbol in the display
before touching blood or control
solution to the strip.
• The meter was turned off and on
again, but the strip is still in the
meter.
Hold the meter straight up and down
and let the strip drop out, or take it
out manually, even if it takes a small
amount of force.
• The measurement window is
dirty.
Clean the measurement window
area (see Cleaning Your Meter)
and repeat the test.
• The test strip was taken out during
testing.
Repeat the test, then release the strip
by pressing the
.
• The strip was bent during the test.
Repeat the test with a new strip.
• The test strip cannot be used.
Repeat the test with a new strip.
• The test strips are too old.
Insert a new test drum and repeat
the test.
New Meter
Chapter 1:
5: Your
Maintenance
and Troubleshooting
42
ACCU-CHEK
Customer
ACCU-CHEK
Customer
Care Service Center 1-800-858-8072
Chapter 6: Tec
Product Limitations
Please read the literature pac
specifications and limitations
Specifications
Automatic po
Power
Batt
In
LE
Met
Measuring
Sam
Measuri
System operating con
361_26758_Manual_AC_Compact.qxp
s turned off and on
strip is still in the
r straight up and down
ip drop out, or take it
even if it takes a small
ce.
was taken out during
t, then release the strip
e
.
bent during the test.
t with a new strip.
are too old.
est drum and repeat
mer
are Service Center 1-800-858-8072
6/27/05
11:35 AM
Page 43
Chapter 6: Technical Information
Gradient bar at
top is 44k to
white.
Product Limitations
Please read the literature packaged with your test drum to find the latest information on product
specifications and limitations.
Specifications
Display
Automatic power-off
Power supply
Battery life
Interface
LED/IRED
Meter type
Measuring range
Sample size
Measuring time
System operating conditions
Digital LCD with symbols
After 60 seconds / 5 minutes (depending on testing status)
AAA alkaline batteries (do not use rechargeable)
Approximately 500 tests
Infrared interface
Class I
Reflectance photometric
10 - 600 mg/dL (0.6 - 33.3 mmol/L)
Refer to the test drum package insert
8 seconds
50°F to 104°F (10°C to 40°C)
43
“Product
Limitations ”
and “Specifications ” print
44k.
361_26758_Manual_AC_Compact.qxp
“Product Safety
Information ”
prints 44k.
“Accu-Chek
Compact... ”
prints 44%
black.
6/27/05
Meter storage conditions
Test drum storage conditions
Relative humidity operating range
Memory capacity
Dimensions
Weight
Lancet Device Depths
11:35 AM
Page 44
With batteries and test drum: 36°F to 86°F (2°C to 30°C)
36°F to 86°F (2°C to 30°C)
Less than 85% relative humidity
100 blood glucose values with time and date
4 x 2 x 1.2 inches (103 x 52 x 31 mm)
Approximately 4.2 oz. (120 g) with batteries and test drum
0.80, 0.95, 1.10, 1.25, 1.40, 1.55, 1.70, 1.85,
2.00, 2.15, 2.30 mm
Explanation of Symbols
CAUTION
Please refer to safetyrelated notes in the
manual accompanying
this instrument.
AAA batteries
1: Technical
Your New Information
Meter
Chapter 6:
Roche Diagnostics warrants to
free from defects in materials
period, the meter does not wo
replace it with a new ACCU-CH
replacement meter will expire
of a replacement system, whic
CHEK Compact meter shall be
This warranty does not apply
by accident or has been alte
handle meters that show dam
next page.
Product Safety Information
Gradient bar at
bottom prints
44k to white
with “Chapter 6:
... Information”
reversed-out
white; pages 44
thru 52.
ACCU-CHEK Co
The ACCU-CHEK Compact This product fulfills the
Meter has been listed by
requirements of
Underwriter’s Laboratories, Directive 98/79/EC on
Inc.‚ in accordance with UL
in vitro diagnostic
3101-1 and CAN/CSA C22.2
medical devices.
No. 1010-1.
44
This product fulfills
the requirements of
Directive 93/42/EEC
for medical devices.
ACCU-CHEK
Customer
ACCU-CHEK
Customer
Care Service Center 1-800-858-8072
THE ABOVE WARRANTY IS EX
OTHER WARRANTIES, EXPRE
MERCHANTABILITY OR FITNE
LIABLE TO THE PURCHASER
SPECIAL, OR PUNITIVE DAMA
OPERATION OF THE METER O
PARTICULAR PURPOSE, IF AN
DURATION THAN THREE YEA
Chapter 6:
1: Technical
Your New Information
Meter
Chapter
361_26758_Manual_AC_Compact.qxp
6°F (2°C to 30°C)
date
eries and test drum
1.85,
6/27/05
11:35 AM
Page 45
ACCU-CHEK Compact Meter Limited 3-Year Warranty
Roche Diagnostics warrants to the original purchaser of the meter that your ACCU-CHEK Compact meter will be
free from defects in materials and workmanship for 3 years from the date of purchase. If, during this 3-year
period, the meter does not work properly because of a defect in materials or workmanship, Roche Diagnostics will
replace it with a new ACCU-CHEK Compact meter or equivalent product free of charge. The warranty of the
replacement meter will expire on the date of the original warranty expiration or ninety (90) days after the shipment
of a replacement system, whichever period is longer. The purchaser’s exclusive remedy with respect to the ACCUCHEK Compact meter shall be replacement.
This warranty does not apply to the performance of an ACCU-CHEK Compact meter that has been damaged
by accident or has been altered, misused, tampered with, or abused in any way. Roche Diagnostics will
handle meters that show damage or abuse according to its Non-Warranty Service Policy described on the
next page.
ills the
s of
/EC on
ostic
ces.
This product fulfills
the requirements of
Directive 93/42/EEC
for medical devices.
mer
are Service Center 1-800-858-8072
THE ABOVE WARRANTY IS EXCLUSIVE OF ALL OTHER WARRANTIES, AND ROCHE DIAGNOSTICS MAKES NO
OTHER WARRANTIES, EXPRESS OR IMPLIED, INCLUDING WITHOUT LIMITATION, THE IMPLIED WARRANTY OF
MERCHANTABILITY OR FITNESS FOR A PARTICULAR PURPOSE. IN NO EVENT SHALL ROCHE DIAGNOSTICS BE
LIABLE TO THE PURCHASER OR ANY OTHER PERSON FOR ANY INCIDENTAL, CONSEQUENTIAL, INDIRECT,
SPECIAL, OR PUNITIVE DAMAGES ARISING FROM OR IN ANY WAY CONNECTED WITH THE PURCHASE OR
OPERATION OF THE METER OR ITS PARTS. NO WARRANTY OF MERCHANTABILITY OR FITNESS FOR A
PARTICULAR PURPOSE, IF ANY IS IMPLIED FROM THE SALE OF THE METER, SHALL EXTEND FOR A LONGER
DURATION THAN THREE YEARS FROM THE DATE OF PURCHASE.
Chapter 6:
1: Technical
Your New Information
Meter
Chapter
45
ACCU-CHEK
Customer
Service Center
Center 1-800-858-8072
1-800-858-8072
ACCU-CHEK
Customer
Care Service
“ACCU-CHEK
Compact... ”
prints 44%
black.
361_26758_Manual_AC_Compact.qxp
6/27/05
11:35 AM
Page 46
Some states do not allow limitations on how long an implied warranty will last or the exclusion of incidental or
consequential damages, so the above elimination and exclusion may not apply to you. This warranty gives you specific
legal rights, which vary from state to state.
Money-Back Guarantee
Money-back offer conditions and exceptions: This money-back offer is void for persons enrolled in, or for any
prescriptions reimbursed by, a third-party payer including public (e.g. Medicare/Medicaid) and private payers.
Consumers affected by this exclusion may instead request a different ACCU-CHEK meter/system.
Non-Warranty Service Policy
Roche Diagnostics’ Non-Warranty Service Policy applies to meters where the above warranty has not become
effective, has become inapplicable, or has expired. Roche Diagnostics will replace at its option meters returned to
it for a service charge (not to exceed $35). Replacement will be with the same or similar product.
Replacement meters will be warranted for a period of 90 days from shipment under a limited warranty providing
for replacement of parts and labor at no charge.
Warranty and Service Instructions
All requests for return of ACCU-CHEK Compact meters under the above warranty or service policy must be made
to the ACCU-CHEK Customer Care service center by calling 1-800-858-8072. You will be mailed a return
authorization label, which must be affixed to your carton for shipping the system to Roche Diagnostics. Cartons
received without this label will be returned to you at your expense.
Customers experiencing difficulties should review Maintenance and Troubleshooting in this booklet. Further
inquiries should be directed to the ACCU-CHEK Customer Care service center at 1-800-858-8072.
Be sure to fill out and mail the warranty card that comes with the ACCU-CHEK Compact system.
1: Technical
Your New Information
Meter
Chapter 6:
46
ACCU-CHEK
Customer
ACCU-CHEK
Customer
Care Service Center 1-800-858-8072
!
▲
CAUTION: A REST
READ CAREFULLY
The ACCU-CHEK Softclix lancet de
the ACCU-CHEK Softclix lancet de
Softclix lancet device.
This product, including the monito
following U.S. patents: 5,206,147
5,660,791; 5,720,924; 5,738,244
ACCU-CHEK Compact system is o
drums and test strips. ACCU-CHEK
drum. These test drums and asso
meter. Use of other test strips or t
manufacturer may prevent or imp
Using the ACCU-CHEK Compact s
system only with ACCU-CHEK Com
monitoring kit or an ACCU-CHEK C
regardless of any additional offers
If you do not agree to the terms a
ACCU-CHEK Compact system for
center at 1-800-858-8072.
Except where prohibited by statut
ACCU-CHEK Compact system with
Chapter 6:
1: Technical
Your New Information
Meter
Chapter
361_26758_Manual_AC_Compact.qxp
ion of incidental or
warranty gives you specific
6/27/05
11:35 AM
Page 47
!
▲
CAUTION: A RESTRICTED LICENSE LIMITS USE OF THE ACCU-CHEK COMPACT SYSTEM–
READ CAREFULLY THE LIMITATIONS RECITED BELOW.
g in this booklet. Further
800-858-8072.
K Compact system.
The ACCU-CHEK Softclix lancet device and its use are protected by U.S. Patent Nos. 4,924,879 and Re. 35,803. A license to use
the ACCU-CHEK Softclix lancet device is only granted when ACCU-CHEK Softclix lancets are used as a part of the ACCU-CHEK
Softclix lancet device.
This product, including the monitor and drum (including the test strips), and its use may be covered by one or more of the
following U.S. patents: 5,206,147; 5,240,860; 5,334,508; 5,382,523; 5,510,266; 5,521,060; 5,575,403; 5,630,986; 5,632,410;
5,660,791; 5,720,924; 5,738,244; 5,810,199; 5,863,800; 6,036,919; 6,497,845; and D 448,294. A license to use the
ACCU-CHEK Compact system is only granted when the ACCU-CHEK Compact meter is used with ACCU-CHEK Compact test
drums and test strips. ACCU-CHEK Compact test strips are provided with a specifically matched bar code on the associated test
drum. These test drums and associated bar codes are specifically manufactured for operation with the ACCU-CHEK Compact
meter. Use of other test strips or test drums with unmatched bar codes or even with a matched bar code supplied by another
manufacturer may prevent or impair the proper function of the ACCU-CHEK Compact system.
Using the ACCU-CHEK Compact system indicates your acceptance of the restricted license to use the ACCU-CHEK Compact
system only with ACCU-CHEK Compact test drums and test strips. Further, if you have purchased an ACCU-CHEK Compact
monitoring kit or an ACCU-CHEK Compact meter that includes this restricted license, then this restricted license applies
regardless of any additional offers found in ACCU-CHEK Compact meter or ACCU-CHEK Compact test drum packages.
If you do not agree to the terms and conditions of the restricted license, you may return, at the place of purchase, the unused
ACCU-CHEK Compact system for a full refund. If you have any questions, please call the ACCU-CHEK Customer Care service
center at 1-800-858-8072.
Except where prohibited by statute, all warranties covering the ACCU-CHEK Compact system are voided by use of the
ACCU-CHEK Compact system with any test drums or test strips other than ACCU-CHEK Compact test drums or test strips.
mer
are Service Center 1-800-858-8072
Chapter 6:
1: Technical
Your New Information
Meter
Chapter
sons enrolled in, or for any
aid) and private payers.
er/system.
arranty has not become
s option meters returned to
lar product.
limited warranty providing
rvice policy must be made
be mailed a return
oche Diagnostics. Cartons
47
ACCU-CHEK
Customer
Service Center
Center 1-800-858-8072
1-800-858-8072
ACCU-CHEK
Customer
Care Service
Triangle icon prints
100m,43y, 18k
with “!” reversingout white.
Gradient box
behind “Caution...
below.” prints
27m, 100y, 6k to
white.
361_26758_Manual_AC_Compact.qxp
“Additional
Supplies ”
prints 44k.
6/27/05
11:35 AM
Page 48
Patent Information
This product, including the monitor and drum (including the test strips), and its use may be covered by one or
more of the following U.S. patents: 5,206,147; 5,240,860; 5,334,508; 5,382,523; 5,510,266; 5,521,060;
5,575,403; 5,630,986; 5,632,410; 5,660,791; 5,720,924; 5,738,244; 5,810,199; 5,863,800; 6,036,919;
6,497,845; and D 448,294.
Additional Supplies
The following supplies and accessories are available from authorized diabetes healthcare centers, pharmacies or
medical/surgical supply dealers:
Test Drums
ACCU-CHEK Compact Test Drums (51 count)
ACCU-CHEK Compact Test Drums (102 count)
Control Solutions*
ACCU-CHEK Compact Control Solution
*ACCU-CHEK Compact Blue control solution may not be available in all countries.
Lancets
ACCU-CHEK Softclix Lancet Device
ACCU-CHEK Softclix Lancets (100/box)
ACCU-CHEK Softclix Lancets (200/box)
1: Technical
Your New Information
Meter
Chapter 6:
48
ACCU-CHEK
Customer
ACCU-CHEK
Customer
Care Service Center 1-800-858-8072
Information for
!
▲
Healthcare Profe
facility.
Decisions about whether to reco
knowledge level of the patient an
If you are considering recommen
difference between fingertip and
blood perfusion throughout the b
effects vary between individuals
condition. Our studies involving a
level changes more quickly in th
levels are falling or rising rapidly
or she should consider the delay,
We strongly recommend tha
• AST is not recommended durin
• AST is not recommended for p
extremely low, or who are unaw
• Studies show that AST results
• NEVER ignore symptoms that m
Chapter 6:
1: Technical
Your New Information
Meter
Chapter
361_26758_Manual_AC_Compact.qxp
y be covered by one or
10,266; 5,521,060;
3,800; 6,036,919;
re centers, pharmacies or
6/27/05
11:35 AM
Page 49
Information for Professional Caregivers
!
▲
Healthcare Professionals: Follow the infection control procedures appropriate for your
facility.
Decisions about whether to recommend alternative site testing (AST) should take into account the motivation and
knowledge level of the patient and his or her ability to understand the considerations relative to diabetes and AST.
If you are considering recommending AST for your patients, you need to understand that there is a potential for a significant
difference between fingertip and alternative site blood glucose results. The difference in capillary bed concentration and
blood perfusion throughout the body can lead to blood sample site-to-site differences in glucose results. These physiological
effects vary between individuals and can vary within a single individual based upon his or her behavior and relative physical
condition. Our studies involving alternative site testing of adults with diabetes show that most persons will find their glucose
level changes more quickly in the fingers’ blood than the alternative sites’ blood. This is especially important when glucose
levels are falling or rising rapidly. If your patient is used to making treatment decisions based upon fingerstick readings, he
or she should consider the delay, or lag-time, affecting the reading obtained from an alternative site.
We strongly recommend that people considering AST understand the following:
ries.
mer
are Service Center 1-800-858-8072
• AST is not recommended during periods of rapid decreases or increases in blood glucose levels.
• AST is not recommended for people with a history of recurrent hypoglycemia, who suspect that their blood glucose is
extremely low, or who are unaware of hypoglycemic events.
• Studies show that AST results immediately before a meal and near bedtime are more similar to fingertip results.
• NEVER ignore symptoms that may be due to low or high blood glucose.
Chapter 6:
1: Technical
Your New Information
Meter
Chapter
49
ACCU-CHEK
Customer
Service Center
Center 1-800-858-8072
1-800-858-8072
ACCU-CHEK
Customer
Care Service
“Information for
Professional
Caregivers ” prints
44k.
Triangle icon prints
100m,43y, 18k with
“!” reversing-out
white.
Gradient box behind
“Healthcare...
facility.” prints 27m,
100y, 6k to white.
361_26758_Manual_AC_Compact.qxp
“References ”
and “Index ”
print 44k.
6/27/05
11:35 AM
Page 50
References
1. Stedman, Thomas Lathrop, Stedman’s Medical Dictionary, 27th Edition, 1999, pg. 2082.
2. American Diabetes Association, “Clinical Practice Recommendations 2004.” Diabetes Care, Vol. 27,
Supplement 1, pg. S9.
Index
ACCU-CHEK Softclix Lancet
Device, 19 – 20
Alternative Site Testing, 23
appetite, increased, 29
battery, changing, 10
battery, installing, 10
battery, type, 10
beeper settings, 11 – 12
blood drop, 21
blood sugar, high, 29
blood sugar, low, 29
blood sugar, testing, 21 – 23
1: Technical
Your New Information
Meter
Chapter 6:
blurred vision, 29
computer, connecting your
meter to, 32
control solution, 13 – 14
control test results,
understanding, 17 – 18
control test, acceptable
range, 17
control test, 14 – 17
control test, unacceptable
range, 17
date, expiration, 13, 18
50
dehydration, 3
depth, lancet, 20, 44
diary, 28
display check, 36
drop, blood, 21
error messages, 37 – 42
expiration date, 13, 18
fatigue, 29
frequent urination, 29
heartbeat, rapid, 29
high blood sugar, 29
hyperglycemia, 29
ACCU-CHEK
Customer
ACCU-CHEK
Customer
Care Service Center 1-800-858-8072
hypoglycemia, 29
information, technical, 43 – 4
lancet depth, 20, 44
lancet device, 19
lancet, 19
limitations, product, 43
low blood sugar, 29
maintenance, meter, 34
memory, meter, 30 – 32
messages, error, 37 – 42
meter memory, 30 – 32
meter screens, 37 – 42
meter, ACCU-CHEK
Compact, 2, 6 – 7
numbness, 29
product limitations, 43
Chapter 6:
1: Technical
Your New Information
Meter
Chapter
361_26758_Manual_AC_Compact.qxp
. 2082.
betes Care, Vol. 27,
ation, 3
ancet, 20, 44
8
check, 36
ood, 21
essages, 37 – 42
on date, 13, 18
29
t urination, 29
at, rapid, 29
ood sugar, 29
ycemia, 29
mer
are Service Center 1-800-858-8072
hypoglycemia, 29
information, technical, 43 – 44
lancet depth, 20, 44
lancet device, 19
lancet, 19
limitations, product, 43
low blood sugar, 29
maintenance, meter, 34
memory, meter, 30 – 32
messages, error, 37 – 42
meter memory, 30 – 32
meter screens, 37 – 42
meter, ACCU-CHEK
Compact, 2, 6 – 7
numbness, 29
product limitations, 43
Chapter 6:
1: Technical
Your New Information
Meter
Chapter
6/27/05
11:35 AM
Page 51
product specifications, 43
professional caregivers, 49
rapid heartbeat, 29
results, control test,
understanding, 17 – 18
results, logging, 28
results, test,
understanding, 28
screens, meter, 37 – 42
Softclix Lancet Device, 19
specifications, product, 43
storing supplies, 28
supplies, 48
sweating, 29
symbols, 44
technical information,
43 – 44
51
test results, understanding, 28
test results, unusual, 29
test drum,
ACCU-CHEK Compact, 7
test, blood sugar, 21 – 22
thirst, increased, 29
time and date, setting, 11
tingling, 29
trembling, 29
troubleshooting, 37 – 42
unusual test results, 29
urination, frequent, 29
vision, blurred, 29
warranty, 45
water loss, 3
www.accu-chek.com, 1
ACCU-CHEK
Customer
Service Center
Center 1-800-858-8072
1-800-858-8072
ACCU-CHEK
Customer
Care Service
361_26758_Manual_AC_Compact.qxp
“Notes ” prints
44k.
6/27/05
11:35 AM
Page 52
Notes
1: Technical
Your New Information
Meter
Chapter 6:
52
ACCU-CHEK
Customer
ACCU-CHEK
Customer
Care Service Center 1-800-858-8072
361_26758_Manual_AC_Compact.qxp
6/27/05
11:35 AM
Page 53
Inside back
cover
mer
are Service Center 1-800-858-8072
361_26758_Manual_AC_Compact.qxp
“ACCU-CHEK
Customer Care...
www.ACCUCHEK.com ” prints
100c, 47y, 15k.
6/27/05
11:35 AM
Page 54
ACCU-CHEK Compact
®
ACCU-CHEK Customer Care Service Center 1-800-858-8072
www.accu-chek.com
©2005 Roche Diagnostics. All rights reserved.
Assembled for and distributed in the U.S.A. by Roche Diagnostics, Indianapolis, IN
Made in Ireland
Roche Diagnostics
9115 Hague Road
Indianapolis, IN 46256
ACCU-CHEK, ACCU-CHEK COMPACT, SOFTCLIX, ACCU-CHEK COMPASS, and
ACCU-CHEK POCKET COMPASS are trademarks of Roche.
03503097005-0605