1
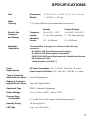
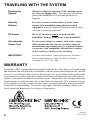
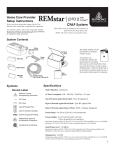
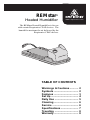
REMstar®
Heated Humidifier
www.respironics.com
The REMstar Heated Humidifier is for use
with certain Respironics CPAP devices. The
humidifier moistens the air delivered by the
Respironics CPAP devices.
TABLE OF CONTENTS
Warnings & Cautions ...........
Symbols ................................
Features ................................
Set Up ....................................
Daily Use ...............................
Cleaning ................................
Service ..................................
Specifications .......................
Traveling ...............................
Warranty ................................
2
2
3
4
5
6
6
7
8
8
WARNINGS AND CAUTIONS!
IMPORTANT!
Read all instructions before using the humidifier.
Use only with Respironics CPAP devices whose instructions specify the use
of this humidifier.
CAUTIONS! Indicates the possibility of damage to the device.
US federal law restricts this device to sale by or on the order of a physician.
If fluids are spilled onto the humidifier platform, unplug the power cord
from the AC wall outlet and allow the humidifier platform to drain and dry
before using.
Take precautions to protect furniture from water damage.
WARNINGS! Indicates the possibility for injury to the user or the operator.
Use the humidifier only for its intended use as described in this manual.
Use only accessories recommended by Respironics.
Never operate the humidifier if any of the parts are damaged, if it is not
working properly, or if the humidifier has been dropped or mishandled. Do
not use the humidifier if the water chamber is leaking or damaged in any
way. Have any damaged parts replaced before continuing use.
Never touch the heater plate unless the humidifier is unplugged and the
plate has cooled down.
This equipment is not suitable for use in the presence of a flammable
anesthetic mixture with air or with oxygen or nitrous oxide.
Periodically inspect the power cord for signs of wear or damage. Replace
if necessary.
SYMBOLS
Maximum Fill Line
Hot Surface
Type BF Applied Part
Class II (Double Insulated)
IPX0 Ordinary Equipment
Attention, consult
accompanying documents
0123
2
European CE Marking
FEATURES
Air Inlet with
Rubber Connector
Power
Jumper Cord
(connects to
CPAP device)
Outlet
Port
Replacement
Rubber Connector
Fill
Line
Connect the
AC Power Cord
here
Water Chamber with
Removable Base Plate
Sensor
Heater
Plate
Power Cord:
Indicator
Light
Use the power cord included with your CPAP device.
Power Jumper Cord: Plug this cord into the AC inlet on the Respironics
CPAP device.
Heater Plate:
Warms the water in the water chamber.
Indicator Light:
When lit, this indicates that the heater plate has been
turned on.
Air Inlet with
Rubber Connector: Connect to the outlet port on the CPAP device.
Outlet Port:
Connect the flexible tubing here.
Water Chamber:
The removable water chamber holds the water for
humidification. It has a removable base plate for
ease in cleaning.
Fill Line:
This indicates the maximum water level for safe
operation.
Sensor:
Do not block this sensor. The humidifier will not
operate unless it can detect that the CPAP device is
positioned correctly.
Replacement
Rubber Connector:
This can be used if the rubber connector becomes
damaged.
3
SET UP
1. Place the CPAP device on the humidifier
platform. Position the CPAP device so
that the four feet match up with the
humidifier base.
2. Connect the humidifier’s power jumper
cord to the AC inlet on the device. Plug
the CPAP device’s power cord into the AC
connector on the humidifier. Plug the
remaining end of the power cord into an
AC outlet.
3. Place the CPAP device and
humidifier platform on a firm, flat
surface at a level lower than your
sleeping position.
Caution: Do not turn the
humidifier on without the
water chamber installed.
Caution: Take precautions to protect furniture
from water damage.
4
DAILY USE
1. Rinse the chamber with water. Fill the chamber to the fill line
with water (approx. 1-2/3 cups or 400 ml). Distilled water is
recommended. Do not overfill the water chamber.
CAUTION! Always remove the chamber from the humidifier
before filling with water.
Fill
Line
CAUTION! Do not allow the water chamber to sit for any length of time after it
has been filled with water. Immediately install the chamber into the
humidifier (step 2). Allowing water to sit in the chamber (when it is
not connected to the humidifier) may cause the chamber to separate
from the bottom plate and water leakage.
Rubber
Connector
2. Press down the spring loaded heater plate with the water
chamber and slide the chamber into place. Make sure the
rubber connector on the inlet port fits securely over the
CPAP device’s air outlet.
3. Connect the flexible tubing to the outlet port on the
water chamber. If pressure tubing is used with your
CPAP device, connect the pressure tubing to the
pressure outlet on the front of the CPAP device.
CAUTION! Avoid moving or tilting the humidifier when
the water chamber has water in it.
Pressure
Tubing
Flexible
Tubing
4. Preheat the water before turning on the air flow and before going to
bed. Press the humidifier button on the CPAP device. The humidifier
symbol will appear on the display screen and the green indicator light
on the platform will turn on.
IMPORTANT! The preheat mode will end after 20 minutes if the air flow is not
turned on. If you do not wish to preheat the water, you can press
the humidifier button after the air flow is turned on.
5. The ideal humidity setting depends on room temperature and
humidity. Initially, a setting of 2 is recommended. You can adjust this
setting at any time. Press and hold the humidifier button on the CPAP
device until the humidifier screen appears. Press the humidifier or
ramp buttons to change the setting.
IMPORTANT! The humidifier is turned on whenever the settings menu is entered.
It will turn off in 20 minutes if the air flow is not turned on.
IMPORTANT! When the air flow is turned off, the humidifier will automatically
shut off. If you restart the air flow, and heated humidification is
desired, you must press the humidifier button to reactivate the
humidifier.
5
CLEANING
The water chamber should be cleaned daily or after each use.
WARNING! Emptying and cleaning the water chamber daily will help to
prevent mold and bacteria growth.
WARNING! Allow the water in the chamber to cool down to room temperature before removing it from the humidifier.
WARNING! To avoid electrical shock, disconnect the power cord and power
jumper cord before cleaning the humidifier platform. DO NOT
immerse the humidifier platform or power jumper cord into any
fluids.
Water Chamber
1. Turn the CPAP device off and allow approximately 15 minutes for the heater
plate and water to cool.
2. Disconnect the tubing from the water chamber. Press down on the water
chamber and slide it out of the humidifier platform.
3. Discard any remaining water. Remove the rubber
connector from the air inlet. Gently remove the base
of the chamber with your hands being careful not to
damage the rubber seal. Wash all parts in the dishwasher or a solution of warm water and a mild
dishwashing detergent. Rinse with clean water and
allow to air dry.
Rubber
Connector
Water
Chamber
Base
Plate
4. Reassemble and fill the water chamber. Inspect the water chamber for any
leaks or damage. Replace the water chamber if any damage is present.
Humidifier Platform
1. Clean the humidifier platform by wiping with a damp cloth. Allow to air dry.
2. Inspect the humidifier platform and power jumper cord for any damage and
replace if necessary.
SERVICE
The humidifier does not require routine servicing.
If the humidifier malfunctions or if the LED starts flashing, contact your
home care provider immediately. Never attempt to open the humidifier’s
enclosure.
6
SPECIFICATIONS
Size
Water
Capacity
Product Use,
Transport,
and Storage
Standards
Compliance
Dimensions:
Weight:
13.25” x 6.5” x 2.125” (33.7 x 16.5 x 5.4 cm)
< 1.85 lbs. (< .84 kg)
1 2/3 cups (400 ml) at recommended water level
Temperature:
Humidity:
Atmospheric
Pressure:
Operation
41 to 95° F (5 - 35° C)
15 - 95% Non-condensing
Transport & Storage
-4 to 140° F (-20 to 60° C)
15 - 95% Non-condensing
76.7 - 102 kPascals
50 - 102 kPascals
This humidifier is designed to conform to the following
standards:
IEC 60601-1-1998 General Requirements for Safety
IEC 60601-2-1993 Electromagnetic Compatibility
EN ISO 8185:1998 General Requirements for Humidification Systems
US Deviations (UL 2601)
Canada Deviations (C22.2 601.1)
Power
Requirements
AC Power Consumption: 100 - 240 VAC, 50/60 Hz, 1.0 A max.
Power Jumper Cord Output: 100 - 240 VAC, 50/60 Hz, 1.0 A max.
Type of Protection
against Electric Shock
Class II Equipment
Degree of Protection
against Electric Shock
Type BF Applied Part
Equipment Type
IPX0 - Ordinary Equipment
Heater Settings
1 to 5 (104 to 149° F / 40° to 65° C)
Pressure Drop
w/ Humidifier
0.3 cm H2O over the range of operating pressures
Humidity Range
10-40 mg H2O/L
LED Type
Type 1 per IEC 60825-1
7
TRAVELING WITH THE SYSTEM
Packing the
System
When traveling, the optional CPAP carrying case is
for carry-on luggage only. The carrying case will not
protect the humidifier if it is put through checked
baggage.
Security
Stations
For ease at security stations, there is a note on the
bottom of the humidifier stating that it is medical
equipment. It may be helpful to bring this manual along
with you for security personnel.
DC Power
DC to AC inverters cannot be used with this
humidifier; damage could occur to the humidifier.
Checking the
Power Cord
If you are traveling to a country with a line voltage
different than the one you are currently using, an
international plug adapter may be required to make
your power cord compatible with the power outlets
of the country to which you are traveling.
IMPORTANT!
For more information, contact Respironics Customer
Service department at 1-800-345-6443 (US and
Canada) or 1-412-731-2100.
WARRANTY
Respironics, Inc.® warrants that this humidifier shall be free from defects of workmanship
and materials and will perform in accordance with the product specifications for a period
of one (1) year from the date of sale by Respironics, Inc. to the dealer. If the product fails
to perform in accordance with the product specifications, Respironics, Inc. will repair or
replace, at its option, the defective material or part. Respironics, Inc. will pay customary
freight charges from Respironics, Inc. to the dealer location only. This warranty does not
cover damage caused by accident, misuse, abuse, alteration and other defects not related
to material or workmanship. To exercise your rights under this warranty, contact your
local, authorized Respironics, Inc. dealer or Respironics.
8
1005910
LK 3/15/01