1
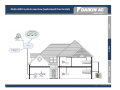
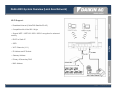
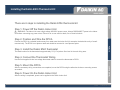
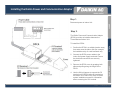
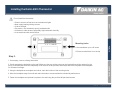
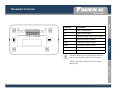
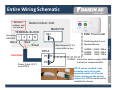
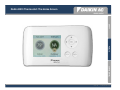
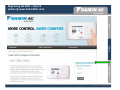
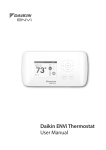
Daikin ENVi Thermostat installation overview RESIDENTIAL | LIGHT COMMERCIAL | COMMERCIAL Presenter’s Name Presenter’s Title © 2012 Daikin AC Daikin ENVi system overview (web‐based thermostat) DRAFT PUBLIC CONFIDENTIAL Slide 2 © 2012 Daikin AC Daikin ENVi System Overview (Local Area Network) Wi-Fi Support: DRAFT • Broadband Internet (Cable/DSL/Satellite/3G-4G) • Compatible with all the 802.11b/g/n • Support WEP / WEP128 / WPA / WPA2 encryption for advanced security • DHCP or Static IP • SSID PUBLIC • Wi-Fi Channels (1-11) • IP Address and IP Subnet • Gateway Address • Primary & Secondary DNS • MAC Address CONFIDENTIAL Slide 3 © 2012 Daikin AC Daikin ENVi System Components DRAFT PUBLIC Contents in box: CONFIDENTIAL 1 – Daikin ENVi Thermostat 1 – Trim Plate 1 – Daikin Power and Communication Adaptor (DPCA) 1 – Wiring Harness 1 – Double-Sided Adhesive 1 – Set of fasteners 1 – Serial Number Sticker 1 – Set (2) Wire Ties 1 – User manual / Installation Manual Slide 4 © 2012 Daikin AC Daikin Equipment Compatibility DRAFT The Daikin ENVi thermostat is designed to operate only with Daikin Heat Pump and Cooling Indoor Units where the BRC944 wired remote controller is applicable. Equipment Compatibility Single-Split system Multi-Split system (2 to 8 ports) SkyAir FTXS Indoor Units PUBLIC Applicable indoor unit models: FTXS, FTXN (09/12 requires KRP980B1 interface adaptor), CTXS, FDXS, and CDXS The Daikin ENVi thermostat also supports single-stage auxiliary heating Slide 5 CONFIDENTIAL Any auxiliary heater that requires air flow from the Indoor Unit should be equipped with an air flow switch for safety. The indoor unit fan could stop during a defrost cycle and other situations. © 2012 Daikin AC Daikin ENVi ‐ system specifications DPCA Specifications Temperature Temperature Heat Set Point Range 45 to 80 °F (7 to 26.5 °C) Operating Range 20 to 140 °F (–7 to 60 °C) Cool Set Point Range 64 to 95 °F (18.5 to 35 °C) Humidity Display Range 40 to 100 °F (5 to 37 °C) DRAFT Thermostat Specifications Operating Range 5 to 95% R.H (non-condensing) Dimensions Sensitivity +/- 1 °F (0.5 °C) Operating Range 32 to 130 °F (0 to 55 °C) Power PUBLIC Humidity Width x Height x Depth 4.7 x 2.0 x 1.3 inches (120 x 50 x 32.5 mm) 208/230 VAC (provided from Indoor Unit) Display Range 20 to 90% R.H. Sensitivity +/- 5% R.H. Operating Range 5 to 95% R.H (non-condensing) Dimensions Width x Height x Depth 5.5 x 3.25 x 1 inches (139.5 x 82.5 x 25mm) CONFIDENTIAL Power 24 VAC, 3VA (provided from the DPCA) Auxiliary Heater Relay 30VAC, MAX Current 3A Slide 6 © 2012 Daikin AC Pre‐Install: Wiring (Verify existing thermostat wire) DRAFT The Daikin ENVi thermostat uses a standard 4-wire thermostat connect to the Daikin Power and Communication Adapter (DPCA) which connects to the Indoor Evaporator Unit. Wiring specs are: 20 AWG 22 AWG 1250ft/380m 800ft/240m 500ft/150m PUBLIC Thermostat to DPCA 18 AWG CONFIDENTIAL Slide 7 © 2012 Daikin AC Installing the Daikin ENVi Thermostat Kit DRAFT There are 6 steps to installing the Daikin ENVi thermostat kit: Step 1. Power Off the Daikin Indoor Unit WARNING: The Indoor Unit uses a high-voltage 208/230V power source. Always DISCONNECT power to the Indoor Unit before connecting any power wires. Failure to do so can result in death, fire or electrical shock. Step 2. Position and Wire the DPCA Position the DPCA in a suitable location away from water near the Indoor Unit (for example, the backside cavity of a wallmounted unit). The DPCA is not plenum rated and should be mounted in a non-plenum space. PUBLIC Step 3. Install the Daikin ENVi thermostat The ideal location for the thermostat is approximately 5 ft (1.5 m) above floor level in the main living area. Step 4. Connect the Thermostat Wiring Use the field-supplied 4-wire low-voltage thermostat cable to connect the thermostat to DPCA. After the necessary wiring connections are completed, mount the DPCA using the adhesive stickers or mounting screws as needed. Step 6. Power On the Daikin Indoor Unit After the wiring is completed, power can be applied to the Daikin Indoor Unit. Slide 8 CONFIDENTIAL Step 5. Mount the DPCA © 2012 Daikin AC Installing the Daikin Power and Communication Adaptor Step 1. Disconnect power to Indoor Unit DRAFT Step 2. The Daikin Power and Communication Adaptor (DPCA) provides an interface between the Thermostat and Indoor Unit. To install the DPCA: PUBLIC 1. Position the DPCA in a suitable location away from water near the Indoor Unit (for example, the backside cavity of a wall-mounted unit). 2. Connect the DCPA power cables to the indoor Unit power supply terminals. Ensure the electrical connections are securely tightened. 4. Use the Wiring Harness to connect the P2 terminal on the DPCA to the S1 terminal on the Indoor Unit’s main PCB. Refer to Daikin system installation manual for information about accessing the S21 terminal. Slide 9 CONFIDENTIAL 3. Remove the DPCA cover by grasping both sides and pulling along the length of the DPCA. © 2012 Daikin AC Installing the Daikin ENVi Thermostat Do not install the thermostat: DRAFT Close to sources of heat such as incandescent lights Near supply heating/cooling sources In direct sunlight On exterior, non-insulated or poorly insulated walls In Kitchen or other areas of potentially high heat and/or humidity In an area that could restrict airflow Mounting holes Ensure terminal block is on the top PUBLIC Accommodates up to a #6 screw Step 3. 1. If necessary, remove existing thermostat. CONFIDENTIAL 2. Gently separate the backplate on the wall. Make sure the any existing wires can be inserted through the opening for the wiring. If the backplate does not adequately cover the area of the previous thermostat, attach the trim plate to the backplate for increased coverage. 3. Using the backplate as a template and a level, mark the location of the mounting holes. 4. Move the backplate away from wall and make the holes to accommodate the included drywall anchors. 5. Fasten the backplate and optional trim plate to the wall using the provided #6 pan-head screws. Slide 10 © 2012 Daikin AC Thermostat Terminals DRAFT Description D- Data Communication D+ Data Communication C Common (24VAC) from DPCA module R 24VAC from DPCA module AUXr To Auxiliary Heater Control AUX To Auxiliary Heater Control PUBLIC Terminal • Note: AUX/AUXr is a normally open relay and does not share power with R and C terminals. • 24VAC must be provided from the Auxiliary Heating Unit. CONFIDENTIAL Slide 11 © 2012 Daikin AC Connect the Thermostat Wiring , Secure DPCA and Power On Daikin Indoor Unit Step 4. 1. Connect the wires as illustrated. DRAFT 2. Ensure all wiring connections are secure. 3. Attach the Daikin ENVi thermostat to the thermostat backplate. Ensure that the pins on the thermostat align with the terminal block on the backplate. Step 5. After the wiring connections are complete mount the DPCA using the adhesive sticker or mounting screws as needed. PUBLIC Mount the DPCA Step 6. Power On Daikin Indoor Unit 1. Verify the green LED on the DPCA has illuminated. Upon verification, reattach the DPCA cover. 2. Use the wire ties to secure the wires as needed. Slide 12 CONFIDENTIAL After you power on the Indoor Unit: © 2012 Daikin AC Entire Wiring Schematic Daikin Indoor Unit MAIN PCB TERMINAL BLOCK Incoming 208/230V 1 2 DRAFT Wires to outdoor unit not shown 3 S21 ENVi Thermostat G Red Black Wire Harness (5’ 4”) come within a box DPCA 208/230VAC P2 To ENVi : 2-wires for power supply 24VAC 2-wires for communication DPCA can be installed in the backside cavity of the wallmounted indoor unit (if space allows) and beside the ducted indoor unit. DPCA should not be installed in plenum. Slide 13 CONFIDENTIAL Power Cable (5’ 4”) from DPCA P1 18AWG: 1,250ft / 380m 20AWG: 800ft / 240m 22AWG: 500ft / 150m PUBLIC Green Field Supplied 4 core thermostat wire © 2012 Daikin AC DPCA Power Wiring 1/2 DRAFT 208230VAC 1PH Indoor Unit Terminals DPCA PUBLIC Outdoor unit Terminals CONFIDENTIAL Slide 14 © 2012 Daikin AC DPCA Power Wiring 2/2 208230VAC 1PH Indoor Unit Terminals DPCA Aspen Pump DACA-CP1-1 Normally closed wire from pump safety circuit CONFIDENTIAL 1 amp in line fuse (comes with pump) PUBLIC Outdoor unit Terminals DRAFT With Condensate Pump Cap normally open wire from pump safety circuit Slide 15 © 2012 Daikin AC Daikin ENVi Thermostat: The Home Screen DRAFT PUBLIC CONFIDENTIAL Slide 16 © 2012 Daikin AC Configuring the Daikin ENVi Thermostat ‐ Preferences The first step after installing the Daikin ENVi thermostat is to configure the thermostat settings for the Indoor Unit. Intelligent Eye: Menu > Settings > Preferences > Intelligent Eye > Yes/No DRAFT Some models of the Indoor Unit include an intelligent eye, an infrared sensor that detects room occupancy. It adjust the set point by 3.6°F (2°C) if no movement is detected in order to save energy (+3.6°F/+2°C if cooling,-3.6°F/-2°C if heating). To use intelligent eye, you must enable this option in the Daikin ENVi thermostat and then enable it with the Daikin wireless remote controller. If enabled, the thermostat’s Smart Recovery and Temp Alert functions are not available. By default, intelligent eye is disabled on the thermostat. Do NOT enable the intelligent eye with the Daikin wireless remote controller when it is disabled on the thermostat as this may cause suboptimal operation and result in invalid recovery and alert messages. Also, if an auxiliary heater is configured, enabling intelligent eye may energize the auxiliary heater more often than would normally be required. PUBLIC CONFIDENTIAL Slide 17 © 2012 Daikin AC Configuring the Daikin ENVi Thermostat ‐ Installation Settings Installation Settings: From Home screen select Menu > Settings > Installation Settings Allow Auto Heat/Cool DRAFT Enabling this option allows the user to select auto change-over as a system mode. Only visible if the Indoor Unit supports heat or an auxiliary heat source is configured. Heat/Cool Min Delta Sets the minimum difference between the heat mode set temperature and the cool mode set temperature when the system mode is in auto-changeover. The delta is adjustable from 2 to 10 °F (1.1 to 5.5 °C). The default value is 5 °F (2.8 °C). PUBLIC Only visible if the Indoor Unit supports heat or an auxiliary heat source is configured. CONFIDENTIAL Slide 18 © 2012 Daikin AC Configuring the Daikin ENVi Thermostat – System Settings System Settings: Menu > Settings > Installation Settings > System Settings DRAFT Min Cycle Off Time Sets the minimum equipment off time between cool cycles: 240 to 900 seconds (default is 240 seconds). Min Cycle On Time Sets the minimum equipment run time in cool mode: 1 to 20 min (default is 3 min). PUBLIC Min Outdoor Temp Disables the compressor when the outside air temperature reaches the configured minimum setting. This performs two functions. It prevents the compressor from running when the outdoor temperature is too low, thus resulting in damage to the compressor. You can also set this value to determine when you want the auxiliary heat (if installed) to engage to help meet the set temperature. The temperature range is adjustable from -10 to 65 °F (–23.3 to 18.3 °C) or disabled by default. This feature uses the Internet to obtain the current outdoor temperature. If no Internet is available, the Outdoor Unit’s temperature sensor is used instead. Cool Differential Temp The minimum difference between the current temperature and set temperature before the system calls for cool. A smaller difference means shorter cycle times, whereas a larger difference results in longer cycle times. The temperature range is adjustable from 0.5 to 3 °F (0.3 to 1.7 °C) in 0.5°F (0.3°C) increments. CONFIDENTIAL Cool Dissipation Time The amount of time the fan will run after the cool has been turned off. Running the fan for a period of time allows for any cooled air left in the ducts to circulate throughout the home. The time is adjustable from 0 to 900 seconds (default is 0 seconds). Slide 19 © 2012 Daikin AC Configuring the Daikin ENVi Thermostat – System Settings (continued) DRAFT AC Overcool Max When using the AC to dehumidify, the setting configures how many degrees below the current set point the thermostat will run in order to reach the dehumidify set point. Options are Disabled (default) and 0.5 to 3 °F (0.3 to 1.8°C) in 0.5 F (0.3°C) increments. Heat Differential Temp The minimum difference between the current temperature and set temperature before the system calls for heat. A smaller difference means shorter cycle times, whereas a larger difference results in longer cycle times. The temperature range is adjustable form 0.5 to 3 °F (0.3 to 1.7 °C) in 0.5°F (0.3°C) increments. The default offset is 0.5°F (0.3°C). If the Indoor Unit is AC only and an auxiliary heater is configured, this option appears under the Aux Heat Settings menu. PUBLIC Heat Dissipation Time The amount of time the fan will run after the heat set point has been reached and the call for heat has been turned off. Running the fan for a period of time allows for heated air to circulate throughout the home. The time is adjustable from 0 to 900 seconds (default is 0 seconds). If the Indoor Unit is AC only and an auxiliary heater is configured, this option appears under the Aux Heat Settings menu. CONFIDENTIAL Slide 20 © 2012 Daikin AC Configuring the Daikin ENVi Thermostat – System Settings (continued) DRAFT Indoor Unit Temp Offset Depending on its type, the Indoor Unit uses a temperature offset for the heating set point, taking into consideration the higher sensing temperature. The Daikin ENVi thermostat applies the offset to the set point which is sent to the Indoor Unit. The offset should be 3.5°F (2.0°C) for wall-mounted and ducted indoor units, and 0°F (0°C) for floor-standing indoor units (available in the future). The offset range is adjustable from 0°F (0°C) to 5.5 °F (3.0°C) in 0.5°F (0.3°C) increments to allow for future indoor unit expansions. The default offset is 3.5°F (2.0°C). Heat Pump to Aux Temp Delta The minimum difference between the current temperature and the set temperature that will activate Aux Heat (regardless if the maximum run time of the heat pump was reached). Options are Auto (default) and 1 to 10 °F (0.6 to 5.6 °C). PUBLIC Only visible if Indoor Unit supports heat and an auxiliary heat source is also configured. Heat Pump to Aux Runtime The maximum amount of time the heat pump will run before engaging Aux Heat. Options are Auto (default), Disabled, and 10 to 180 minutes. Only visible if Indoor Unit supports heat and an auxiliary heat source is also configured. CONFIDENTIAL Slide 21 © 2012 Daikin AC Configuring the Daikin ENVi Thermostat – Installation Settings Aux Heat Settings: Menu > Settings > Installation Settings > Aux Heat Settings The Aux Heat Settings configure an auxiliary heat source. DRAFT If you want to test the auxiliary heater during installation, set Aux Heat Installed to Yes and set Allow HP with Aux Heat to No. Then, adjust the heat set point to enable the auxiliary heater. Aux Heat Installed When set to Yes, configures the thermostat to control an auxiliary heat source. Aux Heat Requires Fan When set to Yes, configures the thermostat to control the fan when auxiliary heat is used. PUBLIC Allow HP with Aux Heat When set to Yes, it will turn on auxiliary heat in addition to the heat pump. For information about how auxiliary heat will be engaged with the heat pump, see the settings Heat Pump to Aux Temp Delta and Heat Pump to Aux Runtime. Aux Min On Time Sets the minimum equipment run time for auxiliary heat: 1 to 20 min (default is 5 min). Max Outdoor Temp Configures the maximum outdoor temperature threshold. Above this level, the auxiliary heat will not be activated. The temperature is adjustable from 0 to 80 °F (26.5 °C) in increments of 0.5°F (0.5°C). The default value is 70°F (21°C). CONFIDENTIAL Slide 22 © 2012 Daikin AC Configuring the Daikin ENVi Thermostat – Installation Settings (continued) Fan Configuration: Menu > Settings > Installation Settings > Fan Configuration DRAFT The Fan Configuration settings map the Indoor Unit’s internal fan speeds to the fan speed options displayed to the user on the thermostat. Heating Mode Speeds Configures fan speed when the user selects High, Medium or Low while the system is in heat mode. The possible speeds for each value are High, Medium High, Medium, Medium Low, and Low. Cooling Mode Speeds Configures fan speed when the user selects High, Medium or Low while the system is in cool mode. The possible speeds for each value are High, Medium High, Medium, Medium Low, and Low. PUBLIC Fan Only Mode Speeds Configures fan speed when the user selects High, Medium or Low while the system is not actively cooling or heating the room. The possible speeds for each value are High, Medium High, Medium, Medium Low, and Low. Aux Fan Min Speed Configures minimum fan speed used when Aux Heat requires a fan. The possible speed is High, Medium High, Medium, Medium Low, or Low. CONFIDENTIAL Slide 23 © 2012 Daikin AC Configuring the Daikin ENVi Thermostat – Installation Settings (continued) Force System Off: Menu > Settings > Installation Settings > Force System Off DRAFT Force System Off is used to clear a latched system error status in the indoor unit by turning off the equipment for five seconds after system servicing. Operation will automatically resume with the previous settings once complete. T-stat Temp Correction: Menu > Settings > Installation Settings > Tstat Temp Correction Lets you program an offset between the real temperature at the thermostat and the displayed temperature. If you find that the temperature where the thermostat is located does not represent the room temperature, change the offset to compensate for the difference. The correct temperature is adjustable from +/- 10°F (+/-5 .6°C) in 0.5°F (0.3°C) increments. Installer Code: Menu > Settings > Installation Settings > Installer Code PUBLIC To prevent accidental modifications to the installation settings, you can enable the following installer code: 3262. The code is fixed and cannot be changed. Communications Monitor: > Menu > Settings > Installation Settings > Communications Monitor This will display the last register values for communication with the Indoor Unit. CONFIDENTIAL Slide 24 © 2012 Daikin AC Configuring the Daikin ENVi Thermostat – Reminders & Alerts Reminders and Alerts: Menu > Reminders and Alerts DRAFT The system service (maintenance) reminder generates an alert telling the homeowner that regularly scheduled maintenance is required. This reminder, along with technician contact information, can be displayed on the screen. If homeowners register their thermostats, the reminders will be emailed to them and be displayed in the web portal. You can set the Last Service date, turn the Reminder On or Off, and to set the Frequency of the maintenance interval in months. Low Temp Alert Sets the temperature at which the thermostat will generate a Low Temperature Alert. The range can be: Disabled – No alert will be generated. Enabled - Set temperature range of 35 to 68 °F (1.5 to 20 °C). PUBLIC High Temp Alert Sets the temperature at which the thermostat will generate a High Temperature Alert. The range can be: Disabled – No alert will be generated. Enabled - Set temperature range of 60 to 104 °F (15.5 to 40 °C). Display Alerts on Thermostat CONFIDENTIAL Select No if you do not want any of the alerts to be displayed on the Daikin ENVi thermostat screen. Alerts will continue to be displayed on the web portal and sent via email. Enable Heating/Cooling Alerts Select No to disable alerts for heat/cool error conditions. If disabled, alerts indicating that the system failed to heat or cool will not be appear in the screen, web portal, or emails. Slide 25 © 2012 Daikin AC Configuring the Daikin ENVi Thermostat – Resetting the Thermostat Reset Equipment or User Settings: Menu > Settings > Reset DRAFT You can restore equipment or user settings on the Daikin ENVi thermostat back to their factory defaults. Reset Registration Resets the connection between the Daikin ENVi thermostat and the user’s personalized Web Portal. Preferences and Schedule Resets all preferences, reminders, alerts and programming back to the default state. HVAC Equipment Settings Resets the configuration of the Indoor Unit and/or auxiliary heat equipment. PUBLIC All Settings Resets the Daikin ENVi thermostat back to its default factory settings. Reset Contractor Info Resets any information about the Contractor who installed the Daikin ENVi thermostat. Rebooting the Daikin ENVi thermostat You can reboot the Daikin ENVi thermostat by pressing the physical hardware reset button, located through an opening in the bottom left corner of the Daikin ENVi thermostat. Rebooting will not alter programming or configuration options. CONFIDENTIAL Slide 26 © 2012 Daikin AC Configuring the Daikin ENVi Thermostat – Sensors Menu > Sensors > Configure Sensors DRAFT By default, the Daikin ENVi thermostat’s Internal Sensor is used for an accurate indication of the room temperature (recommended settings). The Indoor Unit is also equipped with a room temperature sensor which you can use instead. You can also enable both sensors to provide an average sensing temperature. However, the Indoor Unit sensor and averaging methods are not recommended because the Indoor Unit sensor, especially wall-mounted models, can be affected by certain operations such as starting up and defrosting in a short time which may cause improper control of the Indoor Unit by the ENVi Thermostat. PUBLIC Enable or disable each sensor by selecting Internal Sensor or Indoor Unit and then selecting Yes or No. CONFIDENTIAL Slide 27 © 2012 Daikin AC Configuring the Daikin ENVi Thermostat – List of Alerts Below is a complete list of alerts. Depending on your configuration, some of these may not apply. DRAFT Low Temp Alert: Temperature in the home is too low. High Temp Alert: Temperature in the home is too high. Heat Not Responding : The system has failed to heat the home. Cool Not Responding: The system has failed to cool the home. System Service: HVAC system due for regular maintenance. Auxiliary Heat Run Time: Auxiliary heat source is running too often. PUBLIC Auxiliary Outdoor Temperature: Your auxiliary heat has been called to run when the outdoor temperature exceeds the programmed set point. System error, service required: System error occurred. If the Inddor Units’s status LED is blinking after the error has been corrected, select Settings ▶ Installation Settings ▶ Force System Off to reset the latched error status and turn off the blinking LED. CONFIDENTIAL •Lost Communication: Communication with the Indoor Unit has been lost. Check the wiring connections between the DPCA, ENVi thermostat and Indoor Unit. The green LED on DPCA should be on and solid. •Upon initial power up of the system communication, this alert may be generated. Wait up 10 minutes for system to initialized before troubleshooting. The alert will be removed automatically once communication has been established. Slide 28 © 2012 Daikin AC Registering the ENVi – Step 1 (select Register) DRAFT PUBLIC CONFIDENTIAL Slide 29 © 2012 Daikin AC Registering the ENVi – Step 2 (connecting to Wi‐Fi) DRAFT PUBLIC CONFIDENTIAL Slide 30 © 2012 Daikin AC Registering the ENVi– Step 3 (connecting to Wi‐Fi) DRAFT PUBLIC CONFIDENTIAL Slide 31 © 2012 Daikin AC Registering the ENVi– Step 4 (connecting to Wi‐Fi) DRAFT PUBLIC CONFIDENTIAL Slide 32 © 2012 Daikin AC Registering the ENVi – Step 5 (connecting to Wi‐Fi) DRAFT PUBLIC CONFIDENTIAL Slide 33 © 2012 Daikin AC Registering the ENVi – Step 6 (connecting to Wi‐Fi) DRAFT PUBLIC CONFIDENTIAL Slide 34 © 2012 Daikin AC Registering the ENVi – Step 7 (connecting to Wi‐Fi) DRAFT PUBLIC CONFIDENTIAL Slide 35 © 2012 Daikin AC Registering the ENVi – Step 8 (connecting to Wi‐Fi) DRAFT PUBLIC CONFIDENTIAL Slide 36 © 2012 Daikin AC Registering the ENVi ‐ (connecting to Wi‐Fi) DRAFT PUBLIC CONFIDENTIAL Slide 37 © 2012 Daikin AC Registering the ENVi – (connecting to Server) DRAFT PUBLIC CONFIDENTIAL Slide 38 © 2012 Daikin AC Registering the ENVi – Step 9 (registration code) DRAFT PUBLIC CONFIDENTIAL Slide 39 © 2012 Daikin AC Registering the ENVi – Step 10 (online @ www.DaikinENVi.com) DRAFT PUBLIC CONFIDENTIAL Slide 40 © 2012 Daikin AC Registering the ENVi – Step 11 (Registration online) DRAFT PUBLIC CONFIDENTIAL Slide 41 © 2012 Daikin AC Registering the ENVi – Step 13 (Registration online) DRAFT [email protected] daikinac PUBLIC daikinac CONFIDENTIAL Slide 42 © 2012 Daikin AC Registering the ENVi – Step 14 (Registration online) DRAFT 4euw PUBLIC CONFIDENTIAL Slide 43 © 2012 Daikin AC Registering the ENVi – Step 15 (Registration online) DRAFT PUBLIC CONFIDENTIAL Slide 44 © 2012 Daikin AC Daikin ENVi system overview (web‐based thermostat) DRAFT PUBLIC CONFIDENTIAL Slide 45 © 2012 Daikin AC Registering the ENVi – Step 16 (Registration online) DRAFT PUBLIC CONFIDENTIAL Slide 46 © 2012 Daikin AC Registering the ENVi – Step 17 (Registration online) DRAFT PUBLIC CONFIDENTIAL Slide 47 © 2012 Daikin AC Registering the ENVi – Step 17 (Registration online) DRAFT PUBLIC CONFIDENTIAL Slide 48 © 2012 Daikin AC The end‐user Web Portal DRAFT PUBLIC CONFIDENTIAL End-User is re-directed to their personal web-portal upon completing registration. Slide 49 © 2012 Daikin AC Registering the ENVi – completed! DRAFT PUBLIC CONFIDENTIAL Slide 50 © 2012 Daikin AC Accessing the Web Portal‐ www.DaikinENVi.com Enter Username 2. Enter Password 3. Click Login DRAFT 1. PUBLIC CONFIDENTIAL Slide 51 © 2012 Daikin AC Accessing the Web Portal‐ the Comfort tab DRAFT PUBLIC Program: this allows the user to modify the 7-day program, adjust their set-points, fan operation and add new climate periods. System Details: the user can override the 7-day program, change system mode or change fan operation. Today: this provides the function to modify the current day program without the need to permanently modify the 7-day program. Vacation: the user can define a range of dates/times, choose a heat/cool set-point and fan status to override 7-day program. Weather: provides current day forecast + 4 days in advance. Slide 52 CONFIDENTIAL Comfort © 2012 Daikin AC Accessing the Web Portal‐ the Settings tab DRAFT PUBLIC About: provides information about the product, software version and if linked to a Contractor Portal. Custom Message: user can send message to thermostat from web portal. Groups: allows the user to group multiple thermostat’s together to share Programs, Preferences, Reminders, etc. My House: the physical address to which the thermostat has been registered to. Password: user can change password from here. Preferences: user can change thermostat preferences from this widget. (e.g. Celsius / Fahrenheit, Hold Action, etc) Reminders: the user can define what type of alerts and frequency to provide by email, on thermostat or web portal. Reset: to reset Registration or Programs & Preferences. Slide 53 CONFIDENTIAL Settings © 2012 Daikin AC Accessing the Web Portal‐ the HomeIQ™ tab DRAFT PUBLIC Home IQ Details: a month over month / year or year direct comparison of heating & cooling runtimes Home IQ Insights: a month over month summary of HVAC runtimes and what variables had influence on energy usage Reports: provides HVAC runtime operation for current day and the previous 2-days Slide 54 CONFIDENTIAL HomeIQ™ © 2012 Daikin AC End‐User Privacy Setting DRAFT The contractor will link the customer’s DaikinENVi thermostat to their Contractor Portal. (See slide 61). Then the customer will see the contractor information at the Settings tab > the About widget > Contractor tab. PUBLIC From the Privacy tab the customer can select the following options and allow their contractor to view : CONFIDENTIAL Share my Alerts and Reminders Share my HVAC Runtime Reports Slide 55 © 2012 Daikin AC Contractor Portal DRAFT PUBLIC CONFIDENTIAL Slide 56 © 2012 Daikin AC Contractor Portal DRAFT PUBLIC CONFIDENTIAL Slide 57 © 2012 Daikin AC Contractor Portal DRAFT PUBLIC Note: when Auxiliary has been configured it will be indicated in the Contractor Portal as “Furnace”. CONFIDENTIAL Slide 58 © 2012 Daikin AC Contractor Portal DRAFT PUBLIC CONFIDENTIAL Slide 59 © 2012 Daikin AC Contractor Portal DRAFT PUBLIC CONFIDENTIAL Slide 60 © 2012 Daikin AC Contractor Portal Option 1: From the Thermostat widget DRAFT 265 259 902 493 265 259 902 PUBLIC Option 2: From the Main Navigation page 493 Slide 61 CONFIDENTIAL Thermostat serial # can be obtained from the serial # sticker in the thermostat box. It is a 12-digit serial #. © 2012 Daikin AC Thank You © 2012 Daikin AC