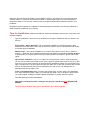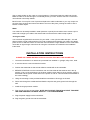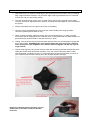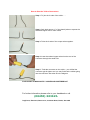
1
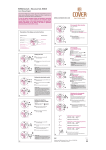
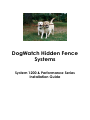
DogWatch Hidden Fence
Systems
System 1200 & Performance Series
Installation Guide
Below are the instructions for installing your DogWatch System. The battery life on the RG1200 & R7
receiver collars = 6 months and on the R1200 & R8 = 2 years. Battery plans can be purchased from
DogFence, either on our web site or direct and a list of approved alternative batteries is listed in your
handbook.
DogWatch systems operate on a digitally encoded FM signal and are safe to use with any electrical or
radio equipment installed on your property.
Tips for Installation: Please read and then follow the installation instructions in conjunction with
the DVD supplied.
Type of installations: There are many variations on the type of installation that your System can
achieve.
Single Cable – Entire Boundary: The most popular installation is a single boundary cable
around the entire perimeter. This is the most secure system in terms of containment and usually
the easiest type of installation.
Banana Loop – This type of installation is for a rear or front garden only or semi or terraced
property – remember when installing a banana loop the cables must be placed at least 2ft apart
in areas where you require signal. Closing the cable together will deaden or greatly reduce the
signal.
nd
Up and Over installation – this is a 2 option for customers with a semi or terraced property –
you can run the cable up the walls of your house, along the gutter and around the roof or up and
over the roof if you wish to achieve an entire boundary installation without using the banana loop
option. Do take into account though that where the cable runs up the wall you will receive a small
amount of signal internally and this may well affect your dog or cat if it a sleeping area of
passage way that they need to use.
Front or Single Boundary only – similar to the banana loop, we often refer to this installation
as a “there and back system”. Again you must keep the cable a min of 2ft apart in areas where
you require signal. Closing the cables together will deaden or greatly reduce the signal.
The table below gives some illustrations.
Remember installing the cable in tubing or burying the cable DOES NOT REDUCE THE
SIGNAL.
The only way to deaden the signal is the twist the two cables together.
Diagram to illustrate various installation layouts:-
Attaching to fencing.
If attaching to a fence use a cable clip or staples to attach the cable to the fence. Try to install the
cable midway on the fence if possible (be careful not to pinch the outer jacket of your cable if you are
using staples). Clips are available for purchase on our web site. If your fence is stock fencing or
chain link you can simply weave the boundary cable through the fencing (a good tip is to tape the
end to a bamboo cane and “sew” the cable through the fence).
Hedges
Again, a bamboo cane is the easiest method to ensure that your cab le is installed deep into your
hedge – where possible lift the cable approx 18” from the ground to allow any small wild life to pass
underneath.
Lawns and Paddocks
If you have to or want to bury your cable the easiest option is to use a spade or lawn edger to open a
small gap – dig down approx 4 – 6” into the ground and push the cable into the grove using a bolster
of blunt object.
Driveways & Concrete
Gravel drives: scrape back the gravel or top layer from your drive, if the under layer is scalpings or
mud you will need to dig a trench approx 6” deep and insert a hose or conduit that the cable can be
laid in for protection. Replace the layers and the cable will invisible and protected.
Concrete or Tarmac:
Put on a dust mask and goggles to protect your eyes and lungs. A shard of flying concrete can
injure your eyes, and the dust from concrete or blacktop may harm your lungs.
Mark the area where you'll install the wire. If you're installing the wire at a joint in your concrete
driveway, you can just follow that line. If you're installing the wire in tarmac, use a chalk snap line to
mark your cut.
Use an angle grinder or disc cutter to cut a slot approx ½” deep and insert the cable into the slot.
Make sure the cut is wide enough to comfortably house your wire. Seal the slot with a coloured or
clear silicone or driveway sealant.
Block Pavers: You may lift a row of pavers and place the cable underneath or you may scrape out
the moss from the joints and weave the cable in and out of the joints, pushing the cable in with a
bolster or similar object.
Water
Your cable can be safely installed in water (streams or ponds) but we advise not to create a join in
water and to weight your cable to the stream bed to ensure that the cable is kept in place.
Joining the cable
You have been supplied with connectors for your cable – never join the cable with tape – this will
allow moisture to enter underneath the PVC outer coating and will damage your cable. Also taped
joints are not an effective means of connection and can lead to a high resistance in the cable which
cause lack of signal range. Instructions for using the connectors are included in the installation
instructions.
INSTALLATION INSTRUCTIONS
PLEASE USE THESE INSTRUCTIONS IN CONJUNCTION WITH THE ONLINE DVD
1. Locate the transmitter in an area that is protected from weather i.e. garage, utility room, shed.
2. It must be close to a 240 volt electrical socket.
3. Position the transmitter so that a hole drilled to outside will not be noticeable.
4. BEFORE STARTING: turn the transmitter over and check that all the switches are in the up
position. (If any of the switches are in the down position return them to the up position, plug the
transmitter into the power socket and turn the power on and off. This will reset the transmitter to
the correct setting).
5. Using the mounting screws provided install the transmitter to fit snugly on the wall.
6. Drill a hole through the outside wall and feed the zip wire and green ground wire through the
wall.
7. Install the surge protector outside.
8. Plug the zip wire into the transmitter. NOTE ON YOUR DVD THIS IS BLACK BUT THIS WIRE
HAS NOW CHANGED TO WHITE & BLACK – IT IS THE SAME WIRE
9. Plug the power supply into the transmitter.
10. Plug the green ground wire into the transmitter.
SURGE PROTECTOR – Protects the system from lightening strikes.
1. Locate the surge protector outside where the zip wire and green ground wire exit the wall.
2. Bring the wires through the rubber gasket (it will need to be cut) and connect each end of the zip
wire (you will need to split the two wires apart) from the transmitter to the inside point of each
terminal (two bottom terminals in the surge protector – one end of the wire on each terminal).
3. Bring the ends of the twisted wire going to the boundary through the rubber gasket and attach to
the outside point of each terminal (same terminals that the zip wires are attached to – again one
wire to each side).
4. Connect one end of the ground wire (from Jan 09 this wire is green and yellow) to the ground
terminal post in the surge protector (middle terminal) and exit through the rubber gasket.
5. Install the ground rod outside the building near the surge protector.
6. Connect the solid ground wire (green and yellow wire) and the green ground wire from the
transmitter to the earth rod with earth clamp provided. (Cut the small ring from the end of the
green ground wire as this is for installation in the USA and attach the end of the wire
to the earth clamp).
PLANNING
1. It is important to carefully plan the installation of the boundary wire. Consider the location of
gardens, paths, pools, plants and driveway crossings. Utilise the natural boundaries of your
property. This will help in your dogs training.
2. Plan the path of the twisted wire to the boundary wire. The wire must form a continuous loop. If
you are installing for just one boundary or a gateway you must still form a loop. Lay the wires out
to form a long sausage shaped loop across the area to be excluded. The wires in the loop
(sausage) must be a min of 2 ft apart. If less than 2 ft your wires will act as twisted cable
and cancel each other out – no signal will be emitted. Hint: if forming a sausage loop do not
bury both the cables until you have your system working. Remember your cables do not have to
be buried.
3.
Avoid sharp corners as they produce irregular radio signals, avoid creating alleys or bottlenecks
where the wire is less than 20ft away from
itself.
4. Avoid placing boundary wire too close to your
house to prevent the signal from entering
through the walls.
5. Avoid laying the wire parallel to any
underground cables or metal pipes as the
signal may be conducted by these items and
bring signal into a “safe” area.
6. The wire can be laid beneath rocks, bricks or paving slabs without effecting the signal.
INSTALLING
1. Determine where you want the inside edge of the signal field to be and mark it with your training
flags. Flags should be 10ft apart. They mark the edge of the signal field and act as a visual aid
for both you and your dog during training.
2. The wire can be buried by cutting a 3 to 4” deep narrow groove using a spade or lawn edger.
The wire can also be clipped to fences, walls etc or passed through hedges or even loose laid on
the ground.
3. Place the boundary wire in the groove and cover it completely.
4. Join each end of the twisted wire to the each end of the boundary wire using the yellow
connectors (see diagram at back for use).
5. When crossing driveways, paths etc tarmac and concrete should have a ½” deep cut made
across them with an angle grinder the cable laid in the cut and sealed with a suitable sealant. For
gravel drives lay the wire inside a hose pipe and bury 4” down.
6. Testing: Turn the power switch on the red power light will come one and the green loop light will
be on and constant. PLEASE NOTE: in the video supplied the green loop light is flashing,
since making this video DogWatch have added a software upgrade and the loop light no
longer flashes.
7. Test the radio signal by carrying the receiver collar with the test light towards the boundary wire repeat this several times around the boundary. From Jan 2012 the test lamp and the collar
wrench has been combined into one unit. The image below shows the new tester (as shown in
your handbook) but the DVD currently show the old style (torpedo test lamp).
Diagram to illustrate placing the tester over the
probes (this is the same for the R12 & R12m
receivers)
!!YOU MUST COMPLETE THIS SECTION OTHERWISE YOUR UNIT WILL NOT WORK!!
SETTING THE RANGE – VIP All units are sent out with the range on zero – if you do not adjust the
range the collar will not respond to the transmitter.
1.
The range of the signal field should be set for 3 – 8 feet (depending on the size of the
property and breed of dog). Confirm the actual distance by approaching the boundary wire
whilst holding the receiver collar with the test light. The collar will buzz and the test light will
come on at the edge of signal field. The range can be adjusted using the range adjuster on
the side of the transmitter box. This should be done before allowing your dog outside.
2.
Set rate to level 2 (if using a Performance Series System). Set mode to on (not applicable to
System 1200 transmitters or GroundsKeeper).
TRAINING See DogWatch Handbook.
1. You must first set the collar to Audible only as laid out in the DogWatch handbook – Follow the
phases through starting with Phase 1 “Audible and “Beep” training.
To Set the collar to Audible only take the tester and place it between the locator points (the diagrams
below illustrate how to do this). Ensure that you have inserted the battery in the collar before changing
the levels and that is the correct way up (+ end down in the R12m and R7m and + up in the R12 & R9).
The collar will most likely beep twice when you place the tester in the locator points. Leave the tester in
place (the collar will beep through the levels) until you get to the long flat tone (this indicates Audible only
– beep no shock). Remove the tester when you hear the long tone and the collar will be set to audible
only.
Adjusting the training levels
on the R12 & R9 receivers
Adjusting the levels on the
R12m & R7m receivers
2. If your dog has been on a hidden fence system before then you do not have to follow the beep
training phase. For all other dogs you should follow the beep only training phase in your
DogWatch handbook. Your owners guide will show you how to set the collar to “audible only”. –
(see also Troubleshooting 3. below).
3. You can move through the phases at a quicker rate provided your dog is responding and
understanding each phase. If you are unsure at any point please contact us.
4. If you have any concerns about your dog’s training please contact us: (08450) 623623
ADJUSTING THE COLLAR
1. Collar tightness is critical both contact points must touch your dogs skin. If not he will not receive
electrical stimulation. A loose collar will also allow the contact posts to rub back and forth on the
skin possibly causing irritation. If your dog has long hair install the longer contact posts on the
collar using the collar wrench supplied use care as over tightening could cause damage to
your receiver.
2. The receiver collar should be removed each day to allow your dogs skin to gradually condition
itself to the contact posts. Failure to follow procedure could lead to skin irritations and possible
infections.
TROUBLE SHOOTING
1.
Everything is installed – I have a green loop light and a red power light but the collars do not
work?
Response:- Have you adjusted the range? – see page above “setting the range”. Turn your range
button towards the + (located on the right hand side of your transmitter), this will bring the signal field out
and your collar will pick up the signal & work correctly.
2. I have no green light and the transmitter is making a strange noise.
Response - you have a break in the boundary cable or you have a bad connection. Check all wire
connectors to ensure that you have tightened them fully.
3. How Do I adjust my dog’s training level?
Response – using the black tester adjuster (star shape). Place the metal end of the adjuster between the
two raised lines. These are located on the side of the dog’s receiver box. The collar will beep to indicate
the level – Long beep indicates no shock, beep/audible only and then one beep for level 1, 2 beeps for
level two etc. When you reach the required level remove the adjuster. If you miss your level continue as
the levels go round in a cycle.
Important Additional Info:In the first few weeks of using your DogWatch hidden fence system it is important that the dog builds up
to wearing the collar for prolonged periods (similar to breaking in a new pair of shoes). In the first few
weeks the pet should only wear the collar for 2 – 3 hours in one session and then should have a break of
at least 1 – 2 hours. Over the a period 2 - 3 weeks the pet can build up to wearing the collar for longer
periods but the collar should always be removed at night or for dogs living outside the collar must be
removed for at least 8 hours in any 24 hour period. It should be possible to place a finger between the
contact posts and the pet’s neck, the collar must fit snugly but not tightly. It is important to check your
collar fit on a regular basis as your dog may gain or loose weight and the collar will stretch in the first 4 –
6 weeks.
How to Use the Yellow Connectors.
Step 1: To join the 2 ends of the cable……
Step 2: Strip back approx ½” of the plastic jacket to expose the
stranded copper wire on each cable.
Step 3: Twist the 2 ends of the cooper wires together.
Step 4: Insert the twisted copper wires into the end of the
connector through the small hole.
Step 5.: Twist the connector on the cable – you will feel the
connector grip & tighten and you may find that the cables going
into the connector also twist as in the diagram.
YOUR CABLE IS NOW SAFELY JOINED AND WATERPROOF
For further information please refer to your handbook or call
(08450) 623623.
DogFence, Elmwood, Dean Lane, Cookham Dean, Berks, SL6 9AG