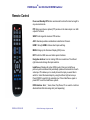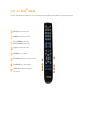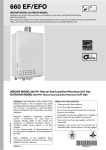
1
DVDO Quick6R™
6x2 4K Ultra HD HDMI Switcher (Roku Ready Certified)
User Guide
Version 1.0
DVDO Quick6R 6x2 4K Ultra HD HDMI Switcher
Important Safety Information
•
•
•
•
•
•
•
•
•
•
•
Follow all instructions.
Use only a dry cloth to clean.
Use caution not to block any vents in either unit.
To reduce the risk of electric shock, do not use near water or expose to rain or moisture. Keep away from
excess moisture.
Do not use near heat sources such as room heaters or hot A/V equipment.
Read all warnings.
Use only accessories, including mounting brackets, approved by DVDO.
Unplug the device during lightning storms or when unused for long periods of time.
Keep away from open flames.
Protect all connected cords including power cords from being pinched, compressed, or stepped on.
Do not open the case. All servicing should be done only by qualified and approved service personnel.
DVDO-UG-1001-B.01
© 2014 Silicon Image, All rights reserved
2
DVDO Quick6R 6x2 4K Ultra HD HDMI Switcher
Contents
Overview .......................................................................................................................... 4 Key Features ................................................................................................................. 4 In the Box ...................................................................................................................... 4 InstaPrevue Visual Switching Technology .................................................................... 5 InstaPort S Single-second Switching Technology ........................................................ 6 Roku Streaming StickSupport ....................................................................................... 7 Input/Output ..................................................................................................................... 8 Front Panel ................................................................................................................... 8 Rear Panel .................................................................................................................... 9 Connections ..................................................................................................................... 9 AVR via AUX HDMI and AVR via S/PIDF Modes ......................................................... 9 Mirror Mode ................................................................................................................. 12 Audio Return Channel (ARC) ......................................................................................... 14 Remote Control .............................................................................................................. 17 Onscreen Display Menu System .................................................................................... 18 Updating Firmware ......................................................................................................... 23 Updating Firmware Using the Onscreen Display ........................................................ 23 Upgrading Firmware Using the Update Firmware Button ........................................... 24 Troubleshooting a Firmware Update Error .................................................................. 25 Resetting to Factory Default Settings ............................................................................ 25 Serial Control ................................................................................................................. 25 Troubleshooting ............................................................................................................. 26 Specifications ................................................................................................................. 30 FCC Interference and Compliance Statement ............................................................... 31 ROKU END USER AGREEMENT .............................................................................. 32 Warranty......................................................................................................................... 37 Getting Help ................................................................................................................... 40 Legal notices .................................................................................................................. 41 Installing and using the Roku Streaming Stick (Roku Ready Version) .......................... 42 DVDO-UG-1001-B.01
© 2014 Silicon Image, All rights reserved
3
DVDO Quick6R 6x2 4K Ultra HD HDMI Switcher
Overview
Quick6R™ is DVDO’s latest HDMI switcher for home entertainment and theater applications supporting Roku
Streaming Stick (Roku Ready® Version)
Key Features
•
•
•
•
•
•
•
•
•
•
•
•
InstaPrevue® technology
InstaPort® S Single-second technology
Six HDMI inputs, two HDMI outputs; 4K Ultra HD capable
MHL® capability on two inputs
Auto switching – three modes
Optical and coax S/PDIF outputs
Serial and IR remote control
Simple firmware update using USB flash drive
Onscreen Display (OSD) for easy setup and control
Special AVR mode for easy integration with any existing audio receiver
Auto negotiating Mirror mode ensures compatibility
Remote control, including discrete on and off codes with Roku specific buttons
In the Box
•
•
•
•
Quick6R HDMI switcher
12 VDC power supply
Remote control
Quick Start Guide
DVDO-UG-1001-B.01
© 2014 Silicon Image, All rights reserved
4
DVDO Quick6R 6x2 4K Ultra HD HDMI Switcher
InstaPrevue Visual Switching Technology
Quick6R InstaPrevue technology gives you a simple way to view and select inputs. Instead of choosing from
a text list of input names, Quick6R offers visual input selection by displaying individual preview windows for
each active input. Activate InstaPrevue by pressing the InstaPrevue button:
.
Note that preview windows only display connected inputs that are active.
Use the arrow buttons on the remote control to select the input you want to watch and press the ENTER
button to switch to that input.
There are two modes available that are set in the InstaPrevue Setup > Activate Names menu:
•
•
Offset mode: The selected window is offset to show which input is selected.
Named mode: The name of the selected input shows above its preview window.
DVDO-UG-1001-B.01
© 2014 Silicon Image, All rights reserved
5
DVDO Quick6R 6x2 4K Ultra HD HDMI Switcher
Offset Mode
Named Mode
InstaPort S Single-second Switching Technology
The Quick6R InstaPort S Single-second technology makes it possible that when you select an HDMI source,
that contents becomes available immediately, without delay. With InstaPort S technology, the only delay in
the system is caused by the TV when you switch between sources of different resolutions, while the TV
syncs to the new format.
The Quick6R superior source switching performance is possible because the InstaPort S technology
performs the HDCP authorization immediately when the device is connected. This is in contrast to the usual
situation when, upon connecting a source to an HDMI switcher, the HDCP authorization process is not
initialized until that source is selected as the input to be displayed on the TV.
DVDO-UG-1001-B.01
© 2014 Silicon Image, All rights reserved
6
DVDO Quick6R 6x2 4K Ultra HD HDMI Switcher
Roku Streaming Stick (Roku Ready Version) support
Quick6R is certified as Roku Ready and ships with a remote control that supports all the functionality of the
Roku Streaming Stick (Roku Ready Version). The Roku Streaming Stick is available from www.roku.com
and only functions in the Input #6. Full installation and operational instructions are in the “Installing and
Using the Roku Streaming Stick” section of this users guide.
DVDO-UG-1001-B.01
© 2014 Silicon Image, All rights reserved
7
DVDO Quick6R 6x2 4K Ultra HD HDMI Switcher
Input/Output
Front Panel
1
1
2
3
4
5
IR window
Input indicators
Input select
Power switch
Power indicator
DVDO-UG-1001-B.01
2
3
4
5
Remote control receiver
Off = no connection, Amber = HDMI connected, Green = active input.
Manually cycles through connected inputs.
6R
Press to turn on the Quick or to turn off.
6R
Lights up in green when the Quick is on.
© 2014 Silicon Image, All rights reserved
8
DVDO Quick6R 6x2 4K Ultra HD HDMI Switcher
Rear Panel
1
2
3
4
5
6
7
8
1
2
Power input
Update Firmware button
3
USB connector
4
5
Serial port
HDMI outputs
6
S/PDIF audio outputs
7
HDMI Inputs 1 through 6
8
Input #6
12 VDC 3 A minimum
See the Updating Firmware section on page 23 for details. This button is held
during power-up to start the firmware update process from an attached USB
flash drive.
Primarily used for updating firmware, and also supplies 5 V @ up to 1 A for
accessories.
6R
Allows control of Quick by external control systems.
MAIN output is always active, AUX output depends on OSD setting; The two
available modes are Mirror and AVR.
Coax and optical: Whenever the audio stream permits, audio is extracted from
the active input and sent to the S/PDIF outputs.
Input 1 and Input 6 are each capable of connecting to an HDMI device or an
MHL mobile device using only a passive cable. Each of these ports can supply
up to 900 mA for charging the mobile device.
Input #6 is the only port that will accept the Roku streaming stick
Connections
AVR via AUX HDMI and AVR via S/PIDF Modes
In these AVR connection modes, Quick6R becomes the primary HDMI switch and control center for a home
theater. Connection to an existing Audio-Video Receiver (AVR) is accomplished using either HDMI or
S/PDIF (for older AVRs with no HDMI). If the AVR has an HDMI input, this is the preferred connection
because it provides the best overall experience. With either connection, the AVR is always left on that input
and all switching is done with Quick6R.
DVDO-UG-1001-B.01
© 2014 Silicon Image, All rights reserved
9
DVDO Quick6R 6x2 4K Ultra HD HDMI Switcher
If the Quick6R connection to the AVR is from the AUX HDMI output, then choose AVR via AUX HDMI in the
output setup menu. If the Quick6R connection to the AVR is from the optical or coax S/PDIF output, then
choose AVR via S/PDIF in the output setup menu.
Why Use AVR Mode?
The AVR mode extends the life of your existing AVR. In most installations, the AVR is used not only as the
audio amplifier but also as the central video switch. Since the audio needs to match the video being
displayed, running everything through the AVR is the simplest method. While AVRs tend to have a long life
and continue to provide basic audio functions, video standards and features change more often. Adding
Quick6R to an existing system upgrades the entire entertainment center to the latest features. With Quick6R
installed, the AVR becomes the primary audio processor and Quick6R becomes the primary switch in the
system. Quick6R routes the best possible audio to the AVR and the best possible video to the TV.
Audio and Video Resolution and Routing
When Quick6R is put into AVR via AUX HDMI mode, the full audio capabilities of the AVR are scanned and
combined with the best possible video capabilities of the TV and the combination is reported back to all
inputs. In this way, the inputs send the best possible audio routed to the AVR and the best possible video
routed to the TV. Since the input signal could have a resolution of up to 4K (Ultra HD) with HD audio, and
the TV may not be able to handle HD audio, Quick6R mutes the audio going to the TV when the AVR is on.
HD Audio includes Dolby® TrueHD as well as DTS-HD Master Audio™ formats.
When the AVR is disconnected or powered off, the audio capability of the TV which is normally just PCM
stereo is reported back to the inputs and the TV audio is unmuted. In this way you can choose to watch a
program just with the TV audio (AVR off) or with full surround sound from the AVR (no audio from the TV).
This special negotiation only happens if the AVR is connected to the AUX HDMI output.
When Quick6R is put into AVR via S/PDIF mode, the video capabilities of the TV are scanned and combined
with a prestored capability list of a standard AVR connected through S/PDIF and the combination is reported
to all the inputs. This is necessary because the capabilities of the connected AVR cannot be read through
S/PDIF. This allows full TV resolution up to 4K while delivering the full audio capabilities possible over
S/PDIF, including bit stream such as Dolby, DTS, and other formats. In this mode, Quick6R also mutes the
audio going to the TV to prevent formats unknown to the TV from causing unwanted noise.
DVDO-UG-1001-B.01
© 2014 Silicon Image, All rights reserved
10
DVDO Quick6R 6x2 4K Ultra HD HDMI Switcher
Because S/PDIF offers no way to detect if the AVR is on or off, if you want to use the TV speakers the output
mode must be switched manually back to Mirror or AVR via AUX HDMI.
AVR Mode Routing
DVDO-UG-1001-B.01
© 2014 Silicon Image, All rights reserved
11
DVDO Quick6R 6x2 4K Ultra HD HDMI Switcher
AVR Mode Resolution
Mirror Mode
In this configuration, Quick6R allows two devices to share a single stack of equipment. This mode is normally
used to feed both a TV and video projector in the same room or for a second monitor in a close but related
area, such as a bar at the back of a home theater.
Audio and Video Resolution and Routing
In Mirror mode, the two outputs provide the same audio and video signal. If they have different capabilities,
the highest common video resolution and audio capability is reported to the inputs. For example, the main
TV is 1080p, PCM stereo, and the Aux TV is 720p, 5.1-channel capable; in this case 720p PCM stereo is
reported to all inputs.
The Onscreen Display (OSD) is only shown on the main output.
DVDO-UG-1001-B.01
© 2014 Silicon Image, All rights reserved
12
DVDO Quick6R 6x2 4K Ultra HD HDMI Switcher
Mirror Mode Routing
DVDO-UG-1001-B.01
© 2014 Silicon Image, All rights reserved
13
DVDO Quick6R 6x2 4K Ultra HD HDMI Switcher
Mirror Mode Resolution
Audio Return Channel (ARC)
In certain setups, the TV may be the source of audio. This is most common when watching live terrestrial TV
from an HD antenna. In this case, the TV receives a live ATSC signal over-the-air. The video is displayed
onscreen, but you may want the audio to be played from the AVR. The audio path is shown in red in the
figure below.
In most cases the preference is to route audio from the Quick6R HDMI or MHL inputs to the Aux HDMI output
or to the S/PDIF output, using ARC only when viewing over-the-air broadcasts.
Most TVs can be put into automatic ARC mode so that when sensing that an audio receiver capable of
receiving ARC is connected, they automatically negotiate with the receiver to establish an ARC channel.
DVDO-UG-1001-B.01
© 2014 Silicon Image, All rights reserved
14
DVDO Quick6R 6x2 4K Ultra HD HDMI Switcher
Audio Return Channel
DVDO-UG-1001-B.01
© 2014 Silicon Image, All rights reserved
15
DVDO Quick6R 6x2 4K Ultra HD HDMI Switcher
Quick6R has a special control mechanism allowing you to easily switch ARC on and off. To use ARC with a
Quick6R system:
1. Ensure that your TV is capable of ARC and that the correct TV HDMI input (usually marked ) is
connected to the Quick6R MAIN HDMI output.
2. Put the TV into the ARC-on mode and enable CEC (manufacturers label these two menu items
differently; refer to the TV’s user documentation for more information).
3. Connect an audio receiver from either the coax or optical Quick6R S/PDIF output to the S/PDIF input of
the receiver.
4. Switch the receiver to the S/PDIF input source.
5. Press the ARC button on the Quick6R remote control or select Send Initiate ARC on the Quick6R
Onscreen Advanced Settings menu.
You can enable or disable ARC with the Onscreen Display. The ARC button on the remote control toggles
between enabling and disabling ARC mode.
Normally, leave the TV with ARC on and CEC enabled. When you want to use ARC, switch the audio
receiver to the S/PDIF input and press the ARC button on the Quick6R remote.
DVDO-UG-1001-B.01
© 2014 Silicon Image, All rights reserved
16
DVDO Quick6R 6x2 4K Ultra HD HDMI Switcher
Remote Control
Power and Standby/Off buttons are discrete functions that can be taught to
any universal remote.
PIP: Brings up picture-in-picture (PIP) window on the main output or on both
outputs if mirrored.
SWAP: Exchanges the main and PIP window.
ARC: Alternately enables and disables Audio Return Channel.
HDMI 1 through HDMI 6: Allows direct input switching.
MENU: Brings up the Onscreen Display (OSD) menu.
EXIT: Exits the OSD menu and other special functions.
Navigation buttons: Use for making OSD menu selections. The left and
right arrows also change the input selection.
InstaPrevue: Displays all active HDMI inputs in their own InstaPrevue
picture-in-picture windows that periodically update with screenshots of each
video input. This allows you to visually choose the input you would like to
switch to. Select the desired input by using the left and right arrow keys.
Press ENTER to switch to the selected input. Press InstaPrevue again or
press EXIT to exit the InstaPrevue system.
ROKU buttons: Back, *, Home, Rew, Play/Pause, FF are used to control an
attached Roku MHL streaming stick (sold separately)
DVDO-UG-1001-B.01
© 2014 Silicon Image, All rights reserved
17
DVDO Quick6R 6x2 4K Ultra HD HDMI Switcher
Onscreen Display Menu System
Press MENU on the remote control to display the System Setup menu, which provides
access to system settings.
Asterisks (*) in the descriptions below indicate the factory default settings.
The Change Input menu allows to directly select the active input. This is exactly like
pressing one of the HDMI input select buttons on the remote control.
Making a selection in this menu has no effect on the switching mode.
DVDO-UG-1001-B.01
© 2014 Silicon Image, All rights reserved
18
DVDO Quick6R 6x2 4K Ultra HD HDMI Switcher
Manual: No auto switching; used when Quick6R is controlled externally by the
serial port or by a universal remote.
Scan on Disconnect: Quick6R switches to the lowest numbered active input if
the current source is turned off or unplugged.
*Scan + goto new: Operates the same as Scan on Disconnect, and also
makes a source that is turned on or connected become the active input.
*Mirror Mode: Both HDMI outputs display the same audio and video. The maximum
common resolution and audio capability of the two TVs is used.
AVR via Aux HDMI: This is a special mode that indicates that the AUX output is going to an
AVR primarily to carry audio. In this mode, if the AVR is on, its audio EDID is presented to
the inputs so that the maximum audio capability of the AVR can be used. The Main output
audio is also muted. If the AVR is switched off, the main TV output EDID is presented to the
inputs and main audio is unmuted. This selection allows you to use the TV speakers for
audio in normal situations or turn on an AVR and get full HD audio.
AVR via S/PDIF: This mode is similar to AVR via AUX HDMI except the connection to the AVR
is via S/PDIF coax or optical. Because audio capabilities and power status cannot be sensed
through S/PDIF, this mode uses a common prestored audio capability common to most AVRs.
This mode also mutes the audio on the main HDMI output. If mirror mode is used, then the TV's
audio capability, which is normally only stereo PCM, is used; the AVR via S/PDIF mode,
however, enables up to full bitstream DTS audio to be delivered to the AVR.
DVDO-UG-1001-B.01
© 2014 Silicon Image, All rights reserved
19
DVDO Quick6R 6x2 4K Ultra HD HDMI Switcher
Location: Allows you to move the InstaPrevue windows to four different screen locations.
By default, they display vertically along the *Left side of the screen.
Input Naming: This selection displays an onscreen keyboard to allow you to give friendly
names to each input. The default names are *HDMI 1 through HDMI 6.
Activate Names: If checked, the friendly names are shown above the InstaPrevue
windows when the InstaPrevue button is pressed. If *not checked a simple offset display
style is used to show the InstaPrevue selection.
Under Input Naming, scroll to select the input that you want to name.
Use the onscreen keyboard that appears to enter your custom name.
First, select CLR to remove the existing name.
DVDO-UG-1001-B.01
© 2014 Silicon Image, All rights reserved
20
DVDO Quick6R 6x2 4K Ultra HD HDMI Switcher
Then, using no more than 6 characters, enter the new name.
Use lower case shift to enter lower case letters.
Select OK to save.
Customized names are saved to memory and will remain even through a power outage.
Remember that inputs 1 and 6 also support the MHL interface.
On the rear panel, input 6 is spaced a little farther from Input 5 to allow room for special
MHL devices, such as the Roku Streaming Stick. If the Roku stick is plugged into Input 6,
then that port automatically takes the name “Roku”
The Information screen provides switch settings and information about the audio and
video of the active input.
DVDO-UG-1001-B.01
© 2014 Silicon Image, All rights reserved
21
DVDO Quick6R 6x2 4K Ultra HD HDMI Switcher
CEC Enable: If *checked, Quick6R responds to CEC commands such as power on or off.
If unchecked, CEC commands are ignored.
Send Initiate ARC: Enables the Audio Return Channel from the TV to the main HDMI
output and sends a request to the TV to begin sending audio.
Send Terminate ARC: Disables the ARC function and sends a request to the TV to exit
ARC mode.
Load FW from USB: Loads new firmware from an inserted USB flash drive. See the
Updating Firmware section on page 23 for more information.
Factory Settings: Resets Quick6R to factory default settings; refer to the Resetting to
Factory Default Settings on page 25.
EDID Mode: Allows setting a fixed EDID.
HDMI 6 Power: Allows non-MHL mobile devices to charge on port 6 and aids with
compatibility with older devices. When activated, this input always appears to be active
even if the connected source is off. This results in a blank InstaPrevue and PIP window
and the amber input LED is always on. This feature is *Off by default.
*Auto: When selected, Quick6R automatically senses source and display capabilities. Use
this for best compatibility unless you have trouble with a specific device.
Custom: When checked, one of the two capability choices below can be selected. These
options activate a special mode where all capabilities of attached devices are ignored and
the selected ones are used instead. This feature is *Off by default.
1080P, PCM: Sends 1080p video and stereo PCM audio EDID capability information to all
sources regardless of their display capabilities.
1080P, HBR: Sends 1080p video and High Bit Rate (HD) Audio EDID capability
information to all sources regardless of their display capabilities.
When using a custom EDID, this selection overrides any choices in the output setup menu.
DVDO-UG-1001-B.01
© 2014 Silicon Image, All rights reserved
22
DVDO Quick6R 6x2 4K Ultra HD HDMI Switcher
Updating Firmware
Quick6R allows firmware updates using a USB flash drive and the USB port on the Quick6R Rear Panel.
You can check the current firmware version using the OSD menu and accessing the information screen For
example: firmware version 0101 (filename Q6FW0101.BIN) displays as 01.01.xx on the information
screen.
Two files are required to update the Quick6R firmware, that are available from DVDO.com when new
firmware is released. The files are:
•
BIN file which contains the actual firmware binary, and
• OSD file which contains the fonts, text, and graphics for the OSD.
To update the Quick6R firmware:
•
The two files must be placed in the root directory of a FAT- or FAT32-formatted USB flash drive
The files must be in the format Q6FWxxxx.BIN and Q6FWxxxx.OSD where xxxx is the version number
of the firmware.
All letters must be upper case, including the extensions BIN and OSD.
•
•
The two files must have the same firmware version.
Only one pair of firmware files can exist in the root directory of the flash drive.
•
•
There are two methods for updating firmware: through the onscreen display and by pressing the Update
Firmware button. The preferred method is by using the onscreen display.
Updating Firmware Using the Onscreen Display
1. Download the two firmware files from DVDO.com, place them on an USB flash drive, and insert the drive
into the USB slot at the rear panel of Quick6R.
2. Press MENU on the Quick6R remote control, select Advanced Settings, then select Load FW from USB.
3. Press ENTER to confirm that you want to update the firmware.
DVDO-UG-1001-B.01
© 2014 Silicon Image, All rights reserved
23
DVDO Quick6R 6x2 4K Ultra HD HDMI Switcher
4. The following occurs:
a. While updating the green light on Input 3 blinks.
b. If the update was successful, the green lights on Input 1 and 3 blink alternately; if the update failed
the amber light on Input 2 lights solid.
c. Quick6R then resets and enters the active mode.
5. Check the information screen from the main menu to confirm the new firmware version. If the update
failed, use the procedure described in the Upgrading Firmware Using the Update Firmware Button
section.
If you choose to return to the factory default settings, or if instructed to do so as part of the particular
firmware version you are updating to, refer to the Resetting to Factory Default Settings on page 25.
Upgrading Firmware Using the Update Firmware Button
This is a fail-safe method that works even if the firmware becomes corrupted and you cannot load firmware
from the OSD.
1. Download the two firmware files from DVDO.com, place them on a USB flash drive, and insert the drive
into the USB slot on the back of Quick6R.
2. Unplug the power cord and all sources from Quick6R.
3. While pressing the Update Firmware button, plug in the power cord.
4. Continue to press the Update Firmware button until the green LED on port 3 lights solid, for about three
seconds.
5. Release the Update Firmware button.
6. If the update was successful, the green lights on Input 1 and 3 blink alternately; if it fails the amber light
on Input 2 lights solid. This process normally takes between five and ten seconds.
If you choose to return to also reset settings to the factory default settings, or if instructed to do so as part of
the particular firmware version you are updating to, refer to the Resetting to Factory Default Settings on
page 25.
DVDO-UG-1001-B.01
© 2014 Silicon Image, All rights reserved
24
DVDO Quick6R 6x2 4K Ultra HD HDMI Switcher
Troubleshooting a Firmware Update Error
A firmware update error is indicated by one or two solid amber lights on the front of Quick6R. Check the
following to determine why the update failed.
•
•
•
•
•
Be sure the firmware version you are trying to load is different from the one already in Quick6R a firmware
update will not proceed if the versions are identical.
Be sure that there are two files on the root directory of the USB stick and they conform to the naming
convention described in the Updating Firmware section on page 23: Q6FWxxxx.BIN and
Q6FWxxxx.OSD. Upper case letters are required).
If there is no USB flash drive inserted or the files are incorrect, a single or double amber light illuminates
and a reset requires removing the power cord and then reattaching.
Start with an empty USB flash drive formatted to FAT or FAT32.
If the firmware has become corrupted, use the method described in the Upgrading Firmware Using the
Update Firmware Button on page 24.
Resetting to Factory Default Settings
To return to the factory default settings:
1.
2.
3.
4.
Press MENU on the remote control and select Advanced Settings.
Select Factory Settings.
Press ENTER to confirm you want to return to the factory settings.
After about 30 seconds, a message on screen instructs you to reboot. Turn Quick6R off and on again.
Serial Control
The serial port allows an external home automation system to control Quick6R. All menu and remote
commands are available as well as a series of queries to determine the status of Quick6R. Contact DVDO for
a detailed command reference.
DVDO-UG-1001-B.01
© 2014 Silicon Image, All rights reserved
25
DVDO Quick6R 6x2 4K Ultra HD HDMI Switcher
Troubleshooting
Issue
6R
Quick or other sources
turn off unexpectedly.
6R
Quick or sources
power down when the
TV is turned off.
Blu-ray pauses when a
6R
different input on Quick
is selected.
Slow response in the
menu system or in
system switching.
Source is not recognized
6R
by Quick .
No video.
DVDO-UG-1001-B.01
Possible Resolution
CEC commands from the TV are instructing other devices to power down when it is switched off. If
6R
this is undesired behavior, uncheck the CEC Enable box in the Advanced settings Menu on Quick .
6R
6R
This tells Quick to ignore CEC commands, which are still passed through Quick to the sources.
6R
CEC commands from Quick are instructing other devices to power down or pause when switched.
If this is undesired behavior, uncheck the CEC Enable box in the Advanced Settings menu on
6R
6R
6R
Quick . This tells Quick to ignore CEC commands. They are still e passed through Quick to the
sources.
6R
Uncheck the CEC Enable box in the Advanced Settings menu of Quick . Excessive CEC
commands can cause unexpected behavior.
If a source does not cause the corresponding amber input LED to light, indicating that an active
source is plugged in to an HDMI port):
1) If your hardware version is Rev X04 or later (found on the serial number sticker on the bottom of
the unit), use input 5 for that source.
2) If that fails, or if you have Rev X03 or lower, move that source to HDMI input 6.
6R
Then, check the HDMI 6 Power box in the Advanced Settings in the Quick menu. Some earlier
devices need extra help being recognized.
6R
With the HDMI 6 Power setting enabled and an MHL passive cable connected, Quick can charge
any cellphone or tablet.
Check that the source is not forced to a resolution that your display cannot handle.
Check that all HDMI cables are firmly plugged in on both ends.
6R
Try selecting another input on Quick and then switch back to reset the capability tables.
6R
Make sure the correct output mode is chosen in the Quick menu: Mirror Mode if using two
displays; AVR via AUX HDMI if an AVR is connected to the auxiliary HDMI output; AVR via S/PDIF if
an AVR is connected to the S/PDIF output.
6R
Try using a custom EDID if your display is capable of 1080p using the EDID Mode in the Quick
Advanced Settings menu.
© 2014 Silicon Image, All rights reserved
26
DVDO Quick6R 6x2 4K Ultra HD HDMI Switcher
Issue
No audio.
The AVR only plays
stereo when in AVR via
AUX HDMI or AVR via
S/PDIF mode.
6R
Quick is not
autoswitching properly.
InstaPrevue windows
are missing.
Firmware does not
update from the USB
flash drive.
Factory default issues:
Slow response after
resetting to defaults,
Defaults not saved
properly.
DVDO-UG-1001-B.01
Possible Resolution
6R
Make sure that the correct output mode is chosen in the Quick menu: Mirror Mode if using two
displays; AVR via AUX HDMI if an AVR is connected to the auxiliary HDMI output; AVR via S/PDIF if
an AVR is connected to the S/PDIF output.
If in Mirror Mode, make sure the source is not forcing audio, such as bitstream, to a format that the
TV cannot interpret.
Make sure the AVR is powered on and that the correct input is correctly connected to either the Aux
6R
HDMI or S/PDIF inputs on Quick .
If using the S/PDIF connection ensure that it is properly assigned on the AVR to the selected video
input.
Even though the full audio capability of the AVR is being reported back to the selected source, such as
a Blu-ray or DVD player, audio modes such as bitstream DTS and Dolby normally have to be manually
selected on the source menu. PS3 and most DVD players allow the audio mode to be manually
selected as bitstream, which enables full surround sound, even through the S/PDIF channel on
6R
Quick .
6R
If bitstream is chosen on a source and the AVR is then switched off, even though Quick unmutes
the audio stream to the main display, the main display may not be capable of decoding a bitstream
audio channel. Either change the source audio back to PCM/LPCM or turn on the AVR and select
the appropriate input.
6R
Check the autoswitch settings in the Auto Input Select Quick menu. The Manual selection disables
autoswitch.
Only active inputs are displayed in the InstaPrevue screen. Any sources that are powered down or
in standby will not appear. If HDMI 6 Power is used or an input uses a nonstandard power-save
mode, a grey window may appear for that input.
Be sure that both .OSD and .BIN firmware files are in the root directory of the USB flash drive and
the root directory does not contain any other firmware files.
Be sure both files are for the same firmware version number.
Be sure all capital letters are used in the filenames including the extension; format should be
Q6FWxxxx.BIN and Q6FWxxxx.OSD where xxxx is a 4-digit number common to both filenames.
When writing the files to the USB flash drive from a computer, right-click the mouse and choose
Eject ensure that the files are properly closed and written before removing the drive.
6R
When updating with the Update Firmware button, unplug all HDMI connections from Quick ,
6R
remove power from Quick , hold the Update Firmware button, and apply power.
Exactly follow the reset procedure:
6R
Choose Factory Settings from the Advanced Settings menu on Quick .
Press ENTER to confirm and start the reset.
Wait 30 seconds.
6R
Power Quick down and then back up.
© 2014 Silicon Image, All rights reserved
27
DVDO Quick6R 6x2 4K Ultra HD HDMI Switcher
Issue
Audio Return Channel
(ARC) is not working.
InstaPrevue windows
are slow to update.
PIP windows are slow to
update.
6R
Quick is slow to switch.
6R
Quick will not power up
properly, or will not
upgrade firmware.
DVDO-UG-1001-B.01
Possible Resolution
The Audio Return Channel (ARC) depends on a set of instructions passed between the primary
6R
6R
display and Quick . Since Quick replaces the AVR as the main switching device in the system,
6R
Quick has the ability to appear as either a standard switcher or an AVR to the display. First, set up
6R
the TV to allow ARC. Then Quick can be set to appear as a switcher by turning off the ARC
channel or appear as an AVR by turning on the ARC channel.
In the primary TV menu system, turn CEC on. (Different manufacturers use different brand names
for this function; refer to the TV user documentation for more information on enabling commands
over HDMI.)
In the primary TV menu system, enable ARC, which is usually in an audio menu.
6R
If applicable to your TV, scan for and select Quick as the primary audio source.
6R
Use Quick to enable and disable the ARC channel as needed with one of the following methods:
6R
From the Advanced Settings menu in Quick , choose Send Initiate ARC to start the ARC channel
or Send Terminate ARC to stop the ARC channel. These commands are provided separately in
case your TV needs to see the command more than one time to make the switch.
6R
From the Quick remote control, press the ARC button one time to enable the ARC channel and
once again to disable ARC channel.
6R
The path for ARC is from the main display into the Quick Main HDMI output and then out through
6R
the S/PDIF output. When you press the ARC button on the Quick remote control, the S/PDIF
6R
output alternates between the audio from the selected input on Quick to the audio from the main
display.
6R
Depending on the types of sources that you have, one input may need to be active on Quick for
ARC to pass audio properly and for the menu system to be visible.
6R
Be sure that your TV supports ARC and that the connection from Quick to the TV is from the MAIN
6R
HDMI output on Quick to a TV input that supports ARC, and that is normally labeled ARC. Not all
inputs on a TV support ARC.
Try moving the InstaPrevue windows to the left or right position.
6R
Upon initial power up and the first use of InstaPrevue/PIP after powering up, Quick goes through a
discovery process to determine the capabilities and encryption settings of each source, display, and
AVR. Allow all windows to populate one time, and then resume normal use.
6R
When updating with the Update Firmware button, unplug all HDMI connections from Quick .
6R
Remove power from Quick . Hold the Update Firmware button and apply power.
© 2014 Silicon Image, All rights reserved
28
DVDO Quick6R 6x2 4K Ultra HD HDMI Switcher
Issue
Trouble entering friendly
names for inputs.
DVDO-UG-1001-B.01
Possible Resolution
The on-screen-keyboard is provided to make naming your inputs simple.
At the bottom of the keyboard, special characters provide keyboard control:
a
Go to lowercase letters and extra symbols
CLR
Clear entire entry; normally use this first before entering new characters
DEL
delete currently highlighted character
SPC
space
OK
save the entry and return
INS
insert a character
◀
Move cursor left
▶
Move cursor right
Each name can only have 6 characters
© 2014 Silicon Image, All rights reserved
29
DVDO Quick6R 6x2 4K Ultra HD HDMI Switcher
Specifications
Four 300 MHz (4K Ultra HD) HDMI inputs and two HDMI/MHL combination inputs
S/PDIF coax and optical outputs
Two 300 MHz (4K Ultra HD) HDMI outputs
HDMI certification including CEC and ARC
MHL certification
FCC and CE
IR and Serial Control
Serial protocol: 19200: 8, n, 1
Serial commands available on request from [email protected]
USB firmware update using FAT- or FAT32-formatted flash drive
12 VDC, 3 A input
Rack mounting using a shelf
DVDO-UG-1001-B.01
© 2014 Silicon Image, All rights reserved
30
DVDO Quick6R 6x2 4K Ultra HD HDMI Switcher
FCC Interference and Compliance Statement
This device complies with part 15 of the FCC Rules.
Operation is subject to the following two conditions:
1. This device may not cause harmful interference, and
2. This device must accept any interference received, including interference that may cause undesired operation.
FCC WARNING
This equipment has been tested and found to comply with the limits for a Class B digital device, pursuant to Part 15 of the FCC
Rules. These limits are designed to provide reasonable protection against harmful interference in a residential installation. This
equipment generates, uses, and can radiate radio frequency energy and, if not installed and used in accordance with the
instructions, may cause harmful interference to radio communications. However, there is no guarantee that interference will not
occur in a particular installation. If this equipment does cause harmful interference to radio or television reception, which can be
determined by turning the equipment off and on, the user is encouraged to try to correct the interference by one or more of the
following measures:
•Reorient or relocate the receiving antenna.
•Increase the separation between the equipment and the receiver.
•Connect the equipment into an outlet different from that to which the receiver is connected.
•Consult the dealer or an experienced radio/TV technician for help.
Caution
To comply with the limits for an FCC Class B computing device, always use the shielded signal cord supplied with this unit.
The Federal Communications Commission warns that changes or modifications of the unit not expressly approved by the party
responsible for compliance could void the user’s authority to operate the equipment.
CE mark for Class B ITE (Following European standard EN55022/1998; EN61000-3-2/1995; EN61000-3-3/1995, EN55024/1998,
EN60950-1/2001)
Radio Frequency Interference Statement Warning: This is a Class B product. In a domestic environment, this product may cause
radio interference in which case the user may be required to take adequate measures.
DVDO-UG-1001-B.01
© 2014 Silicon Image, All rights reserved
31
DVDO Quick6R 6x2 4K Ultra HD HDMI Switcher
ROKU END USER AGREEMENT
IMPORTANT: READ THIS AGREEMENT CAREFULLY AND REVIEW THE FULL PRODUCT AND SAFETY INFORMATION AT
WWW.ROKU.COM (OR ROKU.COM/CA IF IN CANADA), BEFORE POWERING UP YOUR PLAYER FOR THE FIRST TIME.
Purpose and Scope of Agreement
This Roku End User Agreement (“Agreement”) is the legal agreement between you (“You”) and Roku, Inc. (“Roku”) governing Your use of: (i)
any product that uses the Roku platform to play digital content distributed over the internet or downloaded to the product (a “Player”), (ii) the
firmware and software that Roku installs on, or updates directly to the Player (the “Software”), (iii) the Roku Channel Store (the “Channel
Store”), and (iv) if downloaded by You to a mobile device, any Roku Mobile Application (a “Mobile App”). By establishing an account at
https://owner.roku.com (a “Roku Account”) and using a Player, and/or by downloading a Mobile App, you are agreeing to be bound by the
terms and conditions of this Agreement. If you do not agree to these terms and conditions, you are not granted any right to use the Player or to
access the Channel Store, and you should return the Player to the place where you obtained it for a refund.
Personal, Non-Commercial Use Only; Copying and Redistribution Prohibited; No Rights Except as Expressly Granted
The Player, the Software, the Channel Store, and the Mobile Apps are intended for personal, non-commercial use only. You may not use them
for any commercial or illegal purpose. Copying or redistribution of the Software, a Mobile App, or of any content delivered via the Player (the
“Content”) are strictly prohibited. Except as expressly provided under this Agreement, You do not acquire any intellectual property or other
proprietary rights in or to the Player, the Software, the Channel Store, a Mobile App or the Content, including without limitation, any rights in
patents, inventions, improvements, designs, trademarks, or copyrights, nor do you acquire any rights in any confidential information or tradesecrets. All rights not expressly granted to You in this Agreement are reserved by Roku or its third party licensors. You may not remove or alter
any trademark, logo, copyright or other proprietary notice in or on a Player, the Software, or a Mobile App.
Software Licenses and Third Party Notices
Software License
The Software is proprietary to Roku or its third party licensors and may be used only in connection with a Player. Subject to the terms of this
Agreement, Roku grants You a nonexclusive, nontransferable license to run the Software and any updated versions provided to You by Roku,
only in and as incorporated in a Player. This is a license and not a sale. You may not (i) copy or distribute, sublicense, lease, rent or otherwise
transfer the Software to any third party except as incorporated in a Player; (ii) modify, adapt, alter, translate, or create derivative works of the
Software; (iii) decompile, disassemble, reverse engineer or otherwise derive or attempt to derive source code from the Software; or (iv) have any
of the foregoing done for You by a third party. Roku reserves the right to update the Software from time to time in its sole discretion, including
adding, changing or removing functionalities and features, including but not limited to changing the user interface or the manner in which You are
able to access Content via a Player.
Separately Licensed Code
Notwithstanding the other provisions of this Agreement, certain components of the Software, known as “free” or “open source” software code
(the “Separately Licensed Code”), are subject to separate license terms and are not subject to the license granted above. As required by the
terms of the relevant Separately Licensed Code licenses, Roku makes the Separately Licensed Code, and Roku’s modifications to it, available
on Roku’s website at no charge. Please visit http://www.roku.com/opensource for detailed information on our use of Separately Licensed Code.
The font software files for the fonts used in the closed captions for the Player are subject to the terms of the SIL Open Font License Version 1.1
and are not subject to the license granted above. The license is copied below, and is also available with a FAQ at: http://scripts.sil.org/OFL
Copyright © 2012 vernon adams ([email protected]), with Reserved Font Name ‘Cutive’
Copyright © 2011 Angel Koziupa ([email protected]) and Copyright © 2011 Alejandro Paul ([email protected]), with Reserved Font
Name ‘Bubblegum Sans’
Copyright © 2011-2012 Carolina Giovagnoli (huertatipografica.com.ar [email protected]), with Reserved Font Name ‘Andada’
Copyright © 2010 Pablo Impallari (www.impallari.com│[email protected]) and Copyright © 2010, Igino Marini
(www.ikern.com│[email protected]), with Reserved Font Name ‘Dancing Script’
Copyright © 2012 Brian J. Bonislawsky DBA Astigmatic (AOETI) ([email protected]), with Reserved Font Name ‘Marcellus’
DVDO-UG-1001-B.01
© 2014 Silicon Image, All rights reserved
32
DVDO Quick6R 6x2 4K Ultra HD HDMI Switcher
SIL OPEN FONT LICENSE
Version 1.1 - 26 February 2007
PREAMBLE
The goals of the Open Font License (OFL) are to stimulate worldwide development of collaborative font projects, to support the font creation
efforts of academic and linguistic communities, and to provide a free and open framework in which fonts may be shared and improved in
partnership with others.
The OFL allows the licensed fonts to be used, studied, modified and redistributed freely as long as they are not sold by themselves. The fonts,
including any derivative works, can be bundled, embedded, redistributed and/or sold with any software provided that any reserved names are
not used by derivative works. The fonts and derivatives, however, cannot be released under any other type of license. The requirement for fonts
to remain under this license does not apply to any document created using the fonts or their derivatives.
DEFINITIONS
"Font Software" refers to the set of files released by the Copyright Holder(s) under this license and clearly marked as such. This may include
source files, build scripts and documentation.
"Reserved Font Name" refers to any names specified as such after the copyright statement(s).
"Original Version" refers to the collection of Font Software components as distributed by the Copyright Holder(s).
"Modified Version" refers to any derivative made by adding to, deleting, or substituting — in part or in whole — any of the components of the
Original Version, by changing formats or by porting the Font Software to a new environment.
"Author" refers to any designer, engineer, programmer, technical writer or other person who contributed to the Font Software.
PERMISSION & CONDITIONS
Permission is hereby granted, free of charge, to any person obtaining a copy of the Font Software, to use, study, copy, merge, embed, modify,
redistribute, and sell modified and unmodified copies of the Font Software, subject to the following conditions:
1) Neither the Font Software nor any of its individual components, in Original or Modified Versions, may be sold by itself.
2) Original or Modified Versions of the Font Software may be bundled, redistributed and/or sold with any software, provided that each copy
contains the above copyright notice and this license. These can be included either as stand-alone text files, human-readable headers or in the
appropriate machine-readable metadata fields within text or binary files as long as those fields can be easily viewed by the user.
3) No Modified Version of the Font Software may use the Reserved Font Name(s) unless explicit written permission is granted by the
corresponding Copyright Holder. This restriction only applies to the primary font name as presented to the users.
4) The name(s) of the Copyright Holder(s) or the Author(s) of the Font Software shall not be used to promote, endorse or advertise any Modified
Version, except to acknowledge the contribution(s) of the Copyright Holder(s) and the Author(s) or with their explicit written permission.
5) The Font Software, modified or unmodified, in part or in whole, must be distributed entirely under this license, and must not be distributed
under any other license. The requirement for fonts to remain under this license does not apply to any document created using the Font Software.
TERMINATION
This license becomes null and void if any of the above conditions are not met.
DISCLAIMER
THE FONT SOFTWARE IS PROVIDED "AS IS", WITHOUT WARRANTY OF ANY KIND, EXPRESS OR IMPLIED, INCLUDING BUT NOT
LIMITED TO ANY WARRANTIES OF MERCHANTABILITY, FITNESS FOR A PARTICULAR PURPOSE AND NONINFRINGEMENT OF
COPYRIGHT, PATENT, TRADEMARK, OR OTHER RIGHT. IN NO EVENT SHALL THE COPYRIGHT HOLDER BE LIABLE FOR ANY CLAIM,
DAMAGES OR OTHER LIABILITY, INCLUDING ANY GENERAL, SPECIAL, INDIRECT, INCIDENTAL, OR CONSEQUENTIAL DAMAGES,
WHETHER IN AN ACTION OF CONTRACT, TORT OR OTHERWISE, ARISING FROM, OUT OF THE USE OR INABILITY TO USE THE FONT
SOFTWARE OR FROM OTHER DEALINGS IN THE FONT SOFTWARE.
Third Party Notices
Some of the technology utilized in the Player is subject to third party licenses that require that You be given the following notices:
Hoefler Foundry, Inc. d/b/a Hoefler & Frere-Jones holds the copyright to the font used in the user interface of the Player.
MPEG LAYER-3 AUDIO CODING TECHNOLOGY LICENSED FROM FRAUNHOFER IIS AND THOMSON.
DVDO-UG-1001-B.01
© 2014 Silicon Image, All rights reserved
33
DVDO Quick6R 6x2 4K Ultra HD HDMI Switcher
THE PLAYER IS LICENSED UNDER THE AVC PATENT PORTFOLIO LICENSE FOR THE PERSONAL AND NON-COMMERCIAL USE OF A
CONSUMER TO (i) ENCODE VIDEO IN COMPLIANCE WITH THE AVC STANDARD (“AVC VIDEO”) AND/OR (ii) DECODE AVC VIDEO THAT
WAS ENCODED BY A CONSUMER ENGAGED IN A PERSONAL AND NON-COMMERCIAL ACTIVITY AND/OR WAS OBTAINED FROM A
VIDEO PROVIDER LICENSED TO PROVIDE AVC VIDEO. NO LICENSE IS GRANTED OR SHALL BE IMPLIED FOR ANY OTHER USE.
ADDITIONAL INFORMATION MAY BE OBTAINED FROM MPEG LA, L.L.C. SEE WWW.MPEGLA.COM.
THE PLAYER CONTAINS TECHNOLOGY SUBJECT TO CERTAIN INTELLECTUAL PROPERTY RIGHTS OF MICROSOFT. USE OR
DISTRIBUTION OF THIS TECHNOLOGY OUTSIDE OF THE PLAYER IS PROHIBITED WITHOUT THE APPROPRIATE LICENSE(S) FROM
MICROSOFT. SOME CONTENT OWNERS USE WINDOWS MEDIA DIGITAL RIGHTS MANAGEMENT TECHNOLOGY (WMDRM) AND
OTHERS USE PLAYREADY DIGITAL RIGHTS MANAGEMENT TECHNOLOGY TO PROTECT THEIR INTELLECTUAL PROPERTY,
INCLUDING COPYRIGHTS. THE PLAYER USES WMDRM AND PLAYREADY SOFTWARE TO ACCESS WMDRM-PROTECTED AND
PLAYREADY-PROTECTED CONTENT. IF THE WMDRM OR PLAYREADY SOFTWARE FAILS TO PROTECT THE CONTENT, CONTENT
OWNERS MAY ASK MICROSOFT TO REVOKE THE SOFTWARE’S ABILITY TO USE WMDRM OR PLAYREADY TO PLAY OR COPY
PROTECTED CONTENT. REVOCATION DOES NOT AFFECT UNPROTECTED CONTENT. WHEN YOU DOWNLOAD LICENSES FOR
PROTECTED CONTENT, YOU AGREE THAT MICROSOFT MAY INCLUDE A REVOCATION LIST WITH THE LICENSES. CONTENT
OWNERS MAY REQUIRE YOU TO UPGRADE WMDRM OR PLAYREADY TO ACCESS THEIR CONTENT. IF YOU DECLINE AN UPGRADE,
YOU WILL NOT BE ABLE TO ACCESS CONTENT THAT REQUIRES THE UPGRADE.
USE OF THE PLAYER IS LIMITED TO PRIVATE NON-PROFESSIONAL USE BY CONSUMERS FOR LICENSED CONTENT. NO RIGHTS
ARE GRANTED FOR PROFESSIONAL USE OR FOR USE OF THE PLAYER IN COMBINATION WITH PLAYERS NOT LICENCED UNDER
THE MPEG-1 OR MPEG-2 AUDIO STANDARDS.
Access to Content: Roku Accounts
Definitions Applicable to this Section:
“Channel” means the video, audio, photo, game, and other channels available in the Channel Store to enable delivery of Content via a Player.
“Channel Store” means the on-screen menu accessed via a Player which permits end users to browse and install selected Channels on a
Player.
“Content Provider” means a third party who provides Content that is accessible via the Channel Store and a Player.
“Fee-Based Programming” means the specific Content available to end users of a Player who agree to pay the applicable fee to access the
Content.
“One-Time Fee” means a single one-time charge payable for access to selected Fee-Based Programming.
“Private Channel” means a Channel which may be accessed by entering a developer-provided linking code on the Roku website.
“Public Channel” means a Channel that is generally available to all Roku users and is visible in the Roku Channel Store.
“Subscription Fee” means a monthly or annual fee charged for access to selected Fee-Based Programming.
Establishing an Account
Players are enabled to permit users to access Content provided by various Content Providers. In order to access Content, You are required to
establish a Roku Account at https://owner.roku.com and provide Your credit card number or PayPal account information against which Your FeeBased Programming fees will be charged. At Your option, a PIN code may be required to access certain Fee-Based Programming. If You prefer
to use a PIN, You will choose Your PIN when establishing Your Roku Account preferences. Through Your Roku Account, You will be provided
the opportunity to review monthly summaries of Your charges. In addition, for some of the Content, You may be required to maintain a valid and
active account in good standing with one or more Content Providers. You must adhere to Roku’s terms of service and to the terms of service of
any Content Provider whose Content You choose to access. See www.roku.com/channels#!now-playing for a list of Content Providers for a
Player. Roku may add or remove Content Providers from time to time, in its sole discretion. Roku reserves the right to remove from Your Player
Your access to certain Content if Roku has reason to believe that it is not properly authorized or licensed, violates any law, or has been offered
by a Content Provider in violation of any agreement between the Content Provider and Roku. You are responsible for ensuring that any agerestricted Content is not viewed by any person not meeting the applicable age limits, as specified by law, regulation or the Content Provider.
Fees and Charges
Where Roku manages the handling and processing of Your payments for Fee-Based Programming, the following terms apply:
DVDO-UG-1001-B.01
© 2014 Silicon Image, All rights reserved
34
DVDO Quick6R 6x2 4K Ultra HD HDMI Switcher
One-Time Fee Programming. For Public Channels, Your account will be charged in full when You confirm Your Channel selection or when the
PIN is entered, if applicable. For Private Channels, You will be charged after the Channel appears as an option in Your Channel line-up and You
have confirmed Your desire to purchase access to the Channel.
Subscription Fee Programming. The timing of Your initial selection of subscription Fee-Based Programming will provide the basis for Your bill
dates for all future monthly and yearly Subscription Fees. All Subscription Fees will be charged for the full term of the applicable subscription
period, i.e., for the month or year, as applicable, at the time You order the subscription, except where pro-rated monthly billing applies. Where
the first month is pro-rated, the second and all subsequent charges applied to Your account will be for the full monthly or yearly Subscription
Fee, as applicable.
Subscription Renewals and Cancellations. All subscriptions will automatically renew until cancelled by You. Details for how to cancel a
subscription are available by entering the key words “cancel subscription” in the “Ask a Question” box on www.roku.com/support. If a
subscription is cancelled mid-way through a subscription period, the subscription will end at the end of the subscription period. You will continue
to receive the Content until the end of the subscription period and fees for the remainder of the subscription period will not be refunded.
Credit/Refund Policy. Credits and refunds will be issued only in accordance with the terms posted at www.roku.com/support. For details, go to
www.roku.com/support and enter the key words “credit policy” in the “Ask a Question” box.
Privacy
Our privacy policy, available at http://www.roku.com/about/privacy, explains our policies regarding Roku’s collection, use, and disclosure of Your
personally identifiable and anonymous information, including the collection and provision of such information on behalf of Content Providers. You
should review our privacy policy before using Your Roku Account.
Advertising and Promotional Messages
Roku and the Content Providers reserve the rights to deliver and display advertising and promotional messages to You via a Player and to
include such advertising and promotional messages in or with any user interface, notices or Content that are displayed via a Player.
Ninety (90) Day Limited Player Hardware Warranty and Disclaimer
Subject to the additional terms and conditions set forth below, Roku provides this Limited Warranty only to the person or entity that originally
purchased the Player from Roku or from one of its authorized resellers or distributors, and only for Players purchased and delivered to the end
user within the United States and Canada.
Limited Player Hardware Warranty
Roku warrants the Player hardware against defects in materials and workmanship under normal use for a period of ninety (90) days from the
date of purchase (the “Warranty Period”). If Roku determines that a Player’s hardware is defective, Roku will either repair the unit or replace the
unit with either a new or rebuilt Player, at its option. If the Warranty Period has expired or is otherwise not applicable (see Scope and Limitation
on Warranty below), we will return the Player to You. More information about this warranty and the Roku return process can be found at
www.roku.com/support by clicking on the License/Warranty tab.
Scope of and Limitation on Player Hardware Warranty
The warranty on a Player is limited to the repair or replacement of defective units as described in the Limited Warranty section above. This
warranty does not cover customer training or education, installation, set up adjustments, or signal reception problems. This warranty also does
not cover any issue related to the service provided by Your internet service provider or Content Providers, including but not limited to service
disruption, changes in service terms, changes in offerings, changes in format, or technical problems. This warranty does not cover damage due
to acts of God, accident, misuse, abuse, negligence, commercial use or modification of, or to any part of, Your Player. This warranty does not
cover damage due to improper operation or maintenance, connection to improper voltage supply or attempted repair by anyone other than a
facility authorized by Roku to service Your Player. This warranty does not cover consumables (such as fuses and batteries). THE OBLIGATION
TO REPAIR OR REPLACE DEFECTIVE HARDWARE AS SET FORTH IN “LIMITED PLAYER HARDWARE WARRANTY” ABOVE IS ROKU’S
SOLE OBLIGATION AND YOUR EXCLUSIVE REMEDY IN THE EVENT OF ANY BREACH OF THE LIMITED WARRANTY.
No Warranty for the Channel Store, the Software, or a Mobile App; No Other Warranty for the Players
EXCEPT AS EXPRESSLY PROVIDED IN “LIMITED PLAYER HARWARE WARRANTY”, ABOVE, AND TO THE MAXIMUM EXTENT
PERMITTED BY APPLICABLE LAW, THE PLAYER, THE MOBILE APPS, THE SEPARATELY LICENSED CODE, THE SOFTWARE, AND THE
CHANNEL STORE, AND ANY SERVICES PERFORMED OR PROVIDED BY THE FOREGOING ARE PROVIDED “AS IS” AND “AS
DVDO-UG-1001-B.01
© 2014 Silicon Image, All rights reserved
35
DVDO Quick6R 6x2 4K Ultra HD HDMI Switcher
AVAILABLE”, WITH ALL FAULTS AND WITHOUT WARRANTY OF ANY KIND, AND ROKU HEREBY DISCLAIMS ALL WARRANTIES AND
CONDITIONS WITH RESPECT TO THE PLAYER, THE MOBILE APPS, THE SEPARATELY LICENSED CODE, THE SOFTWARE, AND THE
CHANNEL STORE, AND ANY SERVICES PERFORMED OR PROVIDED BY THE FOREGOING , EITHER EXPRESS, IMPLIED OR
STATUTORY, INCLUDING, BUT NOT LIMITED TO, THE IMPLIED WARRANTIES AND/OR CONDITIONS OF MERCHANTABILITY, OF
SATISFACTORY QUALITY, OF FITNESS FOR A PARTICULAR PURPOSE, OF RELIABILITY OR AVAILABILITY, OF ACCURACY, OF QUIET
ENJOYMENT, OF QUIET POSSESSION, OF WORKMANLIKE EFFORT, OF LACK OF VIRUSES, OR REASONABLE CARE AND SKILL, AND
NON-INFRINGEMENT OF THIRD PARTY RIGHTS. ROKU DOES NOT WARRANT (1) AGAINST INTERFERENCE WITH YOUR ENJOYMENT
OF THE PLAYER, THE MOBILE APPS, THE SOFTWARE, THE SEPARATELY LICENSED CODE, OR THE CHANNEL STORE, (2) THAT THE
FUNCTIONS CONTAINED IN OR SERVICES PERFORMED OR PROVIDED BY THE ANY OF THE FOREGOING WILL MEET YOUR
REQUIREMENTS, (3) THAT THE OPERATION OF ANY OF THE FOREGOING WILL BE UNINTERRUPTED OR ERROR-FREE, OR (4) THAT
DEFECTS WILL BE CORRECTED. EXCEPT AS EXPRESSLY PROVIDED IN “LIMITED HARDWARE WARRANTY” ABOVE, NO ORAL OR
WRITTEN INFORMATION OR ADVICE GIVEN BY ROKU OR ITS AUTHORIZED REPRESENTATIVES SHALL CREATE A WARRANTY, AND
YOU ASSUME THE ENTIRE COST OF ALL NECESSARY SERVICING, REPAIR OR CORRECTION.
Some jurisdictions do not allow exclusions or limitations on implied warranties, so the foregoing limitations of the warranties may not apply to
You. The limited player hardware warranty gives You specific legal rights. You may also have other rights that vary from jurisdiction to
jurisdiction.
Limitation of Liability
IN NO EVENT WILL ROKU OR ITS SUPPLIERS BE LIABLE FOR ANY CONSEQUENTIAL, SPECIAL, EXEMPLARY, INCIDENTAL AND
INDIRECT DAMAGES, OR FOR LOSS OF REVENUE OR PROFITS OR DATA OR USE OR FOR THE COST OF SUBSTITUTE GOODS,
WHETHER IN CONTRACT OR TORT (INCLUDING NEGLIGENCE), ARISING OUT OF, OR IN CONNECTION WITH A PLAYER, THE
CHANNEL STORE, THE MOBILE APPS, THE SOFTWARE, THE SEPARATELY LICENSED CODE, OR YOUR USE THEREOF. IN NO EVENT
WILL ROKU’S OR ITS SUPPLIERS’ TOTAL CUMULATIVE LIABILITY RELATING TO A PLAYER, THE CHANNEL STORE, THE SOFTWARE,
THE SEPARATELY LICENSED CODE, AND THE MOBILE APPS EXCEED THE PURCHASE PRICE OF THE PLAYER. Some jurisdictions do
not allow limitation of liability for certain incidental or consequential damages, so the exclusions set forth above may not apply to You.
Additional Terms Applicable to Mobile Apps
License
The Mobile Apps are licensed, not sold, to You for use only under the terms of this Agreement. Roku, as the licensor, reserves all rights not
expressly granted to You. This license granted to You by Roku for a Mobile App is limited to a non-exclusive, non-transferable license to use the
Mobile App for personal and non-commercial purposes solely on any mobile device that You own or control and as permitted by the usage rules
set forth in any application store terms and conditions and only within the country or location authorized by Roku. This license does not grant any
rights to obtaining future upgrades, updates or supplements to a Mobile App.
Usage Rules
You may not commercialize the Mobile Apps in any way. You will not, and You will not allow any person to, copy the Mobile App or any part
thereof, to analyze it by means of reverse engineering, to decompile, disassemble, attempt to derive the source code of, modify, or create
derivative works of the Mobile App, or of any updates thereto or any part thereof (except as and only to the extent any foregoing restriction is
prohibited by applicable law or to the extent as may be permitted by the licensing terms governing use of any Separately Licensed Code
included with a Mobile App). Any attempt to do so is a violation of the rights of Roku and its licensors. If You breach this restriction, You may be
subject to prosecution and damages. The terms of this license will govern any upgrades provided by Roku to aMobile App, unless such upgrade
is accompanied by a separate license in which case the terms of that license will govern.
Consent to Use of Data
You agree that Roku or a third party contracted by Roku, may collect and use technical and usage data and related information, including but not
limited to information about Your device, system and software, peripherals and Mobile App usage that is gathered periodically to facilitate the
provision of updates, product support and other services (if any) to You related to the Mobile App. Roku may use this information, as long as it is
in a form that does not personally identify You, to improve its products or to provide services or technologies to You.
Export Controls
DVDO-UG-1001-B.01
© 2014 Silicon Image, All rights reserved
36
DVDO Quick6R 6x2 4K Ultra HD HDMI Switcher
You agree not to download any Content, Mobile App, or Software, nor otherwise export or re-export a Player or a Mobile App, into (or to a
national or resident of) Cuba, Iraq, Libya, North Korea, Iran, Syria or any other country as to which the United States has embargoed goods, or
to anyone on the U.S. Treasury Department's List of Specially Designated Nationals or the U.S. Commerce Department's Table of Denial
Orders. By using a Player, the Channel Store, the Software, or a Mobile App,
You are representing and warranting that You are not located in, under the control of, or a national or resident of any such country or on any
such list.
Roku Reserves the Right to Change Policies and Web Pages
The policies and other content of the Roku web pages referred to in this Agreement may be changed by Roku from time to time in its sole
discretion.
Miscellaneous
This Agreement is the final, complete and exclusive agreement between You and Roku relating to a Player, the Channel Store, the Software,
and a Mobile App (as applicable), and supersedes all prior or contemporaneous proposals, advertisements, representations, understandings, or
agreements relating thereto, whether oral or written. No waiver or modification of the Agreement will be valid unless signed by both Roku and
You. Your right to use the Software, a Player, the Channel Store, the Software, and a Mobile App (as applicable) will immediately terminate upon
Your breach of any applicable provision of this Agreement. The waiver of a breach of any term hereof will in no way be construed as a waiver of
any other term or breach hereof. If any provision of this Agreement is held by a court of competent jurisdiction to be unenforceable, the
remaining provisions of this Agreement will remain in full force and effect. This Agreement shall be governed by the laws of the State of
California, as if entered into by residents of California, without giving effect to any conflict of laws principles that may provide the application of
the law of another jurisdiction. Any action or proceeding arising from or relating to this Agreement may be brought in a federal court in the
Northern District of California or in state court in Santa Clara County, California, and You irrevocably submit to the jurisdiction and venue of any
such court in any such action or proceeding. The United Nations Convention on Contracts for the International Sale of Goods shall not apply to
this Agreement.
Contact Information
Should You have any question about this Agreement, or if You desire to contact Roku, please contact us by mail at Roku, Inc., 12980 Saratoga
Ave., Suite D, Saratoga, CA 95070 or by email at [email protected].
Copyright © 2013 Roku, Inc. All rights reserved. Roku and the Roku logo are registered trademarks of Roku, Inc.
Warranty
General Warranty Terms
DVDO, Inc., (DVDO), offers a limited warranty for its DVDO products. Any product first sold to you is guaranteed to be free from
defects in both components and workmanship under regular uses. The warranty period commences on the date the item ships.
Attention: Your invoice with the date of purchase, model number and serial number of the product is your proof of the date of
purchase.
The International Limited Warranty is applicable and shall be honored in every country where DVDO or its Authorized Service
Providers offer warranty service subject to the terms and conditions provided in this International Limited Warranty Statement.
DVDO-UG-1001-B.01
© 2014 Silicon Image, All rights reserved
37
DVDO Quick6R 6x2 4K Ultra HD HDMI Switcher
DVDO Products Warranty Period
The warranty terms for all DVDO products are:
Domestic & Asia
1Year
EU & UK
2 Years
Any third party products such as the Roku Streaming Stick are not covered under the DVDO warranty and are covered under the
third party warranty only. See Roku Warranty statement at the end of this document. If you need warranty replacement of the
Roku stick within the Roku warranty period of 90 days, follow the process in the “Obtaining warranty service” section to receive
authorization to return the stick to DVDO for a replacement.
System Warranty
During the warranty period, the defective hardware of DVDO products will be either repaired or replaced, with new or like new
products, at the discretion of DVDO except in the cases listed in the Limitation of Liability Clause of this document
This International Limited Warranty covers the costs of service parts and labor required to restore your product to fully functional
condition. DVDO will, at its discretion, repair or replace any defective products or parts thereof covered by this International
Limited warranty with refurbished parts of the product that are equivalent to new or like new products in both functionality and
performance. A product or part that is repaired or replaced under this International Limited Warranty shall be covered for the
remainder of the original warranty period applying to the product or part, or for 90-days, whichever expires last. All exchanged
parts and products under this International Limited Warranty will become the property of DVDO.
DVDO offers no warranty of any kind for any pre-installed software, its quality, performance, functionality, or compatibility for a particular
purpose. Nor does DVDO warrant that the functions contained in the software will meet specific requirements or that the operation of the
software will be uninterrupted or error-free. Thus, the software is sold ‘as is” unless otherwise explicitly stated in writing.
Obtaining the Warranty Service
Warranty service or Returned Merchandise Authorization (RMA) under this International Limited Warranty will be honored only if
claims are made within the warranty period. For notifications to DVDO or products outside the warranty period, the process will be
the same, but charges may apply. Contact details may be obtained on DVDO website http://www.dvdo.com/support/rma.aspx.
Customers are requested to perform the following actions before claiming DVDO product as defective:
(a) Owner must notify DVDO, during the warranty period, in writing of alleged defect, and allow DVDO a reasonable
opportunity to inspect the allegedly defective product;
(b) No Product may be returned without DVDO’s consent, The DVDO RMA# must accompany all returns, and all returns
must be delivered to DVDO within the warranty period;
(c) Owner may, then at its own expense, return the allegedly defective Product, freight pre-paid and in the original packaging,
accompanied by a brief statement explaining the alleged defect to DVDO;
DVDO-UG-1001-B.01
© 2014 Silicon Image, All rights reserved
38
DVDO Quick6R 6x2 4K Ultra HD HDMI Switcher
(d) If DVDO determines that any returned Product is not defective, or if DVDO determines that the defect is not covered by
the warranty, DVDO will return the Product to the Owner at Owner’s expense, freight collect, and Owner agrees to pay
DVDO’s reasonable cost of handling and testing;
(e) Upon determining that a returned product is defective, to receive warranty service Owner will need to present the invoice
showing the original purchase transaction. If shipping the product, Owner will need to package it carefully and send it,
transportation prepaid by a traceable, insured method, to the DVDO Service Center. Package the product using adequate
padding material to prevent damage in transit. The original container is ideal for this purpose. Include the RMA#, your
name, return shipping address, email address and telephone number where you may be reached during business hours,
inside the shipping package with the unit. Any replacement unit will be warranted under these Terms and Conditions for
the remainder of the original warranty period or ninety (90) days whichever is longer.
Refer to the user manual enclosed within the product package and information on our website for important tips on how to operate
and troubleshoot the product: http://www.dvdo.com/support/documentation.aspx.
International Warranty
Warranty may be valid when a DVDO product is purchased in one country and transferred to another country, without voiding the
warranty. Please be advised that service availability and response time may vary from country to country. Warranty is
transferrable within the warranty period.
DVDO is not responsible for any export and import control issues, handling fees, tariffs, import duties, and all other related fees
where owner is responsible for shipping its products. This International Limited warranty does not affect your statutory rights.
Limitation of Liability
DVDO reserves the right to refuse warranty service of products under disputable conditions. DVDO also holds the rights to
declare final decision whether products are within warranty conditions. The following actions and damages will result in voiding the
limited warranty:
•
Damage caused by act of nature, such as fire, flood, wind, earthquake, lightning, etc.
•
Damage or incompatibility caused by failure to perform a proper installation or to provide an appropriate operational
environment for the product, including but not limited to unstable wired/ wireless network connection and phone lines, bad
grounding, external electro-magnetic fields, direct sunlight, high humidity and vibration.
•
Damage caused by impact with other objects, dropping, falls, spilled liquids, or submersion in liquids.
•
Damage caused by unauthorized repair or disassembling of the product.
•
Damage caused by any other abuse, misuse, mishandling, or misapplication.
•
Damage caused by third party peripherals (including but not limited to visible damages on motherboard or other electronic
parts of the product such as burn spots after electric discharge, melting, fusing, splitting, etc.)
•
Any unauthorized software or modification of built-in software not approved by DVDO.
DVDO-UG-1001-B.01
© 2014 Silicon Image, All rights reserved
39
DVDO Quick6R 6x2 4K Ultra HD HDMI Switcher
•
The serial number of the product (or serial number stickers of its parts) has been modified, removed, blurred or damaged.
•
Defects caused by transportation, handling or customer abuse.
Disclaimer of Warranty
THIS WARRANTY IS EXPRESSED IN LIEU OF ALL OTHER WARRANTIES, EXPRESSED OR IMPLIED, INCLUDING THE
IMPLIED WARRANTY OF MERCHANTABILITY, THE IMPLIED WARRANTY OF FITNESS FOR A PARTICULAR PURPOSE
AND OF ALL OTHER OBLIGATIONS OR LIABILITIES ON DVDO’S PART, AND IT NEITHER ASSUMES NOR AUTHORIZES
ANY OTHER PARTY TO ASSUME FOR DVDO ANY OTHER LIABILITIES. THE FOREGOING CONSTITUTES THE BUYER’S
SOLE AND EXCLUSIVE REMEDY FOR THE FURNISHING OF DEFECTIVE OR NONCONFORMING PRODUCTS AND DVDO
WILL NOT IN ANY EVENT BE LIABLE FOR COST OF SUBSTITUTE OR REPLACEMENT, COST OF FACILITIES OR
SERVICE, DOWNTIME COSTS, LOSS OF PROFITS, REVENUES OR GOODWILL, RELIANCE DAMAGES, LOSS OF DATA,
LOSS OF USE IF OR DAMAGE TO ANY ASSOCIATED EQUIPMENT, OR ANY OTHER INDIRECT, INCIDENTAL, SPECIAL,
OR CONSEQUENTIAL DAMAGES BY REASON OF THE FACT THAT SUCH PRODUCTS WILL HAVE BEEN DETERMINED
TO BE DEFECTIVE OR NONCONFORMING.
THE RIGHTS AND OBLIGATIONS OF THE PARTIES UNDER THIS AGREEMENT SHALL NOT BE GOVERENED BY THE
PROVISIONS OF THE 1980 U.S. CONVENTION ON CONTRACTS FOR THE INTERNATIONAL SALE OF GOODS OR THE
UNITED NATIONS CONVENTION ON THE LIMITATION PERIOD IN THE INTERNATIONAL SALE OF GOODS, AS AMENDED
(COLLECTIVELY, THE “CONVENTIONS”); RATHER, THE RIGHTS AND OBLIGATIONS OF THE PARTIES SHALL BE
GOVERNED BY THE LAWS OF THE SATE OF CALIFORNIA, INCLUDING ITS PROVISIONS OF THE UNIFORM
COMMERCIAL CODE, AS APPLICABLE. FOR THE AVOIDANCE OF DOUBT, THE CONVENTIONS ARE HEREBY
EXCLUDED.
This Limited Warranty gives you specific legal rights. You may also have other rights that may vary from state to state or from
country to country. You are advised to consult applicable state or country laws for full determination of your rights. Some
jurisdictions do not allow the exclusion or limitation of special, incidental or consequential damages, or limitations on how long a
warranty lasts, so the above exclusion and limitations may not apply to everyone.
Getting Help
For service and support, contact your local dealer.
To find your dealer or to contact DVDO support, go to:
www.dvdo.com/support
or call
DVDO-UG-1001-B.01
© 2014 Silicon Image, All rights reserved
40
DVDO Quick6R 6x2 4K Ultra HD HDMI Switcher
1-888-651-1765
DVDO Inc.
1140 East Arques Avenue, Suite 700
Sunnyvale, CA 94085
Legal notices
®
6
®
®
DVDO , Quick ™, InstaPort , the InstaPort Logos, and InstaPrevue are trademarks or registered trademarks of Silicon Image,
®
Inc. in the United States or other countries. HDMI and the HDMI logo with High-Definition Multimedia Interface are trademarks or
®
registered trademarks of, and are used under license from, HDMI Licensing, LLC. in the United States or other countries. MHL
and the MHL Logo are trademarks or registered trademarks of, and are used under license from, MHL, LLC. in the United States
or other countries.
HDMI Licensing, LLC, MHL, LLC, and DVDO, Inc. are wholly owned subsidiaries of Silicon Image, Inc.
All other trademarks and registered trademarks are the property of their respective owners in the United States or other countries.
The absence of a trademark symbol does not constitute a waiver of Silicon Image’s trademarks or other intellectual property rights
with regard to a product name, logo or slogan.
DVDO-UG-1001-B.01
© 2014 Silicon Image, All rights reserved
41
DVDO Quick6R 6x2 4K Ultra HD HDMI Switcher
Hi!
Let’s get started.
Installing and using the Roku Stick
DVDO-UG-1001-B.01
© 2014 Silicon Image, All rights reserved
42
What’s in the box
Roku
TM
Streaming Stick
What you need
High speed
Internet
Wireless
Router
Roku Ready
6R
Quick
TM
Know your Streaming Stick
A
B
C
[MHL CONNECTOR] Plugs into the MHL port on
the back of your TV.
[STATUS LIGHT] Signifies it is on when lit, or activity
when flashing.
[RESET BUTTON] Used to reset your Streaming Stick
(you probably won’t ever have to use this).
What to do
Plug it in
6R
Plug your Roku Streaming Stick into the MHL port #6 of your Quick . Simple as that!
Roku stick only functions in input #6
6R
6R
Note that when used with Quick , the Quick
remote is used to control Roku
Connect to network
Now you can grab that Roku remote and jump right into guided setup. When prompted, select “Wireless” as your network connection and have your
network name and password ready to do the following:
• Select your network from the list of available networks.
• Enter your network password, if you use one. Remember, network passwords are case sensitive.
Complete guided setup
It’s the final stretch and hooray—it’s a breeze! Continue following the on-screen instructions and you’ll:
• Get the latest software.
• Link the Roku Streaming Stickto your Roku account on your computer.
Your Roku account: During setup, you’ll be prompted to create your Roku account online at roku.com/link. Your Roku Streaming Stick will
generate a unique code that links your player to your new account. Roku accounts are free and secure. And while a valid credit card number is
required to create your account, rest assured you will only be charged if you authorize purchases of apps and games from the Roku Channel Store.
Know your Quick6R remote
6R
The Quick
remote should feel right at home in your hand. We designed it to be incredibly intuitive for watching TV and great for gaming, too!
[BACK] Return to previous screen
[HOME] Return to Roku home screen
[UP] or [DOWN] Move up or down;
[LEFT] or [RIGHT] Move left or right
[OK] Select an option from a menu
[OPTIONS] View more options
[REV SCAN] Rewind, scroll left one page at a time
[PLAY/PAUSE] Start or pause playback
[FWD SCAN] Fast forward, scroll right one
page at a time
E
G
H
I
J
K
L
Troubleshooting
Having trouble completing setup? Don’t worry: it’s usually an easy fix.
If you cannot see a picture on your TV:
• Make sure your TV is turned on. (This tip could save you some embarrassment.)
• Make sure the video input on your TV or home theater receiver is set to match the output (usually HDMI or MHL) used with the Roku Streaming Stick. Most
TVs have an Input button on the remote control to change video inputs.
If you cannot connect to your wireless home network during guided setup:
• If you are not getting 3 or more signal-strength bars above your wireless network, adjust the location of your Roku Streaming Stick and/or wireless router.
Make sure there are no obstructions, like cement walls, between your Roku Streaming Stick and your wireless router.
• Make sure you select the correct wireless router name on the “Wireless” screen.
• Make sure you enter the correct password, if your network is security-enabled (password is case sensitive).
• If you have turned off SSID broadcasting on your wireless router, you can add your network by selecting “My network is not shown” from the “Wireless” screen.
If you cannot hear sound:
• Make sure the connectors on the cables between your TV and home theater receiver are pushed in all the way.
• Make sure the volume on your TV or home theater receiver is turned up and isn’t on mute.
• Make sure the input on your TV or home theater receiver matches the output (HDMI or MHL) used with your Roku Streaming Stick.
Need more help?
roku.com/support
Get the most out of your Roku Streaming Stick.
Check out our FAQs, instructional videos and user forums.
Roku Player
Important Product Information
The License Agreement
The Roku and third-party software license terms can be found at: www.roku.com/license. Use of the Roku player constitutes acceptance of as well as agreement to those license terms.
Ninety (90) Day Limited Hardware Warranty
Subject to the additional terms and conditions set forth below, Roku provides this Limited Warranty:
• Only to the person or entity that originally purchased the Player from Roku or from one of its authorized resellers or distributors;
and
• Only for Players purchased and delivered to the end user within the United States.
Limited Warranty
Roku warrants the Roku Player (“Player”) hardware against defects in materials and workmanship under normal use for a period of ninety (90) days from the date of purchase (“Warranty
Period”). If Roku determines that the Player’s hardware is defective, Roku will either repair the unit or replace the unit with either a new or rebuilt Player, at its option. If the Warranty
Period has expired or is otherwise not applicable (see Scope and Limitation on Warranty below), we will return the Player to you. More information about this warranty can be found at
www.roku.com/support. THE FOREGOING SETS FORTH ROKU’S SOLE OBLIGATION AND YOUR EXCLUSIVE REMEDY IN THE EVENT OF ANY BREACH OF THIS LIMITED WARRANTY.
Return and Warranty Service Process
Please access and review the online help resources at www.roku.com/support before seeking warranty service. To return or obtain warranty service for a Player, you must first obtain
a Return Merchandise Authorization (RMA) number from a Customer Support Representative
(CSR) at Roku. Customer Support contact
information can be found by visiting
www.roku.com/support. RMA numbers expire thirty days from issuance. Roku may attempt to troubleshoot a warranty-related problem prior to issuing a RMA number. Please be
prepared to provide additional information upon request. Once a RMA number is obtained, you must ship your Player, freight prepaid, together with proof of purchase and all
accessories, in either the original packaging or packaging affording an equal degree of protection, to the Roku authorized distribution facility identified by the CSR. Failure to return any of
the accessories could result in a delay and/or result in an invoice to you or credit to Roku for the missing accessories.
Important: When emailing for a RMA number, please provide the following information with your request: (a) model number, (b) serial number, (c) problem description, (d) software
version (located in the System Configuration menu), (e) date of purchase, (f) place of purchase (reseller or online place of purchase), and (g) return shipping address (P.O. boxes are
not accepted).
Scope of and Limitation on Warranty
The warranty on the Player is limited to the repair or replacement of defective units as described in the Limited Warranty section above. This warranty does not cover customer training or education,
installation, set up adjustments, or signal reception problems. This warranty also does not cover any issue related to the service provided by your Service Provider, including but not limited to
service disruption, changes in service terms, changes in offerings, changes in format, or technical problems. This warranty does not cover damage due to acts of God, accident, misuse,
abuse, negligence, commercial use or modification of, or to any part of, your Player. This warranty does not cover damage due to improper operation or maintenance, connection to improper
voltage supply or attempted repair by anyone other than a facility authorized by Roku to service your Player. This warranty does not cover consumables (such as fuses and batteries).
Legal Notices
Federal Communication Commission Interference Statement
This equipment has been tested and found to comply with the limits for a Class B digital device, pursuant to Part 15 of the FCC Rules. These limits are designed to provide reasonable
protection against harmful interference in a residential installation. This equipment generates, uses and can radiate radio frequency energy and, if not installed and used in accordance
with the instructions, may
cause harmful interference to radio communications. However, there is no guarantee that interference will not occur in a particular installation. If this equipment does cause harmful interference to
radio or television reception, which can be determined by turning the equipment off and on, the user is encouraged to try to correct the interference by one of the following measures:
• Reorient or relocate the receiving antenna.
• Increase the separation between the equipment and receiver.
• Connect the equipment into an outlet on a circuit different from that to which the receiver is connected.
• Consult the dealer or an experienced radio/TV technician for help.
This device complies with Part 15 of the FCC Rules. Operation is subject to the following two conditions: (1) This device may not cause harmful interference, and (2) this device must
accept any interference received, including interference that may cause undesired operation.
FCC Caution: Any changes or modifications not expressly approved by the party responsible for compliance could void the user’s authority to operate this equipment.
IEEE 802.11b or 802.11g operation of this product in the U.S.A. is firmware-limited to channels 1 through 11.
Wireless Radio Use:
This device is restricted to indoor use when operating in the 5.15 to 5.25 GHz frequency band.
IMPORTANT NOTE:
FCC Radiation Exposure Statement:
This equipment complies with FCC radiation exposure limits set forth for an uncontrolled environment. This equipment should be installed and operated with minimum distance 20cm
between the radiator and your body.
This transmitter must not be co-located or operating in conjunction with any other antenna or transmitter.
Note to US model owner:
To comply with US FCC regulation, the country selection function has been completely removed from all US models.
The availability of some specific channels and/or operational frequency bands are country dependent and are firmware programmed at the factory to match the intended destination.
The firmware setting is not accessible by the end user.
Safety Precautions
This product has been designed with the highest concern for safety. However, any electrical device, if used improperly, has the potential for causing fire, electrical shock or personal injury. To help
ensure accident-free operation, follow these guidelines:
• Observe all warnings, precautions and instructions.
• Regularly inspect the AC power adapter for damage.
• Stop use, unplug the AC power adapter from the electrical outlet and disconnect any other cables immediately if the Player
functions in an abnormal manner, produces unusual sounds or smells or becomes too hot to touch.
• For more information on product safety and troubleshooting, please go to www.roku.com/support.
Use and Handling
Note: The Roku 3 features motion-sensing control in its gaming remote. The following precautions pertain to use of this remote.
• When playing video games, use in a well-lit area and stand or sit as far away from the television screen as possible.
• Take a 10-15 minute break every hour if playing video games and avoid prolonged use of the remote.
• Stop using the Player immediately if you begin to feel tired or if you experience discomfort or pain in your hands or arms while operating the wireless remote; if the condition persists,
consult a doctor.
• If you experience any of the following health problems, discontinue use of the Player immediately:
— Dizziness, nausea, fatigue or symptoms similar to motion sickness.
— Discomfort or pain in a part of the body, such as eyes, ears, hands, or arms.
If symptoms persist, consult your physician.
• Keep the Player and accessories, including cable ties and fasteners, out of the reach of small children.
• Do not touch the Player or connected cables during an electrical storm.
• Do not allow liquid, small particles or other foreign objects to get into the Player or accessories.
• Do not expose the Player to smoke or steam.
• Do not expose the Player or accessories to high, temperatures, high humidity or direct sunlight.
• Do not place the Player or the remote on the floor or in a place where they may cause someone to trip or stumble.
• To prevent possible hearing damage, do not listen at high volume levels for long periods.
IMPORTANT tips about battery handling!
Inserting batteries: When inserting batteries, be sure to insert each battery negative (-) side first, pushing it into the coil and then into the compartment. Never insert batteries positive
(+) side first.
Replacing batteries: Always replace dead batteries with two brand-new batteries from the same manufacturer. Never use damaged batteries.
Disposal of batteries: Always dispose of batteries following federal guidelines or local ordinances. Do not dispose of used batteries in an open fire.
Warning: If your remote gets warm/hot during use, discontinue use and contact Roku Customer Support immediately at roku.com/support.
There is a risk of explosion if battery is replaced by an incorrect type.
www.roku.com
Copyright © 2014 Roku, Inc. All rights reserved. Roku and the Roku logo are registered trademarks of Roku, Inc.
the