1
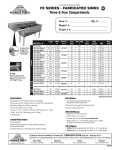
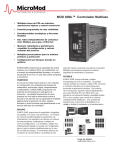
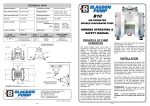
Cadco Ltd. WARRANTY Cadco warrants that this appliance be free from defects in material and workmanship for a period of one year from date of purchase. Gasket and bulbs have a 90 day warranty. (A copy of your original purchase receipt is required for proof of purchase date. This warranty does not cover consequential damage of any kind or damages resulting from accident, misuse, abuse, or external service or repair attempts by unauthorized personnel. Inquiries concerning this warranty and the use and maintenance of this unit should be directed to Cadco, Ltd. Please note: This appliance is a carry-in service item; customer is responsible for packaging the unit securely and returning it to Cadco* or an authorized service center for service, along with a copy of your original purchase receipt, a description of the problem, and your name, shipping address and phone number. (Warranty provides repair of unit and returning it to customer.) -If sending it to Cadco, ship to: Cadco, Ltd., Attn: REPAIR, 145 Colebrook River Road, Winsted, CT 06098. *Call Cadco at 860-738-2500 for Return Authorization Number BEFORE returning any item directly to Cadco for repair. Return Authorization Number MUST be written on outside of carton to track the unit and avoid service delays. -If not sending it directly to Cadco for service, call us at 860-738-2500 for the location of your nearest authorized service center. -*Canadian customers contact Joicey Food Services, Ltd. in Ontario, Tel. (905) 825-9665.) When shipping the unit for service, we recommend that you insure it for its original purchase price. Cadco is not responsible for damage or loss of unit in transit to service location. Warranty is applicable only in USA and Canada*. (*Canadian customers contact Joicey Food Services, Ltd. in Ontario, Tel. (905) 825-9665.) IMPORTANT NOTES: Model #_______________Date of Purchase: __________________________ Commercial Convection Oven Use & Care Manual Model OV-250 Power Voltage 1,500 Watts/12.5 Amps 120 Volts Frequency 60 Hz Place of Purchase: _______________________________________________ To expedite all warranty claims please keep your dated sales receipt from place of purchase. 8/17/2004 RV05 Cadco, Ltd. 145 Colebrook River Road Winsted, CT 06098 860-738-2500 Fax 860-738-9772 E-mail: [email protected] Website: www.cadco-ltd.com NOTES Congratulations on your purchase of the high-performance Cadco OV-250 Countertop Convection Oven. IMPORTANT SAFEGUARDS 1. 2. 3. READ ALL INSTRUCTIONS BEFORE USE. Do not touch hot surfaces!!! Always use hot pad or pot holder until unit cools. To protect against electrical hazards, do not immerse cord, plug, or oven in water or any other liquid. 4. Close supervision is necessary when any appliance is used by or near children. 5. Unplug from outlet before cleaning. Allow to cool completely before putting on or taking off parts. 6. Do not operate any appliance with a damaged cord or plug or, or if the appliance malfunctions or has been damaged in any manner. Call Factory Service at 860-738-2500 with any questions or service needs. (Canadian customers contact Joicey Food Services, Ltd. in Ontario, Tel. (905) 8259665.) 7. Do not use outdoors. 8. Do not let cord hang over edge of table or counter or touch hot surfaces. 9. Do not place on or near a hot gas or electric burner. 10. Extreme caution must be used when moving an appliance containing oil or other hot liquids. 11. Use extreme caution when removing a sheet pan used as a drip tray or disposing of hot grease. 12. Do not use appliance for other than intended household use. 13. Do not clean with metal scouring pads. Pieces can break off the pad and touch electrical parts, creating a shock hazard. 14. A fire may occur if this appliance is covered or touching flammable material, including curtains, walls, etc., when in operation. Do not store any item on top of the appliance when in operation. 15. Extreme caution should be exercised when using containers other than the intended, proper heat tempered metal and glass pans for baking. 16. Always unplug appliance from outlet when not in use. 17. The use of accessory attachments not recommended by the appliance manufacturer may cause injuries. 18. Do not cover any part of the oven or a sheet pan used as a drip tray with aluminum foil; this may cause overheating of the oven. SAVE THESE INSTRUCTIONS. 2 11 NOTES TABLE OF CONTENTS Door Assembly /Disassembly...........................................4 Important Notes........................................................................4 Installation................................................................. 5 Operating Guidelines .................................................... 5 Convection Oven Recipe Conversion Guidelines.............6 Cleaning Instructions........................................................6 Recipes for Baking ...........................................................7 Roasting Chart .................................................................9 Internal Temperature Chart for Meats ..............................9 Notes ..............................................................................10 Warranty.........................................................................12 For menu ideas or if you are unsure of a procedure, e-mail the Cadco Executive Chef: [email protected] 10 3 Oven Door Removal Instructions (To attach the door, reverse the directions,starting with Step 3) Step 1 (side view) Open the door fully. Side of Oven Hinge lock - in down/unlocked position Door (fully opened; does not open flat) Step 2 Side of Oven Bottom Hook (side view) Rotate the Hinge Lock to up position. Side of Oven Hinge Lock- must be in up/locked position) Top Hook Step 3 ) (2 (1) PLEASE NOTE: Hinge Locks may become jostled into the unlocked position by rough handling of the carton during shipping, causing the door to be unhinged from the oven when the carton is opened. If this occurs, follow the directions for attaching the door. 2. 3. 4. 5. Carefully remove the protective film from the external stainless steel walls before using oven for the first time. If any glue residue should remain, remove it with a suitable solvent recommended for stainless. Your unit is equipped with a grounded, current-carrying plug. This plug will fit into any 3 pronged outlet. This is a SAFETY feature. Electrical connection must be a proper outlet for the 3 pronged cord. Before connecting power, make sure the voltage and frequency correspond to the data plate on the oven (120 volts/60hz.) , and that your electrical circuit can handle the 12.5 Amps used by the oven in addition to any other appliances operating on the same circuit. A short power cord is provided to reduce the hazards resulting from accidents such as tripping, entanglement, etc. Reset button This oven is equipped with a manually resettable CAP thermal breaker for protection against overheating. It completely deactivates the oven if there is an intervention. To reset this device, remove the black cap positioned to the bottom of the back of the oven, push the reset button, and replace the black cap. This oven uses 12.5 amps. If the thermal breaker shuts your oven off, before turning your oven back on, be sure to check your entire circuit to verify that the total amps being drawn by all the appliances, lights, etc. on that circuit do not ON OFF exceed the amps available on that circuit. Figure 1 Reset button 4 BEEF ROAST 300° F Hinge Arm 1) Tilt door up at about 45o angle until the Top Hook on the Hinge Arm is lower than the Top Hook Roller, 2) then pull out of the Hinge Slots. 1. VARIETY OF MEAT / OVEN TEMP. (side view) Top Hook Roller Hinge Lock- in up/locked position) Bottom Hook IMPORTANT NOTES ROASTING CHART FRESH PORK 300° F LAMB-300° F VEAL - 300° F CUT WEIGHT IN POUNDS APPROX. ROASTING TIME* INTERNAL TEMP. AT END OF ROASTING TIME Standing Rib 3-6 Standing Rib 7-10 Rib Roast, boned and tied 3-6 Sirloin Tip, tied 4-7 Eye Round 3-6 Loin, bone-in Loin, boned and tied Picnic Shoulder Fresh Ham Leg of Lamb 3-7 3-5 5-8 3-7 3-8 24-28 min/lb. 29-34 min/lb. 14-18 min/lb. 19-23 min/lb. 24-29 min/lb. 17-23 min/lb. 24-30 min/lb. 31-37 min/lb. 14-17 min/lb. 18-21 min/lb. 22-25 min/lb. 15-18 min/lb. 19-23 min/lb. 24-28 min/lb. 26-33 min/lb. 20-30 min/lb 29-34 min/lb. 26-33 min/lb. 26-25 min/lb. 25-35 min/lb. 30-45 min/lb 1-1 ¾ hrs 1 ¼ -2 hrs 1 hr 1 ½ -2 hrs 1 ¾ - 2 ½ hrs 1 ½ -1 ¾ hrs 1 ¾ hrs med 140° well 160° rare 130° med l40° well 160° rare 130° med 140° well 160° rare 130° med 140° well 150°-160° rare 130° med 140° well 160° well 170° well 170° well 170° well 170° med 140°-150° well 170° well 170° 180°-185° 180°-185° 180°-185° 180°-185° 180°-185° 180°-185° 180°-185° Veal Shoulder, rolled Roasting Chicken POULTRY - 325° F Roasting Chicken, stuffed Cornish Game Hens POULTRY-300° F Turkey Turkey, stuffed POULTRY - 400° F Duckling Duckling, stuffed 4-7 3½ -6 3½ -6 1-1 ½ 6-10 6-10 4-6 4-6 *Note: Meat should be at refrigerator temperature. INTERNAL TEMPERATURE CHART FOR MEATS (Use as general guidelines) Rare 130° F Medium Rare 135° F Medium 140° F Medium Well 150° F Well 160° - 185°F 9 RECIPES FOR BAKING - continued Butter Cookies 1 Cup Unsalted Butter or Margarine 3/4 Cup Sugar 2 Eggs 1 Tbsp Water 1 Tsp Vanilla 1/8 Tsp Salt 3-1/2 Cups All Purpose Flour 1 Egg White Slightly Beaten Buttermilk Biscuits 2 Cups Sifted, All Purpose Flour 2-1/2 Tsp Baking Powder 1/2 Tsp Salt 1/2 Tsp Baking Soda 1/3 Cup Butter 3/4 Cup Buttermilk Baked Potatoes Tuna Noodle Casserole 2 Cups Cooked Noodles 1 Drained Can of Tuna Fish 1 Cup of Condensed Mushroom Soup (Season soup with dry sherry or curry powder and 1/4 cup chopped parsley) 1/2 Cup Buttered Corn Flake Crumbs or Buttered Bread Crumbs Baked Macaroni and Cheese Cook 4 Ounces (1 Cup) Macaroni 1 Cup Shredded Cheddar Cheese 2 Eggs 2/3 Cups Milk 1/4 Tsp Salt 1 Tablespoon Grated Onion 1/4 Tsp Paprika Cream together butter and sugar, add eggs, water, vanilla and salt and beat well. Add flour, a little at a time, mixing well. Cover and chill dough for at least an hour, longer is better. Take half the dough (the other half keep chilled and roll out on floured surface to 1/8" thick. Cut the dough with your favorite cookie cutter, dipping cutter into flour to prevent sticking. Place cookies on ungreased pans. Brush tops with egg white and lightly sprinkle with sugar. Bake at 320 degrees F for 10-12 minutes or until cookies are golden. Yield 4 dozen. 6. This model is equipped with a powerful fan to move large quantities of air, giving you optimum convection heat. When oven is in operation, you will hear the noise of the fans motor. This is normal. 1. Plug unit into a grounded, 3-prong,120 volts/60hz outlet. Be sure you have at least 12.5 amps available for this oven on your circuit. When positioning oven on counter, be sure the oven has a minimum of 4 of air space on the top and 2 all sides. See Important Safeguards on Page 2 for additional guidelines. 2. OPERATING GUIDELINES These convection ovens can be automatically controlled by the use of the temperature knob and the timer/on knob. (See Figure 2.) 2 position control knob l Continuous on turn knob hard to LEFT to On position (the symbol.) Unit will remain on until knob is turned back to Off (0). l Timer Turn knob to select cooking times up to 120 minutes. Timer will automatically turn oven off at completion of time. Combine all dry ingredients and sift into mixing bowl. Add butter and cut into flour with a knife or pastry blade. Knead dough about three minutes and roll out into a circle about 1/2" thick. Cut biscuits to the desired size, dip each one into melted butter and arrange on parchment paper covered shelf. Bake at 350 degrees F for 12-15 minutes or until lightly brown on the bottom. Preheat oven to 375 degrees F. Place scrubbed potatoes on shelves. Bake about 45 minutes at 375 degrees F. (Time will depend on size and quantity of potatoes.) Preheat oven to 325 degrees F. Combine first three ingredients in casserole dish. Top casserole with buttered crumbs. Bake at 325 degrees F for 25-30 minutes or until top is browned. Figure 2 1. 2. 3. 2. 3. Preheat oven to 325 degrees F. Layer cooked macaroni in a baking dish alternately with shredded cheddar cheese. Combine next five ingredients, pour over layered macaroni. Bake at 325 degrees for 25-30 minutes. 8 INSTALLATION INSTRUCTIONS 4. 5. Light indicates the elements are heating up. Light goes out when set temperature is attained. Temperature knob can be set for temperatures between 1750 and 5000 F. ALWAYS PREHEAT OVEN FOR A MINIMUM OF 7 MINUTES. Shelf positions - This model has 3 shelves. When cooking larger volume foods, it may not be appropriate to use all the shelves. Use the shelf positions that best center the food in the oven. You may use a sheet pan as a drip tray on the bottom of the oven. Warming - Set temperatures around 1750F. Reheating - If food is frozen, cook longer at lower temperatures. This will ensure that food is heated evenly and prevent food fillings from being served too hot. For proper food safety, be sure that internal temperature of reheated food reaches at least 1650F. For even cooking - Always space food evenly on your cooking pans, space pans evenly in the oven, and leave space between shelves for proper air circulation. This oven can handle up to three standard 1/4 size commercial sheet pans at once. They also handle up to two 1/2 size, 2-1/2 deep commercial steam table pans. When preparing meat - Always put a sheet pan on the bottom of the oven cavity to catch any drips. DO NOT cover any part of the oven or a sheet pan used as a drip tray with aluminum foil, which may cause oven to overheat, or may get caught in fan. 5 RECIPES FOR BAKING CONVECTION OVEN RECIPE CONVERSION GUIDELINES Cooking is not an exact science, due to many variables such as size and quantity of food, temperature of food when first put in the oven, etc. Here are general guidelines for converting conventional recipes for use in a convection oven. Option one: Bake at the same temperature that the conventional recipe recommends, but for less time. Option two: Bake for the amount of time that the conventional recipe calls for, but reduce the temperature of the oven by about 25 degrees F. This is the best option for batter -type items such as muffins and cakes, Option three: (Best) Bake for a little less time than the conventional recipe calls for, and also reduce the temperature of the oven. Cheese Cake 1-1/2 Lbs Cream Cheese 1-1/4 Cups Sugar 5 Eggs 1 Tsp Vanilla CONVECTION COOKING TIPS 1. If your original conventional recipe baking time is less than 15 minutes, keep the original baking time but reduce the temperature by 25-30 degrees F. 2. As with any recipe, check the food about 5-10 minutes before the expected finish time, due to variables such as the temperature of the food when first placed in the oven, quantity of food in the oven, your preferred level of doneness, etc. 3. The more food in the oven at one time, the longer the cooking time. 4. Some folks recommend preheating any oven at 50 degrees F above the desired temperature, then turning the temperature control down to the desired temperature once you put the food in and close the door. This is because an oven can lose one degree per second that the door is open. The average loss is about 50 seconds. 5. For best results, leave about an inch around the perimeter of the oven interior for air to circulate. 6. The choice of when to use a convection oven and when to use a conventional oven with radiant heat usually depends on the cooking container rather than the food. The whole point of convection cooking is to have the heat circulating around the food. Casserole lids and high-sided cooking pans block the heat from circulating around the food and prevent the oven from cooking efficiently. A few rules of thumb for best results: l Cookie sheets use convection oven l Shallow pans (inch sides or so) use convection oven l Anything covered (including roasting bags) use conventional oven l Deep roasting pans use conventional oven (Exception : In a convection oven, you can roast meats like turkey, beef or lamb in roasting pans that have inch-and-a-half-high sides if you elevate the meat on a rack, which you should probably do anyway. ) 7. If items such as cakes with runny batter, muffins, or cookies are baking unevenly, it is generally because the baking temperature is too high or the oven was not preheated long enough before baking. 1. 2. 3. 4. CLEANING & MAINTENANCE INSTRUCTIONS ALWAYS UNPLUG UNIT AND ALLOW TO COOL BEFORE CLEANING. The interior and exterior of the oven are stainless steel and can be cleaned easily with any cleaner recommended for stainless steel. DO NOT USE ANY ABRASIVE PRODUCTS. The door can be removed for cleaning. (Page 3 has disassembly instructions.) The shelves and sheet pan may be washed in hot sudsy water or in your dishwasher. 6 1-2-3-4 Cake 1 Cup Butter 2 Cups Sugar 2 3/4 Cup All Purpose Flour 3 Tsp Baking Powder 1 Cup Milk 1 1/2 TspVanilla 4 Eggs Generously grease bottom and sides of 8"x8"x 2" pan or 9" spring form pan. Generously sprinkle the sides and bottom of baking pan with 1/2 cup of graham cracker crumbs, cornflake crumbs, or your favorite cookie crushed into crumbs, and set aside. Beat cream cheese until soft and light, adding sugar 1/4 cup at a time. Continue to beat, adding eggs, one at a time, and then vanilla. Preheat oven to 325 degrees F and bake for about 30-35 minutes. Butter and flour two 9" baking pans. Cream butter and sugar until light and fluffy. Add eggs one at a time, beating after each addition. Sift flour, baking powder and salt together. Combine milk and vanilla. Add dry ingredients and milk alternatively to the egg batter mixture. Pour into prepared bake pans. Preheat oven to 325 degrees F, and then bake 35-40 minutes. NOTE: You can adapt your own favorite recipes or use prepackaged cake mixes. Chocolate Chip Cookies 3/4 Cup Butter 3/4 Cup White Sugar 3/4 Cup Brown Sugar 1 Egg 1 Tsp Vanilla 3 Tbsp Milk 2 1/2 Cup Sifted Flour 1 /4 Tsp Salt 12 Oz. Semisweet Chocolate Pieces Cream butter and sugar together. Beat in eggs, vanilla and salt. Sift dry ingredients together and add to the batter, stirring with each addition. Stir in chocolate pieces. Drop a full teaspoon of batter for each cookie on very lightly greased cookie sheet. Preheat oven to 300 degrees F, then bake 8-12 minutes. NOTE: You can try your favorite recipe using these basic baking instructions. 7