1
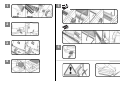
CWB406, CWB406E
USER GUIDE
P
INSTRUCÕES DE UTILIZÇAÕ
D
BEDIENUNGSANLEITUNG
S
BRUKSANVISNING
F
MODE D’EMPLOI
GB
DK
H
Pуководство для полъзовaтеля
KEZELÉSI UTASÍTÁS
BETJENINGSVEJLEDNING
GR
ODGCIER VQGRGR - EKKGMIJA
BRUKSANVISNING
CZ
NÁVOD K POUŽITÍ
TR
KULLANIM KILAVUZU
NL
GEBRUIKSAANWIJZING
N
I
ISTRUZIONI PER L’USO
FIN
KÄYTTÖOHJE
E
INSTRUCCIONES DE FUNCIONAMIENTO
PL
INSTRUKCJA OBSŁUGI
CWB406
RUS
CWB406E
www.accoeurope.com
GB
Welcome
Thank you for choosing a Rexel binding machine.
We produce quality binding machines with features
that give you excellent results every time.
Before using your machine for the first time, please
take a few minutes to read through this guide.
Retain these instructions for future reference.
D
Bienvenue
Merci d'avoir choisi un perforelieur Rexel. Nous
visons à produire des produits de qualité, dotés de
caractéristiques garantissant toujours d'excellents
résultats.
Avant d'utiliser votre machine pour la première fois,
veuillez prendre quelques minutes pour lire
attentivement ce guide.
NL
Welkom
Bedankt voor het aanschaffen van een Rexel
pons/bindmachine. Als fabrikant streven wij er naar
pons/bindmachines van hoge kwaliteit te leveren,
met producteigenschappen waarmee u elke keer
opnieuw een perfect eindresultaat kunt realiseren.
Neem, voordat u de machine voor de eerste maal
in gebruik neemt, de tijd om deze
gebruiksaanwijzing door te nemen.
I
Bienvenidos
N
Velkommen
Takk for at du valgte en Rexel innbindingsmaskin.
Vårt mål er å produsere innbindingsmaskiner på
et høyt nivå, med funksjoner som til enhver tid gir
utmerkete resultater.
Før du bruker maskinen for første gang, vennligst
ta deg noen minutter for å lese gjennom denne
bruksanvisningen.
H
Üdvözöljük!
Köszönjük, hogy Rexel iratfűzö gépet választott.
Célunk, hogy olyan minöségi iratfűzö gépeket
kínáljunk, amelyek mindig kiváló eredményeket
biztosítanak.
Agép használatba vétele elött fordítson néhány
percet arra, hogy figyelmesen elolvassa ezt az
útmutatót.
Willkommen
Vielen Dank, dass Sie sich für ein Rexel
Bindesystem entschieden haben. Unsere
Qualitätsbindegeräte verfügen über einzigartige
Funktionen, durch die Sie durchgängig exzellente
Ergebnisse erzielen.
Bevor Sie Ihr Gerät zum ersten Mal verwenden,
nehmen Sie sich bitte einige Minuten Zeit, um
diese Anleitung durchzulesen.
F
E
Gracias por escoger una máquina encuadernadora
Rexel. Nuestro objetivo es producir máquinas
encuadernadoras de calidad con unas funciones
que le permitan obtener unos resultados
excelentes cada vez.
Antes de utilizar su máquina por primera vez le
rogamos pase unos minutos leyendo esta guía.
Benvenuti
Desideriamo innanzitutto ringraziarvi per aver
scelto una Rilegatrice Rexel. Il nostro obiettivo è di
offrirvi una rilegatrice di ottima qualità, con
caratteristiche che vi aiuteranno ad ottenere
risultati eccellenti in qualsiasi situazione.
Prima di usare la vostra rilegatrice, vi preghiamo di
dedicare alcuni minuti alla lettura di questo
opuscolo.
FIN
P
Bem-vindo
Agradecemos a sua escolha de uma
encadernadora Rexel. Empenhamo-nos em
produzir encadernadoras de qualidade dotadas de
características que lhe permitam criar sempre
resultados excelentes.
Antes de utilizar a sua máquina pela primeira vez,
tire uns minutos para ler este guia.
PL
S
Välkommen
Tack för att du valde en bindningsmaskin från
Rexel. Vår målsättning är att tillverka
kvalitetsbindningsmaskiner med funktioner som gör
det möjligt att få utmärkta resultat varje gång.
Innan du använder maskin första gången, bör du
ägna några minuter åt att läsa igenom den här
handboken.
DK
Velkommen
Tak fordi du valgte en Rexel indbindingsmaskine.
Det er vores mål at fremstille indbindingsmaskiner
af høj kvalitet med funktioner, som gør det muligt
for dig at opnå fremragende resultater hver gang.
Før du tager maskinen i brug første gang, bedes
du bruge et par minutter på at læse denne
vejledning igennem.
Tervetuloa
Kiitos, että olet valinnut käyttöösi Rexelkampasidontalaitteen. Tavoitteenamme on
valmistaa käyttöominaisuuksiltaan luotettavia
koneita.
Tutustu näihin ohjeisiin ennen koneen
käyttöönottamista.
Witamy
Dziękujemy za wybranie bindownicy Rexel.
Dokładamy starań, aby produkować wysokiej
jakości bindownice, których parametry zawsze
zapewnią użytkownikowi uzyskiwanie znakomitych
efektów pracy.
Przed pierwszym użyciem urządzenia prosimy
poświęcić kilka minut na przeczytanie niniejszej
instrukcji.
RUS
добро пожaловaтъ
Блaгодaрим вaс зa то, что вы приобрели
брошюровочную мaшину Rexel. Haшa зaдaчa –
выпуск кaчественных брошюровочных мaшин,
конструктивные особенности которых
позволяют вaм получaтъ неизменно отличный
резулътaт.
Прежде чем приступитъ к эксплуaтaции
мaшины, нaйдите несколъко минут, чтобы
внимaтелъно прочестъ дaнное руководство.
GR
Jak Oa
Ra ao
o dakna a a
k Rexel.
Ro a a a ao a k
oa aa o a
naako a aokaa o.
CZ
Vítejte
Děkujeme Vám, že jste si vybrali vázací stroj
Rexel. Naším cílem je vyrábět kvalitní vázací stroje
s takovými vlastnostmi, které Vám umožní
dosahovat kdykoliv skvělých výsledků.
Před prvním použitím svého stroje prosím věnujte
několik minut pročtení tohoto návodu.
TR
Hoş geldiniz
Rexel ciltleme makinelerini tercih ettiğiniz için
teşekkür ederiz.
Her zaman mükemmel sonuçları elde etmenizi
sağlayacak özelliklere sahip kaliteli ciltleme
makineleri üretmeyi hedefliyoruz.
Makinenizi ilk kez kullanmadan önce lütfen bir kaç
dakikanızı ayırarak bu kılavuzu okuyun.
1
5
2
3
6
4
Contents
●
Inhalt
Sisällys
●
●
Table des matières
●
Spis
treści
●
Inhoudsopgave
●
Cдержaние
●
Indice
●
Índice
Tartalom
●
GB
Getting Started
2
N
D
Inbetriebnahme
4
F
Mise en route
Hoe te beginnen
●
●
Índice
●
Innehåll
П
●
●
Indhold
Obsah
●
●
Indhold
İçeriği
Kom igang
20
FIN
Valmistelutoimet
22
6
PL
Pierwsze uruchomienie
24
8
RUS
Haчaло рaботы
26
Istruzioni per l'uso
10
H
Bevezetés
28
E
Incio le Permitira Encuadernar
12
GR
30
P
Preparação
14
CZ
Začínáme
32
S
Sätta igång
16
TR
Başlangıç
34
Sådan kommer du i gang
18
NL
I
DK
1
Getting Started
Safety tips
●
In order to avoid overloading your machine, please refer to the
maximum punch guide located on the front of your machine
before punching.
●
DO NOT punch metallic objects such as staples or paper clips.
●
Please empty the waste tray regularly.
●
Ensure that the machine is operated on a flat stable surface.
●
Never lift the machine by the punching handle. Always use the
hand grips located on the side of the machine.
●
To avoid risk of injury DO NOT put your fingers into the wire
binding channel.
Safety tips - CWB406E only
●
DO NOT obstruct air inlets and outlets.
●
DO NOT use the binder if the power cord (mains cable) is
damaged.
●
DO NOT place the power cord where it may be tripped over or
pulled. Ensure it does not come into contact with hot surfaces
such as pipes or radiators. Make sure the cable is not squashed
or pinched.
GB
●
When complete the green LED will remain ON.
●
The binder is ready for operation.
WARNING:
Troubleshooting
●
This machine has a recommended duty cycle of 5 operations per
minute, up to a maximum of 30 minutes on / 30 minutes off.
●
This machine is fitted with a thermal overload safety feature. In
extreme circumstances, the motor may overheat which will
activate the safety feature. This feature will prevent the machine
punching until it has cooled sufficiently.
●
The thermal overload switch will automatically reset after
approximately 15 minutes. The machine will then operate as if it
had been overloaded (see step 4 below).
●
DO NOT leave the binder connected to the electricity supply when
not in use.
●
DO NOT immerse the binder in water or other liquids. Doing so
will result in ELECTRIC SHOCK.
●
DO NOT attempt to disassemble the binder. Always consult a
qualified person.
●
Unpacking and setting up
1
●
●
●
●
●
Your machine is ready to use when removed from the box. Retain
the packaging in case you need to return the machine for repair.
●
●
●
●
The punching mechanism is coated with a protective film of
lubricant, which will mark your paper. Clear this by punching scrap
sheets of paper until clean prior to binding.
Unpacking and setting up - CWB406E only
Connect the binder to the electricity supply with the power cord
supplied.
Switch ON using the ON/OFF switch located at the rear of the
binder by the power inlet socket.
On manual machines, always ensure the punch handle is in the
upright position before centering the paper.
●
Load the first paper stack into the punch slot.
●
Centre the paper using the dial located at the front of the
machine.
Adjusting your machine for A5:
●
For manual punching: Lower the raised handle until the paper is
punched, and support the machine when lifting the handle to the
upright position.
●
For electric punching (CWB406E only):
Press the 'punch button' located on the right panel of the
machine.
Note:
If the machine is overloaded and fails to complete the punch
cycle, the red LED will be lit. Press the 'punch button’ to cancel
the red LED. If this does not work contact the service helpline.
5
Sort paper
●
To manage large documents use the document separator.
●
Push the separator into the document.
●
Lift the separator upwards to reveal the first stack of paper ready
for easy punching.
Wait while the binder goes through an automatic check
procedure, both LED’s light up.
2
Punch paper
●
Set the comb
Lift the lid and punch handle to the upright position.
Place entire document so it rests on the lid.
Check the comb size (mm) needed using the paper thickness
guide.
Measure your comb using the comb size guide.
Turn the comb selector (located at the side of the machine) until
the number matches your comb size (6 - 25+ mm).
The machine will now automatically prevent your comb from over
opening and will adjust the margin depth.
2
Adjust the machine by sliding the switch located at the front of the
machine from A4 to A5.
4
Please open the quick start guide, located at the front of the machine
for reference. Each step relates to the illustrations throw-out at the
front of this manual.
DO NOT use an extension cable unless it is absolutely necessary
and then only use one of a suitable current rating (10A or
greater).
Set paper size
●
Comb binding instructions
●
●
This appliance MUST be earthed.
If in doubt consult a qualified electrician.
3
Comb binding
●
Place the plastic comb open side up on the metal teeth.
●
To open the comb, turn the comb opening knob (located at the
side of the machine).
●
Punch and then load each paper stack onto the opened comb
until the entire document is loaded.
●
To close the comb, rewind the comb opening knob and lift the
bound document from the metal teeth.
Binding tips:
●
Load the rear cover onto the open comb first, followed by the
internal sheets and front cover.
●
To edit your document, additional sheets may be included or
removed by placing your document (comb open side up) onto the
metal teeth and following step 5 instructions again.
●
For further hints and tips please visit our website:
www.boundtopresent.com
Getting Started
GB
5
Wire binding instructions
For use with Rexel 21 loop wire elements.
1
Set the wire
Security
Wire binding
●
Open the hinged cover at the front of the machine to reveal the
wire binding channel.
●
Place the wire (open side up) on the wire support.
●
Feed each paper stack onto the wire and repeat until your
document is complete.
A security slot is fitted for use with leading makes of security leash.
E.g. Kensington Microsaver. (
)
Technical data
●
Lift the lid and punch handle to the upright position.
●
Place entire document so it rests on the lid.
●
Support the document and wire on removal from the wire support.
Technical data
CWB406
CWB406E
●
Check the wire size (mm) needed using the paper thickness
guide.
●
Insert the document into the wire closing jaws (wire opening face
down).
Operation mode
manual
electric
●
Measure your wire using the wire size guide.
●
Support the document and pull down the handle at the side of the
machine to close the jaws.
●
Use the wire closing guide (located in the wire closing jaws) to
ensure correct closure of the wire.
2
Sort paper
Max. binding size
Hole pitch
A4
US Pitch 9/6” / 14.28mm
Number of punch slots
21
●
For managing large documents use the document separator.
Binding tips:
Margin depth
●
Push the separator into the document.
To hide the spine of the wire:
Punching paper (80gsm)
max. 30
Lift the separator upwards to reveal the first stack of paper ready
for easy punching.
●
Load the internal sheets onto the wire first, repeating until all are
loaded.
Punching PVC plastic foils
(0.2mm)
max. 4
●
Load the front PVC cover onto the wire element.
Max. comb diameter (mm)
50
●
Load the rear cover onto the wire element last.
Max. wire diameter (mm)
14
Binding capacity (sheets)
450/140
●
3
Set paper size
●
Load the first paper stack into the punch slot.
●
●
Centre the paper using the dial located at the front of the
machine.
It is best to close the wire a little, check, and then close the wire a
little more until you are happy with the wire closure.
●
Always use the wire size closing guide (located in the wire closing
jaws) to prevent over closing the wire.
Dimensions WxDxH (mm)
For further hints and tips please visit our website:
www.boundtopresent.com
Voltage
Adjusting your machine for A5:
●
Slide the switch located at the front of the machine from A4 to A5.
4
Punch paper
●
6
Maintenance
●
For manual punching: Lower the raised handle until the paper is
punched and support the machine when lifting the handle to the
upright position.
Please ensure the clippings tray is emptied on a regular basis. This
may prevent your machine from overloading.
●
For electric punching (CWB406E only):
Press the 'punch button' located on the right panel of the
machine.
CWB406:
Note:
If the machine is overloaded and fails to complete the punch
cycle, the red LED will be lit. Press the 'punch button’ to cancel
the red LED. If this does not work contact the service helpline.
When the clippings tray is full, you will see the clear window full of
clippings. Empty the contents of the tray to continue binding.
CWB406E:
When the clippings tray is full, a yellow LED will be lit. Empty the
contents of the tray to continue binding.
3
Net weight (kg)
variable
12.2
17.1
525x450x200
525x450x170
230V 50Hz AC
CWB406E is approved to EN60950 and CE Standards
Technical data subject to change without notification
Location of Controls
●
Anordnung der Bedienelemente
●
Position des commandes
●
Positie van de bedieningsmechanismen
●
Posizione comandi
●
Situación de los mandos
Punching handle (CWB406 only)
Stanzhebel (nur CWB406)
Poignée de perforation (CWB406 seulement)
Ponshendel (alleen CWB406)
Maniglia di perforazione (solo CWB406)
Asa de perforación (sólo modelo CWB406)
Document separator
Papierseparation
Séparateur de document
Document separator
Separatore di documenti
Separador de documentos
Clippings tray (located at side of machine)
Stanzabfallbehälter (an der Seite des Geräts)
Tiroir à confettis (situé sur le côté de la machine)
Snipperopvangbak (aan de zijkant van de machine)
Cassetto degli sfridi (situato sul lato della macchina)
Bandeja de recortes (situada en el lateral de la máquina)
Punching slot
Lochstanzschlitz
Fente de perforation
Papierinvoeropening
Slot di perforazione
Ranura de perforación
On/Off switch (CWB406E only)
Ein-/Ausschalter (nur CWB406E)
Interrupteur On/Off (CWB406E seulement)
Aan/Uit schakelaar (alleen CWB406E)
Interruttore di accensione/spegnimento (solo CWB406E)
Interruptor de encendido (sólo modelo CWB406E)
Wire closing handle
Hebel zum Schließen des Drahtbinderückens
Poignée de fermeture de spirale
Hendel voor sluiten draadruggen
Maniglia di chiusura del filo metallico
Asa de cierre de alambre
A4/A5 switch
A4/A5-Umschalter
Curseur A4/A5
A4/A5 formaat keuzeschakelaar
Selettore A4/A5
Cambiador A4/A5
Comb opening teeth
Zähne zum Öffnen des Binderückens
Dents d’ouverture du peigne
Metalen tanden bindrug-openingsmechanisme
Denti di apertura della spirale metallica
Dientes de apertura del peine
Comb selector
Binderückenselektor
Sélecteur de peigne
Draaiknop instellen diameter bindrug
Selettore dell’anello
Selector de peine
Paper centering dial
Papier-Zentrierknopf
Cadran de centrage du papier
Draaiknop automatisch centreer systeem
Manopola di centramento della carta
Mando de centrado del papel
Wire binding channel
Drahtbindekanal
Voie de reliure métallique
Kleminrichting metalen draadruggen
Canale di rilegatura a spirale metallica
Barra de alambre para encuadernación
Electric punch button (CWB406E only)
Taste für das elektrische Lochstanzen (nur CWB406E)
Bouton de perforation électrique (CWB406E seulement)
Drukknop electrisch ponsen (alleen CWB406E)
Pulsante di perforazione elettrica (solo CWB406E)
Botón de perforación eléctrica (sólo modelo CWB406E)
Comb opening knob
Binderückenöffnungsknopf
Molette d’ouverture du peigne
Openingsknop bindrug
Manopola di apertura anello
Botón de apertura del peine