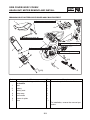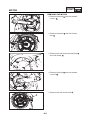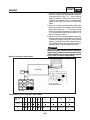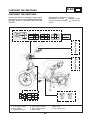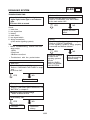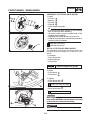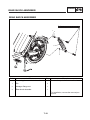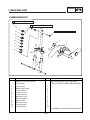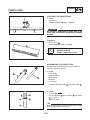
1
E-TON POWER EV3 E-MO SERVICE MANUAL E-MO SERVICE MANUAL 2009 by E-TON POWER TECH CO., LTD. First edition, April 2009 All rights reserved. Any reproduction or unauthorized use without the written permission of E-TON POWER TECH CO., LTD. is expressly prohibited. IMPORTANT This manual was produced by the E-TON POWER TECH CO., LTD., primarily for use by E-TON dealers and their qualified mechanics. It is not possible to include all the knowledge of a mechanic in one manual. Therefore, anyone who uses this book to perform maintenance and repairs on E-TON vehicles should have a basic understanding of the mechanics and the techniques to repair these types of vehicles. Repair and maintenance work attempted by anyone without this knowledge is likely to render the vehicle unsafe and unfit for use. E-TON POWER TECH CO., LTD., is continually striving to improve all of its models. Modifications and significant changes in specifications or procedures will be forwarded to all authorized E-TON dealers and will appear in future editions of this manual where applicabe. NOTE: Designs and specifications are subject to change without notice. IMPORTANT INFORMATION Particularly important information is distinguished in this manual by the following notations: This is the safety alert symbol. It is used to alert you to potential personal injury hazards. Obey all safety messages that follow this symbol to avoid possible injury or death. WARNING A WARNING indicates a hazardous situation which, if not avoided, could result in death or serious injury. NOTICE A NOTICE indicates special precautions that must be taken to avoid damage to the vehicle or other property. TIP A TIP provides key information to make procedures easier or clearer. * Product and specifications are subject to change without notice. TABLE OF CONTENTS GENERAL INFORMATION GEN INFO SPECIFICATIONS SPEC PERIODIC CHECKS AND ADJUSTMENTS CHK ADJ CONTROLLER SYSTEM CONT BATTERY/ CHARGER BAT CHA ELECTRICAL SYSTEM ELEC CHASSIS CHAS TROUBLESHOOTING TRBL SHTG – + CHAPTER 1 GENERAL INFORMATION GENERAL INFORMATION . . . . . . . . . . . . . . . . . . . . . . . . . . . . . . . . . . . . . . . . . . . . . . . . . . . . . . 1-1 FRAME SERIAL NUMBER . . . . . . . . . . . . . . . . . . . . . . . . . . . . . . . . . . . . . . . . . . . . . . . . . . . . 1-1 MOTOR SERIAL NUMBER . . . . . . . . . . . . . . . . . . . . . . . . . . . . . . . . . . . . . . . . . . . . . . . . . . . . 1-1 IMPORTANT INFORMATION . . . . . . . . . . . . . . . . . . . . . . . . . . . . . . . . . . . . . . . . . . . . . . . . . . . 1-2 REPLACEMENT PARTS . . . . . . . . . . . . . . . . . . . . . . . . . . . . . . . . . . . . . . . . . . . . . . . . . . . . . . 1-2 GASKETS, OIL SEALS AND O-RINGS . . . . . . . . . . . . . . . . . . . . . . . . . . . . . . . . . . . . . . . . . 1-2 CHECKING THE CONNECTIONS . . . . . . . . . . . . . . . . . . . . . . . . . . . . . . . . . . . . . . . . . . . . . . 1-3 SPECIAL TOOLS . . . . . . . . . . . . . . . . . . . . . . . . . . . . . . . . . . . . . . . . . . . . . . . . . . . . . . . . . . . . . 1-4 GEN INFO IDENTIFICATION OF SCOOTER GENERAL INFORMATION SCOOTER IDENTIFICATION FRAME SERIAL NUMBER is stamped on the The frame serial number chassis. TIP The fourth to the sixth digits of these numbers are for identifying the model; the remaining digits constitute the production number of the unit. MOTOR SERIAL NUMBER The serial number of the motor is stamped on the portion of the left section of the motor box. TIP Designs and specifications are subject to change without notice. 1-1 GEN INFO IMPORTANT INFORMATION IMPORTANT INFORMATION REPLACEMENT PARTS 1. Use only genuine E-TON parts for all replacements. Use the oil and/or grease recommended by E-TON for assembly and adjustment. GASKETS, OIL SEALS AND O-RINGS 1. Replace all gaskets, seals and O-rings when overhauling the rim. All gasket surfaces, oil seal lips and O-rings must be cleaned. 2. Properly oil all mating parts and bearings during reassembly. Apply grease to the oil seal lips. LOCK WASHERS/PLATES AND COTTER PINS 1. Replace all lock washers/plates and cotter pins after removal. Bend lock tabs along the bolt or nut flats after the bolt or nut has been tightened to specification. or BEARINGS AND OIL SEALS 1. Install the bearings and oil seals with their manufacturer brands or numbers facing outwards. (In other words, the stamped letters should be on the side exposed to view.) When installing oil seals, apply a light coating of lightweight lithium base grease to the seal lips. Put oil on the bearings when installing. NOTICE Do not use compressed air to spin the bearings dry. This will damage the bearing surface. 1-2 GEN INFO IMPORTANT INFORMATION CHECKING THE CONNECTIONS Check the leads, couplers, and connectors for stains, rust, moisture, etc. 1. Disconnect: • lead • coupler • connector 2. Check: • lead • coupler • connector Moisture ĺ Dry with an air blower. Rust/stains ĺ Connect and disconnect several times. 3. Check: • all connections Loose connection ĺ Connect properly. TIP If the pin 1 on the terminal is flattened, bend it up. 4. • • • Connect: lead coupler connector TIP Make sure all connections are tight. 5. Check: • continuity (with the pocket tester) TIP • If there is no continuity, clean the terminals. • When checking the wire harness, perform steps 1 to 3. • As a quick remedy, use a contact revitalizer available at most part stores. 1-3 GEN INFO SPECIAL TOOLS SPECIAL TOOLS The following special tools are necessary for complete and accurate tune-up and assembly. Use only the appropriate special tools as this will help prevent damage caused by the use of inappropriate tools or improvised techniques. Tool NO. Tool name / Function Picture Tool name: SE3200-5BA0-0FA1 Six legs socket Function: To disassemble and assemble the nut of front fork component. Tool name: SA6100-A26-0FA1 Bearing inner puller set Function: To disassemble the bearing of front wheel. Specification: 8‚ 10‚ 12‚ 15‚ 17‚ 20‚ 22‚ 25‚ 30‚ 32/ mm Tool name: Oil seal & bearing installer set SA6100-A26-0FA2 Function: Used for installing the bearing of the front wheel and oil seal. Specification: 27, 32, 35, 40, 42, 45, 47, 48, 52, 58, 64/ mm SD4712-EGC2-0FA1 Tool name: Tire valve driver Function: To disassemble and assemble an air needle in the inner tube of a tire. Specification: Double head (6.2mm& 5.4mm) SD4711-EGC2-0FA1 Tool name: Tire lever component Function: To disassemble and assemble the inner tube of a tire. Specification: 11 inch and 15 inch. 1-4 GEN INFO SPECIAL TOOLS Tool NO. Tool name / Function Picture Tool name: SC9003-EGC2-0000 Testing interface software Function: Only for testing driver. Tool name: Testing interface connector SC9004-EGC2-0000 Function: Only for connecting the driver connector and USB connector of the computer. Tool name: Motor checking tool SC130A-EGC2-0FG1 Function: Testing the Hall data of motor. Tool name: Instrument panel check tools SC7200-EGC2-0FG1 Function: Only for testing the instrument panel quality. 1-5 CHAPTER 2 SPECIFICATIONS SPECIFICATIONS . . . . . . . . . . . . . . . . . . . . . . . . . . . . . . . . . . . . . . . . . . . . . . . . . . . . . . . . . . . . . . 2-1 GENERAL SPECIFICATIONS . . . . . . . . . . . . . . . . . . . . . . . . . . . . . . . . . . . . . . . . . . . . . . . . . 2-1 MAINTENENCE SPECIFICATIONS . . . . . . . . . . . . . . . . . . . . . . . . . . . . . . . . . . . . . . . . . . . . 2-2 CONVERSION TABLE/ GENERAL TIGHTENING TORQUE SPECIFICATIONS . . . . . . . . . . . . . . . . . . . . . . . . . . . . . . . . . . . . . . . . . . . . . . . . . . . . . 2-4 CONVERSION TABLE . . . . . . . . . . . . . . . . . . . . . . . . . . . . . . . . . . . . . . . . . . . . . . . . . . . . . . . . 2-4 GENERAL TIGHTENING TORQUE SPECIFICATIONS . . . . . . . . . . . . . . . . . . . . . . . . . . 2-4 TIGHTENING TORQUES . . . . . . . . . . . . . . . . . . . . . . . . . . . . . . . . . . . . . . . . . . . . . . . . . . . . . . . . 2-5 CHASSIS TIGHTENING TORQUES . . . . . . . . . . . . . . . . . . . . . . . . . . . . . . . . . . . . . . . . . . . . . . . . . . . . . . 2-5 CABLE ROUTING . . . . . . . . . . . . . . . . . . . . . . . . . . . . . . . . . . . . . . . . . . . . . . . . . . . . . . . . . . . . . . 2-6 SPEC GENERAL SPECIFICATIONS SPECIFICATIONS GENERAL SPECIFICATIONS Standard Item Dimensions Overall length Overall width Overall height Wheelbase Minimum ground clearance Minimum turning radius Basic weight Chassis Frame type Caster angle Trail Tire Size Size Manufacturer Manufacturer Type Type Tire pressure (cold tire) Maximum load* *Load in total weight of rider and accessories Brake Front brake Rear brake 1,550 mm (61.0 in) 650 mm (25.6 in) 1,000 mm (39.4 in) 1,050 mm (41.3 in) 115 mm (4.5 in) 1,600 mm (63.0 in) 50 kg (110.2 lb) Steel tube FRAME 24°00' 73.5 mm (2.9 in) front rear front rear front rear 2.25-14 27B 2.25-14 27B MAXXIS MAXXIS C-109R-X C-109R-X front rear 98kg (215 LBS ) 225 kPa (2.25 kgf/cm 2,32 psi) 225 kPa (2.25 kgf/cm 2,32 psi) type operation type operation Drum brake Right hand operation Drum brake Left hand operation 2-1 SPEC MAINTENANCE SPECIFICATIONS CHASSIS Standard Item Front suspension Front fork travel 50 mm (1.97 in) Rear suspension Shock absorber travel 30 mm (1.18 in) Front wheel Rim size Rim material Rim runout limit radial lateral Rear wheel Rim size Rim material Rim runout limit radial lateral Front drum brake Type Brake drum inside diameter 1.4 x 14" Aluminum 2.0 mm (0.08 in) 2.0 mm (0.08 in) 1.4 x 14" Aluminum 2.0 mm (0.08 in) 2.0 mm (0.08 in) Leading, trailing 85.0 mm (3.35 in) Lining thickness 3.0 mm (0.12 in) Shoe spring free length 46.3 mm (1.82 in) Rear drum brake Type Brake drum inside diameter Limit Leading, trailing 85.0 mm (3.35 in) Lining thickness 3.0 mm (0.12 in) Shoe spring free length 46.3 mm (1.82 in) 2-2 ---86.0mm (3.39 in) 1.5mm (0.06 in) ------86.0mm (3.39 in) 1.5mm (0.06 in) ---- SPEC MAINTENANCE SPECIFICATIONS ELECTRICITY Standard Item Battery Type Battery capacity Li-ion Mn battery 48.0 V/ 10AH Lights X number Headlight Tail/ brake light Turn signal light 12V 35/ 35W X1 12V 21/ 5W X1 12V 10W X4 Fuse Fuse (main) Fuse (turn signal) 30A 10A Controller system Power input DC transformer output Driver output voltage current 48V ±10V 0A ~ 30A voltage current 12V ± 1V 7A ± 0.5A voltage current 48V ± 10V 25A ± 1A Charger Voltage range 115V/ 230V Motor Type 48V Brushless DC Motor 2-3 Limit CONVERSION TABLE/GENERAL TIGHTENING TORQUE SPECIFICATIONS GENERAL TIGHTENING TORQUE SPECIFICATIONS CONVERSION TABLE All specification data in this manual are listed in SI and METRIC UNITS. Use this table to convert METRIC unit data to IMPERIAL unit data. This chart specifies tightening torques for standard fasteners with a standard ISO thread pitch. Tightening torque specifications for special components or assemblies are provided for each chapter of this manual. To avoid warpage, tighten multi-fastener assemblies in a crisscross pattern and progressive stages until the specified tightening torque is reached. Unless otherwise specified, tightening torque specifications require clean, dry threads. Components should be at room temperature. Ex. METRIC MULTIPLIER IMPERIAL ** mm x 0.03937 = ** in 2 mm x 0.03937 = 0.08 in SPEC CONVERSION TABLE METRIC TO IMPERIAL Metric unit Multiplier Imperial unit m · kg m · kg cm · kg cm · kg 7.233 86.794 0.0723 0.8679 ft · lb in · lb ft · lb in · lb Weight kg g 2.205 0.03527 lb oz Speed km/h 0.6214 mph Distance km m m cm mm 0.6214 3.281 1.094 0.3937 0.03937 mi ft yd in in Torque 3) Volume/ Capacity cc (cm cc (cm3) lt (liter) lt (liter) 0.03527 0.06102 0.8799 0.2199 oz (Imp liq.) cu · in qt (Imp liq.) gal (Imp liq.) Misc. kg/mm kg/cm2 Centigrade (°C) 55.997 14.2234 9/5+32 lb/in psi (lb/in2) Fahrenheit (°F) A: Distance between flats B: Outside thread diameter A (nut) 2-4 B (bolt) General tightening torques Nm m · kg ft · lb 10 mm 6 mm 6 0.6 4.3 12 mm 8 mm 15 1.5 11 14 mm 10 mm 30 3.0 22 17 mm 12 mm 55 5.5 40 19 mm 14 mm 85 8.5 61 22 mm 16 mm 130 13.0 94 SPEC TIGHTENING TORQUES CHASSIS TIGHTENING TORQUES Part to be tightened Part Thread name size Q’ty Tightening torque Nm m•kg ft•lb Remarks Chassis Rear fork Nut M10 1 35 3.5 25.3 Front fork Nut M25 2 50 5.0 36.2 Rear shock absorber (up) Bolt M10 1 35 3.5 25.3 Bar footrest Controller system Bolt Bolt M8 4 25 2.5 18.1 M6 4 10 1.0 7.2 Horn Bolt M6 1 10 1.0 7.2 Hinge of seat Bolt M6 1 10 1.0 7.2 Body cover Bolt M6 24 4 0.4 2.9 Battery seat Bolt M6 4 4 0.4 2.9 Rear wheel axle Nut M14 2 80 8.0 57.9 Rear shock absorber (down) Bolt M10 1 35 3.5 25.3 Main stand Bolt M8 2 25 2.5 18.1 Rear fender bracket Bolt M6 1 10 1.0 7.2 Body cover Bolt M6 3 4 0.4 2.9 Body cover Bolt M6 2 4 0.4 2.9 Handle bar Nut M10 1 45 4.5 32.5 Front shock absorber (down) Bolt M10 1 35 3.5 25.3 Body cover Bolt M6 4 4 0.4 2.9 Bolt M6 2 4 0.4 2.9 Bolt M6 2 6 0.6 4.3 Bolt M6 2 9 0.9 6.5 Rear fork Front fork Handle bar Speedometer comp Seat Hinge of seat Brake disk Front brake arm cam/ brake arm 2-5 See chapter 3 “ADJUSTING THE STEERING HEAD” SPEC CABLE ROUTING 1 2 Wire harness Cable brake, rear 3 4 5 Main switch lead Horn lead EMI coil 6 7 8 wire clamp Turn signal lead 12 pin connector 9 10 Starter controller lead DC 12V connecter 11 12 13 14 15 16 UVW motor three-phases connecter 6 pin connecter Positive battery lead Negative battery lead tail/brake light Turn light connector A B Main switch comp Horn C D EMI coil Turn signal relay 15 6 A B C 16 D 1 5 6 3 7 4 2 14 9 8 10 12 11 2-6 13 SPEC CABLE ROUTING 1 Right turn light lead 2 Right brake lead 3 4 5 6 Cable brake, front Throttle lead Headlight lead Meter connector 7 Horn lead 8 Cable brake, rear 9 Left brake lead 10 Left turn light lead 8 2 1 3 10 9 6 5 7 8 1 3 2 4 9 10 2-7 CHAPTER 3 PERIODIC CHECKS AND ADJUSTMENTS INTRODUCTION/ PERIODIC MAINTENANCE/ LUBRICATION . . . . . . . . . . . . . . . . . . . . . 3-1 SIDE COVER/ BODY COVER/ HEADLIGHT/ METER REMOVE AND INSTALL . . . . . . 3-2 REMOVING THE SIDE COVER AND THE BODY COVER . . . . . . . . . . . . . . . . . . . . . . . 3-2 REMOVING SEAT/ BATTERY SEAT/ DRIVER ASSY/ BAR FOOTREST . . . . . . . . . . 3-3 REMOVING HEADLIGHT/ METER/ METER SIDE COVER . . . . . . . . . . . . . . . . . . . . . . . 3-4 REMOVING AND INSTALLING REAR BOTTOM COVER/ REAR FENDER . . . . . . . . . 3-5 ADJUSTMENT FRONT/REAR BRAKE FREE PLAY . . . . . . . . . . . . . . . . . . . . . . . . . . . . . . . 3-6 CHECKING THE BRAKE SHOE . . . . . . . . . . . . . . . . . . . . . . . . . . . . . . . . . . . . . . . . . . . . . . . . . 3-7 CHECKING THE STEERING SYSTEN . . . . . . . . . . . . . . . . . . . . . . . . . . . . . . . . . . . . . . . . . . . 3-8 CHECKING THE FROENT FORK . . . . . . . . . . . . . . . . . . . . . . . . . . . . . . . . . . . . . . . . . . . . . . . . 3-9 CHECKING THE REAR SHOCK ABSORBER . . . . . . . . . . . . . . . . . . . . . . . . . . . . . . . . . . . . 3-10 CHECKING THE TIRES . . . . . . . . . . . . . . . . . . . . . . . . . . . . . . . . . . . . . . . . . . . . . . . . . . . . . . . . 3-10 CHECKING THE WHEELS . . . . . . . . . . . . . . . . . . . . . . . . . . . . . . . . . . . . . . . . . . . . . . . . . . . . . . 3-11 REPLACING THE HEADLIGHT BULB . . . . . . . . . . . . . . . . . . . . . . . . . . . . . . . . . . . . . . . . . . . 3-12 REPLACING THE FRONT/ REAR TURN LIGHT BULB . . . . . . . . . . . . . . . . . . . . . . . . . . . 3-13 REPLACING THE TAIL LIGHT BULB . . . . . . . . . . . . . . . . . . . . . . . . . . . . . . . . . . . . . . . . . . . . 3-14 CHK ADJ INTRODUCTION/ PERIODIC MAINTENANCE/LUBRICATION PERIODIC CHECKS AND ADJUSTMENTS INTRODUCTION This chapter includes all information necessary to perform recommended checks and adjustments. These preventive maintenance procedures, if followed, will ensure more reliable motorcycle operation and a longer service life. The need for costly overhaul work will be greatly reduced. This information applies to motorcycles already in service as well as to new motorcycles that are being prepared for sale. All service technicians should be familiar with this entire chapter. PERIODIC MAINTENANCE CHART FOR THE EMISSION CONTROL SYSTEM ODOMETER READING (km) ITEM No. CHECKS OR MAINTENANCE JOB 1 Brake (drum) • Check operation and adjust brake lever free play. • Checking and replace the hose if necessary. 2 Tires • Check tread depth and for damage. • Replace if necessary. 3 Wheel bearings 4 Front fork 5 • Check bearing play and steering for roughness. Steering bearings • Replace if necessary. • Lubricate with lithium-soap-based grease. 6 Rear shock absorber • Check operation and for oil leakage. assembly • Replace if necessary. 7 Main stand • Check operation and lubricate. 8 Battery • Check battery box for cracks or damage. • Clean 9 • Make sure that all nuts, bolts and screws are Chassis fasteners properly tightened. First 500km 3000km 5500km 8000km 10500km 13000km 15500km ANNUAL or or or or or or or CHECK 1 month 3 month 6 month 9 month 12 month 15 month 18 month Every 1,000km • Check bearing for looseness or damage. Replace if necessary. • Check operation and correct if necessary. • Replace if necessary. ¥ ¥ ¥ ¥ ¥ ¥ ¥ ¥ ¥ ¥ ¥ ¥ ¥ ¥ ¥ ¥ ¥ ¥ ¥ ¥ ¥ ¥ ¥ ¥ ¥ Every 12,000km ¥ ¥ ¥ ¥ ¥ ¥ ¥ ¥ ¥ ¥ ¥ ¥ ¥ ¥ ¥ ¥ ¥ ¥ ¥ ¥ ¥ ¥ ¥ ¥ ¥ ¥ ¥ ¥ ¥ 10 Moving parts and cables • Lubricate. ¥ ¥ ¥ 11 Wheels • Check runout and for damage, and replace if necessary. ¥ ¥ ¥ 12 Lights, signals and switches • Check operation and correct if necessary • Adjust headlight beam. ¥ ¥ ¥ ¥ ¥ ¥ ¥ ¥ 13 Front and rear brake switches • Check operation and correct if necessary. ¥ ¥ ¥ ¥ ¥ ¥ ¥ ¥ ¥ * Since these items require special tools, data and technical skills, have an E-TON dealer perform the service. TIP • After 15,500 mileages has been reached or 18 months has been past, an additional maintenance shall be conducted in every 2,500 km or 2 months. • It should check and replace ahead of time in a dirt area or rainy day. • Please check and replace ahead of time after by long riding distance or heavy load. • Replace the brake cable every two years or if cracked or damaged. If find the cracks or damage, should replace the new one immediately. 3-1 SIDE COVER/ BODY COVER/ HEADLIGHT/ METER REMOVE AND INSTALL CHK ADJ REMOVING THE SIDE COVER AND THE BODY COVER T. T. R. R. 4 Nm (0.4 m • kg, 2.9 ft • Ib) 4 Nm (0.4 m • kg, 2.9 ft • Ib) (X3) (X2) 3 2 1 (X2) 4 (X2) T. R. 4 Nm (0.4 m • kg, 2.9 ft • Ib) (X6) (X2) 1 T. (X4) R. Order Job/Part Q’ty 1 2 Removing the side cover and the body cover Side cover Top cover (Rear) 2 1 3 Top cover (Front) 1 4 Bottom cover (Rear) 1 4 Nm (0.4 m • kg, 2.9 ft • Ib) Remarks Remove the parts in the order listed. For installation, reverse the removal procedure. 3-2 SIDE COVER/ BODY COVER/ HEADLIGHT/ METER REMOVE AND INSTALL CHK ADJ REMOVING SEAT/ BATTERY SEAT/ DRIVER ASSY/ BAR FOOTREST T. 1 R. 10 Nm (1.0 m • kg, 7.2 ft • Ib) (X4) 4 7 T. R. 6 Nm (0.6 m • kg, 4.3 ft • Ib) T. R. 10 Nm (1.0 m • kg, 7.2 ft • Ib) T. R. 4 Nm (0.4 m • kg, 2.9 ft • Ib) 2 T. R. 25 Nm (2.5 m • kg, 18.08 ft • Ib) (X2) 6 (X4) 3 (X2) Order 5 1 Job/Part Q’ty Remarks Removing seat/ battery seat/ driver assy/ Remove the parts in the order listed. bar footrest 1 Seat 2 Battery 1 3 Battery seat 1 4 Driver assy 1 5 6 Bar footrest Frame vin plate 1 1 7 Horn 1 For installation, reverse the removal procedure. 3-3 SIDE COVER/ BODY COVER/ HEADLIGHT/ METER REMOVE AND INSTALL CHK ADJ REMOVING HEADLIGHT/ METER/ METER SIDE COVER T. R. (X3) 4 Nm (0.4 m • kg, 2.9 ft • Ib) 2 (X2) T. R. 5 4 Nm (0.4 m • kg, 2.9 ft • Ib) 4 3 1 T. R. Order 4 Nm (0.4 m • kg, 2.9 ft • Ib) Job/Part Q’ty Removing headlight/ meter/ meter side cover 1 2 3 4 Front cap Meter Meter side (L) Headlight 1 1 1 1 5 Meter side (R) 1 Remarks Remove the parts in the order listed. For installation, reverse the removal procedure. 3-4 REMOVING AND INSTALLING REAR BOTTOM COVER/ REAR FENDER CHK ADJ REMOVING REAR BOTTOM COVER/ REAR FENDER T. R. 4 Nm (0.4 m • kg, 2.9 ft • Ib) 3 T. R. 4 35 Nm (3.5 m • kg, 25.3 ft • Ib) (X4) 2 3 6 1 4 5 T. R. 4 Nm (0.4 m • kg, 2.9 ft • Ib) T. R. Order Job/Part Q’ty Removing rear bottom cover/ rear fender 1 2 3 4 Rear bottom cover (L) Rear bottom cover (R) Cap A Cap B 1 1 2 2 5 6 Rear fender Main stand 1 1 25 Nm (2.5 m • kg, 18.1 ft • Ib) Remarks Remove the parts in the order listed. For installation, reverse the removal procedure. 3-5 ADJUSTING THE FRONT/REAR BRAKE CHECKING THE BRAKE SHOES CHK ADJ CHASSIS Front brake Adjusting the front/rear brake lever free play 1. Check • Clockwise (a) revolving will reduce free play. • Counterclockwise (b) revolving will increase free play. (b) (a) Adjusting nut TIP Before adjusting the front and rear brake, the front and rear brake linings should be checked. Rear brake NOT ICE რ Proper lever free play is essential to avoid excessive brake drag. (b) (a) Adjusting nut Dowel pin TIP Must confirm adjusting nut and dowel pin clench the teeth. Adjusting nut 2. Measure • front and rear brake lever free play a . Out of specification ĺ Adjust. a Front and rear brake lever free play 5 ~ 10 mm (0.20 ~ 0.39 in) 3. Adjust • front and rear brake lever free play • Loosen or tighten the nuts until the specified front brake lever free play is obtained. WARNING After the brake is adjusted, must confirm braking lights action are normal. 3-6 ADJUSTING THE FRONT/REAR BRAKE CHECKING THE BRAKE SHOES CHECKING THE BRAKE SHOES A Wear limit line CHK ADJ 1. Operate the brake. 2. Check • brake shoes Wear indicators reaches the wear limit line ĺ Replace the brake shoes as a set. Refer to “REAR BRAKE” in chapter 7. Wear indicator 3. Adjust the front and rear brake lever free play after replace the brake shoes. A Front brake B B Rear brake Wear limit line Wear indicator Measure position. Brake lining wear limit a 1.0 mm (0.04 in) a 3-7 CHK ADJ CHECKING THE STEERING HEAD CHECKING THE STEERING HEAD WARNING Securely support the scooter so that there is no danger of it falling over. 1. Stand the scooter on a level surface. TIP • Please support by main stand. 2. Use a support put in the buttom of vehicle and raise the front wheel. 3. Check • steering shaft bushings and bearings Grasp the bottom of the front fork legs and gently rock the front fork. Binding/looseness ĺ adjust the steering hand. Refer to “STEERING SYSTEM” in chapter 7. 4. Remove • Front cap • Meter • Side cover (L) • Headlight • Side cover (R) Refer to "FRONT FORK" in chapter 7. 1 5. Adjust • Steering head 2 a. Remove the upper ring nut 1 . b. Loosen the lower ring nut 2 . c. Use a steering nut wrench the lower ring nut 2 . 3 and tighten T. R. Lower ring nut (initial tightening torque) 35 Nm (3.5 m • kg, 25.3 ft • lb) 3 TIP 2 Install a ring nut wrench on the steering nut wrench 3 and tighten by verticality and get the tightening torque. 3-8 CHECKING THE STEERING HEAD/ CHECKING THE FRONT FORK CHK ADJ d. Loosen the lower ring nut 1/2 turn counterclockwise then tighten it to specification with a steering nut wrench. T. R. Lower ring nut (final tightening torque) 12 Nm (1.2 m • kg, 8.7 ft • lb) e. Check the steering head for looseness or binding by turning the front fork all the way in both directions. If any binding is felt, remove the front fork and check the upper and lower bearing. Refer to “STEERING HEAD” in chapter 7. T. f. Hold the lower ring nuts with a ring nut wrench and tighten the upper ring nut with a steering nut wrench. Upper ring nut 50 Nm (5.0 m • kg, 36.2 ft • lb) R. 6. Install • Side cover (R) • Headlight • Side cover (L) • Meter • Front cap CHECKING THE FRONT FORK 1. Stand the scooter on a level surface. 2. Check • Front fork 6FUDSHGDPDJHĺUHSODFH 3. Operation Push down hard on the handlebar several times and check if the front fork rebounds smoothly. Rough movement ĺ Replace Refer to “FROENT FORK” in chapter 7. WARNING • Securely support the scooter so that there is no danger of it falling over. • If there is any abnormal sound, please replace immediately. 3-9 CHECKING THE REAR SHOCK ABSORBER/ CHECKING THE TIRES CHK ADJ CHECKING THE REAR SHOCK ABSORBER 1. Stand the scooter on a level surface. 2. Check: • Oil leakage/ crack/ damaged ĺ5HSODFHWKH rear shock absorber assembly. • Spring 'DPDJHZHDUĺthe rear shock absorber assembly. 5Hfer to5($56+2&.$%625%(5in chapter 7. • Bolts Loosen ĺWLJKWHQ Upper/lower Bolts . T. Upper Bolt, 35 Nm (3.5 m • kg, 25.3 ft • lb) R. T. Lower Bolt, 35 Nm (3.5 m • kg, 25.3 ft • lb) R. WARNING The rear shock absorbers can't disassemble, improper one overhaul can cause performance reduce. CHECKING THE TIRES • TIRE CHARACTERISTICS The tire characteristic effect the operation of (02VRWKHIURQWDQGUHDUWLUHVVKRXOGDOZD\V EHE\WKHVDPHPDQXIDFWXUHUVDQGWKHVSHFLIL FDWLRQ$IWHUH[WHQVLYHWHVWVWKHWLUHVOLVWHG EHORZKDYHEHHQDSSURYHGE\(72132:(5 7(&+&R/WG8VLQJWKHRWKHUEUDQGVWLUH because is unable to measure its characteristic of tire, may lead to the danger happen while riding, so not propose using. Manufacturer Front MAXXIS Rear MAXXIS Size 2.25-14 27B 2.25-14 27B Type C-109R-X C-109R-X WARNING Ride conservatively after installing a tire to allow it to seat itself properly on the rim. 3-10 CHK ADJ CHECKING THE TIRES/ CHECKING THE WHEELS • TIRE PRESSURE 1. Measure 7LUHSUHVVXUH 2YHUVSHFLILHGYDOXHĺ$GMXVW 3 Maximum ORDG T.W.I. 2 4 98 kg 5HDU FrRQW T.W.I. * TRWDO weighWRf rider anGDFFHVVRULHV NSD. NSD (2.25kg/cm 2 ) (2.25kg/cm 2 ) 1 2. Check: • Tire surfaces 'DPDJHZHDUĺ5HSODFHWKHWLUH Minimum depth of thread of tires a 0.8 mm (0.03 in) 7KUHDGGHSWK 2 6LGHZDOO 3 :HDUOLPLWOLQH 4 :HDULQGLFDWRU 1 WARNING It is dangerous to ride with a worn-out tire. When tire wear is out of specification, replace the tire immediately. 1 CHECKING THE WHEELS 1.Check: ZKHHO 1 'DPDJHRXWRIURXQGĺ5HSODFH 2. WKLOH DGMXVWing and UHSODFLQJWhe ZKHHOV, SOHDVe SXWWhe innerWube inWRWheWire and make sureWhe 2 YDOYHFDQEHLQWKHILUPSRVLWLRQ WARNING Never attempt to make any repairs to the wheel. TIP $IWer aWire RU ZKHHO has been changed RU UHSODFHG, DOZD\VEDODQFHWKHZKHHO 2 3-11 CHK ADJ REPLACING THE HEADLIGHT BULB REPLACING THE HEADLIGHT BULB 1. Remove • Headlight 1 . Refer to " REMOVING AND INSTALLING THE COVER". 1 • Opening the headlight bulb holder cover 2 . 2 3 • Remove headlight coupler 3 . • Loosen the screw of bulb fixer 4 and the fixer will open. 4 3-12 REPLACING THE HEADLIGHT BULB/ REPLACING THE FRONT/ REAR TURN LIGHTS CHK ADJ 2. Change • Headlight bulb 5 (burned). 5 WARNING Since the headlight bulb gets extremely hot, keep flammable products and your hands away from the bulb until it has cooled down. 3. Install • Headlight bulb. New • Bulb fixer. • Headlight coupler. • Bulb holder cover. • Headlight. TIP • Make sure the triangle flange of bulb connect with coupler. • Make sure the bulb fixer infix to groove. NOTICE Avoid touching the glass part of the headlight bulb to keep it free from oil, otherwise the transparency of the glass, the life of the bulb and the luminous flux will be adversely affected. If the headlight bulb gets soiled, thoroughly clean it with a cloth moistened with alcohol or lacquer thinner. REPLACING THE FROENT/ REAR TURN LIGHT BULB 3 1 1. Remove • Lens 1 . • Turn light holder site 2 . • Bulb 3 . 2 2. Replace • Bulb (burned). a TIP • Counterclockwise a revolving the bulb will take it out. 3-13 REPLACING THE FRONT/ REAR TURN LIGHTS BULB/ REPLACING TAIL LIGHT BULB CHK ADJ WARNING Since the light bulb gets extremely hot, keep flammable products and your hands away from the bulb until it has cooled down. 3 2. Install • • • • Bulb. New The turn light holder site. Lens. Left/ right turn light. TIP • Make sure the bulb infix to groove 3 . REPLACING THE TAIL LIGHT BULB 1. Remove • Lens 1 . • Bulb 2 . TIP 1 • Press the bulb in and counterclockwise a revolving will take it out. 2. Replace • Bulb (burned). WARNING Since the light bulb gets extremely hot, keep flammable products and your hands away from the bulb until it has cooled down. a 2 3. Install • Bulb. • Lens. b TIP • Press the bulb in and clockwise b revloving will insert into the holder site. • Make sure the bulb infix to groove. 3-14 CHAPTER 4 CONTROLLER SYSTEM MOTOR . . . . . . . . . . . . . . . . . . . . . . . . . . . . . . . . . . . . . . . . . . . . . . . . . . . . . . . . . . . . . . . . . . . . . . . . 4-1 CHECK AND TROUBLESHOOTING . . . . . . . . . . . . . . . . . . . . . . . . . . . . . . . . . . . . . . . . . . . 4-1 REMOVING THE MOTOR . . . . . . . . . . . . . . . . . . . . . . . . . . . . . . . . . . . . . . . . . . . . . . . . . . . . 4-2 MOTOR INSTALLATION . . . . . . . . . . . . . . . . . . . . . . . . . . . . . . . . . . . . . . . . . . . . . . . . . . . . . . 4-4 DRIVER . . . . . . . . . . . . . . . . . . . . . . . . . . . . . . . . . . . . . . . . . . . . . . . . . . . . . . . . . . . . . . . . . . . . . . . . 4-5 SPECIFICATION . . . . . . . . . . . . . . . . . . . . . . . . . . . . . . . . . . . . . . . . . . . . . . . . . . . . . . . . . . . . . 4-5 CHECK AND TROUBLESHOOTING . . . . . . . . . . . . . . . . . . . . . . . . . . . . . . . . . . . . . . . . . . . 4-5 LEV INTERFACE (TESTING INTERFACE) . . . . . . . . . . . . . . . . . . . . . . . . . . . . . . . . . . . . . 4-7 STATUS . . . . . . . . . . . . . . . . . . . . . . . . . . . . . . . . . . . . . . . . . . . . . . . . . . . . . . . . . . . . . . . . . . . . . 4-10 INSTRUMENT PANEL . . . . . . . . . . . . . . . . . . . . . . . . . . . . . . . . . . . . . . . . . . . . . . . . . . . . . . . . . . 4-11 HOW TO READ INSTRUMENT PANEL . . . . . . . . . . . . . . . . . . . . . . . . . . . . . . . . . . . . . . . . 4-11 CHECK AND TROUBLESHOOTING . . . . . . . . . . . . . . . . . . . . . . . . . . . . . . . . . . . . . . . . . . . 4-11 CONT MOTOR CHECK AND TROUBLESHOOTING • When the rider control motor speed via acceleration handle, and if the motor can’t run and smoothly and the instrument panel sends out a warning signal, it is necessary to check the motor. Motor Controller Hall sensor Motor Hall sensor 1 2 3 4 Motor checking tool HALL Hall warning tone TIP • It is necessary to confirm relevant motorcycle components are free of failure or damage before testing. • It is necessary to confirm the connector between the motor and controller is loosened or damaged. 1. Testing on check tools • Remove the Hall sensor between the motor and controller. • Connect motor Hall sensor 1 and the Hall sensor 2 on the check tools and switch on the power of check tool 3 . • Turn the rear wheel by hand to confirm whether the Hall indicator (U, V, W) 4 can function norm ally by conducting the checking steps as in the following: a. How to confirm Hall sensor signal functions regularly : • Turn the rear wheel by hand. If none of Hall signal indicators doesn’t remain on light-on or light-off and every indictor remains on flashing, the Hall signal can function normally. b. How to confirm Hall Sensor signal function irregularly : • Turn the rear wheel by hand. If any of Hall signal indicator remains on light-on or lightoff and any indicator doesn’t remain on flashing, the Hall signal functions irregularly. Please replace the motor. c. If the instrument panel sends out a warning tone or warning signal : If the instrument panel sends out a warning tone, the control system can’t detect the signals of motor Hall Sensor and the motor Hall Sensor functions irregular. The check procedures are as below: • When the instrument panel sends out a warning tone and the Hall sensor sends out a warning signal (as illustrated in the left), please check whether motor Hall sensor and controller Hall sensor is loosened or there is poor contact. • If wiring is regular, but there still sends out a warning signal during riding, Please replace the motor. Motor checking tool SC130A-EGC2-0FG1 X 4-1 CONT MOTOR REMOVING THE MOTOR 2 ԦʳʳRemove the bolts 1 and rear bottom cover L 2 . 1 ԦʳʳRemove the band 1 and rear fender bolt 2 . 1 2 ԦʳʳRemove the rear fender bracket bolt 1 and rear fender 2 . 2 1 ԦʳʳRemove the bolts 1 and rear bottom cover R 2 . 2 1 ԦʳʳRemove the rear fender bolt 1 . 1 4-2 CONT MOTOR • Remove brake cable adjusting bolt 1 . 1 • Remove brake cable set nut 1 to rear end. • Adjust the adjusting nut 2 to loosening position and fix the groove 3 across the brake drum. • Remove brake cable. 3 1 2 • Loosen set nuts on left and right motor and frame as illustrated. 1 • Remove motor three-phase circuit 1 and Hall connector 2 as illustrated. • Pull the three-phase circuit and Hall connector across frame gap. • Remove the motor. 2 WARNING 1 When failed, the precise circuits and electronic component in the motor must be replaced or repaired by the authorized dealer immediately and are forbidden to be removed and decomposed by the rider to insure riding safety. 4-3 CONT MOTOR MOTOR INSTALLATION Dowel pin • Reverse the removal procedure for installation. NOTICE • It is necessary to confirm whether the regular and dowel pin are fastened tightly during brake cable installation. • It is necessary to check and adjust the brake clearance to maintain at 5~10mm. Regulator WARNING It is necessary to confirm whether brake indicator can light on and function regularly after adjusting brake. 4-4 CONT DRIVER SPECIFICATION Voltage Power input Electric current 48 V ± 10 V 0 A ~ 30 A DC transfer output 12 V ± 1 V 7 A ± 0.5 A Motor driver output 48 V ± 10 V 25 A ± 1 A CHECK AND TROUBLESHOOTING • Check the fuse whether blow or not. Turn signal fuse 10 A Remove 1. Open the upper fuse cover. 2. Use a long nose pliers and pull out the fuse. Main fuse 30 A Check 1. Connect the pocket tester to the fuse and check the continuity. TIP 6HWWKHSRFNHWWHVWHUVHOHFWRUWR[ • If an Avometer displays “ ”, please replace the fuse. Installation Turn the main switch to “OFF”. • Install a new fuse of the same specification and press the fuse to the bottom. • Close and press the fuse folder cover tightly. • Turn the main switch to “ON” and confirm each circuit system can function regularly. • If the fuse blows out quickly again, please check each circuit system. WARNING • Never use the fuse of a different specification or other metal to replace the fuse. • Using the fuse exceeding the specified capacity will lead to wiring over-heating or blowing out. 4-5 CONT DRIVER 2. Remove out wiring assembly after testing the driver according to the illustration and list below LQGLFDWHGE\WKHVLJQ³Ɣ´8VHDSRFNHW tester to measure. If there is any short-circuit VHQGLQJRXWD³%HHS´WRQHRUDPHDVXUHPHQW YDOXHRIOHVVWKDQLWFDQEHMXGJHGDV failed. 3. Remove out wiring assembly after testing the driver according to the illustration and list below LQGLFDWHGE\WKHVLJQ³ż´,IWKHUHLVQRWDQ\ VKRUWFLUFXLWZLWKRXWVHQGLQJRXWD³%HHS´WRQH RUDPHDVXUHPHQWYDOXHRIOHVVWKDQLW FDQEHMXGJHGDVIDLOHG 4. Remove out wiring assembly after testing the driver according to the illustration and list below LQGLFDWHGE\GLJLWDOYDOXHDQGXVHDSRFNHW tester to conduct ohmmeter measurement. If the measurement value exceeds the corresSRQGLQJYDOXHLWFDQEHMXGJHGDVIDLOHG WARNING When failed, the precise circuits and electronic component in the controller must be replaced or repaired by the authorized dealer immediately and are forbidden to be removed and decomposed by the rider to insure riding safety. Data for controller cable outlet Fuse Controller Plug R R Y G B W Br W B Y R W Blue G W Y W W BrW GB BW YB GY BrB G Blue B W P ȝPSRURVLW\ ZDWHUUHSHOOHQWFRYHU BW YG YBr Terminal Comparison list for controller cable outlet Cable outlet 3 serial 4 5 6 7 8 9 10 12 13 14 16 1&2 6 3k~10k 3k~10k 3k~10k 120k~140k "_" indicates exemStion of testing. 4-6 CONT DRIVER LEV INTERFACE (TESTING INTERFACE) 1. Testing: Lev Interface (testing interface) Testing interface software SC9003-EGC2-0000 Ꮪ।൷ᙰ Panel connector NOTICE List the all possible causes according to troubleshooting and be sure to check and confirm all other causes shall be excluded before testing driver according to testing interface Driver ᦀ೯ᕴ൷ᙰ connector How to operate testing interface • Remove frontal fender • Remove the connector between instrument panel and driver (as illustrated in the left) and connect the 4 pin connector of the testing interface with the driver connector and the other end connects with the UBS connector of the computer. • Inert the key to switch on the power. Please install the testing interface software and testing interface driver by first use. Testing interface ᛀྒྷտ૿൷ᙰ connector ᛀྒྷտ૿൷ᒵ Testing interface wiring USB ൷ᙰ USB connector Testing interface connector SC9004-EGC2-0000 • Start the testing interface software on the software as illustrated in the following: 4-7 CONT DRIVER • Fill in LEV in the selected frame for connecting to the COM port of the computer, such as filling 3 for COM 3 after clicking COM Created . TIP The COM port position has gotten by click my FRPSXWHUĺFOLFNULJKWNH\ERDUGĺclick contents ĺFOLFNKDUGZDUHĺGHYLFHNHHSHUDIWHULQVWDOO WKHWHVWLQJLQWHUIDFHVRIWZDUHDQGFRQQHFWGULYHU and computer. 7KHVRIWZDUHRI:LQGRZV;39LVWD are suitable for use the steps. ,IRQOLQHFRQQHFWLRQIDLOVDZURQJPHVVDJH ZLQGRZZLOODSSHDUDVLOOXVWUDWHGLQWKHOHIW 3OHDVHFRQILUPZKHWKHUWKHZLULQJFRQQHFWLRQ is installed completely and COM port setting is correct. • After successful on-line connection, please click on the frame Get . 4-8 CONT DRIVER • The controller will report the system status as shown in the selected frame. • If it is necessary to leave interface testing software after completing testing, please click on the selected frame COM Release , and click on COM Release ,and the switch off the software and pull off the plug to avoid software crash. 4-9 CONT DRIVER STATUS Status: Unable to starting computer booting (there is no display on the panel instrument or beep tone continues). • Operate according the testing interface operation steps. If the illustration in the left still doesn’t appear, the driver shall be replaced. Status: If electricity shuts down during riding (the power and instrument panel display disappear) • Operate according the testing interface operation steps. If the system report like in illustration in the left still doesn’t appear, the driver shall be replaced. • If the system report appears, connect the instrument panel connector with the driver and start the booting. After successful booting, turn the rear wheel slowly. If the electricity shuts down, the driver shall be replaced. Status: Operate the throttle switch after the booting but the vehicle doesn’t respond. • Operate according the testing interface operation steps. After the system report status appear, turn the handle throttle. The turn range is bigger as the digits in the selected frame become bigger. If the digits don’t change as the throttle switches on or off, the driver shall be replaced. Status: The vehicle can’t run smoothly and suffers. • Operate according the testing interface operation steps. After the system report status appear, turn the rear wheel slowly. The selected frame will also change. If the selected frame doesn’t change as the rear wheel turns, it means unchanged or the change doesn’t proceed as in the sequence in the following list, the driver shall be replaced. Hall logic list Order ˄ ˅ ˆ ˇ ˈ ˉ 4-10 U-Phase Hall Voltage V-Phase Hall Voltage W-Phase Hall Voltage CONT INSTRUMENT PANEL HOW TO READ INSTRUMENT PANEL ˉ ˊ ˋ 888888 8888.8 Trip 88 8888 ˄ˇ ˌ ODO Km/H mph ˅ ˄ˇ Pow Yes 1 Total mileage 2 Vehicle speed unit 3 Battery residual power 4 Failure signal 5 Cancellation key 6 Speed 7 Single trip odometer(reset to zero) ˄ˈ ˄ ˆ NO X ˇ ˈ ˄˃ ˄˄ ˄˅ 8 Signal code 9 Power mode 10 Status warning signal Confirmation key 11 12 Button A 13 Button B 14 Turn light signal 15 Headlight ˄ˆ CHECK AND TROUBLESHOOTING EV3 instrument panel owns simple functions and can display only status output, button input and odometer accumulation. Except that the headlight, turn signals are accessed from the electricity signal of lamps, all other signals, such as speed, electricity volume, unit (kilometers or miles), warning status are all provided by controller via RS232. 4 testing steps are described in the following to confirm whether instrument panel can function regularly or not. Each testing item describes how to judge irregular function and to make troubleshooting. push 888888 8888.8 ODO Km/H mph Trip 8888 Standby screen 88 Pow 8888.8 Yes NO Trip X Riding screen 1ʳ 888888 ODO Km/H 00 Booting screen Testing steps 1. After switching on the power of electric vehicle, the instrument panel beeper shall sound and LCD shall display booting screen (as illustrated in the left) and the backlight is on. It will enter into the standby screen. Press Button A ˄ , it will enter into riding screen. Troubleshooting 1 3-Pin Connector 4-Pin Connector • There is no response and no screen on LCD after starting booting. a. Check whether 4-pin connector is installed correctly. Make sure the installation is completed properly. 4-11 CONT INSTRUMENT PANEL b. After the instrument panel check tools are connected (move the panel and the 3 pin connector of main wiring and connect with the instrument panel check tools and panel connector), according to the instrument panel check tools instruction check whether the instrument panel can function regularly. If the instrument panel can’t function regularly, the panel instrument shall be replaced. Panel connector Main wiring connector Instrument panel check tools ˢˡʳ Instrument panel line Spee d/ Ba ttery ˢ˙˙ʳ ˢˡ˂ʳ ˢ˙˙ʳ ˖˟˘˔ ˥ʳˢ˗ ˢʳ c. If the panel instrument can function regularly, use the electricity meter to measure electricity + (brown/ white), - (black/white)electricity voltage at two ends of main wiring terminal of 4-Pin connector. Check whether electricity voltage of main wiring 12 V can function regularly. If the electricity voltage of main wiring 12 V functions irregularly, check the main distribution wirings. Instrument panel check tools SC7200-EGC2-0FG1 Failure status 2 • There appears broken or uneven-shading words on LCD after booting. a. Connect the instrument panel check tool to confirm whether the panel instrument can function regularly. If the instrument panel functions irregularly, it is necessary to replace with a new instrument panel. Failure status 3 • After booting, instrument panel LCD backlight is insufficient or irregular. a. Connect the instrument panel check tool to confirm whether the panel instrument can function regularly. If the instrument panel functions irregularly, it is necessary to replace with a new instrument panel. Failure status 4 • After booting, the instrument panel LCD functions regularly but the beeper doesn’t sound or sound irregularly. a. Check beeper connection wire or connector is installed properly. Make sure the installation is completed properly. b. When poor contact is confirmed but beeper still sound irregularly, the beeper shall be replaced. Failure Status 5 • After booting, LCD still keeps on displaying booting screen and can’t enter into standby screen. a. Check 4-pin connector is installed properly. Make sure the connector is installed properly. b. Connect the instrument panel check tool and check whether the instrument panel can function regularly. If the instrument panel functions irregularly, it is necessary to replace with a new instrument panel. c. If the instrument panel can function regularly, and the wiring connector is installed properly, it is necessary to check whether the controller can function regularly. Please refer to testing steps for the controller. Failure status 6 • In booting screen, press the left button but it is always unable to enter into the riding screen. a. Check 4-pin connector is installed properly. Make sure the connector is installed properly. 4-12 CONT INSTRUMENT PANEL Eye Eye 8888.8 Trip 8888.8 888888 ODO Km/H Trip 20 888888 ODO Km/H 20 Left turn signal indicator LED Right turn signal indicator LED 3 pin connector 4 pin connector Headlight indicator LED 8888.8 Trip 888888 00 ODO Km/H LCD backlight b. Connect the instrument panel check tool and check whether the instrument panel can function regularly. If the instrument panel functions irregularly, it is necessary to replace with a new instrument panel. c. If the instrument panel can function regularly, and the wiring connector is installed properly, it is necessary to check whether the controller can function regularly. Please refer to testing steps for the controller. Testing steps 2. Switch on a turn signal in riding screen. The icon “Eye” and turn signal indicator LED shall flash. Failure Status 1 • Switch on turn signal in the riding screen, but the turn signal LED doesn’t flash regularly. a. Check 3-pin connector is installed properly. Make sure the connector is installed properly. b. Connect the instrument panel check tool and check whether the instrument panel can function regularly. If the instrument panel functions irregularly, it is necessary to replace with a new instrument panel. c. If the instrument panel can function regularly, it is necessary to check whether the turn signal and main wiring can function regularly. Please refer to Chapter 6 signal system. • Switch on turn signal in the riding screen, but the turn signal LED doesn’t flash regularly. a. Check 3-pin connector is installed properly. Make sure the connector is installed properly. b. Connect the instrument panel check tool and check whether the instrument panel can function regularly. If the instrument panel functions irregularly, it is necessary to replace with a new instrument panel. c. If the instrument panel can function regularly, it is necessary to check whether the turn signal and main wiring can function regularly. Please refer to Chapter 6 wiring diagram. Failure Status 2 • Switch on the turn signal in riding screen and the turn signal LED flashes but the icon “Eye” in the LCD functions irregularly. a. Connect the instrument panel check tool and check whether the instrument panel can function regularly. If the instrument panel functions irregularly, it is necessary to replace with a new instrument panel. Testing Steps 3. Switch on the headlight and LCD backlight and the headlight indicator LED will be on. Failure Status 1 • Switch the headlight in the riding screen but the headlight indicator LCD doesn’t switch on. a. Check 3-pin connector is installed properly. Make sure the connector is installed properly. b. Connect the instrument panel check tool and check whether the instrument panel can function regularly. If the instrument panel functions irregularly, it is necessary to replace with a new instrument panel. 4-13 CONT INSTRUMENT PANEL c. If the instrument panel can function regularly, it is necessary to check whether the headlight and main wiring can function regularly. Please refer to Chapter 6 Wiring Diagram NO Yes Button A Testing Steps 4. There will sound beeper tone upon pressing Button A or Button B in the riding screen. Failure Status 1 • The button tone doesn’t sound upon pressing the left or right button in the riding screen. a.Restart the booting to make sure the beeper can make booting sound effects. b. If there is no booting sound effect, check whether the beeper wiring, connector, the beeper can function regularly. c. If there is booting sound effect and the beeper can function regularly but there is still no button tone upon pressing the left or right button in the riding screen. Connect the instrument panel check tool to make sure the instrument panel can function regularly. If the instrument panel functions irregularly, it is necessary to replace with a new instrument panel. X Button B Headlight indicator LED 8888.8 Trip 888888 00 ODO Km/H LCD backlight Testing Steps 5. Switch on the headlight in the riding screen and the LCD backlight and the headlight indicator LED be on. Failure Status 1 • Switch on the headlight in the riding screen but the headlight indicator LCD isn’t on. a.Check 3-pin connector is installed properly. Make sure the connector is installed properly. b. Connect the instrument panel check tool and check whether the instrument panel can function regularly. If the instrument panel functions irregularly, it is necessary to replace with a new instrument panel. c. If the instrument panel can function regularly, it is necessary to check whether the headlight and main wiring can function regularly. Please refer to Chapter 6 Wiring Diagram. Failure Status 2 • Switch on the headlight in the riding screen and the headlight indicator LCD is on but the LCD backlight isn’t on. a.Connect the instrument panel check tool to check whether the instrument panel can function regularly. If the instrument panel functions irregularly, it is necessary to replace with a new instrument panel. 4-14 CHAPTER 5 BATTERY/CHARGER BATTERY . . . . . . . . . . . . . . . . . . . . . . . . . . . . . . . . . . . . . . . . . . . . . . . . . . . . . . . . . . . . . . . . . . . . . . 5-1 HOW TO CHECK BATTERY RESIDUAL CAPACITY . . . . . . . . . . . . . . . . . . . . . . . . . . . . . 5-1 REFERENCE VALUE FOR BATTERY RESIDUAL CAPACITY . . . . . . . . . . . . . . . . . . . . 5-2 CHECKING BATTERY . . . . . . . . . . . . . . . . . . . . . . . . . . . . . . . . . . . . . . . . . . . . . . . . . . . . . . . . 5-3 Discharge . . . . . . . . . . . . . . . . . . . . . . . . . . . . . . . . . . . . . . . . . . . . . . . . . . . . . . . . . . . . . . . . . 5-3 Testing charging . . . . . . . . . . . . . . . . . . . . . . . . . . . . . . . . . . . . . . . . . . . . . . . . . . . . . . . . . . . . . . . . . 5-3 CHARGER. . . . . . . . . . . . . . . . . . . . . . . . . . . . . . . . . . . . . . . . . . . . . . . . . . . . . . . . . . . . . . . . . . . . . . 5-4 INSTALLATION STEPS . . . . . . . . . . . . . . . . . . . . . . . . . . . . . . . . . . . . . . . . . . . . . . . . . . . . . . . 5-4 CHARGING ELECTRICITY CURRENT AND OPERATION ENVIRONMENT TEMPERATURE . . . . . . . . . . . . . . . . . . . . . . . . . . . . . . . . . . . . . . . . . . . . . 5-5 MAINTENANCE AND TESTING STEPS . . . . . . . . . . . . . . . . . . . . . . . . . . . . . . . . . . . . . . . . 5-5 TROUBLESHOOTING . . . . . . . . . . . . . . . . . . . . . . . . . . . . . . . . . . . . . . . . . . . . . . . . . . . . . . . . . 5-6 BAT CHA BATTERY – + HOW TO CHECK BATTERY RESIDUAL CAPACITY Read the battery residual capacity indicator or observe the indicator light on the battery box. From the battery residual capacity indicator in the display Turn the main switch to ON. The battery residual capacity icon in the display will light fully for few seconds. The battery residual capacity will be displayed then. Battery residual capacity How to read the battery residual capacity indicator light from the battery box 1. Remove the battery a. Turn the main switch to OFF b. Lift the seat Pull the buckle 1 on the seat rear upwards and lift the seat rear upwards to open the seat. 1 Key Battery housing c. Use the key to open the battery protection cover and open the battery cover by hand carefully. NOTICE The battery protection cover will be bounced off upwards by the spring. d. Hold the battery handle and pull the battery out. 5-1 BAT CHA BATTERY – + e. Remove the battery to observe the indicator light on the battery box as illustrated in the following list. NOTICE The indicator light on the battery box One of the E-MO features is Li-ion Mn battery and its performance (electric capacity) will reduce gradually. The performance reduction speed will depend on usage. Repeating charging and discharging for about 500 times will reduce electric capacity to 70%~80% of the new product. REFERENCE VALUE FOR BATTERY RESIDUAL CAPACITY Battery residual capacity(%) Screen Bright Light signals Flash Green Red Situation Only 2 sections of battery residual capacity flash on the instrument panel or red light on the battery means nearly no battery residual capacity. Riding shall be stopped and charging shall be conducted immediately. Only 2 sections of battery residual capacity on the instrument panel or 1 green light on the battery means battery is nearly out of charge and charging shall be conducted soon. 0 ~ 24 25 ~ 39 Only 4 sections of battery residual capacity on the instrument panel or 2 green light on the battery means less than half battery residual capacity. Charging shall be conducted soon. Only 6 sections of battery residual capacity on the instrument panel or 3 green light on the battery means about 1/2 battery residual capacity. Battery capacity shall be noticed during riding. 40 ~ 54 55 ~ 69 70 ~ 84 There are 8 sections of battery residual capacity on the instrument panel or 4 green light on the battery means sufficient battery capacity. 85 ~ 100 There are 10 sections of battery residual capacity on the instrument panel or all green light on the battery means sufficient battery capacity. ϡʳPress on the battery box to display light signal. TIP Before replacing the battery, use E-Mo Charger to charge the battery completely. If the battery is not charged completely, the indicator can’t display the battery residual capacity correctly. 5-2 BAT CHA BATTERY – + CHECKING BATTERY 1 Discharge 1. Press battery residual power display button 1 and observe whether LED light !!! 2 is on. If LED is not on, the battery might out of electricity. Please conduct the next step. 2 Indicator light 2. Plug on Charger plug and make the charger be OFF. Charging plug Charging outlet 3. Use an ammeter to measure the output on the positive and negative poles of the battery and stay the probe on the output terminal for 10 seconds and observe whether electricity voltage is over 36V. If the electricity voltage is less than 36V, please replace the battery immediately. Testing charging 1. Plug on the charger plug and make the charger be OFF. Switch on the charger and observe whether the charger indicator 1 light illumi-!!!! nates in red. 1 2. Use an ammeter to measure charging signal. Use the red probe of the ammeter to test the positive pole of the battery; the black probe to test the negative pole of the battery and then observe whether electricity voltage is more than 40V and keeps on increasing. If the electricity voltage is less than 40V, please use an ammeter to measure the negative and positive poles of the battery to observe whether the electricity voltage is more than 40V. If not, please replace with a new charger. If yes, please replace with a new battery. 5-3 BAT CHA CHARGER Power switch + INSTALLATION STEPS Electricity voltage switch 1. Make sure the charger is switched off. Connect the battery to output terminal. Select proper output wire suitable for the electricity current to act as the conducting wire between the battery and charger. 230 WARNING Each pole shall be connected correctly. Positive pole (+) shall be connected to (+) terminal and negative pole (-) shall be connected to (-) terminal. Output positive and negative poles shall avoid short circuit. Charging outlet LED +V -V 2. Use selection switch to adjust the AC input electricity voltage range 115/230V according to local electricity voltage. Factory default is preset to be 115V(Taiwan). 3. After the electricity power is connected, turn the power switch (0/-) to ON(-). Check whether the LED light illuminates in red (in charging status). Green light indicates it is already fully charged. Terminal WARRANT IS VOID IF STICKER IS BROKEN ᐺᄤྤய – NOTICE Θ This battery can charge for the lithium battery of this vehicle. Charger Θ This charger shall be kept in drafty and dry Power cable and shall avoid exposure to rain or snow. Θ The length of conducting wire connecting Θ Input terminal Θ Charging outlet Charging plug Θ Θ Battery Power outlet Charger Power switch 5-4 the battery to the charger shall be kept as short as possible to avoid lengthening the time for full charge due to excessive voltage reduction. Make sure the charging electricity voltage and electricity current complying with battery specification. Both new and old battery can’t be charged in parallel connection. Make sure the charger is switched off upon plugging into or off the conducting wire. 2-year warranty is provided for the charger except damage caused by improper usage. BAT CHA CHARGER – + The charging electricity current and voltage in each phase is shown as in the left. Start Charging Charging voltage 100% Charging current Phase 2 Phase 1 Fixed electricity current Fixed electricity voltage Floating charging Red Indicator light color Green Adjustment electricity Voltage button under the warn sticker, have already set up the voltage of charging suitable when dispatched from the factory, it will cause the damage of battery and charger to adjust by oneself. Warranty is void if sticker is broken. ᐺᄤྤய ʳʳ WARRANT IS VOID IF STICKER IS BROKEN LED WARRANT IS VOID IF STICKER IS BROKEN ᐺᄤྤய WARNING +V ʳʳʳ-V CHARGING ELECTRICITY CURRENT AND OPERATION ENVIRONMENT TEMPERATURE 100 80 1. PB-360 Charger can charge with the maximum electricity current at the temperature under 40°. The maximum electricity current will be reduced automatically at the temperature higher than 40° as shown in the left. 70 60 40 30 -20 10 20 30 40 50 60 70 к Environment temperature °C MAINTENANCE AND TESTING STEPS 1. Set the DC voltage of ammeter to over 100V. 2. The charger shall not be connected with the battery. Switch on the charger and the charger shall illuminate in green. 3. Use the red probe of the ammeter to contact the positive pole (P1) and the black probe to contact the negative (P2) as shown in the left. 4. The displaying voltage range of the ammeter is about 54.9±0.3V 5. If the electricity voltage is not within the range mentioned above, adjust SVR1. The electricity reduces back to 54.9±0.3V as shown in the left. 6. If troubleshooting still can’t be attained after conducting the steps mentioned above, it means the product is already damaged. ᐺᄤྤய P1 (+V) P3 (-V) WARRANT IS VOID IF STICKER IS BROKEN workload % 90 P2 (-V) 5-5 BAT CHA CHARGER – + TROUBLESHOOTING If the troubleshooting still can’t be attained after conducting the steps as in the following list, please contact the E-TON Co., Ltd. or the authorized dealer. Status No output electricity voltage Excessively low output electricity voltage Possible cause Solution Power switch is not turned to ON. Incorrect connection of electric pole (output fuse burned out) 115/230VAC Incorrect selection on switch Turn to ON position 115/230VAC Incorrect selection on switch Turn the switch to the correct position Replace the fuse Maintenance and repair is needed. The battery charging still Battery is aged or damaged Replace with new battery can’t reach the floating charging phase (in green Select wire of proper diameter Excessively narrow light) output wire diameter 5-6 CHAPTER 6 ELECTRICAL ELECTRICAL COMPONENTS ˁ ˁ ˁ ˁ ˁ ˁ ˁ ˁ ˁ ˁ ˁ ˁ ˁ ˁ ˁ ˁ ˁ ˁ ˁ ˁ ˁ ˁ ˁ ˁ ˁ ˁ ˁ ˁ ˁ ˁ ˁ ˁ ˁ ˁ ˁ ˁ ˁ ˁ ˁ ˁ ˁ ˁ ˁ ˁ ˁ ˁ ˁ ˁ ˁ ˁ ˁ ˁ ˁ ˁ ˁ ˁ 6-1 WIRING DIAGRAM ˁ ˁ ˁ ˁ ˁ ˁ ˁ ˁ ˁ ˁ ˁ ˁ ˁ ˁ ˁ ˁ ˁ ˁ ˁ ˁ ˁ ˁ ˁ ˁ ˁ ˁ ˁ ˁ ˁ ˁ ˁ ˁ ˁ ˁ ˁ ˁ ˁ ˁ ˁ ˁ ˁ ˁ ˁ ˁ ˁ ˁ ˁ ˁ ˁ ˁ ˁ ˁ ˁ ˁ ˁ ˁ ˁ ˁ ˁ ˁ ˁ ˁ ˁ ˁ ˁ ˁ ˁ 6-2 CHECKING SWITCH CONTINUITY ˁ ˁ ˁ ˁ ˁ ˁ ˁ ˁ ˁ ˁ ˁ ˁ ˁ ˁ ˁ ˁ ˁ ˁ ˁ ˁ ˁ ˁ ˁ ˁ ˁ ˁ ˁ ˁ ˁ ˁ ˁ ˁ ˁ ˁ ˁ ˁ ˁ ˁ ˁ ˁ ˁ ˁ ˁ ˁ ˁ ˁ ˁ ˁ ˁ ˁ ˁ 6-3 CHECKING SWITCH CONTINUITY ˁ ˁ ˁ ˁ ˁ ˁ ˁ ˁ ˁ ˁ ˁ ˁ ˁ ˁ ˁ ˁ ˁ ˁ ˁ ˁ ˁ ˁ ˁ ˁ ˁ ˁ ˁ ˁ ˁ ˁ ˁ ˁ ˁ ˁ ˁ ˁ ˁ ˁ ˁ ˁ ˁ ˁ ˁ ˁ ˁ ˁ ˁ ˁ ˁ 6-3 CHECKING THE SWITCHES ˁ ˁ ˁ ˁ ˁ ˁ ˁ ˁ ˁ ˁ ˁ ˁ ˁ ˁ ˁ ˁ ˁ ˁ ˁ ˁ ˁ ˁ ˁ ˁ ˁ ˁ ˁ ˁ ˁ ˁ ˁ ˁ ˁ ˁ ˁ ˁ ˁ ˁ ˁ ˁ ˁ ˁ ˁ ˁ ˁ ˁ ˁ ˁ ˁ ˁ ˁ ˁ ˁ ˁ ˁ ˁ 6-4 CHECKING THE BULBS AND BULB SOCKETS ˁ ˁ ˁ ˁ ˁ ˁ ˁ ˁ ˁ ˁ ˁ ˁ ˁ ˁ ˁ ˁ ˁ ˁ ˁ ˁ ˁ ˁ ˁ ˁ ˁ ˁ ˁ ˁ ˁ ˁ ˁ ˁ ˁ ˁ ˁ ˁ ˁ 6-5 CHECKING THE CONDITION OF THE BULBS ˁ ˁ ˁ ˁ ˁ ˁ ˁ ˁ ˁ ˁ ˁ ˁ ˁ ˁ ˁ ˁ ˁ ˁ ˁ ˁ ˁ ˁ ˁ ˁ ˁ ˁ ˁ ˁ ˁ ˁ ˁ ˁ ˁ ˁ ˁ ˁ ˁ 6-5 CHECKING THE CONDITION OF THE BULB SOCKETS ˁ ˁ ˁ ˁ ˁ ˁ ˁ ˁ ˁ ˁ ˁ ˁ ˁ ˁ ˁ ˁ ˁ ˁ ˁ ˁ ˁ ˁ ˁ ˁ ˁ ˁ ˁ 6-6 LIGHTING SYSTEM ˁ ˁ ˁ ˁ ˁ ˁ ˁ ˁ ˁ ˁ ˁ ˁ ˁ ˁ ˁ ˁ ˁ ˁ ˁ ˁ ˁ ˁ ˁ ˁ ˁ ˁ ˁ ˁ ˁ ˁ ˁ ˁ ˁ ˁ ˁ ˁ ˁ ˁ ˁ ˁ ˁ ˁ ˁ ˁ ˁ ˁ ˁ ˁ ˁ ˁ ˁ ˁ ˁ ˁ ˁ ˁ ˁ ˁ ˁ ˁ ˁ ˁ ˁ ˁ ˁ ˁ 6-7 CIRCUIT DIAGRAM ˁ ˁ ˁ ˁ ˁ ˁ ˁ ˁ ˁ ˁ ˁ ˁ ˁ ˁ ˁ ˁ ˁ ˁ ˁ ˁ ˁ ˁ ˁ ˁ ˁ ˁ ˁ ˁ ˁ ˁ ˁ ˁ ˁ ˁ ˁ ˁ ˁ ˁ ˁ ˁ ˁ ˁ ˁ ˁ ˁ ˁ ˁ ˁ ˁ ˁ ˁ ˁ ˁ ˁ ˁ ˁ ˁ ˁ ˁ ˁ ˁ ˁ ˁ ˁ ˁ 6-7 TROUBLESHOOTING ˁ ˁ ˁ ˁ ˁ ˁ ˁ ˁ ˁ ˁ ˁ ˁ ˁ ˁ ˁ ˁ ˁ ˁ ˁ ˁ ˁ ˁ ˁ ˁ ˁ ˁ ˁ ˁ ˁ ˁ ˁ ˁ ˁ ˁ ˁ ˁ ˁ ˁ ˁ ˁ ˁ ˁ ˁ ˁ ˁ ˁ ˁ ˁ ˁ ˁ ˁ ˁ ˁ ˁ ˁ ˁ ˁ ˁ ˁ ˁ ˁ ˁ 6-8 CHECKING THE LIGHTING SYSTEM ˁ ˁ ˁ ˁ ˁ ˁ ˁ ˁ ˁ ˁ ˁ ˁ ˁ ˁ ˁ ˁ ˁ ˁ ˁ ˁ ˁ ˁ ˁ ˁ ˁ ˁ ˁ ˁ ˁ ˁ ˁ ˁ ˁ ˁ ˁ ˁ ˁ ˁ ˁ ˁ ˁ ˁ ˁ ˁ ˁ ˁ 6-9 SIGNALING SYSTEM ˁ ˁ ˁ ˁ ˁ ˁ ˁ ˁ ˁ ˁ ˁ ˁ ˁ ˁ ˁ ˁ ˁ ˁ ˁ ˁ ˁ ˁ ˁ ˁ ˁ ˁ ˁ ˁ ˁ ˁ ˁ ˁ ˁ ˁ ˁ ˁ ˁ ˁ ˁ ˁ ˁ ˁ ˁ ˁ ˁ ˁ ˁ ˁ ˁ ˁ ˁ ˁ ˁ ˁ ˁ ˁ ˁ ˁ ˁ ˁ ˁ ˁ ˁ ˁ 6-10 CIRCUIT DIAGRAM ˁ ˁ ˁ ˁ ˁ ˁ ˁ ˁ ˁ ˁ ˁ ˁ ˁ ˁ ˁ ˁ ˁ ˁ ˁ ˁ ˁ ˁ ˁ ˁ ˁ ˁ ˁ ˁ ˁ ˁ ˁ ˁ ˁ ˁ ˁ ˁ ˁ ˁ ˁ ˁ ˁ ˁ ˁ ˁ ˁ ˁ ˁ ˁ ˁ ˁ ˁ ˁ ˁ ˁ ˁ ˁ ˁ ˁ ˁ ˁ ˁ ˁ ˁ ˁ ˁ 6-10 TROUBLESHOOTING ˁ ˁ ˁ ˁ ˁ ˁ ˁ ˁ ˁ ˁ ˁ ˁ ˁ ˁ ˁ ˁ ˁ ˁ ˁ ˁ ˁ ˁ ˁ ˁ ˁ ˁ ˁ ˁ ˁ ˁ ˁ ˁ ˁ ˁ ˁ ˁ ˁ ˁ ˁ ˁ ˁ ˁ ˁ ˁ ˁ ˁ ˁ ˁ ˁ ˁ ˁ ˁ ˁ ˁ ˁ ˁ ˁ ˁ ˁ ˁ ˁ ˁ 6-11 CHECKING THE SIGNALING SYSTEM ˁ ˁ ˁ ˁ ˁ ˁ ˁ ˁ ˁ ˁ ˁ ˁ ˁ ˁ ˁ ˁ ˁ ˁ ˁ ˁ ˁ ˁ ˁ ˁ ˁ ˁ ˁ ˁ ˁ ˁ ˁ ˁ ˁ ˁ ˁ ˁ ˁ ˁ ˁ ˁ ˁ ˁ ˁ ˁ ˁ 6-12 ELEC ELECTRICAL COMPONENTS ELECTRICAL SYSTEM ELECTRICAL COMPONENTS 1 2 3 4 5 6 Main switch Controller Battery Fuse Throttle Handle Motor 7 8 9 10 11 Switch Horn Meter Turn signal relay Charge 7 5 9 10 6 11 3 1 4 6-1 2 8 – + Br 21 R/W 16 LG 12V 10W R/W 12V 10W L/Y R/W L/Y 22 19 R/W Br/Y Br/Y R/W R/W 17 Br R/W R/W L/Y L/Y R/W 18 LG 12V 10W R/W Br G/Y R/W Br/Y Br/Y R/W G/Y 20 TURN SIGNAL SW R R PUSH PUSH L 9 12 Y/R Br/Y Br B/Y L/Y LG LG B/Y Y/R R/W R/W Y/R B/Y B/Y R/W ON OFF 13 ON OFF 11 14 HORN SW HEADLIGHT SW 10 LG L/Y B/Y Br Br/Y Y/R B/Y 15 12V 35W L/Y R/W Y/R L/Y G/Y B/Y Y/R Br/Y G/Y B/Y G/Y B/W Br/W G/B G/B Br/W Y/B Y/B R/W B/Y B/Y G G L Y Y/G Y/Br G/Y Br/B Gr Br B/W L Y B/W Br/W G/B B/W Y/B Y/Br Y/G Br/B G/Y R/W B/Y R/W G/Y B/W Gr Y/B B/W G/B Br/W Br/Y LG Br 2 3 1 7 ON OFF Y/Br Y/G Y/Br Y/G Y/Br B/W L/W G/W Br/W Y/W L/W B/W G/W Y/W Br/W Br/B Br/Y Y/B L L G/B G/B Y/B Y G B/W Br/W Br/W Y 12V 10W Br/Y R/W Br/Y 12V 21/5W R/W B/W B/W B/W B B 5 W/Pu R R Br/B W/Pu LG Y/Br Br/W B/W G Y/G L/W L/W Br/W B/W Y/W G/W Y/G Gr Y/W 6-2 G/W Gr R LG Gr Br/B 8 30A 10A Br/B Gr B/W B/W 6 Or Br/Y Or Br 4 B Controller Meter Motor Fuse Battery connection Battery box Main switch Throttle handle Turn signal switch Horn switch Headlight switch Turn signal relay Front brake light switch Rear brake light switch Front turn signal light (R) Front turn signal light (L) Rear turn signal light (R) Rear turn signal light (L) Head light Tail/brake light Horn Protective choke coil B Black Br Brown G Green Gr Gray L Blue LG Light Green Or Orange R Red Y Yellow Br/B Brown/Black B/W Black/White B/Y Black/Yellow Br/W Brown/White Br/Y Brown/Yellow G/B Green/Black G/W Green/White G/Y Green/Yellow L/W Blue/White R/W Red/White W/Pu White/Purple Y/B Yellow/Black Y/Br Yellow/Brown Y/G Yellow/Green Y/L Yellow/Blue Y/R Yellow/Red Y/W Yellow/White Color Code 22 21 20 18 19 17 15 16 11 12 13 14 10 1 2 3 4 5 6 7 8 9 WIRING DIAGRAM ELEC – + ELEC CHECKING SWITCH CONTINUITY – + CHECKING SWITCH CONTINUITY 0 Check each switch for continuity with the pocket tester. If the continuity reading is incorrect, check the wiring connections and if necessary, replace the switch. Pocket tester x1 NOTICE Never insert the tester probes into the coupler terminal slots. Always insert the probes from the opposite end of the coupler, taking care not to loosen or damage the leads. TIP • Before checking for continuity, set the pocket tester to “0” and to the “ x1” range. • When checking for continuity, switch back and forth between the switch positions a few times. The terminal connections for switches (e.g., trun signal switch, horn switch) are shown in an illustration similar to the one on the left. The switch positions a are shown in the far left column and the switch lead colors b are shown in the top row in the switch illustration. b Br Y/R LG a R PUSH L TIP “ — ” indicates a continuity of electricity between switch terminals (i.e., a closed circuit at the respective switch position). The example illustration on the left shows that: There is continuity between brown and yellow/red when the switch is set to “ R ”. 6-3 ELEC CHECKING THE SWITCHES – + CHECKING THE SWITCHES Damage/wear Repair or replace. Properly connect. Improperly connected Incorrect continuity reading Replace the switch. Check each switch for damage or wear, proper connections, and also for continuity between the terminals. Refer to “CHECKING SWITCH CONTINUITY”. 1 2 Br Y/R LG 3 L/Y B/Y R PUSH L ON OFF Br/Y B/Y ON OFF Y/R Br/Y Br Br Br/Y Y/R B/Y Y/L LG LG Y/L B/Y 4 G/Y B/Y 5 G/Y B/Y 6 Y/Br Y/Br Y/G Y/G 7 8 Y/Br Y/G ON OFF 30A 1 Turn signal switch 2 Horn switch 3 Headlight switch 4 Front brake switch 5 Rear brake switch 6 Main switch 6-4 7 Main fuse 8 Turn signal fuse 10A CHECKING THE BULBS AND BULB SOCKETS ELEC – + CHECKING THE BULBS AND BULB SOCKETS Check each bulb and bulb socket for damage or wear, proper connections, and also for continuity between the terminals. Repair or replace the bulb, Damage/wear bulb socket or both. Properly connect. Improperly connected Repair or replace the bulb, No continuity bulb socket or both. a b TYPES OF BULBS The bulbs used on this scooter are shown in the illustration on the left. • Bulbs a and b are used for the headlights and usually use a bulb holder that must be detached before removing the bulb. The majority of these types of bulbs can be removed from their respective socket by turning them counterclockwise. • Bulbs c is used for turn signal and tail/brake lights and can be removed from the socket by pushing and turning the bulb counterclockwise. • Bulbs d and e are used for meter and indicator lights and can be removed from their respective socket by carefully pulling them out. c d e CHECKING THE CONDITION OF THE BULBS The following procedure applies to all of the bulbs. 1. Remove: • bulb WARNING Since the headlight bulb gets extremely hot, keep flammable products and your hands away from the bulb until it has cooled down. NOTICE • Be sure to hold the socket firmly when removing the bulb. Never pull the lead, otherwise it may be pulled out of the terminal in the coupler. • Avoid touching the glass part of the headlight bulb to keep it free from oil, otherwise the transparency of the glass, the life of the bulb, and the luminous flux will be adversely affected. If the headlight bulb gets soiled, thoroughly clean it with a cloth moistened with alcohol or lacquer thinner. 6-5 CHECKING THE BULBS AND BULB SOCKETS ELEC – + 2. Check: • bulb (for continuity) (with the pocket tester) Replace. No continuity TIP Before checking for continuity, set the pocket x 1” range. tester to “0” and to the “ a. Connect the positive tester probe to terminal 1 and the negative tester probe to terminal 2 , and check the continuity. b. Connect the positive tester probe to terminal 1 and the negative tester probe to terminal 3 , and check the continuity. c. If either of the readings indicate no continuity, replace the bulb. CHECKING THE CONDITION OF THE BULB SOCKETS The following procedure applies to all of the bulb sockets. 1. Check: • bulb socket (for continuity) (with the pocket tester) Replace. No continuity TIP Check each bulb socket for continuity in the same manner as described in the bulb section; however, note the following. a. Install a good bulb into the bulb socket. b. Connect the pocket tester probes to the respective leads of the bulb socket. c. Check the bulb socket for continuity. If any of the readings indicate no continuity, replace the bulb socket. 6-6 Br 21 R/W 16 LG 12V 10W R/W 12V 10W L/Y R/W L/Y 22 19 R/W Br/Y Br/Y R/W R/W 17 Br R/W R/W L/Y L/Y R/W 18 LG 12V 10W R/W Br G/Y R/W Br/Y Br/Y R/W G/Y 20 TURN SIGNAL SW R PUSH L 9 12 B/Y L/Y LG Y/R Br/Y Br LG B/Y Y/R R/W R/W Y/R B/Y B/Y R/W ON OFF 13 ON OFF 11 14 HORN SW HEAD LIGHT SW 10 LG L/Y B/Y Br Br/Y Y/R B/Y 15 12V 35W L/Y R/W Y/R L/Y G/Y B/Y Y/R Br/Y G/Y B/Y G/Y B/Y R/W B/Y R/W G/Y B/W Br/W Y/B G/B Br/W G/B Y/B B/W B/Y G G L Y Y/G Y/Br G/Y Br/B Gr L Y B/W Br/W G/B B/W Y/B Y/Br Y/G Br/B G/Y R/W B/W Gr Y/B B/W G/B Br/W Br/Y LG Br 2 3 1 7 ON OFF Y/Br Y/G Y/Br Y/G Y/Br B/W L/W G/W Br/W Y/W L/W B/W G/W Y/W Br/W Br/B Br Y/B L L G/B G/B Y/B G B/W Br/W Br/W G 12V 10W Br/Y R/W Br/Y 12V 21/5W R/W B/W B/W B/W B B 5 W/Pu R R Br/B W/Pu Br/Y Y/Br Br/W B/W Y Y Y/G L/W L/W Br/W B/W Y/W G/W Y/G Gr Y/W 6-7 G/W Gr R LG Gr Br/B 8 30A 10A 6 4 Br/B Gr B/W B/W Or LG B Br/Y Or Br LIGHTING SYSTEM ELEC 1 2 4 5 6 7 – + LIGHTING SYSTEM CIRCUIT DIAGRAM Controller Meter Fuse Battery connection Battery box Main switch 11 Head light switch 19 Headlight 20 Tail/brake light ELEC LIGHTING SYSTEM TROUBLESHOOTING + 2. Battery • Check the condition of the battery. Refer to “CHECKING AND CHARGING THE BATTERY” in chapter 3. Any of the following fail to light: headlight, and meter light. Check: 1. main fuse 2. battery 3. main switch 4. headlight switch 5. wiring connections Minimum open-circuit voltage 40.0 V or more at 20°C • Is the battery OK? ` YES NO • Clean the battery terminals. • Recharge or replace the battery. TIP • Before troubleshooting, remove the following part(s): 1.Seat 2.Cap,front 3. Main switch • Check the main switch for continuity. Refer to “CHECKING THE SWITCHES”. • Is the main switch OK? • Troubleshoot with the pocket tester. 1. Main fuse • Check the fuses for continuity. Refer to “CHECKING THE FUSES” in chapter 4. • Is the fuse OK? YES – YES NO Replace the main switch. NO 4. Headlight switch • Check the headlight switch for continuity. Refer to “CHECKING THE SWITCHES”. • Is the headlight switch OK? Replace the fuse. YES NO The headlight switch is faulty. Replace the left handlebar switch. 5. Wiring • Check the entire lighting system’s wiring. Refer to “CIRCUIT DIAGRAM”. • Is the lighting system’s wiring properly connected and without defects? 6-8 YES NO Check the condition of each of the lighting system’s circuits. Refer to “CIRCUIT DIAGRAM”. Properly connect or repair the lighting system’s wiring. LIGHTING SYSTEM + 3. The tail/brake light fails to come on. CHECKING THE LIGHTING SYSTEM 1. The headlight fail to come on. 1. Tail/brake light bulb and socket • Check the tail/brake light bulb and socket for continuity. Refer to “CHECKING THE BULBS AND BULB SOCKETS” • Are the tail/brake light bulb and socket OK? 1. Headlight bulb and socket • Check the headlight bulb and socket for continuity. Refer to “CHECKING THE BULBS AND BULB SOCKETS” • Are the headlight bulb and socket OK? YES YES – ELEC NO NO Replace the tail/brake light bulb, socket or both. Replace the headlight bulb, socket or both. 2. Voltage • Connect the pocket tester (DC 20 V) to the tail/brake light coupler (wire harness side) as shown. 2. Voltage • Connect the pocket tester (DC 20 V) to the headlight couplers as shown. 12V 35W 1 2 R/W G/Y • Set the main switch to “ON”. •Measure the voltage (DC12V) on the tail/brake light coupler (tail/brake light side). • Is the voltage within specification? Br/Y R/W • Set the main switch to “ON”. • Measure the voltage (DC 12 V) on the headlight coupler (wire harness side). • Is the voltage within specification? YES This circuit is OK. This circuit is OK. 1 Br/Y R/W R/W Br/Y YES red/white 1 brown/yellow 2 2 G/Y Br/Y red/white 1 brown/yellow 2 12V 21/5W Positive tester probe Negative tester probe Positive tester probe Negative tester probe NO Wiring circuit from the main switch to the headlight light coupler is faulty and must be repaired. 6-9 NO Wiring circuit from the main switch to the tail/brake light coupler is faulty and must be repaired. Br 21 R/W 16 LG 12V 10W R/W 12V 10W L/Y R/W L/Y 22 19 R/W Br/Y Br/Y R/W R/W 17 Br R/W R/W L/Y L/Y R/W 18 LG 12V 10W R/W Br G/Y R/W Br/Y Br/Y R/W G/Y 20 TURN SIGNAL SW R PUSH L 9 12 B/Y L/Y LG Y/R Br/Y Br LG B/Y Y/R R/W R/W Y/R B/Y B/Y R/W ON OFF 13 ON OFF 11 14 HORN SW HEAD LIGHT SW 10 LG L/Y B/Y Br Br/Y Y/R B/Y 15 12V 35W L/Y R/W Y/R L/Y G/Y B/Y Y/R Br/Y G/Y B/Y G/Y B/Y R/W B/Y R/W G/Y B/W Br/W Y/B G/B Br/W G/B Y/B B/W B/Y G G L Y Y/G Y/Br G/Y Br/B Gr L Y B/W Br/W G/B B/W Y/B Y/Br Y/G Br/B G/Y R/W B/W Gr Y/B B/W G/B Br/W Br/Y LG Br 2 3 1 7 ON OFF Y/Br Y/G Y/Br Y/G Y/Br B/W L/W G/W Br/W Y/W L/W B/W G/W Y/W Br/W Br/B Br Y/B L L G/B G/B Y/B G B/W Br/W Br/W G 12V 10W Br/Y R/W Br/Y 12V 21/5W R/W B/W B/W B/W B B 5 W/Pu R R Br/B W/Pu Br/Y Y/Br Br/W B/W Y Y Y/G L/W L/W Br/W B/W Y/W G/W Y/G Gr Y/W 6-10 G/W Gr R LG Gr Br/B 8 30A 10A 6 4 Br/B Gr B/W B/W Or LG B Br/Y Or Br SIGNALING SYSTEM ELEC 1 2 4 5 6 7 9 10 12 13 14 15 16 17 18 20 21 22 – + SIGNALING SYSTEM CIRCUIT DIAGRAM Controller Meter Fuse Battery connection Battery box Main switch Turn signal switch Horn switch Turn signal relay Front brake light switch Rear brake light switch Front turn signal light (R) Front turn signal light (L) Rear turn signal light (R) Rear turn signal light (L) Tail/brake light Horn Protective choke coil ELEC SIGNALING SYSTEM TROUBLESHOOTING • Check the main switch for continuity. Refer to “CHECKING THE SWITCHES”. • Is the main switch OK? YES Check: 1. main fuse 2. turn signal fuse 3. battery 4. main switch 5. turn signal switch 6. wiring connections (of the entire signaling system) 4. Wiring • Check the entire signal system’s wiring. Refer to “CIRCUIT DIAGRAM”. • Is the signaling system’s wiring properly connected and without defects? • Before troubleshooting, remove the following part(s): 1.Seat 2.Cap,front 3.Bottom cover,front YES Check the condition of each of the signaling system’s circuits. Refer to “CHECKING THE SIGNALING SYSTEM”. • Troubleshoot with the pocket tester. 1. Main fuse • Check the fuse for continuity. Refer to “CHECKING THE FUSES” in chapter 4. • Is the fuse OK? NO Replace the fuse. 2. Battery • Check the condition of the battery. Refer to “CHECKING AND CHARGING THE BATTERY” in chapter 5. Minimum open-circuit voltage 40.0 V or more at 20°C • Is the battery OK? • Clean the battery terminals. NO Replace the main switch. TIP YES + 3. Main switch •Any of the following fail to light : turn signal light, brake light or an indicator light. •The horn fails to sound. YES – NO • Recharge or replace the battery. 6-11 NO Properly connect or repair the signaling system’s wiring. ELEC SIGNALING SYSTEM + 3. Horn CHECKING THE SIGNALING SYSTEM 1. The horn fails to sound. • Disconnect the blue/yellow connector at the horn terminal. • Connect a jumper lead to the horn terminal and ground the jumper lead. • Set the main switch to “ON”. • Does the horn sound? 1. Horn switch • Check the horn switch for continuity. Refer to “CHECKING THE SWITCHES”. • Is the horn switch OK? YES – NO R/W L/Y Replace the left handlebar switch. 2. Voltage • Connect the pocket tester (DC 20 V) to the horn connector at the horn terminal as shown. Positive tester probe Negative tester probe YES red/white ground R/W NO Replace the horn. 4. Voltage L/Y • Connect the pocket tester (DC 20 V) to the horn connectors as shown. Positive tester probe Negative tester probe R/W red/white ground L/Y • Set the main switch to “ON”. • Measure the voltage (DC 12 V) of brown at the horn terminal. • Is the voltage within specification? YES NO The wiring circuit from the main switch to the horn connector is faulty and must be repaired. • Set the main switch to “ON”. Push horn switch • Measure the voltage (DC 12V) of blue/yellow at the horn terminal. • Is the voltage within specification? YES This circuit is OK. 6-12 NO The wiring circuit or horn switch is faulty and must be repaired. ELEC SIGNALING SYSTEM 2. The tail/brake light fails to come on. + • Set the main switch to “ON”. • Pull in the brake levers. • Measure the voltage (DC 1 2V) of red/white on the tail/brake light coupler (wire harn -ess side). • Is the voltage within specification? 1. Tail/brake light bulb and socket • Check the tail/brake light bulb and socket for continuity. Refer to “CHECKING THE BULBS AND BULB SOCKETS” • Are the tail/brake light bulb and socket OK? YES – YES NO NO This circuit is OK. The wiring circuit from the main switch to the tail/brake light coupler is faulty and must be repaired. Replace the tail/brake light bulb, socket or both. 2. Brake light switches • Check the brake light switches for continuity. Refer to “CHECKING THE SWITCHES”. • Is the brake light switch OK? YES 3. The turn signal light, turn signal indicator light or both fail to blink. 1. Turn signal indicator light bulb and socket • Check the turn signal light bulb and socket for continuity. Refer to “CHECKING THE BULBS AND BULB SOCKETS” • Are the turn signal light bulb and socket OK? NO Replace the brake light switch. 3. Voltage YES • Connect the pocket tester (DC 20 V) to the tail/brake light coupler (wire harness side) as shown. Replace the turn signal light bulb, socket or both. red/white green/yellow G/Y 2. Turn signal switch 1 Br/Y 12V 21/5W Br/Y Positive tester probe Negative tester probe NO R/W • Check the turn signal switch for continuity. Refer to “CHECKING THE SWITCHES”. • Is the turn signal switch OK? 2 G/Y YES NO R/W Replace the left handlebar switch. 6-13 3. Voltage + • Set the main switch to “ON”. • Set the turn signal switch to “L” or “R”. • Measure the voltage (DC 12 V) on yellow/red at the turn signal relay coupler (wire harness side). • Is the voltage within specification? • Connect the pocket tester (DC 20 V) to the turn signal relay coupler (wire harness side) as shown. Positive tester probe Negative tester probe – ELEC SIGNALING SYSTEM red/white ground YES NO The turn signal relay is faulty and must be replaced. B/Y Y/R R/W 5. Voltage R/W Y/R B/Y + - 1 • Connect the pocket tester (DC 20 V) to the turn signal light connector or meter coupler (wire harness side) as shown. • Set the main switch to “ON”. • Measure the voltage (DC 12 V) on red/white at the turn signal relay coupler (wire harness side). • Is the voltage within specification? YES Right turn signal light Positive tester probe Negative tester probe Left turn signal light Positive tester probe Negative tester probe red/white 1 brown 3 red/white 1 light green 2 NO The wiring circuit from the main switch to the turn signal relay coupler is faulty and must be repaired. 1 R/W 1 R/W 12V 10W Br 12V 10W LG 3 2 4. Voltage • Set the main switch to “ON”. • Set the turn signal switch to “L” or “R”. • Measure the voltage (DC 12 V) of the light green 2 or brown 3 at the turn signal light connector (wire harness side). • Is the voltage within specification? • Connect the pocket tester (DC 20 V) to the turn signal relay coupler (wire harness side) as shown. Positive tester probe Negative tester probe yellow/red ground YES NO B/Y Y/R R/W This circuit is OK. R/W Y/R B/Y - + 1 6-14 The wiring circuit from the turn signal switch to the turn signal light connector is faulty and must be repaired. CHAPTER 7 CHASSIS FRONT WHEEL / REAR WHEEL . . . . . . . . . . . . . . . . . . . . . . . . . . . . . . . . . . . . . . . . . . . . . . . . 7-1 FRONT WHEEL . . . . . . . . . . . . . . . . . . . . . . . . . . . . . . . . . . . . . . . . . . . . . . . . . . . . . . . . . . . . . . 7-1 REAR WHEEL . . . . . . . . . . . . . . . . . . . . . . . . . . . . . . . . . . . . . . . . . . . . . . . . . . . . . . . . . . . . . . . 7-2 REMOVING THE FRONT/ REAR WHEEL . . . . . . . . . . . . . . . . . . . . . . . . . . . . . . . . . . . . . . 7-3 CHECKING THE FRONT/ REAR WHEEL . . . . . . . . . . . . . . . . . . . . . . . . . . . . . . . . . . . . . . 7-3 CHECKING THE FRONT/ REAR WHEEL AXLE . . . . . . . . . . . . . . . . . . . . . . . . . . . . . . . . . 7-3 ASSEMBLE THE FRONT/ REAR WHEEL . . . . . . . . . . . . . . . . . . . . . . . . . . . . . . . . . . . . . . 7-4 INSTALL THE FRONT/ REAR WHEEL . . . . . . . . . . . . . . . . . . . . . . . . . . . . . . . . . . . . . . . . . 7-4 FRONT BRAKE / REAR BRAKE . . . . . . . . . . . . . . . . . . . . . . . . . . . . . . . . . . . . . . . . . . . . . . . . 7-5 FRONT BRAKE . . . . . . . . . . . . . . . . . . . . . . . . . . . . . . . . . . . . . . . . . . . . . . . . . . . . . . . . . . . . . . 7-5 REAR BRAKE . . . . . . . . . . . . . . . . . . . . . . . . . . . . . . . . . . . . . . . . . . . . . . . . . . . . . . . . . . . . . . . 7-6 REMOVING THE FRONT/ REAR BRAKE . . . . . . . . . . . . . . . . . . . . . . . . . . . . . . . . . . . . . . 7-7 CHECKING THE BRAKE DISK . . . . . . . . . . . . . . . . . . . . . . . . . . . . . . . . . . . . . . . . . . . . . . . . 7-7 CHECKING THE BRAKE SHOES . . . . . . . . . . . . . . . . . . . . . . . . . . . . . . . . . . . . . . . . . . . . . . 7-7 CHECKING THE BRAKE DRUMS . . . . . . . . . . . . . . . . . . . . . . . . . . . . . . . . . . . . . . . . . . . . . . 7-8 REMOVING THE FRONT/ REAR BRAKE . . . . . . . . . . . . . . . . . . . . . . . . . . . . . . . . . . . . . . 7-8 SWINGARM . . . . . . . . . . . . . . . . . . . . . . . . . . . . . . . . . . . . . . . . . . . . . . . . . . . . . . . . . . . . . . . . . . . 7-10 SWINGARM . . . . . . . . . . . . . . . . . . . . . . . . . . . . . . . . . . . . . . . . . . . . . . . . . . . . . . . . . . . . . . . . . 7-10 REMOVE THE SWINGARM . . . . . . . . . . . . . . . . . . . . . . . . . . . . . . . . . . . . . . . . . . . . . . . . . . . 7-11 CHECKING THE SWINGARM . . . . . . . . . . . . . . . . . . . . . . . . . . . . . . . . . . . . . . . . . . . . . . . . . 7-11 REAR SHOCK ABSORBER . . . . . . . . . . . . . . . . . . . . . . . . . . . . . . . . . . . . . . . . . . . . . . . . . . . . . 7-12 REAR SHOCK ABSORBER . . . . . . . . . . . . . . . . . . . . . . . . . . . . . . . . . . . . . . . . . . . . . . . . . . . 7-12 CHECKING THE REAR SHOCK ABSORBER . . . . . . . . . . . . . . . . . . . . . . . . . . . . . . . . . . . 7-13 INSTALL THE REAR SHOCK ABSORBER . . . . . . . . . . . . . . . . . . . . . . . . . . . . . . . . . . . . . 7-13 STEERING SYSTEM . . . . . . . . . . . . . . . . . . . . . . . . . . . . . . . . . . . . . . . . . . . . . . . . . . . . . . . . . . . 7-14 HEADLEBAR . . . . . . . . . . . . . . . . . . . . . . . . . . . . . . . . . . . . . . . . . . . . . . . . . . . . . . . . . . . . . . . . 7-14 REMOVING THE HANDLEBAR GRIP . . . . . . . . . . . . . . . . . . . . . . . . . . . . . . . . . . . . . . . . . . 7-15 INSTALLING THE HANDLEBAR . . . . . . . . . . . . . . . . . . . . . . . . . . . . . . . . . . . . . . . . . . . . . . . 7-15 CHAPTER 7 CHASSIS LOWER BRACKET . . . . . . . . . . . . . . . . . . . . . . . . . . . . . . . . . . . . . . . . . . . . . . . . . . . . . . . . . . . . . 7-17 LOWER BRACKET. . . . . . . . . . . . . . . . . . . . . . . . . . . . . . . . . . . . . . . . . . . . . . . . . . . . . . . . . . . . 7-17 REMOVING THE LOWER BRACKET . . . . . . . . . . . . . . . . . . . . . . . . . . . . . . . . . . . . . . . . . . . 7-18 CHECKING THE LOWER BRACKET . . . . . . . . . . . . . . . . . . . . . . . . . . . . . . . . . . . . . . . . . . . 7-18 INSTALLING THE LOWER BRACKET . . . . . . . . . . . . . . . . . . . . . . . . . . . . . . . . . . . . . . . . . . 7-19 FRONT FORK . . . . . . . . . . . . . . . . . . . . . . . . . . . . . . . . . . . . . . . . . . . . . . . . . . . . . . . . . . . . . . . . . . 7-21 FRONT FORK . . . . . . . . . . . . . . . . . . . . . . . . . . . . . . . . . . . . . . . . . . . . . . . . . . . . . . . . . . . . . . . . 7-21 REMOVING THE FRONT FORK . . . . . . . . . . . . . . . . . . . . . . . . . . . . . . . . . . . . . . . . . . . . . . . 7-22 DISASSEMBLE THE FRONT FORK . . . . . . . . . . . . . . . . . . . . . . . . . . . . . . . . . . . . . . . . . . . . 7-22 CHECKING THE FRONT FORK . . . . . . . . . . . . . . . . . . . . . . . . . . . . . . . . . . . . . . . . . . . . . . . 7-23 ASSEMBLING THE FRONT FORK . . . . . . . . . . . . . . . . . . . . . . . . . . . . . . . . . . . . . . . . . . . . . 7-23 INSTALLING THE FRONT FORK . . . . . . . . . . . . . . . . . . . . . . . . . . . . . . . . . . . . . . . . . . . . . . 7-24 CHAS FRONT WHEEL / REAR WHEEL FRONT WHEEL T. R. 35 Nm (3.5 m • kg, 25.3 ft • lb) 1 2 5 3 6 7 6 5 4 Order 1 2 3 4 5 6 7 Job/Part Removing the front wheel Q’ty Hexagon flange bolt Collar B Front brake shoe plate Front wheel Oil seal Bearing Collar A 1 1 1 1 2 2 Remarks Remove the parts in the order listed. TIP Place the scooter on a suitable stand so that the front wheel is elevated. 1 For installation, reverse the removal procedure. 7-1 CHAS FRONT WHEEL / REAR WHEEL REAR WHEEL T. R. 4 Nm (0.4 m • kg, 2.9 ft • Ib) 2 1 (x4) T. T. R. 4 Nm (0.4 m • kg, 2.9 ft • Ib) R. 80 Nm (8.0 m • kg, 57.9 ft • Ib) 3 5 4 6 1 Order Job/Part Removing the rear wheel Q’ty Remarks Remove the parts in the order listed. TIP Place the scooter on a suitable stand so that the front wheel is elevated. 1 2 3 4 5 6 Rear bottom cover L/R Rear fender Rear fender bracket Rear brake shoe plate Hexagon flange bolt Rear wheel 1/1 1 1 1 1 1 For installation, reverse the removal procedure. 7-2 CHAS FRONT WHEEL / REAR WHEEL REMOVING THE FRONT/ REAR WHEEL 1. Removing • Wheel bearings 1 • Collar 2 Remove the wheel bearings with a general bearing puller 3 . 2 General bearing puller 3 1 SA6100-A26-0FA1 1 NOT ICE რ Securely support the wheel to avoid damaging the brake disk. If the brake disk had damaged, please replace immediately. CHECKING THE FRONT/ REAR WHEEL 1. Checking • Wheels 2XWRIVKDSHĺUHSODFH • Rim Out of shape ĺ replace the wheel or check the bearings operation. • Tire 'DPDJHZHDUĺ5HSODFH Please refer to “CHECKING THE TIRES” in chapter 3. WARNING Ride conservatively after installing a tire to allow it to seat itself properly on the rim. CHECKING THE FRONT/ REAR WHEEL AXLE 1. Checking • Front wheel axle 2 • Rear wheel axle 3 'DPDJHZHDUĺ5HSODFH Roll the wheel axle on a flat surface and check. WARNING Do not attempt to straighten a bent wheel axle. • Front/ rear wheel axle If the wheel axle could shake or the tire unsmooth RSHUDWLRQĺUHSODFHWKHZKHHOEHDULQJV NOT ICE რ • Do not strike the center race of the bearings to avoid damaging the bearings. • Securely support the wheel to avoid damaging the brake disk. If the brake disk had damaged, please replace immedicately. • Oil seal 'DPDJHZHDUĺ5HSODFH 7-3 CHAS FRONT WHEEL / REAR WHEEL ASSEMBLE THE FRONT/ REAR WHEEL 5 4 1. Install • Collar A 2 • Bearing 3 • Oil seal 4 • Collar B 5 • Front brake shoe plate 3 2 3 4 TIP • Put lithium soap base grease on the bearings and oil seal lips when installing. • Using the collar connect outside track of the bearing while installing. • Replacing the oil seal should use a new one. • Install oil seal with their manufacturer brands or numbers facing outwards. ˔ ˔ Install the front wheel ˕ Install the rear wheel INSTALL THE FRONT/ REAR WHEEL For installation, reverse the removal procedure and following procedure applies to all the front/ rear wheel. ˕ 1. Lubricate • Front wheel axle • Wheel bearings • Oil seal lips Lithium-soap-based grease 2. Install • Front wheel • Rear wheel 2 3 3. Tighten • Front wheel axle 4 • Front wheel axle nut 4 T. R. 2 35 Nm (3.5 m•kg, 25.3 ft•lb) • Rear wheel axle 5 • Rear wheel axle nut T. R. 80 Nm (8.0 m•kg, 57.9 ft•lb) NOT ICE რ Before tightening the wheel axle nut, push down hard on the handlebar several times and check if the front fork rebounds smoothly. 5 3 WARNING Make sure the brake cable is routed properly. 7-4 CHAS FRONT BRAKE / REAR BRAKE FRONT BRAKE T. R. 35 Nm (3.5 m • kg, 25.3 ft • lb) 1 6 7 8 2 Order 1 2 3 4 5 6 7 8 9 Job/Part Removing the front brake Front fender Q’ty Front brake cable Front wheel Brake arm Brake indicator Felt seal Spring Brake shoe Brake arm cam Brake disk A 9 5 4 3 Remarks Remove the parts in the order listed. Please refer to " LOWER BRACKET " in cheaper 7. 1 1 1 1 1 1 2 1 1 For installation, reverse the removal procedure. 7-5 CHAS FRONT BRAKE / REAR BRAKE REAR BRAKE T. R. 4 Nm (0.4 m • kg, 2.9 ft • Ib) T. R. 4 Nm (0.4 m • kg, 2.9 ft • Ib) (x4) 6 1 7 3 8 2 9 5 4 T. R. Order 1 2 3 4 5 6 7 8 9 9 Nm (0.9 m • kg, 6.5 ft • Ib) Job/Part Removing the rear brake Front fender Bottom cover of rear fork (L/ R) Q’ty Remarks Remove the parts in the order listed. Please refer to " MOVING AND STALLING THE COVER " in cheaper 3. 1 1 1 1 1 1 2 1 1 Rear wheel Rear brake cable Brake arm Brake indicator Felt seal Spring Brake shoe Brake arm cam Brake disk B For installation, reverse the removal procedure. 7-6 CHAS FRONT BRAKE / REAR BRAKE REMOVING THE FRONT/ REAR BRAKE ʳThe following procedure applies to each brake. brake and rear brake. 1. Removing • Brake arm 2 • Brake arm cam 3 2 TIP 3 When removing the brake arm, mark the position on the brake arm where it is aligned with the punch mark in the brake arm cam. CHECKING THE BRAKE DISK The following procedure applies to each brake. 1. Checking • Brake disk A • pivot pin • Brake arm cam %HQGVFUDFNVGDPDJHĺUHSODFH • Felt seal :HDUGDPDJHĺUHSODFH CHECKING THE BRAKE SHOES The following procedure applies to each brake. 1. Checking • Brake shoes 2 • Brake shoe spring 3 &UDFNVGDPDJHĺUHSODFH 3 2 TIP When replacing the brake shoes, replace the brake shoe springs at the same time. • brake shoe lining surface *OD]HGDUHDVĺUHPRYH Use coarse sandpaper. TIP After using sandpaper, wipe off the polished particles with a cloth. 7-7 CHAS FRONT BRAKE / REAR BRAKE 2 2 3. Measure • brake shoe lining thickness a 2XWRIVSHFLILFDWLRQĺUHSODFH Measuring points 2 TIP Replace the brake shoes as a set if either is found to be worn to the wear limit. b Brake lining thickness 3.0 mm (0.12 in) <Limit>: 1.5 mm (0.06 in) CHECKING THE BRAKE DRUMS The following procedure applies to each brake. 1. Check • brake drum inside diameter a 2XWRIVSHFLILFDWLRQĺUHSODFH b Brake drum inside diameter 85.0 mm (3.35 in) <Limit>: 86.0 mm (3.39 in) INSTALLING THE FRONT AND THE REAR BRAKES Reverse the “Removal” procedure. Note the following points. 1. Lubricate • brake camshaft • pivot pin Lithium-soap-based grease NOTICE During installation, lightly grease the brake camshaft and the pivot pin. Wipe off the excess grease. 7-8 CHAS FRONT BRAKE / REAR BRAKE 2. Install • brake arm cam • brake arm 3 2 R. T. a 2 9 Nm( 0.9 m•kg, 6.5ft•lb) TIP 3 • Install the brake arm cam so its punch mark a is positioned as shown. • Align the punch mark in the brake arm cam with the mark on the brake arm. • Brake disk 4 • Rear brake cable • brake arm operation 8QVPRRWKRSHUDWLRQĺUHSDLU B ˶ 4 TIP • When installing the brake disk, align the groove ˶ of the brake disk with the projection of ˷ the steering knuckle. • Check that the brake shoes are properly positioned. ˷ C 4 B Front fork. C Swing arm. ˶ ˷ 3. Adjust • front brake • rear brake Refer to “ADJUSTING THE FRONT BRAKE REAR BRAKE” in chapter 3. 7-9 CHAS SWINGARM SWINGARM T. R 2 4 Nm (0.4 m • kg, 2.9 ft • Ib) 5 3 1 6 4 7 9 T. R. 10 Nm (1.0 m • kg, 7.2 ft • Ib) 8 6 3 T. R. 35 Nm (3.5 m • kg, 25.3 ft • Ib) T. R. 25 Nm (2.5 m • kg, 18.1 ft • Ib) 2 1 Order Job/Part Removing the swingarm Q’ty 1 Cap A 2 2 Cap B 2 3 Rear bottom cover L/R 4 Rear fender bracket 1 5 Rear fender 1 6 Hexagon flange nut 2 7 Motor 1 8 Main stand Hexagon flange nut 1 9 Remarks Remove the parts in the order listed. 1/1 1 7-10 Removing 6 pin connector and rear brake cable before remove motor. Refer to "REAR SHOCK ABSORBER" in cheaper 7. CHAS SWINGARM REMOVE THE SWINGARM 1. Check • Swing arm free play a. Check the tightening torque of the pivot shaft nut. 35 Nm (3.5m •kg, 25 .3 ft • Ib) A Swingarm free play 1.0 mm (0.04 in) B b. Check the swingarm side play A by moving ing it from side to side. If side play is noticeable, check the spacer, bearings and frame pivot. c. Check the swingarm vertical movement B by moving it up and down. If vertical movement is tight or rough, or if there is binding, check the spacer, bearings and frame pivot. 2. Remove • Pivot shaft nut • Pivot shaft • Swingarm CHECKING THE SWINGARM 1. Check • Swingarm %HQGVFUDFNVGDPDJHĺUHSODFH 2. Check • Pivot shaft Roll the axle on a flat surface. %HQGVĺUHSODFH WARNING Do not attempt to straighten a bent pivot shaft. 3. Clean • Pivot shaft • Spacer Recommended cleaning solvent Kerosene 7-11 CHAS REAR SHOCK ABSORBER REAR SHOCK ABSORBER T. R. 1 35 Nm (3.5 m • kg, 25.3 ft • Ib) 2 3 1 Order Job/Part Removing the rear shock absorber Q’ty 1 Pin 2 2 Hexagon flange nut 1 3 Rear shock absorber 1 Remarks Remove the parts in the order listed. For installation, reverse the removal procedure. 7-12 CHAS REAR SHOCK ABSORBER CHECKING THE REAR SHOCK ABSORBER 1. Check • Shock absorber rod Bends/damageĺreplace the rear absorber assembly. • Shock absorber Oil leaks ĺ replace the rear absorber assembly. • Spring Fatigueĺreplace the rear shock absorber assembly. INSTALL THE REAR SHOCK ABSORBER 1. Install • Shock absorber • Rear shock absorber upper bolt and nut 35 Nm (3.5m• kg, 25 .3 ft • Ib) • Rear shock absorber upper pin • Rear shock absorber lower bolt 35 Nm (3.5m• kg, 25 .3 ft • Ib) • Rear shock absorber lower pin TIP When installing the rear shock absorber assembly assembly, press backward the vehicle slightly. 7-13 CHAS STEERING SYSTEM HEADLEBAR 4 1 3 2 4 5 T. R. Order Job/Part 45 Nm (4.5 m • kg, 32.5 ft • lb) Q’ty Front brake cable Front cap Meter side L/ R Headlight Meter 1 2 3 4 5 Handle lever assembly (L) Handlebar grip (L) Handle lever comp (R) Left / right brake lever Handlebar Remarks Remove the parts in the order listed. Refer to "MOVING AND INSTALLING COVER " in cheaper 3. 1 1 1 1/1 1 For installation, reverse the removal procedure. 7-14 CHAS STEERING SYSTEM REMOVING THE HANDLEBAR GRIP 1. Remove • Handlebar grip ϰϰϰϰϰϰϰϰϰϰϰϰϰϰϰϰϰϰϰϰϰϰϰ Removing step : • Blow compressed air between the handlebar and handlebar grip, and gradually push the grip off the handlebar. ϧϧϧϧϧϧϧϧϧϧϧϧϧϧϧϧϧϧϧϧϧϧϧ CHECKING THE HANDLEBAR 1. Check • Handlebar %HQGVGDPDJHĺUHSODFH WARNING Do not attempt to straighten a bent handlebar as this may dangerously weaken the handlebar. INSTALLING THE HANDLEBAR 2 1. Handlebar 2 Tighten the bolt. R. T. 45 Nm( 4.5 m•kg, 32.5 ft•lb) 2. Install • Handlebar grip 3 Refer to "MAINTAINENCE FRONT BRAKE" in cheaper 3. TIP 3 Before installing the handlebar grip,should be put oil on the left headlebar grip. 7-15 CHAS STEERING SYSTEM INSTALL THE HANDLEBAR Reverse the removal procedure for installation and pay attention the following tips: 1 2 1. Clean • If the connection part of steering a touch with grease, should be clean. a WARNING • Install all cables should refer to "CABLE ROUTING" in cheaper 2. • Securely support the scooter so that there is no danger of it falling over. 2. Install • Handlebar 1 • Flange bolt 2 Align the lower handlebar holder with the upper groove of steering. • Handle lever assembly (L) • Handlebar grip (L) • Handle lever comp (R) • Left / right brake lever TIP Lubricate the inside of the throttle grip with a thin coat of lithium soap base grease and install it onto the handlebar. 7-16 CHAS LOWER BRACKET LOWER BRACKET T. 50 Nm (5.0 m • kg, 36.2 ft • lb) R. T. R. 12 Nm (1.2 m • kg, 8.7 ft • lb) 4 T. 5 R. 45 Nm (4.5 m • kg, 32.5 ft • lb) 6 7 3 8 1 9 9 2 8 3 10 11 Order Job/Part Q’ty Remove the lower bracket. Front wheel 1 2 3 4 5 6 7 8 9 10 11 Front fender Break hose holder Circle reflector Upper ring nut Lower ring nut Ball race cover Ball race upper Bearing ball Ball race outer Lower bracket Left/ right fork Remarks Remove the parts in the order listed. Refer to "FRONT WHEEL/ REAR WHEEL". 1 1 2 1 1 1 1 2 2 1 1/1 For installation, reverse the removal procedure. 7-17 CHAS LOWER BRACKET REMOVING THE LOWER BRACKET 1. Remove • Ring nut 2 • Ball race cover 3 • Ball race upper 4 • Bearing ball 5 • Ball race outer 6 • Front fender assembly 2 7 2 6 5 3 4 5 TIP • Removing the ring nut by the steering nut wrench 7 . • Support the front fork safety and firmly, avoid topple and fall. • Do not lose the bearing ball inside of the bearing. 6 2. Remove • Front fender Please refer to "FRONT FROK" in cheaper 7. CHECKING THE LOWER BRACKET 1. Washing the bearing ball with solution. 2. Check • Bearing ball 3LWWLQJGDPDJHĺUHSODFH 3. Check • Lower bracket 2 3LWWLQJEHQGVGDPDJHĺUHSODFH 2 WARNING Do not attempt to straighten a bent lower bracket as this may dangerously weaken the lower bracket. 7-18 CHAS LOWER BRACKET INSTALLING THE LOWER BRACKET 1. Install • Bearing ball 1 • Outer bearing race 2 2 1 NOTICE • Make sure the bearing ball size is correct. • Make sure the site of up and down while installing outer bearing race and upper bearing race. 2. Lubricate • Bearing ball 1 Please use lithium-soap-based grease to smear. Lithium-soap-based grease 5 1 4 2 3 2 1 3. Install • Front fender assembly • Ball race outer 1 • Bearing ball 2 • Ball race upper 3 • Ball race cover 4 • Ring nut 5 TIP Holding the front fender assembly until tighten. 4. Tighten • Ring nut ϰϰϰϰϰϰϰϰϰϰϰϰϰϰϰϰϰϰϰϰϰϰϰ Tighten steps : • Tighten the ring nut 1 with the ring nut wrench 2 . 3 1 2 T. R. Lower ring nut (initial tightening torque) 35Nm (3.5m • kg, 25.3ft • lb) Lower ring nut (final tightening torque) 12Nm (1.2m • kg, 8.7ft • lb) Upper ring nut 50 Nm (5.0 m • kg, 36.2 ft • lb) TIP Install a ring nut wrench on the steering nut wrench 3 and tighten by verticality and get the tightening torque. 7-19 CHAS LOWER BRACKET • Tighten the ring nut, please refer to "CHECKING STEERING HEAD " in cheaper 3. 2 3 ϧϧϧϧϧϧϧϧϧϧϧϧϧϧϧϧϧϧϧϧϧϧϧ 7-20 CHAS FRONT FORK FRONT FORK 1 1 T. R. 30 Nm (3.0 m • kg, 21.7 ft • Ib) 2 2 3 3 4 Order Job/Part Q’ty Remove the front fork. Remarks Remove the parts in the order listed. 1 Cap (L / R) 2 2 Nut (L / R) 2 3 Bolt (L / R) 2 4 Front fork (L / R) 2 For installation, reverse the removal procedure. 7-21 CHAS FRONT FORK REMOVING THE FRONT FORK WARNING • Securely support the scooter so that there is no danger of it falling over. a a 1 1 2 2 3 1. Remove • Cap a • Nut (fork) 1 • Bolt 2 WARNING The fork spring would spring, should pay attention when remove the bolt. • Front fork (L/ R) 3 DISASSEMBLE THE FRONT FORK 1. Remove • Inner tube 1 • ʳDust seal 2 • Circlip • Oil seal 3 • Outer tube 1 2 NOTICE 4 Do not reuse the oil seal. • Wiper 4 3 NEW 7-22 CHAS FRONT FORK CHECKING THE FRONT FORK 1. Check • Inner tube :HDUVEHQGVGDPDJHĺUHSODFH WARNING Do not try to straighten an outer tube or an inner tube as this may dangerously weaken the tube. 2. Measure )RUNVSULQJ a $ERYHVSHFLILHGOLPLWĺUHSODFH a Fork spring free length 99.0 mm (3.90 in) <limit> : 94.0 mm (3.70 in) ASSEMBLING THE FRONT FORK 5HYHUVHWKHGLVDVVHPEO\SURFHGXUH%HDULQ PLQGWKHIROORZLQJSRLQWV 2 1 ,QVWDOO )RUNVSULQJ 6SULQJZDVKHU 0LQLVSULQJ • Washer • Inner tube 1 2 &RPELQHWKHLQQHUWXEHZLWKRXWHUWXEH 2 3 4 1 ,QVWDOO 2LOVHDO 1 NEW 3 8VHDKDPPHUDQGFRQGXLWIRULQVWDOO 2 WKHRLOVHDO 4 Outer tube. TIP %HIRUHLQVWDOOLQJWKHRLOVHDODSSO\OLWKLXPVRDS EDVHJUHDVHWRWKHRLOVHDOOLSV 7-23 CHAS FRONT FORK 3. Install • Circlip 1 • Dust seal 1 TIP Couple the circlip correctly on the groove of the outer tube. 4. Check • Operation of inner tube 8QVPRRWKRSHUDWLRQĺUHSODFH b b 1 1 2 2 3 INSTALLING THE FRONT FORK Reverse the disassembly procedure. The following points should be remembered. 1. Install • Front fork 3 2. Tighten R. T. 7-24 T • Nut (fork) 1 • Bolt 2 • Cap a 30 Nm(3.0 m•kg, 21.7 ft•lb) 30 Nm(3.0 m•kg, 21.7 ft•lb) CHAPTER 8 TROUBLE SHOOTING STARTING FAILURES ˁ ˁ ˁ ˁ ˁ ˁ ˁ ˁ ˁ ˁ ˁ ˁ ˁ ˁ ˁ ˁ ˁ ˁ ˁ ˁ ˁ ˁ ˁ ˁ ˁ ˁ ˁ ˁ ˁ ˁ ˁ ˁ ˁ ˁ ˁ ˁ ˁ ˁ ˁ ˁ ˁ ˁ ˁ ˁ ˁ ˁ ˁ ˁ ˁ ˁ ˁ ˁ ˁ ˁ ˁ ˁ ˁ ˁ ˁ ˁ ˁ ˁ ˁ ˁ 8-1 Meter t has no display and no response ˁ ˁ ˁ ˁ ˁ ˁ ˁ ˁ ˁ ˁ ˁ ˁ ˁ ˁ ˁ ˁ ˁ ˁ ˁ ˁ ˁ ˁ ˁ ˁ ˁ ˁ ˁ ˁ ˁ ˁ ˁ ˁ ˁ ˁ ˁ ˁ ˁ ˁ ˁ ˁ ˁ ˁ ˁ ˁ ˁ ˁ ˁ ˁ ˁ 8-1 Lasting meter warning tone ˁ ˁ ˁ ˁ ˁ ˁ ˁ ˁ ˁ ˁ ˁ ˁ ˁ ˁ ˁ ˁ ˁ ˁ ˁ ˁ ˁ ˁ ˁ ˁ ˁ ˁ ˁ ˁ ˁ ˁ ˁ ˁ ˁ ˁ ˁ ˁ ˁ ˁ ˁ ˁ ˁ ˁ ˁ ˁ ˁ ˁ ˁ ˁ ˁ ˁ ˁ ˁ ˁ ˁ ˁ ˁ ˁ 8-1 Main switch "ON", turn handle bar the vehicle no reaction ˁ ˁ ˁ ˁ ˁ ˁ ˁ ˁ ˁ ˁ ˁ ˁ ˁ ˁ ˁ ˁ ˁ ˁ ˁ ˁ ˁ ˁ ˁ ˁ ˁ 8-1 POOR RIDING PERFORMANCE ˁ ˁ ˁ ˁ ˁ ˁ ˁ ˁ ˁ ˁ ˁ ˁ ˁ ˁ ˁ ˁ ˁ ˁ ˁ ˁ ˁ ˁ ˁ ˁ ˁ ˁ ˁ ˁ ˁ ˁ ˁ ˁ ˁ ˁ ˁ ˁ ˁ ˁ ˁ ˁ ˁ ˁ ˁ ˁ ˁ ˁ ˁ ˁ ˁ ˁ ˁ ˁ ˁ ˁ 8-1 LIGHT ODES NOT LIGHT ˁ ˁ ˁ ˁ ˁ ˁ ˁ ˁ ˁ ˁ ˁ ˁ ˁ ˁ ˁ ˁ ˁ ˁ ˁ ˁ ˁ ˁ ˁ ˁ ˁ ˁ ˁ ˁ ˁ ˁ ˁ ˁ ˁ ˁ ˁ ˁ ˁ ˁ ˁ ˁ ˁ ˁ ˁ ˁ ˁ ˁ ˁ ˁ ˁ ˁ ˁ ˁ ˁ ˁ ˁ ˁ ˁ ˁ ˁ ˁ ˁ 8-1 WHILE RIDING LOST ELECTRICITY SUDDENLY ˁ ˁ ˁ ˁ ˁ ˁ ˁ ˁ ˁ ˁ ˁ ˁ ˁ ˁ ˁ ˁ ˁ ˁ ˁ ˁ ˁ ˁ ˁ ˁ ˁ ˁ ˁ ˁ ˁ ˁ ˁ ˁ ˁ ˁ ˁ ˁ 8-1 WARNING TONE ˁ ˁ ˁ ˁ ˁ ˁ ˁ ˁ ˁ ˁ ˁ ˁ ˁ ˁ ˁ ˁ ˁ ˁ ˁ ˁ ˁ ˁ ˁ ˁ ˁ ˁ ˁ ˁ ˁ ˁ ˁ ˁ ˁ ˁ ˁ ˁ ˁ ˁ ˁ ˁ ˁ ˁ ˁ ˁ ˁ ˁ ˁ ˁ ˁ ˁ ˁ ˁ ˁ ˁ ˁ ˁ ˁ ˁ ˁ ˁ ˁ ˁ ˁ ˁ ˁ ˁ ˁ ˁ ˁ 8-1 POOR BRAKING PERFORMANCE ˁ ˁ ˁ ˁ ˁ ˁ ˁ ˁ ˁ ˁ ˁ ˁ ˁ ˁ ˁ ˁ ˁ ˁ ˁ ˁ ˁ ˁ ˁ ˁ ˁ ˁ ˁ ˁ ˁ ˁ ˁ ˁ ˁ ˁ ˁ ˁ ˁ ˁ ˁ ˁ ˁ ˁ ˁ ˁ ˁ ˁ ˁ ˁ ˁ ˁ ˁ 8-2 FAULTY FRONT FORK LEGS ˁ ˁ ˁ ˁ ˁ ˁ ˁ ˁ ˁ ˁ ˁ ˁ ˁ ˁ ˁ ˁ ˁ ˁ ˁ ˁ ˁ ˁ ˁ ˁ ˁ ˁ ˁ ˁ ˁ ˁ ˁ ˁ ˁ ˁ ˁ ˁ ˁ ˁ ˁ ˁ ˁ ˁ ˁ ˁ ˁ ˁ ˁ ˁ ˁ ˁ ˁ ˁ ˁ ˁ ˁ ˁ 8-2 HORN DOES NOT SOUND ˁ ˁ ˁ ˁ ˁ ˁ ˁ ˁ ˁ ˁ ˁ ˁ ˁ ˁ ˁ ˁ ˁ ˁ ˁ ˁ ˁ ˁ ˁ ˁ ˁ ˁ ˁ ˁ ˁ ˁ ˁ ˁ ˁ ˁ ˁ ˁ ˁ ˁ ˁ ˁ ˁ ˁ ˁ ˁ ˁ ˁ ˁ ˁ ˁ ˁ ˁ ˁ ˁ ˁ ˁ ˁ ˁ ˁ ˁ 8-2 FAULTY LIGHTING OR SIGNALING SYSTEM ˁ ˁ ˁ ˁ ˁ ˁ ˁ ˁ ˁ ˁ ˁ ˁ ˁ ˁ ˁ ˁ ˁ ˁ ˁ ˁ ˁ ˁ ˁ ˁ ˁ ˁ ˁ ˁ ˁ ˁ ˁ ˁ ˁ ˁ ˁ ˁ ˁ ˁ ˁ ˁ ˁ ˁ 8-2 ˁ Headlight does not light ˁ ˁ ˁ ˁ ˁ ˁ ˁ ˁ ˁ ˁ ˁ ˁ ˁ ˁ ˁ ˁ ˁ ˁ ˁ ˁ ˁ ˁ ˁ ˁ ˁ ˁ ˁ ˁ ˁ ˁ ˁ ˁ ˁ ˁ ˁ ˁ ˁ ˁ ˁ ˁ ˁ ˁ ˁ ˁ ˁ ˁ ˁ ˁ ˁ ˁ ˁ ˁ ˁ ˁ ˁ ˁ ˁ ˁ ˁ ˁ ˁ ˁ 8-2 Light bulb burnt out ˁ ˁ ˁ ˁ ˁ ˁ ˁ ˁ ˁ ˁ ˁ ˁ ˁ ˁ ˁ ˁ ˁ ˁ ˁ ˁ ˁ ˁ ˁ ˁ ˁ ˁ ˁ ˁ ˁ ˁ ˁ ˁ ˁ ˁ ˁ ˁ ˁ ˁ ˁ ˁ ˁ ˁ ˁ ˁ ˁ ˁ ˁ ˁ ˁ ˁ ˁ ˁ ˁ ˁ ˁ ˁ ˁ ˁ ˁ ˁ ˁ ˁ ˁ ˁ ˁ 8-2 Turn signal does not light ˁ ˁ ˁ ˁ ˁ ˁ ˁ ˁ ˁ ˁ ˁ ˁ ˁ ˁ ˁ ˁ ˁ ˁ ˁ ˁ ˁ ˁ ˁ ˁ ˁ ˁ ˁ ˁ ˁ ˁ ˁ ˁ ˁ ˁ ˁ ˁ ˁ ˁ ˁ ˁ ˁ ˁ ˁ ˁ ˁ ˁ ˁ ˁ ˁ ˁ ˁ ˁ ˁ ˁ ˁ ˁ ˁ ˁ ˁ 8-2 Turn signal remains lit ˁ ˁ ˁ ˁ ˁ ˁ ˁ ˁ ˁ ˁ ˁ ˁ ˁ ˁ ˁ ˁ ˁ ˁ ˁ ˁ ˁ ˁ ˁ ˁ ˁ ˁ ˁ ˁ ˁ ˁ ˁ ˁ ˁ ˁ ˁ ˁ ˁ ˁ ˁ ˁ ˁ ˁ ˁ ˁ ˁ ˁ ˁ ˁ ˁ ˁ ˁ ˁ ˁ ˁ ˁ ˁ ˁ ˁ ˁ ˁ ˁ ˁ 8-2 Turn signal blinks slowly ˁ ˁ ˁ ˁ ˁ ˁ ˁ ˁ ˁ ˁ ˁ ˁ ˁ ˁ ˁ ˁ ˁ ˁ ˁ ˁ ˁ ˁ ˁ ˁ ˁ ˁ ˁ ˁ ˁ ˁ ˁ ˁ ˁ ˁ ˁ ˁ ˁ ˁ ˁ ˁ ˁ ˁ ˁ ˁ ˁ ˁ ˁ ˁ ˁ ˁ ˁ ˁ ˁ ˁ ˁ ˁ ˁ ˁ ˁ ˁ 8-2 Turn signal blinks quickly ˁ ˁ ˁ ˁ ˁ ˁ ˁ ˁ ˁ ˁ ˁ ˁ ˁ ˁ ˁ ˁ ˁ ˁ ˁ ˁ ˁ ˁ ˁ ˁ ˁ ˁ ˁ ˁ ˁ ˁ ˁ ˁ ˁ ˁ ˁ ˁ ˁ ˁ ˁ ˁ ˁ ˁ ˁ ˁ ˁ ˁ ˁ ˁ ˁ ˁ ˁ ˁ ˁ ˁ ˁ ˁ ˁ ˁ ˁ 8-2 MESSAGE CODE ˁ ˁ ˁ ˁ ˁ ˁ ˁ ˁ ˁ ˁ ˁ ˁ ˁ ˁ ˁ ˁ ˁ ˁ ˁ ˁ ˁ ˁ ˁ ˁ ˁ ˁ ˁ ˁ ˁ ˁ ˁ ˁ ˁ ˁ ˁ ˁ ˁ ˁ ˁ ˁ ˁ ˁ ˁ ˁ ˁ ˁ ˁ ˁ ˁ ˁ ˁ ˁ ˁ ˁ ˁ ˁ ˁ ˁ ˁ ˁ ˁ ˁ ˁ ˁ ˁ ˁ ˁ ˁ ˁ 8-3 Meter m essage code Εwarning message(warning tone) drawing ˁ ˁ ˁ ˁ ˁ ˁ ˁ ˁ ˁ ˁ ˁ ˁ ˁ ˁ ˁ ˁ ˁ ˁ 8-3 Warning and Cue signal ˁ ˁ ˁ ˁ ˁ ˁ ˁ ˁ ˁ ˁ ˁ ˁ ˁ ˁ ˁ ˁ ˁ ˁ ˁ ˁ ˁ ˁ ˁ ˁ ˁ ˁ ˁ ˁ ˁ ˁ ˁ ˁ ˁ ˁ ˁ ˁ ˁ ˁ ˁ ˁ ˁ ˁ ˁ ˁ ˁ ˁ ˁ ˁ ˁ ˁ ˁ ˁ ˁ ˁ ˁ ˁ ˁ ˁ ˁ ˁ 8-3 TRBL SHTG TROUBLESHOOTING TIP The following guide for troubleshooting does not cover all the possible causes of trouble. It should be helpful, however, as a guide to basic troubleshooting. Refer to the relative procedure in this manual for checks, adjustments, and replacement of parts. STARTING FAILURES Meter t has no display and no response ԦʳʳHave not put the battery. ԦʳʳFaulty battery. ԦʳʳBattery protecting (turn off the main switch and wait about 15 seconds, turn on the main switch again). ԦʳʳBattery contact bad connection. ԦʳʳBlown, damaged or incorrect fuse. ԦʳʳWiring contact bad connection or damage. ԦʳʳFaulty main switch. ԦʳʳFaulty meter. ԦʳʳFaulty driver. LIGHT ODES NOT LIGHT ԦʳʳDriving modes is set standard mode. ԦʳʳWiring contact bad connection or damage. ԦʳʳBurnt-out light bulb. WHILE RIDING LOST ELECTRICITY SUDDENLY ԦʳʳDriving modes is set ԦʳʳFaulty main fuse. ԦʳʳFaulty ԦʳʳFaulty Lasting meter warning tone ԦʳʳWiring contact bad connection or damage. ԦʳʳFaulty driver. ԦʳʳFaulty meter. standard mode. battery. driver. WARNING TONE E-MO will notify vehicle operation and movement starts by sending out warning tone. ϬʳWarning Main switch "ON", turn handle bar the vehicle no reaction ԦʳʳWiring contact bad connection or damage. ԦʳʳFaulty handle bar switch. ԦʳʳFaulty motor. ԦʳʳFaulty driver. tone list O: Tone X: No tone Vehicle operation POOR RIDING PERFORMANCE contact bad connection or damage. ԦʳʳFaulty motor. ԦʳʳFaulty driver. ԦʳʳBrake drag. Main switch ON O Press an operation button O Password decode O Wrong password O No operation for 30 seconds O 10% battery residual volume O Warning and warning message O Main switch OFF X ԦʳʳWiring 8-1 Warning tone TRBL SHTG POOR BRAKING PERFORMANCE FAULTY LIGHTING OR SIGNALING SYSTEM Headlight does not light ԦʳʳWrong headlight bulb. ԦʳʳToo many electrical accessories. ԦʳʳHard charging. ԦʳʳFaulty battery. ԦʳʳIncorrect connection. ԦʳʳImproperly grounded circuit. ԦʳʳPoor contacts (main or light switch). ԦʳʳHeadlight bulb life expired. ԦʳʳWorn brake shoe lining. ԦʳʳIncorrect brake lever free play. ԦʳʳIncorrect brake shoe position. ԦʳʳWearing brake camshaft. ԦʳʳWorn or rusty brake drum. ԦʳʳDust or water on the brake drum. ԦʳʳOil or grease on the brake drum. ԦʳʳWorn brake cable wire. ԦʳʳWorn brake spring. ԦʳʳWorn brake camshaft and brake lever. Light bulb burnt out ԦʳʳWrong light bulb. ԦʳʳFaulty battery. ԦʳʳImproperly grounded circuit. ԦʳʳPoor contacts (main or light switch). ԦʳʳLight bulb life expired. FAULTY FRONT FORK LEGS ԦʳʳBent or damaged inner tube. ԦʳʳBent or damaged outer tube. ԦʳʳDamaged fork spring. ԦʳʳBent or damaged damper rod. ԦʳʳIncorrect oil viscosity. ԦʳʳIncorrect oil level. Turn signal does not light ԦʳʳImproperly grounded circuit. ԦʳʳFaulty battery. ԦʳʳBlown, damaged or incorrect fuse. ԦʳʳFaulty turn signal switch. ԦʳʳFaulty turn signal relay. ԦʳʳDamaged or faulty wire harness. ԦʳʳBurnt-out turn signal bulb. HORN DOES NOT SOUND ԦʳʳFaulty battery. ԦʳʳBlown, damaged or incorrect fuse. ԦʳʳFaulty main switch / horn switch. ԦʳʳImproperly adjusted horn. ԦʳʳDamaged or faulty horn. ԦʳʳFaulty wire harness. Turn signal remains lit ԦʳʳFaulty turn signal relay. ԦʳʳFaulty battery. ԦʳʳBurnt-out turn signal bulb. Turn signal blinks slowly ԦʳʳFaulty turn signal relay. ԦʳʳFaulty battery. ԦʳʳIncorrect turn signal bulb. ԦʳʳPoor contacts (main or light Turn signal blinks quickly ԦʳʳFaulty turn signal relay. ԦʳIncorrect turn signal bulb. 8-2 switch). TRBL SHTG MESSAGE CODE Meter message codeΕwarning message(warning tone) drawing Message code 888888 8888.8 ODO Km/H Trip LOwv Battery residual capacity 88 Pow X Warning message (Warning tone) The following warning messages might display with a warning tone during riding status. Ϭ Warning and Cue signal Code Warning Indication Action Cause OVC2 OVC1 The controller detects increasingly high 1. Release the accelerator and let go of hands. Wait until the message disappears then continue on driving. electric current. The power of the motor disappears while the warning message 2. If the warning message does not disappear, or if this warning message appears a lot, take the motor to the service station for check up. and warning sound are given out. OV T The controller detects increasingly high 1. Wait for the controller to cool down before driving continues. temperature. The power of the motor 2. If the warning message does not disappear, or if this warning message disappears while the warning message appears a lot, take the motor to the service station for check up. and warning sound are given out. OV V The controller detects increasingly high 1. Restart. voltage. The power of the motor disappears 2. If the warning message does not disappear, or if this warning message while the warning message and warning appears a lot, take the motor to the service station for check up. sound are given out. LOWV The controller detects decreasingly low 1. Restart. voltage. The power of the motor disappears 2. If the warning message does not disappear, or if this warning message while the warning message and warning appears a lot, take the motor to the service station for check up. sound are given out. STL1 Strong resistance (stalling) at startup or 1. Release the accelerator and let go of hands. Wait until the message during moving. The power of the motor disappears then continue on driving. disappears while the warning message 2. If the warning message does not disappear, or if this warning message and warning sound are given out. appears a lot, take the motor to the service station for check up. NO B This message appears when the battery Residual capacity of battery is around 10%. is completely exhausted to remind the Recharge the battery as soon as possible. user to recharge the battery. CHAR Remind that the battery is charging. Wait for the battery to be fully charged. FULL Remind that the battery charging has already completed. Remove the battery charger. 8-3 TRBL SHTG Code SPD0 Operate code lock during riding. No operating code lock during riding can terminate this message. FAST Over speed warning. (over 52KM/HR) Reducing driving speed as soon as possible. LOWB Recharge battery as soon as possible. Low battery. Using Power mode during low battery residual The system will shift back to standard mode automatically and LOWP charge. will disappear. 1. This message will display to remind the rider that vehicle locking has already been 1. Rider can switch off safely. set success fully. LOWP LOCK Indication FAIL Cause Action 2.This message will display on restarting to remind that the vehicle locking has already 2. Press confirmation button and input password to unlock the vehicle. been set success fully. Wrong password. Re-enter the password. OLD On setting vehicle locking password, this message will display to remind the rider to input old password if an old password has Enter the old password. already existed. NEW ON setting vehicle locking password, this message will display to remind the rider to input a new password if there are no password Enter the new password. was set up in system or already enter the correct password. PUSH During standby mode, this message will display to remind the user to press confirmation Press confirmation button A. button to enter into riding page. PRES TPS0 After starting. This message will display to remind the rider if the vehicle still stays in Release throttle handle and press confirmation button to enter into standby page but the rider intends to turn around riding page. handlebars. After PRESS is conducted, this message will display to remind the rider if the confirmation Release throttle handle and press confirmation button to enter into button is pressed before handle bar is not riding page. yet released. 8-4