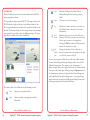
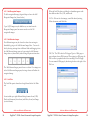
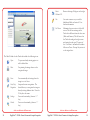
1
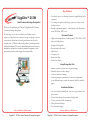
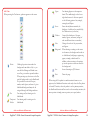
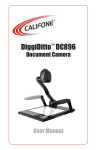
DiggiDitto™ DC596
Smart Camera with Image Recognition
User Manual
Key Features
DiggiDitto™ DC596
Smart Camera with Image Recognition
Thank you for purchasing the Califone® DiggiDitto DC596 Smart
Camera with Image Recognition.
We encourage you to visit our website, www.califone.com, to
register your product for its warranty coverage, to sign up to receive
our newsletter, download our catalog, and learn more about the
complete line of Califone audio visual products, including portable
and installed wireless PA systems, multimedia players and recorders,
headphones and headsets, computer peripheral equipment, visual
presentation products, and language learning materials.
• Provides an easy to use learning solution by simply linking with a
computer
• Uses image recognition technology to present a variety of curriculum content
• Includes multimedia support – sound, image, video/flash, document (MS Office, PDF), web
Document Camera
•
•
•
•
•
•
•
•
High-resolution projection (2 million pixels, UXGA 1600 ×1200)
Saves and edits pictures
Integrated microphone
Records video with sound
Splits Screen
Zooms in/out
Rotates and flips
Prints view directly
Image Recognition Tool
•
•
•
•
Initiates sounds or pictures as it recognizes images
Identifies objects as well as images
Creates a database of images
Links each image to a minimum of one and a maximum of
seven different images, sounds, documents, flash files, and web
pages.
Annotation Software
• Use as an electronic blackboard - write on top of pictures, computer screen.
• Choose from among four annotation backgrounds
• Choose pen color, width, transparency
• Draw geometrical shapes
• Save annotated images
visit us online at califone.com
2
DiggiDitto™ DC596—Smart Camera with Image Recognition
visit us online at califone.com
DiggiDitto™ DC596—Smart Camera with Image Recognition
3
Important Safety Information
Attention: All safety and operating instructions should be read
before operating appliance. All operating and use instructions should
be followed when operating the appliance. Heed and adhere to all
warnings on the appliance and in the operating instructions. Retain all
safety and operating instructions for future reference.
Water and moisture: Do not use the appliance near water; i.e.,
bathtub, washbowl, kitchen sink, laundry tub, wet basement, or
swimming pool.
Ventilation: Do not situate the appliance so that its location or
position interferes with its proper ventilation. For example, the
appliance should not be situated on a bed, sofa, rug, or similar
surface that may block the ventilation openings. The appliance should
not be placed in a built-in installation, such as a bookcase or cabinet,
that may impede the flow of air through the ventilation openings.
Heat: Situate the appliance away from heat sources such as radiators,
heat registers, stoves, or other appliances (including amplifiers) that
produce heat.
Power sources: Connect the appliance only to a power supply type
described in the operating instructions or marked on the appliance.
Grounding or polarization: Precautions should be taken so that the
grounding or polarization means of the appliance are not defeated.
Non-use periods: Unplug the appliance power cord from the outlet
when left unused for a long period of time.
Object and liquid entry: Care should be taken so that objects do not
fall and liquids are not spilled into the enclosure through openings.
Damage requiring service: The appliance should be serviced by
qualified service personnel when (a) the power supply cord or the
plug has been damaged, (b) objects have fallen or liquid has been
spilled into the appliance, (c) the appliance has been exposed to
rain, (d) the appliance does not appear to be operating normally or
exhibits a marked change in performance, or (e) the appliance has
been dropped or the enclosure damaged.
Servicing: The user should not attempt to service the appliance
beyond that described in the operating instructions. All other
servicing refers to a qualified service personnel.
Location: Place the device on a stable surface to prevent injuries or
damage. Do not place directly under sunlight. Keep the camera away
from acid or alkali gasses. Do not place in humid, dusty or windy
locations. Keep within the recommended environment: temperature
of 0ºC to 45ºC (32ºF to 113ºF), humidity of less than 75%.
Abnormal functionality: If this equipment functions abnormally,
such as smoke, smell, or noise, immediately unplug and call for
professional assistance.
Power cord protection: Power supply cords should be routed so
that they are not likely to be walked on or pinched by items placed
upon or against them, paying particular attention to cords at plugs,
convenience receptacles, and the point where they exit from the
appliance.
Cleaning: The appliance should be cleaned only as recommended by
the manufacturer. Always unplug before cleaning the device. Use a
damp soft-cloth for cleaning. Do not use volatile solvent.
visit us online at califone.com
4
DiggiDitto™ DC596—Smart Camera with Image Recognition
visit us online at califone.com
DiggiDitto™ DC596—Smart Camera with Image Recognition
5
Table of Contents
1. Package Contents.............................................................7
2. Setup and Installation......................................................8
2.1 Install DC596 Program File........................................ 8
2.2 Setup of the DC596 driver.......................................... 9
3. Basic Operation..............................................................10
3.1
3.2
3.3
3.4
3.5
3.6
Camera Tab ............................................................. 10
Capture Frame......................................................... 11
Pen Palette............................................................... 11
Make Tab.................................................................. 12
Teach Tab................................................................. 13
Big Screen................................................................ 14
1. Package Contents
The following materials are included with your Califone® DiggiDitto
DC596 Smart Camera:
• DiggiDitto DC596 Camera Head with attached USB Cord
• DiggiDitto DC596 Camera Base
• Carrying Case
• USB Extender Cable
• Software CD
• User Manual
4. Detailed Functions.........................................................15
4.1
4.2
4.3
4.4
Main Menu................................................................ 15
Cursors..................................................................... 18
Main Toolbar............................................................. 18
Camera Tab.............................................................. 19
4.4.1 Capture Window............................................. 22
4.4.2 Record Movie Window.................................... 23
4.4.3 Pen ................................................................ 24
4.5 Make Tab.................................................................. 26
4.5.1 Add Recognized Images................................. 28
4.5.2 Add Alternate Images..................................... 28
4.5.3 Link Files........................................................ 28
4.6 Teach Tab................................................................. 31
5. Troubleshooting..............................................................36
6. Specifications.................................................................39
7. Warranty..........................................................................41
visit us online at califone.com
6
DiggiDitto™ DC596—Smart Camera with Image Recognition
visit us online at califone.com
DiggiDitto™ DC596—Smart Camera with Image Recognition
7
2. Setup and Installation
After inserting the CD into the computer CD drive, the following
image will appear on the screen. Press on the appropriate installation
button.
2.2 Setup of the DC596 driver
After installing the DC596 device driver, complete the following
steps:
1.
2.
Connect the USB cable to the computer.
Verify that the driver is responding correctly:
• Driver setup procedure (auto configuration): USB Connect → New hardware detection → Driver auto configuration → Compliant message display → Press Continue
→ Finish
• Driver setup procedure (manual configuration): USB
Connect → New hardware detection → Driver manual
configuration → Locate driver → Compliant message
display → Press Continue → Finish
If the computer does not show the above screen, the software can
also be installed manually: Insert Installation CD → Install DC596
Program File → Connect DC596 to the Computer → Finish
2.1 Install DC596 Program File
1.
2.
3.
Insert the installation CD into the CD drive and click the
setup.exe file.
The Install Shield Wizard will be presented.
Press Next to start the installation process.
When the installation is complete, click the OK button.
An DC596 icon appears on the Desktop as well as on the
Start Menu.
visit us online at califone.com
8
DiggiDitto™ DC596—Smart Camera with Image Recognition
visit us online at califone.com
DiggiDitto™ DC596—Smart Camera with Image Recognition
9
3. Basic Operation
3.2 Capture Frame
3.1 Camera Tab
Open to view images
other than what the
camera sees.
Save to save edited image.
Crop to pick out an
image out of an image.
Copy copies the image
to paste onto another
document.
Ver.Flip image along
the vertical axis.
Hor.Flip image along
the horizontal axis.
3.3 Pen Palette
visit us online at califone.com
10
DiggiDitto™ DC596—Smart Camera with Image Recognition
visit us online at califone.com
DiggiDitto™ DC596—Smart Camera with Image Recognition
11
3.4 Make Tab
3.5 Teach Tab
visit us online at califone.com
12
DiggiDitto™ DC596—Smart Camera with Image Recognition
visit us online at califone.com
DiggiDitto™ DC596—Smart Camera with Image Recognition
13
4. Detailed Functions
3.6 Big Screen
4.1 Main Menu
The advanced buttons are located on the Main Menu at the top of
the screen above the toolbar. This menu includes the File, Modes,
Window, and Help tabs.
File includes the following items:
• New: To open new project folders. Each project is a presentation.
It is possible to have multiple projects or multiple lessons in a
single project.
• Open: To open an existing project.
• Save: To save a new or edited project.
• Import: To import a project to another computer. Importing nxp
formatted files will result in a directory of the same name in the
project folder.
Play and pause
(shortcut: F3 key)
Press the Previous and Next
buttons to move through your
recognized images.
keys
Shortcut:
Press the volume
button to mute the
sound.
,
• Export: To export a project from one’s own computer. When
a project is exported, the resulting file will have the extension
“nxp” and will be placed on the Desktop if a different location is
not selected.
• Print: To print a page(s) or a selection (can also specify where to
print).
visit us online at califone.com
14
DiggiDitto™ DC596—Smart Camera with Image Recognition
visit us online at califone.com
DiggiDitto™ DC596—Smart Camera with Image Recognition
15
Tools
Several tools are included within the DC596:
• Split Screen: To divide the screen in two for comparison.
• Focus: To focus the image when the image shown on-screen is
out of focus.
• Freeze Frame: To freeze a moving image to edit, save, or compare.
• Change Camera Resolution: Changes the camera resolution from
1600 × 1200 to 800 × 600 and vice versa. This changes the camera resolution for the document camera only and is not available
in other modes.
• Image Capture: For capturing and/or editing images.
By selecting Print, the following pop-up will appear to set the
details of printing. The scale as well as how many copies of the
image can be customized. An image that has been rotated, or
split etc., will only print the regular view.
• Recently Opened Files: Recently opened projects.
• Exit: To exit the program.
Modes
Three modes are included in the DC596:
• Camera: Document camera mode, where it is possible to rotate,
compare, zoom in and out, and edit images in this mode.
• Make: To make, edit, and link up projects that utilize the image
recognition feature of the device.
• Teach: To present to a classroom or to a single pupil using the image recognition feature.
• Record Movie: To record a short video clip of up to 10 minutes.
• Zoom: Includes zoom in, zoom out, and reset.
• Rotate: Able to rotate 90 degrees clockwise, counterclockwise,
and 180 degrees.
• Recognition: For starting/stopping recognition. This is applicable
only for the Make and Teach modes.
• Pen: For writing/drawing/erasing on the screen of the whole
monitor.
• Camera Setting: To select the behavior of the camera.
Window
• Full Screen: To maximize the window size. For the case of the
Teach Mode, only the right pane gets enlarged.
• Move Toolbar: The toolbar can be placed on the top or on the bottom.
Help
• About DC596: For version information.
visit us online at califone.com
16
DiggiDitto™ DC596—Smart Camera with Image Recognition
visit us online at califone.com
DiggiDitto™ DC596—Smart Camera with Image Recognition
17
Left
4.2 Cursors
Center
Right
The many cursors shown throughout this program are defined below.
Move
To shift/move in any direction.
The icons change from tab to tab, from Camera to Make to Teach.
Move
To shift/move in any direction, specifically
when zoomed-in.
Camera Tab
Grab Image
To grab and shift/move the position of the
image.
Split Screen
To shift the image left and right.
Make Tab
Teach Tab
Cursors within the Pen functionality
Pen
The cursor changes to a pen when you are
writing on the board.
Marker The cursor changes to a marker when you are
drawing on the board.
Eraser The cursor changes to an Eraser when you are
erasing the board.
Figures
4.4 Camera Tab
The Camera tab shows the document camera window. When an
object is placed under the camera, the object (e.g., a computer
monitor or a TV connected to the PC) is shown on the monitor. The
uses here are similar to that of other document cameras.
The cursor changes to that of a figure when you
are constructing figures.
4.3 Main Toolbar
The Main Toolbar is divided into three parts: left, center, and right.
The left has three tabs: Camera, Make, and Teach. The center has the
function icons for the different tabs. The right has the Full Frame,
Lock Toolbar, and Toggle Toolbar.
visit us online at califone.com
18
DiggiDitto™ DC596—Smart Camera with Image Recognition
visit us online at califone.com
DiggiDitto™ DC596—Smart Camera with Image Recognition
19
The Main Toolbar in the Camera tab has the following buttons:
Print
Split Screen
Focus
Prints the image displayed on the
screen via the default printer. When a
moving image is displayed on-screen,
the computer freezes the frame and
sends it over to the printer. However,
when the window is split, or when the
image is rotated, the original image (not
the split or rotated image) is printed.
Splits the screen in two, showing the
captured image on the left and the
original image on the right. This is a
good mode to compare one image to
another.
Automatically refocuses the image.
Freeze/
To freeze the movement in front of
Release Frame the camera. This can also be done by
pressing the F5 key.
Capture
To create a still image and make
corrections i.e., crop, flip, sharpen,
brighten, etc.
Record Movie To make a simple movie clip of 10
minutes or less. When going to the
movie recording screen, the resolution
changes to 640 × 480. For a smaller
footprint, try going down to 320 × 240.
Enlarge
Zoom-in functionality. May also press
the “+” key.
Shrink
Zoom-out functionality. May also press
the “-“ key.
Rotate
Rotates the image 90 degrees to the
o
Clockwise 90 right.
visit us online at califone.com
20
DiggiDitto™ DC596—Smart Camera with Image Recognition
Pen
To write on-screen as you would on a
blackboard.
Full Screen: Enlarges the screen to fit the monitor.
Pressing <Ctrl-Enter> does the same.
Press it again to restore it to the
original size.
Lock/Unlock Locks the toolbar. Notice that the Lock
icon is grayed out when first launched;
it becomes golden (active) when the
screen is enlarged to fit the monitor.
Click it to unlock the toolbar so as
to hide the toolbar when moving the
mouse pointer away from the toolbar.
Top/Bottom Changes the position of the toolbar,
Icon
from the top of the screen to the
bottom. The toolbar cannot move
sideways. (shortcut: Ctrl-M)
visit us online at califone.com
DiggiDitto™ DC596—Smart Camera with Image Recognition
21
4.4.1 Capture Window
When the Capture button in the Toolbar Menu of the Camera tab is
pressed, the following window appears:
When cropping an image, select the portion to be cropped and
doubleclick the image. This newly cropped image may be saved.
4.4.2 Record Movie Window
This feature enables you to make a short movie clip (10 minutes
maximum).
1.
Click the Record Movie button.
The following window appears:
From this window, you can perform the following functions:
• Open a new image file
• Save an adjusted file
• Print the image
• Crop an image
• Copy an image
• Invert (to produce a negative image)
• Zoom in and out
• Rotate and/or flip the image across the horizontal and the vertical axis
• Control brightness, contrast, and sharpness from the captured
image
The Copy button enables you to copy an image to the clipboard. You
can paste the image from the clipboard to a different application by
copying the material to the clipboard then pressing <Ctrl-V> to paste
the image.
visit us online at califone.com
22
DiggiDitto™ DC596—Smart Camera with Image Recognition
2.
3.
Aim the camera and press the red Record button at the
bottom to start the recording process.
Once the recording is finished, press the black Stop button
to end the recording and save.
The initial resolution is set to 640 × 480 and may be set to
320 × 240. It will save in the size of the resulting video
size. The recording may be cancelled at anytime.
visit us online at califone.com
DiggiDitto™ DC596—Smart Camera with Image Recognition
23
4.4.3 Pen
When pressing the Pen button, a palette appears on the screen:
Figures:
Save:
For drawing figures on the computer
board. The small triangle on the lower
right-hand corner of this icon expands
to the following options: line, triangle,
rectangle, and ellipses.
Erases already-drawn material, the
thickness of which can be controlled by
the Thickness icon (see below).
Controls the thickness of the pen,
marker, figures, and eraser (settings of
each are different from one another).
Changes the color of the pen, marker,
and figures.
When drawing or writing on the screen
via the mouse, the background can be set
to a blackboard, staff paper, engineering
paper, or simply a whiteboard. In
addition, when returning to the pointer,
up to nine previous screens are saved in
the background.
Saves a drawing in a JPG format.
Print:
Prints the page.
Eraser:
Thickness:
Color:
Background:
Pointer:
Pen:
Transparent
Marker:
Clicking the pointer icon makes the
background come back to life, i.e., you
can click the Enlarge and Shrink icons
as well as go to another opened window.
When pressing any other icon on the Pen
pad, the background is only a blackboard.
It is possible to write with the pen,
marker, make figures, and erase. A given
blackboard background may also be
assigned through the Background icon.
For writing and/or drawing on the
blackboard.
For drawing and/or writing on the
blackboard.
visit us online at califone.com
24
DiggiDitto™ DC596—Smart Camera with Image Recognition
When using the Pen palette in a multi-monitor format or on a
projector, the blackboard function works only where the Pen palette
is located. Therefore, when the palette is on the primary monitor,
the blackboard function will not work on the secondary monitor; the
mouse pointer is simply a mouse pointer, not a pen/marker.
visit us online at califone.com
DiggiDitto™ DC596—Smart Camera with Image Recognition
25
4.5 Make Tab
From the Make tab, you can create a presentation with the DC596
image recognition software.
To begin, place an image under the DC596. The image will incite the
DC596 software to play or link up to eight different kinds of files.
The recognized images are located in the top and bottom half on the
left side. The alternate images are those images shown when an image
is recognized. It is possible to have five additional images. The lower
right side of the Make tab shows the linked files.
Save:
Focus:
Pen:
Full
Screen:
Top/
Bottom
Icon:
Saves after adding a new project folder or
adding/deleting files after opening a project
folder.
Refocuses an out-of-focus image.
Enables you to write onscreen as one writes on
a blackboard (refer to Section 4.3 for further
information).
Maximizes the screen size to fit the full screen.
Pressing <Ctrl-Enter> produces the same result.
Press it again to return to the original size.
Pressing the ESC key when in Full Screen mode
restores the window size as well.
Changes the position of the toolbar (up or
down). You cannot move the toolbar to the right
or to the left. (shortcut: Ctrl-M)
As soon as you open the Make tab, you will see five different panes:
Camera, Selected Image, Recognized Images, Link Files, and Add
Alternate Images panes. The camera sees the Camera pane. A
different image/object can be placed in front of the camera and will
show up on the Camera pane. When pressing the Capture button in
the Camera pane, the image is captured to the Selected Image pane
and is placed in the Recognized Images pane. A recognized image
may be chosen by pressing the Add Recognized Images button and
selecting an image from an individual collection.
The main toolbar of the Make tab has the following buttons.
New:
Opens up a new project folder.
Open:
Opens an already existing project to add or
delete links.
visit us online at califone.com
26
DiggiDitto™ DC596—Smart Camera with Image Recognition
visit us online at califone.com
DiggiDitto™ DC596—Smart Camera with Image Recognition
27
4.5.1 Add Recognized Images
To add a recognizable image, drag and drop or choose the Add
Recognized Images bar (shown below):
When the Link Files button is clicked, a subwindow appears with
three different tabs: Files, URL, and Record.
File Tab: Files are for other images, sound files already existing,
Office documents, and Flash files.
Up to 50 JPG images may be added at any one time from the
Recognized Images pane but cannot exceed a total of 100
recognizable images.
4.5.2 Add Alternate Images
Five different images may be selected to show when an image is
identified by going to the Add Alternate Images Pane. You can do
this by selecting an image from a different folder and dragging it into
the Add Alternate Images pane, or by pressing the Add Alternate
Images button (shown below) and selecting the pictures from there.
URL Tab: The URL tab is for Web pages. Type in a Web page or
copy and paste from a Web browser. When typing in a Web page, the
Title text box is populated with the last wording of the Web page.
You can name the Web page by deselecting the box at the right of the
Title box.
The Add Alternate Images pane is there as a choice. If no images are
in the Add Alternate Images pane, the image shown will reflect the
recognized image.
4.5.3 Link Files
The Link Files pane is located on the right-hand side of the Make
tab:
It can include up to eight different linking formats: Sound, URL,
Flash, and document (first column) and Movie, Sound, and Image
(second column).
visit us online at califone.com
28
DiggiDitto™ DC596—Smart Camera with Image Recognition
visit us online at califone.com
DiggiDitto™ DC596—Smart Camera with Image Recognition
29
Record Tab: The Record tab may record sounds up to 3 minutes long
through the microphone attached to the front of the camera head.
The name is highlighted on the screen when a sound file is being
recorded. To listen to what has been recorded, choose the filename as
shown on the second item, as shown below:
Deleting a Link File
To delete a link file from the link list, press the right mouse button
and navigate to a sound link file, then cancel the auto sound play.
Selecting to delete the file removes one link item. Items that are
changed in the Make tab are saved upon navigating to another tab.
To delete all linked files, select Select All and press Delete. To
selectively delete files, check individual links and press Delete.
Note that the saved files are copied to the project folders location.
Here, it is copied to the folder “C:\DiggiDtto\DC596\Project”
Pressing OK will bring up the initial Make tab.
The radio button (shown in the image below) indicates whether the
sound will be played when the appropriate image is recognized. If the
radio button on the left is not selected, then the alternate sound on
the right will be played with the recognized image.
4.6 Teach Tab
From the Teach tab, you can play sound files, play video files, show
documents, and open URLs at the turn of a page. If the file has
already been linked to a recognized image and the auto-play feature
of a sound file is selected, it will play on its own. Any linked file at
the lower left-hand side of the screen can be selected.
visit us online at califone.com
30
DiggiDitto™ DC596—Smart Camera with Image Recognition
visit us online at califone.com
DiggiDitto™ DC596—Smart Camera with Image Recognition
31
Rotate
Rotates the image 90 degrees to the right.
o
Clockwise 90 :
Pen:
Full Screen:
Can write onscreen as you would a
blackboard. Refer to Section 4.3 for
further information.
Maximizes the screen size to fit the full
screen. The full screen image in the
Teach tab is different from the other two
(Make and Camera). The full screen for
the Teach tab enlarges the right screen
and omits the other two. The press of
the <Ctrl-Enter> will make the window
full screen. Press <Escape>key restore it
to the original size.
The Main Toolbar for the Teach tab includes the following icons.
Open:
To open an already existing project to
add or delete links.
Print:
For printing the image shown on the
recognized image.
Focus:
For automatically refocusing when the
image is out of focus.
Start/Stop
Recognition:
Stops and restarts recognition. The
dotted lines try to recognize the image to
already existing database data. Press the
F5 key does the same.
Zoom-in functionality (shortcut: “+”
key).
Enlarge:
Shrink:
Zoom-out functionality (shortcut: “-“
key).
visit us online at califone.com
32
DiggiDitto™ DC596—Smart Camera with Image Recognition
visit us online at califone.com
DiggiDitto™ DC596—Smart Camera with Image Recognition
33
Top/Bottom
Icon:
The Top/Bottom icon will allow you to
change the position of the toolbar to the
top or bottom of the screen. The toolbar
cannot be moved to the right or to the
left of the screen.
The Recognition Camera in the upper
left hand corner shows where the camera
recognizes the image. When an image is
recognized, the image, whether it’s the
recognized image or a separate alternate
image that you have chosen in the Make
tab, is displayed on the big screen. From
the linked items on the left-hand corner,
you can choose which items have not
been selected to play automatically.
Next:
For viewing the next alternate images
when an image is recognized. These are
the images that one chose as the alternate
images on the bottom of the Make tab.
Use the “+” button as a shortcut.
The Stop, Play, Rewind, Forward buttons are for listening to the
music files. Toggle between the Play/Pause with the press of the F3
key. The press of the volume button will mute the sound. Press it
again to unmute it.
When choosing Full Screen either in
the Main Menu → Windows→ Full
Screen or by going to the upper righthand corner and selecting the Full
Screen button or with the <Ctrl-Enter>
shortcut, the image on the right gets
blown up to fill the screen.
There are several buttons on the bottom
half of the main screen on the Teach tab.
Here are their descriptions.
Previous:
(shortcut: Ctrl-M)
For viewing the previous alternate images
when an image is recognized. These are
the alternate images on the bottom of
the Make tab. Use the “-“ button as a
shortcut.
visit us online at califone.com
34
DiggiDitto™ DC596—Smart Camera with Image Recognition
visit us online at califone.com
DiggiDitto™ DC596—Smart Camera with Image Recognition
35
5. Troubleshooting
Issue
Issue
Resolution
When running the
DC596 program the
following message
comes up, and
doesn’t run. “The
camera is either
not connected or is
not the appropriate
camera. Reconnect
the appropriate
camera.”
Sound recording
does not work
properly when
recording in Make
Mode
Check whether the DC596 camera is
properly connected to the USB port.
(Cameras other than from DC596 will not
work.)
Check to see if Settings – System –
Hardware tab – Device Manager – Imaging
Device – DC596 is properly installed. If not,
please reinstall the driver.
Check to see connection is properly
connected to the USB port. Sound
recordings can only be done by the internal
microphone of DC596. Check to see if the
USB Audio device is connected in Settings
– System – Hardware tab – Device Manager
– Sound, Video, and Game Controller. If it is
not, please reinstall the driver.
If the USB device is correctly connected,
the volume settings of the DC596 may be
the problem. Select USB2.0 Web Camera
and press Volume in Settings – Sound,
Audio Device – Voice tab – Voice Recording.
Uncheck the Silence All and select the
volume accordingly.
Caution: Do not manipulate or delete any of
the files in the path of DC596
visit us online at califone.com
36
DiggiDitto™ DC596—Smart Camera with Image Recognition
Sound recording
does not work
properly when
recording in Make
Mode (Con’d)
Resolution
It may be possible to have problems opening
contents if editing or deleting files in “.\
DiggiDitto\DC596\Project\Contents” and
also in the additional contents folder made.
Always use the DC596 program to insert /
edit / delete files or contents.
I’ve connected the
• There are a few PC’s that do not provide
camera and started
enough power to the USB 2.0 ports and
the DC596 program
thus the camera does not behave cor, yet the image does
rectly.
not show on the PC.
Need to use a USB hub which has a
separate power supply.
• The USB hub with separate power supply does not improve the situation, i.e. a
black screen appears on the PC.
There are computers that have 512 MB of
RAM and no RAM on the video cards and is
in turn using part of the 512MB of system
RAM. The problem occurs because it does
not have enough memory to process the
commands from the camera. An addition of
512 MB of RAM may be required.
The PC may have been infected with a virus
and several devices may not be working
correctly. A reinstallation of the PC with
the operating system is needed. (Remember
that DiggiDitto DC596 works on a PC with
Microsoft Windows XP Service Pack 2.0 and
beyond.)
visit us online at califone.com
DiggiDitto™ DC596—Smart Camera with Image Recognition
37
Issue
Resolution
The camera is
connected but the
camera resolution
seems off.
The DC596 product is for USB 2.0 and
above. There are several PC’s that have
separate USB 1.0 ports and USB 2.0 ports.
Plug the USB connector to the appropriate
USB 2.0 port.
6. Specifications
Software
Features
Compatible Operating
Systems
Camera Sensor
Resolution
Aperture/Focusing Distance
Diagonal Angle of View
Focus Control Function
Brightness / Color Control
Video Capture Resolution/
Frame Rate
USB Compatibility
Minimum System
Requirements
visit us online at califone.com
38
DiggiDitto™ DC596—Smart Camera with Image Recognition
DiggiDitto Software Version 1.3.0
or higher
Camera with internal microphone,
fully adjustible mounting stand,
sturdy storage case
Windows 2000/XP/Vista/Windows 7
(32/64-bit), Mac OS
* Note: Included software is only
compatible with Windows operating
systems. For use with Mac OS, use 3rd
party software.
1/3 inch 2 million pixel
Maximum UXGA 1600 ×1200
ƒ2.8 / 5 cm ~ ∞ / 65.3°
Auto focus (can be reset manually)
Manual
30 fps@320 ×240, 24 fps@640 ×
480
USB 2.0
Pentium 4, 1GB RAM
visit us online at califone.com
DiggiDitto™ DC596—Smart Camera with Image Recognition
39
All dimensions in centimeters.
7. Warranty
Califone warrants the DC596 to be free from defective material and
workmanship for one year from the purchase date. Our “Project
Intercept” Customer Satisfaction program will replace defective parts
and repair malfunctioning equipment under this warranty when the
defect occurs under normal use.
All Damage Claims Must Be Made With the Freight Carrier
Notify the freight carrier immediately if you observe any damage to
the shipping carton or product. Repack the unit in the carton and
await inspection by the carrier’s claim agent. Notify your dealer of the
pending freight claim.
Returning Your Unit for Service or Repairs
Should your unit require service, contact our Customer Service
Department online at califone.com/techsupport or via email
[email protected] or by phone at 800-722-0500 / 818-407-2400
to first obtain an RA (Return Authorization) number before returning
it to Califone. The unit must be returned to our factory via prepaid
transportation only after the factory issues an RA number, which
must be clearly written on the outside of the box.
visit us online at califone.com
40
DiggiDitto™ DC596—Smart Camera with Image Recognition
visit us online at califone.com
DiggiDitto™ DC596—Smart Camera with Image Recognition
41
Note
Note
visit us online at califone.com
42
DiggiDitto™ DC596—Smart Camera with Image Recognition
visit us online at califone.com
DiggiDitto™ DC596—Smart Camera with Image Recognition
43
Califone® International, Inc.
1145 Arroyo Avenue, #A
San Fernando, CA 91340 USA
Toll Free 800.722.0500 | Toll Free Fax 877.402.2248
International Customers call 818.407.2400 or Fax 818.407.2405
califone.com
Califone DC596 Rev 04 0311