1
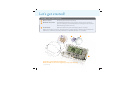
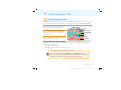
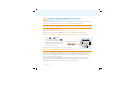
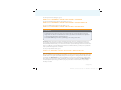
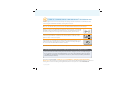
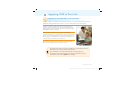
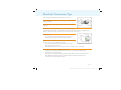
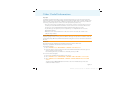
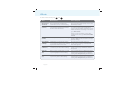
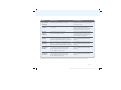
Getting Started
with Continuous Glucose Monitoring
MEDTRONIC • CGM Getting Started Guide - X23 • MECHANICAL • Renie Design 1 / 29 / 10
Congratulations on your decision to use the
MiniMed Paradigm® REAL-Time Revel™ System!
A solid understanding of Continuous Glucose Monitoring (CGM) basics
is essential to your success. Here’s what we’ll cover in this guide:
1
2
U N DE R S TA N DI N G C G M
Glucose Readings
Blood glucose (BG) meter and sensor glucose readings
come from similar, but different, places in your body
Calibration
A sensor needs BG meter readings to function properly
Settings
Personalize and adjust your settings over time
S TA RT I N G - U P C G M
Step 1 – Inserting the Glucose Sensor
Step 2 – Programming Settings
Step 3 – Connecting the MiniLink® Transmitter
Step 4 – Calibrating
Step 5 – Reading the Display
3
A P P LY I N G C G M I N YO U R L I F E
What is CareLink™ Therapy Management Software?
How do CareLink Software reports help me?
How do I sign up for CareLink Software?
Understanding CGM | 1
MEDTRONIC • CGM Getting Started Guide - X23 • MECHANICAL • Renie Design 1 / 29 / 10
Let’s get started!
Your CGM system includes 3 key items:
1
Glucose Sensor
Measures glucose levels in the body.
2
MiniLink® transmitter
The MiniLink transmitter connects to the glucose sensor and sends
glucose readings to your insulin pump. It is recharged and stored in the
MiniLink charger when not in use.
3
Insulin Pump
Delivers insulin and receives and displays glucose readings.
Other items include: Sen-serter® Insertion Device, test plug, IV-3000® adhesive tape and CareLink™
USB used to download your pump information to CareLink software on a computer.
1
2
3
Remember, your healthcare provider and
Medtronic Diabetes are here to support you every step of the way.
2 | Understanding CGM
1
Understanding CGM
G L U C O S E R E A DI N G S
Your BG meter measures glucose (sugar) levels in your blood, and your glucose sensor measures
glucose levels in the fluid surrounding the cells in your tissue, which is called interstitial fluid.
Most of the time, glucose travels first to your
blood and then to your interstitial fluid.
MiniLink ®
Skin
Glucose Sensor
Because of how glucose travels, your BG
meter readings and sensor readings will
rarely match exactly. This is normal and
should be expected.
Interstitial Fluid
Cell
Glucose
Usually your BG meter readings and your
sensor readings will be close.
Blood Vessel
However, when glucose levels are rising or falling quickly, you should expect to see a larger
difference between your BG meter value and the sensor glucose reading. Examples of times
when this may occur include:
• After meals or after insulin
• When or arrows appear on your pump screen
Use CGM to understand your glucose trends.
Focus on what matters: the direction and the speed of the sensor
glucose change. Pay less attention to each individual glucose number.
Always rely on BG meter readings for therapy adjustments.
Understanding CGM | 3
MEDTRONIC • CGM Getting Started Guide - X23 • MECHANICAL • Renie Design 1 / 29 / 10
C A L I B R AT ION
Your MiniMed Paradigm® REAL-Time Revel™ System uses BG meter readings to make sure the
glucose sensor maintains its accuracy over time. This is called calibration.
To calibrate you must check your BG on your meter and enter the value into the pump. The
two most common ways to calibrate are through the Bolus Wizard® and the sensor menu. The
preferred method is the Bolus Wizard, which may help to prevent the stacking of insulin.
When you calibrate is important.
• On day one of a new sensor, a calibration is needed:
– approximately 2 hours after you connect the MiniLink® transmitter to your
sensor (the system will notify you)
– again within 6 hours
– again within 12 hours
• After day one, calibrate 3–4 times a day for optimal sensor accuracy
• A minimum of 1 calibration every 12 hours is required to receive sensor glucose readings
It’s easy to remember when to calibrate. Think Before is best. The best times to calibrate are
when glucose levels are least likely to be changing rapidly, such as:
• Before meals
• Before insulin
• Before bedtime
• When there are no arrows on your insulin pump screen
Tip:
Time your calibrations so you will not have to wake up in the middle of the night.
Remember, you can calibrate early! For example, if it’s 9pm and you know a
calibration will be required by 3am, go ahead and calibrate before bed. This will start
the 12 hour calibration clock over. To find out when your next calibration is due,
press ESC 3 times from the HOME screen.
If you notice a large difference between your BG meter and sensor glucose readings,
calibration may be needed to bring them closer together again (remember, only
calibrate if there are no arrows on your display).
4 | Understanding CGM
Calibration is essential for optimal sensor performance. The glucose
sensor performs best when calibrated 3–4 times per day.
CGM does not eliminate the need for BG meter readings (fingersticks).
You do not need to wait 6 hours (day one) and 12 hours to calibrate.
You can calibrate early, as long as your glucose is stable.
SET TINGS
Your MiniMed Paradigm REAL-Time System allows you to customize alerts to help improve your glucose control. Your healthcare provider will work with you and your trainer to determine
the initial alert settings that work best for you.
In using CGM, these settings will determine how often you are
alerted. You will want to find a balance between the benefit of
receiving these alerts and any inconvenience that may be caused by receiving too many.
During the first several weeks on CGM, you and your healthcare provider may consider
(i) waiting to turn these alerts on, (ii) turning on only certain alerts, or (iii) setting these alerts
very wide. As you learn more about your glucose patterns and how to use CGM, you will be
able to adjust your alert settings to meet your individual needs.
Understanding CGM | 5
MEDTRONIC • CGM Getting Started Guide - X23 • MECHANICAL • Renie Design 1 / 29 / 10
2
Starting-Up CGM*
S T E P 1 : G L U C O S E S E N S OR I N S E RT ION
Site Selection
Choose a place on your body at least:
• 2 inches from your navel
• 2 inches from your insulin pump infusion site
• 3 inches from any manual insulin injection site
For best glucose sensor performance, avoid:
• Sites where clothing may rub or constrict
(for example your beltline)
• Sites where your body naturally bends a
great deal
• Sites that are scarred or have hardened tissue
or stretch marks
Note: clinical trials for glucose sensors were performed
on sensors inserted in the abdominal area.
Insertion
• Wash hands.
• Remove glucose sensor from package by holding the sensor base or tape.
Do not hold the glucose sensor by the introducer needle handle.
• Using an alcohol swab, clean the selected site prior to insertion.
• Allow the alcohol to dry, then follow the steps outlined on page 7 to insert the
glucose sensor.
Proper insertion is important for optimal glucose sensor performance
and to prevent bleeding at the site.
*For more detailed information on starting up CGM, please review the sensor section of the Insulin Pump User Guide.
6 | Starting-Up CGM
Insertion:
1 Place the glucose sensor
in the Sen-serter® Insertion
Device until it fits snugly.
2 Place your thumb on the back
of the white tape and push
the glucose sensor down
until it locks.
3 While holding down the white
tape, remove the clear tape.
4 Gently remove the needle guard.
6 Hold the skin taut. Place two
fingers on the Sen-serter base
to stabilize it for insertion. Press
the white button on top of the
Sen-serter Insertion Device.
7 Gently hold the glucose sensor
in place and gently slide the
Sen-serter Insertion Device away
from the glucose sensor in a
horizontal motion.
8 Gently hold the glucose sensor
in place and remove the white
paper from the adhesive pad.
Press adhesive against your skin.
9 Hold the glucose sensor base
with two fingers and gently
remove the introducer needle
at the same angle that it
was inserted.
5
Insert the glucose sensor at a
45-60° angle. Rest the Sen-serter
Insertion Device with legs flat
on the skin to achieve a 45°
insertion angle. Tilt it slightly up
to achieve a 60° insertion angle.
10 Wait 10–15 minutes before
connecting the fully charged
MiniLink® transmitter to the
glucose sensor. Be sure to
follow step 2 and 3 of this guide
before connecting the MiniLink
transmitter.
Starting-Up CGM | 7
MEDTRONIC • CGM Getting Started Guide - X23 • MECHANICAL • Renie Design 1 / 29 / 10
S T E P 2 : PR O G R A M M I N G S E T T I N G S
A good time to program your glucose sensor settings into your insulin pump is after glucose
sensor insertion, while the glucose sensor is still wetting with interstitial fluid.
Your healthcare provider will work with you and your trainer to determine your initial settings.
To turn the SENSOR feature on, go to:
HOME Screen > MAIN MENU > SENSOR > EDIT SETTINGS > Sensor: ON
After you have turned your SENSOR feature on, enter your MiniLink® transmitter ID:
HOME Screen > MAIN MENU > SENSOR > EDIT SETTINGS > Transmtr ID > SET TRANSMITTER ID
• Use the
and
buttons
to select each digit and press ACT
to enter. The seven-digit ID (or serial
number) is located on the flat side of
the MiniLink transmitter. Be sure to
only select the numbers.
Transmitter ID Number
MEDTRONIC MINIMED
MiniLink Transmitter
REF MMT-7703XX
SN GT2XXXXXXM
FCC D: OH27703
IC: 3458-7703
IPX8
1234
Follow these steps to personalize your sensor settings:
HOME Screen > MAIN MENU > SENSOR > EDIT SETTINGS
Two alerts are the HIGH SG and LOW SG alerts, which notify you when your glucose has moved
above or below your programmed glucose limits. For example, if your HIGH SG alert is set at
250 mg/dL and your LOW SG alert is set at 70 mg/dL, you will receive an alert every time your
glucose goes above 250 or below 70.
You can set up to 8 customizable HIGH SG and LOW SG alert limits for different periods
of the day. This is especially helpful, for example, if you would like to set your glucose alert
limit differently at night to prevent frequent alerts while you sleep.
8 | Starting-Up CGM
To turn your sensor setting on, go to:
HOME Screen > MAIN MENU > SENSOR > EDIT SETTINGS > SENSOR: ON
To turn your high and low glucose alert limits on, go to:
HOME Screen > MAIN MENU > SENSOR > EDIT SETTINGS > GLUCOSE ALERTS: ON
To set your high and low glucose alert limits, go to:
HOME Screen >MAIN MENU > SENSOR > EDIT SETTINGS > GLUCOSE LIMITS
Remember!
Your High and Low glucose alerts are not the same as your target glucose ranges.
High and Low alerts are useful features of the system that are meant to be adjusted
as your knowledge of the system improves.
Successful CGM usage involves optimizing your settings over time.
Predictive alerts provide you with a warning that your glucose is trending towards your
chosen high and low glucose limits 5-30 minutes before you would otherwise reach these
limits. With predictive alerts, you can be made aware of potential highs and lows even before
they occur. Based on your healthcare provider’s recommendations, you may set a predictive
low, a predictive high, both, or neither.
To set your predictive alerts, go to:
HOME Screen > MAIN MENU > SENSOR > EDIT SETTINGS > PREDICT ALERTS: ON
Rate of Change alerts notify you that your glucose levels are rising or falling at a certain rate.
They are useful for understanding how quickly your glucose levels are affected by meals and
insulin, and to recognize potentially dangerous sensor glucose changes before they become
a problem. The RISE RATE alert can be helpful if you are prone to forgetting to take insulin,
since glucose levels tend to spike significantly at these times. Likewise, the FALL RATE alert
can be helpful in protecting you when you give yourself too much insulin, or if you skip a
meal by accident.
Starting-Up CGM | 9
MEDTRONIC • CGM Getting Started Guide - X23 • MECHANICAL • Renie Design 1 / 29 / 10
To set your rate of change alerts, go to:
HOME Screen > MAIN MENU > SENSOR > EDIT SETTINGS > Rate Alerts
You will be asked first to set a fall rate of 1.1 to 5.0 mg/dL/min, or select to turn it OFF. After
your fall rate is selected, you will then be asked to set your rise rate. You may set a rise rate of
1.1 to 5.0 mg/dL/min, or turn it OFF. It’s often best to wait until you have adjusted to CGM to
set these alerts.
Going to a movie or making a presentation? You can set the volume to VIBRATE if you prefer to
not receive audible alerts for any reason. There is also an Alert Silence feature which allows
you to silence specific sensor alerts in the system. You will still be able to see these alerts on
the screen of your insulin pump.
To place your monitor on VIBRATE mode, go to:
HOME Screen > MAIN MENU > UTILITIES > ALERT > ALERT TYPE > Vibrate
To set your ALERT SILENCE feature, go to:
HOME Screen > MAIN MENU > SENSOR > Alert Silence
You can then select which alerts you would like to silence.
The Repeat setting is the time the system waits after an alert and before it alerts again if the
situation is not resolved. Setting the repeat properly will prevent excessive alerts for HIGH SG
and LOW SG situations which you have already taken action to correct.
To set your high repeat, go to:
HOME Screen > MAIN MENU > SENSOR > EDIT SETTINGS > Hi Repeat
To set your low repeat, go to:
HOME Screen > MAIN MENU > SENSOR > EDIT SETTINGS > Lo Repeat
Your personalized CareLink™ reports will help you and your healthcare provider to see where
to best set your alerts over time.
10 | Starting-Up CGM
Commonly
Used Settings
Setting
What It Does
High Repeat
The amount of time until you are reminded that your
sensor glucose is still above your high alert setting
2 hrs – 3 hrs
Low Repeat
The amount of time until you are reminded that your
sensor glucose is still below your low alert setting
20 min – 30 min
Cal Repeat
The amount of time after you miss a calibration
(Meter BG Now alert) before you are reminded
1 hr
Cal Reminder The amount of time until your next calibration
30 min – 1 hr
Weak Signal
30 min
The amount of time before you are alerted if there
is a weak signal
Remember, alerts are optional and are meant to be personalized and
adjusted over time. Start wide and customize your alerts as you use
CGM to learn more about your glucose trends and patterns.
You can adjust your alert settings so that they are different during
your bedtime hours to ensure that you get a good night’s sleep.
CareLink reports help you and your healthcare provider fine tune
your settings.
Starting-Up CGM | 11
MEDTRONIC • CGM Getting Started Guide - X23 • MECHANICAL • Renie Design 1 / 29 / 10
STEP 3: CONNECTING THE MINILINK® TRANSMITTER
After the glucose sensor is inserted and your settings are entered, wait 10–15 minutes before
connecting the MiniLink transmitter to the glucose sensor.
Once 10–15 minutes have passed, remove the MiniLink transmitter from the charger.
When you remove the MiniLink transmitter from the charger, a green light
will flash on the transmitter. This indicates it has enough battery power to
last at least 3 days and is ready to be connected to the glucose sensor.
Connect the MiniLink transmitter to the glucose sensor. When properly
connected, you will hear a click. Do not connect if there is blood on the
glucose sensor connection point.
A green light on the MiniLink transmitter will begin flashing when a good
connection exists and the glucose sensor is “wet” (note: it may take up to
20 seconds for the MiniLink transmitter to flash).
Optional: IV-3000® adhesive can be used to tape down and secure your sensor and MiniLink.
If the MiniLink transmitter does not flash when connected to the glucose sensor:
Disconnect the transmitter and place it back in the charger to ensure it is fully charged.
If you still do not see the transmitter flash, your sensor may simply need more time to
wet. With the transmitter connected to the sensor, wait 2 hours and then perform the
Sensor Start (see below).
Perform the Sensor Start: HOME Screen > MAIN MENU > SENSOR > LINK TO SENSOR >
New Sensor. The system is ready approximately 2 hours after the MiniLink transmitter is connected
to the glucose sensor and the green light flashes. This 2 hour period is called initialization.
12 | Starting-Up CGM
S T E P 4 : C A L I B R AT I N G
METER BG NOW alert will sound when the system is ready for you to enter a BG meter value
for initial calibration. Remember, the preferred method is to use the Bolus Wizard.® Clear the
alert and follow either of these steps to enter a BG meter value:
> ENTER BG > BG to update Sensor : YES or
MAIN MENU > SENSOR > CALIBRATE > Enter BG
After you calibrate, it will take 10–15 minutes for sensor glucose readings to appear on your
insulin pump screen.
After your initial calibration, another calibration will be required within 6 hours.
1 calibration every 12 hours is the minimum required to continue to receive glucose sensor
readings after the first day.
Calibrate 3–4 times a day thereafter for optimal glucose sensor accuracy.
Remember!
The best times to calibrate the glucose sensor are when your glucose levels are least
likely to be changing rapidly. Think Before: before meals, before bedtime, before insulin.
Also, you do not need to wait until you are alerted to calibrate. You can calibrate at
any time when your glucose is stable.
If you get a CAL ERROR on your insulin pump, don’t worry. This is a feature of your system
intended to ensure good performance.
• To avoid a CAL ERROR make sure you calibrate when your glucose is least likely to be
changing rapidly
• If you get a CAL ERROR recalibrate if the BG is stable, otherwise wait 15–30 minutes before
calibrating again
Starting-Up CGM | 13
MEDTRONIC • CGM Getting Started Guide - X23 • MECHANICAL • Renie Design 1 / 29 / 10
S T E P 5 : R E A DI N G T H E DI S P L AY
Your insulin pump screen displays 3-hour, 6-hour, 12-hour, and 24-hour glucose trend graphs.
Press ESC once from the HOME Screen to display the most recently viewed trend graph. Press
to display the other graphs.
Connection icon
Glucose sensor
graph
11:50
Each time you bolus a
marker will appear on
your graph
210
The darkened area is the 12 hours
from 6:00pm to 6:00am
Press
Time of most recent
sensor glucose reading
24-hour trend graph
Trend arrows
Sensor glucose reading
to view individual sensor glucose readings on the graph.
What the Sensor Icons Mean
or
Glucose has risen or fallen 1-2 mg/dL per minute.
or
Glucose has risen or fallen 2.0 or more mg/dL per minute.
Insulin pump indicates that the MiniLink® transmitter and insulin pump
are communicating properly.
Pump has not received a signal for more than 5–7 minutes. This is okay;
the MiniLink transmitter stores up to 40 minutes of data and will send
these readings to the insulin pump once a signal is reestablished.
14 | Starting-Up CGM
3
Applying CGM in Your Life
W H AT I S C A R E L I N K ™ S OF T WA R E ?
CareLink software is a Web-based software that allows you to upload information from your
MiniMed Paradigm® REAL-Time System to a secure online (internet) site for viewing.
CareLink software organizes all of your insulin pump and
glucose sensor information into reports (charts, tables and
graphs) that help you track glucose levels, insulin usage and
carbohydrate intake over time.
With CareLink software, you can grant your healthcare
provider online access – or just bring a copy of your CareLink
reports to your appointments – so you and your provider can
work together to determine the best therapy decisions and
system settings to improve your outcomes.
Don’t have a computer? Your healthcare provider may be
able to download the reports at your next visit.
CareLink reports help you and your healthcare provider make decisions
that improve your control and fit your lifestyle.
The combination of insulin pump therapy, continuous glucose
monitoring and CareLink software provides you with the tools and
information you need to optimize your therapy.
Applying CGM in Your Life | 15
MEDTRONIC • CGM Getting Started Guide - X23 • MECHANICAL • Renie Design 1 / 29 / 10
HOW DO CARELINK™ SOFTWARE REPORTS HELP ME?
CareLink software provides you with information you’ve never had before about your glucose
trends and patterns. Take action and make simple changes to optimize your glucose control.
CareLink software helps you answer questions like:
• Do I need to adjust my basal rate or use temporary basal rates to avoid going high or low
at the same time every day?
• Am I accurately counting my carbs at meals?
• Are my carb ratios correct?
• Do I need to use the Dual Wave® or Square Wave® bolus functions for tighter control?
• Where should I set my high, low, predictive, and rate of change alerts?
16 | Applying CGM in Your Life
CareLink™ Software Tips
For best results using CareLink software, Medtronic Diabetes recommends:
• Finding a consistent time once a week to review your CareLink reports.
• Reviewing two CareLink reports to start: the Sensor Daily Overlay Report and
the Daily Summary Report.
• Picking one or two simple adjustments to work on at a time when you review
the past week’s information in CareLink software.
Always remember to review and discuss your CareLink reports when you visit your
healthcare provider. Note: some providers may use a different but similar version
of CareLink software called CareLink Pro at their office.
HOW D O I SIGN UP F OR C A R EL INK S OF T WA R E?
To sign up for your free CareLink software account visit:
www.medtronicdiabetes.com/carelink
Set up a meeting with your Medtronic Diabetes trainer
or your healthcare provider to learn more about how to
use this valuable tool.
See the difference that the combination of insulin
pump therapy, CGM and CareLink software can make
in your life.
CGM and Medtronic – giving you
the confidence to live your life.
Applying CGM in Your Life | 17
MEDTRONIC • CGM Getting Started Guide - X23 • MECHANICAL • Renie Design 1 / 29 / 10
Appendix
• M i n i L i n k® Tra n s m i t te r T i p s
• C l e a n i n g Yo u r M i n i L i n k Tra n s m i t te r
• O t h e r U s e f u l I n fo r m a t i o n
Ta p e T i p s
X - ray s , M R I s a n d C T s c a n s
A i r Trave l
• Alerts
• No te s
18 | Appendix
MiniLink® Transmitter Tips
Fully charge the MiniLink transmitter before each use.
When the MiniLink transmitter is charging, a green light on the
charger will flash.
The green light on the charger will turn off when completely
charged.
When you remove the MiniLink transmitter from the charger,
a green light should flash on the MiniLink transmitter. This indicates it has enough battery
power to last at least 3 days and is ready to be connected to the sensor.
Charging time:
• For a completely depleted transmitter: up to 8 hours.
• Normal use: less than 20 minutes to fully recharge.
Always store the MiniLink transmitter in the charger when not
in use (so that it retains optimal battery life).
• To preserve transmitter battery life during periods of
infrequent usage, remove the
MiniLink transmitter from its charger for at least 1 minute every 1-2 months.
Battery status for charger and MiniLink transmitter:
• The light on the charger will flash red once every 2 seconds if the AAA battery in
the charger needs replacement.
• The light on the charger will quickly and repeatedly flash red over 2 second intervals
if the MiniLink transmitter battery is depleted. This should rarely happen if the
transmitter is recharged after each use.
Appendix | 19
MEDTRONIC • CGM Getting Started Guide - X23 • MECHANICAL • Renie Design 1 / 29 / 10
Cleaning Your MiniLink® Transmitter
Medtronic Diabetes does not recommend cleaning the MiniLink transmitter after each sensor use.
CAUTION: The MiniLink charger and test plug are not waterproof and should not be
immersed in water.
If you feel that the MiniLink transmitter needs cleaning, follow these steps:
• Attach the test plug to the MiniLink transmitter to help prevent water, soap and sanitizer
from damaging the connector pins inside the MiniLink transmitter. Do not expose the
connector pins to liquids.
• Wipe the MiniLink transmitter with a dampened cloth and mild liquid soap.
• Remove the soap using warm tap water. Be sure not to let water enter the
MiniLink transmitter connection point.
• Wipe the MiniLink transmitter surface with anti-bacterial hand sanitizer.
• Wipe the MiniLink transmitter with a dry cloth and air dry for three minutes.
20 | Appendix
Other Useful Information
Tape Tips
It is highly recommended that you put a transparent dressing to secure the system in place
and ensure that the sensor remains fully inserted underneath the skin. Seasonal climates, skin
lotions/creams, trapped moisture or different clothing may affect your sensor tape adhesion
or the way your body reacts to it. Here are some tips you may want to try:
• Cut a piece of IV-3000® in half and place it crossways so that it covers the glucose sensor
and the part of the MiniLink® transmitter closest to the sensor connection. This secures
the glucose sensor and MiniLink transmitter while allowing them to air dry.
• Try another type of tape from your local pharmacy or a simple Band-Aid® over the
MiniLink transmitter.
• While the sensor and transmitter are safe to be worn in a hot tub, be careful as the
adhesive may weaken.
X-rays, MRIs and CT scans
If you are going to have an X-ray, CT scan, MRI or other type of exposure to radiation, take off
your insulin pump, BG meter, MiniLink transmitter and glucose sensor and remove them from
the area.
Air Travel
The Federal Aviation Administration (FAA) requires that devices with radio
frequency capabilities should not be used on an aircraft.
For the flight simply:
1) Go to: HOME Screen > MAIN MENU > SENSOR > Turn Off Sensor
2) Keep the glucose sensor in, but disconnect the MiniLink transmitter from the glucose
sensor and store on the charger
Note: During this time you will have to manually check your BG
To reconnect after the flight:
1) Reconnect the MiniLink transmitter to the sensor
2) Go to: HOME Screen > MAIN MENU > SENSOR > EDIT SETTINGS > Sensor: ON
3) Go to: HOME Screen > MAIN MENU > SENSOR > LINK TO SENSOR > Reconnect Old
Sensor
Just like starting a New Sensor, there will be a two hour initialization period and a
calibration will be needed.
Appendix | 21
MEDTRONIC • CGM Getting Started Guide - X23 • MECHANICAL • Renie Design 1 / 29 / 10
Alerts
To clear an alert screen, press
ESC
, then
ACT .
Alert
What It Means
How to Respond
Weak Signal
(WeakSn)
The insulin pump and MiniLink®
transmitter are not communicating.
Re-position the insulin pump closer to the
MiniLink transmitter.
Lost Sensor
(SenLos)
Insulin pump has not received a
signal from the MiniLink transmitter
for more than 40 minutes.
Ensure the MiniLink transmitter and sensor
are connected. Place the insulin pump
closer to the transmitter. If this alert occurs
within 20 minutes of starting a new sensor,
go to New Sensor.
If alert occurs 20 minutes or more after
starting a new sensor, go to Reconnect Old
Sensor.
Cal Error
(CalErr)
BG entry is out of expected BG range.
Re-calibrate if BGs are stable. Wait 15 – 30
minutes if BG was entered at time of rapid
glucose change.
Meter BG By
(mBGby)
A BG will be needed for the system
Clear the alert. You will continue to
to continue providing sensor readings receive sensor readings until Meter BG
by the time shown on the alert
Now alert appears.
Meter BG Now A BG is needed for the system to
(mBGnow)
continue to provide sensor readings.
Make sure there are no arrows on the
pump screen, test your BG and calibrate
the system.
High SG
(Hi)
Glucose level is higher than or equal
to your high glucose alert setting.
Treat as required based on BG meter reading.
If this alert becomes frequent, adjust the
setting and/or Repeat setting for this alert.
Low SG
(Lo)
Glucose level is lower than or equal
to your low glucose alert setting.
Treat as required based on BG meter reading.
If this alert becomes frequent, adjust the
setting and/or Repeat setting for this alert.
22 | Appendix
Alert
What It Means
How to Respond
Sensor End
(SenEnd)
Sensor has been used for 72 hours.
Remove sensor and follow guide for
new sensor start.
Sensor Error
(SenErr)
Sensor signals are either too high
or too low.
Clear the alert and ignore if this
happens during initialization.
If alert happens more than 3 times
in 24 hours, replace the sensor
Change
Sensor
(ChgSen)
System has detected a sensor
that isn’t working correctly.
If alert occurs during initialization,
wait and perform a sensor start
using the same sensor. Otherwise,
call our 24-Hour HelpLine.
Rise Rate
(UpSlp)
The sensor glucose measurements are
rising at a rate that is equal to or faster
than the SET RISE RATE LIMIT you selected.
Consider taking corrective action
after confirming with a BG meter
reading.
Fall Rate
(DwnSlp)
The sensor glucose measurements are
falling at a rate that is equal to or faster
than the SET FALL RATE LIMIT you selected.
Consider taking corrective action
after confirming with a BG meter
reading.
High
Predicted
(PrdHi)
Sensor glucose is trending to reach
or go above your high glucose limit
in the length of time you selected
for the high predictive alert.
Consider taking corrective action
after confirming with a BG meter
reading.
Low
Predicted
(PrdLow)
Sensor glucose is trending to reach
or go below your low glucose limit
in the length of time you selected
for the low predictive alert.
Consider taking corrective action
after confirming with a BG meter
reading.
The versions in parentheses above show how the alert will appear in the Sensor Alert History.
Appendix | 23
MEDTRONIC • CGM Getting Started Guide - X23 • MECHANICAL • Renie Design 1 / 29 / 10
Notes
24 | Understanding CGM
www.medtronicdiabetes.com
Medtronic Diabetes
18000 Devonshire Street
Northridge, CA 91325
1.800.646.4633
Band-Aid® is a registered trademark of Johnson & Johnson Companies.
MiniLink, Sen-serter, Paradigm, and Bolus Wizard are registered trademarks of Medtronic MiniMed, Inc.
Revel and CareLink are trademarks of Medtronic MiniMed, Inc.
IV-3000 is a registered trademark of Smith & Nephew, Inc.
9403341-011 012810 ©Medtronic MiniMed, Inc. 2010. All rights reserved.
Still have questions?
Our 24-Hour HelpLine is here to help.
Call 1.800.646.4633, option 1.
MEDTRONIC • CGM Getting Started Guide - X23 • MECHANICAL • Renie Design 1 / 29 / 10