1
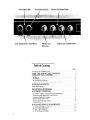
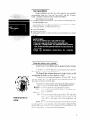
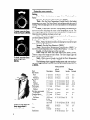
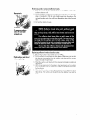
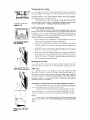
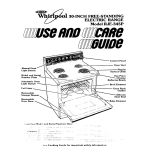
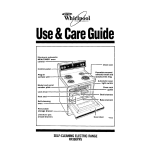
SO-INCH FREE-STANDING ELECTRIC RANGE
Model RJE-3020
Control
Panel
One-Piece
Chrome
Reflector Bowls
-
Sire Cooking
Guide
for important
safety
information
Oven Vent
Oven Signal Light
Oven Temperature
Control
Oven Selector
Knob
Knob
Surface Unit
Indicators
Surface Unit Signal Light
Surface Unit Control
Knobs
Table of Contents
Page
................
YOUR RESPONSIBILITIES
USING THE SURFACE UNIT CONTROLS
USING THE OVEN CONTROLS ...............
...............................
. Baking
l Broiling ..........
....................
l Variable Broil Feature ....................
l Resetting the Oven Temperature Control Knob
...............
OVEN RACK POSITIONS
....
THEOVENVENT
.........
..............
THE OPTIONAL ROTISSERIE .................
ACCESSORY CANNING KIT ................
CLEANING AND CARING FOR YOUR RANGE
Removing and Replacing Control Knobs .........
Cleaning Under the Cooktop .................
Removing the Oven Door ...............
Removing the Storage Drawer ...............
Cleaning Chart .........................
.....
IF YOU NEED SERVICE OR ASSISTANCE
1. Before Calling for Assistance ...............
2. If You Need Assistance ....................
..............
3. If You Need Service
- ~.
4. IfYouHaveaProbtem
,..
5
6
6
6
7
10
:i
11
11
Your responsibilities
Proper installation and safe use of the range are your personal
responsibilities. Read this “Use and Care Guide” and the “Cooking
Guide” carefully for important use and safety information.
floor that will hold the weight. and
l
l
l
l
l
is connected only to the right kind of outlet, with the right electric supply
and grounding (see “Installation Instructions”)
is used only for jobs expected of home ranges.
is out of the weather
is properly maintained.
is not used by children or others who may not understand how it should
be used.
Using
the surface
Surface
7i1tr1
PUSH IN and turn to
setting.
c?lthtcl
ikilL’
unit
controls
Unit Control
Knobs
to
LOCI
ttri,
.~ttlrly
must be pushed
in before turning.
rl’dllt
A design by ecjc-hknob tells which unit is turned on by that knob.
(For example. I . I shljws the right front unit )
The Signal Light will glow whenever a Surface Unit is on. Be
sure this light is off when you have finished cooking.
The knob ma5 be set anywhere between “HI” and “OFF“ As you
use your surface units. you will get used to the settings that match your
pots. pans and favontej foods the best
As a guide. the setting should cook at about the following heats.
HI -~-~To start most foods cooking. To bring water to a boil.
MED-HI - To hold a rapid boil, to fry pancakes or chicken.
MED --- To make gravy. puddings and icings: to cook large quantltlr 1I! vegetables
MED-LO
-- Xl ket>p food cooklng after starting it at a higher setting
LO ~ To keep food warm until ready to serve. You will notice
that !.ou can set the heat higher or lower within the LO
band &% l to help keep food at the temperature you
Want
USA’o111yflat-bottomed utensils for best results and to prevent damage to thcj rarlge Specialty Items with rounded or ndged bottoms
(woks. ndged bottorr! canner\ or ted kettles) are not recommended See
the “CookIng Gu~iip’ lor Important utensil Iriformatlon
NOTE:
Using
the oven controls
Baking:
First-Follow
the directions
on page
5 for “Positioning
Oven
Racks ”
To bake, turn the Oven
Selector Knob to BAKE.
Second-Turn
the Oven Selector Knob to “BAKE”.
Third-Turn
the Oven Temperature Control Knob to the baking
temperature you want. The Oven Signal Light will glow while the oven is
heating. When this light goes off, the oven has heated to the temperature
you set.
Fourth-Place
food in the oven. During baking, the elements will
turn on and off to help keep the oven at the temperature you set. The
Oven Signal Light will turn on and off with the elements. The top element
helps heat during baking, but does not turn red.
Fifth-When
the baking is done, turn both the Oven Temperature
and Oven Selector Knobs to “OFF.”
Broiling: (Note-The
door must be partly open while broiling.)
First-Follow
the directions below for placing the meat at the right
distance from the Broil Element.
Second-Turn
Third-Turn
To broil, turn the Oven
Selector Knob to
BROIL.
Food
Beef Steaks
Rare
Medium
Well done
Beef Steaks
Rare
Medium
Well done
Hamburgers
Lamb Chops
Medium
Ham slice, precooked
or tendered
Canadian Bacon
Pork Rib or Loin Chop
Well done
Chicken
ALWAYS broil with the
door open about 4
inches (10 cm).
Fish
Liver
Frankfurters
4
the Oven Selector to “BROIL.”
the Oven Temperature Control Knob to “BROIL” or
turn it to a lower temperature (see “Variable Broil Feature,” on page 5).
Fourth-Put
the broiler pan on the oven rack.
Fifth-Keep
the oven door open about four inches (10 cm).
There is a stop in the hinges to hold it there. The Oven Signal Light will
glow while the broil element is on.
Sixth-When
you are through, turn both the Oven Temperature
Control and the Oven Selector Knobs to “OFF.”
The following chart suggests broiling times and oven-rack positions for different kinds of meats when the Oven Selector Knob is set
to BROIL.
Description
Inches (cm) from
top of food ’
to broil
Element
Approximate
Minutes
1st side
2nd side
1” (2.5 cm)
1” (2.5 cm)
1” (2.5 cm)
3" (8 cm)
3" (8 cm)
3"(8 cm)
7-9
9-11
11-13
1%“(4cm)
1%” (4 cm)
1%” (4 cm)
%” (1 cm)
4".5"(10-13
4"-5"(10-13
4".5"(10-13
3"(8 cm)
1” (2.5 cm)
‘/2”-1”
(l-2.5 cm)
%” (1 cm)
3/4 1’.1”
(2-2.5 cm)
2-3 lb.
(l-1.5 kg)
cut in half
whole
fillets
yz ‘I_3/ ”
(1-2 cm)
3-5
4-7
5-7
6-8
6-8
8-10
14-16
4-5
3"(8 cm)
6-8
4-5
3"(8 cm)
3"(8 cm)
6-8
6
4-5
4
cm) 13-15
cm) 17-19
cm) 19-21
4"-5"(10-13
cm) 15
10
7" -9"(18-23
3"(8 cm)
3"(8 cm)
cm) 25-30
10-12
9-14
5-7
3"(8 cm)
4"-5"(10-13
11-16
7-8
3
cm)
6-7
3
4-5
Variable
Broil Feature:
You might want to broil some foods slower than others. Broiling
can be slowed down by setting a lower temperature on the Oven Temperature Control Knob instead of “BROIL.” Using a lower temperature will
cause the broil element to turn on and off during the broiling so that the
food broils more slowly.
When the Oven Temperature Control Knob is on “BROIL.” the
Broil Element heats all the time Set the temperature lower and it heats
some of the time The lower the temperature setting. the shorter are the
periods of heating.
/
Loosen the locking
I
screw; NOTICE position
of notches.
Lower: move black part
toward “LO.”
One notch equals about
10°F (5’C).
NOTE: The Oven Selector must be on BROIL
must be partly open for all broiling temperatures.
Resetting the Oven Temperature
Control:
and the door
Does your new oven seem hotter or colder than your old oven?
The temperatures in older ovens often shift very gradually, getting hotter
or colder without the user really noticing the change. Your new oven is
properly adjusted to provide accurate temperatures, but when compared
to your old range. the new design may give you different baking results. If
you think that the temperature setting on your range needs to be hotter or
colder. you can adjust the Oven Temperature Control Knob by yourself.
To adjust the setting. first pull the Oven Temperature Control Knob
straight off. On the back. lust across from the locking screw. are a row of
notches on the black part of the knob and one tooth on the chrome part.
To set your oven about lO’F(5’C) cooler. loosen the locking screw
about two full turns and move the row of notches one notch closer to
“LO” To set your oven about lO”F(5’C) warmer, move the row of
notches one notch closer to “HI.” Each notch equals about lO^F(5”C).
Tighten the locking screw and put the knob back on the control
panel.
Oven rack positions
Higher:
move black
part toward “HI.”
One notch equals about
10°F (5°C).
Your oven has two racks. Always put the racks where you want
them to be before you turn on the oven.
To remove a rack, take hold of it on the front edge and pull it out
until it stops. Then lift up the front edge and pl:ll again. It will slide past the
stops. out of the guides and out of the oven.
To put it back, fit the back corners into the guides at each side of
the oven and slide it in. keeping the front tilted up until the rack passes
the stops in the rack guides.
For:
Baking
Place Rack:
On the second rack guide from the bottom or
so food is in the center of the oven.
Broiling
Roasting LARGE
cuts of meat
Roasting
SMALLER
cuts of meat
So food is about the distance from the broil
element suggested in the broiling timetable
under “Using the Oven Controls.”
On the bottom rack guides.
So food is in the center of the oven.
To remove rack, pull
forward until rack
stops, lift front and pull.
5
When baking, always leave at least 1% to 2 inches (4-5 cm) of
air space between the sides of a pan and other pans and the oven wall
for air circulation.
For best results. get additional information on placing pans, cookie
sheets and other utensils from the “Cooking Guide.”
The oven vent
There is an oven vent under the right rear surface element. When
the oven is on. heated air will escape through it. A vent is needed for air
circulation in the oven during baking. You can cook on this surface unit
while the oven is on. A warm pan of food will stay warm on this unit while
the oven is on. It may be warm enough to melt butter, too.
Do not try to save heat or energy by blocking the vent. Poor
baking can result. Plastic utensils may melt if they are over the vent
while the oven is on.
The optional
rotisserie
If you would like a rotisserie with your oven, you can order a kit
(Part No. 261880) from your dealer. Easy installation instructions come
with the kit.
Accessory
canning
kit (Part No. 242905)
The large diameter of most water-bath or pressure canners combined with high heat settings for long periods of time can shorten the life
of regular surface units and cause damage to the cooktop.
If you plan to use the cooktop for canning. we recommend the
installation of a Canning Kit. Order the kit from your Whirlpool Dealer or
Tech-Care Service Company
SEE THE “COOKING
INFORMATION.
Cleaning
GUIDE”
and caring
FOR IMPORTANT
CANNING
for your range
Your range is designed to be easy to clean. You will usually wipe off
spills and spatters when they happen, but you will sometimes want to
clean under and behind the control knobs and surface units. This section
will tell you how to remove those, and what to use when cleaning.
Removing
Pull knob and trim ring
straight out. Remember
how the spring goes.
1.
2.
3.
4.
5.
and replacing
control
knobs:
Be sure the control knobs are set to “OFF“.
Pull the black knobs straight off.
If the control has a chrome trim ring. pull it straight off.
Wash the knobs (and trim rings) in warm, sudsy water.
Replace the trim rings first. If the control spring was removed,
it back exactly
as shown
on the left...small
put
end first.
6. Hold the black knob so it points to “OFF,” Push it straight back on.
Removing
1.
2
3.
4.
and Replacing
Oven Control
Knobs:
Be sure the knobs are set to “OFF.”
Pull each knob straight off.
Wash the knobs in warm. sudsy water
The knobs are not interchangeable. Make sure you put the adjustable Oven Temperature
Control Knob on the right place. and the
nonadjustable
Oven Selector Knob on the other.
Removing
ReceDtacle
surface
units and reflector
bowls:
1. First. be sure the Surface Unit Controls are all “OFF” and that the
surface units are cool.
2. Lift each surface unit about an inch (2.5 cm) at the edge away from the
plug-in (receptacle). Pull the unit straight away from the plug-in. Do
not wash surface units: they will burn themselves clean during normal
USC?
3. Lift out the reflector bowls.
To remove surface
unit. lift and pull
stralght out.
Replacing reflector bowls and surface units:
1 Be sure the surface unit controls are on “OFF,”
Hold surface unit level
when replacing.
Put the reflector bowls back into their places. Make sure you can see
the plug-ins (receptacles) for the surface units through the square
hole in the side of each bowl.
Hold the surface unit level with the prongs (terminals) pointing at
the plug-in.
With the prongs started in the plug-in. start pushing in on the surface
unit. At the same time, lift a little on the side of the surface unit that’s
by the plug-in.
Make sure the surface-unit prongs are pushed into the plug-in as far as
they will go. The surface unit should fit into the reflector bowl and be
level
7
Cleaning
Prop up the top with
support rod.
Easier
Use aluminum
easy cleaning.
foil for
under the cooktop:
To clean the area under the cooktop, lift the front of the cooktop at
the center. Rarse the swing-up rod to hold it. (Be sure the tip of the rod is
in the notch in the cooktop.) Use warm soapy water and a sponge or cloth.
Scouring powders or any other abrasive cleaner may harm porcelainenamel finishes and can scratch chrome.
Be careful not to raise the cooktop so high that it touches the
control console. And don’t drop it. Dropping the cooktop can chip or crack
a hard porcelain finish, or damage side panels and surface units.
cleaning
Removing
Pull straight with ike
angle of part-open door.
with aluminum
foil:
Oven cleaning can be a chore when spillovers bake onto the
bottom of the oven. Use aluminum foil so you can just throw it away with
the spillovers. You can use the heavy-duty 18-inch (45 cm) aluminum foil
found in most grocery stores Or you can order an aluminum foil kit (Part
Number 241430) from your Whirlpool Dealer.
When cutting the foil. make sure it is long enough to cover the
bottom with enough left over to start up both sides.
Make sure the bake element is cool. Lift it far enough to raise its feet
from the bottom of the oven. (You may have to remove the
oven rack )
Slide the foil sheet under the bake element. Make sure it is centered
and long enough to start up the sides.
When you put the bake element back down, make sure all the feet
rest solidly on the foil and that the foil is smoothed out across the
bottom of the oven. If the feet on the element are not solidly on the
foil. the oven may not bake properly.
the oven door:
Removing the oven door may make it easier to clean the oven. To
remove the door, first open it to the first stop (about 4 inches or 10 cm).
Take hold of both sides of the door near the top; then lift it at the same
angle it is in.
Wrth the door off. you will notice how the ends of the hinges slide
into slots at the bottom corners of the door. To put the door back on, fit
both bottom corners of the door over the ends of the hinges. Push the
door down evenly, so neither corner gets ahead of the other. When it
reaches the bottom. you can close the door. A safety latch will hold the
door open until it is on correctly.
Removing
the storage
drawer
(use care when handling
the drawer):
The drawer below your oven is meant to store pots and pans.
Never
Push down evenly.
::
&
Pull to stop. Lift; pull
again.
x
keep anything
in there that will burn or melt.
You may want to remove the drawer for cleaning under the range.
Pull it straight out until it stops. Use care when handling the drawer. Lift
the front and pull some more to get it over the stop. Now slide it out until
it stops again. Lift the drawer away from the range until it slips out of the
guides.
To put it back. frt the side rails at the back of the drawer into both
guides on the range. Push it closed while lifting the front to get past the
stops.
PART
WHAT TO USE
Outside of
appliance
Soft cloth, warm soapy
water
HOW TO CLEAN
Wipe off regularly when range is cool.
l
Do not allow food containing acids (such as
vinegar, tomato, lemon juice or milk) to remain
on surface. Acids will remove the glossy finish.
l
Nylon or plastic scouring
pad for stubborn spots
Do not use abrasive or harsh cleansers.
l
Surface units
No cleaning required
Control knobs
and chrome rims
Warm, sudsy water and
bristle brush
Chrome reflector
bowls
Automatic dishwasher or
warm, soapy water or plastic
scrubbing pad
Aluminum
broiler pan and
grid
Warm, soapy water or soapy
steel wool pads
Control panel
Warm, soapy water
Oven racks
Warm, soapy water or soapy
steel wool pads
Standard oven
Warm, soapy water or soapy
steel wool pads
Commercial oven cleaners
l
Spatters or spills will burn off.
Wipe off excessive spills with damp cloth when
surface unit is cold.
l
Do not immerse in water.
l
Wash, rinse and dry well.
l
Do not soak.
l
0 Clean frequently.
l
Wash with other cooking utensils.
l
Do not use harsh abrasives.
l
Wash with other cooking utensils.
l
Wash, rinse and dry with soft cloth.
l
l
Wash, rinse and dry. Use soapy steel wool pads
for stubborn areas.
Remove door for easier access.
0 Place newspaper on floor to protect floor surface.
l
Follow directions provided with the oven cleaner.
l
Rinse well with clear water.
l
l
Use in well ventilated room.
Do not allow commercial oven cleaner to contact
the heating elements, oven seal, or exterior
surfaces of the range.
9
IF YOU NEED SERVICE OR ASSISTANCE,
FOLLOW THESE FOUR STEPS:
1. Before calling
WE SUGGEST
for assistance..
Performance
problems often result from little things
and fix yourself without tools of any kind.
If nothing operates:
l
l
YOU
you can find
Is the range plugged into an operating outlet or wired into a live
circuit with the proper voltage? (See Installation
Instructions.)
tiave you checkc>dthe main fuse or circuit-breaker box?
If the oven will not operate:
l
l
Is the Oven Selector Knob turned to a setting (BAKE or BROIL)?
Is the Oven Tenlperature Control Knob turned to a temperature
setting)
If surface
l
l
l
units will not operate:
HaLIe you checked the main fuse or circuit-breaker box?
Are >urface units plugged in all the way?
Do t ht’ control knobs turn?
If surface-unit
Control
Knob or Knobs will not turn:
Is the spring put 1~ correctly. as shown on page 6 in the “Cleaning
and C‘arlrlg for yciiur Range” Section’?
0 Did WLI push 1:)!>*fore trying to turn?
l
If cooking
results
aren’t what you expect:
Is the range level
l
Are ~:ou using pa’ls recommended in the Cooking Guide?
l
If baking. have y[ :u allowed 112 to 2 inches (4-5 cm) on all sides of
the pana tor air c!~culation’?
0 Does the oven trrnperature seem too low or too high? See page 5.
“Resetting Your ( )ven Temperature Control Knob.”
* Halt: you preheared the oven as the recipe calls for?
l
Are the pans the ‘,ize called for in the recipe?
l
Are I.WUl~)llowln~ a tested recipe from a reliable source?
l
Do the c-ookiny utensils have smooth. flat bottoms7
l
Do the cooking utensils fit the surface unit being used?
See rhe Cooking Guide for more informatlon on cooking problems and how to solvt-’ them
l
2. If you need assistance*.
Call the Whirlpool
COOL-LINE”
service assistance telephone number. Dial free from:
. ... .
. (800) 253-1301
Continental
U.S.
.
...
. (800) 632-2243
Michigan
. . .
.
(800) 253-1121
Alaska & Hawaii
and talk with one of our trained
Consultants.
The Consultant
can
instruct you in how to obtain satisfactory
operation from your appliance
or. if service is necessary, recommend
a qualified service company
in
your area.
3. If you need service*
em/-
- Whid
d
FRANCHISED
01 SERVICE
i
Whirlpool has a nationwide network of franchised TECH-CARE”
service companies.
TECH-CARE
service technicians
are trained to
fulfill the product warranty
and provide after-warranty
service, anywhere in the United States. To locate TECH-CARE
service in your area,
call our COOL-LINE
service assistance telephone number (see Step 2)
or look in your telephone directory Yellow Pages under:
ELECTRICAL
APPLIANCESMAJOR-REPAIRING
h PARTS
APPLIANCES-HOUSEHOLDS
MAJOR-SERVICE
h REPAIR
OR HHIHLPOOLAPPLIANCES
WHlRLPOOLA~PLlANCES
FRANCH,SEC ‘FCr FARE CiSil
\tiii
XkLSERVlCf
i
123 MaONe
[l4NCHlSEC
‘1
I/c F c IJU,‘l
q+
Id‘
WASHING MACHINES,
A IRONERS-SERVICING
OR WHIRLPOOLAPPLIANCES
TECH-C4RE SERVICF
.\b..x\‘I(
r ‘. FUVICE ?r
j 4 Maple
DRYERS
f, ( o.uP4.vib.~
y99 9999
FRANCHISED TECH CARE SERVICI
YERI’,(‘b
XYZ SERVICE CO
123 Maple
I‘o.Mf.4,vl~.s
999~9999
4. If you have a problem*
Call our COC )I~-LINF. service assistance telephone
number (see
Step 2) and ralk with one of our Consultants,
or if you prefer. write to:
Mr. Guy ‘TurncJr. Vice President
Whirlpool
Corporation
Administratil
v Center
2000 (IS-33 ICorth
RcJnton Ha& 11,Ml 49022
‘If you must c,all !)r ti.xite. please provide: model numbers, serial number. date of purchasr,
and a complete description
of the problem. This
information
is needed III order to better respond to your request for
assistanc7.
11
FSP IS a reglstered trademark
of Whrrlpool Corporation
for
quality parts took for this
symbol of quality whenever
FSP
YOU need a replacement
part
@I for your Whirlpool appliance
FSP replacement
ports
will fit right and work right. because they are
made to the same exacting specifications
use0 to build every new WhIrlpool appliance
0
Benlon Harbor. Michigan. Automatic Washers, Clothes Dryers.
Freezers, Relrigerator-Freezers.
Ice Makers, Dishwashers.
Built-in Ovens and Surlace Unils, Ranges, Microwave Ovens,
Compactors, Room Air Condiiionets. Dehumidtliers.
Central
Healing and Air Conditioning Systems.
Part No 310593 Rev B
Printed
in U.S.A