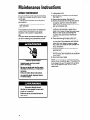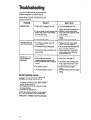
1
HOW TO MAKE A HOME 3.”
InstallationInstructions
and
Use81CareGuide
THROUGH-THE-WALL
AIR CONDITIONER
MODELS:
PART NO. 23-1 l-1 186N-OOiY789600
Rev. A
ACU072XE,
ACUl14XE
ACUl02XE,
Contents
Page
Important Safety Instructions
........................ 2
Electrical Requirements
.................................
3
Installation
Instructions
..................................
7
Operating Instructions
..................................
IO
Starting your air conditioner ........................ IO
The exhaust vent control ............................. 11
Changing air direction .................................
11
Cleaning Instructions
...................................
12
Cleaning the front panel ...............................
12
Cleaning the slide-out air filter ...................... 13
Maintenance
Instructions
.............................
14
Annual maintenance .....................................
14
Energy saving tips ........................................
15
Troubleshooting
.............................................
16
Requesting Assistance or Service ............... 17
Warranty .........................................................
20
0 1995 Whirlpool
Corporalion
Thank you for buying this appliance. Please
complete the form below. Have this information
ready if you need service or call with a question.
l Copy model and serial numbers
from label (see
diagram below) and purchase date from
sales slip.
l Keep this book and sales slip together
in a
handy place.
Model Number
Serial Number
Purchase
Date
Service Company
Phone Number
Mlodtet and
seria I m lmber
label
mportantSafety
nstructions
To reduce the risk of fire, electrical
shock, or personal injury when using
your air conditioner,
follow these basic
precautions:
l Read all instructions
before using your
air conditioner.
l Complete
the installation
requirements
as described in “Installation
Instructions” on pages 7-9.
l Never allow
children to operate or play
with the air conditioner.
l Do not operate
the air conditioner
with
the front panel removed.
l Never clean
air conditioner
parts with
flammable fluids. The fumes can create
a fire hazard or explosion.
l FOR YOUR SAFETY
l
DO NOT STORE OR USE GASOLINE OR
OTHER FLAMMABLE VAPORS AND
LIQUIDS IN THE VICINITY OF THIS OR
ANY OTHER APPLIANCE. THE FUMES
CAN CREATE A FIRE HAZARD OR
EXPLOSION.
It is your responsibility to be sure your air
conditioner:
l Is installed
in a wall that will hold the
weight, and is secured according to the
installation instructions.
l Is connected
only to the proper kind of
outlet, with the correct electrical supply and
grounding. (See “Electrical Requirements”
on pages 3-6.)
l Is the correct size for the area you want
to cool.
l Is used only for the job it was designed
to do.
l Is not used by children or anyone
unable to
operate it properly.
l Is properly
maintained.
Also, remove Energy Label and Buy Guide.
Use a damp cloth to take off any glue
residue. Do not use sharp instruments,
flammable fluids, or abrasive cleaners.
These can damage the material.
- SAVE THESE INSTRUCTIONS
-
ElectricalRequirements
Below are electrical plug variations, choose the
one which matches the ampere rating of your
unit. Your model’s ampere rating is printed on the
model and serial number label, attached to the
unit, behind the front panel. (See diagram on
we 2.)
OBSERVE ALL LOCAL CODES AND
ORDINANCES.
DO NOT, UNDER ANY CIRCUMSTANCES,
REMOVE THE POWER SUPPLY CORD
GROUNDING PRONG.
Fire Hazard
Do not use an extension cord.
Doing so can result in death, fire, or
electrical shock.
NOTE: If codes permit and a separate grounding
wire is used, it is recommended that a qualified
electrician determine that the grounding path is
adequate and not interrupted by plastic, nonmetallic gaskets or other insulating materials.
I
1
I
PLUG TYPE
I
ELECTRICAL
Electrical Shock Hazard
Plug into a grounded three prong outlet.
Do not remove ground prong.
Do not use an adapter.
Do not fuse neutral or grounding circuit.
Do not use air conditioner
with front
panel removed.
Failure to follow these instructions
can
result in death, electrical shock, or
serious injury.
REQUIREMENTS
SEE PAGE
3.prong
groufling
plug
115 volt models with amperes up
through 7.5
4
For 115 volt models with amperes
from 7.6 to 12.0
5
230/208 volt models with amperes
up through 12.0
6
Power supply cord
- 3.prong
grounding
type wall
receplacle
Power s”&~ly
I
I
‘K blade
tandem
blades
cord
Receptacle
-
\-
Grounding
Prong
Electrical Requirements
Continued
115 volt modelswith amperes
up through7.5
Fire Hazard
Do not use an extension cord.
Doing so can result in death, fire, or
electrical shock.
Receptacle wiring
Receptacle wiring should be a minimum of
14 gauge. Use copper wire only. It is the
responsibility of the consumer to provide
proper and adequate receptacle wiring,
installed by a qualified electrician. Observe
National Electrical Code and all local governing
codes and ordinances.
Electrical requirements
A 115 volt (103.5 min., 126.5 max.), 60 Hz,
AC only, 15 ampere fused electrical supply is
required (time delay fuse or time delay circuit
breaker required). It is required that a separate
circuit, serving only this air conditioner, be
provided.
Electrical Shock Hazard
Plug into a grounded three prong outlet.
Do not remove ground prong.
Do not use an adapter.
Do not fuse neutral or grounding circuit.
Do not use air conditioner
with front
panel removed.
Failure to follow these instructions
can
result in death, electrical shock, or
serious injury.
Electrical connection
Electrical ground is required on this air conditioner.
Sprang
groundlng
Plug
4
Recommended
grounding method
For your personal safety, this air conditioner must
be grounded. This air conditioner is equipped
with a power supply cord having a 3-prong
grounding plug. To minimize possible shock
hazard, the cord must be plugged into a mating
3prong grounding-type wall receptacle,
grounded in accordance with the National
Electrical Code (ANSVNFPA 70 - latest edition)
and local codes and ordinances. If a mating wall
receptacle is not available, it is the responsibility
of the customer to have a properly grounded
3-prong wall receptacle installed by a qualified
electrician.
115 volt models with amperes
from 7.6 through 12.0
Receptacle wiring
Receptacle wiring should be a minimum of
14 gauge. Use copper wire only. It is the
responsibility of the consumer to provide
proper and adequate receptacle wiring,
installed by a qualified electrician. Observe
National Electrical Code and all local governing
codes and ordinances.
Fire Hazard
Do not use an extension cord.
Doing so can result in death, fire, or
electrical shock.
Electrical requirements
A 115volt (103.5 min., 126.5 max.), 60 Hz,
AC only, 15 ampere fused electrical supply is
required (time delay fuse or time delay circuit
breaker required). It is required that a separate
circuit, serving only this air conditioner, be
provided.
Electrical Shock Hazard
Plug into a grounded three prong outlet.
Do not remove ground prong.
Do not use an adapter.
Do not fuse neutral or grounding circuit.
Do not use air conditioner
with front
panel removed.
Failure to follow these instructions
can
result in death, electrical shock, or
serious injury.
Electrical connection
Electrical ground is required on this air conditioner.
3-prong
E;;;nding
3-prong
grounding
type wall
receptacle
(single
outlet)
Recommended
grounding method
For your personal safety, this air conditioner must
be grounded. This air conditioner is equipped
with a power supply cord having a 3-prong
grounding plug. To minimize possible shock
hazard, the cord must be plugged into a mating
3-prong grounding-type wall receptacle,
grounded in accordance with the National
Electrical Code (ANSVNFPA 70 - latest edition)
and local codes and ordinances. If a mating wall
receptacle is not available, it is the responsibility
of the customer to have a properly grounded
3-prong wall receptacle installed by a qualified
electrician.
5
Electrical Requirements
Continued
230/208volt modelswith
amperesup through 12.0
1 ~;I;:::;;~~~~rd..
Domg so can result In death, fire, or
,
Receptacle wiring
Receptacle wiring should be a minimum of
14 gauge. Use copper wire only. It is the
responsibility of the consumer to provide
proper and adequate receptacle wiring,
installed by a qualified electrician. Observe
National Electrical Code and all local governing
codes and ordinances.
Electrical requirements
A 230/208 volt (197.6 min., 253 max.), 60 Hz,
AC only, 15 ampere fused electrical supply is
required (time delay fuse or time delay circuit
breaker required). It is required that a separate
circuit, serving only this air conditioner, be
provided.
Electrical Shock Hazard
Plug into a grounded three prong outlet.
Do not remove ground prong.
Do not use an adapter.
Do not fuse neutral or grounding circuit.
Do not use air conditioner
with front
panel removed.
Failure to follow these instructions
can
result in death, electrical shock, or
serious injury.
3-prong
grounding
type wall
receptacle
6
Electrical connection
Electrical ground is required on this air conditioner.
Recommended
grounding method
For your personal safety, this air conditioner must
be grounded. This air conditioner is equipped
with a power supply cord having a 3-prong
grounding plug. To minimize possible shock
hazard, the cord must be plugged into a mating
3-prong grounding-type wall receptacle,
grounded in accordance with the National
Electrical Code (ANSVNFPA -/O-latest edition)
and local codes and ordinances. If a mating wall
receptacle is not available, it is the responsibility
of the customer to have a properly grounded
3-prong wall receptacle installed by a qualified
electrician.
Installation Instructions
Excessive Weight Hazard
Use two or more people to move and
install air conditioner.
Failure to do so can result in back or
other injury.
This air conditioner has been designed for
installation through the wall, in a sleeve. It is the
responsibility and obligation of the customer to
have this product installed by a qualified technician familiar with through-the-wall installation.
OR
If you choose to install the air conditioner
yourself, read all installation instructions, as well
as the electrical requirements and operating
instructions, before installing your unit. This will
help to avoid any installation problems and will
help ensure trouble-free performance of your new
air conditioner.
Before installing your
air conditioner
Installation tips
Inspect the condition of the wall where the air
conditioner will be installed. Be sure it will
support the weight of the unit.
l Watch out for the sharp metal fins on the front
and rear coils.
l Be sure your air conditioner
does not fall during
installation.
l Do not install the air conditioner
where the
plastic cabinet front will be exposed to a heat
source that raises the surface temperature
above 120°F.
l
Tools required
l Phillips screwdriver
Installing your air conditioner
Installing in an old sleeve
1. Remove the rear grille from the sleeve and
replace it with the new grille.
2. The part number label on the grille should face
the inside of the room.
NOTE: If your sleeve is of another make, you
can purchase a sleeve and adapter kit designed
to adapt your sleeve to this air conditioner. An
accessory kit is also available for window installation. Both kits are available from your local dealer.
continued
on next page
Installation
Continued
Instructions
Installing in a new sleeve
1. Remove the front and back covers. Save
these for future use to seal the sleeve if the
air conditioner is removed.
2. Remove the rear grille from the sleeve.
3. Brush out all debris from inside the sleeve
making sure the inside is clean and that the
drain holes are completely clear.
4. Loosen screws in the rear grille to about W
Then, while holding on to the wire loop, tip the
grille and pass it through the rear opening of
the sleeve. The baffle contact area should be
on the left.
5. Align the grille to engage the screw heads
through the keyhole slots in the outer flanges
of the sleeve. Push downward until the screws
are positioned into the bottom of the keyhole
slots. Tighten all 4 screws, and unwind and
discard the wire loop.
6. Unpack the air conditioner according to
the carton instructions.
P
P
al
7. Remove the 2 screws from the outer edges
of the top of the cabinet. Use these and the
additional 3 screws supplied to attach the top
trim frame.
6. Use 6 of the screws supplied to attach the left
and right vertical trim frames to the existing
holes in the cabinet.
9. Slide the air conditioner fully into the sleeve.
Center the air conditioner in the sleeve so
that all seals bear evenly to prevent leakage.
10. Use the 2 screws supplied to attach the
bottom trim frame to the existing holes in the
vertical trim frame.
IL
Fire Hazard
Do not use an extension cord.
Doing so can result in death, fire, or
electrical shock.
Electrical Shock Hazard
Plug into a grounded three prong outlet.
Do not remove ground prong.
Do not use an adapter.
Do not fuse neutral or grounding circuit.
Do not use air conditioner
with front
panel removed.
Failure to follow these instructions
can
result in death, electrical shock, or
serious injury.
11. Before inserting the plug into the power
supply, make sure the Fan Control is OFF.
OperatingInstructions
Startingyour air conditioner
Flre Hazard
Do not use an extenslon cord.
Dolng so can result In death, fire, or
electrical shock.
Electrical Shock Hazard
Plug Into a grounded three prong outlet.
Do not remove ground prong.
Do not use an adapter.
Do not fuse neutral or grounding clrcult.
Do not use alr condltloner
wlth front
panel removed.
Failure to follow these lnstructlons
can
result In death, electrlcal shock, or
serious Injury.
1. Set Exhaust Control to CLOSED for maximum cooling results.
2. Set Fan Control to the desired setting.
LOW COOL .. .. .. ... ... ... .. .. ... .. .. for sleeping comfort
HIGH COOL ... .. ... .. ... ... .. ... .. . for maximum cooling
LOW and HIGH FAN ... .. ... for circulating room air
when no cooling is desired
3. Turn the Thermostat Control to the desired
setting. You can adjust the air conditioner’s
cooling performance by turning the Thermostat Control clockwise for more cooling or
counterclockwise for less cooling. You will
need to experiment to find the setting which
suits you best.
NOTE: If you turn your air conditioner off or if the
compressor turns off when lowering the Thermostat Control, wait at least 3 minutes before turning
it back on or you may blow a fuse or trip a circuit
breaker.
10
The exhaustvent control
The Exhaust Vent draws stale or smoky air from
the room, or circulates existing room air.
To exhaust room air
1. Set the Exhaust Vent Control to OPEN.
2. Set the Fan Control to the desired setting.
If no cooling is desired, set the Fan Control
to LOW or HIGH FAN.
3. Set the Thermostat Control to the desired
setting.
To circulate room air
1. Set the Exhaust Vent Control to CLOSED.
2. Set the Fan Control to the desired setting.
If no cooling is desired, set the Fan Control
to LOW or HIGH FAN.
3. Set the Thermostat Control to the desired
setting.
NOTE: For maximum performance, the Exhaust
Vent Control must be in the CLOSED position
when cooling or room air circulation is desired.
Changingair direction
The air direction louvers, in the top grille area of
the front panel, control the direction of the cooled
air. Move the tabs in the center area of the
louvers to adjust airflow left, right, or straight
ahead. Move the thumb wheel between the
louvers to direct airflow up or down.
11
CleaningInstructions
Proper use and care of your air conditioner will
help ensure longer life of the unit and lower
operating costs. Follow these instructions
carefully. Call your local servicing dealer for an
annual checkup.
Cleaningthe front panel
Explosion
Hazard
Unplug power cord from outlet before
cleaning air conditioner.
Use only nonflammable
cleaners.
Failure to follow these instructions
result in death, explosion,
fire, or
electrical shock.
can
1. Unplug power cord.
2. Remove the front panel from unit for cleaning.
3. Place the tip of a thin blade screwdriver
against the cabinet behind the plastic projection on the upper right side of the front panel.
Gently push with the screwdriver to unlock the
plastic projection and pull the front panel
forward. Repeat steps for plastic projection on
the bottom right side. Watch out for the sharp
metal fins on the front and rear
condenser coils.
4. Swing the right side of the front panel away
from the cabinet and unhook the plastic
projection on the left side.
5. Clean the front panel using a soft cloth with
warm water and a mild detergent. Rinse
and dry.
6. Replace the front panel. Hook the plastic
projections on the left side and swing the right
side into position. Gently press the right
corners back into position while pushing on
the side of the cabinet with the screwdriver.
7. Reconnect power supply.
Cleaningthe slide-out air
filter
The filter is cleanable. A clean filter helps remove
dust, lint, and other particles from the air. Check
the filter every 2 weeks to see if it needs
cleaning.
1. To remove the filter, gently pull the filter frame
handle forward and slide the filter to the left.
2. Clean the filter using a vacuum cleaner.
OR
If the filter is very dirty, wash it with warm
water and a mild detergent. Air dry the filter
thoroughly before replacing it. Do not use a
hot air dryer to dry the filter.
3. To replace the filter, slide it to the right, then
push the handle in.
13
MaintenanceInstructions
Annual maintenance
Your air conditioner needs annual maintenance
to help ensure steady, top performance throughout the year.
Call the service company recommended by
your dealer to:
l Inspect and clean the coils and condensate
water passages.
l Check fan.
The compressor and fan motor are sealed and
need no oiling. The expense of an annual
inspection is the customer’s responsibility.
OR
If you are familiar with electrical appliances, you
can do the cleaning and maintenance yourself.
If you choose to do so, follow these steps:
Electrical
Shock Hazard
Unplug power cord from outlet
before servicing.
Be sure no liquid gets into the motor,
electrical control box, or compressor
terminals.
Failure to follow these instructions
can result in death, electrical shock,
or serious injury.
Excessive
Weight Hazard
Use two or more people
install air conditioner.
to move and
Failure to do so can result in back or
other injury.
14
1. Unplug power cord.
2. Remove the air conditioner from the sleeve.
See pages 7-9.
3. Remove the front panel. See page 12.
4. Remove the screws from the top and sides of
the cabinet, and then remove the cabinet.
Watch out for the sharp metal fins on the front
and rear condenser coils.
5. Wrap the motor, electrical control box, and
compressor terminal box in plastic film to
make sure no water or other liquid gets inside.
Water or other liquids could damage the
insulation and cause serious mechanical
problems.
6. Clean and hose out the base, coils, and
condensate pan. Clean at least once a year,
or more often if the condenser coils and pan
collect dirt, sand, leaves, insects, or algae.
Also, clean if you detect an odor coming from
the air conditioner.
7. Remove the plastic film from the motor and
electrical parts.
8. Reattach the cabinet with the screws. Replace
the front panel, and reinstall the air conditioner
in the sleeve.
9. Reconnect power supply.
NOTE: It is a good idea to wait 24 hours before
starting the air conditioner again. This allows time
for all areas to dry out. The water from rainfall or
from normal operation does not harm these
components.
Energysaving tips
l
l
l
l
l
l
l
Improve home insulation. Seal doors, windows,
and close fireplace flue.
Close blinds or drapes on sunny side of house.
Add window awnings.
Keep air filter clean. Do not block airflow with
drapes or furniture.
Ventilate attic (high temperature levels add to
normal cooling load).
Try not to use heat producing appliances during
the hottest part of the day. Turn lights, radios,
televisions, and other appliances off when not
needed.
Keep heat registers and cool air returns closed
or blocked off so cooled air won’t escape.
Use a vent fan in cooking, laundry, or bathing
areas to pull out heat and moisture near its
source.
15
Troubleshooting
Listed in the chart below are the most common
problems consumers run into with their air
conditioners. Please read through this chart
before calling for service. It could save you the
cost of a service call.
PROBLEM
Unit won’t run.
l
l
l
Local power has failed.
l
l
l
Unit turns on and
off, OR does not
cool room.
l
l
l
Normal
operating
Power cord is plugged into a live
circuit with proper voltage.
Fuse has blown or circuit breaker has
tripped. Also, check if a time-delay
fuse has been used.
Fan Control is set to OFF.
l
Unit blows fuses or
trips circuit breaker.
Time-delay fuse being used is of
correct capacity.
An extension cord is being used.
Cooling circuit was turned off and on
again quickly.
Filter is dirty.
Inside evaporator coils and
outside condenser coils are dirty.
There is excessive heat or moisture
in room.
l
l
l
l
l
l
l
l
l
l
l
Fan speed is too low.
l
l
Thermostat
l
sounds
setting is too low.
...
When your room air conditioner is operating
normally, you will hear sounds such as:
l Droplets of water hitting the condenser,
causing
a “pinging” or “clicking” sound. Water droplets
help to cool the condenser.
l Air movement
from the fan, especially on high
fan speed settings.
l Clicks from the cooling cycle.
Sounds also may be caused by house construction - such as vibration of the unit due to wall
construction or unsteady window mounting area.
16
WHAT TO DO
CHECK IF
Firmly plug power cord into
electrical outlet. Check circuit
voltage at fuse/circuit breaker box.
Replace fuse with a time-delay
fuse of the correct capacity. Reset
circuit breaker.
Set Fan Control to another
setting.
Wait for power to be restored.
Replace fuse with a time-delay
fuse of the correct capacity.
Do not use an extension cord with
this or any other appliance.
Wait at least three minutes after
turning cooling circuit off before
trying to restart unit.
Clean filter. (See page 13.)
Clean coils. (See page 14.)
Use exhaust fans to reduce room
heat, or set Exhaust Vent Control
to CLOSED to reduce moisture.
Set Fan Control to a higher
setting.
Set Thermostat Control to a colder
setting
Requesting
Assistance
or Service
Before calling for assistance or service, please
check “Troubleshooting” on page 16. It may save
you the cost of a service call. If you still need
help, follow the instructions below.
1. If you need assistance*
...
Call our Consumer Assistance
Center
telephone number. Dial toll-free from anywhere in the U.S.A.:
1-800-253-l 301
and talk with one of our trained consultants. The
consultant can instruct you in how to obtain
satisfactory operation from your appliance or, if
service is necessary, recommend a qualified
service company in your area.
2. If you need service’ ...
We have a nationwide network of authorized
service companies. Our service technicians are
trained to fulfill the product warranty and provide
after-warranty service, anywhere in the United
States. To locate the authorized service company
in your area, call our Consumer Assistance
Center telephone number (see Step 1) or look in
your telephone directory Yellow Pages under:
APPLIANCES
- HOUSEHOLD
MAJOR-SERVICE
-
4. If you are not satisfied with how
the problem was solved* .. .
Contact the Major Appliance Consumer Action
Program (MACAP). MACAP is a group of
independent consumer experts that voices
consumer views at the highest levels of the
major appliance industry.
Contact MACAP only when the dealer and
authorized servicer have failed to resolve your
problem.
Major Appliance Consumer Action Program
20 North Wacker Drive
Chicago, IL 60606
MACAP will in turn inform us of your action.
When requesting assistance, please provide:
model number, serial number, date of purchase,
and a complete description of the problem. This
information is needed in order to better respond
to your request.
& REPAIR
3. If you need replacement
parts* . ..
To locate replacement parts in your area, refer
to Step 2 above or call our Consumer Assistance
Center number in Step 1.
17
WHIRLPOOL
RoomAir ConditionerWarranty
LENGTH OF WARRANTY
WHIRLPOOL
FULL ONE-YEAR
WARRANTY
From Date of Purchase
FSP@ replacement parts and repair labor to correct defects in
materials or workmanship.
FULL FIVE-YEAR
WARRANTY
From Date of Purchase
FSP replacement parts and repair labor to correct defects in
materials or workmanship in the sealed refrigeration system.
These parts are:
1. Compressor
2. Evaporator
3. Condenser
4. Drier-strainer
5. Connecting tubing
WHIRLPOOL
WILL PAY FOR
WILL NOT PAY FOR
A. Service calls to:
1. Correct the installation of your air conditioner.
2. Instruct you how to use your air conditioner.
3. Replace house fuses or correct house wiring.
4. Clean or replace air filter.
B. Pickup and delivery. Your air conditioner is designed to be repaired in the home.
C. Damage to your air conditioner caused by accident, misuse, fire, flood, acts of God, or use of
products not approved by Whirlpool.
D. The removal and reinstallation of your air conditioner if it is installed in an overhead or other
inaccessible location or not installed in accordance with published installation instructions.
E. Repairs to parts or systems caused by unauthorized modifications made to the appliance.
s/94
Service under the full warranties must be provided by an authorized Whirlpool service company.
WHIRLPOOL CORPORATION SHALL NOT BE LIABLE FOR INCIDENTAL OR CONSEQUENTIAL
DAMAGES. Some states do not allow the exclusion or limitation of incidental or consequential damages
so this exclusion or limitation may not apply to you. This warranty gives you specific legal rights, and you
may also have other rights which vary from state to state.
Outside the United States, a different warranty may apply. For details, please contact your authorized Whirlpool dealer.
If you need service, first see the “Troubleshooting” section of this book. After checking “Troubleshooting,”
additional help can be found by checking the “Requesting Assistance or Service” section, or by calling our
Consumer Assistance Center telephone number, l-800-253-1 301, from anywhere in the U.S.A.
PART NO. 23-1 l-l 186N-002/789600
0 1995 Whirlpool
Corporation
Rev. A
Q Registered
trademark
01 Whirlpool
U.S.A.
Printed
1 z/95
in U.S.A.