1
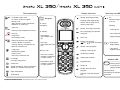
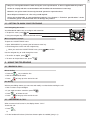
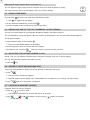
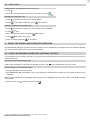
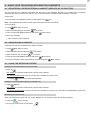
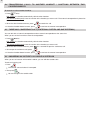
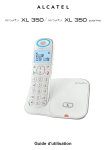
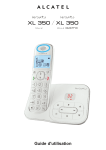
User’s Guide
The box contains the following elements:
Versatis XL 350
- the base
- the line cord
- the handset
- the power supply
- the batteries and battery compartment cover
- the mini-guide.
Versatis XL 350 duo/trio
- the additional handset(s)
- the charger(s)
- the battery compartment cover(s)
- the batteries
Please read this guide carefully to get to know the main features of your Versatis XL 350 and read the safety
instructions before using it. We would also ask you to share the safety guidelines contained in this guide with all family
members, and especially children.
Parents and those in charge of very young children are reminded that they must always be careful not to let children place
any metallic objects or plastic items or parts in their mouths, except for safe eating utensils.
The handset keys
- In standby: open menu
- In menus: confirm an option
- During a call:
open Intercom mode, Phonebook,
Redial list, or Calls Log*
Display and icons
Navigator
Flashing: poor signal quality
In menus:
navigation
- Take call
- Flash (access to operator services)*
- Hang up
- Long press:
turn handset on/off
-
Return to previous menu option
Correct / Delete a character
Activate Secrecy (microphone off)
Make an intercom call
- Long press:
lock/unlock keypad
- During a call:
three-way conference call
In standby:
cut ringer (long press)
Hands-free
Sound experience: select “NATURAL”,
“BASS” or “TREBLE” during a call
Steady: good signal quality
Absent: out of range (move
nearer to the base)
Base key and LED
On:
handset charging
or in use
Flashing:
Steady: new call(s) received*
- incoming call
In standby:
- Press down:
open Dialled Calls
list
- Press up:
open Received Calls
list *
New message(s) on operator
voicemail*
- new voicemail*
Alarm set
- paging handset
Battery charge level
OK,
needs recharging
- Short press:
page handset
Steady: call in progress
During a call:
Flashing: incoming call
- Press up: increase
earpiece, hands-free
or ringer volume
Hands-free enabled
- Press down: lower
earpiece, hands-free
or ringer volume
Keypad locked
Audio boost enabled
- Long press:
register handset
Handset LED
Flashing quickly:
Ringer off
- incoming call
- paging handset
Open Phonebook
Steady: intercom call in
progress
Flashing slowly:
Audio boost
Flashing: incoming intercom
call
message(s) on operator
voicemail*
* Subject to availability of service and subscription from your network operator.
1
1.
1.1
1.2
1.3
FIRST USE . . . . . . . . . . . . . . . . . . . . . . . . . . . . . . . . . . . . . . . . . . . . . . . . . . . . . . . . . . . . . . . . . . . . . . . . . . . . . . . . .
Installing the base . . . . . . . . . . . . . . . . . . . . . . . . . . . . . . . . . . . . . . . . . . . . . . . . . . . . . . . . . . . . . . . . . . . . . . . . . . . .
Installing the handset . . . . . . . . . . . . . . . . . . . . . . . . . . . . . . . . . . . . . . . . . . . . . . . . . . . . . . . . . . . . . . . . . . . . . . . . .
Getting to know your telephone . . . . . . . . . . . . . . . . . . . . . . . . . . . . . . . . . . . . . . . . . . . . . . . . . . . . . . . . . . . . . . . . .
2
2
2
3
2.
2.1
2.2
2.3
2.4
2.5
2.6
2.7
USING THE TELEPHONE . . . . . . . . . . . . . . . . . . . . . . . . . . . . . . . . . . . . . . . . . . . . . . . . . . . . . . . . . . . . . . . . . . . . .
Making a call . . . . . . . . . . . . . . . . . . . . . . . . . . . . . . . . . . . . . . . . . . . . . . . . . . . . . . . . . . . . . . . . . . . . . . . . . . . . . . . .
Answering a call . . . . . . . . . . . . . . . . . . . . . . . . . . . . . . . . . . . . . . . . . . . . . . . . . . . . . . . . . . . . . . . . . . . . . . . . . . . . .
Hands-free mode . . . . . . . . . . . . . . . . . . . . . . . . . . . . . . . . . . . . . . . . . . . . . . . . . . . . . . . . . . . . . . . . . . . . . . . . . . . .
Redialling one of the last numbers called (redial) . . . . . . . . . . . . . . . . . . . . . . . . . . . . . . . . . . . . . . . . . . . . . . . . . . .
Adjusting the volume during a call . . . . . . . . . . . . . . . . . . . . . . . . . . . . . . . . . . . . . . . . . . . . . . . . . . . . . . . . . . . . . . .
Secrecy / Mute (microphone off) . . . . . . . . . . . . . . . . . . . . . . . . . . . . . . . . . . . . . . . . . . . . . . . . . . . . . . . . . . . . . . . .
Locating a handset (Paging) . . . . . . . . . . . . . . . . . . . . . . . . . . . . . . . . . . . . . . . . . . . . . . . . . . . . . . . . . . . . . . . . . . . .
3
3
3
4
4
4
4
4
3.
3.1
3.2
3.3
3.4
3.5
YOUR PHONEBOOK . . . . . . . . . . . . . . . . . . . . . . . . . . . . . . . . . . . . . . . . . . . . . . . . . . . . . . . . . . . . . . . . . . . . . . . . .
Creating entries . . . . . . . . . . . . . . . . . . . . . . . . . . . . . . . . . . . . . . . . . . . . . . . . . . . . . . . . . . . . . . . . . . . . . . . . . . . . . .
Using the phonebook to make a call . . . . . . . . . . . . . . . . . . . . . . . . . . . . . . . . . . . . . . . . . . . . . . . . . . . . . . . . . . . . .
Editing entries . . . . . . . . . . . . . . . . . . . . . . . . . . . . . . . . . . . . . . . . . . . . . . . . . . . . . . . . . . . . . . . . . . . . . . . . . . . . . . .
Deleting entries . . . . . . . . . . . . . . . . . . . . . . . . . . . . . . . . . . . . . . . . . . . . . . . . . . . . . . . . . . . . . . . . . . . . . . . . . . . . . .
Speed dial keys . . . . . . . . . . . . . . . . . . . . . . . . . . . . . . . . . . . . . . . . . . . . . . . . . . . . . . . . . . . . . . . . . . . . . . . . . . . . .
5
5
5
6
6
6
4.
4.1
4.2
4.3
IDENTIFYING CALLERS . . . . . . . . . . . . . . . . . . . . . . . . . . . . . . . . . . . . . . . . . . . . . . . . . . . . . . . . . . . . . . . . . . . . . .
Understanding the caller ID information . . . . . . . . . . . . . . . . . . . . . . . . . . . . . . . . . . . . . . . . . . . . . . . . . . . . . . . . . . .
Viewing the missed calls list . . . . . . . . . . . . . . . . . . . . . . . . . . . . . . . . . . . . . . . . . . . . . . . . . . . . . . . . . . . . . . . . . . . .
Calls log . . . . . . . . . . . . . . . . . . . . . . . . . . . . . . . . . . . . . . . . . . . . . . . . . . . . . . . . . . . . . . . . . . . . . . . . . . . . . . . . . . .
6
6
6
7
5. USING THE FIXED-LINE OPERATOR SERVICES . . . . . . . . . . . . . . . . . . . . . . . . . . . . . . . . . . . . . . . . . . . . . . . . . . 7
5.1 Using the network operator’s voicemail service . . . . . . . . . . . . . . . . . . . . . . . . . . . . . . . . . . . . . . . . . . . . . . . . . . . . . 7
6.
6.1
6.2
6.3
6.4
6.5
6.6
6.7
6.8
CUSTOMISING YOUR TELEPHONE . . . . . . . . . . . . . . . . . . . . . . . . . . . . . . . . . . . . . . . . . . . . . . . . . . . . . . . . . . . .
Ringtones . . . . . . . . . . . . . . . . . . . . . . . . . . . . . . . . . . . . . . . . . . . . . . . . . . . . . . . . . . . . . . . . . . . . . . . . . . . . . . . . . .
Sound experience . . . . . . . . . . . . . . . . . . . . . . . . . . . . . . . . . . . . . . . . . . . . . . . . . . . . . . . . . . . . . . . . . . . . . . . . . . . .
Date and time . . . . . . . . . . . . . . . . . . . . . . . . . . . . . . . . . . . . . . . . . . . . . . . . . . . . . . . . . . . . . . . . . . . . . . . . . . . . . . .
Alarm . . . . . . . . . . . . . . . . . . . . . . . . . . . . . . . . . . . . . . . . . . . . . . . . . . . . . . . . . . . . . . . . . . . . . . . . . . . . . . . . . . . . . .
Key beeps . . . . . . . . . . . . . . . . . . . . . . . . . . . . . . . . . . . . . . . . . . . . . . . . . . . . . . . . . . . . . . . . . . . . . . . . . . . . . . . . . .
Volume . . . . . . . . . . . . . . . . . . . . . . . . . . . . . . . . . . . . . . . . . . . . . . . . . . . . . . . . . . . . . . . . . . . . . . . . . . . . . . . . . . . .
Auto-answer . . . . . . . . . . . . . . . . . . . . . . . . . . . . . . . . . . . . . . . . . . . . . . . . . . . . . . . . . . . . . . . . . . . . . . . . . . . . . . . .
Display language . . . . . . . . . . . . . . . . . . . . . . . . . . . . . . . . . . . . . . . . . . . . . . . . . . . . . . . . . . . . . . . . . . . . . . . . . . . .
8
8
8
8
8
9
9
9
9
7.
7.1
7.2
7.3
7.4
BASE SETTINGS . . . . . . . . . . . . . . . . . . . . . . . . . . . . . . . . . . . . . . . . . . . . . . . . . . . . . . . . . . . . . . . . . . . . . . . . . . . .10
Changing the PIN code . . . . . . . . . . . . . . . . . . . . . . . . . . . . . . . . . . . . . . . . . . . . . . . . . . . . . . . . . . . . . . . . . . . . . . . .10
Restoring the default settings . . . . . . . . . . . . . . . . . . . . . . . . . . . . . . . . . . . . . . . . . . . . . . . . . . . . . . . . . . . . . . . . . . .10
Line settings . . . . . . . . . . . . . . . . . . . . . . . . . . . . . . . . . . . . . . . . . . . . . . . . . . . . . . . . . . . . . . . . . . . . . . . . . . . . . . . .10
Eco mode . . . . . . . . . . . . . . . . . . . . . . . . . . . . . . . . . . . . . . . . . . . . . . . . . . . . . . . . . . . . . . . . . . . . . . . . . . . . . . . . . .10
8.
8.1
8.2
8.3
8.4
8.5
8.6
USING YOUR TELEPHONE WITH MULTIPLE HANDSETS . . . . . . . . . . . . . . . . . . . . . . . . . . . . . . . . . . . . . . . . . .11
Registering / Re-registering a handset (Versatis XL 350 duo/trio) . . . . . . . . . . . . . . . . . . . . . . . . . . . . . . . . . . . . . . .11
Uninstalling a handset . . . . . . . . . . . . . . . . . . . . . . . . . . . . . . . . . . . . . . . . . . . . . . . . . . . . . . . . . . . . . . . . . . . . . . . . .11
Using the intercom feature . . . . . . . . . . . . . . . . . . . . . . . . . . . . . . . . . . . . . . . . . . . . . . . . . . . . . . . . . . . . . . . . . . . . .11
Transferring calls to another handset / Shuttling between two correspondents . . . . . . . . . . . . . . . . . . . . . . . . . . . . .12
Three-way conference call (2 internal parties and one external) . . . . . . . . . . . . . . . . . . . . . . . . . . . . . . . . . . . . . . . .12
Answering an outside call while in intercom . . . . . . . . . . . . . . . . . . . . . . . . . . . . . . . . . . . . . . . . . . . . . . . . . . . . . . . .12
9.
TECHNICAL SPECIFICATIONS . . . . . . . . . . . . . . . . . . . . . . . . . . . . . . . . . . . . . . . . . . . . . . . . . . . . . . . . . . . . . . . .13
10. TROUBLESHOOTING... . . . . . . . . . . . . . . . . . . . . . . . . . . . . . . . . . . . . . . . . . . . . . . . . . . . . . . . . . . . . . . . . . . . . . . .14
11. PRODUCT WARRANTY . . . . . . . . . . . . . . . . . . . . . . . . . . . . . . . . . . . . . . . . . . . . . . . . . . . . . . . . . . . . . . . . . . . . . .15
12. SAFETY . . . . . . . . . . . . . . . . . . . . . . . . . . . . . . . . . . . . . . . . . . . . . . . . . . . . . . . . . . . . . . . . . . . . . . . . . . . . . . . . . . .17
13. ENVIRONMENT . . . . . . . . . . . . . . . . . . . . . . . . . . . . . . . . . . . . . . . . . . . . . . . . . . . . . . . . . . . . . . . . . . . . . . . . . . . . .17
2
1. FIRST USE
1.1 INSTALLING THE BASE
1.1.1 Precautions
Signal quality will depend on the location and environment of the base and handset. Your Versatis XL 350 must be kept
away from sources of excessive heat (radiators, direct sunlight, etc.) and protected against vibrations and dust. Never
allow your telephone to come into contact with water or other liquids, or with aerosols. To reduce the risk of interference
and optimise reception, take particular care not to install the base in the immediate vicinity of windows, large metal objects,
reinforced concrete, televisions, music centres, halogen lamps or heating devices, fluorescent lighting, burglar alarms,
microwave ovens, computers, etc.
To clean your Versatis XL 350, use an antistatic cloth lightly moistened with water.
This telephone requires an electrical power supply in order to function.
NB:
Your Versatis XL 350 is a DECT™* standard appliance designed to receive and transmit telephone calls. It is designed
for connection to the European public telecommunications network.
1.1.2 Connecting the base
Connect the line cord and the power supply under the base,
as shown.
Plug the telephone jack into the wall socket.
Connect the power cable to a 230V/50Hz power supply.
4 The light on the base comes on
.
Line cord
Power cable
1.1.3 Connecting the charger(s) for the Versatis XL 350 duo/trio
Plug the power cable into the connector on the charger.
Connect the mains adapter to a 230V/50Hz power supply.
1.2 INSTALLING THE HANDSET
1.2.1 Fitting the batteries and charging up for the first time
Once the base is connected, open the battery compartment at the back of the handset by
sliding the cover.
Insert the batteries and slide the cover back into place.
Place the handset on the base. The red light
once.
on the base comes on and it beeps
4 The battery charge icon on the handset starts to move.
Before using for the first time, we recommend that you leave the handset to charge up on
the base for 24 hours in order to optimise battery life and performance.
Make sure the range symbol
shown in § 8.1.
Take the line by pressing
is on steady. If it is absent, re-register the handset as
.
The dial tone confirms that your Versatis XL 350 is working (if not, see Chapter 10).
* DECT is a registered trademark of ETSI.
3
!
Only use rechargeable batteries with exactly the same specifications as those supplied with the product.
Failure to comply with this recommendation will invalidate the manufacturer's warranty.
Batteries can split or leak if incorrectly inserted, opened or exposed to heat.
Never dispose of batteries in a fire: they could explode.
Using non-rechargeable or non-conforming batteries (see Chapter 9 “Technical Specifications” of the
instructions) poses a health hazard and can damage the product.
1.3 GETTING TO KNOW YOUR TELEPHONE
1.3.1 Navigating the menus
Your Versatis XL 350 is easy to configure and customise.
To open the menu, press
Using the navigator key, select the desired submenu.
.
Menu navigation example:
To open the “HS SETTINGS” menu:
Open “MAIN MENU” by pressing the left context-menu key.
Scroll through the menus with the navigator key.
4 When you reach the “HS SETTINGS” menu, press
to confirm.
Use the navigator key to scroll through the menu.
To confirm an option, press
To return to the previous menu, press
.
.
2. USING THE TELEPHONE
2.1 MAKING A CALL
Direct dialling
Press the
Dial the number to be called.
Press
key to take the line.
to hang up at the end of the call.
Pre-dialling
With the pre-dialling feature you can enter and modify a number before making the call.
Dial a number of up to 20 digits.
If you need to make a correction, press
Press
to initiate the call.
Press
to hang up at the end of the call.
.
2.2 ANSWERING A CALL
When an external call comes in, the display shows: “CALL”.
To take the call:
Press
.
or
Lift the handset off its base (if the Auto-Answer option is enabled) (see § 6.7).
4
Adjusting the ringer volume when a call comes in
You can adjust the ringer volume with the navigator at any time while the phone is ringing.
The ringer volume is shown on the display. There are 5 volume settings.
2.3 HANDS-FREE MODE
You can press
4 The
at any time to switch over to hands-free mode.
icon appears on the display.
To quit hands-free mode during a call, press
Use the navigator to turn the hands-free volume up or down.
.
2.4 REDIALLING ONE OF THE LAST NUMBERS CALLED (REDIAL)
The last 10 numbers dialled on your Versatis XL 350 are stored in the Dialled Calls list.
The correspondents' names will appear if they are listed in the Phonebook. If not, only the number dialled appears.
To call someone again:
Press the down arrow on the navigator
.
4 The last number dialled appears on the display.
Scroll through the names or numbers with the navigator.
To initiate the call, just press
when you reach the name or number you want.
2.5 ADJUSTING THE VOLUME DURING A CALL
During a call, you can adjust the handset volume using the navigator. There are 5 volume settings.
You can also boost the earpiece volume during a call:
Press the
key.
2.6 SECRECY / MUTE (MICROPHONE OFF)
To put your correspondent on hold while you talk privately to someone next to you:
Press
.
4 This turns off the handset microphone.
4 "MUTED” appears on the display. Your correspondent can no longer hear you, and you can talk privately.
Press
again to re-activate the microphone.
2.7 LOCATING A HANDSET (PAGING)
Forgotten where you left your handset?
Press the
key on the base.
4 The handsets associated with the base will ring for 30 seconds.
Press
,
or
to stop the ringer or press
again on the base.
5
3. YOUR PHONEBOOK
You can store the telephone numbers of your 50 most useful contacts in the Phonebook.
3.1 CREATING ENTRIES
With your Versatis XL 350 you can key in letters as well as digits. Handy for entering names in the Phonebook!
3.1.1 Basic entry creation
Press
Select “PHONEBOOK” with the navigator and press
Press
Key in the name and press
.
to confirm.
twice.
to confirm.
To select a letter, press the corresponding key as many times as required.
For example:
- for the letter S, press
4 times.
- for the letter E, press
twice.
If the next letter you want is on the same key, wait for the cursor to move on first, or use the navigator to move on to the
next letter.
To enter a space, press
.
To make a correction, press
.
Enter the number and press
Select the melody you want to associate with the contact* and press
To exit the menu: press
to confirm.
to confirm.
.
3.1.2 Creating an entry from the Received Calls list*
For more details, see Chapter 4 “Identifying Callers”.
Press
Press
Key in or confirm the name and press
Press
Select a melody and press
to open the list, and select the contact to be stored in the Phonebook.
twice.
to save it.
to confirm the number.
to confirm.
3.2 USING THE PHONEBOOK TO MAKE A CALL
Press
Key in the first letter of the name, then use the navigator to pick out the name you want.
.
or
Scroll through the list of names with the navigator.
Press
to initiate the call.
* This option only works if you are subscribed to your network operator’s caller ID service, where available.
6
3.3 EDITING ENTRIES
Press
Press
Press
to edit the name and
Press
to edit the number and
Select the melody and press
, then use the navigator to select the entry to be modified.
, select “EDIT” and press
to confirm.
to confirm.
to confirm.
to confirm.
3.4 DELETING ENTRIES
Press
Press
, then select the entry you want to delete.
, select “DELETE” and press
to confirm.
You can also delete all the entries in one go.
Press the
key, followed by
and select “DELETE ALL”; press
to confirm.
3.5 SPEED DIAL KEYS
You can store 3 numbers on keys
,
and
.
Press
Select “SPEED DIAL” and press
Select “KEY 1”, “KEY 2” or “KEY 3” with the navigator and press
Enter the number and press
, select “HS SETTINGS” and press
to confirm.
,
or
to confirm.
to confirm.
Note: To erase a number, press the
A long press on
to confirm.
key.
automatically dials the stored number.
4. IDENTIFYING CALLERS
4.1 UNDERSTANDING THE CALLER ID INFORMATION
If you are subscribed to your network operator's Caller Identification service, you can see the caller’s number (or name,
if the number is listed in your phonebook or transmitted by the network) before you answer.
Received calls are recorded in a log which stores the last 20 caller numbers along with their dates & times.
During the call, the following network messages are displayed:
- the caller name and number, if the number is stored in your Phonebook or transmitted by the network,
- the caller number, if transmitted by the network,
- “WITHHELD” if the caller is using Caller ID Blocking to avoid identification,
- “OUT OF AREA” if the name or number was not correctly transmitted by the network.
4.2 VIEWING THE MISSED CALLS LIST
If you are subscribed to your network operator's Caller Identification service, your Versatis XL 350 will log the last 20 calls
received, along with the date and time of each call.
To listen to the calls:
Press
Scroll through the list with the navigator.
.
7
4.3 CALLS LOG*
Calling back a correspondent from a Calls List
Press
Once you have selected a call from one of the lists, just press
.
.
Deleting an entry from a list
Press
Press
then select the contact you want to delete.
and select “DELETE”; press
to confirm.
Storing a contact from the Calls Log
Press
Press
Key in or confirm the name and press
Press
Select a melody and press
then select the contact you want to store in the Phonebook.
twice.
to confirm.
to confirm the number.
to confirm.
5. USING THE FIXED-LINE OPERATOR SERVICES
Your Versatis XL 350 gives you direct access to certain services available on subscription from your fixed-line operator.
Ask your service provider about the terms and conditions.
5.1 USING THE NETWORK OPERATOR’S VOICEMAIL SERVICE
By subscription to your network operator, you can have your calls diverted to a voicemail box when you are absent or
already on the line.
5.1.1 Receiving voicemail messages
When a new message is received on the operator voicemail, the
icon is displayed on the main screen.
5.1.2 Listening to voicemail messages
Dial your operator’s voicemail number.
Your Versatis XL 350 automatically calls up your operator’s voicemail server. Follow the voice guide to listen to your
messages.
After you have listened to the messages and hung up, the icon disappears from the main screen. If this doesn’t happen
automatically:
Open the Calls Log
and do a long press on
.
* Subject to availability of service and subscription from your network operator.
8
6. CUSTOMISING YOUR TELEPHONE
This section tells you how you can personalise your Versatis XL 350.
6.1 RINGTONES
The Versatis XL 350 offers 10 melodies for the handset. You can use different melodies to distinguish between internal
and external calls.
Press
Select “HS SETTINGS” and press
Select “RING SETUP” and press
Select “INT. RING” or “EXT. RING” and press
Select your preferred ringtone with the navigator and press
.
to confirm.
to confirm.
to confirm.
to confirm.
6.2 SOUND EXPERIENCE
For optimal listening comfort, you can increase the bass or treble.
During a call, press
as many times as required to select “TREBLE” (crystalline), “BASS” (warm) or “NATURAL”.
Note: The default setting is “NATURAL”.
6.3 DATE AND TIME
Press
Select “DATE & TIME” and press
Select “DATE FORMAT” and press
Select the preferred format and press
Then select “SET DATE” and press
Enter the date and press
Then select “TIME FORMAT” and press
Select the preferred format and press
Then select “SET TIME” and press
Enter the time and press
!
to open the menu.
to confirm.
to confirm.
to confirm.
to confirm.
to confirm.
to confirm.
to confirm.
to confirm.
to confirm.
If you are subscribed to the Caller ID service, the date & time are updated automatically.
6.4 ALARM
You can program your telephone's “Alarm” function.
Press
Select “ALARM” and press
Select “ON” and press
to open the menu.
to confirm.
to confirm.
4 The display should look like this:
TIME: 00:00
Enter the time when you want the telephone to ring and press
Then select “SNOOZE OFF” or “SNOOZE ON” and press
To disable the Alarm function, select “OFF” and press
to confirm.
to confirm.
to confirm.
9
6.5 KEY BEEPS
The key beeps confirm that the keystrokes have been registered. To access this option, press
SETTINGS”, “TONE SETUP”, “KEY TONE”, then “ON” or “OFF”.
, select “HS
6.6 VOLUME
6.6.1 Ringer volume
Press
Select “HS SETTINGS” and press
Select “RING SETUP” and press
Select “RING VOLUME” and press
Set the desired volume by pressing the navigator up or down accordingly. There are 5 volume levels plus “VOLUME
OFF” (obtained by turning the volume right down). Press
to confirm.
to open the menu.
to confirm.
to confirm.
to confirm.
6.6.2 Ear volume
Press the
Then press the navigator to turn the volume up or down.
Choose the desired volume from the 5 levels available and hang up.
key.
6.7 AUTO-ANSWER
The “Auto-Answer” feature is enabled by default.
It enables you to pick up calls by lifting the handset off the base, without having to press
To turn this feature off:
Press
Select “HS SETTINGS” and press
Select “AUTO ANSWER” and press
Select “OFF” and press
To reactivate the feature, follow the same procedure but select “ON”.
to open the menu.
to confirm.
to confirm.
to confirm.
6.8 DISPLAY LANGUAGE
To change the language:
Press
Select “HS SETTINGS” and press
Select “LANGUAGE” and press
to confirm.
Choose the language and press
to confirm.
to open the menu.
to confirm.
.
10
7. BASE SETTINGS
7.1 CHANGING THE PIN CODE
The confidential system PIN is used for registering new handsets with your Versatis XL 350.
Press
Select “BS SETTINGS” and press
Select “CHANGE PIN” and press
Enter the 4 digits of the current PIN (0000 by default) and press
Enter the 4 digits of the new PIN and press
to open the menu.
to confirm.
to confirm.
to confirm.
to confirm.
8 The display now reads “CONFIRM?”.
Enter the new PIN again for validation and press
to confirm.
7.2 RESTORING THE DEFAULT SETTINGS
You can go back to the default settings of your Versatis XL 350.
This procedure will erase all the entries in the Calls Log and the Dialled Numbers list.
Press
Select “DEFAULT” and press
to open the menu.
to confirm.
4 “PIN?” appears; enter the system PIN (0000 by default) and validate with
. Press
to confirm.
4 Your Versatis XL 350 is restored to its default settings.
7.3 LINE SETTINGS
7.3.1 Setting the recall or flash time (R key)
Press
Select “BS SETTINGS” and press
Select “FLASH TIME and press
Select the appropriate setting for your country and press
to open the menu.
to confirm.
to confirm.
to confirm.
7.4 ECO MODE
Your DECT wireless handset automatically reduces its transmission power in proportion to its distance from the base,
helping to reduce energy consumption.
Press
Select “BS SETTINGS” and press
Select “ECO MODE” and press
Select “ON” (to enable the function) or “OFF” (to disable the function) and press
to open the menu.
Note: By default, ECO mode is enabled.
to confirm.
to confirm.
to confirm.
11
8. USING YOUR TELEPHONE WITH MULTIPLE HANDSETS
8.1 REGISTERING / RE-REGISTERING A HANDSET (VERSATIS XL 350 DUO/TRIO)
You can have up to 5 handsets associated with the base of your Versatis XL 350. If you already have 5 handsets
registered and want to change one of them, you must first uninstall a handset before installing the new one.
On the base:
Put the base into registration mode by holding down the
key.
Note: The registration operation must be carried out within the next 90 seconds.
On the handset:
Press
Select “REGISTRATION” and press
Enter the PIN code (0000 by default) and press
Wait a few seconds.
to open the menu.
to confirm.
to confirm.
4 Your handset is now registered.
8.2 UNINSTALLING A HANDSET
A handset can only be uninstalled from another handset.
Press
Select “BS SETTINGS” and press
Select “DELETE HS” and press
Enter the PIN code (0000 by default) and press
Using the navigator, select the handset to uninstall and press
to open the menu.
to confirm.
to confirm.
to confirm.
to confirm.
8.3 USING THE INTERCOM FEATURE
Calling an internal handset in intercom mode
Press
.
Duo version: the handset automatically calls the other handset.
Trio version (and beyond): enter the number of the handset you want to call.
4 Pressing
calls all of the associated handsets.
Calling an internal handset during an outside call
Press
twice.
Duo version: the handset automatically calls the other handset.
Trio version (and beyond): enter the number of the handset you want to call. The external correspondent is placed on
hold.
Answering an internal call
When you receive an internal call, the screen displays “CALL” and the number of the calling handset.
Press the
To hang up at the end of the call, press
key to answer.
.
12
8.4 TRANSFERRING CALLS TO ANOTHER HANDSET / SHUTTLING BETWEEN TWO
CORRESPONDENTS
To transfer a call to another handset
Press
twice.
Duo version: the handset automatically calls the other handset.
Trio version (and beyond): enter the number of the handset you want to call. The external correspondent is placed on
hold.
When the other handset answers, press
If the other handset doesn't answer, press
to transfer the call.
to retrieve the external correspondent.
8.5 THREE-WAY CONFERENCE CALL (2 INTERNAL PARTIES AND ONE EXTERNAL)
You can talk with an internal correspondent and an external correspondent at the same time.
When you are on the line with an external correspondent:
Press
twice.
Duo version: the handset automatically calls the other handset.
Trio version (and beyond): enter the number of the handset you want to call.
When the other handset answers, press
for 2 seconds to open the conference call.
To interrupt the conference call, press
.
If the other handset doesn't answer, press
to retrieve the external correspondent.
8.6 ANSWERING AN OUTSIDE CALL WHILE IN INTERCOM
When you are on intercom with another handset, you can still take outside calls.
To take an incoming call:
Press
.
4 The internal communication is interrupted.
Then press
.
4 You are through to the outside caller.
13
9. TECHNICAL SPECIFICATIONS
Free field range
Up to 300 meters*
Indoor range
Up to 50 meters*
Handset battery life
(average values)
10 hours talk time**
100 hours standby**
Number of handsets
Up to 5
Intercom mode
Yes
Three-way conference (1 external +
2 internal parties)
Yes
Electrical connection /
Base mains adapter /
Charger mains adapter
Manufacturer: ATLINKS
Model VT04EEU06045
Input: 100-240V / 50-60Hz / 0.15A
Output: 6V DC / 450mA
or:
Manufacturer: ATLINKS
Model S004LV0600045
Input: 100-240V / 50-60Hz / 0.15A
Output: 6V DC / 450mA
Only use the adapters supplied with the telephone.
Single-phase AC, excluding IT installations defined by the EN 60950 standard.
Caution: the network voltage is classified as a hazard by the criteria of this
standard.
Telephone connection
Appliance designed for connection to a TNV3 class (telecommunications
network voltage) analogue telephone line as defined by the EN 60950 standard.
Rechargeable batteries
2 x 400mAh NiMH AAA – 1.2 V
Operating temperature
From 5 to 40°C
* Value may vary according to environment.
** For guidance only: depends on initial battery charge.
14
10. TROUBLESHOOTING...
As a general rule, if a problem occurs, remove the batteries from all the handsets in your installation and disconnect the
power supply to the base. Wait for about 1 minute, then reconnect the base and reinstall the handset batteries.
Problems
Nothing appears on the display.
Causes
Solutions
The device is not powered up.
Make sure the batteries are correctly
installed.
Check the power supply connection.
There is no dial tone.
The handset has been turned off.
Press
base.
The batteries are flat.
Put the handset back on its base to
recharge the batteries.
The handset is out of range of the
base.
Move nearer to the base.
The handset is not registered with
the base.
See § 8.1 “Registering / re-registering a
handset”.
The batteries are flat (
Put the handset on its base to recharge
the batteries.
icon).
or place the handset on its
The device is not connected to the
telephone network.
Check that the phone cord is properly
connected to the base.
You are out of range of the base or
in an environment subject to
interference.
Move nearer to the base.
You have an ADSL network
connection.
Connect an approved ADSL filter between
the phone connector and the wall socket.
Your correspondent can't hear
you.
The microphone is off: the
Secrecy/Mute function is active.
See § 2.6 “Secrecy / Mute (microphone
off)”.
The handset doesn't ring.
The ringer is off.
See § 6.6.1 “Ringer volume”.
The batteries are still flat after
several hours on charge.
The base or charger is not powered
up.
Check your power supply connections.
The handset batteries are defective.
Ask your reseller to supply you with new
batteries.
The reception quality is poor, or
deteriorates during a call.
The store where you bought your telephone can also provide you with information and after-sales support.
15
11. PRODUCT WARRANTY
Please read carefully the user’s guide included in this package.
The product Versatis XL 350 is certified as conforming to European technical standards, as evidenced by the CE Mark
affixed thereto.
The product you have just bought is a technological product, which must be handled with care.
UK legislation, including Sale of Goods Acts and regulations, imply certain conditions which may apply to the
product you have purchased from the retailer (statutory warranty). These include conditions relating to quality.
For information concerning the statutory warranty, please consult the retailer who sold the product to you (seller).
Without prejudice to any statutory warranty from which the product benefits, ATLINKS Europe whose registered office
address is at 22 quai Gallieni 92150 Suresnes France warrants that the product contained in this package complies with
the technical specifications set forth in the user’s guide, during a warranty period commencing on the date of purchase of
an unused Product, which shall be presumed to be the date appearing on the invoice or the receipt issued by the seller,
upon which appears the seller’s name and continuing for:
- Twenty-four (24) months for the telephone, excluding consumables, accessories and batteries.
Together with any claim made under this warranty during the warranty period, the complete Product must be returned to
the seller as soon as the defect appears or is discovered, together with proof of purchase, consisting of an invoice or
receipt issued by the seller specifying the place of purchase and the serial number of the Product.
Any Product or Product part found, during the warranty period, to have a defect in design, materials or workmanship shall
be repaired or replaced, at no cost to you, by a product or part that is identical or at least equivalent in terms of function
and performance. If repair or replacement is not possible on a commercially reasonable basis, ATLINKS will refund the
purchase price of the Product or replace the Product by an equivalent product.
The repaired or replaced Product or part, which, may be new or refurbished, shall be under warranty for a period of ninety
(90) days from the date of repair or replacement, or until the end of the initial warranty period if that exceeds the said
ninety (90) days; the warranty period shall also be extended by any period exceeding six days between the date the
defective Product is delivered to the seller and the date that the repaired or replaced Product is placed at your disposition.
This warranty does not apply in case of:
- damage caused by installing or using the Product otherwise than in accordance with the instructions contained in the
user’s guide;
- improper connection or abnormal use of the Product, in particular together with incompatible accessories, as stipulated
in the user’s guide;
- a Product that has been opened, modified or fitted with unapproved replacement parts;
- removal of the serial number or defacement rendering the serial number illegible;
- normal wear and tear, including normal wear and tear of accessories, batteries and screens;
- non-compliance with technical and safety standards in force in the geographical area of utilization;
- Products having suffered an impact or a fall;
- damage caused by lightning, power surge, proximity to a source of heat or radiation, water damage, exposure to
excessive temperature, humidity or other environmental conditions or any other cause external to the Product;
- negligent or defective maintenance;
- damage caused by servicing, modification or repair performed by any person other than an authorized ATLINKS service
provider.
If the returned Product is not covered by the warranty, you will receive a repair estimate giving the processing cost and
the transport fees that will be charged if you wish the Product to be returned to you.
This warranty is applicable where the Product is lawfully purchased, in the United Kingdom.
All warranties other than the warranty set forth herein are expressly excluded. Nothing in this warranty shall exclude or
limit conditions or warranties implied by law including the statutory warranty.
16
ATLINKS shall:
(a) only be responsible to you for losses suffered by you that are a foreseeable consequence of a defect in the Product;
(b) not be responsible to you for losses that result from a defect in the Product which fall into the following categories:
(i)
loss of income or revenue;
(ii) loss of profit;
(iii) loss of business;
(iv) loss of anticipated savings;
(v) loss of data;
(vi) any waste of time; or
(vii) downtime or loss of use;
However this clause shall not prevent claims for foreseeable loss of, or damage to, your physical property;
Nothing in this warranty excludes or limits in any way ATLINKS liability for:
(i)
death or personal injury caused by our negligence;
(ii) fraud or fraudulent misrepresentation;
(iii) any breach of the obligations implied by section 12 of the Sale of Goods Act 1979 or section 2 of the Supply of
Goods and Services Act 1982;
(iv) defective products under the Consumer Protection Act 1987; or
(v) any other matter for which it would be illegal or unlawful for ATLINKS to exclude or attempt to exclude liability.
17
12. SAFETY
In the event of danger, the mains adapter acts as 230 V power isolating device. It should therefore, as a precaution, be
installed close to the appliance and be easily accessible. To cut off the device from the primary power supply, the mains
adapter must be disconnected from the 230V AC / 50Hz socket.
If the mains adapter fails, it must be replaced by an identical model.
If not connected to the mains power, or if there is a mains power failure, telephones with cordless handsets will cease to
function. You will then be unable to make or receive calls in the event of an emergency. This is why we recommend that
you also keep a conventional telephone – one that doesn’t require a power supply – as a backup.
!
Do not use your telephone to notify a gas leak when standing in the vicinity of the leak.
It is recommended that you avoid using this device during electrical storms. Do not attempt to open the batteries, as they
contain chemical substances. In the event of leakage, avoid contact with the skin, eyes, nose and mouth. In the event of
contact, rinse the affected part for about twenty minutes with running water and seek urgent medical attention. Clean the
product with absorbent paper or a dry cloth and contact your reseller to changer your battery pack.
ATLINKS hereby declares that the Versatis XL 350 and the Versatis XL 350 duo/trio conform to the essential
requirements and other applicable provisions of European directive 1999/5/EC.
13. ENVIRONMENT
This symbol means that your inoperative electronic appliance must be collected separately and not mixed with
the household waste. The European Union has implemented a specific collection and recycling system for
which producers are responsible.
This appliance has been designed and manufactured with high quality materials and components that can be recycled
and reused. Electrical and electronic appliances are liable to contain parts that are necessary in order for the system to
work properly but which can become a health and environmental hazard if they are not handled or disposed of in the
proper way. Consequently, please do not throw out your inoperative appliance with the household waste.
If you are the owner of the appliance, you must deposit it at the appropriate local collection point or leave it with the vendor
when buying a new appliance.
- If you are a professional user, please follow your supplier's instructions.
- If the appliance is rented to you or left in your care, please contact your service provider.
Keen to preserve the environment, ATLINKS has equipped this appliance with a switching power supply, offering better
energy efficiency. The advantages include not only very low electricity consumption, but also a more compact format than
the conventional power supply units used by the previous range.
The used batteries from your telephone (if it has batteries) must be disposed of in compliance with current environmental
protection regulations. Comply with your local regulations. Return your batteries to your reseller or dispose of them at an
approved recycling centre.
Help us protect the environment in which we live!
ATLINKS Europe
www.atlinks.com
22, Quai Gallieni - 92150 Suresnes - France
S.A.S. (Simplified Joined Stock Company) with capital of 500 000 euros – Business reg. number: 508 823 747 RCS Nanterre
Ref.: 00000000 Rev.0 (EN) 13/01/12
© ATLINKS 2012 - Reproduction prohibited
The manufacturer reserves the right to modify the specifications of its products in order to make technical improvements or comply with new regulations.
ATLINKS, ALCATEL and VERSATIS are registered trademarks.
The Alcatel logo and Alcatel name are trademarks of Alcatel and used under licence by ATLINKS.
19