1
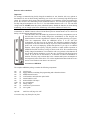
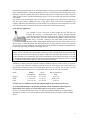
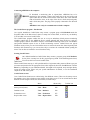
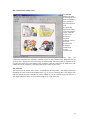
Meditech ABPM-04
ambulatory blood pressure monitor
with
CardioVisions
USER’S GUIDE
Important information – precautions for use – read carefully!
This symbol on the device is a warning that you should read the accompanying
documentation (this manual).
ABPM-04 is manufactured by
Mail: H-1701 Kispest, POB 27, Hungary
E-mail: [email protected]
Meditech Ltd.
Fax: +36 1 282 9388
Homepage: www.meditech.hu
Our representative in the European Union
Mail: 76124 Norrtälje, POB 380, Sweden
E-mail: [email protected]
Meditech Sverige AB
Fax: +46 176 206340
Homepage: www.meditech-sweden.se
Contact us on any address given above for further product and service information.
!
• Do not apply ambulatory blood pressure monitoring devices to unconscious or
otherwise incapable patients, or patients with coagulation disturbances.
• Do not apply ambulatory blood pressure monitoring devices to patients with serious
mobility or other impairments without supervision.
• Though ABPM-04 has been validated to function properly with patients with atrial
fibrillation or other common arrhythmias, the oscillometric blood pressure
measurement method is generally recommended for use only with special caution in
patients with arrhythmias, Parkinson’s disease, or other diseases with tremor.
• Always consult a physician for interpretation of blood pressure measurements. Note
that any blood pressure recording may be affected by body position, the physiological
condition of the patient, and other factors.
ABPM-04 complies with the requirements of the EU Medical Devices Directive
(93/42 EEC). MDD classification IIa. EMC class A. EMC group not applicable.
ABPM-04 is an internally powered type CF device.
Protection vs. ingress of water: ordinary. Mode of operation: continuous.
;
Blood pressure measurements determined with Meditech ABPM-04 on adults are
equivalent to those obtained by a trained observer using the cuff/stethoscope
auscultation method Korotkoff phase V, within the limits prescribed by the American
National Standard for Electronic or Automated Sphygmomanometers. ABPM-04 also
fulfills the requirements of the British Hypertension Society Validation Protocol for
Automated Blood Pressure Measuring Devices (grade B for both systolic and diastolic
accuracy, validation study published in Blood Pressure Monitoring 1998; 3(6):363-8
by Barna I & al).
99/BP41123 The first two digits of the serial number of the device show the year of production. The
three characters following the slash serve as device type identifier (BP4).
!
!
For routine care and maintenance instructions, see page 7.
For information on cuffs and their application, see page 9.
No user serviceable parts inside.
ABPM-04 contains high complexity electronic and fine mechanical components.
If you have any problems, please refer the device to qualified service personnel.
Meditech ABPM-04 with CardioVisions
This User’s Guide © Meditech Ltd. 1998 All rights reserved. PIC: BP4-D501-UK
2
Welcome to the Meditech ABPM-04 system
Thank you for purchasing ABPM-04, the ambulatory blood pressure monitor of Meditech Ltd. For
best use of the device and the adjoining software please read this guide carefully. It is aimed at giving
you practical knowledge and a general overview of the ABPM-04 system. The use of the adjoining
CardioVisions software requires virtually no previous computer literacy. The explanation of any terms
you might be unfamiliar with can be found in the extensive on-line help. We are always ready to be at
your disposal through your local distributor or directly through our office.
Meditech Ltd.
TABLE OF CONTENTS
WORKING WITH ABPM-04 ................................................................................................................................ 5
THE ABPM-04 DEVICE ........................................................................................................................................ 5
BATTERIES AND ACCUMULATORS ........................................................................................................................ 6
ACCESSORIES OF ABPM-04................................................................................................................................. 6
TECHNICAL PARAMETERS OF ABPM-04 .............................................................................................................. 7
ROUTINE CARE AND MAINTENANCE ..................................................................................................................... 7
THE OPERATION OF ABPM-04 ............................................................................................................................. 8
RULES OF MONITORING ........................................................................................................................................ 8
INDICATIONS FOR USE .......................................................................................................................................... 8
BLOOD PRESSURE MEASUREMENT ........................................................................................................................ 8
CUFFS AND THEIR APPLICATION ........................................................................................................................... 9
THE BUTTONS OF ABPM-04 .............................................................................................................................. 10
THE LCD OF ABPM-04 ..................................................................................................................................... 11
CONNECTING ABPM-04 TO THE COMPUTER ...................................................................................................... 12
THE CARDIOVISIONS PROGRAM - INTRODUCTION................................................................................. 12
STARTING CARDIOVISIONS ................................................................................................................................ 12
CARDIOVISIONS SCREENS .................................................................................................................................. 12
THE CARDIOVISIONS STARTUP SCREEN .................................................................................................... 13
THE STATUS LINE ............................................................................................................................................... 13
THE SPEED BUTTONS .......................................................................................................................................... 14
MENUS OF THE CARDIOVISIONS PROGRAM ............................................................................................. 15
TOOLBARS OF THE CARDIOVISIONS PROGRAM ...................................................................................... 15
THE DATABASE SCREEN ................................................................................................................................ 16
THE EVALUATION SCREEN............................................................................................................................ 17
THE REPORT EDITOR SCREEN....................................................................................................................... 18
INSTALLATION OF ABPM-04 AND CARDIOVISIONS ................................................................................ 19
CONNECTING ABPM-04 TO THE COMPUTER ...................................................................................................... 19
INSTALLATION AND FIRST START OF CARDIOVISIONS ........................................................................................ 20
REGISTRATION OF CARDIOVISIONS .................................................................................................................... 22
ADDING NEW USERS ........................................................................................................................................... 23
SELECTING THE COMMUNICATION PORT ............................................................................................................. 24
IMPORTING EXISTING ABPM DATA .................................................................................................................... 25
CARDIOVISIONS HELP ........................................................................................................................................ 25
CARDIOVISIONS SOFTWARE LICENSE AGREEMENT .............................................................................. 26
MEDITECH ABPM-04 PRODUCT WARRANTY INFORMATION ................................................................ 26
3
*** This page is intentionally left blank ***
4
IMPORTANT!
The following description assumes that you have the ABPM-04 system (both the serial interface and
the CardioVisions software) correctly installed on your computer. If you are in the process of a first
installation, please refer to the chapter on installation at the end of this guide.
This manual gives you the basic knowledge to start and use the CardioVisions program and the
ABPM-04 device. For information on any detail, please refer to the on-line help of the program from
the Help menu.
Working with ABPM-04
ABPM-04 is a computer-based ambulatory blood pressure monitoring system. Before you begin, you
must have the CardioVisions program installed on your computer and the device correctly connected.
To activate its functions, ABPM-04 has to be programmed from the computer. Then it gathers data for
24 hours to be transferred for evaluation to the CardioVisions program.
A successful monitoring session consists of the following steps:
1. Insert batteries in the battery compartment of ABPM-04 and check the voltage
2. Start the CardioVisions program
3. Add a new patient to the database or select an existing patient
4. Create a monitoring plan (called a schedule) containing blood pressure measurements
5. Connect ABPM-04 to the computer
6. Download the monitoring plan from the computer to the ABPM-04 recorder
7. Apply cuff to patient
8. Give instructions to the patient who wears ABPM-04 (typically for 24 hours)
... MONITORING SESSION ...
9. Start the CardioVisions program
10 Connect ABPM-04 to the computer and upload data from the device
11. Analyze the blood pressure profile
12. Create and print a report
The ABPM-04 device
Cuff connector
LCD
Start button
(unmarked)
Event button
(marked with a
circle)
The ABPM-04 device is a compact, lightweight
monitoring unit typically worn by the patient for 24
hours. It has a battery compartment and a rating
label on its back housing. The serial number is
placed on the rating label. It is also stored
electronically in the solid state memory of the
device. On the front housing, there is the LCD, the
buttons of the device and a sticker displaying the
name of the device. The cuff connector is located
on the top. ABPM-04 operates from 4 AA size
accumulators or batteries. The device can be
connected to the serial port of an IBM compatible
PC with an optoelectronic interface.
Optical interface
socket (bottom of device)
5
Batteries and accumulators
Important!
We strongly recommend using freshly charged accumulators or new batteries with every patient so
that batteries do not run down during monitoring even in the case of extremely high blood pressure
values. It is advised to check voltage after inserting batteries or accumulators, before programming the
device. Do not start a new monitoring session with weak batteries. You can expect the typical voltage
for fully charged accumulators to be over 5.1 V, for fresh alkaline batteries over 6.1 V. You can check
voltage with the START button (the plain, unmarked button). Should the batteries run down during
monitoring, you can simply replace them. Monitoring will continue and data will not be lost.
Meditech includes two sets of accumulators and a charger in the complete package. With these
accumulators or alkaline batteries about 250-300 blood pressure measurements can be carried out
during a 24-48 hour long monitoring session.
Take the monitor out of the holder bag and remove the battery compartment cover on
the back-side. Place four freshly charged AA accumulators or four long-life AA
alkaline batteries into the compartment as shown in the polarity drawing (see figure).
Close the compartment. While the ABPM-04 device is in use with four
accumulators, the other four can be charged. The included accumulators should be
charged for 18-20 hours with the charger. If you use other accumulators or chargers,
please refer to the accompanying product descriptions. If you opt to use alkaline
batteries, choose high capacity, long-life products to enable reliable operation of
ABPM-04. Possible low battery-voltage is shown on the LCD. We recommend using
freshly charged accumulators or new batteries with every patient so that batteries do
not run down during monitoring even in the case of extremely high blood pressure
values. If you do not use the monitor, it is advisable to remove accumulators or
batteries since they may run down due to the constant small power consumption of
the integrated circuits of the device. We wish to emphasize that data in the device are
not lost even if batteries run down or are removed.
Accessories of ABPM-04
The complete ABPM-04 package contains the following components:
one
two
one
one
one
one
eight
one
one
one
(1)
(2)
(1)
(1)
(1)
(1)
(8)
(1)
(1)
(1)
optional:
carrying case
floppy diskettes containing the programming and evaluation software
ABPM-04 monitor unit
serial interface unit with twin optical cable
normal adult size cuff
monitor holder with straps
AA accumulators
battery charger
serial 25-to-9-pin converter
user’s guide
small size cuff, large size cuff
Accessories may vary from place to place.
6
Technical parameters of ABPM-04
Power supply:
4 AA accumulators or batteries
Display:
liquid-crystal
Blood pressure measurement method:
oscillometric
Blood pressure storage:
over 600 measurements
Pressure measurement range:
0-280 mmHg
Static accuracy:
± 3 mmHg or ± 2% of measured value
(stability: 2 years)
Pressure sensor:
piezo-resistive
Inflation:
automatically controlled pump
Safety:
maximum inflation 300 mmHg;
safety release valve for power failure
Deflation and rapid air release:
automatic pressure release valve
Intended measurement ranges:
blood pressure 30-260 mmHg
heart rate 40-200 beat per minute
Data storage:
serial EEPROM
Data transmission:
optical cable, standard serial line
PC interface:
special optoelectronic serial interface
with 9 pin Canon RS232 connector
Computer software:
CardioVisions graphical display and
evaluation system
Computer requirements:
Pentium processor, 64 MB RAM
800*600 256 color display
20 MB free HDD capacity (to install
program; more for data storage)
MS Windows 98 or higher
1 free serial (RS232) port
Operating environment:
10…40 °C of temperature,
15..90 % non-condensing humidity,
70-106 kPa atmospheric pressure
Size:
124 x 82 x 33.5 mm
Weight:
app. 350 g (batteries included)
Routine care and maintenance
Do not use or store the ABPM-04 outside the above specifications, as it may not meet its performance
specifications if used or stored outside its environmental and intended measurement range
specifications. The device is not specially protected against spills or ingression of water or other
liquids. Do not use it in rain, in a shower or under water, and protect it from any liquids.
Clean the ABPM-04 device and/or the rubber bladder of the cuff with a dry, anti-static cloth as
necessary. Do not use detergents or cleaning fluids. Do not sterilize ABPM-04 or its bladder, do not
expose them to heat or steam, and do not immerse them in water, or any other fluid.
To clean the cuff, remove the rubber bladder from the textile sleeve. Wipe or wash sleeve with mild
detergent. Let it dry at room temperature, then re-insert bladder in sleeve.
There are no user serviceable parts inside the device.
Contact Meditech or your distributor for service information. See page 2 for contact details.
ABPM-04 contains high complexity electronic and fine mechanical components. If you have any
problems, please refer the device to qualified service personnel. The device keeps its passive accuracy
for 2 years, then re-calibration is recommended.
In addition to this regular recalibration, no other accuracy checks are necessary. You may wish to
follow some guidelines suggesting that the accuracy of ABPM devices be checked regularly. You may
do this by comparing a reading of the device with a blood pressure value obtained by a trained
observer. For such comparison, use the cuff/stethoscope auscultation method on the same arm of the
same patient within a minute after the reading taken by the device.
7
The operation of ABPM-04
ABPM-04 has to be programmed for operation with the CardioVisions software before a monitoring
session. When the pre-programmed time is reached, it automatically starts measurements based on the
monitoring plan, so it does not have to be switched on. However, it may be switched off manually, and
in this case it must be switched back on manually. To gain reliable blood pressure readings, some rules
must be observed.
Rules of monitoring
1.
2.
3.
4.
5.
6.
7.
8.
Please inform your patients about the goal and expectable results of the monitoring and give them
an event diary and guidelines in all cases.
Basic rule! Patients should avoid excess movement during measurements. They should hold their
arm loose, slightly away from the chest.
Patients can attach and fix the device with adjustable straps which close with safety claps.
The cuff should be properly placed, not too loose or too tight. It should be connected to the
device. It is advisable to wear a thin shirt under the cuff. This does not influence measure-ment
accuracy but prevents problems caused by long-time wear (sweat, itching, etc.).
Patients may start extra blood pressure measurements with the START button (the plain,
unmarked button). They should mark events with the EVENT button (the button marked with a
circle). They may interrupt a measurement if necessary with either button.
Patients should not take the device off at night. By loosening the straps they can avoid problems
when turning in their sleep. The device does not disturb the majority of patients and they do not
wake up due to the measurements.
Should the batteries run down during a monitoring session, they can be simply replaced.
Monitoring will continue and data will not be lost.
Patients should never measure somebody else’s blood pressure with the device.
Do not apply ambulatory blood pressure monitoring devices to people with serious mobility or
other impairments without supervision, unconscious or otherwise incapable patients, nor to
patients with coagulation disturbances.
Indications for use
Indications for use, as recommended in the most recent guidelines for ambulatory blood pressure
monitoring (ABPM):
1. Based upon studies on prognosis and a clinical trial based upon BP control as an outcome,
ambulatory BP monitoring should be considered for untreated patients whenever an officeinduced increase in BP is suspected.
2. Ambulatory BP monitoring should be considered for treated patients suspected of having an
office-induced increase in BP, including individuals with apparent resistance to drug therapy,
symptoms suggestive of hypotension, and fluctuating office BP readings.
3. Based upon studies on prognosis, changes in nocturnal BP should be taken into account in any
decision to withhold drug therapy based upon the ABP.
Blood pressure measurement
Blood pressure measurement takes place during the stepwise deflation (with decreasing numbers on
the LCD). It is typical of a successful measurement that discrete pressure-levels, following each other
quickly, are soon followed by a complete deflation. The measurement results are stored and - if this
feature is not specifically disabled - they are displayed. First the systolic value (with the upper LCD
segment lit to the left) is displayed on the LCD, then the diastolic value (with the lower LCD segment
lit to the left), followed by the pulse rate (preceded by a letter P). The result of a programmed
measurement is displayed twice in this sequence, and the result of an extra, manually started
measurement is displayed six times. Then the device automatically switches back to normal operation
mode, displaying the time on its LCD, waiting for the following programmed measurement. Extra
8
blood pressure measurements can be initiated manually any time by pressing the START button (the
plain, unmarked button). Average measurement times vary with blood pressure and physical activity,
and with a cooperative patient with average blood pressure they are around 30-40 seconds. For patient
safety the device aborts any BP measurement process if it is not successful after trying for maximum
120 seconds.
If a blood pressure measurement is not successful for some reason or the patient aborts it, the device
will store error codes to identify the cause of the failure. These codes will be transferred to the
computer with other data and displayed on the numeric list of blood pressure measurements. To learn
more about error codes, please refer to the on-line help of the CardioVisions program.
Cuffs and their application
It is advisable to wear a thin shirt or blouse under the cuff. This does not
influence the accuracy of measurements but it prevents possible problems
caused by long-time wear (sweat, itching, rush, etc.). Place the cuff on the upper
arm so that the rubber tube looks upwards and the bladder is placed above the
brachial artery, if possible. Contrary to the usual blood pressure meters, the
advantage of this arrangement is that the patient can wear a loose jacket over the
shirt or blouse. Connect the rubber tube of the cuff into the air plug connector, which you can find on
the top of the vertically standing device. Always place tubing carefully to minimize strangulation risk.
Connect the cuff turning it clockwise with slight pressure.
Note that according to recommendations the cuff should be applied quite tightly, as acceptable for the
patient. A loose cuff will cause much longer measurement times (possibly aborted measurements due
to time-out), because the device first has to pump to tighten the cuff on the arm and then to reach the
pressure necessary for measurement. This causes inconvenience for the patient and results in less data
for evaluation. If the patient removes the cuff for some reason during the monitoring session, it should
be re-applied with appropriate tightness, with external help if necessary.
ABPM-04 recognizes and works perfectly with three different cuff sizes. If the cuff size is not preset
to a specific type within the computer program, the device will adjust to any of the three sizes
specified below during the first few measurements. However, if a specific size is preset, this will
overrule the internal size detection. It is advisable to select a specific size only if necessary.
Name
Normal
Small
Large
Bladder
Dimensions
12.5 x 22.5 cm
6 x 28.5 cm
14.5 x 32 cm
Sleeve
dimensions
16 x 52 cm
9 x 41 cm
16 x 70 cm
Arm circumference
range
24-32 cm
under 24 cm
32-42 cm
Caution: Use of a cuff different from that supplied might result in measurement error.
To avoid possible damage to the internal pneumatic system of ambulatory blood pressure
monitoring devices, always use a cuff, which comes as an accessory of the device.
Do not use cuffs from an uncertain source, as cuffs not intended for ambulatory use might contain
anti-adhesive powder or even contamination, which is harmful for the pneumatic system of ABPM
devices.
9
The buttons of ABPM-04
There are two buttons on the device next to the LCD, the inner START
button, unmarked, and the outer EVENT button, marked with a circle.
Pressing either button causes a low beep.
Functions of the START button (unmarked)
Manual blood pressure measurement
If it seems necessary, the patient can start an additional, manual blood pressure measurement by
pressing the START button shortly (less than 5 seconds). The result with a manual measurement
marker will be stored in the memory of the device.
Typical causes for this use: dizziness, pain (angina pectoris or headache), palpitation, etc.
Switching the device off
Press and hold the START button for 10 seconds, then release when two horizontal segments appear
on the LCD. ABPM-04 will be switched off.
If the device is switched off, it can only be switched on, normal functions are not available.
Switching the device on
ABPM-04 is switched on to normal operation if the START button is pressed and held for more
than 3 seconds. If the device is switched off, no other functions are available.
Checking the voltage of batteries
IMPORTANT! We strongly recommend using freshly charged accumulators or new batteries with
every patient. It is advised to check voltage after inserting batteries or accumulators, before
programming the device. You could expect the typical voltage for four fully charged accumulators
to be over 5.1 V, for four fresh alkaline batteries over 6.1 V.
Pressing and holding the START button for more than 5 but less than 10 seconds, the battery
voltage will be shown on the LCD (e.g. 5_24, equal to 5.24 V). The voltage is displayed until the
button is released but not more than 5 seconds. When you check the voltage, do not forget to release
the button. As you do, the device will return to normal operation mode. If the button is released after
10 seconds, the device will be switched off. Should this happen by chance, you can simply switch
the device on. This will not cause data loss or interruption of monitoring.
Interrupting a measurement
A blood pressure measurement in progress can be interrupted by pressing the START button, this
way the cuff can be deflated quickly. Such interruption is limited to the measurement in progress
only and has no effect on further operation.
Checking the segments of the LCD
Pressing and holding the START button will light up all segments of the LCD. Thus it is possible to
check whether they are all in working order. Depending on the time elapsed before you release the
button, the result may be an extra measurement, returning to normal mode through voltage display,
or switching off.
Functions of the EVENT button (marked with a circle)
Event marking
Any event the patient feels important for some reason, but one which does not require an extra blood
pressure measurement can be marked by pressing the EVENT button. The device will store the time
and an event marker in its memory.
There are two special events during a typical 24-hour monitoring session: the time the patient goes
to sleep and the time the patient wakes up. These two special events divide the monitoring session
into the active (wake, daytime) and the passive (sleep, night-time) period. These periods have an
important role in the statistical evaluation of the blood pressure profile. ABPM-04 makes it possible
to mark these two important events in a special way with the EVENT button. After the measurement
plan is downloaded to the device, ABPM-04 is in normal active mode, i.e., it is in the active,
10
daytime period. In the evening, when the patient goes to bed, pressing and holding the EVENT
button for at least 5 seconds will store the time of going to sleep as a special event marker in its
memory. This is the end of the active and the beginning of the passive period. The LCD will display
an additional dot at the bottom in the middle, showing that this is now the passive period. The device
will not beep with normal activities during the passive period. In the morning, when the patient
wakes up, pressing and holding the EVENT button for at least 5 seconds will store the time of
waking up as a special event marker in its memory. This is the end of the passive and the beginning
of the active period. The additional dot will disappear from the LCD and beeps will return (if they
were not specifically disabled on programming the device). Knowing the exact time of these two
events, the statistical evaluation can be really precise. Should the patient forget to mark either special
event (or both), the evaluation can still be based on the event diary or oral information from the
patient.
Typical causes for this use: waking up and going to sleep (special), taking medicine, etc.
Interrupting a measurement
A blood pressure measurement can be interrupted by pressing the EVENT button, this way the cuff
can be deflated quickly. Such interruption is limited to the measurement in progress only and has no
effect on further operation. This use of the button will not set an event marker.
The LCD of ABPM-04
ABPM-04 has an in-built LCD to display monitoring status and results. The most important displays
are listed here.
Time is displayed if the device is
in normal mode
Two horizontal segments are
displayed if the device is switched
off
Up arrow and increasing numbers
show that the device is pumping
up
Blinking rectangle in unison with
the pulse and stepwise changing
numbers show that a BP
measurement is in progress
Upper segment and a number - the
systolic value
Lower segment and a number - the
diastolic value
P and a number - the pulse rate
was stored
OFF shows that the
recent measurement has
just been interrupted with
a button
Three dots at the bottom
show that the batteries are
exhausted
The numbers show the
voltage of batteries in
5.37 V format
"PC" shows that the
device is communicating
with the personal
computer
Two horizontal segments with two
dots show that an event marker
In addition to these most important and most frequent displays, a lot of extraordinary situations,
disturbances and errors have their own code displayed on the LCD. These error codes are stored in the
memory of the device as well and after the results are transferred to the computer, they are listed in the
CardioVisions program. This helps service personnel to identify causes of an unexpected behavior,
result or error.
11
Connecting ABPM-04 to the computer
To download a monitoring plan or upload data, ABPM-04 has to be
connected to the computer. Connect the small plug at the end of the twin
optical cable into the socket on the bottom of the device (the cable indicated
with red should be closer to the edge of the device). Insert and push gently
until it clicks into place. The plug can be properly connected in one direction
only.
ABPM-04 is now ready for communication with the computer.
The CardioVisions program - Introduction
On a typical installation, CardioVisions setup creates a program group called Meditech under the
Programs folder of the Start menu. It places a startup icon in this folder, as well as on your desktop.
You can either icon to start CardioVisions.
The CardioVisions program enables the user to set up an ambulatory blood pressure monitoring
schedule, transfer this to the ABPM-04 device, upload gathered data from the device, and give
complex graphic, numeric and statistic analysis. It can handle monitoring results in its own database
and generate detailed reports of new or archive monitoring sessions. CardioVisions uses typical
Windows menus, where you can click with the mouse to activate the menu bar. Some frequently used
functions offer shortcut keys; you can use these keys to activate the command without opening the
menu. You can also use toolbars to access functions easily.
Starting CardioVisions
On a default installation CardioVisions Setup creates a program group called Meditech.
It also places a startup icon in this program group (folder of the Start/Programs menu).
You can use this icon to start CardioVisions.
When CardioVisions starts up, it will by default ask for a login name and a password. Please type your
user name and password in the appropriate boxes when requested, then click the OK button or hit the
Enter key. Depending on your installation details, this might not be required, and you might directly
access the startup screen. Please ask your system administrator for details, or see the installation
chapter at the end of this guide.
CardioVisions screens
Core CardioVisions functions are realized using four different screens. These are the startup screen,
the database screen, the evaluation screen and the report editor screen. You can switch between these
different screens using the menus, the main toolbar, or shortcut keys.
Menu
Shortcut key
Startup screen (home)
View – Home
F5
Database screen
View – Database
F6
Evaluation screen
View – Evaluation
F7
Report editor screen
View – Report editor
F8
12
Toolbar icon
The CardioVisions startup screen
The title bar
displays the name
of the program, and
when a recording is
open, it displays
the patient name as
well.
It contains the
application control
icon in the leftmost
corner. Click this
icon to access
functions to
maximize,
minimize, resize or
move the
CardioVisions
workspace.
Double click
to close
CardioVisions.
The
title
bar
contains the usual buttons to maximize, minimize, restore or close CardioVisions. Below the title bar
the menu bar is displayed to access functions of CardioVisions. The main toolbar is displayed at the
top while the status line at the bottom of the workspace if they are enabled in the View menu. The
remnant area of the workspace is the background to all CardioVisions screens.
The status line
The status line at the bottom of the screen - if enabled from the View menu - will display information
depending on cursor position and program status. E.g., if you are evaluating data, it will display time
and value (blood pressure) coordinates or statistic settings. If you are communicating with a device, it
will display transfer settings. So it is worth keeping an eye on the status line.
13
The speed buttons
There are by default four large graphical speed buttons displayed on the CardioVisions startup screen.
These buttons ensure fast and easy access to the basic, most typically used program functions. The
upper left speed button lets you add a new patient to the database. The upper right speed button takes
you to the database browser screen where you can open existing data. The lower left speed button lets
you choose a monitoring plan and initialize the ABPM-04 recorder. The lower right speed button lets
you upload data from a recorder to your database, display just uploaded data and create a report.
Speed button - Adding a new patient to the database
Opens the New patient wizard where you can add a new patient to the database
using a step-by-step guided function. Patient data displayed in bold are required;
other fields are optional.
Speed button - Opening the database screen
Takes you to the database screen where you can browse folders, select patients
and examinations.
Speed button - Programming the ABPM-04 recorder
Opens the ABPM programming wizard to select a patient, then select - and
optionally modify - a standard monitoring plan, or create a brand new plan, see it
summarized, then send it to an ABPM-04 device properly connected to the
computer. This step-by-step guided procedure will initialize the device to
perform a monitoring session with the parameters you used in the plan.
Speed button – Loading monitoring results from recorder to database
Opens the Load data from ABPM recorder wizard to load ABPM results from
a properly connected ABPM-04 recorder to the database, display just uploaded
data in a quick chart view, then optionally create and print a standard ABPM
report.
14
Menus of the CardioVisions program
The File menu
The File menu gives you access to basic data handling functions, such as opening or saving
recordings, printing reports, sending a recording as an email attachment. Some commands may appear
dim if they are not accessible at the current position.
The Edit menu
The Edit menu gives you access to clipboard functions and basic editing functions depending on
which screen you are working with.
The View menu
The View menu lets you switch between the four main screens or access patient information which
may be useful on any screen. It also lets you show or hide the toolbar and the status bar.
The Format menu
The Format menu gives you access to various formatting options to change and optimize the layout of
the active screen, or a certain frame on a screen. E.g., if you want to us bold letters in the report editor,
you will find the appropriate command in the Format menu.
The Device menu
The Device menu lets you select and handle Meditech devices. In this version of CardioVisions, the
default option is the ABPM-04 device.
The Tools menu
The Tools menu gives you access to the Options dialog where you can see and modify different
program options. The menu also contains various non-core functions, e.g., exporting data, changing
your password, or accessing the internal messaging system in a multi-user installation. It contains
system administrator tools, too, accessible only with system administrator login.
The Help menu
The Help menu gives you access to the on-line help of CardioVisions.
Toolbars of the CardioVisions program
Toolbars of CardioVisions contain buttons and other controls to give you fast and easy access to
frequently used functions. The toolbar can be displayed or hidden in the View menu. Toolbars give
you flexibility and ease of use when displayed. If you need more space, e.g., you are working with low
screen resolution, you can hide the toolbars to leave more space for your data.
The constant part (the first row) of the toolbar contains general functions (such as Open, Save, New,
Cut, Copy or Paste). It lets you switch between screens with the screen selector buttons. It displays the
name of the active frame in multi-frame screens, and lets you switch between frames.
The variable part (the second row) of the toolbar contains less general, typically frame-specific tools to
access functions of the active frame.
15
The database screen
Folders
The left vertical frame of the database screen displays how your database is organized. Patients can be
organized in folders and subfolders. Anyone can access the Guest folder; access to other folders may
be restricted in a multi-user installation. Demo data are by default copied to a Demo folder during
setup.
Patients
The top horizontal frame of the database screen lists patients from the selected folder. You can click
any column header in the Patients frame to sort patients in order of data in the relevant column. Click
again to switch between ascending and descending order. Click a line to select a patient. Right-click a
selected patient to access a local menu.
Examinations
The bottom horizontal frame of the database screen lists examinations of the patient selected in the
Patients frame above. This frame is by default sorted in chronological order of examinations. Click a
line to select an examination. Double-click a line to open the examination. This will take you to the
Evaluation screen.
16
The evaluation screen
List of data
The left vertical frame of the evaluation screen displays a numeric list of blood pressure readings of
the open examination (ABPM recording). You can add or remove columns, or change their order
using Tools – Options. Use the mouse to drag the vertical frame separator to the right to show more of
this frame. Drag the vertical frame separator to the left to hide some of this frame. When the frame is
active, you can use the variable part of the toolbar to filter the list. Hypertensive values are displayed
in red; hypotensive values in green. Normal values are blue.
Graphic profile
The top horizontal frame of the evaluation screen displays a typical ABPM chart view of the open
examination. Depending on your frame settings (Tools – Options or F9 to access), the graphic blood
pressure profile may look slightly different. Systolic and diastolic blood pressure are by default
displayed as vertical red bars. Pulse rate values are by default displayed as a blue line. Background
shading helps to see day, night and optionally morning periods.
Statistics
The middle horizontal frame displays blood pressure statistics.
Histograms
The bottom horizontal frame – not shown above - displays blood pressure histograms.
17
The report editor screen
The report editor screen is a single-frame screen. It is practically a typical text editor, so most of its
functions will be familiar from your word processor. CardioVisions creates its reports in a rich text
format (RTF), which lets you edit the report practically as free text, delete some parts, add your
comments, or highlight important details. You can even save your report as an external RTF file for
further editing with a word processor, or to send it as a normal document to a site without
CardioVisions. The variable part of the toolbar contains text editing and formatting functions on the
report editor screen.
IMPORTANT!
The header and footer of the report are not editable on the internal report editor screen, as they include
important user and patient identification data.
18
Installation of ABPM-04 and CardioVisions
Connecting ABPM-04 to the computer
To download a monitoring plan or upload data, ABPM-04 has to be connected to the computer. Steps
to follow for the first connection:
1. Locate a free serial port on your computer
Serial communication ports are called COMn, numbered from 1 to possibly 4 (COM1 to COM4).
However, there are only 2 serial ports on a standard personal computer.
2. Take the optoelectronic interface unit with the optical cable out of the ABPM-04 package
The interface unit is integrated in the serial plug with the optical cable.
3. Connect the interface unit to the port
If you find a free 9-pin (male) port, plug in the serial connector of the interface unit. If you find a free
25-pin (male) port, use a 25-to-9 serial converter to connect the interface.
4. Connect the device to the optical cable
Connect the small optical plug at the free end of the optical cable into the socket on the bottom of the
ABPM-04 device (the cable marked with red should be outside, i.e., closer to the edge of the device).
Insert and push gently until click. Simply pull to remove. Do not pull cable itself, always handle plug.
ABPM-04 is now ready for communication with the computer.
If you do not use the serial port for other purposes, it is advisable to connect the interface unit to the
serial port as described above only once when setting up the system. Then the interface unit with the
optical cable is constantly connected to the computer, and only the free end of the cable has to be
inserted into the socket on the ABPM-04 device as described above to establish the connection.
The serial interface unit
The serial interface unit which converts optical signals to electric ones and vice versa is integrated into
a normal serial connector with a twin optical cable which transfers optical signals between the
interface unit and the ABPM-04 device. The optical cable is not removable from the interface.
The optical interface cable
The optical interface cable gives the route for optical communication between the personal computer
and the ABPM-04 unit. It is a twin plastic cable, giving a possibility for bi-directional communication.
Data transfer in one direction is carried out on one fiber while the other fiber is used for the other
direction. The cable is flexible, but sensitive to cutting forces. Avoid sharp pressure on cable (edge of
drawer, leg of chair), as this may result in permanent mechanical and/or optical distortion, instability
of data transfer, or even total impossibility of communication.
19
Installation and first start of CardioVisions
CardioVisions comes in two different editions. The Personal Edition is capable of handling several
users but can be used by only one user at a time on the computer it has been installed onto. This
version is advisable to install e.g. in a surgery, where two physicians work in the morning and
afternoon shifts respectively. In this case the physicians can use the software during their own surgery
hours. The Network Edition is capable of handling several users at the same time. This version is
developed to be installed onto a server of a computer network, where several users have access to it
through the connecting terminals.
Personal Edition
Minimum Requirements
CPU
RAM
VGA
HDD
OS
Suggested Configuration
100 MHz Pentium I
500 MHz Pentium III
32 MB
128 MB
800x600 @16 bit color
1024x768 @16 bit color
20 MB + disk space of database*
(Windows 95 / 98)** Widows 98 SE / Me / NT4.0 + service pack 4 / 2000 / XP
* The disk space of the database depends on the number of patients and examinations.
Typically 75 MB for 1000 ABPM measurements.
** In the case of Windows 95 or 98 first edition the system needs updating in order to handle the
software. If your Windows system has not been updated yet, you can find the files needed to
upgrade on the installation disk. In the case of Windows 95 the Internet Explorer 4.0 or a later
version is necessary for the prefect operation of the help.
Insert the CardioVisions Personal Edition setup CD into the CD-ROM drive. If autoplay is enabled on
your computer, Setup will automatically start. Otherwise start Setup.exe located in the root directory
of the setup CD. Setup will guide you step by step through the installation process. Please follow the
instructions appearing on the screen.
It is not necessary to restart Windows after installation. If you select default installation, you can start
the installed program by selecting Start Menu / Programs / Meditech / CardioVisions 1.0.10 Personal
Edition. When first started, the just installed CardioVisions program will ask for the name and
password of the system administrator (the title "system administrator" refers to the user with system
administration access within the CardioVisions software and does not necessarily denote the system
administrator of the institution). Please enter a login name and password, on the basis of which you
can be identified as system administrator by the program. Select a name and password that are easy to
remember. Should you forget the password of the system administrator, it is not possible to enter a
new password! The system administrator has access only to system administration (e.g. change users'
rights, register new users, restore deleted data), but has no rights to store or modify medical
information (e.g. view or modify measurement data, edit reports). After entering the name and
password, CardioVisions will automatically start the Registration Wizard, which will guide you
through the steps of registration. The Personal Edition also works without registration, but with one
recorder only, and at most two active users. The first recorder you communicate with will be the only
one you can use without registration. If you do not wish to register the software, exit the Registration
Wizard. After closing the Registration Wizard, the Users' Data window will appear, where you can
create normal users. The data in bold are mandatory to enter.
Warning! Registration is required to access certain functions, program modules, as well as to receive
technical support.
Network Edition
System requirements
Server Minimum
20
Client Minimum
Suggested:(server and client)
CPU
RAM
VGA
HDD
LAN
OS
100 MHz Pentium I
500 MHz Pentium III
64 MB
32 MB
128 MB
800x600 @16 bit color
1024x768 @16 bit color
20 MB + disk space of database*
10 Mbit/s
100 Mbit/s
Windows 95 / 98** / 98 SE / Me / NT4.0 + service pack 4 / 2000 / XP
* The disk space of the database depends on the number of patients and examinations.
Typically 75 MB for 1000 ABPM measurements.
** In the case of Windows 95 or 98 first edition the system needs updating in order to handle the
software. If your Windows system has not been updated yet, you can find the files needed to
upgrade on the installation disk. In the case of Windows 95 the Internet Explorer 4.0 or a later
version is necessary for the prefect operation of the help.
CardioVisions Network Edition is advisable to be installed onto a continuously working server with
Windows operating system. Insert the CardioVisions Network Edition installation disk into the CDROM drive. If autoplay is enabled, the Setup will start automatically. Otherwise start Setup.exe in the
root directory of the installation disk. Setup will guide you step by step through the installation
process. Please follow the instructions appearing on the screen.
During installation the client and the server program will be installed onto the same (server) computer,
by default into the folder C:\Program Files\Meditech\CVNET. The client program has to be made
available for other computers on the network, therefore the client folder has to be shared with read
access (e.g. labeled Cv1010), a password is not necessary. No installation procedure is necessary on
the client computers; only a shortcut icon to CV000.EXE located in the shared folder on the server has
to be created. At the end of the Preferences/Target entry of the shortcut icon properties it is possible to
enter a login name as shown in the example, so the user only has to type their password.
E.g., the name of the computer with the installed
CardioVisions Network Edition and containing the
shared directory is Center and the user's login name
is Carter, the Target entry of the shortcut icon on a
client should be as follows
\\CENTER\CV1010\Cv000.exe Carter
(see picture)
It is not necessary to restart Windows after
installation. In order to use the just installed
CardioVisions
software,
the
CardioVisions
Database Server has to be started by selecting Start
Menu / Programs / Meditech / Database Server by
default. CardioVisions clients can be started only
after this process. Otherwise CardioVisions clients
will send an error message “Server not available”
on a dialog and quit.
By default CardioVisions can be started by selecting
Start Menu / Programs / Meditech / CardioVisions
1.0.10 Client. When first started, the program will ask for the name and password of the system
administrator (the title "system administrator" refers to the user with system administration access
within the CardioVisions software and does not necessarily denote the system administrator of the
institution). Please type in a login name and password, on the basis of which you will be identified as
system administrator by the program. Select a name and password that are easy to remember. Should
you forget the password of the system administrator, it is not possible to enter a new one! The system
administrator has only administration rights (e.g. change users' rights, register new users, restore
21
deleted data), they cannot store or modify medical information (e.g. view or modify measurement
data, edit report). After entering the name and password the program will automatically start the
Registration Wizard, which will guide you through the steps of registration. After closing the
Registration Wizard, the Users' Data window will appear, where you can create users. The data in bold
are mandatory to enter. See following chapters for details.
Warning! CardioVisions Network Edition will not work without registration.
Registration of CardioVisions
CardioVisions Personal Edition works also without registration in a somewhat limited mode, but
registration has advantages even in this case. Registered users are entitled to receive technical support
as well as information on CardioVisions updates and new features. Registration is required for the
Network Edition, for the use of several recorder devices and certain special software modules.
Registration is performed with the help of the Registration Wizard, which will automatically start with
the first start of the program and will guide you through the steps of registration. The registration
process requires system administrator's rights. You can start the Registration Wizard manually from
the Tools Menu with the appropriate access.
The registration process has two phases.
In the request phase, follow the instructions of the Registration Wizard. After entering the necessary
data the program will create a registration request letter, which contains the registration data as well as
a request code. Please send this letter in an e-mail or by fax to Meditech (e-mail:
[email protected], fax: +36 1 282 9388) directly, or ask your Meditech representative to do this
for you. During registration a key device should be selected that plays a part at the end of registration
and any other registration process that may follow.
In the validation phase, you need to enter the reply code sent by Meditech to your e-mail address or
fax. Please log in as system administrator, start the Registration Wizard from the Tools Menu and
follow the instructions in order to enter the response code. The key device selected during the first
registration phase should also be connected to complete registration. Should the key device be
unavailable at this time (e.g. it has been handed over to a patient), it can also be connected later. If the
key device is connected later, the repeated use of the Registration Wizard is not necessary, therefore it
can be connected by any user. During uploading or downloading the data, the program will recognize
the key device and the registration process will be completed.
22
Adding new users
You can create new users in the Users' Data window, which will automatically open with the first start
of the program. Later you should open this window by selecting Tools Menu / System Administrator
Tools / Users' Data. Only the system administrator has the right to open this window. Here you can set
the minimal length of the login password. By clicking on the Permission button you can grant access
rights to certain users or revoke them. If you click on the New user button, you can create a new user
in the appearing window.
In the New User window the data in bold are
mandatory to enter. If there is a tick next to Create
personal folder, the software will create a separate
folder in the database for the user. The name of the
user's own folder is their family name by default, but
it can be changed in the field at the bottom. If there is
a tick next to Create personal Demo, the software
will create a subfolder containing demo
measurements in the user's own folder. Through the
demo measurements the user can test the functions
view settings of the software.
23
Selecting the communication port
In order to communicate successfully with the device, the communication port to be used must be set.
Please connect the optical cable to a free serial port on the computer, then connect a device to the
optical cable. Start CardioVisions, then open the Options window by clicking on the Options
command of the Tools Menu. Select ABPM from the list on the left side of the Options window, then
select a communication port and the type of the connected device on the panel appearing on the right
side (see picture). Check the connection by clicking on the Test button. During communication, a
progress bar will be seen. The program will inform you of the success of communication in a message
window. If communication is not successful, select another communication port and repeat the test. If
communication cannot be achieved through any of the ports*, check the connection of the cable both
on the side of the device and that of the computer, as well as the charging status of the batteries of the
device (the device displays low battery voltage: periods will appear between the digits at the bottom of
the display).
Warning! In the case of a Network Edition installation, this setting must be completed on each client
computer.
* The serial port to be used may not be available in Windows Operating System due to a failure. This
can be checked by opening the System element of the Control Panel and clicking on the Device
Manager label (Windows 9X). Should this be the case, please turn to the system administrator.
24
Importing existing ABPM data
If you used our Medibase software in the past and you wish your previous records to be available in
your CardioVisions database, the old database can be added to your current CardioVisions database
with the help of the Import Wizard. Registration is essential for the use of the Import Wizard.
After registration you can start the Import Wizard by clicking on the Tools Menu / Data Import /
Medibase Format of the CardioVisions software. Follow the commands belonging to each step. You
can find detailed information in the Help of the software.
CardioVisions Help
You can start the Help of the software by clicking on the Contents command of the Help Menu or by
pressing F1. When pressing F1, the Help displays the topic belonging to the actual item. The topics in
the Help can be selected from the list located on the left. The selected topic can be viewed on the right.
Each topic contains links, which are marked by underlining and color. By clicking on the links with
the mouse, new topics or hidden texts will appear. Most pictures to be found in the Help also contain
links, clicking on which new information will appear, or the picture will change, producing even more
links (e.g. the structure of the menus).
If you only wish to start the Help alone, please click on Start Menu / Programs / Meditech /
Installation and Information / CardioVisions 1.0.10 / Help.
25
CardioVisions Software License Agreement
IMPORTANT - READ CAREFULLY: This License Agreement is a legal agreement between you
(either an individual or a single legal entity) and Meditech Ltd. for the CardioVisions software which
includes computer software (SOFTWARE) and may contain accompanying data carrier, printed
material and "on-line" or electronic documentation . By installing, copying, or otherwise using the
SOFTWARE, you agree to be bound by the terms and all the information and conditions described in
this Agreement. If you do not agree to the terms of this Agreement, promptly return the unused
SOFTWARE to the place from which you obtained it.
SOFTWARE LICENSE
The SOFTWARE is protected by copyright laws and international copyright treaties, as well as other
intellectual property laws and treaties. The SOFTWARE is licensed, not sold.
GRANT OF LICENSE
This Agreement grants you the following rights:
Software: You may install and use one copy of the SOFTWARE only on one computer.
Storage/Network Use: You may also store or install a copy of the SOFTWARE on a storage device,
such as a network server, used only to install or run the SOFTWARE on your other computers over an
internal network.
DESCRIPTION OF OTHER RIGHTS AND LIMITATIONS
Limitations on Reverse Engineering, Decompilation, and Disassembly: You may not reverse engineer,
decompile, or disassemble the SOFTWARE.
Separation of Components: The SOFTWARE is licensed as a single product. Its component parts may
not be separated for any purposes.
Rental: You may not rent or lease the SOFTWARE from anyone except from Meditech or an
authorized representative of Meditech.
Trade: You may not distribute, sell, lease or otherwise bring to the market the SOFTWARE.
Demonstration: You may only demonstrate or hand the SOFTWARE on if all the information
described in this Agreement is disclosed to third parties.
Software Transfer: You may not transfer any of your rights under this Agreement, to any other party,
without the prior written consent of Meditech Ltd.
Termination: Without prejudice to any other rights, Meditech may terminate this Agreement if you fail
to comply with the terms and conditions of this Agreement. In such event, you must destroy all copies
of the SOFTWARE and all of its component parts.
COPYRIGHT
All title and copyrights in and to the SOFTWARE, the accompanying electronic and printed materials,
and any copies of the SOFTWARE are owned by Meditech Ltd. The SOFTWARE is protected by
copyright laws and international treaty provisions. Therefore, you must treat the SOFTWARE like any
other copyrighted material, except if you are allowed to make a copy of the software only for control
and evaluation purposes. You may not copy the printed materials accompanying the SOFTWARE.
MISCELLANEOUS
This Agreement is governed by the laws of Hungary. Should you have any questions concerning this
Agreement, please contact Meditech Ltd.
Meditech ABPM-04 product warranty information
(a) RECORDER WARRANTY. The ABPM-04 device will be free from defects in materials and
workmanship under normal use and service for a period of two (2) years from the date of receipt.
26
This warranty covers the ABPM-04 recorder unit. This warranty does not cover any accessories
that might come with the device.
(b) ACCESSORIES WARRANTY. The non-disposable accessories delivered with the ABPM-04
device will be free from defects in materials and workmanship under normal use and service for a
period of one (1) year from the date of receipt. This warranty covers the following accessories
delivered with the ABPM-04 device exclusively: carrying case, serial interface unit with twin
optical cable, monitor holder with straps, AA accumulators (if supplied with the set), battery
charger (if supplied with the set).
(c) CUFF WARRANTY. The cuff delivered with the ABPM-04 device will be free from defects in
materials and workmanship under normal use and service for a period of six (6) months from the
date of receipt. This warranty covers the cuff delivered with the ABPM-04 device exclusively.
(d) SOFTWARE WARRANTY. The CardioVisions software under normal use will perform
substantially in accordance with the accompanying written/electronic documents for a period of
ninety (90) days from the date of receipt.
This warranty is valid at the local supplier, or at the site of purchase, as displayed upon a commercial
invoice or any other valid business document duly signed by the supplier and the recipient of the
ABPM-04 system. If such business document displaying a certain site for warranty validity cannot be
presented, this warranty is valid at Meditech HQ office in Budapest, Hungary.
This warranty does not cover any malfunction or defects of the device or any of its accessories arising
from improper use, accident, theft, or use of the device outside its operating environmental
specifications and intended measurement range as described on page 7. of the ABPM-04 user’s guide.
Removing the closing label from the back side of the device, or opening the device any other way
voids this warranty.
NO OTHER WARRANTIES. Meditech disclaims all other warranties, either express or implied,
including, but not limited to, implied warranties of merchantability and fitness for a particular purpose,
with regard to the ABPM-04 device, any accessory or other accompanying hardware, and the
CardioVisions software.
NO LIABILITY FOR CONSEQUENTIAL DAMAGES. In no event shall Meditech be liable for any
special, incidental, indirect, or consequential damages whatsoever (including, without limitation,
damages for loss of business profits, business interruption, loss of business information, loss of data,
or any other pecuniary loss) arising out of the use of or inability to use the ABPM-04 device, its
accessories and/or the CardioVisions software, even if Meditech has been advised of the possibility of
such damages.
27