1
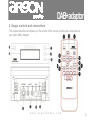
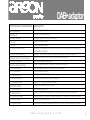
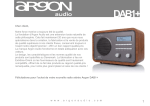
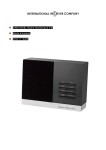
DAB+adaptor
Dear Customer,
Quality has always been our driving force and founding
Argon Audio is a natural extension of this philosophy.
We have 20 years' experience in creating and specifying
high quality products, manufacturing them and selling them
on to end users with Value-for-Money as the primary aim.
And Argon Audio is a brand fully compliant with these values.
Design, features and quality standards are all specified
in Denmark and manufacturing takes place in the Far East,
where quality vendors are highly competitive - and as a result
supply outstanding Value-for-Money products
– to the delight of both ourselves and our customers!
Congratulations with your new Argon DAB+ Adaptor.
w w w . a r g o n a u d i o . c o m
1
DAB+adaptor
Content
1 Introduction
1.1
1.2
Safety
Contents of the box
2 Usage, controls and connections
3 Using Your Argon DAB+ Adaptor
A
B
C
D
E
F
G
H
I
J
K
L
”Power” button
”Tune” buttons
”Menu” button
”Snooze” button
”Display” button
”Sleep” button
”AutoScan” button
”Clock” button
”Alarm” button
”Preset” buttons (1-6)
”Volume” buttons
Resetting Your DAB+ Adaptor and New Stations
4 General Specifications
5 DAB Frequency list
w w w . a r g o n a u d i o . c o m
page
page
page
page
3
3-5
5
6-7
page
page
page
page
page
page
page
page
page
page
page
page
page
8
8
10
10
10
10
11
11
12
12
13
13
13
page
page
14
14
2
DAB+adaptor
1. Introduction
1.1 Safety
Safety instructions
WARNING
To reduce the risk of fire or electric shock, do
not expose this unit to rain or moisture.
Read Instructions
Read all safety and operating instructions
before operating the product.
CAUTION
Use of controls or adjustments or performance
of procedures other than those specified may
result in hazardous radiation exposure.
The lighting flash with arrowhead symbol, within
an equilateral triangle, is intended to alert user
of the presence of un-insulated dangerous
voltage within the products enclosure that may
be of sufficient magnitude to constitute risk of
electric
shock to a person.
The exclamation point within an equilateral
triangle is intended to alert user to the presence
of important operating and maintenance
(servicing) instruction in the literature
accompanying the appliance.
Retain Instructions
Keep all safety and operating instructions for
future reference.
Heed Warnings
Take note of all warnings on the product and in
the operating instructions.
Follow Instructions
Follow all operating and usage instructions.
Cleaning
Unplug this product from the power source
before cleaning. Do not use liquid or aerosol
cleaners.
Use a damp cloth for cleaning.
w w w . a r g o n a u d i o . c o m
3
DAB+adaptor
Attachments.
Do not use attachments of accessories not
recommended by us as they may cause
hazards.
.
Water and Moisture
Do not use this product near any water source
or water hazard.
Placement
Place the product on a stable surface or
recommended stand, otherwise the product
may fall and cause injury to a person, and
damage to the product.
Follow the manufacturers instructions for
mounting the product.
Ventilation
To ensure reliable operation and to prevent
overheating, do not block or cover ventilation
openings and slots with fabrics or impermeable
material Do not place in a built-in
installation such as a bookcase or rack unless
there is proper ventilation or our instructions
have been adhered to.
Heat
Do not place this product anywhere near heat
sources such as radiators, stoves, and other
products (including amplifiers) that produce heat.
Power Sources
This radio is specifically designed for operation
within the electrical range(s) specified on the
provided power adapter and use outside of this
range shall be at your own risk. Please contact
your local electric utility company if you have any
questions about the electrical voltage at your
intended location of use.
Power-cord Protection
Arrange the power-cord to minimize the risk of
damage from traffic or other hazards. Pay
particular attention to the area near the plug head,
the power source outlet and the connection from
the product.
Lightning
Unplug the product from the power source during
lightning storms of if unused for long periods of
time. This will prevent lightning and power-line
surge damage to the product.
w w w . a r g o n a u d i o . c o m
4
DAB+adaptor
Overloading
Do not overload wall outlets, extension cords,
or integral power circuits as this can result in a
risk of fire or electric shock.
Object and Liquid Entry
Never push any object through the product
openings, as this can result in a fire, electric
shock or damage. Do not spill liquids on the
product.
Servicing
Do not attempt to service the product yourself.
Refer all servicing to qualified service
personnel.
1.2 Contents of the box;
• ARGON DAB+ Adaptor
• DC5V 1A Power adapter
• User manuals different languages.
We recommend that you keep the original box
and packing material for future transportation.
We also recommend that you keep this User
Manual.
Damage Requiring Service
Call for servicing when:
a) the power-supply cord or plug is damaged.
b) objects have fallen through or liquids have
been spilled into the product openings.
c) the product does not operate normally when
following the operating instructions.
d) the product has been dropped or damaged
in any way.
w w w . a r g o n a u d i o . c o m
5
DAB+adaptor
2. Usage, controls and connections
This chapter describes and shows you the location of the various controls and connections on
your Argon DAB+ Adaptor.
w w w . a r g o n a u d i o . c o m
6
DAB+adaptor
Functions and connections
Description
1. LCD display
2. Reciever
3. Power button
4. Tune +
5. Tune 6. Antenna connection
The display of the adaptor
7. Audio out connection
8. Digital audio out connection
9. Power connect
10. Snooze/mute button
11. Power button
12. Clock button
13. Menu button
14. Display button
15. Volume button
16. Select button
17. Tune button
18. Sleep button
19. Autoscan button
20. Alarm button
21. Preset button
remote control reciever eye
Press the button for 3 sec. To turn on/off
Press to choose stations
Press to choose stations
Antenna is connected here. Either your own choice of antenna or the antenna that
comes with the adaptor
Use RCA/stereo phono cable to connect the Adaptor to your Hi-Fi system
Use this connection if you have a Amplifier with Digital input
Connect the power supply here
Press to temporarily turn off alarm or press to mute sound
Press to enable Stand-by or Power-on of the Adaptor
Press to adjust the clock
Press to enter the Main Menu
Press to change between Menu information
Press + or - to adjust volume up or down
Press once to use as "enter" button
Press to change station
Press to activate and adjust when the Adaptor should turn off automatically
Press to search for stations. Press and hold 5 sec. To make a full-scan of stations
Press to set the alarm timer
Press either number to get saved stations or hold for 5 sec to save station playing.
w w w . a r g o n a u d i o . c o m
7
DAB+adaptor
3. Using Your Argon DAB+ Adaptor
Notice: Most of the controls and functionality for the DAB+ Adaptor are on the Remote control only.
The usage of controls and buttons in this manual refer to the Remote control unless otherwise stated.
A. Power button on the Unit and on the Remote
When connected to a Power outlet the Display on the Argon DAB+ Adaptor, will show similar to figure 3-1.
.
After app. 3 seconds the Argon DAB+ Adaptor automatically goes into auto tune process.
The Display will show similar to figure 3-2.
w w w . a r g o n a u d i o . c o m
8
DAB+adaptor
When stations are found during the auto tune process, the Display similar to figure 3-3 will appear.
(In the figure below the units has found the station DR P3 – a Danish broadcast in Denmark only).
If no stations are found during the auto tune process the Display similar to figure 3-4 appears.
By pressing the “Power” button on the Unit or on the Remote you switch between Power ON or Standby.
w w w . a r g o n a u d i o . c o m
9
DAB+adaptor
B. “Tune” buttons on the Unit and on the Remote
By pressing the ”Tune +/-” buttons you can choose the station you want to listen to.
C. “Menu” button
The Menu button allows you to see different kind of Display information.
To activate Menu:
Use the remote control - Press “Menu” button followed by press "Display" once.
Hereafter by pressing the ”Display” button continually, different Display information will appear
"Menu" information shown contains; Reset function, SW version, Date/time, Program type, Bit rate, Scrolling
Radio text, Station frequency and Station name.
Information shown in the Display will change by a press on the "Display" button.
Some information shown in the Display, during use of Menu function, can be accessed for further information
or it can be changed. To access further in the information Displayed press “Select” on the Remote.
D. ”Snooze” button
(1) Pressing the ”Snooze” button will mute the sound, to turn off the mute function, press the ”Snooze” button
again.
(2) If the DAB+ Adaptor is in Alarm mode, you can press the ”Snooze” button on the remote control to put the
unit in to snooze mode.
E. ”Display” button
The Display button is used to navigate through the different Display information once ”Menu” function is
activated. (See point C ”Menu button”).
w w w . a r g o n a u d i o . c o m
10
DAB+adaptor
F. ”Sleep” button
The Sleep function can be set to turn the DAB+ Adaptor off automatically after a predefined time.
The Sleep function turn-off-time is set the following way:
Press and hold "Sleep" button for 3 sec.
Press "Tune + or -" to select ON or OFF
Confirm by pressing “Select”
Press "Tune + or -" to Sleep time
Confirm the wished Sleep time by pressing “Select”.
G. ”AutoScan” button
By pressing ”Autoscan” the DAB+ Adaptor will automatically scan for new stations. Display will show
scanning status as in figur 3-5
There are two Auto scan options:
(1)
(2)
Auto tune local: Scan all frequencies in the national channel allocation. This should take only a few
seconds to do.
Local auto tune is activated by a short press on the “Auto scan” button.
Auto tune full: Scan the full range of all digital frequencies. This may take a few minutes.
Full auto tune is activated by pressing and holding the “Auto scan” button for 3 sec.
w w w . a r g o n a u d i o . c o m
11
DAB+adaptor
H. ”Clock” button
This button allows You to manually set the Time, Date and Year.
Press the “Clock” button and Year, Date and Time will appear in the Display.
“Year” will start flashing as the first. Change/choose the right “Year” by using “Tune +/-”, when the right year
appear in the Display, press “Select”. Continue the same process with Date and Time”.
I. ”Alarm” button
To Set the Alarm. Press and hold "Alarm" button for 3 sec.
Press "Tune + /-" to select “Alarm1” or “Alarm2”.
Confirm Your selection by pressing “Select”.
Next appears: “OFF”, Choose either "ON" or "OFF" by using “Tune + / -".
Confirm your selection by pressing ”Select”.
Next appears: “Daily”, by using the “Tune +/-” You can choose either: “Daily”, “Date”, “Week Day”,
“Weekend”, “Weekly” or “Once”.
Confirm Your selection by pressing “Select”.
Use the “Tune +/-” to adjust the settings for the choice you make above.
Confirm Your selection by pressing “Select”.
Finally appears: “Buzz”, by using the “Tune +/-” You can choose either: “Buzz” or “Radio”.
Confirm Your selection by pressing “Select”.
Notice: if you have chosen “Radio” it will restart in Alarm mode on the Radio Station last used before you
turned off the Unit.
w w w . a r g o n a u d i o . c o m
12
DAB+adaptor
J. ”Preset” buttons (buttons numbered 1-6)
Pressing one of the numbered buttons can either Store or Recall a previously stored station.
(1) To store a Station.
Once listening to the Station you want to Store, decide under which preset (number) You want to Store
the Station.
Press and Hold this “Numeric” button of your choice for 3 seconds and the Stations will be Stored.
You can do so for up to 6 stations. One station for each Numeric number on the Remote can be stored.
(2) To Recall a Station.
Simply press the “Numeric” number on the Remote that corresponds with the Station you want
K. ”Volume” buttons (+/- or up down)
Press either “+ or –“ volume to increase or decrease the volume. The display will show the volume.
Notice: that the volume set on Your amplifier (where the DAB+ Adaptor is connected) will be the maximum
volume level the DAB+ adaptor can play when at full level (full volume level of the DAB+ Adaptor is “20”)
L. Resetting Your DAB+ Adaptor and New Stations
If you change location (move to another place) or want to add new Stations, in case more stations have
become available, You should Reset the DAB+ adaptor.
By resetting the DAB+ adaptor it will automatically find all new Stations and remove possible obsolete
Stations at the same time. It will also search for Station on a new frequency in case you have moved.
Reset of the DAB+ adaptor is done by:
Press "Menu" once followed by pressing "Display" once (reset info will appear in the display), press “Select”
to confirm reset.
The DAB+ adaptor will automatically start up and do a full scan for stations.
Notice: when doing a Reset you will delete all preset station and Alarm setting previous made.
w w w . a r g o n a u d i o . c o m
13
DAB+adaptor
4. General Specifications
Frequency range – DAB Band III: (174~240MHz)
LCD display: 16x2 characters.
Input voltage: 5V DC/1A.
Audio out: Optical Digital and analogue RCA stereo connection to external Amplifier.
Dimensions and weight (WxHxD): 140mmx63mmx63mm Weight: 0,66 kg
5. DAB Frequency list
w w w . a r g o n a u d i o . c o m
14