1
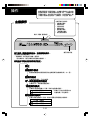
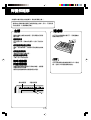
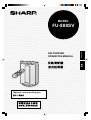
R
MODEL
AIR PURIFIER
OPERATION MANUAL
Tabletop / wall-mounting type
ENGLISH
ENGLISH
FU-888SV
ENGLISH
CONTENTS
Cluster Ion Control
SAFETY PRECAUTIONS ........................ E-2
The unit controls the ratio of negative cluster ions and positive cluster ions
depending on the condition of the room.
• CAUTIONS CONCERNING THE USAGE
. OF THIS PRODUCT .................................... E-3
• Clean mode
Approximately the same amount of
positive and negative cluster ions are
discharged. This mode is effective for
removing mold fungus in the air.
• Refresh mode
In this mode, the ratio of negative cluster
ions is increased. Negative ions are ions
that can be found most in the natural environment such as near waterfalls, etc.,
and have a characteristic of gently
refreshing the body.
HEPA Filter
• High-efficiency particulate air filter
Stamina-power carbon
• Powerful deodorization by large particles
of columnar charcoal.
• CAUTIONS CONCERNING
. THE INSTALLATION .................................... E-3
PARTS NAMES ............................................. E-4
• ACCESSORIES ........................................... E-5
INSTALLATION ....................................... E-6
• HOW TO PUT THE UNIT ON A TABLE .......... E-6
• HOW TO MOUNT THE
UNIT ON A WALL ......................................... E-7
PREPARATION........................................ E-8
• INSTALLING THE FILTERS ......................... E-8
• INSERTING BATTERIES
INTO THE REMOTE CONTROL ................. E-8
• HOW TO USE THE REMOTE CONTROL ... E-9
OPERATION .......................................... E-10
• MAIN UNIT OPERATION .......................... E-10
• REMOTE CONTROL OPERATION ........... E-11
CARE AND MAINTENANCE ................. E-12
• MAIN UNIT ................................................ E-12
• FILTERS .................................................... E-12
• REPLACING THE FILTERS ...................... E-13
TROUBLE SHOOTING .......................... E-14
FOR UNDERSTANDING
THE PRODUCT
Some of the odor ingredients
adsorbed by the filters become separated and are discharged through the
exhaust port as odor.
Depending on the usage environment, this odor may be noticed from
the exhaust port in several months.
In this case, purchase the optional
filter FZ-40SEF and replace the filters.
SPECIFICATIONS ................................. E-14
Thank you for purchasing the SHARP FU888SV. Please read the instruction manual
carefully for correct usage. Before using this
product, be sure to read “Safety precautions.”
After reading this manual, keep it in a convenient location for future reference.
This product is for household use only.
E-1
ENGLISH
FEATURES
SAFETY PRECAUTIONS
• Do not use the unit if the power cord or plug is damaged or the connection to the wall
outlet is loose.
Electrical shock, short circuit and/or fire may occur as a result.
• Do not damage, break, coat, forcefully bend, pull, twist, bundle, pinch or place heavy
objects on the power cord.
If the power cord is damaged, fire and/or electrical shock may occur as a result.
• Do not operate at voltage other than AC 220~240V.
Fire and/or electrical shock may occur as a result.
• Do not modify by yourself. Repair and disassembly of this product are to be performed by
authorized service personnel only.
Fire, electrical shock and/or injury may occur as a result.
For repair, contact your dealer or the nearest Sharp Service Center.
• Periodically remove dust from the power plug
Accumulated dust on the power plug may cause bad insulation from humidity, etc.
Fire and/or electrical shock may occur as a result.
• When cleaning the unit, be sure to remove the power plug from the wall outlet.
In addition, never handle the power plug with wet hands.
Electrical shock and/or injury may occur as a result.
• Do not use in any place where oil content in the air, such as cooking oil, is high.
Cracking of the unit surface may occur as a result.
• Do not wipe the unit with benzene or paint thinner. Also, do not spray insecticides on the
unit.
Cracking, electrical shock and/or fire may occur as a result.
• Do not operate the unit when using fuming type insecticides.
Chemical ingredients may accumulate inside the unit and then discharge from the exhaust port
when the unit operates. Discharge of such chemicals may affect your health.
• Do not let the unit intake flammble objects or cigarette ignited with fire.
The unit may ignite as a result.
• Do not use the unit where it is humid, such as in a bathroom, etc., or where the unit may
get wet.
Electrical shock and/or malfunction may occur as a result.
• Do not insert fingers or foreign objects into the intake or exhaust ports.
Electrical shock and/or malfunction may occur as a result.
• When mounting on a wall, select a rigid wall or pillar.
The unit may fall as a result.
• When removing the power plug, always hold the plug and never pull the cord.
Electrical shock and/or fire from short circuit may occur as a result.
• Ventilate well when using the unit along with a heating appliance.
Carbon monoxide poisoning may occur as a result.
• When it is not used for a long time pull out the power plug from the outlet.
Electrical shock from bad insulation and/or fire from short circuit may occur as a result.
• If the supply cord is damaged, it must be replaced by the manufacturer or its service agent
or similarly qualified person in order to avoid a hazard.
• The batteries must be removed from the appliance before it is scrapped and that they are
disposed of safely.
E-2
CAUTIONS CONCERNING THE USAGE OF THIS PRODUCT
• Do not block the intake and exhaust ports.
• Do not use the unit near or on hot objects, such as a stove, etc. Also, do not use the unit where it may
come into contact with steam.
• Do not lay the unit down.
Deformation, malfunction and/or overheating of the motor may occur as a result.
• Do not use the unit in a kitchen, etc., where there is generation of lampblack.
• Do not use detergent when cleaning the unit.
The unit surface may become damaged or cracked.
In addition, the sensors may malfunction as a result.
• When transporting the unit, always hold the handle on the back of the unit.
Holding the front panel when carrying may cause it to detach, thus dropping the unit and resulting in
injury.
CAUTIONS CONCERNING THE INSTALLATION
• Location where there are inverter lighting equipment or electronic light sensor device
The remote control may not operate properly. In this case, move the unit away from such lighting
facility or change the facing direction.
• Location exposed to direct sunlight
The unit may not be able to receive signals from the remote control
The unit may not be able to respond to the signals of the remote control if the ends of fluorescent
lighting become black or lights flicker due the depletion of service life; however, this is not a malfunction
of the remote control or the main unit. In this case, replace the lighting with new fluorescent tubes.
TAKE CAUTION TO THE FOLLOWING DURING INSTALLATION
• Keep a distance of at least 2m away from televisions and radios
It can interrupt the receiving signal.
• Keep a distance of at least 60cm away from the wall
The motor may overheat, causing malfunction as a result.
• Avoid to install at locations where the sensor is exposed to direct blowing air.
The unit may not operate properly.
• Avoid to install at locations where the intake or exhaust port will be blocked by curtains, etc.
Curtains, etc., may become dirty or malfunction may occur as a result.
EFFECTIVE USAGE
• Stable surface with good ventilation
• Near smoking area
Air pollution is detected quickly.
• Tiny dust and odors such as tobacco smoke rise and accumulated in the upper level of the room.
• Large dust such as pollen and house dust accumulated at the lower level of the room.
• The wall, behind the exhaust port may become dirty as time passes. When using the unit for extensive
period in the same location, put some device like plastic sheet on the wall for easy cleanig at the
same time, clean the wall occasionally.
E-3
ENGLISH
DO NOT USE THE REMOTE CONTROL IN THE FOLLOWING LOCATIONS
PARTS NAMES
MAIN UNIT DISPLAY
Tobacco smoke removal operation lamp
Filter replacement lamp
AUTO operation lamp
Pollen removal operation lamp
OFF timer indication lamps
Fan speed lamps
*
Power lamp
(Light up when the power plug is
inserted into the wall outlet)
(preset by remote control)
Plasmacluster
High
Low
Medium Max
Remote control receiver
Dust sensor
Odor sensor
(Detects odors such as tobacco smoke,
incense, pets, cosmetics, etc.)
Air quality Indication lamp
It indicates cleanliness of air
Clean (green) Little dirty (orange) Very dirty (red)
(Detects dust, smoke, pollen, house dust, etc.)
Disassembled
Drawing
MODE/OFF button
(Turning on/off with this button)
Main unit
HEPA filter (white)
(Dust collection filter)
(W/ apatite antibacterial filter)
Stamina-power carbon (black)
(Deodorization filter)
Pre-filter
Front panel
Remote control
Hook
Stand
(Be sure to mount for tabletop installation)
Thumbscrew
*
It can’t remove the noxious substances
(carbon monoxide etc.) of cigarette.
E-4
CLUSTER ION LAMP
Cluster ion operation can be selected using the remote control.
Blue light
When the cluster ion operation is in the Clean mode or AUTO cluster ion mode and the
air in the room is dirty, the light turns on and the unit will operate in the Clean mode.
Green light
When the cluster ion operation is in the Refresh mode or AUTO cluster ion mode and
the air in the room is clean, the light turns on and the unit will operate in the Refresh
mode.
Light off
ABOUT THE DUST SENSOR
ACCESSORIES
• The dust sensor displays a clean sign depending on the relative change of the environment at the time the power plug is inserted in the wall outlet and after.
• When the air is extremely dirty at the time.
When the power plug is inserted, the dust
sensor display may light up in green. (this
is the initial setting of the sensor)
Please switch to manual operation under
this situation.
Remote control
(1 piece)
Battery
(AA battery X
2 pieces)
When using on tabletop
Stand
(1 piece)
BACK
Handle
Exhaust port
Thumbscrew
(2 pieces)
Located on
the bottom
part of the
stand
When mounting this product
onto a wall
Wall mounting
bracket 1
Wall mounting
bracket 2
Wood screw
(4 pieses)
Power cord
Power plug
It changes with
destinations.
E-5
Small screw
(2 pieses)
Cushion gum
(2 pieses)
ENGLISH
No cluster ions are generated.
If the lamp is bright when sleeping, or if the ion generation noise is annoying, turn off
the cluster ion operation.
INSTALLATION
HOW TO MOUNT THE UNIT ON
A WALL
HOW TO PUT THE UNIT ON A
TABLE
MOUNTING THE STAND
CAUTIONS
WHEN MOUNTING THIS
PRODUCT TO A WALL
1 Remove the front panel.
• At the same time, also remove the prefilter, stamina-power carbon and the
HEPA filter.
1
Front panel
• Choose strong point on the wall with firm
piller or timber etc. for mounting.
• Never mount the unit to a thin wall or
plasterboard of insufficient strength. The
unit may drop as a result.
• When mounting the unit to a wall, remove
the front panel and hold the main unit.
Holding the front panel may cause it to
become detached, thus dropping the unit and
resulting in bodily injury.
• Do no install where there is generation of
lampblack, such as in a kitchen, etc.
The unit surface may crack or the sensors may
malfunction as a result.
2
1
the unit with its front
2 Place
side facing down on a flat
1 Choose the mounting location
and stable surface.
Leave space around the bracket by referring
to the illustration below. The unit cannot be
mounted if there is insufficient spacing
around the bracket.
• Place a soft cloth, etc., to prevent
damaging the unit.
75cm or more
Size of main
unit
the tabs of the stand
3 Insert
into the holes of the main
75cm or more
unit and fix the stand using
the included thumbscrews
(2 pieses).
Tabs
69cm or more away
from the ceiling
75cm or more
Mounting
bracket 1
60cm or more away
60cm or more away
from sidewall
from sidewall
Holes
CAUTION
Mount on a flat surface
• Do not mount the unit on a
location that is not flat such as
a wall with a door header, etc.
Do not mount the unit to a thin
wall with little support such as
a plasterboard, etc. The unit
may fall and will be very
dangerous.
Thumbscrews
E-6
mounting bracket 1 on the
2 Inatall
wall
4 Place the 2 cushion gum
• Install it after consulting a specialist and you
can get the confirmation of the strength.
• Mount the bracket using the included wood
screws (long screws) so that it levels.
Use 4 wood screws (long screws)
Cushion gum (2 pieces)
(1) Align the horizontal positions of mounting brackets 1 and 2 and hook the bracket
2 to bracket 1.
(2) Hold the bottom of the main
unit, pull the
unit towards
you and then
pull down.
Wood
Mounting
bracket 1
Wood screws
(4 pieces)
Use 3 wood screws (long screws)
Wood
Mounting
bracket 1
6 Check the installation
• Check to make sure that the tabs on mounting bracket 2 are securely mounted to the
tabs on mounting bracket 1.
• Check that the power cord is not pinched.
Wood screws
(3 units)
mounting bracket 2 onto
3 Install
the main unit
Mount the bracket to the back of the main unit
using the included small screws (2 pieces).
REMOVING THE UNIT
Pull the bottom of the unit towards you and then
lift it up.
Do not use wood screws
(long screws)
Mounting bracket 2
NOTES
• When removing
the unit, use a firm
stand.
• Pull out the power
cord before removing the unit.
Small screws
(2 pieces)
E-7
ENGLISH
5 Mount the main unit
PREPARATION
Be sure to remove the power plug from the wall outlet.
INSTALLING THE FILTERS
To maintain the quality of the filters, they are pre-installed in the main unit and covered with
plastic bags. Be sure to remove the filters from the plastic bags before using the unit.
1
Remove the filters
the unit with its front
1 Place
side facing up
Place the unit on a flat surface, and make
sure that the stand does not contact the
surface.
2
Remove the front panel
Press the hook on the bottom of the front
panel and lift up to remove.
The stand should
not be contorted
with the surface
Soft cloth
Table, etc.
Front panel
1
2
2
1
1
Hook
Prefilter
out the pre-filter, and
3 Take
then take out the staminapower carbon (black) and
HEPA filter (white) from the
plastic bags.
Stamina-power carbon
INSERTING BATTERIES INTO THE REMOTE CONTROL
1
Remove the
back cover
Press the cover and
slide towards yourself.
2 Insert batteries
Insert batteries according to the
and as shown below.
the back
3 Close
cover
E-8
About the batteries
• Life of the batteries is about 1 year.
Replace the batteries when the remote
control does not function.
• Improper use of the batteries may cause
battery fluid leakage and/or damage. Be
sure to follow the instruction below:
• When replacing the batteries, replace
both batteries with new ones of the
same type. (Use AA size alkaline batteries (2 pieces) or AA manganese batteries (2 pieces).)
• Remove the batteries when not in use
for long period to avoid malfunction
caused by fluid leakage.
* The included batteries are for initial use
only and may deplete within 1 year.
2
Tabs
Install the filter
HEPA filter
the HEPA filter from the
1 Takeout
plastic bag and install it into the
main unit with the
display facing upward.
Insert in the direction so that the tabs on
the HEPA filter are facing toward you.
Proper operation cannot be achieved if the
filter is installed on a wrong side.
Stamina-power carbon
the stamina-power car2 Takeout
bon from the plastic bag and install it in the main unit.
ENGLISH
Make sure the tabs on the HEPA filter remain visible.
3 Install the pre-filter
Insert the 4 tabs of the pre-filter into the holes of
the main unit.
in the usage start date on
4 Fill
the replacement label affixed on
Back of front panel
Replacement label
the back of the front panel and
then mount the front panel.
The date is a refarence for filter replacement.
HOW TO USE THE REMOTE CONTROL
• Operate the remote control by pointing fowards the main
unit (receiver).
• The maximum signal range is about 7m (front).
• Make sure no object obstruct the signal.
• When receiving signals the main unit will give a beep
sound.
NOTE
• Avoid making strong impact on the remote control. In
addition, do not wet or place it under direct sunlight or
near a stove, etc. Malfunction may occur as a result.
E-9
Receiver
Transmitter
OPERATION
For the first 30 seconds after the power plug is inserted
into the wall outlet, the unit will check the conditions of
the air. If operation is set to ON during this time, the
Clean sign lamp will alternately flash in green, orange
and red. During this time, the Cluster ion lamp will light
blue and the unit will be in the Clean mode.
MAIN UNIT OPERATION
MODE/OFF button
Operations available with
main unit
•
•
•
•
•
•
AUTO operation
Low operation
Medium operation
High operation
Maximum operation
Tobacco smoke removal
operation
• Pollen removal operation
*
Plasmacluster
Cluster ion lamp
The unit will start operation when the MODE/OFF button is pressed.
(The unit will start operation in AUTO mode)
• During operation, the cluster ion lamp will light up.
(Cluster ion mode is set to be AUTO in the initial operation)
Various operation modes suitable for different conditions are available.
Stop
AUTO operation
The fan speed is automatically switched (High, Medium, Low) depending on the air quality detected by the dust sensor.
Low operation
The unit will operate silently with little discharged air.
Medium ~ Maximum operation
The unit will operate with at medium, high or maximum fan speed.
smoke removal operation
*Tobacco
The unit will operate in High fan speed for 10 minutes, then the unit will
return to AUTO mode.
10 minutes: High fan speed
AUTO mode operation
can’t remove the noxious
*Itsubstances
(carbon monoxide etc.) of cigarette.
Pollen removal operation
The unit will operate in High fan speed for 10 minutes, then the unit will
alternately operate between Low and High fan speed.
10 minutes: High fan speed
20 minutes: medium fan speed
20 minutes: High fan speed
E-10
REMOTE CONTROL
OPERATION
Operations available with
remote control
• Manual fan speed operation
• AUTO fan speed operation
• Low operation
• Max operation
• Tobacco smoke removal
operation
• Pollen removal operation
• OFF timer setting
• Cluster ion selection
AUTO cluster ion
Clean mode
Refresh mode
*
• To start operation, press the ON/OFF button.
A short beep will be heard and operation will start
from the AUTO mode.
• To stop operation, press the ON/OFF button again.
Operation stops with a long beep sound.
Transmitter
Manual (fan speed)
button
AUTO (fan speed)
button
The fan speed can be
switched between Low,
Medium, High and Max.
The fan speed switched automatically depending on the
amount of pollution in the air.
Low operation button
Max operation button
Operation will be in the Low
mode with little discharged air.
Tobacco smoke re*moval
operation but-
Pollen removal operation button
ton
The unit operates effectively
against pollen in the air.
Unit will operate effectively
against smoking cigarettes,
etc.
OFF timer button
ON/OFF button
Used to start AUTO operation
(short beep) and stop operation (long beep).
Plasmacluster
Filter reset button
Press this button after replacing the filters.
It is dented not to push it by
mistake.
Press the filter reset button
with the point of the ball-point
pen and so on. A remote
controller is sometimes
damaged when it is pressed
with the point of a sharp
object.
AIR PURIFIER
Filter reset button
Used to set the OFF timer.
Every time this button is
pressed, the setting will be
switched as shown below.
1 hour
4 hours
8 hours
Cancel
• The remaining time is indicated by the lamp as time
passes.
• The unit will stop operation
when the timer is up.
In the initial operation, the
Cluster ion mode is also set
as AUTO.
can’t remove the noxious substances
*It(carbon
monoxide etc.) of cigarette.
Cluster ion select button
AUTO cluster ion button
OFF button
The unit will switch between the Clean mode and
Refresh mode automatically depending on the
air quality detected by the dust sensor.
The generation of ions is stopped and the
cluster ion lamp is turned off.
Clean button
The unit will constantly operate in the Refresh mode. The Refresh mode maintains
the balance of ions in the air for a refreshing effect.
(Cluster ion lamp lights up in(green))
The unit will constantly operate in the Clean
mode. The Clean mode is effective for removing
mold fungus in the air.
(Cluster ion lamp lights up in(blue))
Refresh button
If the room smells especially moldy, operate the unit in the Clean mode.
E-11
ENGLISH
Used to quickly clean the air in
the room.
CARE AND MAINTENANCE
(To maintain the best performance of this product, please clean the unit periodically.)
When cleaning, be sure to remove the power plug from the wall outlet. In addition, never
handle the power plug with wet hands.
Electrical shock and injury may occur as a result.
MAIN UNIT
FILTERS
Clean off the dirt on the main unit and the
installing surface as frequent as possible.
Stubborn dirt may be difficult to remove.
Clean using the nozzle of a vacuum
cleaner without removing the pre-filter.
Wipe dry with a soft cloth
For stubborn dirt, wipe with a soft cloth dampened with water or warm water of 40°C or less.
Do not use volatile chemicals
Benzene, paint thinner, polishing powder, etc.,
may damage the unit surface.
Do not use detergents
Detergents may damage the unit surface.
Do not splash water
NOTE
Never apply water on the unit.
Never wash or clean the HEPA filter or
stamina-power carbon using the nozzle
of a vacuum cleaner directly. This will
greatly decrease the performance of the
filters.
ODOR SENSOR
DUST SENSOR
The sensitivity of the sensors will become
unstable if the odor or dust sensor is dirty or
blocked.
Remove dust on the surfaces of the sensor
openings using a vacuum cleaner.
Odor sensor
Dust sensor
E-12
REPLACING THE FILTERS
The filter replacement period is indicated by the filter replacement lamp.
(The lamp will light up in about 5 years, when using the unit for 12 hours daily.)
• The operation hours are saved in memory even when removing the power plug for transportation to another room, etc.
The filter replacement lamp is to be used only as a guide.
If dust or odors cannot be removed easily, replace the filters.
Guide for replacing the filters
• HEPA filter
• Stamina-power carbon
About 5 years after opening
About 5 years after opening
REPLACING THE FILTERS
1
2
See page 8 “Installing the filters” for the replacement procedures.
3
Fill in the usage start date of the filters on the date label included with the replacement filters. Affix the label on the surface
of the replacement label that is already on the back of the front
panel.
After replacing the filters:
Be sure to press the Filter button on the remote control with the power plug inserted in the
wall outlet.
A short beep will be heard and the operation hours stored in the memory will be reset. If
the filter replacement lamp is on, the lamp will turn off.
Replacement filters
• HEPA filter: 1 unit
• Stamina-power carbon: 1 unit
Model: FZ-40SEF
Please consult your dealer for replacement of filters.
Cautions concerning the disposal of filters
Please dispose the used filters according to the local disposal laws and regulations.
HEPA filter materials:
• Filter: Polypropylene
• Frame: Polyester
Stamina-power carbon materials:
• Deodorizer: Activated charcoal
• Frame: Polyester
E-13
ENGLISH
The replacement period is subject to smoking 10 cigarettes per day and the dust collection/
deodorization ability is reduced by half than that of new filters.
The replacement period differs depending on the operation hours and location of installation.
(According to Japan Electrical Manufacturers’ Association JEM1467)
Depending on the usage environment, odor may be noticed from the exhaust port in several
months.
(For understanding the product. Refer E-1)
TROUBLESHOOTING
Before calling for repair, check the symptoms below for possible remedies, since the problem may
not be a malfunction of the unit.
SYMPTOM
REMEDY (not a malfunction)
The remote control does not
function
• Have the batteries depleted?
• Are the batteries inserted with correct polarity?
• Is a fluorescent lighting in the room flickering?
Odors and smoke cannot be
removed easily
• Are the filters covered with heavy dust?
The Clean sign lights up in
green even when the air is
dirty
The Clean sign lights up in
orange or red even when the
air is clean
• Is the opening of the dust sensor blocked or clogged?
• Was the air already dirty when the power plug was inserted
into the wall outlet? (Refer E-5)
• The sensitivity of the sensor becomes unstable when the
opening of the dust sensor is dirty or is clogged.
Clean the dust around the sensor opening using a vacuum
cleaner. (Refer E-12)
The cluster ion lamp remains
green (blue) and does not
change
A sound is
Click, click
heard from
the unit
• During the Clean mode (or Refresh mode), the cluster ion
lamp color will not change.
Tick, tick, tick
• This is the sound that is emitted when the unit is in
the Refresh mode.
If the sound is annoying, switch the unit to the Clean mode.
• This is the sound that is emitted when the unit is generating cluster ions.
If the sound is annoying, such as when sleeping, etc., set
the Cluster ion mode to OFF.
The discharged air smells
• The ozone generated by the cluster ion generator may have
an odor. However, the amount of ozone generated is very
little and is harmless to the human body. Furthermore, the
ozone decomposes quickly so it does not accumulate in
the room.
The unit does not operate
even when smoking cigarettes
• Is the unit installed in a location that is difficult for the sensors to detect cigarette smoke?
• If the odor or dust sensor openings blocked or clogged?
(In this case, clean the openings.) (Refer E-12)
SPECIFICATIONS
Fan speed
operation
Power supply
Fan speed adjustment
Rated power consumption
Air delivery rate
Applicable floor surface
Cord length
Dimensions
Weight
The applicable floor surface area is the surface area
for operating the unit in Max fan speed.
(According to Japan Electrical Manufacturers’ Association JEM1467)
220-240V 50Hz
Max
High
Medium
Low
39W
21W
10W
4W
240m3/hour 180m3/hour 117m3/hour 30m3/hour
~31m2
2.5m
415mm(W)X197mm(D)X572mm(H)(W/ stand)
6.6kg
About the reduction of standby power consumption.
In order to operate the electrical circuits while the power plug is inserted in the wall outlet, this product
consumes about 0.8W of standby power.
(Under this condition, the power lamp will be on) For the conservation of energy, remove the power plug
when not using the unit
E-14
中文
功能
目錄
離子簇控製
安全注意事項 .......................... C-2
本機因應房間的空氣質數控製正負離子簇的釋
放比率。
• 使用本機時的注意事項 ..................... C-3
• 淨化模式
本機能釋放出同等數量的正負離子簇,有效地
除去空氣中的霉菌。
• 清新模式
在此模式下,負離子簇的比例會提高。大量的
負離子簇存在於自然環境中,如在瀑布附近。
它能使人感到非常清新。
高效能 HEPA 微塵過濾網
• 高集塵效率
強力的活性碳
• 通過碳棒內的大粒子進行高效除臭。
• 安裝本機時的注意事項 ..................... C-3
部件名稱 .............................. C-4
• 附件 ..................................... C-5
空氣爭化機的安裝 ...................... C-6
• 如何在抬面上擺放 ......................... C-6
• 如何將本機固定於牆上 ..................... C-6
準備工作 .............................. C-8
• 安裝過濾網 ............................... C-8
• 安裝遙控器的電池 ......................... C-8
• 如何使用遙控器 ........................... C-9
操作 ................................. C-10
• 主機操作 ................................ C-10
加深對此產品的瞭解
一些形成臭味的成分被過濾網吸入後分
解,然後經出氣口排出。
根據不同的使用環境,這些氣味會粘在
出氣口上數月,在此情況下,您可以選
購配件 FZ-40SEF 過濾網,將其替代現有
的過濾網。
• 遙控器操作 .............................. C-11
保養和維修 .......................... C-12
• 主機 .................................... C-12
• 過濾網 .................................. C-12
• 更換過濾網 .............................. C-13
維修前的檢查事項 ..................... C-14
規格 ................................. C-14
多謝購買聲寶 FU-888SV 空氣清新機,為正確使用
本機,請仔細閱讀此使用說明書。在使用本機
前,請務必閱讀“安全注意事項”,閱讀過此使用
說明書後,請將其放置在隨時可查閱的地方,本
品只限在家居使用。
C-1
安全注意事項
• 如果電源線或插頭損環或插頭未能牢固地插在插座上,切勿操作本機。
否則會導致觸電或因短路引起火災。
• 切勿損壞、撕破、包裹、屈曲、拉扯、扭曲、捆綁、捏握電源線或將重物放在電源線上。
如果電源線損壞,會導致觸電或因短路引起火災。
• 切勿以 220-240V 以外的交流電源操作本機。
否則會導致觸電或因短路引起火災。
• 不要自行改裝,修理,或拆卸本機,應由認可的維修人員進行。
否則會導致觸電或因短路引起火災。
如需維修,請與您的銷售商或附近的聲寶服務中心聯繫。
• 定期為電源插頭除塵。
電源插頭上積聚的灰塵將因為潮濕等原因而令絕緣失效。
並可能導致觸電或因短路引起火災。
• 清洗本機時切記從插座上拔出電源插頭。
另外,切勿以濕手觸碰電源插頭。
否則會導致觸電或因短路引起火災。
(如食油
)使用本機。
• 切勿在儲油量高的地方
切勿在儲油量高的地方(
如食油)
否則會導致機殼爆裂。
• 切勿使用苯劑或油漆稀釋劑擦拭本機,亦不能以殺蟲劑噴向本機。
否則會導致機殼爆裂,觸電或火災。
• 使用本機時,請勿使用噴霧型殺蟲劑。
殺蟲劑所含的化學成分會在機內積聚,當機器運行時會從出風口排出,外泄的化學物質會影響您的健康。
• 請勿將易燃品或點燃的香煙放在本機的吸入口附近。
此舉可能導致本機燃燒。
• 請勿在浴室等潮濕的地方使用本機,而令機器受潮。
可能引起觸電或機器故障。
• 請勿將手指或其它物品插入本機的吸入口或吹出口。
否則可能會導致觸電或引起機器故障。
• 如將本機掛於牆壁使用時,請選擇堅固的牆或柱。
否則本機有可能墜下。
• 從電源插座拔出電源線時,應握著插頭拔出:切勿只拉扯電源線。
否則會導致觸電或因短路引起火災。
• 當與暖氣裝置一起使用時,請注意保持良好的通風。
否則可能引起一氧化碳中毒。
• 長期不使用本機時,請從電源插座上拔出插頭。
否則可能會因絕緣不良而導致觸電或因短路引起火災。
• 如果電源線破損,為避免傷害,請讓生產商或其服務機構及類似的認可維修人員來更換。
• 在電池耗盡前將其從機內取出,並作妥善處理。
C-2
使用本機時的注意事項
• 請勿堵塞本機的吸入口和吹出口。
• 不要在熱的物體上或其附近使用本機,如火爐。同時,也不要在有可能接觸蒸氣的地方使用。
• 請勿將本機平放操作。
否則將引起機器變形,故障或馬達過熱。
• 切勿在廚房等可能產生黑煙的地方使用本機。
• 清洗本機時請勿使用清潔劑。
否則可能會導致機殼受損或爆裂,此外也會引致感應器故障。
• 運送本機時,必須緊握機身後面的手柄,只手持面板部份可能會導致鬆脫,使本機掉下,造成傷害。
安裝本機時的注意事項
請勿在以下地點使用遙控器
• 有變頻器的照明設備或電子光源感應器的地方。
否則,遙控器會失靈。為避免這種情況,請將本機遠離此等裝置或改變本機所朝的方向。
• 直接暴露在陽光下的地方。
本機可能無法接收遙控器的信號,如果遙控器的熒光管發黑或發出抖動的光線,機器將無法識別,從而縮
短機器的使用壽命。但這不是遙控器或主機的故障,在此情況下,請更換新的熒光管。
安裝時請注意以下事項
• 遠離電視機或收音機至少 2 米。
它們會干擾信號的接收。
• 離開牆壁至少 60 厘米。
否則馬達會過熱並引起故障。
• 切勿將本機安裝在風扇直接吹向感應器的地方。
否則本機將無法正常操作。
• 切勿將本機安裝在窗簾等可能觸碰空氣吸入口或吹出口的地方。
否則該物體會被污染或導致本機故障。
有效的使用方法
• 放置在平穩及通風良好的地方
• 靠近吸煙區
本機可迅速感測到污染的空氣。
• 微小的塵埃和臭味如煙霧會積聚在房間的高處。
• 大的塵埃如花粉和室內的灰塵會積聚在房間的低處。
• 使用一段時間後,污垢會遺留在空氣吹出口後面的牆壁上,若打算長時間放於同一位置使用,應該考慮在
牆上貼上塑膠板以便清潔。同時應該定期清潔牆壁。
C-3
部件名稱
主機狀態顯示面板
* 除煙指示燈
過濾網更換指示燈
自動操作指示燈
風速指示燈
電源指示燈
除花粉指示燈
關機定時器指示燈
(由遙控器設定)
(通電後該燈就亮)
Plasmacluster
高
低
中
空氣質素指示燈
顯示空氣的清潔程度
最高
遙控接收器
氣味感應器
(感測香煙的煙霧,蠟燭的
煙霧及化妝品的氣味等)
清潔(綠)
稍差(桔黃)
非常差(紅)
灰塵感應器
(感測灰塵,煙霧,花
粉,室內灰塵等)
拆卸圖解
模式 / 關機鍵
(用此鍵來開 / 關本機)
主機
HPEA 高效能微塵過濾網
(白色)
(集塵過濾網)
(磷灰石和除菌過濾網)
活性碳過濾網
(黑色)
活性碳過濾網(
(除臭過濾網)
前過濾網
面板
遙控器
掛鉤
底座
(安裝在抬面上時必須使用)
翼型螺絲
*
此空氣淨化機無法去除香煙中的有害
物質(如一氧化碳等)。
C-4
離子簇指示燈
您可以利用遙控器來控製離子簇的運作。
藍色燈
當離子簇以“淨化空氣”或“自動”模式操作而室內的空氣較污濁時,藍色燈便會
亮起,本機將以“淨化空氣”模式操作。
綠色燈
當離子簇以“清新空氣”或“自動”模式操作而室內的空氣較潔淨時,綠色燈便會
點亮,本機將以 “清新空氣”模式操作。
指示燈熄滅
停止釋放離子簇。如果在睡眠時感到指示燈太光亮或離子簇發生器發出擾人的噪
音,請關掉離子簇產生器(停止以離子簇操作 )。
附件
關於塵埃感應器
• 當主機通電時,塵埃感應器能根據環境的轉
變,顯示出房間內空氣的潔淨程度。
• 當空氣非常臟的時候。
當接通電源後,塵埃感應器會亮起綠燈(這是感
應器的初始狀態)。
在此情況下請轉換為手動操作模式。
遙控器
(1 個)
電池
(2 枚 AA 電池)
當放置在抬面上使用時
底座
(1 個)
背面
翼型螺絲釘
(2 枚)
放在底座
的下方
手柄
出氣口
用於掛牆安裝時
牆壁固定支架 1
牆壁固定支架 2
木螺絲釘
(4 枚)
電源線
小螺絲釘
(2 枚)
電源插頭
(根據使用地點的
不同,分2腳和3腳
兩種)。
C-5
膠墊
(2 塊)
空氣淨化機的安裝
如何將本機固定於牆上
如何在抬面上擺放
1 安裝底座。
• 打開面板,同時將前過濾網,除臭過濾網
注意事項
和 HEPA 過濾網拆除。
• 請選擇堅固的石柱或石梁的牆壁安裝。
• 切勿將其安裝在薄牆或石膏板牆壁上,它
們無法提供足夠的支撐力,會導致本機跌
落。
• 把本機安裝在牆壁時,請將面板取下,並
握住主機。
如果只握著面板,主機的重量會使面板和
主機分離,導致主機跌落受損。
• 請勿將本機安裝在廚房等有煙的地方。
如果將本機安裝在這些地方,本機的外殼
可能會爆裂,感應器也可能出現故障。
1
面板
2
1
1 選擇安裝地方。
根據下圖所示,請在支架附近預留一定的
空間,如空間不足,本機將無法安裝。
2 將主機的面朝向下面,並放置在平
坦穩固的表面上。
• 為防止主機表面受損,請在抬面上加一塊
軟布之類的東西。
75 厘米或以上
離天花板 69 厘米或以上
主機的尺寸
75 厘米或以上
固定支架 1
3
將支架上凸起的部分插入主機上的
小 孔 , 並 用 隨 機 附 送 的
(2 枚)
翼型螺絲釘固定支架。
枚)翼型螺絲釘固定支架。
凸起部份
75 厘米或以上
距離牆壁至少 60 厘米
距離牆壁至少 60 厘米
插孔
注意事項
請將主機安裝在平坦的牆
面上
• 請勿將主機安裝在不平坦的
地方,如靠門楣的牆上等。
請勿將主機安裝在石膏板牆面
等支撐力不足的牆上,這樣十
分危險,會導致主機跌落。
翼形螺絲釘
C-6
2 將固定支架 1 安裝在牆上。
• 請咨詢這方面的專家,確保要安裝的牆壁
有足夠的支撐力。
• 安裝時請使用隨機附送的木螺絲釘(長釘)。
4 放置 2 塊膠墊。
膠墊(2 塊)
使用 4 枚木螺絲釘
(長釘)
枚木螺絲釘(
5 固定主機。
(1)調整好固定支架 1 和固定支架 2 的水平位
置,將支架 2 固定在支架 1 上。
(2)托住主機的底部,先向著自己的方向拉,
然後向下拉。
木板
固定支架 1
木螺絲釘(4 枚)
使用 3 枚木螺絲釘
(長釘)
枚木螺絲釘(
木板
固定支架 1
6 檢查安裝情況。
• 檢查支架 2 上的凸起部分是否與支架 1 上的
凸起部分扣緊。
• 檢查電源線是否被夾著。
木螺絲釘(3 枚)
3
將固定支架 2 安裝在主機上。
用隨機附送的(2 枚)
小螺釘將固定支架安裝在主機背面。
取下主機
將主機的底部向自己的方向拉出,然後向上取出。
注意
不要使用木螺絲釘(長釘)
• 取下主機時請使用堅
固的底座。
固定支架 2
• 取下主機時,請謹記
拔出電源線。
小螺絲釘(2 枚)
C-7
準備工作
安裝過濾網
為保持過濾網的質數,過濾網已預先安裝在主機內,並用塑膠袋包裹著。使用主機前,請謹記
拆除塑膠袋。
1 取出過濾網
1 以面板向上,平放本機。
底座不能與抬面接觸
將本機放置在平穩的抬面上,請確保底
座不與抬面接觸。
2
軟布
拆除面板。
按下面板底部的掛鉤,並將面板向上提
起並取出。
抬面等
面板
1
2
2
1
1
鍵
前過濾網
3 取出前過濾網,然後從塑
膠袋中取出除臭過濾網
(黑色)及 HEPA 過濾網(白
色)
。
色)。
強力的活性炭
安裝遙控器的電池
1
關於電池
打開後蓋。
按下後蓋並向自己方
向滑出。
2 裝入電池。
按照下圖所示的正負
極標記裝入電池
(
。)
3 推回後蓋。
C-8
• 電池的壽命大約一年。
當遙控器不能起作用時,請更換電池。
• 如果不正確使用電池,可能導致電池漏液
或破裂。操作時請注意以下事項:
• 更換電池時,應用兩枚相同類型的新
電池同時更換兩節舊電池。(使用兩
枚 AA 鹼性電池或兩枚 AA 錳性電池)
• 遙控器長期不使用,應取出電池,以
免電池漏液,損壞遙控器。
* 隨機附送的兩枚電池壽命可能不超過一
年。
2 安裝過濾網
柵格
HEPA 過濾網
HEPA 過濾網並
1 從塑膠袋中取出
裝入主機內,確保標記
(
))朝向上方
朝向上方 。
請以 HEPA 過濾網的柵格面朝向您的方向安裝。
若以反方向安裝,過濾器將不能正常運作。
從塑膠袋中取出活性碳並裝入
2 主機。
活性碳
確保 HEPA 過濾網的柵格仍然可以被看到。
3 裝入前過濾網。
將前過濾網的 4 個柵格裝入主機相應的孔內。
4 將開始使用日期填寫在貼在面
板背面的更換標簽上。然後裝
面板背面
面板更換標簽
回面板。
此日期供更換過濾網參考之用。
如何使用遙控器
•
•
•
•
對準主機(信號接收器)來操作遙控器。
最高可接收信號的距離大約 7 米(由前面計)。
切勿放置任何可能阻礙信號接收的物體。
接收到信號時,主機將發出嗶聲。
注意
• 切勿撞擊遙控器,切勿將其弄濕,受陽
光曝晒或放置在火爐周圍。否則可能造
成遙控器失靈。
C-9
接收器
發射器
操作
當電源插頭插入電源插座後,主機會在開始的 30 秒內檢
查空氣的質素,如果此時操作設定為 " 開 " ,清潔模式指
示燈會以綠色,橙色和紅色交替閃爍。在這段時間內,離
子簇指示燈會以藍色點亮,主機處於 " 淨化空氣 " 模式。
主機可執行的操作:
主機操作
•
•
•
•
•
•
•
自動模式操作
低模式操作
中模式操作
高模式操作
最高模式操作
* 除煙模式操作
除花粉模式操作
模式 / 關機 選擇按鈕
Plasmacluster
按下模式 / 關機選擇按鈕後,主機會開始操作。
離子簇指示燈
(主機將以自動模式操作)
• 運轉期間,離子簇指示燈會一直點亮。
(初次操作時,離子簇模式被設置為自動模式。)
具有適合不同狀況的操作模式設定。
停止
自動操作模式
風速會根據塵埃感應器感測到的空氣質素而自動轉換(高,中,低)。
低操作模式
主機安靜地操作,只送出微風。
中,高或最高操作模式
主機將以中,高或最高風速操作。
* 除煙操作模式
主機將以高風速運轉 10 分鐘,然後以自動模式操作。
10 分鐘:高風速
* 該模式不能去除香煙中的
有害物質(一氧化碳等)。
自動操作模式
除花粉操作模式
主機以高風速運轉 10 分鐘,然後以低風速和高風速交替操作。
10 分鐘:高風速
20 分鐘:中風速
20 分鐘:高風速
C-10
遙控器可完成的操作有:
遙控器操作
• 如欲啟動操作,請按模式 / 關機按鈕。聽到短一聲
“ 嗶 ” 聲後,主機便會以自動模式操作。
• 如欲停止操作,請再按模式 / 關機按鈕。聽到短一
長 “ 嗶 ” 聲後,主機便停止操作。
• 手動選擇風速操作
• 自動風速操作
• 低模式操作
• 最高模式操作
• * 除煙模式操作
• 除花粉模式操作
• 關機定時器設定
• 離子簇選擇
自動淨化空氣模式
淨化空氣模式
清新空氣模式
遙控器
自動風速按鈕
手動
(風速)按鈕
手動(
根據空氣污染程度自動調整風
速。
風速可切換為低,中,高和最
高
最高模式操作按鈕
低模式操作按鈕
以低模式操作,送出微風。
快速淨化房間內的空氣。
* 除煙模式操作按鈕
除花粉操作按鈕
主機能有效地清除煙霧。
有效地去除空氣中的花粉。
開 / 關按鈕
關機定時器設定按鈕
用以啟動自動模式(短 “ 嗶 ”
聲)或停止操作(長 “ 嗶 ” 聲)。
Plasmacluster
過濾網重設按鈕
在更換過濾網後按此按鈕,此
按鈕是凹陷的,以防止誤按)
用圓珠筆筆尖或類似物體,按
下過濾網重設按鈕。如用尖銳
物體按壓,遙控器可能會損
壞。
*
不能去除香煙中的有害物
質(如一氧化碳等)。
AIR PURIFIER
用來設定關機時間,每按一次,
定時器即按以下順序設定:
1 小時
4 小時
8 小時
取消
• 指示燈會顯示剩餘時間。
• 設定時間到時,主機會停止操
作。
在初次操作時,離子簇模式會被
設定為 “ 自動 ” 。
Filter reset button
過濾器重置按鈕
離子簇選擇按鈕
自動離子簇按鈕
關機按鈕
根據塵埃感應器探測到的空氣質素自動切換到淨化
空氣模式或清新空氣模式。
主機停止釋放離子簇,離子簇指示燈熄滅。
淨化空氣模式按鈕
主機會持續以淨化空氣模式操作,能有效地去除空
氣中的霉菌。
(離子簇指示燈以藍色點亮。)
清新空氣按鈕
主機會持續以清新空氣模式操作,保持空氣中的離
子平衡,以達到清新的效果。
(離子簇指示燈以綠色點亮。)
如果房間中有異味,尤其是霉味時,請把主機設定在淨化空氣模式。
C-11
保養和維修
(為確保本機以最佳的性能操作,請定期清潔主機。)
清潔時必須確保電源插頭已從電源插座上拔掉。另外,不要用濕
手拔出插頭,以免觸電或受傷。
主機
過濾網
請經常清潔主機及安裝表面,否則頑固的污垢將
難以清除。
在不取出前過濾網的情況下,用吸塵機的
吸嘴來吸除污垢。
用軟布抹淨
對于頑固污垢,用軟布及攝氏 40 度以下的溫水
抹淨。
切勿使用揮發性化學品
苯劑,油漆稀釋劑,打蠟粉等可能損害主機表
面。
切物使用清潔劑
清潔劑可能損壞主機表面。
切勿用水潑向本機
千萬不可以水潑向主機。
注意
氣味感應器
灰塵感應器
切勿用吸塵器的吸嘴直接清潔 H E P A 過濾
網,這將大大降低過濾網的性能。
如果氣味或塵埃感應器有污垢或被堵塞,感應器
的靈敏度會受到影響。
請用真空吸塵機吸除感應器表面的灰塵。
氣味感應器
灰塵感應器
C-12
更換過濾網
需要更換過濾網時,過濾網更換指示燈會點亮。
(以每日使用 12 小時計算,指示燈會在大約五年後點亮完畢。)
• 操作時間會儲存在記憶體中,即使拔掉電源把本機移到另一個房間,操作時間也不會消失。
過濾網更換指示燈只作參考。
如果不能清除塵埃或氣味,請更換過濾網。
更換過濾網指南
• HEPA 過濾網
使用期約五年
• 活性碳
使用期約五年
更換期是以每日點燃 10 支香煙,而且除塵 / 除臭能力比初次使用時減少一半來計算的。
更換期取決於主機的操作時間長短及其安裝地點。
(根據日本電氣製造商協會 JEM1467 標準)
根據使用環境,數月後從出氣口可聞到氣味。
(若需要詳細了解此產品,請參閱 C1 。)
更換過濾網
1
2
更換步驟請參考 C-8 頁“安裝過濾網
安裝過濾網
。
安裝過濾網”。
3
更換過濾網的標簽上寫上過濾網開始使用日期,將此標簽貼在面板背面
已有的更換標簽之上。
更換過濾網後:
接上電源後,按下遙控器上的過濾網重設按鈕。
可以聽到一短的 “ 嗶 ” 聲,而存
儲了的操作時間會被重置,如果過濾更換指示燈亮起,則在更換後熄滅。
更換過濾網
• HEPA 過濾網 1 只
• 活性碳 1 只
型號:FZ-40SEF
請向你的經銷商咨詢過濾網更換事宜。
過濾網棄置的注意事項
請根據當地的棄置法律規定棄置使用過的過濾網。
HEPA 過濾網的材料包括:
• 過濾網:聚丙乙烯
• 外框:聚酯
活性碳:
• 除臭劑:活性碳
• 外框:聚酯
C-13
維修前的檢查事項
在維修之前,檢查以下症狀以採取相應措施. 這些問題可能不是由于機器故障而引起的。
症狀
補救措施 ((並非故障
並非故障
)
並非故障)
遙控器不起作用
• 是否電池已秏蓋?
• 電池安裝極性正確嗎?
• 房間內是否有螢光閃爍?
很難去除異味和煙霧
• 過濾網上是否積聚太多塵埃?
空氣污濁時,空氣質素指示燈依然
以綠色點亮
• 灰塵感應器是否堵塞了?
• 插入電源插頭時的空氣是否已潔淨。
當空氣清潔時,空氣質素指示燈依
然以黃色或紅色點亮
• 當灰塵感應器檢測口堵塞或有污垢時,灰塵感應器的靈敏
度會變得不穩定。
用吸塵器清潔灰塵感應器感測口的灰塵。
離子簇指示燈以綠色
(藍色)點亮
離子簇指示燈以綠色(
而不改變
• 在淨化空氣模式或清新空氣模式下,離子簇指示燈的顏色
將不改變。
主機內傳
出聲音
:
出聲音:
• 當主機運行於清新空氣模式時,會發出這種聲音。如果討
厭這種聲音,可以將主機切換到淨化空氣模式。
• 當主機產生離子簇時會發出這種聲音。如果討厭這種聲
音,如睡眠時,可以把離子簇模式設定為關。
喀噠,喀噠聲
滴噠,滴噠聲
釋放出有異味的空氣
• 離子簇發生器可能產生有異味的臭氧,但是所產生的臭氧
數量很少並且對人體無害。而且,臭氧能很快分解,不會
積聚在房間裡。
吸煙時主機不操作
• 主機是否安裝在不容易探測到煙霧的地方?
• 氣味或灰塵感應器的檢測口是否堵塞?(在此情況下,請清
潔感應器的感測處。)
(參考 C-12)
規格
適用的房間面積大小是能以最大風速操作本機的面積計算
(根據日本電氣製造商協會 JEM1476 標準)
電源
風速操作
風速控製
耗電量
送風速度
適用面積
電源線長度
尺寸
重量
220-240V
50HZ
最高
高
中
低
39 瓦
21 瓦
10 瓦
4瓦
240 立方米 / 小時 180 立方米 / 小時 117 立方米 / 小時 30 立方米 / 小時
約 31 平方米
2.5 米
415 毫米(闊) X 197 毫米(深) X 572 毫米(高)(連底座)
6.6 公斤
關於減少備用耗電量
在電源插頭插入電源插座時,本機在備用情況下所耗的電量為 0.8 瓦。
(在這種情況下,電源指示燈會處於點亮狀態),若需節省用電,請在主機不使用時拔掉電源插頭。
C-14
ENGLISH
SHARP CORPORATION
OSAKA, JAPAN
TINS-A048KKRZ 02CO 1