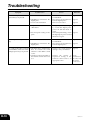
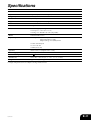
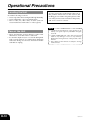
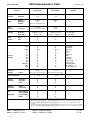
1
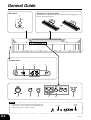
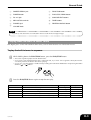
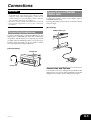
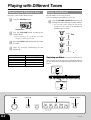
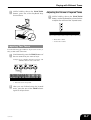
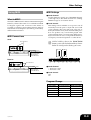
ES
USER’S GUIDE
GUÍA DEL USUARIO
Please keep all information for future reference.
Guarde toda información para tener como referencia futura.
Safety Precautions
Before trying to use the piano, be sure to
read the separate “Safety Precautions”.
Precauciones de seguridad
Antes de intentar usar el piano, asegúrese
de leer las “Precauciones de seguridad”
separadas.
CDP100ES1A
TO REDUCE THE RISK OF FIRE OR ELECTRIC SHOCK, REFER SERVICING TO QUALIFIED SERVICE PERSONNEL.
IMPORTANT SAFETY INSTRUCTIONS
1.
2.
3.
4.
5.
6.
7.
8.
9.
10.
11.
12.
Read these instructions.
Keep these instructions.
Heed all warnings.
Follow all instructions.
Do not use this apparatus near water.
Clean only with dry cloth.
Do not block any ventilation openings. Install in accordance with the manufacturer’s instructions.
Do not install near any heat sources such as radiators, heat registers, stoves, or other apparatus (including amplifiers)
that produce heat.
Do not defeat the safety purpose of the polarized or grounding-type plug. A polarized plug has two blades with one
wider than the other. A grounding type plug has two blades and a third grounding prong. The wide blade or the third
prong are provided for your safety. If the provided plug does not fit into your outlet, consult an electrician for replacement
of the obsolete outlet.
Protect the power cord from being walked on or pinched particularly at plugs, convenience receptacles, and the point
where they exit from the apparatus.
Only use attachments/accessories specified by the manufacturer.
Use only with the cart, stand, tripod, bracket, or table specified by the manufacturer, or sold with the
apparatus. When a cart is used, use caution when moving the cart/apparatus combination to avoid
injury from tip-over.
13. Unplug this apparatus during lightning storms or when unused for long periods of time.
14. Refer all servicing to qualified service personnel. Servicing is required when the apparatus has been damaged in any
way, such as power-supply cord or plug is damaged, liquid has been spilled or objects have fallen into the apparatus,
the apparatus has been exposed to rain or moisture, does not operate normally, or has been dropped.
The apparatus shall not be exposed to dripping or splashing and that no objects filled with liquids, such as vases, shall be
placed on the apparatus.
The power indicator being unlit does not mean the apparatus is completely disconnected from the MAINS.
When you need to have the apparatus completely disconnected from the MAINS, you must unplug the power cord. For that
purpose, locate the apparatus in a way that secures easy access to the power cord.
NOTICE
This equipment has been tested and found to comply with the limits for a Class B digital device, pursuant to Part 15 of the FCC
Rules. These limits are designed to provide reasonable protection against harmful interference in a residential installation.
This equipment generates, uses and can radiate radio frequency energy and, if not installed and used in accordance with the
instructions, may cause harmful interference to radio communications. However, there is no guarantee that interference will
not occur in a particular installation. If this equipment does cause harmful interference to radio or television reception, which
can be determined by turning the equipment off and on, the user is encouraged to try to correct the interference by one or more
of the following measures:
• Reorient or relocate the receiving antenna.
• Increase the separation between the equipment and receiver.
• Connect the equipment into an outlet on a circuit different from that to which the receiver is connected.
• Consult the dealer or an experienced radio/TV technician for help.
FCC WARNING
Changes or modifications not expressly approved by the party responsible for compliance could void the user’s authority to
operate the equipment.
Important!
Please note the following important information before using this product.
• Before using the AD-12 Adaptor to power the unit, be sure to check the AC Adaptor for any damage first. Carefully
check the power cord for breakage, cuts, exposed wire and other serious damage. Never let children use an AC adaptor
that is seriously damaged.
• The product is not intended for children under 3 years.
• Use only CASIO AD-12 adaptor.
• The AC adaptor is not a toy.
• Be sure to disconnect the AC adaptor before cleaning the product.
This mark applies in EU countries only.
CASIO Europe GmbH
Bornbarch 10, 22848 Norderstedt, Germany
403A-E-002A
Contents
General Guide .......................... E-2
Attachment of the Score Stand .................. E-2
Company and product names used in this
manual may be registered trademarks of others.
Playing Back the Built-in Demo Tunes ....... E-3
Power Supply ........................... E-4
Using the AC Adaptor ................................. E-4
Connections ............................. E-5
Connecting Headphones ............................ E-5
Connecting to a DAMPER PEDAL Jack ..... E-5
Playing with Different Tones ... E-6
Selecting and Playing a Tone ..................... E-6
Using Tone Effects ...................................... E-6
Layering Two Tones .................................... E-7
Other Settings .......................... E-8
Changing the Keyboard Touch ................... E-8
Changing the Pitch of the Piano to Match
Another Instrument ..................................... E-8
Changing the Piano Key ............................. E-8
Using MIDI .................................................. E-9
Troubleshooting ..................... E-10
Specifications......................... E-11
Operational Precautions ....... E-12
Locating the Unit ....................................... E-12
Care of the Unit ......................................... E-12
MIDI Implementation Chart
403A-E-003A
E-1
General Guide
Back Panel
Attachment of the Score Stand
Insert the score stand into the slot at the top of the digital piano as
shown in the illustration.
1
Left Side Panel
2
6
3
4
7
5
8
9
0
A
NOTE
• Each chapter of this manual starts with an illustration
of the piano’s console, which shows the buttons and
other controllers you need to operate.
E-2
FUNCTION
REVERB
CHORUS
403A-E-004A
General Guide
1
DAMPER PEDAL jack
7
FUNCTION button
2
POWER button
8
PLAY/STOP, DEMO button
3
DC 12V jack
9
SONG SELECT buttons
4
MIDI OUT/IN terminals
0
TONE buttons
5
PHONES jack
A
REVERB CHORUS button
6
VOLUME knob
NOTE
• Key, button, and other names are indicated in the text of this manual using bold type.
Playing Back the Built-in Demo Tunes
This digital piano comes with 5 built-in demo tunes, each of which features one of the built-in tones.
To play the built-in tunes in sequence
1
While holding down the FUNCTION button, press the PLAY/STOP button.
2
Press the PLAY/STOP button again to stop the tune play.
• This starts sequential playback of the built-in tunes.
• You can play along with the built-in tunes on the keyboard, if you want. Tone assigned to the keyboard is the
one that is preset for the built-in tune that is playing.
• You can also cycle through the available tunes by holding down the FUNCTION button and pressing the SONG
SELECT [ ] or [ ] button.
Title
Composer
Play Time
GRAND PIANO 1
Étude Op.25-9
F.F.Chopin
0:56
GRAND PIANO 2
NorwegischeTänze 2
E.Grieg
1:45
Original
–
1:49
Gavotte [Französische Suite 5]
J.S.Bach
0:43
Intermezzo Sinfonico [Cavalleria Rusticana]
P.Mascagni
1:49
Tone
ELEC PIANO
HARPSICHORD
STRINGS
403A-E-005A
E-3
General Guide
To play a specific built-in tune
1
While holding down the FUNCTION button, press the SONG SELECT [
through the available tunes.
2
Press the PLAY/STOP button.
3
Press the PLAY/STOP button again to stop tune play.
] or [
] button to cycle
• This starts the playback of the tune in an endless loop.
Power Supply
You can power this digital piano by plugging it into a
standard household power outlet.
Be sure you turn off power and unplug the power cord
from the electrical outlet whenever the digital piano
is not in use.
Using the AC Adaptor
Make sure that you use only the AC adaptor specified
for this digital piano.
Specified AC Adaptor: AD-12
[Left Side Panel]
DC 12V jack
AC adaptor AD-12
Note the following important precautions to avoid
damage to the power cord.
● During Use
• Never pull on the cord with excessive force.
• Never repeatedly pull on the cord.
• Never twist the cord at the base of the plug or
connector.
• The power cord should not be stretched tight
while it is in use.
● During Movement
• Before moving the keyboard, be sure to unplug
the AC adaptor from the power outlet.
● During Storage
• Loop and bundle the power cord, but never wind
it around the AC adaptor.
IMPORTANT!
• Make sure that the product is turned off before connecting
or disconnecting the AC adaptor.
• Using the AC adaptor for a long time can cause it to
become warm to touch. This is normal and does not
indicate malfunction.
AC outlet
E-4
403A-E-006A
Connections
IMPORTANT!
• Whenever connecting external equipment, first set the
VOLUME knob of the digital piano and the volume
controller of the external equipment to relatively low
volume settings. You can later adjust volume to the level
you want after connections are complete.
• Be sure also to refer to the documentation that comes with
the external equipment for its proper connection
procedures.
Connecting to a DAMPER
PEDAL Jack
Connect the pedal’s cable to the digital piano’s
DAMPER PEDAL jack.
Pressing this pedal causes notes to reverberate and to
sustain longer.
[Back Panel]
Connecting Headphones
DAMPER PEDAL jack
Connect commercially available headphones to the
digital piano’s PHONES jack. This cuts off the builtin speakers, which means you can practice even late
at night without disturbing others. To protect your
hearing, make sure that you do not set the volume
level too high when using headphones.
[Left Side Panel]
PHONES jack
SP-3
Headphones
Accessories and Options
Use only the accessories and options specified for this
digital piano. Use of non-authorized items creates the
danger of fire, electric shock, and personal injury.
403A-E-007A
E-5
Playing with Different Tones
Selecting and Playing a Tone
The piano comes with 5 built-in tones.
1
Using Tone Effects
Reverb: Makes your notes resonate
Chorus: Adds more breadth to your notes
Press the POWER button.
1
• You can find out the current reverb/chorus
configuration by looking at the REVERB and
CHORUS indicator lamps.
POWER button
2
Press the REVERB CHORUS button to cycle
through the effect settings as shown below.
Use the VOLUME knob to adjust the
volume level.
Both on
• Before playing, it is a good idea to set the
volume to a relatively low level.
3
Both off
Press the TONE button of the tone you want
to select.
Reverb on
4
Now try playing something on the
keyboard.
Chorus on
Tone Name
GRAND PIANO 1
GRAND PIANO 2
ELEC PIANO
HARPSICHORD
STRINGS
Maximum Polyphony
16
32
32
16
32
Selecting an Effect
You can select from among four reverb effects and four
chorus effects by pressing the keyboard keys shown
below.
1 Reverb Effect Keys
Room 2
Hall 2
Hall 1
Room 1
▲
C1
▲
C2
▲
C3
▲
C4
▲
C5
▲
C6
▲
C7
▲
C8
2 Chorus Effect Keys
Chorus 2
Chorus 1
VOLUME
E-6
FUNCTION
TONE
Chorus 4
Chorus 3
REVERB CHORUS
403A-E-008A
Playing with Different Tones
1
While holding down the FUNCTION
button, press one of the keyboard keys
shown above.
Adjusting the Volume of Layered Tones
1
While holding down the FUNCTION
button, use the keyboard keys shown below
to adjust the volume of the layered tones.
+
–
▲
C1
▲
C2
▲
C3
▲
C4
▲
C5
▲
C6
▲
C7
▲
C8
+ : Raises the volume
– : Lowers the volume
Layering Two Tones
Use the following procedure to layer to two tones, so
they sound at the same time.
1
Simultaneously press the TONE buttons of
the two tones that you want to layer.
Example: Press GRAND PIANO 2 button and
STRINGS button at the same time.
GRAND PIANO 2
STRINGS
• The tones are now layered.
2
403A-E-009A
After you are finished using the layered
tones, press the one of the TONE buttons
again to unlayer them.
E-7
Other Settings
Changing the Keyboard Touch
1 This setting changes the relative touch of the
keyboard keys.
Changing the Pitch of the Piano
to Match Another Instrument
2 Use this setting to raise or lower the overall pitch
of the piano. The setting range is plus or minus 50
cents (100 cents = 1 semitone) from the standard
pitch of A4 = 440.0Hz.
1 Changing the Keyboard Touch
Off
Weak (Strong sound is produced even when
relatively light pressure is applied.)
Normal
Strong (Normal sound is produced even when
relatively strong pressure is applied.)
2 Changing the Pitch of the Piano to Match
Another Instrument
+: Raise
– : Lower
* Each press of a key changes the current setting by
approximately 1 cents (1/100 semitone).
NOTE
Changing the Piano Key
3 Use this setting to raise or lower the overall key of
the keyboard in semitone steps.
While holding down the FUNCTION
button, use the keyboard keys shown below
to select the keyboard setting you want.
1
• Holding down the FUNCTION button and pressing
keyboard keys “–” and “+” at the same time returns
tuning to the standard A4 = 440.0Hz.
3 Changing the Piano Key
Higher (C to F)
Normal (C)
Lower (F to B)
1
Weak
Normal
Off
▲
C1
Strong
▲
C2
▲
C3
▲
C4
▲
C5
▲
C6
▲
C7
▲
C8
3
2
+ : Raise
– : Lower
Lower
Higher
C2 : Normal
FUNCTION
E-8
403A-E-010A
Other Settings
MIDI Settings
Using MIDI
1 Send Channel
Use this setting to specify one of the MIDI channels
(1 through 16) as the Send Channel for sending
MIDI messages to an external device.
What is MIDI?
The letters MIDI stand for Musical Instrument Digital
Interface, which is the name of a worldwide standard
for digital signals and connectors that makes it
possible to exchange musical data between musical
instruments and computers (machines) produced by
different manufacturers.
MIDI Connections
2 Local Control
This setting controls whether or not power is cut off
internally from the piano’s keyboard and sound
source. Turning off Local Control cuts off power to
the keyboard and source, which means that the piano
does not produce any sound when played. This
comes in handy when you want to turn off the piano’s
keyboard and use its auto accompaniment feature to
accompany an external sequencer or other device.
Send
1
MIDI cabel: MK-5
While holding down the FUNCTION
button, press one the keyboard keys shown
below to configure the setting you want.
1
Sender
OUT
IN
+
Receiver
MIDI musical instrument
MIDI sound module
MIDI sequenser
Other MIDI device
2 On
–
Off
Receive
▲
C1
MIDI cable: MK-5
Receiver
IN
OUT
Sender
MIDI musical instrument
MIDI sequencer
Other MIDI device
▲
C2
▲
C3
▲
C4
▲
C5
▲
C6
▲
C7
▲
C8
1 Send Channel
– : Decreases value
+: Increases value
2 Local Control
Off
On
Program Change
Tone Name
Program Change
GRAND PIANO 1
0
GRAND PIANO 2
1
ELEC PIANO
2
HARPSICHORD
3
STRINGS
4
403A-E-011A
Bank Select MSB
0
0
0
0
0
E-9
Troubleshooting
Symptom
Possible Cause
Action
Reference
No sound produced when 1. VOLUME knob set to MIN.
1. Move the VOLUME knob more Page E-6
keyboard keys are pressed.
towards MAX.
2. Headphones connected to the 2. Disconnect the headphones Page E-5
from the digital piano.
digital piano.
3. Turn on Local control.
3. Local Control turned off.
Page E-9
Keyboard out of tune.
1. The piano key is set to a value 1. Change the piano key setting to Page E-8
other than C.
C, or turn the digital piano
power off and then back on
again.
2. Incorrect pitch setting of the 2. Correct the pitch setting, or turn Page E-8
the digital piano power off and
piano.
then back on again.
No sound produced by demo tune 1. VOLUME knob set to MIN.
1. Move the VOLUME knob more Page E-6
play.
towards MAX.
2. Headphones connected to the 2. Disconnect the headphones Page E-5
from the digital piano.
digital piano.
No sound produced by connected 1. The digital piano Send Channel 1. Change the Send Channel
external MIDI sound source when
does not match the Send
settings so they are identical.
the digital piano keys are pressed.
Channel of the MIDI sound
source.
2. Volume or expression setting of 2. Change the volume or
the external sound source is set
expression setting of the
to 0.
external sound source to an
appropriate value.
E-10
Page E-9
See the
documentation
that comes with
the external
sound source.
403A-E-012A
Specifications
Models:
CDP-100
Keyboard:
88 piano keys (with touch response)
Polyphony:
32 notes, maximum
Tones:
5; with layer
Digital Effects:
Reverb (4 types), Chorus (4 types)
Built-in Tunes:
5
Pedal:
Damper
Other Functions:
• Touch: 3 types, off
• Transpose: 1 octave (F to C to F)
• Tuning: A4 = 440.0Hz ±50 cents (adjustable)
MIDI:
16 multi-timbre receive
Input/Output:
• Headphones: Stereo mini jack
Output Impedance: 170Ω
Output Voltage: 4.8V (RMS) MAX
• Pedal: Standard jack
• Power: 12V DC
• MIDI (OUT) (IN)
Speakers:
(12cm × 6cm) × 2 (Output: 8.0W + 8.0W)
Power Supply:
AC Adaptor: AD-12
Power Consumption:
12V
Dimensions:
132.3 × 27.8 × 13.2 cm (52 2/16 × 10 15/16 × 5 3/16 inch)
Weight:
Approximately 11.2 kg (24.7 lbs)
18W
• Design and specifications are subject to change without notice.
403A-E-013A
E-11
Operational Precautions
Locating the Unit
Avoid the following locations.
• Areas exposed to direct sunlight and high humidity
• Areas subjected to very low temperatures
• Near a radio, TV, video deck, or tuner (unit can
cause interference with audio or video signals)
You may notice lines in the finish of the case of
this product. These lines are the result of the
molding process used to shape the plastic of the
case. They are not cracks or breaks in the plastic,
and are no cause for concern.
NOTE
Care of the Unit
• Never use benzene, alcohol, thinner or other such
chemicals to clean the exterior of the unit.
• To clean the keyboard, use a soft cloth dampened
with a weak solution of a mild neutral detergent
and water. Wring out all excess moisture from the
cloth before wiping.
E-12
• Unauthorized reproduction of this manual in its
entirety or in part is expressly forbidden. All rights
reserved.
• CASIO COMPUTER CO., LTD. shall not be held
liable for any damages or losses or any claims by
third parties arising from use of this product or this
manual.
• The contents of this manual are subject to change
without notice.
403A-E-014A
MIDI Implementation Chart
Model CDP-100
Function ...
Transmitted
Recognized
Basic
Channel
Default
Changed
1
1-16
1-16
1-16
Mode
Default
Messages
Altered
Mode 3
X
❊❊❊❊❊❊❊❊❊❊❊❊❊❊
Mode 3
X
True voice
21-108
❊❊❊❊❊❊❊❊❊❊❊❊❊❊
0-127
0-127
Velocity
Note ON
Note OFF
O 9nH V = 1-127
X 8nH V = 64
O 9nH V = 1-127
X 9nH V = 0,8nH V = **
After
Touch
Key’s
Ch’s
X
X
X
X
X
O
O
X
O*1
O
O
O
O
X
X
O
O
O
X
O
O
O
O*1
O
O
O
O
O
O
O
O
O
O
O
Note
Number
Pitch Bender
0, 32
1
6, 38
7
10
11
64
66
67
91
93
100, 101
120
121
Control
Change
Program
Change
:True #
O 0-4
❊❊❊❊❊❊❊❊❊❊❊❊❊❊
O*2
O*2
System
Common
: Song Pos
: Song Sel
: Tune
X
X
X
X
X
X
System
Real Time
: Clock
: Commands
X
X
X
X
Aux
: Local ON/OFF
: All notes OFF
: Active Sense
: Reset
X
X
X
X
X
O
O
X
Remarks
Mode 1 : OMNI ON, POLY
Mode 3 : OMNI OFF, POLY
403A-E-031A
Remarks
**: no relation
**: sin relación
Bank select
Modulation
Data entry
Volume
Pan
Expression
Hold1
Sostenuto
Soft pedal
Reverb send
Chorus send
RPN LSB, MSB
All sound off
Reset all controller
O 0-4
❊❊❊❊❊❊❊❊❊❊❊❊❊❊
System Exclusive
Messages
Version: 1.0
*1 Fine tune and coarse tune send/receive, RPN Null, and pitch bend sense receives
*1 Afinación fina y envío/recepción de afinación gruesa, RPN nulo y recepción de captación de inflexión de altura tonal.
*2 • Reverb type [F0][7F][7F][04][05][01][01][01][01][01][00][vv][F7] vv=00: Room1, 01: Room2, 04: Hall1, 03: Hall2
• Chorus type [F0][7F][7F][04][05][01][01][01][01][02][00][vv][F7] vv=00: Chorus1, 01: Chorus2, 02: Chorus3, 03:
Chorus4
*2 • Tipo de reverberación [F0][7F][7F][04][05][01][01][01][01][01][00][vv][F7] vv=00: Room1, 01: Room2, 04: Hall1, 03: Hall2
• Tipo de chorus [F0][7F][7F][04][05][01][01][01][01][02][00][vv][F7] vv=00: Chorus1, 01: Chorus2, 02: Chorus3, 03: Chorus4
Mode 2 : OMNI ON, MONO
Mode 4 : OMNI OFF, MONO
O : Yes
X : No
This recycle mark indicates that the packaging conforms to
the environmental protection legislation in Germany.
Esta marca de reciclaje indica que el empaquetado se
ajusta a la legislación de protección ambiental en Alemania.
CASIO COMPUTER CO.,LTD.
6-2, Hon-machi 1-chome
Shibuya-ku, Tokyo 151-8543, Japan
P
MA0505-A Printed in China
CDP100ES1A