1
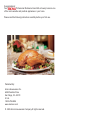
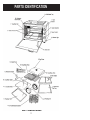
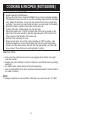
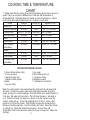
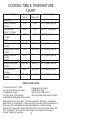
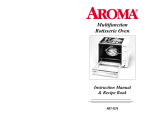
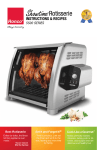
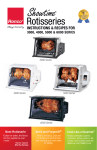
Professional Rotisserie Oven/Grill
Instruction Manual
Model: ABT-285
Congratulations!
Your
Professional Rotisserie Oven/Grill will surely become one
of the most versatile and practical appliances in your home.
Please read the following instructions carefully before your first use.
Published By:
Aroma Housewares Co.
6469 Flanders Drive
San Diego, CA 92121
U.S.A.
1-800-276-6286
www.aromaco.com
© 2000 Aroma Housewares Company All rights reserved.
IMPORTANT SAFEGUARDS
Basic safety precautions should always be taken when using electrical
appliances, including the following:
1. Important: Read all instructions carefully before using the machine.
2. Do not touch hot surfaces. Use handles or knobs.
3. To protect against electrical shock, do not immerse cord, plug or the
appliance itself in water or other liquid.
4. Close supervision is necessary when the appliance is used near children.
5. Prior to plugging appliance into proper wall outlet, ensure all control switches
are set to the "OFF" position. To disconnect, turn all control switches to
"OFF" position, and then remove plug from wall outlet.
6. Unplug from outlet when not in use and before cleaning. Allow unit to cool
before putting on or taking off parts, and before cleaning the appliance.
7. Do not operate any appliance with a damaged cord or plug, or after the
appliance malfunctions or has been damaged in any manner. Return
appliance to the nearest authorized service facility for examination, repair or
adjustment.
8. Using attachments or accessories other than those supplied by the
manufacturer can create a HAZARD. DO NOT use incompatible parts.
9. Do not use outdoors.
10. Do not let cord touch hot surface, hang over the edge of a counter or a table.
11. Do not place on or near a hot burner or in a heated oven.
12. Extreme caution must be taken when removing the drip tray and disposing
hot grease or other hot liquid. Always use two hands when moving unit.
13. Do not use the appliance for other than intended use.
14. Do not clean with metal scouring pads. Pieces can break off the pad and
touch electrical parts, involving a risk of electric shock. Also, metal-scouring
pads may damage rotisserie finish.
15. When in use, keep oven a minimum of 10-12 inches away from walls & clear
on top. Place on a stable, heat-resistant surface and in a well-ventilated area.
16. A fire may occur if the toaster-oven is covered or touching flammable
material, including curtains, draperies, walls, and the like, when in operation.
Do not store any items on top of the appliance when in operation.
17. Do not put any of the following or similar materials in or on the oven: paper,
cardboard, plastic, and the like.
SAVE THESE INSTRUCTIONS
1
ADDITIONAL IMPORTANT
SAFEGUARDS
¾ Oversize foods or metal utensils must not be inserted in a toaster¾
¾
¾
¾
¾
oven as they may create a fire or risk of electric shock.
The oven becomes very hot when in use. (glass door, top, back, and
side of the oven). Be sure to use handles and wear protective oven
mitts or gloves.
DO NOT touch the interior parts until they have completely cooled.
Extreme caution should be exercised when using containers
constructed of other than metal or glass.
Do not store any materials, other than manufacturers recommended
accessories, in this oven when not in use.
When the oven door is open, DO NOT set anything on the door-it
might break the glass.
SHORT CORD INSTRUCTIONS
1. A short power-supply cord is provided to reduce risk resulting from becoming
entangled in or tripping over a longer cord.
2. Longer extension cords are available and may be used if care is exercised in
their use.
3. If a longer extension cord is used:
a. The marked electrical rating of the extension cord should be at least as
great as the electrical rating of the appliance.
b. The longer cord should be arranged so that it will not drape over the counter
top or tabletop where it can be pulled by children or tripped over
unintentionally.
POLARIZED PLUG
This appliance has a polarized plug (one blade is wider than the other); follow
the instructions below:
To reduce the risk of electric shock, this plug is intended to fit into a polarized
outlet only one way. If the plug does not fit fully into the outlet, reverse the plug.
If it still does not fit, contact a qualified electrician. Do not attempt to modify the
plug in any way.
This appliance is for household use only.
2
PARTS IDENTIFICATION
3
CONTROL & ACCESSORIES
Your Aroma Professional Rotisserie Oven/Grill has great features and benefits
with a full accessories package. Being familiar with them will help you to use
your appliance to its fullest.
¾ Temperature Control: A fully adjustable temperature control (to 470ºF) allows
you to choose your ideal temperature for a variety of cooking.
¾ Heater Selection: Offers choices of different heating settings for many cooking
¾
¾
¾
¾
¾
¾
¾
¾
¾
¾
¾
¾
requirements such as UPPER for griddle/grill and broil and ALL/Rotisserie for
Rotisserie, Roast, Bake, etc.
Timer Control: 60-minute timer with bell alert feature.
Non-Stick Drip and Crumb Tray: Use for roasting or broiling to avoid fat
drippings and spattering. It is removable and ensures easy cleaning.
Dust Cover: To be placed on top of the oven when it is not in use.
Griddle/Grill: Half-ridged, half-skillet surface on the top of the oven is easy to
use and easy to remove for cleaning.
Chrome Roast / Bake Rack: Use for baking, roasting, and broiling.
Cookie Sheet: Each holds about 9-12 medium-size cookies.
Rotisserie Rotating set: Holds meat and poultry and allows it to roast evenly.
Rotisserie handle: Easy for you to take the Rotisserie Rotating set out from
the oven when your roast is done.
Non-stick Food basket: Allows you to put all kinds of food into it for rotisserie.
Kabob Rods: Snap-On design makes operation an easy task.
Non-stick Coated Roasting Tray: Can be used to either roast or bake food to
prevent oil from dripping onto the lower heating element.
Tray/Rack Handle: Used to remove tray or rack from the oven.
NOTE: When you unpack your shipping carton, check all the items
carefully and make sure they are all received in good condition.
4
OPERATION INSTRUCTONS
Before first using your Professional Rotisserie Oven/Grill
CLEANING:
1. Read all the instructions carefully in the manual.
2. Remove all packaging materials; make sure all items are received and are in
good condition.
3. Remove the sticker from the glass door.
4. Wash all the accessories with a small amount of mild detergent, using a
sponge or dishcloth.
5. Rinse thoroughly to remove soapy residue.
6. Wipe body clean with a damp cloth. Be careful not to touch the heating
elements.
¾ Do not use abrasive cleaners or scouring pads.
¾ Do not immerse the appliance in water at any time.
BEFORE FIRST USE:
1. Due to the manufacturing process, smoke and odor may be emitted during the
first few uses. This is normal and causes no harm.
2. We recommend that you pre-heat the oven to eliminate smoke and odor.
3. Be sure to place the oven on a flat, heat-resistant surface and pre-heat in a
well-ventilated area.
4. Set the temperature to the "OFF" position before plugging into a proper outlet.
5. Pre-heat the oven for 30 minutes at the maximum temperature, or until smoke
and odor are gone.
6. Turn the temperature control to the "OFF" position, remove the plug from wall
outlet, and allow the oven to cool completely.
5
HOW TO USE
1.
2.
3.
4.
5.
6.
7.
Set the temperature to the "OFF" position.
Plug in the power cord to the proper wall outlet.
Set your desired temperature.
Set the Heater Selection to your desired setting.
Place food onto the roast/bake rack or roasting tray or rotisserie rotating set.
Set the Timer and begin to cook.
When finished, turn all the control switches to "OFF" position and unplug
right away.
NOTE:
¾ The Indicator Light will come on once you set the timer and cooking temperature
and select your heater functions. It indicates that the oven is in operation.
¾ During operation, the light will turn on and off indicating the proper
temperature is being maintained.
HOW TO CLEAN
1.
2.
3.
4.
5.
6.
7.
Turn all control switches to the "OFF" position.
Disconnect the plug from the wall outlet.
Allow the unit to cool completely.
Remove any food residue by using a non-abrasive cleaning pad.
Wash cooking racks, trays and other items in warm, soapy water.
Clean the oven door with a sponge or dishcloth. Wipe dry with paper towel.
Wipe body clean with a damp cloth.
¾ Do not immerse the appliance in water or other liquid.
¾ Do not use abrasive cleaners or scouring pads.
¾ Do not use the oven or any of its accessories if they are still wet.
6
HELPFUL TIPS
¾ The Everything Oven Plus has been designed to utilize everyday recipes.
¾
¾
¾
¾
¾
¾
¾
¾
However, cooking temperatures and times may vary. We recommend you
monitor the cooking progress by checking your food frequently during
operation to ensure ideal cooking results.
Some recipes call for the oven to be preheated. You might want to preheat 5
to 10 minutes prior to cooking time.
Always use non-abrasive cooking utensils since metal may scratch the surfaces.
Always use oven mitts to protect from burns and injuries.
To protect and prolong the life of your non-stick coated roasting tray, you may
line the tray with aluminum foil (shiny side down).
DO NOT place any items on the oven door while it is open. This may cause
the glass to break and may result in injury.
Extreme caution should be exercised when you open the glass door.
When the oven is not in use, remember to turn all the control switches to
"OFF" position and unplug the unit.
Some of the cooking may cause oil to drip on the heating elements. The oil
will vaporize and cause some smoke. If smoke is not excessive, it will not
harm the oven or food.
7
COOKING & RECIPES (ROTISSERIE)
1.
2.
3.
4.
5.
6.
7.
8.
9.
Temperature set: 450 F-475°F
Heater Selection: All/Rotisserie
Remove the Dust Cover. Keep the Griddle Tray as a top cover during operation.
Thumbscrew the two spit rods on one of the rotating wheel that has a pointed
end. Mount the chickens. If you cook two chickens at one time, place them
vertically. If you cook only one chicken at a time, you can place it horizontally.
Ensure the food is placed in the center of the spit rods.
Position the other rotating wheel onto the spit rods.
Mount the rotating set. Put the "pointed" end into the drive socket on the
right side of the oven wall first, and then press down the "Rod" end to the
drive socket on the left side of the oven wall.
Set the Timer and begin to cook.
When food is done, turn all the control switches to "OFF" position. Use
Rotisserie Handle to remove the Rotating Set; first lift up the left rotating
wheel out of the drive socket, and then pull the right wheel out of the right
drive socket. Place the food on cutting board or platter.
USEFUL TIPS:
¾ If you cook two chickens at one time, we suggest each chicken not weigh
over five pounds.
¾ Always use cotton butcher's cord for rotisserie to avoid food touching heating
elements.
¾ For better taste, season with your favorite seasoning.
¾ Use an independent timer and a reliable meat thermometer to check whether
the meat is cooked.
NOTE:
¾ Always remember to use protective mitts when you use the oven. It is Hot!
8
COOKING TIME & TEMPERATURE
CHART
** Please note that the cooking times and temperatures given here are only as a
guide. They may vary due to differences in meat size and temperature of
refrigerated food. Desired doneness is based on personal preference. Adjust
your cooking time and temperature for rare, medium, or well done.
Food
Weight
Temp (F)
Approx Time
POULTRY
Chicken (whole)
3-5 lbs
450
1 Hr. 15 - 30 Min.
Cornish Hen
3/4 to 1 1/2 lbs 425-450 18 - 30 Min.
Duck (Whole)
4-5 lbs
400
1 Hr. 20 Min.
BEEF
Roast Beef
3-5 lbs
450
1 Hr. 40 - 45 Min.
Veal (Roast)
4-5 lbs
450-Max 2 Hrs. 20 - 30 Min.
(boneless)
PORK
Pork Spareribs
3-5 lbs
425-450 2 Hrs. 15 - 30 Min.
Pork Roast
3-5 lbs
450
1 Hr. 30 Min.
Smoked Ham
4-5 lbs
425-450 1 Hr. 30 - 40 Min.
(boneless)
TERIYAKI ROTISSERIE CHICKEN
1 whole chicken (about 4 lbs.)
1/2 cup soy sauce
¼ teaspoon garlic salt
¼ teaspoon white pepper
powder
¼ cup dry sherry
¼ cup sugar
3 slices fresh ginger root
1 ½ teaspoon honey
3 tablespoons water
1 ½ tablespoons cornstarch
Wash the whole chicken; rinse well and pat dry inside and out; pull excess fat.
Set aside. Combine soy sauce, garlic salt, white pepper powder, dry sherry,
ginger, and sugar in a small saucepan. Boil and simmer over medium heat for 23 minutes. Mix water with cornstarch. Stir to thicken the sauce. Set aside to
cool. Place the chicken in a large bowl. Brush or rub the sauce all over the
chicken, inside and out. Cover and refrigerate for 2-12 hours. Use a cotton
butcher's cord to tie the chicken. Wrap it tightly to keep legs and wings from
falling on to heating elements. Coat the chicken with honey. Mount the chicken
on rotating set. Follow the Rotisserie instructions. Use the Time and
Temperature Chart in the book as a reference of your cooking time. Makes 4-6
Servings.
9
B.B.Q. PORK SPARERIBS
B.B.Q. Sauce (medium-size bowl)
¾ cup chili sauce
1 cup ketchup
¼ steak sauce
1 tablespoon Worcestershire sauce
1 tablespoon garlic, finely pressed
¼ cup fresh horseradish, finely grated
3 tablespoons dry mustard
1 tablespoon Tabasco sauce
1 tablespoon molasses
1 tablespoon red wine vinegar
½ cup dry red wine
1 tablespoon black peppercorn
3 tablespoons tequila
1 rack of pork spareribs, 3-4 lbs.
Wash the rack and boil over medium heat for about 10-15 minutes or until meat
turns white. Set aside to cool. Combine all the ingredients of B.B.Q. sauce in a
bowl and mix well. Adjust seasonings to taste. Brush the ribs well on all sides
with barbecue sauce. Follow the Rotisserie instruction to position the rib on the
Rotisserie Spit Rods or place it in the Food Basket. Use Time and Temperature
chart in the book as a reference to roast or until it is tender. Serve the ribs with
the remaining sauce on the side. Makes 6-8 servings
BUTTERY MUSTARD GAME HEN
2 1 ½ to 2- lbs. cornish game hen, thaw if frozen
¼ cup butter melted
¼ dijon mustard
2 cloves garlic, finely minced
1 ½ tablespoons fresh rosemary, minced or 2 teaspoons dry rosemary
salt and freshly ground black pepper to taste
Wash the hens; take necks and giblets out; rinse well and pat dry. Combine
butter, mustard, minced rosemary, and garlic in a bowl. Mix well and set aside.
Tie legs together and twist wing tips under back. Brush the hens well with
mustard mixture. Arrange the hens on the Rotisserie Spit according to the
Rotisserie cooking instructions. Use the Cooking Time and Temperature Chart
as a guide or until meat near thighbone is white and tender. Season with salt
and black pepper to taste. Makes 4-6 servings.
10
Kabob Rods Use
¾ Place food onto kabob rods.
¾ Kabob Rods easily snap into holes on Rotating Set. Place pointed end into
hole first, then snap "hooked" end into place.
¾ Space kabob Rods at even intervals around the Rotating Set to distribute
weight and ensure even cooking.
¾ Follow the rotisserie instructions to mount the rotating set inside the oven.
Food Basket Use
¾ The Food Basket is supplied for foods that will not work on skewers. It is ideal
for whole fish, fish steaks, fish fillets, sausages, chops, ribs, or even vegetables.
¾ Place food into basket. Balance the weight evenly.
¾ Close basket and carefully slide rotisserie spit rods through basket and
secure to the wheel.
COOKING & RECIPES (ROASTING)
1.
2.
3.
4.
5.
6.
7.
Temperature: Desired setting
Heater Selection: All/Rotisserie
Remove Dust Cover. Use Griddle Tray as a top cover when the oven is in operation.
Accessories to be used: Chrome Roast/Bake Rack or Roasting Tray or Food Basket.
Place food on the Rack or Roasting Tray.
Set the Timer and begin to cook.
When food is done, turn all the switches to "OFF" position.
USEFUL TIPS:
¾ You may use a small amount of cooking spray or oil on your rack or tray.
¾ Use an independent timer & a reliable meat thermometer to check your food.
¾ Internal meat temperature will vary based on the desired doneness of your
food; usually 140°F for rare, 160°F for medium, and 170-180°F for well done.
Determine by simply inserting a meat thermometer.
¾ You may also select "UPPER" heater function and place your food closer to
the top heating elements when you do your roasting.
11
COOKING TIME & TEMPERATURE
CHART
Food Weight
POULTRY
Whole Chicken
3-5 lbs
Cornish Hen
3/4 to 1 1/2 lbs
Turkey Breast
5-7 lbs
BEEF
Rib Eye, boneless
3-5 lbs
Standing Rib Roast
3-5 lbs
Brisket, first cut
5-6 lbs
PORK
Rolled Pork Loin
3-5 lbs
Boneless Ham
3-5 lbs.
Pork Ribs
3-5 lbs
Oven
Temp
Internal
Temp (F)
350
180
18 - 20 Min. per lb
350
180
3/4 to 1 3/4 Hours
350
180
18 Min. per lb.
325-350
140-150
14 - 15 Min. per lb.
325
150-160
20 - 25 Min. per lb.
375
Cooking Time
30 - 35 Min. per lb.
325-350
160-170
25 - 30 Min. per lb.
325
140-160
20 - 24 Min. per lb.
325-350
140
12 - 14 Min. per lb.
ROAST PORK CHOPS
4-6 pork loin chops, 1" thick
3/4 cup light season soy sauce
1 tablespoon olive oil
2 cloves garlic, finely minced
3 tablespoons fresh ginger, finely minced
2 tablespoon dry sherry
1 tablespoon sugar
half an onion, finely sliced
salt and ground black pepper to taste
Wash and dry pork chops well. Remove excess fat. Set aside. Combine all
except onion in a large bowl. Place pork chops in mixture and let marinate for a
few hours; turn once halfway through marinating time. Follow roasting
instructions to place pork chops; add sliced onion on the pork chops. Roast 350
F for 15 minutes. Turn over and roast another 15 minutes or until cooked
through. Makes 4-6 servings.
12
LEMON GINGER GLAZED PORK LOIN
one 3-Ib. boneless pork loin
salt and freshly ground black pepper to taste
2 teaspoons rosemary leaves, finely chopped
1 tablespoon fresh ginger, peeled & minced
1 cup dry white wine
¾ cup lemon marmalade (orange can be substituted)
1 tablespoon unsalted butter ( at room temperature)
Wash and trim all the excess fat from the pork loin. Preheat the oven to 350 F.
Place the pork loin in the Roasting Tray, sprinkling it with salt, black pepper,
rosemary, and ginger.
Add white wine into the bottom of the Roasting Tray and cook for 50 minutes;
basting is needed. Take the Roasting Tray out from the oven. Use a small bowl
to mix marmalade with some pan drippings; pour over the meat. Continue to
cook for another 35-45 minutes, basting during the last 15 minutes, or until the
internal temperature reaches 150 F - 160 F. Slice and serve it with pan juices.
Makes 4-6 servings.
ROAST LAMB
one 5-6 Ib. leg of lamb
½ large onion, thinly sliced
5-6 cloves garlic, chopped
1/3 cup extra virgin olive oil
½ cup dry red white
½ cup light soy sauce
2 ½ teaspoon fresh thyme leaves
salt and freshly ground black pepper to taste
Preheat the oven to 400 F. Wash and trim the thicker portions of fat from the
lamb. Marinate lamb with all the ingredients except for onions. Cover and
refrigerate overnight. Take meat out from marinade, saving the remaining for
basting. Place sliced onion on the meat. Follow Roasting instructions to cook
80-90 minutes for medium lamb, basting with reserved marinade. Cool before
slicing. Makes 6-8 servings.
13
ROASTING BEEF RIBS
one 3-Ib. beef rib
olive oil
salt and garlic pepper
lemon juice
Wash, rinse, and dry the meat. Let it stand at room temperature before
preparing for roasting. Trim off all excess fat. Rub well with olive oil, salt,
pepper, and lemon juice. Set aside for one hour. Place the ribs in the Roasting
Tray with the ribs facing upward. Insert a reliable meat thermometer in the thick
part of the meat. Baste with drippings halfway through roasting. Use Cooking
Time and Temperature Chart as a guide for the roasting. When ribs are done,
take out of oven, let it sit for 10-15 minutes. Makes 6-8 servings.
ROAST BEEF TENDERLOIN
one 2-lb. piece of beef tenderloin
2 ½ tablespoons butter, room temperature
3 teaspoons black peppercorns
3 teaspoons white peppercorns
garlic and salt to taste
Preheat oven to 375 F. Wash and trim any excess fat. Crush peppercorns.
Place meat in the Roasting Tray, spread butter over the meat, and sprinkle with
crushed peppercorns. Roast for about 40-50 minutes for medium doneness.
Cool before slicing. Makes 4 servings.
14
COOKING & RECIPES (ROASTING)
1. Temperature setting: 450 F
2. Heater Selection: Upper
3. Remove Dust Cover. Keep the Griddle Tray as a top cover when the oven
is in use.
4. Accessories to be used: Roasting Tray or Chrome Roast/Bake Rack
5. Insert into the TOP or MIDDLE rack slot
6. Set Timer for broiling
USEFUL TIPS:
¾
¾
¾
¾
For best results, oven needs to be preheated.
Place food close to top heating element for top browning (don't let food touch it).
Brush food to be cooked with oil or sauce.
Turn food over halfway through cooking time.
COOKING TIME & TEMPERATURE
CHART
Food
PORK
Pork Ribs
Pork Chops
BEEF
Sirloin/Porterhouse
Rib Eye
London Broil
FISH
Fish Steak
Fish Fillet
Chicken Breast
Thickness/Weight
Approx. Cooking
Time/Desired Doneness
One Rack
1 inch
20 - 25 Min./ Well
25 - 28 Min./ Well
1 inch
1 inch
1 inch
12 - 14 Min./ Well
12 - 14 Min./ Well
15 - 20 Min./ Well
1 inch
1/2 inch
2 Pieces
12 - 15 Min./ Well
8 - 10 Min./ Well
20 - 25 Min./ Well
Cooking Tip:
¾ Broil Fish Fillet directly in the roasting tray. Turn it over halfway through your
cooking time.
¾ You may use a small amount of cooking spray or oil on your bake rack or
roasting tray.
¾ You may also use a heatproof dish to be placed on the bake rack for broiling..
15
HAMBURGERS
salt and pepper
1-2 tablespoon vegetable oil
1 teaspoon fresh ginger
root, minced
1 lb. ground beef
1 egg, slightly beaten
1 teaspoon red wine
¼ onion, finely minced
Preheat oven for 5 minutes before cooking.
Place ground beef in a bowl, add egg, salt, wine, ginger, and pepper. Mix well.
Make 4 meat patties. Brush burgers with vegetable oil on one side. Place them
on the rack with oiled side down. Brush the top of the burgers. Follow the
broiling instruction to position the rack, and make sure not to touch the heating
elements. Broil about 4-6 minutes; turn halfway through cooking.
LEMON & LIME BROILED FISH FILLETS
4 fish fillets, ½ inch thick
1 tablespoon vegetable oil
2 tablespoons lemon juice
2 tablespoons lime juice
1 ½ teaspoon honey
1 teaspoon Worcestershire sauce
¼ teaspoon onion powder
½ teaspoon garlic salt
1 teaspoon pepper
2 ½ teaspoons parsley, freshly chopped
Use a bowl to mix all the ingredients, then marinate the fish. Refrigerate for
about 2 hours. Preheat the oven for 5 minutes. Place the marinated fish fillets
into the roasting tray. Slide the tray into the top rack slot, not letting the tray
touch the heating elements. Use the Time and Temperature Chart as a cooking
guide. Turn the fillets over halfway through cooking. Fish is done when it flakes
easily with a fork. Makes 4 servings.
BROILED CHICKEN BREAST
4 chicken breasts, boned and skinned
½ teaspoon parsley, freshly chopped
1 ½ clove garlic, finely minced
1 teaspoon minced fresh rosemary
2 ½ tablespoons vegetable oil
2 tablespoons orange juice
2 ½ teaspoons honey
2 tablespoons fresh ginger, finely minced
1 teaspoon dry sherry
Preheat the oven for 5 minutes. Combine all the ingredients to marinate the
chicken breasts. Cover and refrigerate overnight. Place marinated chicken on
Roasting Tray. Follow the broil instruction to place the tray. Use Time and
Temperature Chart as a cooking guide or broil until tops are lightly browned.
Makes 4 servings.
16
COOKING & RECIPES (BAKING)
1.
2.
3.
4.
5.
6.
7.
8.
Temperature: Desired setting
Heater Selection: All/Rotisserie
Remove Dust Cover. Keep Griddle Tray as a top cover when you bake.
Accessories to be used: Chrome Roast/Bake Rack or Roasting Tray
Choose suitable baking pan or use foil
Place item to be baked on the Rack or Tray
Insert into proper rack slot
Set Timer and begin to bake
USEFUL TIPS:
¾ For baking temperature and time, follow the recipe instruction.
¾ Roasting bags, plastic, or glass containers are not recommended, but you
may use heatproof glass dishes such as Pyrex or Corning ware.
¾ When baking two racks of food at one time, rotate halfway through baking
time.
CAULIFLOWER & CARROT CASSEROLE
1/2 lb. cauliflower
2 medium carrots
1 can cream of mushroom soup
1/8 teaspoon black pepper
½ cup milk
two 8-oz. cans of French Fried onions
salt
Cut the cauliflower and the carrots in similar size. Mix them with soup, black
pepper, 1 can of French Fried onions and milk together in 1.5 qt. Casserole dish.
Cover with foil and bake 350ºF until hot; stir occasionally; arrange the remaining
can of French Fried onion on top of vegetables mixture, along the casserole rim.
Bake another 3-5 minutes at 425ºF or until onions are golden brown. Makes 6-8
servings.
17
SWEET POTATO SOUFFLÉ
1 large or 2 small cans sweet potatoes
½ cup sugar
2 large eggs
¼ cup margarine, melt
½ cup light Karo syrup
Combine sugar, butter, syrup, and egg. Beat well until creamy. Stir in mashed
potatoes; spoon mixture into 2-qt. baking dish. Place baking dish on the Chrome
Bake Rack and position it into the right rack slot. Bake at 350 F for 20-25
minutes.
LOW-FAT OAT BRAN BLUEBERRY MUFFINS
¾ cup oat bran
½ cup flour
2 ½ tablespoon brown sugar
¼ cup milk
1 ½ teaspoons baking powder
½ teaspoon salt
1 tablespoon vegetable oil
1 egg
1 teaspoon vanilla extract
2 cups blueberries
Preheat the oven to 425 F.
Place the egg, sugar, milk, salt, and vanilla extract into a large bowl. Mix well.
Add flour, bran, and baking powder into the bowl. Stir until it looks lumpy and
uneven. Add blueberries. Grease a 6-cup muffin pan or line with paper cupcake
liners. Fill each muffin cup 2/3 full. Bake about 18-20 minutes, or until the
muffins split open and are golden brown.
NOTE: Use the Cooking Time and Temperature Chart as a guide and reference.
Actual cooking time may vary.
18
COOKING & RECIPES (GRILL/GRIDDLE)
1.
2.
3.
4.
Temperature setting: 450 F-470°F
Heater Selection: Upper
Set to desired time
Preheat approximately 5 minutes
USEFUL TIPS:
¾ Use griddle for your side dish when you cook your main course.
¾ Ideal for a full breakfast: bacon, egg, pancakes, etc.
¾ Extreme caution should be exercised when taking griddle out for cleaning.
¾ Be very careful when using griddle as it might spatter.
¾ You may slide the Roasting Tray into the top rack slot when you use griddle.
This will help you to keep the heat at the top for ideal cooking.
SWEET POTATO PANCAKES
2 cups mashed and cooked sweet
¼ freshly ground black pepper
potatoes
1 teaspoon curry powder
2 lightly beaten eggs
1 tablespoon all-purpose flour
2 teaspoons dried minced onion flakes 2-3 tablespoons vegetable oil
½ teaspoon salt
Preheat the griddle. Set vegetable oil aside. Use a medium-size mixing bowl to
combine the mashed potatoes and eggs with the ingredients. Stir well. Use a
pastry brush to spread the vegetable oil on the griddle. Spoon the potato mixture
and spread it out to make pancakes. Cook one side until brown and then turn to
cook the other side. Wrap the cooked pancakes in foil and keep them warm in
oven. Makes 10-12 pancakes.
BLUEBERRY PANCAKES
1 cup egg substitute or 4 eggs
¾ teaspoon light brown sugar
1 cup milk
¼ teaspoon salt
1 cup cold water
¾ fresh blueberries
2 ½ cups flour, sifted
2 tablespoons unsalted butter,
¼ cup safflower oil
melted, cooled
Preheat the griddle. Beat egg substitute, milk and water lightly;
add the remaining dry ingredients. Stir well until almost smooth; there may be
some lumps. Butter the griddle lightly, and cook until the bottoms are golden
brown. Turn pancakes when topside is bubbly and cook the other side until it is
brown. Makes 12 pancakes.
19
COOKING & RECIPES (TOASTING)
1.
2.
3.
4.
5.
6.
Temperature: 450 F
Heater Selection: ALL/ROTISSERIE
Remove the Dust Cover.
Keep Griddle Tray as a top cover when the oven is in operation
Put food on Chrome Roast/Bake Rack; place it into the middle or top rack slot.
Set the Timer
USEFUL TIPS:
¾ When you only have one or two items to toast, put them in the middle of the
oven for better results.
¾ Best results for toasting are achieved when used for items too thick for a
conventional toaster.
COOKING & RECIPES (KEEP WARM)
1.
2.
3.
4.
5.
Temperature setting: 220°F-240°F
Heater Selection: Lower, Upper, or All/Rotisserie
Remove the Dust Cover. Keep the Grill/Griddle as a top during operation.
Keep Griddle Tray as a top cover when you use the oven
Place the dish on the rack; make sure to use heatproof dish.
USEFUL TIP:
¾ Warming time over 30 minutes is not recommended, as food might get dry.
¾ When you select Lower, place the rack into lower rack slot; when you select
Upper, place rack close to top heating element. If you select All/Rotisserie,
place food in the middle for warming.
20
LIMITED WARRANTY
Aroma Housewares Company warrants this product free from defects in material
and workmanship for one year from provable date of purchase in continental United
States.
Within this warranty period, Aroma Housewares Company will repair or replace, at
its option, defective parts at no charge, provided the product is returned, freight
prepaid with proof of purchase and U.S. $6.00 for shipping and handling charges
payable to Aroma Housewares Company. Before returning an item, please call the
toll free number below for return authorization number. Allow 2-4 weeks for return
shipping.
This warranty does not cover improper installation, misuse, abuse or neglect on the
part of the owner. Warranty is also invalid in any case that the product is taken
apart or serviced by an unauthorized service station.
This warranty gives you specific legal rights and which may vary from state to state
and does not cover areas outside the United States.
AROMA HOUSEWARES COMPANY
6469 Flanders Drive
San Diego, California 92121
1-800-276-6286
M-F, 8:30 AM - 5:00 PM, Pacific Time
Website: www.aromaco.com
21