1
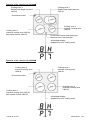
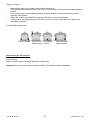
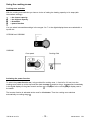
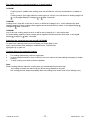
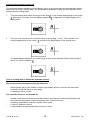
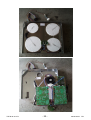
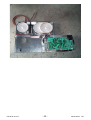
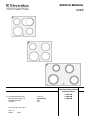
SERVICE MANUAL HOBS Induction Glass Ceramic Cooking Surface © AEG Hausgeräte GmbH Muggenhofer Straße 135 D-90429 Nürnberg Germany Fax +49 (0)911 323 1420 TSE - N Edition: 05.00 Publ.-Nr.: 599 50 82 27 685 EN C 67600 M C 68000 M C 88000 M CONTENTS Special notes on induction cooking zones ...................................................................... 3 How to avoid damaging your appliance .......................................................................... 4 Appliance description ................................................................................................... 4 Function and the way the induction cooking zone works ................................................ 5 Features of the ceramic hob ........................................................................................... 6 The digital displays.......................................................................................................... 7 Safety cutoff of the cooking zone (Hobs C67600M, C6800M) ........................................ 7 Safety cutoff of the cooking zone (Hob C88000M) ......................................................... 7 Resetting the safety cut-out ............................................................................................ 7 Suitable kitchenware for induction cooking zones .......................................................... 8 Pan size .......................................................................................................................... 8 Automatic pan sensing .................................................................................................... 8 Pots and pans for rapid-glowing standard cooking zones (Hob C67600M) .................... 8 Before using for the first time .......................................................................................... 9 - 9 Using the cooking zones ............................................................................................ 10 Cooking zone switches ................................................................................................. 10 Activating the power function ........................................................................................ 10 The power function is not permissible or is deactivated if ........................................ 11 Switching the casserole zone on and off ...................................................................... 11 Cooking without the automatic feature ......................................................................... 11 Cooking with Automatic Heating Up ............................................................................. 12 Tips on Cooking with or without the automatic feature ................................................. 12 - 12 Cleaning and care ....................................................................................................... 13 Advantages for cleaning and caring for the induction cooking zone ............................ 13 Glass ceramic cooking surface ..................................................................................... 13 Problem dirt ...................................................................................................................14 - 14 Installation Instructions ............................................................................................. 15 Technical data (C67600M) ............................................................................................ 15 Technical data (C68000M, C88000M) .......................................................................... 16 Safety instructions for the installer ................................................................................ 17 Electrical connection ..................................................................................................... 17 - 17 Additional information for the service ...................................................................... 18 Cooktop assembly ........................................................................................................ 18 Cooktop technology ...................................................................................................... 18 Compatibility ..................................................................................................................18 Cooktop assembly 4 Induction ...................................................................................... 19 Cooktop assembly 2 Induction ...................................................................................... 21 - 22 - 20 22 What to do if ... ............................................................................................................ 15 TSE-N 05.00 A. B. -2- 599 50 82 27 EN Special notes on induction cooking zones - Scientific investigations have shown that an influence on or endan-gering of patients with implanted heart pace makers by AEG induc-tion cooking zones are normally not to be expected. The distance between the trunk and the cooking zone should howe-ver never be less than 30 cm! - Electromagnetic fields can influence electronic circuits and interfere with transistor radios. - Do not put magnetically rechargable objects (e.g. credit cards, casset-tes etc.) on the glass ceramic surface while the induction cooking zone(s) is (are) in use! - Do not put any metallic objects (e.g. spoons, pan lids etc.) on the induction surface, since they can be warmed up when the induction surface is in use. Certain cooking pots may produce some noise during cooking on induction cooking zones. This, however, is no malfunction of the cooking zone and this does not affect the function in any way. TSE-N 05.00 A. B. -3- 599 50 82 27 EN How to avoid damaging your appliance - Do not use the cooking surface as a work surface or for storage. Do not use the cooking zones with empty pots and pans. Glass ceramic is insensitive to temperature shock and very robust, however it is not unbreakable. Especially sharp and hard objects that fall on the cooking surface can damage it. Do not use pans with damaged bases that are rough and have burrs. Scratching may occur when the pans are slid. Do not place any pans on the cooking surface frame. Scratching may occur or the paint damaged. Make sure that no acidic liquids, e.g. vinegar, lemon or descaling agents are spilt onto the frame of the cooking surface, since these cause matte spots. If sugar or a preparation with sugar comes into contact with the hot cooking zone and melts there it must be cleaned off immediately with a scraper while it is still hot. If it cools, damage to the surface may occur on removal. Keep all items and materials that can melt away from the glass cera-mic surface, e.g. plastics, aluminium foil, or oven foils. If something of this nature should melt onto the glass ceramic surface, it must also be removed immediately using the scraper. Avoid boiling pans dry. The bases could be irreparably damaged in the process and the glass ceramic cooking surface also damaged. Appliance description Function and the way the induction cooking zone works A copper wire induction coil is beneath the glass ceramic cooking surface. This generates electromagnetic fields, which act directly on the base of the pots and pans and not, as with other heating up methods, first heat up the glass ceramic. This means that the base of the pan is immediately heated up, which saves time and energy. Since the heat required for cooking is generated directly in the base of the pan the cooking zone itself hardly warms up. It only receives the reflected heat from the pan base. Note: If there is no pot or pan on the cooking zone there is no energy transfer (heating up) and thereby absolute security against acci-dental switching on. For technical reasons it is necessary that a cooling blower operates when the induction cooking zone is on. TSE-N 05.00 A. B. -4- 599 50 82 27 EN Features of the ceramic hob C67600M Cooking zone 2: Radiant heat single ring zone 1200 W Cooking zone 3: Radiant heat casserole zone 2400 W Oven steam outlet Cooking zone 4: Induction cooking zone 1400 W Cooking zone 1: Induction cooking zone 2200 W; with power function 3000 W Touch control sensor field adding on casserole zone with pilot light 4-fold digital display (separate for each cooking zone) Features of the ceramic hob C68000M Cooking zone 2: Induction cooking zone 1400 W Cooking zone 3: Induction cooking zone 1800 W Oven steam outlet Cooking zone 4: Induction cooking zone 1800 W Cooking zone 1: Induction cooking zone 2200 W; with booster function 3000 W TSE-N 05.00 A. B. 4-fold digital display (separate for each cooking zone) -5- 599 50 82 27 EN Features of the ceramic hob C88000M Cooking zone 2: Induction cooking zone 1400 W Cooking zone 3: Induction cooking zone 1800 W Oven steam outlet Cooking zone 4: Induction cooking zone 1800 W with power function 2300 W Cooking zone 1: Induction cooking zone 2200 W; with power function 3000 W 4-fold digital display (separate for each cooking zone) The digital displays Digits 1 to 9 and four different letters can appear in the display. - The digits show the cooking stage set. = the lowest capacity = the highest capacity = intermediate stage (= 6,5) - The letters indicate the functions: = Error Display flashes if the cooking zone is switched on no pan is on the cooking zone or an unsuitable pot or pan is being used. = Automatic Heating Up (possible for all cooking zones) is lit, if the cooking zone is set to automatic heating up; (is lit until the automatic feature switches over to the set further cooking stage). = Residual Heat Display Danger! Cooking zone still hot; it extinguishes when the cooking zone has cooled down. This display appears only if the cooking zone is switched off. = Power Function lights up when the Power Function is activated. The Power Function delivers extra-high heating power. It can be switched on for cooking zone 1 (front left ø 210 mm). = lights up when the cooking zone is overheated or the automatic switch-off function has been activated. (also see What to do when ...) TSE-N 05.00 A. B. -6- 599 50 82 27 EN Safety cutoff of the cooking zone (Hobs C67600M, C68000M) All cooking zones are automatically switched off 3 hours after a coo-king zone was last switched on. Should a cooking process take longer than 3 hours you can extend the cooking time of one cooking zone by a further 3 hours by switching it off and on again quickly. Safety cutoff for the rings If one of the rings is not switched off after a certain time or if the cooking setting is not changed, all the rings are automatically switched off. appears in the cooker and the ceramic hob ring displays of all the rings that were switched on. - Cooking setting 1 2.5 Cooking setting 3 4 Cooking setting 4.5 5.5 Cooking setting 5.5 9 after 6 hours after 5 hours after 4 hours after 1.5 hours Resetting the safety cut-out Turn all the ring switches to the zero position to cancel the active safety cutoff of the rings. The rings are then ready for operation again. appears in the ceramic hob display if residual heat is still present. Suitable kitchenware for induction cooking zones Pots and Pans - In principle all pots and pans with magnetic bases are suitable. These are steel, steel-enamel as well as cast-iron pots and pans. High grade steel pans with a mixed metal base (sandwich base, e.g. Tefal with an aluminium/ copper base) are suitable for induction only if the manufacturer has expressly marked them as such. In that case they have a ferromagnetic percentage in the base. If you wish to use a special type of pan (e.g. a pressure cooker, sim-mering pan, wok, etc.), please observe the manufacturers instruc-tions. Aluminium, copper, brass, stainless steel pots and pans (unless especi-ally designated as suitale for induction), glass, ceramic or porcelain are not suitable for induction cooking zones. The cooking zone reacts as if it were being used without a pot or pan: Error code . Look for the label: Suitable for induction! Suitability Test If you are not sure if a pot or pan is suitable for cooking or frying on the induction cooking zone you can check this as follows: - Place a pot filled with a little water (3-5 mm filling height) on the cooking zone. Switch the cooking zone to full power (switch setting 9). Caution: The pan base of suitable kitchenware heats up within a few seconds! - You can also check this with a magnet. If it remains fixed to the base the pan is suitable for induction cooking zones. TSE-N 05.00 A. B. -7- 599 50 82 27 EN Pan size Up to a certain limit the induction cooking zone adapts itself to the size of the pan base diameter. However, the pan base diameter must be of a minimum size, depending on the size of the cooking zone. For example: Diameter of the cooking zone 14,5 cm For example: Diameter of the pan base at least 12 cm For example: Diameter of the cooking zone 18 cm For example: Diameter of the pan base at least 14,5 cm For example: Diameter of the cooking zone 21 cm For example: Diameter of the pan base at least 18 cm Note: Please note the diameter of the pan base when buying new pans, since the manufacturers usually specify the top edge diameter of their pans. Automatic pan sensing The induction cooking zone does not function when unsuitable pans are used. If the cooking zone is switched on without a suitable pan on it the cooking zone. flashes in the digital display of After about 10 minutes the cooking zone switches itself off automati- cally. display. appears in the digital Also when overheating occurs (e.g. heating up a pan cooked empty) or with faults in the electronics the display is lit. The cooking zone switches itself off automatically. To be able to switch it on again the cooking zone must have been first switched off and then set to the required stage anew. Pots and pans for rapid-glowing standard cooking zones (Hob C67600M) - On principle all pots and pans with level bases are suitable for radiant heat cooking zones. You can recognise good quality pans by the base of the pan, and not from the material from which the pan is made. The base should be as thick and flat as possible. Rough bases (e.g. cast iron pots) scratch the hob surfaces when they are slid about. Pots with aluminium or copper bases can cause metallic discolouring on the glass ceramic surface, which is very difficult or impossible to remove. The saucepan base and cooking zone should be the same size. Attention! Avoid letting enamel saucepans and frying pans boil dry. The base could be damaged and then scratch the cooking surface when slid. Saucepans and frying pans with sharp edges and burrs will also scratch. TSE-N 05.00 A. B. -8- 599 50 82 27 EN Energy saving tips - Always place pans on the cooking zone before switching on. Ensure that the pots and pans are in the centre of the cooking zone and cover the heated/marked surface. Dirty cooking zones and pan bases damage the glass ceramic cooking surface and increase electricity consumption. Switch the cooking zone off before cooking is finished to use the residual heat. Cooking times are reduced by up to 50%. Not only do you save energy, but more vitamins and minerals are retained. You will waste energy if the.... Pan is too small Pan lid is not Pan base is fitted properly uneven Pan is too large (glass ceramic) Before using for the first time Initial Cleaning Wipe the glass ceramic cooking surface with a damp cloth. Important: Do not use any caustic, abrasive cleaners! The surface could be damaged. TSE-N 05.00 A. B. -9- 599 50 82 27 EN Using the cooking zones Cooking zone switches With the cooking zone switches you have a choice of setting the heating capacity to 14 steps (with intermediate settings) = the lowest capacity = the highest capacity = Automatic = power function You can select intermediate settings in the ranges 2 to 7. In the digital display these are marked with a top left dot. C67600M and C68000M C88000M Oven panel Cooking field Activating the power function To switch the power function on (*only provided for cooking zone 1, front left ø 210 mm) turn the cooking zone switch up to the stop and then back to stage and then let go. A appears immediately in the digital display on the glass ceramic surface. is displayed in the coo-king stage display next to the switch. The booster function is activated at the most for 10 minutes. Then the cooking zone switches automatically to cooking stage . TSE-N 05.00 A. B. - 10 - 599 50 82 27 EN The power function is not permissible or is deactivated if C67600M - Cooking zone 2 (radiant heat cooking zone rear left-hand ø 145 mm) is switched on or added on. or if Cooking zone 4 (front right induction cooking zone ø 145 mm) is or will be set to heating stage 8-9 . In the digital display P changes to after 3 seconds. C68000M cooking zone 2 (rear left ø 145 mm) is set to or will be set to stage 8 to 9 , since otherwise the total heating capacity of both cooking zones together would exceed the limit value. In the digital display changes to after 3 seconds. C88000M one of the rear cooking zones is set to or will be set to stage 8 to 9 , since other-wise the total heating capacity of both cooking zones together would exceed the limit value. In the digital display changes to after 3 seconds. Switching the casserole zone on and off (C67600M) To switch the casserole zone on and off place your finger flatly on the touch control sensor field adding on casserole zone, until the pilot light lights up or goes out. Cooking without the automatic feature 1. 2. 3. For heating up/browning, select a high power. As soon as steam starts to form or the oil is hot, turn back to the heat setting necessary for further cooking. To stop cooking, turn back to the zero position. Note: When cooking with the induction cooking zone you should take into account that the heating up times are reduced by the direct energy transfer to the pan! the cooking process stops immediately after the cooking zone is swit-ched off (no boiling over!). TSE-N 05.00 A. B. - 11 - 599 50 82 27 EN Cooking with automatic heating up This automatic feature operates at its full capacity ( ) for a given time and then automatically switches down to the set further cooking stage. The duration of the automatic heating up boost depends on the selected further cooking stage. 1. Turn the cooking zone switch to the right to the stop . In the cooking stage display of the cooker lights up for a moment, then the display changes to . A appears in the digital display of the cooking zone. 2. Then you must turn back to the required further cooking stage ( 1 to 8 ). This is shown in the is still lit in the digital display of the cooking zone. cooking stage display of the cooker. The digital display changes to the relevant digit as soon as the selected further cooking stage is active 1 to 8 (in the example ). Tips on cooking with or without the automatic feature We recommend the automatic heating up feature for: - dishes that are put on cold, heated up with a high capacity and do not have to be supervised constantly during the further cooking stage. for dishes put into a hot pan. The automatic feature is not suitable for: - Goulash, beef olive and similar braised dishes which are browned, moistened and braised until they reach the right degree of browning and are then cooked until done. Dumplings, pasta dishes cooked in a great deal of liquid. Cooking in pressure cookers Large quantities of soups/stews with more than 2 l liquid. TSE-N 05.00 A. B. - 12 - 599 50 82 27 EN Cleaning and care Advantages for cleaning and caring for the induction cooking zone The cleaning effort for induction glass ceramic cooking surfaces is considerably less than for cooking surfaces with radiant heating: - The induction cooking zone reacts faster to switching down and off. Boiling over and burning in of dishes is avoided to a large degree. - The temperaturs on the glass ceramic surface are clearly lower with inductive cooking than with the conventional radiant heating systems. Since the heat is generated in the pan, food or foodstuffs possibly on the glass ceramic surface are not burnt in as badly. Glass ceramic cooking surface It is important to clean the cooking surface after every use! Attention! Never use aggressive cleaning agents such as, for example, coarse scouring cleaners or scratching scouring pads. Always clean the cooking surface when it is only a little dirty. Use a damp cloth and a little washing up liquid. Then rub the cooking surface dry with a clean cloth. Remnants of cleaner must not be left on the surface. Clean the entire cooking surface thoroughly once a week. For cleaning use Sidol-Edelstahlglanz, Stahl-Fix, WK-Top or Cillit. Then rinse the entire cooking surface with plain water and rub it dry with a clean cloth. Please ensure that no residues (cleaner) remain on the surface. The coo-king surface would otherwise be damaged! TSE-N 05.00 A. B. - 13 - 599 50 82 27 EN Problem dirt Residues from food that has boiled over First soften these using a wet cloth and then remove residues using a glass or razor blade scraper. Danger! Take care not hurt yourself! Then clean the cooking surface with the clea-ners identified above. Burnt-in sugar, melted plastic you must remove immediately while it is still warm (not hot) with a glass scraper otherwise damage can be incurred. Then clean the cooking surface normally. You can prevent damages by sugar or sugar-containing foods by caring for the cooking surface with Collo-Profi or Cera-fix. Spots Limescale stains, mother-of-pearl-like shiny stains, metallic iridiscent discolourations, pan abrasions that have formed during coo-king can be removed best while the cooking zones are still warm. Use one of the cleaners mentioned above. If necessary repeat the cleaning process. Danger! Do not put vinegar, lemons or scale remo-vers on the hob frame, they will make the surface matt. Grains of sand that have fallen on the coo-king surface can cause scratches when the pans are slid around. Ensure, therefore, that no grains of sand remain on the cooking surface. Abraded decor In time the decor is abraded by the use of aggressive cleaners and scouring pan bases and dark stains develop. You can obtain suitable cleaning and caring agents as well as glass scrapers from the AEG customer service. TSE-N 05.00 A. B. - 14 - 599 50 82 27 EN What to do if ... ... The letters flashes in the digital display? Check whether: The pan is on the right cooking zone. The diameter of the pan base is too small for the cooking zone! The pan is suitable for induction cooking! ... appears in the digital display? - Check whether the cooking zone could be overheated. For these checks turn the cooking zone off and let it cool off. Try to switch the cooking zone on again after a few minutes with a suitable pan on it. The automatic switch-off feature for the cooking zone has responded. You can reactivate the cooking zone by turning it quickly off and then on again. - Installationsinstructions Important! This appliance must be installed by qualified personnel, according to the manufacturers instructions and to the relevant coun-try standards. Please observe this instruction, otherwise the warranty will not cover any damage that may occur. Technical data (C67600M) Appliance Dimensions Width Depth Height Cut-Out Dimensions Width Depth Corner radius Power Consumption Radiant heat single ring cooking zone ø 145 mm Radiant heat casserole zone ø 170 mm - ø 265 mm Induction cooking zone ø 145 mm Induction cooking zone ø 210 mm Induction cooking zone ø 210 mm (P) Heater Element Voltage Total Electrical Load Max. TSE-N 05.00 A. B. - 15 - 570 mm 500 mm 52 mm 560 mm 490 mm R3 1200 W 2400 W 1400 W 2200 W 3000 W 230 V ~ 7.2 kW 599 50 82 27 EN Technical data (C68000M) Appliance Dimensions Width Depth Height Cut-Out Dimensions Width Depth Corner radius Power Consumption Induction cooking zone ø 145 mm Induction cooking zone ø 180 mm Induction cooking zone ø 210 mm Induction cooking zone ø 210 mm (P) Heater Element Voltage Total Electrical Load Max. 570 mm 500 mm 53 mm 560 mm 490 mm R3 1400 W 1800 W 2200 W 3000 W 230 V ~ 7.2 kW Technical data (C88000M) Appliance Dimensions Width Depth Height Cut-Out Dimensions Width Depth Corner radius Power Consumption Induction cooking zone ø 145 mm Induction cooking zone ø 180 mm Induction cooking zone ø 180 mm (P) Induction cooking zone ø 210 mm Induction cooking zone ø 210 mm (P) Heater Element Voltage Total Electrical Load Max. TSE-N 05.00 A. B. 761 mm 501 mm 47 mm 750 +2 mm 490 mm R3 1400 W 1800 W 2300 W 2200 W 3000 W 230 V ~ 7.2 kW - 16 - 599 50 82 27 EN Safety instructions for the installer - This hob must be installed by qualified personnel, according to the manufacturers instructions and to the relevant country standards. In respect of fire protection, this appliance corresponds to type Y (IEC 335-2-6). Only this type of appliance may be installed with a high cupboard or wall on one side. It is not permitted to fit drawers below the cooking surface. Protection against electric shock must be provided by the installation. The kitchen unit in which the appliance is fitted must satisfy the requirements of DIN 68930 in respect of stability. Built-in ovens and cooking surfaces are fitted with special connector systems. They may only be combined with appliances with a matching system. All cut surfaces are to be sealed with a suitable sealant for protection against moisture. On tiled work surfaces, the joints in the area where the hob sits on the surface must be completely filled with grout. On natural, artificial stone, or ceramic tops, the snap action springs must be bonded in place. Ensure that the seal is correctly seated in the frame and that it is sea-ted against the work surface without leaving any gaps. Additional silicon sealant must not be applied, this will make removal more difficult in the event of the need for service. To remove the hob, it must be pressed out from below. Electrical connection - Connect the wiring harness plugs with the respective sockets of the same colour of the built-in oven or switch box. C67600M and C88000M This induction glass ceramic cooking zone can only be combined with the following AEG units: Competence E 8. . . Competence E 6. . . Competence E 4106-1 Competence S 8. . . TSE-N 05.00 A. B. - 17 - 599 50 82 27 EN Additional information for the service Cooktop assembly - The cooktop assembly conforms to the system of the New Range, i.e. the cooktop frame and the cooktop glass are two separate parts and not stuck with each other. - After disassembling the cooktop take care that the 7-segment display and, with the self-sufficient built-in cooktops, the control panel are not in the cooktop cover, but is clipped to the cooktop glass from below. Cooktop technology - With the twofold induction, the induction hot plates are front right and left, not laterally one after the other as with the previous version. The induction module is a twofold module. - With the fourfold induction, the induction module consists of a block of four. - With this new series of induction cooktops there are no test points to check the electronic in case of a malfunction. That means, if the reason for a hot plate, which does not function, is to be found in a malfunction of the electronic, the only solution is to exchange the module or, with self-sufficient built-in cooktops, to exchange the control panel. The modules can also not be checked with the help of a test routine. Compatibility - The induction cooktops can only be combined with ranges which are equipped with an ERM (modular energy regulator), from range series Compentence 2000 onward, classes Top and Comfort. - Concerning the compatibility of the control lines, these are directly compatible from Century onward. With the previous range series Competence, the control line is equipped with an adaptor. TSE-N 05.00 A. B. - 18 - 599 50 82 27 EN Cooktop assembly 4 Induction TSE-N 05.00 A. B. - 19 - 599 50 82 27 EN TSE-N 05.00 A. B. - 20 - 599 50 82 27 EN Cooktop assembly 2 Induction TSE-N 05.00 A. B. - 21 - 599 50 82 27 EN TSE-N 05.00 A. B. - 22 - 599 50 82 27 EN