1
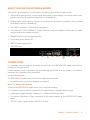
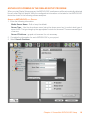
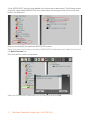
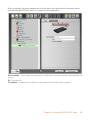
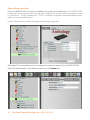
StreamNet™
Anthology™ Media Server
Installation and Setup Guide
TM
AVoIP™
ClearOne
5225 Wiley Post Way
Suite 500
Salt Lake City, UT 84116
Telephone 1.800.283.5936
1.801.974.3760
Tech Sales
1.800.705.2103
FAX1.801.974.3669
[email protected]
On the Web
www.clearone.com
www.streamnetpartners.com
StreamNet
ANTHOLOGY Media Server
Installation and Setup Guide
ClearOne Document
800-000-000-04 _Rev. 1.2 - May 7, 2013
© 2013 ClearOne - All rights reserved. No part of this document
may be reproduced in any form or by any means without
written permission from ClearOne. Printed in the United States
of America. ClearOne reserves specific privileges.
Information in this document is subject to change without
notice.
Table of Contents
Chapter 1: Getting Started.........................................................................................................1
About your ANTHOLOGY Media Server.............................................................................................................................2
Connections.......................................................................................................................................................................2
Included Accessories....................................................................................................................................................2
What You Need to Get Started......................................................................................................................................2
Network Connection......................................................................................................................................................3
Audio Connections........................................................................................................................................................3
Video Connections........................................................................................................................................................3
Chapter 2: ANTHOLOGY Media Server Setup...........................................................................4
The Remote Configuration Utility........................................................................................................................................4
Server Settings..............................................................................................................................................................5
Display Settings.............................................................................................................................................................6
Content..........................................................................................................................................................................7
Firmware.................................................................................................................................................................. 8
Chapter 3: Synchronizing Media.............................................................................................10
Media Synchronization Screens................................................................................................................................ 10
Status Tab.............................................................................................................................................................. 10
iTunes Tab.............................................................................................................................................................. 11
Windows Media Tab.............................................................................................................................................. 12
Folders Tab............................................................................................................................................................ 13
Advanced Tab........................................................................................................................................................ 14
Chapter 4: StreamNet ANTHOLOGY Setup ............................................................................15
ANTHOLOGY Screens in the Dealer Setup Program................................................................................................... 16
Adding an ANTHOLOGY to a Project.................................................................................................................... 16
Pairing Streams with Hosts................................................................................................................................... 19
ANTHOLOGY Analog Output................................................................................................................................ 20
Service and Support.................................................................................................................22
Chapter 1: Getting Started
Congratulations on purchasing your ANTHOLOGY media server. Read this guide to get started.
The ANTHOLOGY media server offers you the convenience of accessing all your local audio content
and streaming internet services in a single device.
The ANTHOLOGY can output 4 independent IP audio streams, plus one additional analog audio
stream with on-screen display (OSD) control through a separate ViewLinX.
ClearOne and NetStreams provide software that allows you to automatically keep your iTunes™ or
Microsoft® Windows Media Player content synchronized with your server. Whenever you purchase
or rip new content on your network, it will automatically be sent to your ANTHOLOGY media server.
With your ANTHOLOGY media server, you can:
• Listen to 5 discreet audio channels in different parts of your home, corporate offices, retail
environments, hospitality and entertainment venues etc.
• Browse music and control playback from around your home using TouchLinX’s, most web
browsers, your iPhone or a professionally installed control system such as Crestron® or AMX™.
• Multiple ANTHOLOGY media servers can be connected in the same network and can be linked
and controlled from the same touch/control panel.
• Watch a slide show of your favorite photos on a remote display.
1
TechSales StreamNet Design Help: 1.800.705.2103
ABOUT YOUR ANTHOLOGY MEDIA SERVER
Your server has several ports on the back for connecting your audio and networking,
• VGA and DVI video ports for connecting to a television or other display. This can be used to view
playlists, etc.(Can be used as a video input for a MediaLinX.)
• Analog stereo audio output to connect to a receiver, pre-processor or amplifier. (Can be used
as an audio input for a MediaLinX.)
• One S/PDIF connector. (Not currently supported.)
• One Ethernet 10/100/1000Base-T Gigabit Ethernet Local Area Network (LAN) port for media
sources and control system interface.
• Multiple USB ports for storage expansion.
• Front panel power status LED.
• 28V DC Power supply input
• ON/OFF button
VGA
DVI
Out
USB
Ethernet
Analog
Audio
Out
S/P DIF
On/Off
28V DC
CONNECTIONS
It is important that you make all necessary connections to the ANTHOLOGY media server before
turning it on for the first time.
Certain aspects of the configuration are automatically set the first time you power on the device
based on the connections that are present.
Included Accessories
The ANTHOLOGY media server includes the following accessories.
• Removable rack mount ears (shipped unmounted)
What You Need to Get Started
To setup the ANTHOLOGY media server, you’ll need the following
• A network router or switch connected to the Internet with an available Ethernet port.
• A standard (straight-through) Category 5 or Category 6 Ethernet cable.
• A computer (Windows or Mac) connected to the same network as the ANTHOLOGY media
server.
• 28 V DC Power supply required (PL250 or PL960).
Chapter 1: Getting Started
2
Network Connection
Using a standard (straight through) Category 5 or Category 6 Ethernet cable, connect the Ethernet
port on the ANTHOLOGY media server to an available port on your network router or switch.
The ANTHOLOGY media server can be controlled over IP ports 5004-5006 and no further connections
are necessary.
Audio Connections
You may connect the analog audio output to an amplifier, receiver or MLAV with a standard 3.5 mm
connection.
Video Connections
To view information about your audio program, you may connect the DVI or VGA video outputs to a
compatible display device or MediaLinX.
3
TechSales StreamNet Design Help: 1.800.705.2103
Chapter 2: ANTHOLOGY Media Server Setup
This chapter provides an overview of using the Remote Configuration Utility to configure the
ANTHOLOGY media server.
Once you have made all the necessary connections, turn on the ANTHOLOGY media server by
pressing the power button on the back of the unit once. You should see that the blue power LED
illuminates.
Wait 5 minutes for your server to completely boot up the first time, or if your server is connected to
a video display, until the “Now Playing” screen shows on the display.
THE REMOTE CONFIGURATION UTILITY
The ANTHOLOGY media server has a built in web server that provides for remote device configuration,
control system integration, and remote control of playback.
After connecting the ANTHOLOGY to the network, use the Dealer Setup program to discover the
ANTHOLOGY’s IP Address. Then enter into a browser on the same network the IP address followed
by “/config” to enter the remote configuration menu. (You can also look up the IP address of the
server using the DHCP client table in your router’s interface or a command prompt on a connected
pc, if necessary.)
You may also enter through a link provided in the Dealer Setup program.
Once you have connected to the web server’s configuration page, you will see several tabs for
configuring the various features of the ANTHOLOGY media server.
Chapter 2: ANTHOLOGY Media Server Setup
4
Server Settings
The Server Settings tab allows you to configure the following options:
Server Identification - Set your servers name on the network, and a description.
Date / Time - Configure the server to automatically obtain its date and time information from a
selection of geographically located NTP (Internet time) servers.
Wired Ethernet - Select the connection method for attaching to the wired network. The automatic
(DHCP) setting is recommended, but if you are setting this manually, you will need to provide an
unused IP address, subnet mask, gateway and DNS server address.
5
TechSales StreamNet Design Help: 1.800.705.2103
Logging - Not currently supported.
Display Settings
The Display Settings tab allows you to configure the ANTHOLOGY’s on screen display options.
Screen Saver - Set the amount of time that will elapse before the server displays a photo slide
show.
Slideshow - Adjust the transition and timing options of the photo slide show.
Chapter 2: ANTHOLOGY Media Server Setup
6
Content
The Content tab allows you to define the content of your ANTHOLOGY media server. Content can
be provided by computers on the network who supply media files to the ANTHOLOGY media server
or from the ANTHOLOGY’s internal hard drive.
Computers - The ANTHOLOGY media server comes with a utility that will automatically synchronize folders on your network, or the contents of your iTunes or Windows Media Player libraries with
your ANTHOLOGY media server’s onboard storage.
This lists all of the computers on your network that have this synchronization utility installed and
are contributing to your ANTHOLOGY media server onboard storage library. If you want to stop
synchronizing with one of the computers, clicking the “X” next to the computer name will remove
it from the list, and will remove all content contributed by that computer from your ANTHOLOGY
media server library.
More information about the synchronization software is available in the Other Software-Media
Synchronization part of this guide, and in the Media Synchronization chapter.
Network Content - When an ANTHOLOGY media server is attached to a network, it will search to
see what else is attached. It will then compile a list of network devices - including other ANTHOLOGY units - and allow you to connect to them. This lets them share content. When you click the
Add Network Content button you are telling the ANTHOLOGY to establish this link.
7
TechSales StreamNet Design Help: 1.800.705.2103
Firmware
The Firmware tab allows you to:
• Update the firmware operating software in your ANTHOLOGY media server
• Download a utility for monitoring the server
• Synchronize server content with other computers and playlists
• Enable remote technical support
Firmware Update - From time to time, new operating software for the ANTHOLOGY media server
is released to add new services or to accommodate changes to existing services. The current status of your firmware is displayed.
If there is an update available, a button will appear in this section that will allow you to download
and apply the update.
Other Software - ANTHOLOGY Client - This section allows you to install an ANTHOLOGY Client
Windows-based client application, or a browser-based application to your computer that lets you
see the “Now Playing” status of the ANTHOLOGY media server. This is the same as what would be
viewed on an attached VGA or DVI monitor.
Chapter 2: ANTHOLOGY Media Server Setup
8
Other Software – Media Synchronization - This section allows you to install a client application that will automatically synchronize folders on your network, or the contents of your iTunes or
Windows Media Player libraries with your ANTHOLOGY media server. Information about using the
client application is detailed in chapter 3, Synchronizing Media.
License Information - This section displays your product license information and serial number.
Remote Support - Not currently supported.
9
TechSales StreamNet Design Help: 1.800.705.2103
Chapter 3: Synchronizing Media
Synchronization provides your ANTHOLOGY media server the information it needs to access and
play external media stored elsewhere on the network. These media sources can be within iTunes,
Windows Media Player or simply files in a folder on a source device connected to the network
To enable synchronization:
1. Identify the computer systems where your media files are located to the ANTHOLOGY system
on the Content tab of the ANTHOLOGY Configuration screens.
2. Install the Media Synchronization client application. This application sends the file location
information of your iTunes, Windows Media Player or media folder libraries to your ANTHOLOGY
media server. This software can be downloaded from a link on the Firmware tab of the
ANTHOLOGY Configuration screens. (See Other Software - Media Synchronization for details.)
After this application is installed you can execute the application to synchronize to the ANTHOLOGY.
MEDIA SYNCHRONIZATION CLIENT SCREENS
The following Media Synchronization client screens facilitate the use of external media files by the
ANTHOLOGY:
Select server - This is the starting point. Select the ANTHOLOGY server on the local network to
receive the media information from the Media Synchronization client.
Status Tab
The status tab monitors the tracks and playlists set for synchronization. You can select to synchronize
and search for specific items to determine their synchronization status.
Chapter 3: Synchronizing Media
10
iTunes
Tab
The iTunes tab controls the synchronization of iTunes managed tracks and playlists to the
ANTHOLOGY. When synchronized, this maintains listings on the ANTHOLOGY of the iTunes media
on the external device running on the network so it can played by the ANTHOLOGY.
»» NOTE: The ANTHOLOGY media server cannot access any media files
on any system unless the system is running on the network, regardless
of synchronization status. Furthermore, media files that have not been
synchronized are inaccessible to the ANTHOLOGY.
Synchronization occurs only when the Media Synchronization application is running on the PC or
MAC. These settings instruct the application to compare and update the ANTHOLOGY listings of
the designated iTunes media.
11
TechSales StreamNet Design Help: 1.800.705.2103
Windows Media Tab
The Windows Media tab controls accessing and synchronizing music on a computer that is usually
managed and played with the Windows Media Player. When synchronized, this maintains listings
on the ANTHOLOGY of the Windows media on the external device running on the network so it can
be played by the ANTHOLOGY
»» NOTE: The ANTHOLOGY media server cannot access any media files
on any system unless the system is running on the network, regardless
of synchronization status. Furthermore, media files that have not been
synchronized are inaccessible to the ANTHOLOGY.
Synchronization occurs only when the Media Synchronization application is running on the PC.
These settings instruct the application to compare and update the ANTHOLOGY listings of the
designated Windows media.
Automatically Update Windows Media Music - When checked this instructs the synchronization
client to compare and update the ANTHOLOGY internal listing of the Windows media files available
on the external computer. The controls for what content is synchronized are listed underneath.
• Update All Music - The full library is checked and information updated.
• Update Selected Playlists - This updates the information of only selected playlists. This can
be further narrowed down by Music added in the last month and Music played in the last
month.
Chapter 3: Synchronizing Media
12
Folders Tab
The Folders tab allows accessing and synchronizing of media files from folders on a networked
source device by the ANTHOLOGY. When synchronized, this maintains listings on the ANTHOLOGY
of the designated folders on the external device running on the network so the contents can be
played by the ANTHOLOGY.
»» NOTE: The ANTHOLOGY media server cannot access any media files
on any system unless the system is running on the network, regardless
of synchronization status. Furthermore, media files that have not been
synchronized are inaccessible to the ANTHOLOGY.
Synchronization occurs only when the Media Synchronization application is running on the PC or
MAC. These settings instruct the application to compare and update the ANTHOLOGY listings of
the designated folders.
Click the Add button to begin navigating to the desired folder.
Click on the X to delete a folder from synchronization. That content is unavailable to the ANTHOLOGY.
13
TechSales StreamNet Design Help: 1.800.705.2103
Advanced Tab
This tab provides additional information about and synchronization options for the ANTHOLOGY
media server.
Configuration Overview - Details about the Server Capacity, Software Version, Serial Number
and IP Address of the selected ANTHOLOGY server.
Sync Program Options - These check boxes set the launching of the Media Synchronization
application with the defined playlists and folders on the source computer.
• Start with Windows - Set the Media Synchronization to load and execute when the Windows
application starts.
• Minimize to tray - Loads and minimize the client to the tray of the operating system on the
source computer.
• Capture Diagnostic data - The client instructs the selected ANTHOLOGY unit to collect and
store diagnostic data to the internal hard disk for use by support personnel.
Chapter 3: Synchronizing Media
14
Chapter 4: StreamNet ANTHOLOGY Setup
The ANTHOLOGY is setup for use in a commercial or residential network using the StreamNet
Dealer Setup program and the accompanying StreamNet Dealer Setup manual. StreamNet Dealer
Setup is a PC-based program that allows you to configure devices so that they can communicate
across a StreamNet network. Phases of the software setup include:
• Adding or creating a new project or opening an existing project
• Finding the new device
• Matching the new ANTHOLOGY physical hardware device to the hardware setup in the project
• Configuring the device with system-specific information
• Saving the project
• Sending the configuration files to the system
The steps involved in these processes are detailed in the DigiLinX Dealer Setup manual available
for viewing or download at:
http://www.clearone.com/uploads/resource/DigiLinX_Dealer_Setup_Manual.pdf
.
15
TechSales StreamNet Design Help: 1.800.705.2103
ANTHOLOGY SCREENS IN THE DEALER SETUP PROGRAM
When you start Dealer Setup program, the ANTHOLOGY media server will be automatically detected
like any other DigiLinX device. Verify the configuration information on the tabs for the ANTHOLOGY
device as shown in the following screen examples:
Adding an ANTHOLOGY to a Project
1. Enter the following information:
Media Server Name - Edit or keep the default.
Server Type - Use the drop-down menu (using the down arrow key) to select what type of
server this is. The type brings up the appropriate controls for the server. There are several types
of servers.
Server IP Address - grayed out because it is not necessary.
2. Complete the information for each ANTHOLOGY in your project.
3. Select Save & Continue.
Chapter 4: StreamNet ANTHOLOGY Setup
16
So far, ANTHOLOGY has only been added to the project as a media server. The following screen
shows the newly added ANTHOLOGY as a media server on the project side of the screen and
listed in the device list:
Now you must identify the particular ANTHOLOGY system.
Select from the project listing on the left the ANTHOLOGY media server just added, then click on
the Match Devices icon.
A list from which to select is presented:
Select the ANTHOLOGY media server you are setting up and click OK.
17
TechSales StreamNet Design Help: 1.800.705.2103
When completed, the device appears with the information tab containing the information about
that particular ANTHOLOGY device. It is ready for final configuration:
Device Name - This is name that appears as a selection on all user interfaces and identifies the
source.
ID - The device ID.
IP Address - IP address of the device as discovered by the Dealer Setup program.
Chapter 4: StreamNet ANTHOLOGY Setup
18
Pairing Streams with Hosts
So far, the ANTHOLOGY has only been added to the project as a media server. The ANTHOLOGY
provides up to four streams plus one local audio output. Each stream must be separately hosted
in a TouchLinX™ TLA250, SpeakerLinX™ SL251 or SLX300 so that each can independently stream
audio into the StreamNet system.
Use the Streams tab to enable and assign the hosting configuration.
Alternately, The hosting device can be configured to a selected stream from the ANTHOLOGY.
Select the desired device, then add the stream from the Stream tab.
19
TechSales StreamNet Design Help: 1.800.705.2103
ANTHOLOGY Analog Output
The ANTHOLOGY has a dedicated analog audio output that is controllable through the use of
the On Screen Display using the VGA or DVI video outputs, and a TouchLinX or programmable
remote control. Accessing and controlling this output requires the installation and configuration
of a MediaLinX A/V encoder such as the NS-MLAV9300-CS attached to the Anthology and one or
more ViewLinX decoders such as the NS-VL9300-CS.
ClearOne Encoder
ClearOne Decoder
StreamNet
LAN
Analog Audio
Output
DVI or VGA
Video Output
Anthology Media Server
SpeakerLinX
Display Screen
Notice how in the example above the ANTHOLOGY is in the project as a media server so it can be
a streaming source and a “ANTHOLOGY Display MLAV” has been created as an “ANTHOLOGY
Display.”
Configure the Driver File as “ANTHOLOGY.lua” and the Source Type as “ClearOne ANTHOLOGY”
Chapter 4: StreamNet ANTHOLOGY Setup
20
Using the TouchLinX, the ANTHOLOGY analog stream can be selected and controlled. The following
two screens show the selection of the ANTHOLOGY Display for the analog stream, and the controls.
The various menus and selections of the ANTHOLOGY analog stream are shown on the display.
A “Now Showing” screen can be displayed while the analog media is streaming. It consists of
the unique information about the selection playing, displayed over a slideshow of changing
backgrounds.
21
TechSales StreamNet Design Help: 1.800.705.2103
Service and Support
If you need assistance setting up or operating your product, please contact us. We welcome your
comments so we can continue to improve our products and better meet your needs.
Technical Support
Telephone:1.800.283.5936
E-mail:
[email protected]
Web site:
www.ClearOne.com
Sales
Telephone:1.800.707.6994
E-mail:
[email protected]
TechSales
Telephone:1.800.705.2103
E-mail:
[email protected]
Product Returns
All product returns require a Return Material Authorization (RMA) number. Contact ClearOne Technical Support before returning your product. Make sure you return all the items and packing materials that originally shipped with your product.
The Power of AV over IP™
CLEARONE LOCATIONS
HEADQUARTERS:
Salt Lake City, UT USA
5225 Wiley Post Way
Suite 500
Salt Lake City, UT 84116
Tel: 801.975.7200
Toll Free: 800.945.7730
Fax: 801.977.0087
e-mail: [email protected]
EMEA
Tel: +44.1454.616.977
e-mail: [email protected]
APAC
Tel: +011.852.3590.4526
e-mail: [email protected]
LATAM
Tel: 801.974.3621
e-mail: [email protected]
TechSales
Tel: 800.705.2103
e-mail: [email protected]
Technical Support
Tel: 800.283.5936
e-mail: [email protected]
Service and Support
22