1
Owner’s Manual Designed and Engineered by Blackstar Amplification UK IMPORTANT SAFETY INSTRUCTIONS 1. Read these instructions. USA / Canada 2. Keep these instructions. 3. Heed all warnings. 4. Follow all instructions. 5. Do not use this apparatus near water. 6. Clean only with dry cloth. 7. Do not block any ventilation openings. 8. Install in accordance with the manufacturer’s instructions. 9. Do not install near any heat sources such as radiators, heat registers, stoves, or other apparatus (including amplifiers) that produce heat. 10. Do not defeat the safety purpose of the polarized or grounding-type plug. A polarized plug has two blades with one wider than the other. A grounding type plug has two blades and a third grounding prong. The wide blade or the third prong are provided for your safety. If the provided plug does not fit into your outlet, consult an electrician for replacement of the obsolete outlet. 11. Protect the power cord from being walked on or pinched particularly at plugs, convenience receptacles, and the point where they exit from the apparatus. 12. Only use attachments/accessories specified by the manufacturer. 13. Unplug this apparatus during lightning storms or when unused for long periods of time. 14. Refer all servicing to qualified service personnel. Servicing is required when the apparatus has been damaged in any way, such as power-supply cord or plug is damaged, liquid has been spilled or objects have fallen into the apparatus, the apparatus has been exposed to rain or moisture, does not operate normally, or has been dropped. “TO COMPLETELY DISCONNECT THIS APPARATUS FROM THE AC MAINS, DISCONNECT THE POWER SUPPLY CORD PLUG FROM THE AC RECEPTACLE”. “WARNING: TO REDUCE THE RISK OF FIRE OR ELECTRIC SHOCK, DO NOT EXPOSE THIS APPARATUS TO RAIN OR MOISTURE AND OBJECTS FILLED WITH LIQUIDS, SUCH AS VASES, SHOULD NOT BE PLACED ON THIS APPARATUS”. This symbol is intended to alert the user to the presence of important operation and maintenance (servicing) instructions in the literature accompanying the appliance. This symbol is intended to alert the user to the presence of uninsulated “dangerous voltage” within the product’s enclosure that may be of sufficient magnitude to constitute a risk of electric shock to persons. 3 English Never disconnect the protective mains earth connection. Important safety information! High loudspeaker levels can cause permanent hearing damage. You should therefore avoid the direct vicinity of loudspeakers operating at high levels. Wear hearing protection if continuously exposed to high levels. READ THE FOLLOWING INFORMATION CAREFULLY. SAVE ALL INSTRUCTIONS FOR FUTURE REFERENCE! Follow all warnings and instructions marked on the product! English Warning! If the product does not operate normally when the operating instructions are followed, then refer the product to a qualified service engineer. Danger! High internal operating voltages. Do not open the equipment case. There are no user serviceable parts in this equipment. Refer all servicing to qualified service personnel. The U.S. Government's Occupational Safety and Health Administration (OSHA) has specified the following permissible noise level exposures: Clean only with a dry cloth. Duration Per Day In Hours Sound Level dBA, Slow Response 8 90 6 92 4 95 3 97 2 100 1½ 102 1 105 ½ 110 ¼ or less 115 Condensation can form on the inside of an amplifier if it is moved from a cold environment to a warmer location. Before switching the unit on, it is recommended that the unit be allowed to reach room temperature. Unauthorised modification of this equipment is expressly forbidden by Blackstar Amplification Ltd. Never push objects of any kind into ventilation slots on the equipment casing. Do not expose this apparatus to rain, liquids or moisture of any type. Do not place this product on an unstable trolley, stand or table. The product may fall, causing serious damage to the product or to persons! Do not cover or block ventilation slots or openings. This unit must only be used in a well ventilated area and never switched on when it is within a poorly ventilated space, such as a bookcase. This product should not be placed near a source of heat such as a stove, radiator, or another heat producing amplifier. Use only the supplied power cord which is compatible with the mains voltage supply in your area. According to OSHA, any exposure in excess of the above permissible limits could result in some hearing loss. Ear plug protectors in the ear canals or over the ears must be worn when operating this amplification system in order to prevent a permanent hearing loss if exposure is in excess of the limits as set forth above. To ensure against potentially dangerous exposure to high sound pressure levels, it is recommended that all persons exposed to equipment capable of producing high sound pressure levels such as this amplification system be protected by hearing protectors while this unit is in operation. Power supply cords should always be handled carefully and should be replaced if damaged in any way. Never break off the earth (ground) pin on the power supply cord. The power supply cord should be unplugged when the unit is to be unused for long periods of time. An apparatus with Class I construction should be connected to a mains socket outlet with a protective earthing connection. The mains plug of the power supply cord should remain readily accessible. Before the unit is switched on, the loudspeaker should be connected as described in the handbook using the lead recommended by the manufacturer. Always replace damaged fuses with the correct rating and type. 4 All electrical and electronic products should be disposed of separately from the municipal waste stream via designated collection facilities appointed by the government or the local authorities. 5 English Features Thank you for purchasing this Blackstar ID:Series amplifier. Like all our products, this amp is the result of countless hours of painstaking Research and Development by our world-class design team. Based in Northampton (UK), the Blackstar team are all experienced musicians themselves and the sole aim of the development process is to provide guitarists with products which are the ultimate tools for self-expression. In the five years since its launch, Blackstar has led the way in the innovation of guitar amplification. The ID:Series represents the culmination of more than seven years’ technical research and development. These amps have an intuitive control set like a traditional amp, but have the versatility of programmability. The unique controls allow you, the guitarist, to custom design your own sound, store it and then have the confidence that the amp will perform in a live environment. All Blackstar products are subjected to extensive laboratory and road testing to ensure that they are truly uncompromising in terms of reliability, quality and above all TONE. The ID:Series represents a truly ground-breaking achievement, combining unique innovations, an intuitive, traditional control set and the versatility of programmability. Please read through this handbook carefully to ensure you get the maximum benefit from your new Blackstar product. If you like what you hear and want to find out more about the Blackstar range of products please visit our website at www.blackstaramps.com. Thanks! The Blackstar Team English Introduction Blackstar’s patent-applied-for True Valve Power offers six distinctly different power valve responses – EL84, 6V6, EL34, KT66, 6L6, KT88. When engaged it delivers the response, dynamics, sag and break up characteristics of a valve amp and uniquely delivers the same acoustic power output as an equivalent valve power amp. This means these amps deliver live without compromise – True Valve Power means LOUD as valveTM. The Voice control has six different settings – Clean Warm, Clean Bright, Crunch, Super Crunch, OD 1, OD 2. When used together with Blackstar’s patented ISF control you can get the exact tone you’re thinking of. The effects section delivers studio quality modulation, delay and reverb effects simultaneously that you can store with your sound. Deep editing and storing of patches is simple using the Blackstar Insider software. Patches can be shared, uploaded and downloaded via the online community. The USB connector also allows you to record from your amp directly to your computer. An emulated output, MP3/line input and MIDI footswitching complete the package. By using the unique Voice control, the patented ISF and patent-applied-for True Valve Power, ID amplifiers allow unparalleled flexibility and ease of use, enabling you to, in effect, design the sound in your head and deliver it live as LOUD as valveTM. Individuality is power! 6 7 English Factory Reset When the amplifier is first switched on after purchase, or after a factory reset, it will be in ‘Demo Mode’. The sound you hear will reflect the physical position of the front panel knobs as it will be in Manual Mode. All effects, plus TVP will be turned off. The default factory patches and settings can be restored to your amplifier at any time. Simply hold down the MOD, DLY and REV buttons simultaneously, whilst switching on the amplifier. The bank LED will illuminate, and change from green, to orange, to red, to indicate that a factory reset is imminent. This process will take a total of two seconds. If any of the MOD, DLY and REV buttons are released before the bank LED has cycled through all colours and switched off, then the operation is cancelled and the amplifier will remain unaffected. All amplifier patch locations will contain Blackstar factory defaults. Patches can be created and stored in Demo Mode but the original factory default patches and settings will be restored each time the amplifier is turned off and turned on again. To exit Demo Mode, hold down the Manual button (22) while switching the amplifier on. The Bank LED (23) will change from red, to orange, to green and then turn off to indicate that Demo Mode has been deactivated. If the Manual button is released before the Bank LED has cycled through all colours and switched off, then the operation is cancelled and the amplifier will remain in Demo Mode. English Demo Mode Once this is complete the amplifier will be in Demo Mode again. IMPORTANT NOTE: This process will overwrite any user content. Blackstar’s Insider software can also be used to exit Demo Mode. From within the program, right click on the Demo Mode label and select ‘Disable’. 8 9 1. Input Plug your guitar in here. Always use a good quality screened guitar lead. 2. Voice The Voice control changes the preamp voicing, ranging from ultra clean to extremely overdriven. Clean Warm – Very clean, dynamic Clean Bright – ‘Boutique’, will break up when pushed hard Crunch – Classic medium gain overdrive Super Crunch – More gain and punch than Crunch OD 1 – Hot-rodded Master Volume overdrive with medium power amp damping OD 2 – Mid boosted hot-rod overdrive This setting is saved when you store a patch. 3. Gain 8. ISF The patented ISF control works in conjunction with the Bass, Middle and Treble controls. It allows you to choose the exact tonal signature you prefer. Fully counter clockwise has a more American characteristic with a tight bottom-end and more aggressive middle, and fully clockwise has a British characteristic which is more ‘woody’ and less aggressive. USA UK Unlike conventional ‘contour’ controls and parametric equalisation systems, the Bass, Middle and Treble controls remain interactive with each other just like in a traditional guitar amplifier tone stack. This leads to a very familiar, musical response. This setting is saved when you store a patch. 9. TVP (True Valve Power) Selector The Gain control adjusts the amount of overdrive or distortion. Low settings, counter clockwise, will deliver a clean sound on the edge of break-up. As the Gain control is turned clockwise the sound will become more overdriven, moving through beautiful crunch tones until, at its maximum position, a full distorted tone is achieved. This setting is saved when you store a patch. Blackstar’s patent-applied-for True Valve Power offers six distinctly different power valve responses – EL84, 6V6, EL34, KT66, 6L6 and KT88. When engaged it delivers the response, dynamics, sag and break-up characteristics of a valve amp and uniquely delivers the same acoustic power output as an equivalent valve power amp. This means that these amps deliver live without compromise – True Valve Power means LOUD as ValveTM. 4. Volume TVP changes the characteristics of the sound from compressed and spongy to dynamic and tight. This controls the preamp volume. Turning it clockwise increases the volume. High levels of volume will introduce the effect of valve power amp distortion and compression, depending on the TVP (9) setting you have selected. This setting is saved when you store a patch. 5. Bass The bass control adjusts the amount of low-end frequencies in your tone. This amp has an advanced tone shaping circuit which allows the tone to be tight and cutting (counter clockwise) to warm and thumping (clockwise). This setting is saved when you store a patch. 6. Middle The middle control adjusts the amount of middle frequencies in your tone. The middle frequencies are particularly important in setting the amount of ‘body’ your tone has. With the middle control set to its minimum position (fully counter clockwise) the sound will be aggressive and scooped, a tone ideal for aggressive rhythm playing. As the middle control is increased (clockwise) the amount of ‘body’ is increased, which is more suitable for sustained lead guitar tones. This setting is saved when you store a patch. 10 As the treble control is increased (clockwise) the sound will become brighter. At the maximum settings the sound will be aggressive and cutting. This setting is saved when you store a patch. English English Front Panel EL84 Bell-like full bodied Class A with lots of compression 6V6 Crisp Class A with high compression and tight mids EL34 Classic British Class A/B crunch with full bodied soft break-up KT66 Rich and warm vintage British hot biased Class A/B 6L6 Tight dynamic Class A/B with extended high and lows KT88 Tight, bold and dynamic Class A/B with strong low end As you move from EL84 to KT88 the amount of compression and overdrive available from each valve response is reduced. Additionally, when either of the two clean voices is selected the output compression and overdrive are affected by the gain control. This setting is saved when you store a patch. 10. TVP (True Valve Power) Switch 7. Treble Pressing this switch turns TVP on and off. The internal button LED will light to show TVP is on. When the LED is off, TVP is not active and the TVP Selector will be deactivated. This setting is saved in a patch. The treble control allows exact adjustment of the treble frequencies within the sound. At low settings (counter clockwise) the sound will be warm and dark in character. NOTE: With TVP off the power amplifier has a linear response and you will not be able to achieve the valve-like sag, compression and power that TVP delivers. 11 English The Effects Table below shows the modifiable parameters: Up to three studio quality effects can be switched on at any time. This setting is saved when you store a patch. 11. MOD (Modulation) 16. Tap Press this switch to turn the modulation effect on, off, or focus the effect for editing. This setting is saved when you store a patch. The Tap button is used to set the rate/time of the current ‘focused’ effect. The time between each press of the tap button defines the rate set. 12. DLY (Delay) Once set, the Tap LED will flash in time with the set rate of the currently ‘focused’ effect. Press this switch to turn the delay effect on, off, or focus the effect for editing. This setting is saved when you store a patch. 13. REV (Reverb) Press this switch to turn the reverb effect on, off, or focus the effect for editing. This setting is saved when you store a patch. With all three of the effect switches the LED will show what state it is in: Effects Table Effect Segment Parameter Level Parameter Tap Parameter MODULATION Effect State Description Phaser Mix Depth Speed LED not on Effect off Effect not active Flanger Feedback Depth Speed LED red Effect on but not ‘focused’ for editing Effect is active, but not affected by the front panel effect controls Chorus Mix Depth Speed Tremolo Frequency modulation depth Amplitude modulation depth Speed Feedback Delay level Time Analogue Feedback Delay level Time Tape Feedback Delay level Time Multi Feedback Delay level Time Room Size Reverb level - Hall Size Reverb level - Spring Size Reverb level - Plate Size Reverb level - Effect on and ‘focused’ for editing Effect active and affected by the front panel effect controls Repeatedly pressing each effect switch on the front panel has the following effect: Effect off Turns the effect on and ‘focuses’ the effect. Any previously focused effect reverts to an ‘on’ state Effect on but not ‘focused’ Focuses the effect. Any previously focused effect reverts to an ‘on’ state Effect on and ‘focused’ Turns the effect off. If any other effect(s) are on, the previously ‘focused’ effect resumes being ‘focused’ NOTE: Only one effect may be ‘focused’ at any time 14. Effect Type This changes the effect type and edits a parameter of the currently ‘focused’ effect (modulation, delay, or reverb). Each segment represents a different effect (four for each type of effect). An LED shows which effect type is currently active. The distance travelled through the ‘segment’ modifies an effect parameter. The Effects Table below shows the modifiable parameters: This setting is saved when you store a patch. 15. Effect Level This modifies an effect parameter. For modulation and delay effects, turning the Level control while holding down the Tap button (16) modifies the rate/time of the effect. 12 The Effects Table below shows the modifiable parameters: LED LED green English Effects DELAY Linear REVERB This setting is saved when you store a patch. Master 17. Resonance The Resonance control sets the overall bass response. At lower settings the cleans will be tight and funky and overdrives will be focused in their bass response. At increased settings the clean sounds will be become full and warm, whilst the crunch and overdrive tones will be more bass heavy and resonant. This is a global setting and not saved when storing a patch. 13 The Presence control sets the overall treble response. Percussive high-end can be accentuated on clean sounds and the amount of aggressive treble controlled with crunch and overdrive settings. This is a global setting and not saved when storing a patch. 19. Master Volume This controls the overall volume of your amplifier. Turning it clockwise increases the volume. This is a global setting and not saved when storing a patch. If the master volume is at zero this allows for silent recording via the emulated output or USB. The emulated level is controlled via the preamp volume. 20. Power Switch The Manual, Bank and Channel LEDs will indicate the closest note to the note being played. Bank LED String 1 and 6 (default E, low/high) CH1 LED String 2 CH2 LED String 3 CH3 LED String 4 CH4 LED String 5 The MOD, DLY and REV LEDs act as indicators to show how close the played note is to the tuned note. This switch is used to turn the amplifier on and off. MOD LED red Note is sharp (above pitch) NOTE: when in Demo Mode powering the amplifier off and then on restores the factory default settings. When not in Demo Mode, the amplifier will retain its state when powered back up. DLY LED green Note is in tune REV LED red Note is flat (below pitch) 21. USB Plug a USB cable in here to connect the amplifier to a Windows PC or Mac. Blackstar’s Insider software can be downloaded from our website and offers a host of features. See the USB Audio section on page 20 for more information. NOTE: The amplifier will appear on a personal computer as an audio capture device within recording software. 22. Manual Press this switch to toggle between Manual Mode and the current patch. When the amplifier is in Manual Mode, the sound will reflect the current physical position of the knobs. This is applicable to the Voice, Gain, Volume, Bass, Middle, Treble, ISF and TVP knobs. The TVP on/off state will be retained from the previously active patch. Any effects that are active when switching to Manual Mode will be turned off. While in Manual Mode any of the controls can still be modified by an external source (Blackstar Insider software, footswitch, MIDI controller), but this means that the sound will not represent the positions of the knobs on the front panel. Tuner Mode Holding the Manual button (22) for three seconds will engage the tuner. The Recall Indicator LED (28) will flash continuously to indicate the amplifier is in Tuner Mode. By default the amplifier ouput will be muted whilst in Tuner Mode. English English 18. Presence All other LEDs on the front panel will be off in Tuner Mode. Pressing any button will exit Tuner Mode. 23. Bank Press the button to scroll through the first three banks of patches. Bank 1 2 Bank 2 3 Bank 3 1 The green LED indicates you’re in Bank 1, the orange LED indicates you’re in Bank 2 and the red LED indicates you’re in Bank 3. NOTE: The first three banks can be selected from the front panel. When you activate Bank 4 and higher from an external controller (e.g. Blackstar Insider software, footcontroller), the Bank LED will not be lit but the channel LEDs will continue to show you the patch location. For example: Patch 11 – Bank LED red, Channel 3 LED lit. Selecting Bank 15 from an external controller will switch you to patch 15 – Bank LED off, Channel 3 lit. When the amplifier is in Manual Mode, the Bank LED will not be lit. The channel will be remembered, therefore the corresponding patch within the current bank will be loaded when scrolling through the banks. 14 15 English Storing a patch will overwrite any previous patch in that location. Channel 1 activates the first patch within the currently active bank. Channel 2 activates the second patch within the currently active bank. Patches can also be stored via Blackstar’s Insider software or a connected Blackstar FS-10 footcontroller. Channel 3 activates the third patch within the currently active bank. Recalling Patches Channel 4 activates the fourth patch within the currently active bank. 28. Recall Indicator The Recall Indicator shows if there is a mismatch between the current value of a parameter within the amplifier and the corresponding physical front panel control. E.g. when you change to a different patch the controls on the front panel may not always reflect the setting you are hearing. To prevent unexpected level jumps in the control you are adjusting, the front panel knobs will have no effect on the sound until the knob reaches the current parameter value. Once reached, the Recall Indicator flashes twice and the knob ‘takes control’ of the value and can increase or decrease the value. The recall indicator will flash twice each time the physical knob ‘passes through’ the value stored within the current patch so you can easily see the programmed value. Recall is only active for Gain, Volume, Bass, Middle, Treble and ISF. When the Tuner is active the Recall Indicator will flash continuously. Press any Channel button to load that patch. Pressing the Bank button will cycle through the three banks – green-orange-red. The Channel will be preserved, therefore the corresponding patch within the current Bank will be loaded when scrolling through the Banks. Alternatively, patches can be recalled via Blackstar’s Insider software or any connected footswitch. MIDI ID:Series amplifiers are able to recall patches via MIDI Program Change messages and to dynamically modify amplifier values via MIDI Control Change messages. To set-up MIDI control, simply connect your MIDI controller’s MIDI Out socket to the MIDI In socket on the rear of the amplifier. From new, or after a Factory Reset, the amplifier is set to OMNI mode and responds to MIDI messages on all MIDI channels. Storing Patches NOTE: You may wish to set the amplifier to respond to MIDI messages on just a single MIDI channel. This can be done using the Blackstar Insider software to specify which of the 16 MIDI channels to use, or to return the amplifier to OMNI mode. To store the current sound as a patch Recalling Patches 1. Press and hold any of the four Channel buttons for one second. All four Channel LEDs will begin to flash. To recall a patch, the MIDI controller should be set to transmit Program Change messages (this is usually the case for footcontrollers). Changing patches on the MIDI controller will activate the corresponding patch stored within the amplifier. Programmability 2. Press the Bank button to toggle through the three banks (green, orange, red) to choose the store location. 3. Press any of the four Channel buttons once to store the patch in the chosen location. The LED corresponding to the chosen store location will illuminate and the new patch will be active. English 24 – 27. Channels 1-4 Modifying Patch Values Many patch values (e.g. Gain, Volume, ISF – see MIDI Implementation Chart on page 102 ) can be adjusted via MIDI Control Change messages in real time. The MIDI controller should be set to send the Control Change messages as defined in the MIDI Implementation Chart. Green bank = Patches 1-4 Orange bank = Patches 5-8 Red bank = Patches 9-12 The amplifier controls can be used to edit the patch at any stage of the store process. Press the Manual button at any stage to cancel the store process and return the amplifier to the last state. 16 17 1. Mains Input The supplied detachable mains lead is connected here. The lead should only be connected to a power outlet that is compatible with the voltage, power and frequency requirements stated on the rear panel. If in doubt get advice from a qualified technician. 4. Footswitch Connect one of the following supported footswitches here. 1 button footswitch Use any latching footswitch (e.g. a Blackstar FS-4) to switch between Channels 1 and 2 of the currently selected Bank. 2. Speaker Outputs Footswitch latched OFF (e.g. LED extinguished on the FS-4) activates Channel 1 Footswitch latched ON (e.g. LED illuminated on the FS-4) activates Channel 2 ID:60TVP, ID:100TVP Blackstar FS-10 Footcontroller There are two parallel speaker outputs for connecting external speaker cabinets. The minimum load is 4 Ohms. This multi function footcontroller allows you to access all patches, toggle effects and program patches. WARNING: The combined impedance must never be less than 4 Ohms (e.g. 1 x 4 Ohm cabinet, or 2 x 8 Ohm cabinets). Failure to correctly match the impedance of the amplifier and speakers will damage the amplifier. NOTE: 2 x ID:412 4 Ohm cabinets cannot be used together. ID:260TVP There are two speaker outputs (1x left channel, 1x right channel) for connecting the internal speakers or external speaker cabinets. The internal speakers are directly plugged into these outputs and must be unplugged before external cabinets can be connected. MIDI footcontrollers Functionality will depend on your footcontroller. 5. MP3/Line In Connect the output of your mp3 or CD player here. Adjust the player’s volume to match that of your guitar to enable you to play along. NOTE: The connection is mono. 6. Emulated Output The minimum load is 4 Ohms. This output emulates the tonal characteristics of a guitar speaker cabinet and provides a natural tone for connection to a recording device or mixing desk WARNING: The impedance of each output must never be less than 4 Ohms. Failure to correctly match the impedance of the amplifier and speakers will damage the amplifier. To make full use of the stereo effects, use a stereo jack to two mono jacks splitter lead to feed two channels of the recording device or mixer. The output will also function into a mono guitar type lead. Always use a good quality screened lead. ID:60TVP Turning the Volume knob (4) will control the Emulated Output level. The Master Volume only affects any connected speaker(s)/cabinet(s). The speaker output is for connecting the internal speaker or external speaker cabinets. The internal speaker is directly plugged into this output and must be unplugged before an external cabinet can be connected. English English Rear Panel NOTE: To ‘silently’ record, set the Master Volume to zero. You may also record from this output without a loudspeaker connected, but ensure that no loudspeaker leads are connected to any of the loudspeaker output jack sockets of the amplifier, as this will defeat the load protection circuit and will cause damage to the amplifier. The minimum load is 4 Ohms. WARNING: The impedance must never be less than 4 Ohms. Failure to correctly match the impedance of the amplifier and speakers will damage the amplifier. 3. MIDI In If using MIDI is required, connect the MIDI device here. Refer to the MIDI section for more details. Always use a good quality MIDI lead. 18 19 Technical Specification Standard audio drivers are used to connect the amplifier to a PC or Mac, no specific drivers are required. The amplifier will appear as an audio capture device within recording software. The output of the audio over USB can be changed via the Blackstar Insider software, and can be one of the following: Speaker emulated stereo effected audio channels 2 x mono audio channels - Left – effected amplifier signal - Right – unprocessed guitar signal Re-amping Mode Re-amping The amplifier can be switched into Re-amping Mode via Blackstar Insider software. This is a non-storable setting and will be switched off either when the USB cable is removed, or when the amplifier power is switched off. When activated, Re-amping Mode allows the amplifier to accept a pre-recorded, dry guitar signal via USB and return a fully processed audio signal. This return signal can then be captured using recording software on the connected PC or Mac. ID:60TVP Power: 60 Watts English English USB Audio Weight (kg): 18 Dimensions (mm): 584(W) x 485(H) x 250(D) Footswitch (not supplied): FS-4 latching footswitch, FS-10 footcontroller, MIDI footcontroller ID:60TVP-H Power: 60 Watts Weight (kg): 10.8 Dimensions (mm): 584(W) x 236(H) x 225(D) Footswitch (not supplied): FS-4 latching footswitch, FS-10 footcontroller, MIDI footcontroller Firmware Update Firmware updates are initiated via Blackstar Insider software. A new version of the Blackstar Insider software will be released whenever an update is available. Each update will take approximately 60-120 seconds. ID:260TVP When the amplifier is connected (via USB) to a version of the Blackstar Insider software containing newer firmware, a message will be displayed, prompting you to install the latest files. Whilst updating, the amplifier controls will be unresponsive. The Tap LED flashes to indicate data activity during the update process. Weight (kg): 24.2 The amplifier power should not be switched off during a firmware update. If the amplifier is switched off during an update, the controls will be unresponsive after the power is reapplied and the amplifier will produce no sound. The Tap LED will flash to indicate that the amplifier contains no valid firmware. The amplifier must be connected to the Blackstar Insider software to reinstall valid firmware. The update process will start automatically if the Blackstar Insider software detects that the amplifier is in this state. Power: 2 x 60 Watts (Stereo) Dimensions (mm): 686(W) x 510(H) x 250(D) Footswitch (not supplied): FS-4 latching footswitch, FS-10 footcontroller, MIDI footcontroller ID:100TVP Power: 100 Watts Weight (kg): 12.8 Dimensions (mm): 686(W) x 246(H) x 225 (D) Footswitch (not supplied): FS-4 latching footswitch, FS-10 footcontroller, MIDI footcontroller 20 21 Deutsch Deutsch Bitte benutzen Sie das Gerät nur in gut belüfteten Räumen und schalten Sie es nie in schlecht belüfteten Umgebungen, wie z.B. Schränken o.ä. an. All electrical and electronic products should be disposed of separately from the municipal waste stream via designated collection facilities appointed by the government or the local authorities. 22 23 Merkmale Vielen Dank, dass Sie sich für den Blackstar ID:Series Verstärker entschieden haben. Dieser Amp ist wie alle unsere Verstärker das Ergebnis unzähliger Stunden akribischer Arbeit durch unser erstklassiges Entwickler-Team. Blackstar hat seinen Sitz in Northampton (UK) und setzt sich aus einem Team erfahrener Musiker zusammen, die nur ein Ziel verfolgen: Gitarristen mit den Werkzeugen zu versorgen, die ihnen dabei helfen, sich selbst zu verwirklichen. In den 5 Jahren seit Gründung hat Blackstar sehr viel für die Innovation von Gitarrenverstärkern getan. Die ID-Series ist nun das Ergebnis aus sieben Jahren technischer Forschung und Entwicklung. Diese Verstärker bieten die gewohnt intuitiven Bedienelemente eines traditionellen Amps, sind aufgrund ihrer Programmierbarkeit aber deutlich vielseitiger. Die einzigartigen Steuermöglichkeiten erlauben es Ihnen als Gitarrist, Ihren ganz persönlichen Sound zu finden, einzustellen und dann in jeder Live-Situation identisch abzurufen. Alle Blackstar-Produkte wurden sowohl in unseren Labors als auch im Live-Betrieb auf Herz und Nieren getestet, um sicherzustellen, dass sie in puncto Zuverlässigkeit, Qualität und KLANG absolut kompromisslose Ergebnisse liefern. Die ID:Series ist eine wirklich bahnbrechende Neuvorstellung, die einzigartige Innovationen mit intuitiv-traditionellen Bedienelemente und einer vielseitigen Programmierbarkeit kombiniert. Bitte lesen Sie dieses Handbuch aufmerksam durch, um Ihr neues BlackstarProdukt optimal nutzen zu können. Wenn Sie mehr über die Blackstar-Produktreihe erfahren möchten, besuchen Sie unsere Webseite unter www.blackstaramps.com. Vielen Dank! Das Blackstar-Team Die von Blackstar zum Patent angemeldete True Valve Power bietet sechs unterschiedliche Charakteristika von Endstufenröhren – EL84, 6V6, EL34, KT66, 6L6 und KT88. Diese Funktion sorgt für eine authentische Ansprache, Dynamik sowie das „Sag“- und das Sättigungsverhalten eines Röhren-Amps und liefert definitiv dieselbe akustische Power wie eine vergleichbare Röhren-Endstufe. Diese Amps präsentieren sich live absolut kompromisslos – True Valve Power bedeutet: LOUD as ValveTM. Deutsch Deutsch Einleitung Der Voice-Regler bietet sechs unterschiedliche Einstellungen – Clean Warm, Clean Bright, Crunch, Super Crunch, OD 1, OD 2. In Verbindung mit dem für Blackstar patentierten ISF-Regler erzielen Sie genau den gewünschten Sound. Die Effekt-Sektion erzeugt gleichzeitig Modulations-, Delay- und Reverb-Effekte in Studio-Qualität, die Sie zusammen mit Ihren Sounds abspeichern können. Mit Hilfe der mitgelieferten Blackstar Insider Software gestaltet sich die tief greifende Editierung ebenso wie das Speichern von Patches extrem einfach. Patches können über die Online Community hochgeladen, heruntergeladen und ausgetauscht werden. Über den USB-Anschluss können Sie über den Amp direkt auf den Computer aufnehmen. Ein emulierter Ausgang, ein MP3/Line-Eingang sowie eine MIDI-Umschaltung per Fuß komplettieren das Angebot. Dank des einzigartigen Voice-Reglers, der patentierten ISF-Schaltung sowie der zum Patent angemeldeten True Valve Power bieten ID-Verstärker eine unvergleichliche Flexibilität bei einfacher Bedienung, die es in Ihnen erlaubt, den Sound, den Sie sich vorstellen, live mit der LOUD as ValveTM zu realisieren. Individuality is Power! 24 25 Deutsch Factory Reset Wenn der Verstärker zum ersten Mal in Betrieb genommen oder auf die Werkseinstellungen zurückgesetzt wird, befindet er sich im ‚Demo-Modus’. Der Sound, den Sie hören, entspricht – wie im Manual-Modus – den physikalischen Reglerpositionen. Alle Effekte sowie TVP sind deaktiviert. Die Werks-Patches und -Einstellungen können im Verstärker zu jeder Zeit wiederhergestellt werden. Halten Sie die Tasten MOD, DLY und REV gleichzeitig gedrückt, während Sie den Verstärker einschalten. Die Bank-LED leuchtet und wechselt von grün über orange zu rot: Das bedeutet, dass ein Factory Reset durchgeführt wird. Dieser Vorgang dauert etwa zwei Sekunden. Wenn Sie eine der Tasten MOD, DLY und REV loslassen, bevor die Bank-LED alle Farben durchlaufen hat und erloschen ist, wird der Vorgang abgebrochen und der Verstärker wird nicht zurückgesetzt. Alle Patch-Speicherplätze sind mit Werkseinstellungen von Blackstar belegt. Sie können Patches im Demo-Modus erzeugen und speichern, allerdings werden die ursprünglichen Werks-Patches und -Einstellungen immer wiederhergestellt, wenn der Verstärker aus- und wieder eingeschaltet wird. Um den Demo-Modus zu verlassen, halten Sie den Taster Manual (22) gedrückt, während Sie den Verstärker einschalten. Die Bank-LED (23) wechselt von rot über orange zu grün und erlischt schließlich: Der Demo-Modus ist nun deaktiviert. Wenn Sie den Taster Manual loslassen, bevor die Bank-LED alle Farben durchlaufen hat und erloschen ist, wird der Vorgang abgebrochen und der Verstärker arbeitet weiterhin im Demo-Modus. Nach diesem Vorgang befindet sich der Verstärker wieder im Demo-Modus. WICHTIGER HINWEIS: Dieser Vorgang überschreibt alle vom Anwender angelegten Daten. Deutsch Demo-Modus Sie können den Demo-Modus auch über die Blackstar Insider Software beenden. Klicken Sie innerhalb des Programms mit der rechten Maustaste auf den Eintrag Demo Mode und wählen Sie ‚Disable’. 26 27 Vorderseite 1. Input Hier schließen Sie Ihre Gitarre an. Verwenden Sie in jedem Fall hochwertige geschirmte Gitarrenkabel. Der Voice-Regler verändert das Preamp-Voicing im Bereich von extrem clean bis extrem übersteuert. Clean Warm – Sehr clean, dynamisch Clean Bright – ‚Boutique’, übersteuert bei hartem Anschlag Crunch – Klassischer Overdrive bei mittlerem Gain Super Crunch – Mehr Gain und Druck als Crunch OD 1 – „Aufgebohrter“ Overdrive-Sound über das Master Volume mit mittlerer Endstufen-Dämpfung. OD 2 – Heftiger Overdrive-Sound mit Mitten-Boost Diese Einstellung wird beim Sichern eines Patches gespeichert. 3. Gain Mit dem Gain-Regler steuern Sie den Grad der Übersteuerung bzw. Verzerrung. Niedrige Einstellungen (gegen den Uhrzeigersinn) liefern einen cleanen Sound mit viel Druck und Durchsetzungsvermögen. Wenn der Gain-Regler im Uhrzeigersinn aufgedreht wird, nimmt der Verzerrungsgrad mehr und mehr zu und wechselt von crunchigen Sounds bis hin zu stark verzerrten Sounds in der Extremposition. Diese Einstellung wird beim Sichern eines Patches gespeichert. 4. Volume Dieser Regler steuert die Aussteuerung des Preamps. Im Uhrzeigersinn heben Sie die Lautstärke an. Abhängig von der Einstellung für TVP (9) tritt bei höherer Lautstärke ein Sättigungs- und Kompressionseffekt in der Röhren-Endstufe auf. Diese Einstellung wird beim Sichern eines Patches gespeichert. 5. Bass Mit dem Regler Treble können Sie gezielt den Höhenanteil im Gesamt-Sound einstellen. Bei niedrigen Einstellungen (gegen den Uhrzeigersinn) erhält der Sound einen warmen und dunkleren Charakter. Wenn der Treble-Regler angehoben wird (im Uhrzeigersinn), wird der Sound immer höhenreicher. In der Maximalposition klingt der Sound schließlich aggressiv und schneidend. Diese Einstellung wird beim Sichern eines Patches gespeichert. 8. ISF Der patentierte ISF-Regler arbeitet mit den Reglern für Bass, Middle und Treble zusammen. Mit seiner Hilfe finden Sie die genau die Klangfärbung, die Sie suchen. Bei Einstellungen gegen den Uhrzeigersinn besitzt der Amp einen „amerikanischen“ Sound-Charakter mit einem knackigen Bassfundament und aggressiveren Mitten. Bei Einstellungen im Uhrzeigersinn erzeugt der Amp einen „britischen“ Sound, der deutlich erdiger und weniger aggressiv klingt. USA UK Deutsch Deutsch 2. Voice 7. Treble Im Gegensatz zu herkömmlichen ‚Contour’-Reglern und parametrischen EQSystemen beeinflussen sich die Regler für Bass, Middle und Treble gegenseitig –so wie man das aus klassischen Gitarren-Stacks her kennt. Das führt letztlich zu einem vertrauten, musikalischen Verhalten. Diese Einstellung wird beim Sichern eines Patches gespeichert. 9. TVP (True Valve Power) Wahlschalter Die von Blackstar zum Patent angemeldete True Valve Power bietet sechs unterschiedliche Charakteristika von Endstufenröhren – EL84, 6V6, EL34, KT66, 6L6 und KT88. Diese Funktion sorgt für eine authentische Ansprache, Dynamik sowie das „Sag“- und das Sättigungsverhalten eines Röhren-Amps und liefert definitiv dieselbe akustische Power wie eine vergleichbare Röhren-Endstufe. Diese Amps präsentieren sich live absolut kompromisslos – True Valve Power bedeutet: LAUT wie eine RöhreTM. TVP verändert die Klangcharakteristik – von komprimiert und druckvoll bis dynamisch und knackig. Der Bass-Regler steuert den Anteil der Bassfrequenzen im Gesamt-Sound. Dieser Verstärker bietet eine umfangreiche Klangregelung, mit der Sie den Ton zwischen knackig und aggressiv (gegen den Uhrzeigersinn) oder warm und druckvoll (im Uhrzeigersinn) einstellen können. Diese Einstellung wird beim Sichern eines Patches gespeichert. EL84 Glockig-kräftiger Class-A-Sound mit viel Kompression 6V6 Knackiger Class-A-Sound mit starker Kompression und kräftigen Mitten EL34 Klassischer britischer Class-A/B-Crunch mit ebenso mächtiger wie angenehmer Übersteuerung KT66 Voller, warmer und typisch britischer Vintage-Class-A/B-Sound mit kräftigem Bias 6. Middle 6L6 Kraftvoller, dynamischer Class-A/B-Sound mit betonten Bässen und Höhen Der Middle-Regler steuert den Anteil der Mittenfrequenzen im Gesamt-Sound. Die Mitten sind insbesondere für den Grundsound entscheidend. In der Minimalposition (komplett gegen den Uhrzeigersinn) ist der Sound sehr aggressiv und hohl, was sich speziell für knackige Rhythmus-Parts eignet. Wenn der Mitten-Regler angehoben wird (im Uhrzeigersinn), nimmt der Grundton-Anteil zu, was sich für singende LeadSounds empfiehlt. Diese Einstellung wird beim Sichern eines Patches gespeichert. KT88 Knackig-fetter und dynamischer Class-A/B-Sound mit kräftigem Bass-Fundament Wenn Sie von EL84 auf KT88 umschalten, wird der Kompressionsgrad und die Übersteuerungsreserve in der Röhrenansprache reduziert. Bei den beiden CleanVoices hängt die Ausgangskompression und -übersteuerung zudem von der Stellung des Gain-Reglers ab. Diese Einstellung wird beim Sichern eines Patches gespeichert. 28 29 10. TVP (True Valve Power) Taster Mit diesem Taster (de-)aktivieren Sie TVP. Die in dem Taster integrierte LED leuchtet, wenn TVP aktiv ist. Wenn die LED nicht leuchtet, ist TVP inaktiv und der TVPWahlschalter ist deaktiviert. Diese Einstellung wird mit dem Patch gespeichert. ANMERKUNG: Wenn TVP inaktiv ist, liefert die Endstufe eine lineare Ansprache: Röhren-typische Effekte wie das „Sag“, die Kompression und Power von TVP stehen entsprechend nicht zur Verfügung. Deutsch Bis zu drei Effekte in Studio-Qualität können zu jeder Zeit aktiviert werden. Diese Einstellung wird beim Sichern eines Patches gespeichert. 15. Effekt-Level Dieser Regler verändert einen Effekt-Parameter. Bei Modulations- und Delay-Effekten können Sie mit dem Level-Regler bei gehaltenem Tap-Taster (16) die Rate/Time des Effekts verändern. Die Effekt Tabelle unten listet alle einstellbaren Parameter auf: 11. MOD (Modulation) Mit diesem Schalter (de-)aktivieren Sie den Modulationseffekt oder wählen ihn zur Editierung aus. Diese Einstellung wird beim Sichern eines Patches gespeichert. Diese Einstellung wird beim Sichern eines Patches gespeichert. 12. DLY (Delay) Der Tap-Taster dient zur Eingabe der Rate/Time des Effekts im aktuellen ‚Fokus’. Die Dauer zwischen jedem Drücken des Tap-Tasters bestimmt die Rate-Einstellung. Mit diesem Schalter (de-)aktivieren Sie den Delay-Effekt oder wählen ihn zur Editierung aus. Diese Einstellung wird beim Sichern eines Patches gespeichert. 13. REV (Reverb) Mit diesem Schalter (de-)aktivieren Sie den Reverb-Effekt oder wählen ihn zur Editierung aus. Diese Einstellung wird beim Sichern eines Patches gespeichert. Die LEDs von allen drei Effekt-Tastern zeigen den aktuellen Status: 16. Tap Nach der Einstellung blinkt die Tap-LED in der Geschwindigkeit, die für den Effekt im ‚Fokus’ eingegeben wurde. Die Effekt Tabelle unten listet alle einstellbaren Parameter auf: Effekt Tabelle Effekt LED Effekt-Status Beschreibung LED inaktiv Effekt aus Effekt inaktiv LED rot Effekt aktiv, aber nicht für die Editierung ausgewählt Effekt ist aktiv, wird aber nicht über die EffektRegler auf der Front gesteuert LED grün Effekt aktiv und für die Editierung ausgewählt Effekt ist aktiv und wird über die Effekt-Regler gesteuert Ein wiederholtes Drücken der Effekt-Taster auf der Vorderseite hat den folgenden Effekt: Effekt aus Aktiviert den Effekt und setzt den Effekt in den ‚Fokus’. Der bisherige ‚Fokus’Effekt wird in den Status ‚On’ geschaltet Effekt aktiv, aber nicht im ‚Fokus’ Setzt den Effekt in den Fokus. Der bisherige ‚Fokus’-Effekt wird in den Status ‚On’ geschaltet Effekt aktiv und im ‚Fokus’ Schaltet den Effekt aus. Wenn ein (oder mehrere) andere(r) Effekt aktiv ist, bleibt der bisherige ‚Fokus’-Effekt weiterhin im ‚Fokus’ ANMERKUNG: Es kann immer nur ein Effekt im ‚Fokus’ stehen. 14. Effekt-Type Hier wählen Sie den Effekt-Typ und editieren einen Parameter des aktuellen ‚Fokus’Effekts (Modulation, Delay oder Reverb). Deutsch Effekte Jedes Segment steht für einen anderen Effekt (vier für jeden Effekt-Typ). Eine LED zeigt, welcher Effekt-Typ momentan aktiv ist. Der Regelweg innerhalb des ‚Segments’ verändert den jeweiligen Effekt-Parameter. Die Effekt Tabelle unten listet alle einstellbaren Parameter auf: Segment-Parameter Level-Parameter Tap-Parameter Phaser Mix Depth Speed Flanger Feedback Depth Speed Chorus Mix Depth Speed Tremolo Depth der FrequenzModulation Depth der AmplitudenModulation Speed Feedback Delay level Time Analogue Feedback Delay level Time Tape Feedback Delay level Time Multi Feedback Delay level Time Room Size Reverb level - Hall Size Reverb level - Spring Size Reverb level - Plate Size Reverb level - MODULATION DELAY Linear REVERB Diese Einstellung wird beim Sichern eines Patches gespeichert. 30 31 Master 17. Resonance Hierbei handelt es sich um eine globale Einstellung, die nicht in den Patches gespeichert wird. 18. Presence Der Presence-Regler steuert global die Ansprache im Höhenbereich. Perkussive Höhen werden bei cleanen Sounds betont, aggressive Höhen lassen sich bei Crunch- und Overdrive-Sounds gezielt steuern. Hierbei handelt es sich um eine globale Einstellung, die nicht in den Patches gespeichert wird. 19. Master Volume Dieser Regler steuert die Gesamtlautstärke Ihres Verstärkers. Im Uhrzeigersinn heben Sie die Lautstärke an. Hierbei handelt es sich um eine globale Einstellung, die nicht in den Patches gespeichert wird. Wenn das Master Volume auf 0 heruntergezogen ist, können Sie ohne den Lautsprecher über den emulierten Ausgang oder über USB Aufnahmen machen. Der Pegel der Emulation wird über das Preamp-Volume ausgesteuert. 20. Power Schalter Mit diesem Schalter schalten Sie den Verstärker ein bzw. aus. ANMERKUNG: Wenn Sie den Verstärker aus dem Demo-Modus heraus aus- und wieder einschalten, werden die Werkseinstellungen wiederhergestellt. Wenn der Demo-Modus nicht aktiv ist, befindet sich der Verstärker nach dem Einschalten wieder im vorher aktiven Modus. 21. USB Hier schließen Sie ein USB-Kabel an, um den Verstärker mit einem Windows PC oder einem Mac zu verbinden. Die Blackstar Insider-Software kann von unserer Webseite heruntergeladen werden und bietet zahlreiche Funktionen. Tuner-Modus Halten Sie den Manual-Taster (22) drei Sekunden gedrückt, um den Tuner zu aktivieren. Die LED der Recall-Anzeige (28) blinkt dauerhaft und zeigt so, dass der Tuner-Modus aktiv ist. In der Voreinstellung wird der Verstärkerausgang stumm geschaltet, wenn der Tuner-Modus aktiv ist. Über die LEDs Manual, Bank und Channel wird die Note angezeigt, die der gespielten Note am nächsten kommt. Bank LED Saite 1 und 6 (Vorgabe E, tief/hoch) CH1 LED Saite 2 CH2 LED Saite 3 CH3 LED Saite 4 CH4 LED Saite 5 Über die LEDs MOD, DLY und REV wird dargestellt, wie nah die gespielte Note der Referenzstimmung kommt. MOD LED rot Note (Stimmung) ist zu hoch DLY LED grün Note ist korrekt gestimmt REV LED rot Note (Stimmung) ist zu tief Alle anderen LEDs auf der Vorderseite sind im Tuner-Modus inaktiv. Durch Drücken eines Tasters auf der Front oder eines angeschlossenen Fußschalters beenden Sie den Tuner-Modus. 23. Bank Drücken Sie diesen Taster, um durch die ersten drei Patch-Bänke zu blättern. Bank 1 2 Lesen Sie dazu den Abschnitt USB Audio auf Seite 39. Bank 2 3 ANMERKUNG: Der Verstärker erscheint innerhalb der Aufnahme-Software auf einem Computer als Audio-Interface. Bank 3 1 22. Manual Mit diesem Taster schalten Sie zwischen dem Manual-Modus und dem aktuellen Patch um. Im Manual-Modus entspricht der Sound den aktuellen physikalischen Positionen der Regler. Das gilt für die Regler Voice, Gain, Volume, Bass, Middle, 32 Im Manual-Modus können alle Regler weiterhin über externe Quellen (Blackstar Insider Software, Fußschalter, MIDI-Controller) gesteuert werden. Das bedeutet aber, dass der Sound nicht den physikalischen Positionen der Regler auf der Front entspricht. Deutsch Deutsch Der Resonance-Regler steuert global die Ansprache im Bassbereich. Bei niedrigen Einstellungen klingen cleane Sounds knackig und funky, während bei angezerrten Sounds die Basswiedergabe angehoben wird. Bei höheren Einstellungen klingen Clean-Sounds voll und warm, während sich Crunch- und Overdrive-Sounds durch wuchtige Bässe und Druck auszeichnen. Treble, ISF und TVP. Der On/Off-Status für TVP wird vom vorher aktiven Patch übernommen. Alle Effekte, die beim Umschalten in den Manual-Modus aktiv sind, werden abgeschaltet. Die grüne LED zeigt, dass Sie sich in Bank 1 befinden, die orange LED steht für Bank 2 und die rote schließlich für Bank 3. ANMERKUNG: Über die Frontseite können Sie nur auf die ersten drei Bänke zugreifen. Wenn Sie Bank 4 oder höher über einen externen Controller (z.B. Software oder Fuß-Controller) aktivieren, leuchten anstelle der Bank-LEDs nun die ChannelLEDs und zeigen den Patch-Speicherplatz an. 33 Programmierung Patch 11 – Bank-LED rot, LED in Channel 3 leuchtet. Speichern von Patches Wenn Sie Bank Up mit einem externen Schalter auswählen, wird Patch 15 aktiviert - Bank LED aus, Channel 3 an. So speichern Sie den aktuellen Sound als Patch Wenn der Verstärker im Manual-Modus arbeitet, leuchtet die Bank-LED nicht. 1. Drücken und halten Sie einen der vier Channel-Taster für eine Sekunde. Alle vier Channel-LEDs blinken daraufhin. Der Channel wird zwischengespeichert, während das entsprechende Patch innerhalb der aktuellen Bank geladen wird, während Sie durch die Bänke blättern. 2. Drücken Sie den Bank-Taster, um zwischen den drei Bänken (grün, orange, rot) umzuschalten und den Speicherplatz auszuwählen. 24 – 27. Channel 1-4 Channel 1 aktiviert das erste Patch in der aktuellen Bank. 3. Drücken Sie einen der vier Channel-Taster einmal, um das Patch auf dem gewählten Speicherplatz abzuspeichern. Channel 2 aktiviert das zweite Patch in der aktuellen Bank. Die LED für den gewählten Speicherplatz leuchtet und das neue Patch ist aktiv. Channel 3 aktiviert das dritte Patch in der aktuellen Bank. Grüne Bank = Patches 1-4 Channel 4 aktiviert das vierte Patch in der aktuellen Bank. Orange Bank = Patches 5-8 28. Recall-Anzeige Die Recall-Anzeige zeigt, ob der aktuelle Parameterwert im Verstärker mit der physikalischen Position des zugehörigen Reglers auf der Vorderseite übereinstimmt oder nicht. Wenn Sie z. B. zu einem anderen Patch wechseln, entsprechen die Regler-Einstellungen auf der Frontseite mit Sicherheit nicht den Einstellungen, die Sie hören. Um unerwünschte Pegelsprünge beim Einstellen der Parameter zu verhindern, haben die Regler auf der Front keine Funktion, bis die physikalische Position den aktuellen Parameterwert erreicht hat. In diesem Moment blinkt die Recall-Anzeige zweimal und der Regler ‚übernimmt’ die Parametersteuerung, so dass Sie den Wert anheben oder absenken können. Die Recall-Anzeige blinkt jeweils zweimal, wenn der physikalische Regler den im Patch gespeicherten Wert erreicht bzw. überstreicht: So können Sie den programmierten Wert zu jeder Zeit direkt ablesen. Recall erfasst nur die Parameter Gain, Volume, Bass, Middle, Treble und ISF. Wenn der Tuner aktiv ist, blinkt die Recall-Anzeige dauerhaft. Deutsch Deutsch Ein Beispiel: Rote Bank = Patches 9-12 Mit Hilfe der Regler am Verstärker können Sie das Patch nun zu jedem Zeitpunkt während dem Speichervorgang editieren. Drücken Sie den Manual-Taster bei Bedarf, um den Speichervorgang abzubrechen: Der Verstärker wird in den vorherigen Zustand zurückversetzt. Das Speichern eines Patches überschreibt ein auf dem Speicherplatz eventuell vorhandenes Patch. Patches können auch über die Blackstar Insider Software oder mit Hilfe eines angeschlossenen Blackstar FS-10 Fuß-Controllers gespeichert werden. Laden von Patches Drücken Sie einen Channel-Taster, um das zugehörige Patch zu laden. Durch Drücken des Bank-Tasters blättern Sie durch die drei Bänke – grüne-orangerot. Der Channel bleibt erhalten, während das entsprechende Patch innerhalb der aktuellen Bank geladen wird, während Sie durch die Bänke blättern. Alternativ können Sie Patches über die Blackstar Insider Software oder einen angeschlossenen Fußschalter laden. 34 35 MIDI Rückseite Bei den Verstärkern der ID:Series können Sie Patches über MIDIProgrammwechselbefehle laden und die Parameterwerte des Verstärkers dynamisch über MIDI-Control-Change-Befehle verändern. 1. Netzanschluss Ab Werk bzw. nach einem Factory Reset ist der Verstärker auf den OMNI-Modus eingestellt und reagiert daher auf Programmwechselbefehle auf allen MIDI-Kanälen. ANMERKUNG: Vielleicht möchten Sie den Verstärker aber so einstellen, dass er nur auf MIDI-Befehle auf einem bestimmten MIDI-Kanal reagiert. Dazu definieren Sie innerhalb der Blackstar Insider Software, welcher der 16 Kanäle benutzt werden soll. Hier können Sie den Verstärker auch wieder in den OMNI-Modus zurückschalten. Laden von Patches Um ein Patch zu laden, muss der MIDI-Controller Programmwechselbefehle ausgeben können (was für Fuß-Controllern normal ist). Wenn Patches am MIDIController umgeschaltet werden, wird das entsprechende Patch im Speicher des Verstärkers aktiviert. 2. Speaker-Ausgänge ID:60TVP und ID:100TVP Zum Anschluss externer Lautsprecher(-boxen) stehen zwei Lautsprecherausgänge zur Verfügung. Die minimale Last ist 4 Ohm. parallele Deutsch Deutsch Um die MIDI-Steuerung einzurichten, müssen Sie lediglich die Buchse MIDI Out am MIDI-Controller mit der Buchse MIDI In auf der Rückseite des Verstärkers verbinden. Hier wird das mitgelieferte Kaltgerätenetzkabel angeschlossen. Das Kabel muss an einer Netzsteckdose angeschlossen werden, die in puncto Spannung, Leistung und Netzfrequenz den auf der Rückseite vermerkten Spezifikationen entspricht. Im Zweifelsfall wenden Sie sich an einen qualifizierten Techniker/Elektriker. WARNUNG: Die kombinierte Impedanz darf nie weniger als 4 Ohm betragen (z.B. 1 x 4 Ohm Box oder 2 x 8 Ohm Box). Wenn die Impedanz von Verstärker und Lautsprecher nicht übereinstimmen, können ernsthafte Schäden am Verstärker auftreten. ANMERKUNG: 2 x ID:412 4 Ohm Boxen können nicht zusammen betrieben werden. Verändern von Patch-Werten Viele Patch-Werte (z. B. Gain, Volume, ISF – siehe MIDI-Implementationstabelle auf der seite 100) können in Echtzeit über MIDI-Control-Change-Befehle eingestellt werden. Der MIDI-Controller muss dazu die in der MIDI-Implementationstabelle definierten Control-Change-Befehle ausgeben. ID:260TVP Es stehen zwei Lautsprecher-Buchsen (1x linker Kanal, 1x rechter Kanal) zum Anschluss der internen Speaker oder externer Lautsprecherboxen zur Verfügung. Die internen Speaker sind direkt an diesen Buchsen angeschlossen und müssen vor dem Anschluss externer Boxen abgezogen werden. Die minimale Last beträgt 4 Ohm. WARNUNG: Die Impedanz jedes Ausgangs darf nie weniger als 4 Ohm betragen. Wenn die Impedanz von Verstärker und Lautsprecher nicht übereinstimmen, können ernsthafte Schäden am Verstärker auftreten. ID:60TVP Der Speaker-Ausgang dient zum Anschluss des internen Speakers oder einer externen Lautsprecher-Box. Der interne Speaker ist direkt an dieser Buchse angeschlossen und muss vor dem Anschluss einer externen Box abgezogen werden. Die minimale Last beträgt 4 Ohm. WARNUNG: Die Impedanz darf nie weniger als 4 Ohm betragen. Wenn die Impedanz von Verstärker und Lautsprecher nicht übereinstimmen, können ernsthafte Schäden am Verstärker auftreten. 36 37 3. MIDI In USB Audio Wenn Sie das Gerät über MIDI steuern möchten, schließen Sie das MIDI-Gerät hier an. Weitere Einzelheiten finden Sie im MIDI-Abschnitt. Verwenden Sie in jedem Fall hochwertige MIDI-Kabel. Die Kommunikation des Verstärkers mit einem PC oder Mac erfolgt über StandardAudio-Treiber, spezifische Treiber werden nicht benötigt. 4. Footswitch Hier schließen Sie einen der unterstützten Fußschalter an. Mit einem Fußumschalter (z.B. Blackstar FS-4) schalten Sie zwischen Channel 1 und 2 der aktuellen Bank um. Fußschalter aktiviert in der Stellung OFF (Beispiel FS-4: LED leuchtet nicht) Channel 1 Fußschalter aktiviert in der Stellung ON (Beispiel FS-4: LED leuchtet) Channel 2 Blackstar FS-10 Fußleiste Mit diesem multifunktionalen Fußschalter können Sie auf alle Patches zugreifen und die Effekte sowie Programm-Patches umschalten. MIDI-Fußleisten Die Funktionalität hängt vom jeweiligen Controller ab. 5. MP3/Line In An dieser Buchse schließen Sie den Ausgang Ihres MP3- oder CD-Spielers an. Zum Üben passen Sie die Lautstärke der externen Quelle an den Pegel Ihrer Gitarre an. ANMERKUNG: Der Anschluss ist mono ausgelegt. 6. Emulated Output Dieser Ausgang emuliert den Klangcharakter einer Gitarren-Lautsprecherbox und sorgt in Kombination mit einem Aufnahmegerät oder Mischpult für einen natürlichen Klang. Um die Stereo-Effekte nutzen zu können, verwenden Sie ein Y-Kabel, das einen Stereoklinkenstecker auf zwei Monoklinkenstecker splittet: So können Sie zwei Kanäle des Aufnahmegeräts oder Mixers ansteuern. Der Ausgang kann aber auch mit einem Mono-Gitarrenkabel belegt werden. Verwenden Sie in jedem Fall hochwertige geschirmte Kabel. Mit dem Volume-Regler (4) steuern Sie den Pegel des Emulated Outputs. Das Master Volume steuert nur den (die) angeschlossenen Lautsprecher/Box(en) aus. ANMERKUNG: Für Aufnahmen ‚ohne Ton’ drehen Sie das Master Volume auf null. Sie können diesen Ausgang auch dann zur Aufnahme verwenden, wenn kein Lautsprecher angeschlossen ist. Stellen Sie jedoch sicher, dass in diesem Fall auch keine Lautsprecherkabel an einem der Lautsprecherausgänge am Verstärker angeschlossen ist, da in diesem Fall die Last-Schutzschaltung umgangen wird und ernsthafte Schäden am Verstärker auftreten können. 38 Folgende Audioformate für die USB-Ausgabe können über die Blackstar Insider Software eingestellt werden: Stereo-Audiokanäle mit Speaker-Emulation und Effekten 2 x Mono-Audiokanäle - Links – Verstärkersignal mit Effekten - Rechts – unbearbeitetes Gitarrensignal Deutsch Deutsch Fußschalter mit 1 Taster Der Verstärker erscheint innerhalb der Aufnahme-Software auf dem Computer als Audio-Interface. Re-Amping-Modus Re-amping Über die Blackstar Insider Software kann der Verstärker in den Re-AmpingModus geschaltet werden. Hierbei handelt es sich um eine nicht-programmierbare Einstellung, die deaktiviert wird, wenn wahlweise das USB-Kabel entfernt oder der Verstärker ausgeschaltet wird. Wenn der Re-Amping-Modus aktiv ist, kann ein bereits aufgenommenes, unbearbeitetes Gitarrensignal über USB in den Verstärker gespeist und ein bearbeitetes Audiosignal wieder ausgegeben werden. Das Return-Signal kann dann über die Recording-Software im angeschlossenen PC oder Mac aufgenommen werden. Firmware Update Firmware-Aktualisierungen werden über die Blackstar Insider Software ausgeführt. Eine neue Version der Blackstar Insider Software wird zu jedem Update veröffentlicht. Jedes Update dauert ungefähr 60 - 120 Sekunden. Wenn der Verstärker über USB mit der Insider Software verbunden ist und diese eine neuere Version der Firmware erkennt, wird eine Meldung eingeblendet, die eine Installation dieser aktuellen Daten vorschlägt. Während der Aktualisierung können die Regler am Verstärker nicht bedient werden. Die Tap-LED blinkt und weist so auf die Datenübermittlung während des Update-Vorgangs hin. Der Verstärker darf während der Firmware-Aktualisierung nicht ausgeschaltet werden. Wenn der Amp während der Aktualisierung ausgeschaltet wird, können die Regler am Verstärker auch nach dem Einschalten nicht bedient werden und der Verstärker gibt keinen Sound aus. Die Tap-LED blinkt und zeigt so, dass im Verstärker keine gültige Firmware installiert ist. Der Verstärker muss an die Blackstar Insider Software angeschlossen werden, um eine gültige Firmware zu installieren. Die Aktualisierung wird automatisch ausgeführt, wenn die Blackstar Insider Software erkennt, dass sich der Verstärker in diesem Status befindet. 39 Technical Specification ID:60TVP Leistung: 60 Watts Gewicht (kg): 18 Fußschalter (nicht im Lieferumfang enthalten): FS-4-Fußschalter, FS-10Fußleiste, MIDI-Fußleiste Deutsch Deutsch Abmessungen (mm): 584(B) x 485(H) x 250(T) ID:60TVP-H Leistung: 60 Watts Gewicht (kg): 10.8 Abmessungen (mm): 584(B) x 236(H) x 225(T) Fußschalter (nicht im Lieferumfang enthalten): FS-4-Fußschalter, FS-10Fußleiste, MIDI-Fußleiste ID:260TVP Leistung: 2 x 60 Watts (Stereo) Gewicht (kg): 24.2 Abmessungen (mm): 686(B) x 510(H) x 250(T) Fußschalter (nicht im Lieferumfang enthalten): FS-4-Fußschalter, FS-10Fußleiste, MIDI-Fußleiste ID:100TVP Leistung: 100 Watts Gewicht (kg): 12.8 Abmessungen (mm): 686(B) x 246(H) x 225 (T) Fußschalter (nicht im Lieferumfang enthalten): FS-4-Fußschalter, FS-10Fußleiste, MIDI-Fußleiste 40 41 Français Français Cet appareil doit être utilisé dans un environnement bien ventilé et ne doit jamais être mis sous tension si l'endroit est confiné. All electrical and electronic products should be disposed of separately from the municipal waste stream via designated collection facilities appointed by the government or the local authorities. 42 43 Introduction Caractéristiques Merci d’avoir acheté cet amplificateur Blackstar ID:Series. Comme tous nos produits, cet amplificateur est le résultat d’innombrables heures de recherche et développement minutieux par notre équipe de conception de classe mondiale. Basée à Northampton (Royaume-Uni), l’équipe Blackstar est composée de musiciens chevronnés et l’unique objectif du processus de développement est de fournir aux guitaristes les outils ultimes pour s’exprimer. Dans les cinq ans qui ont suivi son lancement, Blackstar a montré la voie de l’innovation dans l’amplification de guitare. L’ID Series représente le point culminant de plus sept ans de recherche et développement techniques. Ces amplis ont le jeu de commandes intuitif d’un ampli traditionnel, mais offrent une grande souplesse de programmation. Les commandes uniques vous permettent à vous, le guitariste, de concevoir votre propre son, de le mémoriser et d’être sûr de la façon dont l’ampli se comportera en live. Tous les produits Blackstar sont soumis à des tests intensifs en laboratoire et en conditions réelles pour s’affranchir véritablement de tout compromis en termes de fiabilité, de qualité et avant tout de SON. Si vous aimez ce que vous entendez et voulez en découvrir plus sur la gamme de produits Blackstar, veuillez visiter notre site web à l’adresse www.blackstaramps. com. La commande Voice a six réglages différents – Clean Warm, Clean Bright, Crunch, Super Crunch, OD 1, OD 2. Quand on les utilise avec la commande ISF brevetée de Blackstar, vous pouvez obtenir exactement le son auquel vous pensiez. Merci ! La section d’effets offre simultanément des effets de qualité studio pour la modulation, le delay et la reverb, que vous pouvez mémoriser avec votre son. Français L’ID:Series est véritablement révolutionnaire, combinant des innovations uniques, un jeu de commandes intuitives et traditionnelles, et la souplesse de programmation. L’équipe Blackstar Français Veuillez lire attentivement la totalité de ce mode d’emploi pour tirer le bénéfice maximal de votre nouveau produit Blackstar. La technologie True Valve Power , en instance de brevet, offre six réponses de lampes de puissance distinctement différentes – EL84, 6V6, EL34, KT66, 6L6, KT88. Quand on l’active, elle fournit la réponse, la dynamique, la compression de la redresseuse (« sag ») et la rupture caractéristiques d’un ampli à lampes, et de façon unique elle donne la même puissance de sortie acoustique que son équivalent à lampes. Cela signifie que ces amplis assurent sans compromis en live – True Valve Power signifie « LOUD as valve™ » (aussi fort que les lampes). L’édition en profondeur et la mémorisation des patches est simple grâce au logiciel Insider par Blackstar. Les patches peuvent être partagés, mis à disposition et téléchargés via la communauté en ligne. Le connecteur USB vous permet aussi d’enregistrer directement votre ampli dans votre ordinateur. Une sortie à émulation de baffle, une entrée MP3/ligne et une commutation MIDI au pied complètent l’ensemble. Avec l'exceptionnelle commande Voice, l’ISF brevetée et la True Valve Power en instance de brevet, les amplificateurs ID offrent une flexibilité et une simplicité sans égales, vous permettant de concevoir véritablement le son que vous avez en tête et de le fournir live « LOUD as valve™ ». Individuality is power! 44 45 Mode Démo Réinitialisation d’usine Quand l’amplificateur est allumé pour la première fois après l’achat, ou après une réinitialisation d’usine, il est en « mode Démo ». Le son que vous entendez reflétera la position physique des boutons de la face avant comme ce serait le cas en mode manuel. Tous les effets plus la TVP seront coupés. Les patches et réglages d’origine par défaut peuvent être à tout moment restaurés dans votre amplificateur. Maintenez simplement pressés simultanément les boutons MOD, DLY et REV, pendant que vous allumez l’amplificateur. La LED Bank s’allumera et passera du vert au orange au rouge pour indiquer l’imminence de la réinitialisation d’usine. Ce processus prend un total de 2 secondes. Si n’importe lequel des boutons MOD, DLY ou REV est relâché avant que la LED Bank n’ait passé en revue toutes ces couleurs, alors l’opération est annulée et l’amplificateur ne subit aucune modification. Toutes les mémoires de patch de l’amplificateur contiennent par défaut des réglages d’origine Blackstar. Des patches peuvent être créés et mémorisés en mode Démo mais les patches et réglages d’origine par défaut seront restaurés chaque fois que l’amplificateur sera éteint et rallumé. 46 Le logiciel Insider de Blackstar peut également être utilisé pour sortir du mode Démo. Depuis ce programme, faites un clic droit sur l’intitulé Demo Mode et sélectionnez « Disable » (désactiver). Une fois cela terminé, l’amplificateur retrouve le mode Démo. NOTE IMPORTANTE: ce processus écrasera tout contenu créé par l’utilisateur. Français Français Pour quitter le mode Démo, maintenez le bouton Manual (22) pendant que vous allumez l’amplificateur. Le voyant à LED Bank (23) passe du rouge au orange puis au vert et enfin s’éteint pour indiquer que le mode Démo a été désactivé. Si le bouton Manual est relâché avant que la LED Bank ait passé en revue toutes les couleurs et se soit éteinte, alors l’opération est annulée et l’amplificateur reste en mode Démo. 47 Face avant 1. Input Branchez ici votre guitare. Utilisez toujours un cordon blindé de bonne qualité pour guitare. 2. Voice La commande Voice change l’harmonisation du préampli, en allant du son ultra-clair à la saturation extrême. Français Ce réglage est sauvegardé quand vous mémorisez un patch. 3. Gain La commande Gain règle l’ampleur de la saturation ou de la distorsion. Des réglages bas, dans le sens anti-horaire, donneront un son clair, à la limite de la saturation. Quand on tourne la commande Gain dans le sens horaire, le son devient plus saturé, allant vers de superbes sons Crunch jusqu’à sa position maximale, pour laquelle on obtient un son à pleine distorsion. Ce réglage est sauvegardé quand vous mémorisez un patch. 4. Volume Contrôle le volume du préampli. Le tourner dans le sens horaire augmente le volume. Des hauts niveaux de volume introduiront l’effet de distorsion et de compression d’un ampli de puissance à lampes, selon le réglage TVP (9) que vous avez sélectionné. Ce réglage est sauvegardé quand vous mémorisez un patch. 5. Bass La commande Bass règle la quantité de basses fréquences dans votre son. Cet ampli a un circuit de façonnage sonore sophistiqué qui permet de passer d’un son nerveux et tranchant (dans le sens anti-horaire) à un son chaud et lourd (sens horaire). Ce réglage est sauvegardé quand vous mémorisez un patch. 6. Middle La commande Middle règle la quantité de fréquences médiums dans votre son. Les fréquences médiums sont particulièrement importantes pour déterminer le « coffre » de votre son. Avec la commande Middle en position minimale (à fond dans le sens anti-horaire), le son sera agressif et creusé, ce qui est idéal pur un jeu rythmique agressif. Quand on monte la commande Middle (dans le sens horaire), le « coffre » augmente, ce qui convient mieux aux sons de guitare lead avec sustain. Ce réglage est sauvegardé quand vous mémorisez un patch. 48 La commande Treble permet le réglage exact des aigus (hautes fréquences) dans le son. Avec des réglages bas (dans le sens anti-horaire), le son aura un caractère chaud et feutré. Quand on monte la commande Treble (sens horaire), le son devient plus brillant. Au réglage maximal, le son sera agressif et tranchant. Ce réglage est sauvegardé quand vous mémorisez un patch. 8. ISF La commande ISF brevetée fonctionne en conjonction avec les commandes Bass, Middle et Treble. Elle vous permet de choisir la signature tonale exacte que vous préférez. À fond dans le sens anti-horaire, elle donne un caractère plus américain avec des graves nerveux et des médiums plus agressifs, et à fond dans le sens horaire, un caractère britannique plus « woody » et moins agressif. USA UK Contrairement aux commandes « contour » conventionnelles et aux systèmes égaliseurs paramétriques, les commandes Bass, Middle et Treble restent interactives comme dans un réseau de correction traditionnel d’amplificateur de guitare. Cela donne une réponse musicale, très familière. Ce réglage est sauvegardé quand vous mémorisez un patch. Français Clean Warm – Très propre, dynamique Clean Bright – « Boutique », en rupture si on le pousse à fond Crunch – Saturation classique à gain moyen Super Crunch – Plus de gain et de punch que Crunch OD 1 – Saturation gonflée par volume Master avec amortissement moyen de l’ampli de puissance OD 2 – Saturation gonflée renforcée dans les médiums 7. Treble 9. Sélecteur TVP (True Valve Power) La True Valve Power de Blackstar, en instance de brevet, offre 6 réponses de lampes de puissance distinctement différentes – EL84, 6V6, EL34, KT66, 6L6 et KT88. Quand on l’active, elle fournit la réponse, la dynamique, la compression de la redresseuse (« sag ») et la saturation caractéristiques d’un ampli à lampes, et de façon unique elle donne la même puissance de sortie acoustique que son équivalent à lampes. Cela signifie que ces amplis assurent sans compromis en live – True Valve Power signifie « LOUD as valve™ » (aussi fort que les lampes). La TVP change les caractéristiques du son en le faisant passer d’un son compressé et souple à un son dynamique et nerveux. EL84 Son classe A riche et carillonnant avec beaucoup de compression 6V6 Son classe A net et précis avec forte compression et médiums nerveux EL34 Son crunch britannique classique de classe A/B avec rupture riche et douce KT66 Son classe A/B britannique vintage à haute polarisation, riche et chaud 6L6 Son classe A/B dynamique et nerveux avec aigus et graves étendus KT88 Son classe A/B dynamique, audacieux et nerveux avec de solides graves Quand vous passez d’EL84 à KT88, la quantité de compression et de saturation pouvant être obtenue par chaque réponse de lampes se réduit. De plus, quand un des deux sons clairs est sélectionné, la compression de sortie et la saturation sont affectées par la commande Gain. Ce réglage est sauvegardé quand vous mémorisez un patch. 49 10. Commutateur TVP (True Valve Power) Presser ce commutateur met la TVP en/hors service. La LED intégrée au commutateur s’allume pour signaler que la TVP est en service. Quand la LED est éteinte, la TVP n’est pas active et le sélecteur TVP est désactivé. Ce réglage est sauvegardé quand vous mémorisez un patch. 15. Niveau d’effet (Level) Effets Modifie un paramètre d’effet. Pour les effets de modulation et de retard (delay), tourner la commande Level en maintenant enfoncé le commutateur Tap (16) modifie la cadence/ durée de l’effet. Trois effets de qualité studio peuvent être mis en service à tout moment. Le effet tableau ci-dessous montre les paramètres modifiables. 11. MOD (Modulation) Ce réglage est sauvegardé quand vous mémorisez un patch. Pressez ce commutateur afin de mettre l’effet de modulation en/hors service ou de le choisir pour l'éditer. Ce réglage est sauvegardé quand vous mémorisez un patch. 16. Tap 12. DLY (Delay) Pressez ce commutateur afin de mettre l’effet delay (retard) en/hors service ou de le choisir pour l'éditer. Ce réglage est sauvegardé quand vous mémorisez un patch. 13. REV (Reverb) Pressez ce commutateur afin de mettre l’effet reverb en/hors service ou de le choisir pour l'éditer. Ce réglage est sauvegardé quand vous mémorisez un patch. Pour les trois commutateurs d’effet, la LED indique leur statut : LED Statut de l’effet Description LED éteinte Effet désactivé L’effet n’est pas en service LED rouge Effet activé mais pas choisi pour l’édition L’effet est en service mais il n’est pas affecté par les commandes d’effet de la face avant LED verte Effet activé et choisi pour l’édition L’effet est en service et est affecté par les commandes d’effet de la face avant Presser répétitivement chaque commutateur d’effet de la face avant donne le résultat suivant : Effet désactivé Active l’effet et le choisit pour l’édition. Tout effet préalablement choisi pour l’édition retrouve son simple statut activé Effet activé mais pas choisi pour l’édition Choisit l’effet pour l’édition. Tout effet préalablement choisi pour l’édition retrouve son simple statut activé Effet activé et choisi pour l’édition Désactive l’effet. Si un ou d’autres effets sont activés, l’effet préalablement choisi pour l’édition le redevient NOTE: un seul effet peut être choisi à la fois pour l’édition. 14. Type d’effet Change le type d’effet et modifie un paramètre de l’effet actuellement choisi pour l’édition (modulation, delay ou reverb). 50 Ce réglage est sauvegardé quand vous mémorisez un patch. Le commutateur Tap sert à régler la cadence/durée de l’effet actuellement choisi pour l’édition. L’intervalle de temps séparant deux pressions du bouton Tap définit la cadence. Une fois cela réglé, la LED Tap clignote au rythme ainsi fixé dans l’effet actuellement choisi pour l’édition. Français Français NOTE: avec la TVP désactivée, l’amplificateur de puissance a une réponse linéaire et vous ne pourrez pas obtenir le « sag », la compression et la puissance typiques des lampes qu’offre la TVP. Chaque segment représente un effet différent (quatre pour chaque type d’effet). Une LED indique le type d’effet actuellement activé. La distance parcourue dans le « segment » modifie un paramètre de l’effet. Le effet tableau ci-dessous montre les paramètres modifiables. Le effet tableau ci-dessous montre les paramètres modifiables : Effet Paramètre du segment Paramètre réglé par Level Paramètre réglé par Tap Phaser Mixage Profondeur Vitesse Flanger Réinjection Profondeur Vitesse Chorus Mixage Profondeur Vitesse Tremolo Ampleur de modulation de fréquence Ampleur de modulation d’amplitude Vitesse Linear Réinjection Niveau de retard Temps Analogue Réinjection Niveau de retard Temps Tape Réinjection Niveau de retard Temps Multi Réinjection Niveau de retard Temps Room Taille Niveau de reverb - Hall Taille Niveau de reverb - Spring Taille Niveau de reverb - Plate Taille Niveau de reverb - MODULATION DELAY REVERB Ce réglage est sauvegardé quand vous mémorisez un patch. 51 Master 17. Resonance La commande Resonance règle la réponse générale en graves. Avec des réglages bas, les sons clairs seront nerveux et funky, tandis que les sons saturés seront concentrés sur leur réponse en graves. Avec des réglages plus élevés, les sons clairs deviendront pleins et chauds, tandis que les sons crunch et saturés deviendront plus résonants et plus chargés en graves. C’est un réglage global qui n’est pas sauvegardé quand vous mémorisez un patch. 18. Presence La commande Presence règle la réponse générale en aigus. Le haut de spectre percussif peut être accentué sur les sons clairs et la quantité d’aigus agressifs être contrôlée avec des réglages crunch et saturés. 19. Volume Master Commande le volume général de votre amplificateur. Tourner cette commande dans le sens horaire augmente le volume. C’est un réglage global qui n’est pas sauvegardé quand vous mémorisez un patch. Si le volume Master est à zéro, cela permet d’enregistrer en silence via la sortie avec émulation de baffle ou l’USB. Le niveau émulé est contrôlé au moyen du volume du préampli. Maintenir le commutateur Manual (22) durant trois secondes active l’accordeur. La LED témoin Recall (28) clignotera continuellement pour signaler que l’amplificateur est en mode accordeur. Par défaut, la sortie de l’amplificateur sera coupée en mode accordeur. Les LED Manual, Bank et CH (canal) indiqueront la note la plus proche de celle jouée. LED Bank Cordes 1 et 6 (mi par défaut, grave/aigu) LED CH1 Corde 2 LED CH2 Corde 3 LED CH3 Corde 4 LED CH4 Corde 5 Les LED MOD, DLY et REV servent d’indication de justesse de la note jouée par rapport à la note accordée. 20. Interrupteur d’alimentation Power LED MOD rouge La note est trop aiguë (au-dessus de la hauteur juste) Cet interrupteur sert à mettre l’amplificateur sous et hors tension. LED DLY verte La note est accordée NOTE : en mode Démo, éteindre l’amplificateur et le rallumer restaure les réglages d’usine par défaut. En dehors du mode Démo, l’amplificateur retrouve les réglages qu’il avait à l’extinction. . LED REV rouge La note est trop basse (au-dessous de la hauteur juste) 21. USB Branchez ici un câble USB pour relier l’amplificateur à un PC sous Windows ou à un Mac. Le logiciel Insider de Blackstar peut être téléchargé depuis notre site web et offre une foule de fonctions. Les autres LED de la face avant seront éteintes en mode accordeur. Presser n’importe quel commutateur de la face avant ou du pédalier vous fera quitter le mode accordeur. 23. Bank Voir la section Audio USB en page 69 pour plus d’informations. Pressez ce commutateur pour passer en revue les trois premières banques de patches. NOTE : l’amplificateur apparaîtra dans le logiciel d’enregistrement d’un ordinateur personnel comme un périphérique de capture audio. Banque 1 Banque 2 22. Manual Pressez ce commutateur pour alterner entre le mode manuel et le patch actuel. Quand l’amplificateur est en mode manuel, le son reflète la position physique actuelle des commandes. Cela s’applique aux commandes Voice, Gain, Volume, Bass, Middle, Treble, ISF et TVP. Le statut On/Off de TVP sera toujours celui du dernier patch activé. Tous les effets qui étaient actifs lors du passage en mode manuel sont désactivés. 52 Mode accordeur Français Français C’est un réglage global qui n’est pas sauvegardé quand vous mémorisez un patch. En mode manuel, toutes les commandes peuvent toujours être modifiées par une source externe (logiciel Insider de Blackstar, pédalier, contrôleur MIDI), mais cela signifie alors que le son ne correspondra plus aux positions des commandes de la face avant. Banque 2 Banque 3 Banque 3 Banque 1 La LED verte indique que vous êtes en banque 1, la LED orange que vous êtes en banque 2 et la LED rouge que vous êtes en banque 3. NOTE : seules les trois premières banques peuvent être sélectionnées depuis la façade. Quand vous activez la banque 4 ou plus depuis un contrôleur externe (par exemple le logiciel, le pédalier), la LED Bank ne s’allume pas mais les LED de canaux 53 (CH) continuent de vous indiquer l’emplacement du patch. Programmation Par exemple : Mémorisation des patches Patch 11 – LED Bank rouge, LED CH3 allumée. Pour mémoriser le son actuel comme un patch : La sélection de la banque up avec un contrôleur externe vous commutera sur le patch 15 - LED de Banques off, Canal 3 allumé 1. Pressez et maintenez n’importe lequel des quatre boutons de canal (CH) durant une seconde. Les quatre LED de canal commenceront à clignoter. Quand l’amplificateur est en mode manuel, la LED Bank n’est pas allumée. 2. Pressez le bouton Bank pour alterner entre les trois banques (verte, orange, rouge) en vue de choisir l’emplacement où vous allez mémoriser. Le canal sera mémorisé, par conséquent le patch correspondant dans la banque actuelle sera chargé lorsque vous ferez défiler les banques. 24 – 27. Canaux (CH) 1-4 Le canal 1 active le premier patch de la banque actuellement active. La LED correspondant à l’emplacement de mémorisation choisi s’allumera et le nouveau patch sera activé. Le canal 3 active le troisième patch de la banque actuellement active. Banque verte = Patches 1-4 Le canal 4 active le quatrième patch de la banque actuellement active. Banque orange = Patches 5-8 28. Indicateur Recall L’indicateur Recall signale une disparité entre la valeur actuelle d’un paramètre dans l’amplificateur et la commande physique correspondante en façade. Par exemple, quand vous changez de patch, les commandes de la face avant peuvent ne plus refléter les réglages que vous entendez. Pour éviter des sauts brutaux de niveau quand vous réglez une commande, les commandes de la face avant n’ont pas d’effet sur le son tant que vous ne leur avez pas fait rejoindre la valeur actuelle du paramètre. Une fois celle-ci atteinte, l’indicateur Recall clignote deux fois et la commande « prend le contrôle » de la valeur, ce qui lui permet de l’augmenter ou de la diminuer. L’indicateur Recall clignotera deux fois chaque fois que la commande physique « passera par » la valeur mémorisée dans le patch actuel, pour que vous puissiez facilement voir la valeur programmée. Recall ne concerne que les commandes Gain, Volume, Bass, Middle, Treble et ISF. Quand l’accordeur est en service, l’indicateur Recall clignote continuellement. Banque rouge = Patches 9-12 Les commandes de l’amplificateur peuvent servir à modifier le patch à tout moment du processus de mémorisation. Français Français Le canal 2 active le deuxième patch de la banque actuellement active. 3. Pressez une fois n’importe lequel des quatre boutons de canal (CH) pour mémoriser le patch à l’endroit choisi. Pressez à n’importe quel moment le bouton Manual pour annuler le processus de mémorisation et ramener l’amplificateur à ses derniers réglages. Mémoriser un patch écrasera (remplacera) tout patch déjà mémorisé à cet emplacement. Les patches peuvent également être mémorisés au moyen du logiciel Insider de Blackstar ou d’un pédalier FS-10 Blackstar connecté. Rappel des patches Pressez n’importe quel bouton de canal (CH) pour charger ce patch. Presser le bouton Bank vous fera parcourir les trois banques – verte, orange, rouge. Le canal sera conservé, ce qui signifie que le patch correspondant dans la banque actuelle sera chargé lorsque vous passerez en revue les banques. Sinon, les patches peuvent être rappelés au moyen du logiciel Insider de Blackstar ou de tout pédalier connecté. 54 55 MIDI Face arrière Les amplificateurs ID:Series peuvent voir leurs patches rappelés par des messages MIDI de changement de programme et leurs valeurs d’amplification être dynamiquement modifiées par des messages MIDI de changement de commande (CC). 1. Entrée d’alimentation secteur Pour configurer le contrôle par MIDI, branchez simplement la prise de sortie MIDI Out de votre contrôleur MIDI à la prise d’entrée MIDI In à l’arrière de l’amplificateur. Lorsqu’il est neuf ou après une réinitialisation d’usine, l’amplificateur est réglé en mode OMNI et répond donc aux messages MIDI de tous les canaux MIDI. Rappel des patches Afin de rappeler un patch, le contrôleur MIDI doit être réglé pour transmettre les messages de changement de programme (c’est généralement le cas des pédaliers). Changer de patch sur le contrôleur MIDI activera le patch correspondant mémorisé dans l’amplificateur. Modification des valeurs de patch De nombreuses valeurs de patch (par exemple Gain, Volume, ISF – voir Tableau d’équipement MIDI ci-dessous) peuvent être ajustées en temps réel au moyen de messages MIDI de changement de commande (CC). Le contrôleur MIDI doit être réglé pour envoyer les messages de changement de commande tels que définis dans le tableau d’équipement MIDI. 2. Sorties pour baffle ID:60TVP et ID:100TVP Il y a deux sorties parallèles pour baffle afin de brancher des baffles externes. La charge minimale est de 4 ohms. ATTENTION : l’impédance combinée ne doit jamais descendre sous 4 ohms (par exemple un baffle 4 ohms ou deux baffles 8 ohms). Ne pas faire correctement correspondre l’impédance de l’amplificateur et des baffles endommagera l’amplificateur. NOTE : 2 baffles ID:412 4 ohms ne peuvent pas être utilisés ensemble. Français Français NOTE : vous pouvez souhaiter que l’amplificateur ne réponde qu’aux messages MIDI d’un seul canal MIDI. Cela peut se régler à l’aide du logiciel Insider de Blackstar en spécifiant lequel des 16 canaux MIDI utiliser ou en ramenant l’amplificateur en mode OMNI. which of the 16 MIDI channels to use, or to return the amplifier to OMNI mode. Le cordon d’alimentation secteur détachable fourni se branche ici. Le cordon ne doit être branché qu’à une prise secteur compatible avec les besoins électriques de tension, puissance et fréquence indiqués en face arrière. En cas de doute, demandez conseil à un technicien qualifié. ID:260TVP Il y a deux sorties pour baffle (1 pour le canal gauche, 1 pour le canal droit) afin de connecter les haut-parleurs internes ou des baffles externes. Les haut-parleurs internes sont directement branchés à ces sorties et doivent être débranchés pour que des baffles externes puissent être connectés. La charge minimale est de 4 ohms. ATTENTION : l’impédance de chaque sortie ne doit jamais descendre sous 4 ohms. Ne pas faire correctement correspondre l’impédance de l’amplificateur et des baffles endommagera l’amplificateur. ID:60TVP La sortie pour baffle sert à brancher le haut-parleur interne ou des baffles externes. Le haut-parleur interne est directement branché à cette sortie et doit être débranché pour qu’un baffle externe puisse être connecté. La charge minimale est de 4 ohms. ATTENTION : l’impédance ne doit jamais descendre sous 4 ohms. Ne pas faire correctement correspondre l’impédance de l’amplificateur et des baffles endommagera l’amplificateur. 56 57 3. Entrée MIDI Audio USB Si vous utilisez par MIDI, branchez ici l’appareil MIDI. Référez-vous à la section MIDI pour plus de détails. Utilisez toujours un cordon MIDI de bonne qualité. Des pilotes audio standard sont utilisés pour connecter l’amplificateur à un PC ou à un Mac, aucun pilote spécifique n’est nécessaire. 4. Pédalier L’amplificateur apparaîtra dans le logiciel d’enregistrement comme un périphérique de capture audio. Branchez ici un des pédaliers pris en charge. Pédale commutateur (1 bouton) Utilisez n’importe quelle pédale à commutateur verrouillable (par exemple une FS-4 Blackstar) pour alterner entre les canaux 1 et 2 de la banque actuellement sélectionnée. Le verrouillage sur ON de la pédale (c’est-à-dire que la LED est allumée sur la FS-4) active le canal2 Pédalier FS-10 Blackstar Ce pédalier multifonction vous donne accès à tous les patches, à la commutation des effets et à la programmation des patches. Pédaliers MIDI Les fonctionnalités dépendent de votre pédalier. Canaux audio avec effets stéréo et émulation de baffle 2 canaux audio mono - Gauche – signal d’amplificateur traité - Droite – signal de guitare non traité Mode de ré-amplification Ré-amplification L’amplificateur peut être commuté en mode de ré-amplification via le logiciel. C’est un réglage non programmable qui sera désactivé soit lorsque le câble USB sera retiré soit lorsque l’amplificateur sera éteint. Quand il est activé, le mode de ré-amplification permet à l’amplificateur d’accepter un signal de guitare sec préenregistré via USB et de renvoyer un signal audio entièrement traité. Ce signal de retour peut alors être capturé par le logiciel d’enregistrement sur le PC ou Mac connecté. Français Français Le verrouillage sur OFF de la pédale (c’est-à-dire que la LED est éteinte sur la FS-4) active le canal 1 Le format de l’audio par USB peut être changé via le logiciel, et peut être un des suivants : Mise à jour du firmware 5. Entrée MP3/ligne Branchez ici la sortie de votre lecteur de MP3 ou de CD. Réglez le volume du lecteur en fonction de celui de votre guitare pour jouer avec. NOTE: la connexion est mono. 6. Sortie émulée Cette sortie émule les caractéristiques tonales d’un baffle de guitare et fournit un son naturel pour le branchement à un enregistreur ou à une table de mixage. Pour tirer pleinement parti des effets stéréo, utilisez un câble en Y avec un jack stéréo vers deux jacks mono comme source pour deux canaux de l’enregistreur ou de la table de mixage. La sortie fonctionnera aussi avec un cordon pour guitare de type mono. Utilisez toujours un cordon blindé de bonne qualité. Tourner la commande Volume (4) contrôlera le niveau de la sortie émulée. Le volume Master n’affecte que le ou les haut-parleurs/baffles branchés. NOTE : pour enregistrer « en silence », réglez le volume Master à zéro. Vous pouvez aussi enregistrer par cette sortie sans avoir branché de haut-parleur mais assurezvous qu’aucun cordon de haut-parleur n’est branché à aucune des prises de sortie pour haut-parleur de cet amplificateur, car cela désactiverait le circuit de protection de charge et entraînerait des dommages pour l’amplificateur. 58 Les mises à jour du firmware sont initiées au moyen du logiciel Insider de Blackstar. Une nouvelle version du logiciel Insider de Blackstar sortira lorsqu’une mise à jour sera disponible. Chaque mise à jour nécessite environ 60 à 120 secondes. Quand l’amplificateur est connecté (par USB) à une version contenant un firmware plus récent, un message s’affiche, vous demandant d’installer les derniers fichiers. Durant la mise à jour, les commandes de l’amplificateur ne sont pas opérationnelles. La LED Tap clignote pour indiquer l’activité d’échange de données durant le processus de mise à jour. L’alimentation de l’amplificateur ne doit pas être coupée durant une mise à jour de firmware. Si l’amplificateur est coupé durant une mise à jour, les commandes ne répondront pas lorsqu’il sera rallumé et l’amplificateur ne produira aucun son. La LED clignotera pour indiquer que l’amplificateur ne contient pas de firmware exploitable. L’amplificateur doit être connecté au logiciel Insider de Blackstar pour réinstaller un firmware valable. Le processus de mise à jour démarrera automatiquement si le logiciel Insider de Blackstar détecte que l’amplificateur est dans ces conditions. 59 Caractéristiques techniques ID:60TVP Puissance: 60 Watts Poids (kg): 18 Dimensions (mm): 584(L) x 485(H) x 250(P) Pédalier (pas fourni): pédale verrouillable FS-4, pédalier FS-10, pédalier MIDI ID:60TVP-H Poids (kg): 10.8 Dimensions (mm): 584(L) x 236(H) x 225(P) Pédalier (pas fourni): pédale verrouillable FS-4, pédalier FS-10, pédalier MIDI Français Français Puissance: 60 Watts ID:260TVP Puissance: 2 x 60 Watts (Stereo) Poids (kg): 24.2 Dimensions (mm): 686(L) x 510(H) x 250(P) Pédalier (pas fourni): pédale verrouillable FS-4, pédalier FS-10, pédalier MIDI ID:100TVP Puissance: 100 Watts Poids (kg): 12.8 Dimensions (mm): 686(L) x 246(H) x 225 (P) Pédalier (pas fourni): pédale verrouillable FS-4, pédalier FS-10, pédalier MIDI 60 61 Español Español ESTE EQUIPO SE DEBERá USAR EN UNA ZONA BIEN VENTILADA Y NUNCA SE DEBERá ENCENDER EN ESPACIOS POCO VENTILADOS, COMO UNA ESTANTERíA. All electrical and electronic products should be disposed of separately from the municipal waste stream via designated collection facilities appointed by the government or the local authorities. 62 63 Introducción Características Gracias por comprar este amplificador Blackstar ID Series. Como todos nuestros productos, este amplificador es el resultado de incontables horas de meticulosa Investigación y Desarrollo por parte de nuestro prestigioso equipo de diseño. Con base en Northampton (Reino Unido), el equipo de Blackstar está formado por músicos experimentados y el único objetivo del proceso de desarrollo es proporcionar a los guitarristas con productos que sean las herramientas de autoexpresión definitivas. En los cinco años transcurridos desde su lanzamiento, Blackstar ha liderado el camino de la innovación en amplificadores de guitarra. Los ID Series representan la culminación de más de siete años de investigación técnica y desarrollo. Estos amplificadores tienen un intuitivo panel de control, pero con la versatilidad que ofrece un amplificador programable. Los controles únicos te permiten a ti, el guitarrista, diseñar tu propio sonido, guardarlo y tener la seguridad de que el amplificador responderá en directo. Todos los productos Blackstar son sometidos a intensivas pruebas de laboratorio y de rodaje para asegurar que están fuera de compromiso en términos de fiabilidad, calidad y, sobre todo, TONO. El sistema True Valve Power –Verdadera Potencia a válvulas –, pendiente de patente por parte de Blackstar, ofrece seis respuestas distintas de diferentes válvulas de potencia: EL84, 6V6, EL34, KT66, 6L6 y KT88. Cuando se conecta, entrega la respuesta, dinámica, amortiguación y saturación típicos de un amplificador a válvulas y proporciona el mismo nivel de potencia acústica que una etapa de potencia a válvulas equivalente. Esto significa que estos amplificadores se pueden usar en directo sin problemas. True Valve Power significa LOUD as valveTM. Los ID Series suponen un verdadero logro. Combinan innovaciones únicas, un set de control tradicional e intuitivo y la versatilidad de un amplificador programable. Por favor lee este manual detenidamente para asegurarte de que obtienes el máximo rendimiento de tu nuevo producto Blackstar. Si te gusta lo que oyes y quieres averiguar más acerca de la línea de productos Blackstar, por favor visita nuestro sitio web en www.blackstaramps.com. ¡Gracias! Cuando se usan junto al control ISF –patentado por Blackstar– puedes obtener exactamente el sonido en el que estás pensando. La sección Effects proporciona efectos con calidad de estudio para modulación, reverb y delay que puedes almacenar junto con tu sonido. La edición avanzada de los bancos de sonido, muy sencilla, se realiza usando el software Insider de Blackstar. Los bancos se pueden descargar y compartir con la comunidad de usuarios en línea. El conector USB también te permite grabar directamente desde tu amplificador al ordenador. Español Español El Equipo de Blackstar El control Voice tiene seis ajustes diferentes: Clean Warm, Clean Bright, Crunch, Super Crunch, OD 1 y OD 2. Una salida emulada, entrada de línea o MP3 y control MIDI completan el equipamiento. Usando el único control Voice, el patentado ISF y el pendiente de patente True Valve Power, los amplificadores ID ofrecen una incomparable flexibilidad y facilidad de uso, permitiéndote, en la práctica, diseñar el sonido en tu cabeza y llevarlo al directo con la potencia real de las válvulas - Loud as valveTM Individuality is power! 64 65 Modo Demo Reestablecer ajustes de fábrica Al encenderlo por primera vez, o tras restablecer los ajustes de fábrica, el amplificador estará en modo Demostración. El sonido que escuchas reflejará la posición física de los controles del panel frontal. Todos los efectos, además del control TVP, estarán apagados. Los bancos de sonido por defecto se pueden restablecer en cualquier momento. Simplemente mantén pulsados simultáneamente los botones MOD, DLY y REV, mientras enciendes el amplificador. El indicador de banco de sonidos cambiará de color según la siguiente secuencia: verde, naranja y rojo, para indicar que se van a restablecer los ajustes. Este proceso dura un total de dos segundos. Si alguno de los botones MOD, DLY o REV se suelta antes de que el indicador LED haya finalizado la secuencia de colores hasta finalmente apagarse, la operación será cancelada y el amplificador permanecerá como estaba antes de iniciar el proceso. Todos los bancos de sonido del amplificador incorporan los preajustes por defecto de Blackstar. Los preajustes se pueden crear y almacenar en modo Demo, pero los ajustes de fábrica se restablecerán cada vez que el amplificador se apague y se vuelva a encender. Para salir del modo Demostración, mantén pulsado el botón Manual (22) mientras que enciendes el amplificador. El indicador de banco de sonido cambiará de color según la siguiente secuencia: rojo, naranja, verde y finalmente se apagará para indicar que el modo Demostración ha sido desactivado. Si el botón Manual se suelta antes de este ciclo de colores el amplificador volverá al modo Demostración. Una vez restablecidos los preajustes el amplificador estará en modo Demostración. NOTA IMPORTANTE: Este proceso eliminará cualquier contenido guardado por el usuario. 66 Español Español El software Insider de Blackstar también se puede utilizar para desactivar el modo Demostración. Desde el programa, haz click con el botón derecho del ratón en la etiqueta “Demo Mode” y selecciona ‘Disable’. 67 Panel Frontal 1. Input Conecta tu guitarra aquí. Usa siempre un cable apantallado de calidad. 2. Voice El control Voice cambia el carácter del previo, desde limpios cristalinos hasta distorsión extrema. Clean Warm – Sonido muy limpio y dinámico. Clean Bright – Limpio de ‘Boutique’, romperá cuando se rasguee con fuerza. Crunch – Distorsión clásica de alta ganancia. Super Crunch – Versión más distorsionada del canal Crunch OD 1 – Potente distorsión con volumen master, amortiguación de etapa media. OD 2 – Potente distorsión con énfasis en frecuencias medias. Este ajuste se almacenará al guardar un banco de sonido. El control Gain ajusta la cantidad de overdrive o distorsión. Ajustes bajos (sentido anti-horario) entregarán un sonido limpio a punto de romper. A medida que el control de distorsión se incrementa en sentido horario el sonido se volverá más distorsionado, moviéndose a través de ricos tonos crunch hasta, en su máxima posición, alcanzar un sonido totalmente distorsionado. Este ajuste se almacenará al guardar un banco de sonido. 4. Volume Este control ajusta el volumen del previo. Girarlo en sentido horario incrementa el volumen. Altos niveles de volumen introducirán el efecto de distorsión y compresión de la etapa de potencia, dependiendo del ajuste del control TVP (9). Este ajuste se almacenará al guardar un banco de sonido. El control ISF funciona en conjunto con los controles Bass, Middle y Treble. Te permite elegir la firma tonal exacta que prefieras. Ajustes anti-horarios proporcionan una característica más Americana con bajos apretados y medios agresivos, mientras que los ajustes en sentido horario tienen un tono Británico, que es más denso y menos agresivo. USA 9. Selector TVP (True Valve Power) El control True Valve Power, pendiente de patente por parte de Blackstar, ofrece seis respuestas de frecuencia diferenciadas de válvulas de potencia – EL84, 6V6, EL34, KT66, 6L6 y KT88. Cuando se conecta entrega la respuesta, dinámica, amortiguación y saturación típicas de un amplificador a válvulas y, de una forma única, entrega la misma potencia de salida acústica que en un? amplificador valvular equivalente. Esto significa que estos amplificadores se pueden usar en directo sin problemas. True Valve Power significa LOUD as valveTM. El control TVP cambia las características de la compresión, dinámica y definición de tu sonido. Sonido brillante de Clase A muy comprimido. 5. Bass 6V6 Sonido crujiente de Clase A con compresión fuerte y medios apretados. El control Bass ajusta la cantidad de frecuencias graves en tu sonido. Este amplificador tiene un avanzado circuito de formación de tono que permite que el sonido sea contundente y cortante (sentido anti-horario) o cálido y pesado (sentido horario). Este ajuste se almacenará al guardar un banco de sonido. EL34 Clásico sonido británico de Clase A/B. Crujiente y lleno de cuerpo. KT66 Sonido Británico vintage, rico y cálido. Clase A/B. 6L6 Sonido apretado y dinámico de clase A/B con graves y agudos extendidos. KT88 Apretado, dinámico y redondo sonido de Clase A/B con bajos muy presentes. El control Middle ajusta la cantidad de frecuencias medias en tu sonido. Las frecuencias medias son particularmente importantes al ajustar la cantidad de cuerpo que tiene tu sonido. Con el control Middle en su posición mínima (sentido anti-horario) el sonido será agresivo y cortante, un tono ideal para tonos rítimicos. A medida que el control Middle se incrementa en sentido horario, la cantidad de cuerpo aumenta, que es más apropiada para tonos solistas. Este ajuste se almacenará al guardar un banco de sonido. 7. Treble El control Treble permite un ajuste exacto de las frecuencias agudas o altas en tu UK A diferencia de los convencionales controles de cuerpo o ‘contour’ y sistemas de ecualización paramétrica, los controles Bass, Middle y Treble permanecen interactivos los unos con los otros al igual que en un control de tono de guitarra tradicional. Esto conduce a una respuesta muy musical y familiar. Este ajuste queda almacenado al guardar un banco de sonido. EL84 6. Middle 68 8. ISF Español Español 3. Gain sonido. A niveles bajos (sentido anti-horario) el sonido será oscuro y caliente en carácter. A medida que el control Treble se incrementa en sentido horario el sonido se volverá más brillante. Este ajuste queda almacenado al guardar un banco de sonido. A medida que te mueves desde EL84 hasta KT88 se reduce la cantidad de compresión y distorsión disponible para las respuestas de cada válvula. Adicionalmente, cuando alguno de los sonidos limpios (CLEAN) está seleccionado la compresión y saturación de la etapa se ven afectadas por el control de ganancia. Este ajuste queda almacenado al guardar un banco de sonido. 10. Interruptor TVP (True Valve Power) Presionar este interruptor conecta o desconecta el control TVP. El LED interno se encenderá para indicar que el modo TVP está conectado. Cuando el LED está apagado, el modo TVP está inactivo y el selector TVP estará desactivado. Este ajuste queda almacenado al guardar un banco de sonido. 69 NOTA: Cuando el modo TVP está apagado la etapa de potencia tiene una respuesta lineal y no proporcionará la respuesta, compresión y potencia que entrega el modo TVP. Efectos Se pueden utilizar hasta tres efectos con calidad de estudio simultáneamente. Cada segmento representa un efecto diferente (hay cuatro para cada tipo de efecto). UN LED muestra el tipo de efecto que se encuentra activo. La distancia recorrida por el segmento modifica un parámetro del efecto. La efectos tabla de abajo muestra los parámetros modificables: Este ajuste queda almacenado al guardar un banco de sonido. 15. Effect Level (Nivel de Efecto) 11. MOD (Modulación) Pulsa este interruptor para conectar o desconectar el efecto de modulación, o seleccionar el efecto para su edición. Este ajuste queda almacenado al guardar un banco de sonido. Este control modifica un parámetro de efecto. Para los efectos de modulación y delay, girar el control de nivel mientras se presiona el interruptor Tap (16) modifica la frecuencia o el tiempo del efecto. La effectos tabla de abajo muestra los parámetros modificables: 12. DLY (Delay) Pulsa este interruptor para conectar o desconectar el efecto de delay (retardo), o seleccionar el efecto para su edición. Este ajuste queda almacenado al guardar un banco de sonido. 13. REV (Reverb) Pulsa este interruptor para conectar o desconectar el efecto de reverberación, o seleccionar el efecto para su edición. Este ajuste queda almacenado al guardar un banco de sonido. Este ajuste queda almacenado al guardar un banco de sonido. 16. Tap El interruptor Tap se usa para ajustar la frecuencia ó tiempo del efecto seleccionado para edición actual. El tiempo entre pulsaciones del interruptor Tap estable la frecuencia del efecto. Una vez establecido, el LED del interruptor Tap parpadeará indicando la frecuencia del efecto seleccionado. Para cada uno de los tres efectos el funcionamiento del LED indicador es similar: Estado de efecto Descripción LED apagado Apagado El efecto no estará activo Efecto LED rojo Encendido (no permite edición) El efecto estará activo, pero no responde a los controles del panel frontal MODULATION LED verde Encendido (permite edición) El efecto estará activo y responderá a los controles del panel frontal Al pulsar repetidamente cada uno de los controles de efecto obtendremos la siguiente secuencia: Efecto apagado Enciende el efecto y lo selecciona para edición. Cualquier efecto previamente seleccionado para edición vuelve a su estado normal. Efecto encendido pero no seleccionado para edición Selecciona el efecto para su edición. Cualquier efecto previamente seleccionado para edición vuelve a su estado normal. Efecto encendido y seleccionado para edición Apaga el efecto, quedando seleccionado para edición el último efecto seleccionado en caso de que quedase algún efecto encendido. Segmento Level Parameter Tap Parameter Phaser Mezcla general Profundidad ó ‘Depth’ Velocidad Flanger Realimentación Profundidad ó ‘Depth’ Velocidad Chorus Mezcla general Profundidad ó ‘Depth’ Velocidad Tremolo Profundidad de la modulación de frecuencia Profundidad de la modulación de amplitud Velocidad Linear Realimentación Nivel de delay Tiempo Analógico Realimentación Nivel de delay Tiempo Cinta Realimentación Nivel de delay Tiempo Multi Realimentación Nivel de delay Tiempo Español Español La efectos tabla de abajo muestra los parámetros modificables: LED DELAY NOTA: Sólo un efecto puede estar seleccionado para edición cada vez. REVERB 14. Effect Type (Tipo de Efecto) Room Tamaño Nivel de Reverb Inactivo Cambia el tipo de efecto y edita un parámetro del efecto que esté actualmente seleccionado para edición. (Modulación, delay ó reverb). Hall Tamaño Nivel de Reverb Inactivo Spring Tamaño Nivel de Reverb Inactivo Plate Tamaño Nivel de Reverb Inactivo Este efecto queda almacenado al guardar un banco de sonido. 70 71 Master 17. Resonance (Resonancia) El control de resonancia ajusta el nivel general general de respuesta de las frecuencias graves. En ajustes bajos los limpios serán apretados y con carácter ‘funk’ y las distorsiones serán delgadas. A medida que se aumenta este control los sonidos limpios se vuelven llenos y cálidos, mientras que los sonidos crunch y las distorsiones se hacen más pesadas y resonantes. Este es un ajuste global y no queda almacenado al guardar un banco de sonido. 18. Presence (Presencia) El control Presence ajusta la respuesta general de frecuencias altas. Este control permite acentuar los altos percusivos en sonidos limpios y la cantidad de agresividad en agudos para sonidos de crunch y distorsión. Este es un ajuste global y no queda almacenado al guardar un banco de sonido. 19. Master Volume Controla el volumen general de tu amplificador. Girándolo en sentido horario se incrementa el volumen. En modo manual cualquiera de los controles se puede modificar mediante una fuente externa (Blackstar Insider, Pedal de control, Controladora MIDI…), pero esto significa que el sonido del amplificador no se corresponderá con la posición física de los controles del panel frontal. Afinador Al mantener pulsado el interruptor Manual (22) durante tres segundos se activará el afinador. El LED Recall LED (28) parpadeará continuamente para indicar que el amplificador se encuentra en modo Afinador. Por defecto la salida del amplificador se silenciará en este modo. Los LEDs Manual y bank junto con los LEDs de los distintos canals indicarán la nota más próxima a la nota detectada: LED de Banco Cuerda 1 y 6 (E por defecto, bajo/alto) CH1 LED Cuerda 2 CH2 LED Cuerda 3 CH3 LED Cuerda 4 CH4 LED Cuerda 5 Si el volumen master está a cero, el amplificador se puede utilizar para grabación silenciosa a través de la salida emulada o el conector USB. El nivel de la salida emulada es controlado mediante el volumen del preamplificador. 20. Power Switch (Interruptor de Encendido) Este interruptor se utiliza para encender y apagar el amplificador. NOTA: si apagas el amplificador desde el modo Demo se restaurarán los valores por defecto de fábrica. En modo normal el amplificador guardará el estado previo al apagado. 21. USB Conecta un cable mini USB aquí para enlazar tu amplificador con un sistema Windows o Mac. El software Insider de Blackstar se puede descargar desde nuestro sitio web y ofrece un gran número de posibilidades. Consulta la sección de Audio USB en la página 79 para más información. NOTA: El amplificador aparecerá como “Dispositivo de grabación de audio” en la lista de periféricos de tu ordenador. 22. Manual Pulsa este interruptor para cambiar entre modo manual y el banco de sonido actual. Cuando el amplificador está en modo manual, el sonido reflejará la posición física de los controles del panel frontal. Esto es aplicable a los controles Voice, Gain, Volume, Bass, Middle, Treble, ISF y TVP. El estado del control TVP se obtendrá del último banco de sonido guardado. Los efectos que estén activos cuando se cambie al modo manual se desactivarán. 72 Los LEDs MOD, DLY y REV te indicarán la desviación en la afinación para cada nota: LED MOD (rojo) La nota es más alta que el tono a afinar LED DLY (verde) La nota está afinada LED REV (rojo) La nota es más baja que el tono a afinar Español Español Este es un ajuste global y no queda almacenado al guardar un banco de sonido. Todos los otros LEDs se apagarán durante el modo Afinador. Al pulsar cualquier interruptor del panel frontal el amplificador volverá al modo normal. 23. Bank (Banco) Pulsa el interruptor Bank para moverte por los tres primeros bancos de sonidos. Banco 1 Banco 2 Banco 2 Banco 3 Banco 3 Banco 1 El LED verde indica que estás en el banco 1. El LED naranja indica que estás en el banco 2. El LED rojo indica que estás en el banco 3. NOTA: Sólo los primeros tres bancos se pueden seleccionar desde el panel frontal. Al activar el banco 4 y superiores mediante un controlador externo (Software, Pedalera, MIDI…), el LED BANK no se encenderá pero los LEDs de los distintos canales te indicarán la ubicación del ajuste. 73 Por ejemplo: Programabilidad Preajuste 11 – LED de banco rojo, LED de canal 3 encendido. Guardar Preajustes Incrementar el banco con una controladora externa cambiará el preajuste a 15 – LED de banco apagado, LED de canal 3 encendido. Para guardar el sonido actual como un preajuste: Cuando el amplificador se encuentra en modo manual el LED de banco estará apagado. El canal será recordado por el amplificador, por tanto el correspondiente preajuste del actual banco se cargará al cambiar entre bancos. 24 – 27. Canales 1-4 El canal 1 activa el primer preajuste del banco active actual. El canal 2 activa el segundo preajuste del banco active actual. El canal 3 activa el tercer preajuste del banco active actual. El canal 4 activa el cuarto preajuste del banco active actual. 28. Indicador Recall Para prevenir cambios de nivel inesperados en el control que estás ajustando, los los controles del panel frontal no tendrán ningún efecto en el sonido hasta que el mando alcance el valor del parámetro actual. Una vez alcanzado, el indicador Recall parpadeará dos veces y el mando tomará el control del parámetro, que se podrá aumentar o disminuir. El indicador Recall parpadeará dos veces cada vez que el mando físico pasa por el valor almacenado en el preajuste actual. De este modo podrás ver fácilmente el valor almacenado. El indicador Recall solo se activa con los controles Gain, Volume, Bass, Middle, Treble e ISF. Cuando el afinador está active el indicador Recall parpaderá continuadamente. 74 2. Pulsa el interruptor Bank para cambiar entre los tres bancos diferentes (verde, naranja, rojo). 3. Pulsa cualquiera de los cuatro interruptores de canal una sola vez para guardar el preajuste en la ubicación elegida. El correspondiente LED se iluminará y el nuevo preajuste estará activo. Banco Verde = Preajustes 1-4 Banco Naranja = Preajustes 5-8 Banco Rojo = Preajustes 9-12 Los controles del amplificador se pueden usar para editar un preajuste en cualquier momento del proceso. Pulsa el interruptor Manual en cualquier momento para cancelar el proceso y volver al estado anterior del amplificador. Guardar un preajuste borrará cualquier contenido que hubiese previamente en la memoria seleccionada. Los preajustes también se pueden editar a través del software Insider de Blackstar o una pedalera FS-10. Español Español El indicadir Recall muestra si hay alguna discrepancia entre el valor actual del parámetro del amplificador y la posición de los controles del panel frontal. Por ejemplo, cuando cambias de preajuste los controles no siempre reflejarán el sonido que escuches. 1. Pulsa y mantén cualquiera de los cuatro interruptores de canal. Los cuatro LEDs de canal parpadearán. Recuperando Preajustes Pulsa cualquier interruptor de canal para cargar un preajuste. Pulsar el interruptor Bank cambiará los distintos bancos. El canal se mantendrá, de modo que el correspondiente preajuste del banco actual se cargará cuando te muevas entre bancos Alternativamente, los preajustes se pueden cargar mediante el software Insider de Blackstar o un controlador externo. 75 MIDI Panel Trasero La ID:Series de amplificadores permite recuperar preajustes a través de mensajes de cambios de programa MIDI y modificar dinámicamente los valores del amplificador a través de mensajes de control MIDI. Para configurar un control MIDI, conecta la salida ‘MIDI out’ de tu controladora MIDI a la entrada ‘MIDI in’ ubicada en el panel posterior del amplificador 1. Entrada de corriente Al encenderlo por primera vez, o tras restablecer los ajustes de fábrica, el amplificador estará configurado en modo OMNI y responderá a mensajes MIDI en todos los canales MIDI. 2. Speaker Outputs NOTA: Si quieres puedes configurar el amplificador para responder a mensajes MIDI en un sólo canal MIDI. Esto es posible mediante el software Insider de Blackstar, con el que podrás especificar cuál de los 6 canales MIDI usar o volver al modo OMNI. Hay dos salidas de altavoz en paralelo para conectar pantallas externas. La impedancia mínima es de 4 Ohmios. ID:60TVP y ID:100TVP AVISO: La impedancia resultante nunca debe ser menor de 4 Ohmios (p.ej. una pantalla de 4 Ohmios ó 2 pantallas de 8 Ohmios). Si se utiliza una impedancia incorrecta el amplificador quedará dañado. Para recuperar un preajuste, la controladora MIDI se debe configurar para enviar mensajes de cambio de canal (este es el caso habitual para pedaleras). Cambiar preajustes en la controladora MIDI activará el correspondiente preajuste guardado en el amplificador. NOTA: Dos pantallas ID 412 de 4 Ohmios no se pueden usar al mismo tiempo. Modificar el valor de los Preajustes Hay dos salidas de altavoz (una para el canal izquierdo y una para el canal derecho) para conectar los altavoces internos o pantallas de altavoz externas. Muchos de los valores de los preajustes (p.ej. Gain, Volume, ISF – ver tabla de implementación MIDI en la página 100) se pueden ajustar en tiempo real mediante mensajes de cambio de control MIDI. La controladora MIDI debe estar configurada para enviar mensajes de cambio de control tal y como se especifica en la tabla de implementación MIDI. ID:260TVP Los altavoces internos están conectados directamente a estas salidas y se deberán desconectar antes de conectar ninguna pantalla externa. La impedancia mínima es de 4 Ohmios. Español Español Recuperar Preajuste Conecta aquí el cable de corriente incluido. Este cable sólo se debe conectar a una toma de corriente compatible con el voltaje, potencia y frecuencia requeridos en el panel trasero. En caso de duda pregunta a un técnico cualificado. AVISO: La impedancia resultante nunca debe ser menor de 4 Ohmios. Si se utiliza una impedancia incorrecta el amplificador quedará dañado. ID:60TVP La salida de altavoz es para su uso con el altavoz interno o pantallas externas de altavoz. El altavoz interno está conectado directamente a esta salida y se deberá desconectar antes de conectar una pantalla externa. La impedancia mínima es de 4 Ohmios. AVISO: La impedancia resultante nunca debe ser menor de 4 Ohmios. Si se utiliza una impedancia incorrecta el amplificador quedará dañado. 76 77 3. MIDI In Audio USB Si se requiere funcionalidad MIDI, conecta tu controladora MIDI aquí. Consulta la sección MIDI para más detalles. Usa siempre un cable MIDI de buena calidad. Se pueden utilizar controladores de audio estándar para conectar el amplificador a un PC ó Mac. No se requieren controladores específicos. 4. Pedal de control El amplificador aparecerá como dispositivo de grabación de audio en nuestro panel de control. Conecta uno de los pedales de control soportados aquí. Pedal de un interruptor Usa cualquier pedal con interruptor (p.ej. Blackstar FS-4) para cambiar entre los canales 1 y 2 del banco activo. Con el interruptor abierto (p.ej. LED apagado en el FS-4) el canal 1 estará activo Con el interruptor cerrado (p.ej. LED encendido en el FS-4) el canal 2 estará activo Controlador Blackstar FS-10 Este pedal multifunción te permite el acceso a todos los preajustes, efectos y programas. Controladora MIDI La funcionalidad dependerá de cada controladora. Conecta la salida de tu MP3 o reproductor de CD aquí. Ajusta el volumen del reproductor para igualar al volumen de tu guitarra de modo que puedas tocar al mismo tiempo. NOTA: Esta conexión es mono. 6. Salida emulada Esta salida emula las características tonales de una pantalla de altavoz y proporciona un tono natural para su conexión a un dispositivo de grabación o una mesa de mezclas. Para hacer un uso completo de los efectos estéreo, usa un cable jack estéreo que tenga dos salidas mono para conectar a un dispositivo de grabación o una mesa de mezclas. La salida también funcionará con un cable mono. Usa siempre un cable apantallado de buena calidad. 78 Salida emulada de altavoz con efectos estéreo Modo Re-Amping - Canal Izquierdo – salida de guitarra sin procesar - Canal Derecho – salida de guitarra con efectos Modo Re-Amping El amplificador se puede configurar en modo ‘Re-Amping’ a través del software Insider. Este es un ajuste no programable y se desactivará al desconectar el cable USB o al apagar el amplificador. Activar el modo ‘Re-Amping’ permite al amplificador procesar una señal de guitarra pregrabada a través de USB y devolver una señal totalmente procesada. Esta señal se puede capturar usando un software de grabación en el PC o Mac que estemos utilizando. Actualización de Firmware Las actualizaciones de Software se realizan mediante el software Insider de Blackstar. Se lanzará una nueva versión del software Insider de Blackstar siempre que una actualización esté disponible. Cada actualización llevará aproximadamente 60-120 segundos. Español Español 5. MP3/Line In El formato de audio USB se puede cambiar a través del software Insider de Blackstar, y se puede ajustar a uno de los siguientes: Cuando el amplificador se conecta vía USB a una versión del software Insider de Blackstar conteniendo un nuevo firmware, se mostrará un mensaje preguntando por la instalación de los últimos ficheros. Mientras se actualiza, los controles del amplificador no responderán. El LED ‘Tap’ parpadeará para indicar que hay actividad de datos durante el proceso de actualización. Subir el mando de Volumen (4) ajustará el nivel de la Salida Emulada. El volumen Master sólo afectará a la salida de altavoz. El amplificador no se debe apagar durante una actualización de firmware. Si el amplificador se apaga durante una actualización, los controles no responderán tras volver a encenderlo y el amplificador no producirá ningún sonido. El LED ‘Tap’ parpadeará para indicar que el amplificador no contiene ningún firmware válido. NOTA: Para una grabación silenciosa, ajusta el volumen Master a cero. También puedes grabar desde esta salida si no hay ningún altavoz conectado, pero asegúrate antes de que no haya ningún cable conectado a ninguna de las salidas de altavoz del panel trasero del amplificador, ya que esto podría dañar el amplificador. El amplificador se debe conectar al software Insider de Blackstar para reinstalar un firmware válido. El proceso de actualización comenzará automáticamente si el software Insider de Blackstar detecta que el amplificador no contiene un firmware válido. 79 Especificaciones técnicas ID:60TVP Potencia 60 Watios Peso (kg): 18 Dimensiones (mm): 584(W) x 485(H) x 250(D) Pedal (no incluido): FS-4 no momentáneo, controladora FS-10, pedalera MIDI ID:60TVP-H Potencia 60 Watios Peso (kg): 10.8 Dimensiones (mm): 584(W) x 236(H) x 225(D) Pedal (no incluido): FS-4 no momentáneo, controladora FS-10, pedalera MIDI Potencia 2 x 60 Watios (estéreo) Peso (kg): 24.2 Dimensiones (mm): 686(W) x 510(H) x 250(D) Español Español ID:260TVP Pedal (no incluido): FS-4 no momentáneo, controladora FS-10, pedalera MIDI ID:100TVP Potencia 100 Watios Peso (kg): 12.8 Dimensiones (mm): 686(W) x 246(H) x 225 (D) Pedal (no incluido): FS-4 no momentáneo, controladora FS-10, pedalera MIDI 80 81 Japanese Japanese 83 82 Introduction Features Blackstar IDシリーズ・ アンプリファイアをお買い上げいただき、誠にあり がとうございます。 主な特徴 この製品は、他の当社の製品同様、我々の世界的にもトップレベルの設計チ ームにより、長期間にわたる徹底した研究、調査を元に設計してあります。 英国ノーザンプトンを拠点とする、ブラックスター社は全員がミュージシャ ンとしての経験があり、ギタリストのベストパフォーマンスを実現するため の「究極のギターツール」を提供することを唯一の目的としています。 全てのブラックスター製品は、品質、とりわけサウンドクオリティにおいて 妥協せず、多くの検査機関での試験、およびロードテスト(実施テスト)を 行っています。 このIDシリーズはユニークで革新的であり、直観的に操作できる伝統的なコ ントロール、万能なプログラム機能を統合させたこれまでにない製品です。 ブラックスター製品を最大限に利用していただくために、このハンドブック を注意深くお読みください。 さらにBlackstar製品に関して興味がある場合は、我々のウエブサイトにお立 寄りください。 URL: www.blackstaramps.com ブラックスターが特許請願中のTrue Valve Power(TVP)は6つの異なったパワ ー管 EL84、6V6、EL34、KT66、6L6、KT88のレスポンスを出すことができ、真 空管特有のレスポンス、ダイナミクス、サグや歪み具合を余すところなく表 現し、本物の真空管アンプと同様のユニークな音圧を体験することができ、 これまでにないライブサウンドが楽しめます。True Valve Power - Valve と同じラウドさがそこにあるのです。 ボイス・コントロールはCLEAN WARM、CLEAN BRIGHT、CRUNCH、SUPER CRUNCH、OD1、OD2の6つの異なったセッティングができます。ブラックスター の特許であるISFと合わせて使えば、あなたの思い描いているトーンを正確に 表現することが出来ます。 エフェクト・セクションはスタジオ・クオリティの品質を持たせたモジュレ ーション、ディレイ、リバーブから構成され、サウンドと同様に記憶させる ことが出来ます。 より詳細な編集やパッチの記憶はブラックスターが提供する専用ソフトウェ ア(Blackstar Insider Software)を使って行うことが出来ます。オンライン・ コミュニティ経由でパッチの共有や、アップロード、ダウンロードが出来 ます。USBコネクター経由でアンプから直接あなたのコンピュータにレコー ディングすることが出来ます。エミュレーテット、MP3ライン・インを搭載 し、MIDI フットスイッチにも対応しています。 ユニークなボイス・コントロール、特許取得済のISF、特許請願中のTrue Valve Power(TVP)を活用すれば、IDアンプに無類の柔軟性と使い勝手の良さ が得られ、その結果としてあなたの記憶にある音をデザインし、真空管と同 じラウドなサウンドを生み出すことが出来るのです。個性はパワーなので す。 Japanese Japanese ブラックスター・チームより ブラックスターは画期的なギターアンプによって、創立から5年でシーンの先 頭に到達しました。IDシリーズは弊社が技術研究と開発に7年以上かけて完成 させた、ユニークなコントロールでギタリストが自分自身のサウンドをカス タムデザインし、保存することができるアンプです。だからこそ、ライブス テージで、このアンプの最良の働きを見せることができるのです。 All electrical and electronic products should be disposed of separately from the municipal waste stream via designated collection facilities appointed by the government or the local authorities. 84 85 Demo Mode Factory Reset アンプ購入後、またはファクトリー・リセットの後に最初にスイッチを入れ た場合、アンプはデモ・モードになっています。マニュアル・モードのよう に、アンプからのサウンドはフロントパネルのノブのポジションに合致しま す。全てのエフェクト, TVPはオフ状態です。 アンプを工場出荷時のパッチの状態にいつでも戻すことが出来ます。 全てのパッチ位置は工場出荷時のセッティングになっています。デモ・モー ドでパッチを作成し記憶させることができますが、オリジナルの工場出荷時 のパッチとセッティングはスイッチを切って再び入れるごとに再読み込みさ れます。 デモ・モードから抜け出す場合はアンプがオンの状態でMANUALボタン(22)を 押し続けてください。BANK LED (23)が赤 からオレンジ、緑に変わればデ モ・モードが解除されたことになります。BANK LEDが一巡して点灯しスイッ チ・オフになる前にMANUALボタンを解除するとアンプは再びデモ・モードに 戻ります。 アンプSWをオンにする時にMOD, DLY, REVボタンを同時に押し続けてくださ い。BANK LEDが点灯し緑からオレンジ、赤へと変わりファクトリー・リセッ トになったことを示します。 これはトータルで2秒かかります。もしBANK LEDが一巡し、スイッチ・オフす る前にMOD,DLY,REVボタンを解除してしまうと、リセットへの操作はキャンセ ルされ、アンプは元の状態に戻ります。 この操作が完了すれば、アンプは、デモ・モードに再び戻ります。 重要:この操作はあらゆるユーザー・コンテンツを上書きしてしまうのでご 注意下さい。 86 Japanese Japanese ブラックスター専用ソフト・ウェア(Blackstar Insider Software)を使用しても デモ・モードから抜け出すことができます。プログラム画面のDemo Modeラベ ルをクリックしDisableを選択して下さい。 87 Front Panel 7. Treble 1. Input 高域をコントロールします。左方向に回すとウォームなサウンドになり、右方向に回す に従って明るさが増していきます。右方向に回しきったセッティングではアグレシッブ で切れのあるサウンドになります。 楽器用シールドコードを使ってギターを接続します。 2. Voice プリアンプのボイシングとレンジをクリーンなサウンドからオーバードライ ブ・サウンドまで変化させます 。 Clean Warm – ダイナミックで上質なクリーン Clean Bright – ハードに弾くと軽く歪むブティック・トーン Crunch – 中程度のゲインを持たせたクラシックなオーバードライブ Super Crunch – さらにゲインとパンチを効かせたサウンド OD 1 – 中程度のパワーアンプ・ダンピングを持つホットロッドなオーバードライブ OD 2 – よりミッドレンジを強化させたホットロッドなオーバードライブ 8. ISF ISFはベース、ミドル、トレブルと連動して働き、独自 の音色が選べます。左方向に回すとタイトなボトムエン ドとアグレッシブなミドルのモダンなアメリカンサウン ド、右方向に回すと、より箱鳴り感のあるブリティッシ ュサウンドになります。 USA UK パッチをストアするとセッティングが保存されます 従来のコンツアーやパラメトリックEQと異なり、ベー ス、ミドル、トレブルのコントロールはトラディショナ ルなアンプのように効果的に働きます。そのため音楽的 に使える効果があります。 3. Gain パッチをストアするとセッティングが保存されます。 オーバードライブやディストーションをコントロールします。 9. TVP (True Valve Power) Selector 左方向に回すとエッジの効いたクリーンなサウンドで、右方向に回すに従い、ドライ ブさが増したクランチなトーンになり、回しきったポジションでフルにディストーシ ョンの効いたトーンになります。 ブラックスターが特許出願中のTrue Valve Power(TVP)は6つの異なったパワー管 EL84 、6V6、EL34、KT66、6L6、KT88のレスポンスを再現します。つまり真空管特有のレス ポンス、ダイナミクス、サグのフィーリングや歪み具合を余すところなく表現し、本 物の真空管アンプと同じような音圧を体験することができます。TVPを活用してこれま でにないライブサウンドが楽しめます。True Valve Power - まさに真空管と同じラ ウド感を発揮します。 パッチをストアするとセッティングが保存されます。 4. Volume プリアンプの音量を調節します。右方向に回すに従い音量が大きくなります。ポジショ ンを高いレベルにすると真空管特有のパワー、ディストーション、コンプレッションが 現れます。この効果はTVPの設定によってそれぞれ変わってきます。 パッチをストアするとセッティングが保存されます。 5. Bass 低域をコントロールします。このアンプは進歩したトーンシェイプ回路搭載により左方 向に回すとタイトな切れ味良いサウンド、右方向に回すと暖かみのあるどっしりとした トーンになります。 TVPはサウンド・キャラクターにコンプレッションを効かせたり、柔らかい音色からダ イナミックで締まった音色にまでに自由に変化させることが可能です。 EL84 コンプレッションを効かせたベルの様なフルボディClass Aサウンド 6V6 コンプレッションを効かせた高域とタイトな中域のクリスピーなClass Aサウンド EL34 フルボディでソフトな歪み具合のクラシックなブリティッシュClass A/Bサウンド KT66 ホットにバイアスされリッチで暖かいビンテージ・ブリティッシュ・サウンド 6L6 高域と低域を拡げたタイトでダイナミックなClass A/Bサウンド KT88 低域を強化したタイトで太くダイナミックなClass A/Bサウンド Japanese Japanese パッチをストアするとセッティングが保存されます。 パッチをストアするとセッティングが保存されます。 6. Middle ミドルレンジをコントロールします。ミドルレンジは特に音色を決定する重要なコント ロールです。コントロールを左方向に回すとサウンドはアグレッシブになり、リズムプ レーなどに最適です。コントロールを右方向に回すに従いボディ感が強調され、サステ インのあるリードギターに最適のトーンになります。 パッチをストアするとセッティングが保存されます。 88 例:EL84からKT88に設定を変更するとコンプレッションとオーバードライブの量が減 少します。さらに2つのクリーンサウンドのいずれかを選択すればコンプレッションと オーバードライブがGAINコントロールを操作することによって変化することが分かる でしょう。 パッチをストアするとセッティングが保存されます。 10. TVP (True Valve Power) Switch ボタンを押してTVPのオン/オフを切り替えます。ボタン内のLEDが点灯しTVPがオンに なったことを示します。LEDが消えている場合TVPは作動せずTVPセレクターは機能しま せん。 89 パッチをストアするとセッティングが保存されます。 パッチをストアするとセッティングが保存されます。 注意:TVPをオフにした場合、パワーアンプはリニア・レスポンス(デジタルアンプ) となりTVPが作り出す真空管特有のサグ、コンプレッション、パワー感を得ることはで きません。 15. Effect Level Effects 3種12タイプのスタジオ・クオリティのエフェクトを搭載しています。 MODとDLYに限ってはTAP ボタン(16)を押しながらLEVELコントロールを回すことによって rate/timeを変更することができます。変更出来るパラメータについては下記表を参照くだ さい。 11. MOD (Modulation) パッチをストアするとセッティングが保存されます。 モジュレーションのオン/オフ/エフェクト編集の切替スイッチです。 パッチをストアするとセッティングが保存されます。 16. Tap エフェクト・パラメータを変更します。 選択しているエフェクトのrate/timeを変更します。ボタンをタップする間隔でrate/ timeをセットします。 12. DLY (Delay) ディレイのオン/オフ/エフェクト編集の切替スイッチです。 パッチをストアするとセッティングが保存されます。 セットするとセットしたrate/timeでLEDが点滅します。 変更出来るパラメータについては下記表を参照ください。 13. REV (Reverb) リバーブのオン/オフ/エフェクト編集の切替スイッチです。 パッチをストアするとセッティングが保存されます。 3つのEffect スイッチの点灯するLEDの色によってEffect の状態を確認することがで きます。 Effects Table エフェクト TYPEノブ・パラメータ LEVELノブ・パラメータ TAPスイッチ・ パラメータ 1.フェイザー ミックス デプス スピード 2.フランジャー フィードバック デプス スピード 3.コーラス ミックス デプス スピード 4.トレモロ フリケンシー モジュレーション・デプス スピード 1.リニア フィードバック ディレイ・レベル タイム 2.アナログ フィードバック ディレイ・レベル タイム 3.テープ フィードバック ディレイ・レベル タイム 4.マルチ フィードバック ディレイ・レベル タイム 1.ルーム サイズ リバーブ・レベル - 2.ホール サイズ リバーブ・レベル - 3.スプリング サイズ リバーブ・レベル - 4.プレート サイズ リバーブ・レベル - MODULATION LED 状態 内容 消灯 エフェクト・オフ エフェクトは作動していません。 赤 エフェクト・オン。 編集は不可。 エフェクトは作動しますが、フロントパネル のEFFECTコントロールの影響を受けません。 エフェクト・オン。 編集可能 (14,15,16参照) エフェクトは作動し、フロントパネルの EFFECTコントロール位置の影響を受けます。 Effectスイッチを押すたびにエフェクトの状態が以下の順番で切り替わります。 エフェクト・オフ エフェクト・オン。 編集は不可(赤)) エフェクト・オン。 編集可能(緑) エフェクトがオンになりエフェクト効果がかかります。 前に設定したエ フェクト数値が反映されます。 引き続きエフェクトはオンの状態でエフェクト・パラメータの編集がで きます(14, 15, 16参照)。 エフェクト・オフになります。 他のエフェクトがオンであれば、そのエ フェクトがかかります。 一度に編集できるのは、1つのエフェクトだけです。 14. Effect Type 選択しているエフェクト (MOD, DLY, REV)のエフェクトの種類の変更と、パラメータの 編集をします。 DELAY REVERB Japanese Japanese 緑 パッチをストアするとセッティングが保存されます。 それぞれのセグメント内に異なったエフェクトを4タイプ備えています。 作動中のエフェクトにはLEDが点灯します。セグメント内でエフェクトのパラメータの 変更が出来ます。変更出来るパラメータについては下記表を参照ください。 90 91 Master チューナー・モード 17. Resonance MANUAL ボタンを3秒以上押し続けると内蔵のチューナーが作動します。リコール・イン ジケータ LED(28)が点滅しアンプがチューナー・モードに入ったことを知らせます。工 場出荷時の状態ではチューナー・モードでは出力はミュートされます。 RESONANCEは低音域全体をコントロールします。左方向に回すとクリーンサウンドはタ イトでファンキーになりオーバードライブサウンドではベースレスポンスに効果があり ます。右方向に回すとクリーンサウンドはウォームなサウンドになり、クランチやオー バードライブサウンドはよりヘビーで箱鳴り感が増します。 • 使用する環境に応じてセットするため、設定は保存できません。 18. Presence PRESENCEは高域全体をコントロールします。クリーンサウンドでパーカッシブなハイ エンドを強調し、クランチ/オーバードライブサウンドではアグレッシブなトレブルを コントロールします。 MANUAL, BANK, CHANNELのLEDが最も近い音程を弾くと点灯して知らせます。 Bank LED 1弦、6弦 (工場出荷時はE, low/highです) CH1 LED 2 弦 CH2 LED 3 弦 CH3 LED 4 弦 CH4 LED 5 弦 • 使用する環境に応じてセットするため、設定は保存できません。 19. Master Volume アンプから出る音量を調整します。 • 使用する環境に応じてセットするため、設定は保存できません。 MOD, DLY, REV LEDが弾いた音程がどれぐらい近いかを点灯して知らせます。 MOD LED 赤 音程がシャープ (音程が高い) DLY LED 緑 音程が合っている状態 REV LED 赤 音程がフラット (音程が低い) 20. Power Switch アンプON/OFFを切り替えるスイッチです。 チューナー・モードではフロントパネルの他のLEDはオフになります。 注意:デモ・モードで電源OFFにし、再びONにすると工場出荷時のセッティングに戻り ます。デモ・モードではない場合、バックアップが行われた時の状態になります。 フロントパネルのあらゆるボタン、または接続した、あらゆるフットスイッチのボタン を押すとチューナー・モードから抜け出します。 21. USB Widows PCやMacからのUSBケーブルをここに接続できます。 Bank 1 2 Bank 2 3 詳しくは、Page 98 (ハンドブック後半)に記載するUSB Audio の項目をご覧ください。 Bank 3 1 注意:このアンプはレコーディング・ソフト内のオーディオ・キャプチャー・デバイス としてパーソナル・コンピュータの画面に現れます。 緑のLEDでBANK 1, オレンジのLEDでBANK 2, 赤のLEDでBANK 3を示します。 22. Manual このスイッチを押してマニュアル・モードと現在選択しているパッチの切り替えを行い ます。 マニュアル・モードではサウンドは現在のノブ位置に反映されます。これは Voice、Gain、Volume、Bass、Middle、 Treble、 ISFとTVPに適用されます。TVPのON/ OFF状況は切り替える前のパッチの状態が引き継がれます。あらゆるエフェクト はマニ ュアル・モードに切り替えるとOFFになります。 マニュアル・モードでは全てのコントロールは外部機器(ブラックスター専用ソフトウ ェア(Blackstar Insider Software)、フットスイッチ、MIDIコントローラ)でも変更で きますが、この場合サウンドはフロントパネルのノブ位置に左右されません。 92 このボタン使用し、以下の3つのBANK切替を行います。 注意:最初の3つのBANKだけがフロントパネルから選択できます。外部コントローラ( 例 Blackstar Insider Software, フットコントローラ)からBANK 4またはそれ以上 のBANKを作動させると、BANK LEDは点灯しませんがCH LEDはパッチの位置を示し続けま す。 Japanese Japanese ブラックスター専用ソフトウェア(Blackstar Insider Software)をブラックスター・ウ ェブサイトからダウンロードでき、多くの機能を楽しむことが出来ます。 23. Bank 例: パッチ11では BANK LEDは赤く点灯し、CH 3 LEDが点灯します。 外部コントローラーでバンク15を選択すると、パッチ15を選択します。 - その場合 バンクLEDが消灯しチャンネル3が点灯します。 マニュアル・モードではBANK LEDは点灯しません チャンネル番号は記憶されますので、BANKをスクロールすると選択したBANK内で相当す るパッチが選択されます。 93 24 – 27. Channels 1-4 使用するパッチのCHボタンを押します。 CH 1を選択した場合、現在のBANK内にある最初のパッチが作動します。 BANKボタンを押して緑 -オレンジ-赤の色を切り替え、BANKを決定します。 CH 2を選択した場合、現在のBANK内にある2番目のパッチが 作動します。 CH 3を選択した場合、現在のBANK内にある3番目のパッチが作動します。 CH 4を選択した場合、現在のBANK内にある4番目のパッチが作動します。 パッチはブラックスター専用ソフトウェア(Blackstar Insider Software)あるいは接 続されたフットスイッチでも呼び出すことができます。 28. Recall Indicator MIDI リコール・インジケータは現在のパラメータとフロントパネルのノブ位置との間に差異 があるかどうかを知らせます。例えば、異なったパッチへ変更すると、フロントパネル のコントロールノブは必ずしも実際に聞こえているセッティングを反映しません。 調整する際の極端なレベル変更を避けるため、フロントパネルのノブが現在のパラメー タの位置になるまで操作はサウンドに反映されません。ノブがその位置になるとリコー ル・インジケータは2回点滅して、ノブのコントロールが有効となり効果のコントロー ルが出来るようになります。 現在のパッチに保存されているコントロールの値を通過するたびにリコール・インジケ ータが2回点滅しますので、記憶している値を簡単に確認することができます。 IDシリーズアンプはパッチをMIDI プログラム・チェンジ・メッセージで呼び出せ、ア ンプのコントロール・パラメータの変更も可能です。 MIDIコントロールを設定するには、MIDIコントローラのMIDI OUTとアンプ・リアパネル のMIDI INとを接続します。 この段階、あるいはファクトリー・リセットの後ではアンプはOMNI モードにセットされ ており、全てのMIDIチャンネルのMIDIメッセージに対して反応します。 リコールはGain、Volume、Bass、Middle、TrebleとISFに対して働きます。 注意:シングルMIDIチャンネルのMIDIメッセージに対して反応するようにアンプをセッ トしたい場合は、ブラックスター専用ソフトウェアを使用して、16のMIDIチャンネルを 指定するか、アンプがONMIモードに戻るように設定して下さい。 チューナー が作動している時もリコール・インジケータは継続して点滅します。 MIDIコントローラによるパッチの呼び出し プログラムに関して 現在のサウンドをパッチに記憶させる場合、 MIDIコントローラでパッチの呼び出しをするには、MIDIコントローラがプログラム・チ ェンジ・メッセージを送信するように設定してください。(フットコントローラにおい ては通常のケースです。) 1. パッチ・バリューの変更 4つのCHボタンのいずれかを1秒押し続けると、全てのCH LEDが点滅を始めます。 2. BANKボタンを押して3つのBANK (緑、オレンジ、赤)を切り替え、保存先のBANKを選 択します。 3. パッチの保存先を選択するため、保存するCHボタンを選択し押します。 選択したBANKのLEDの色が点灯し、新しいパッチが作動します。 GREEN BANK = パッチ1-4 ORANGE BANK = パッチ 5-8 多くのパッチ・バリュー(GAIN、 VOLUME、ISF – 下記チャートも参照ください)はMIDI コントロール・チェンジ・メッセージを経由してリアルタイムで調整可能です。MIDIコ ントローラを下記チャートにあるコントロール・チェンジ・メッセージを送るようにセ ットして下さい。 Japanese Japanese CHはそのままで、現在のBANKで呼応するパッチを読み込みます。 RED BANK = パッチ9-12 アンプのコントロールは記憶させる過程であれば、どの段階でもパッチを編集するこ とが出来ます。 記憶させる過程をキャンセルするにはMANUALボタンを押してください。 アンプは前の段階に戻ります。 パッチを記憶させると、同じ場所に入っていた情報は上書きされます。 パッチはブラックスター専用ソフトウェア(Blackstar Insider Software)やブラック スター FS-10フットコントローラでも保存することが出来ます。 パッチの呼び出し 94 95 Rear Panel 4. Footswitch 1. Mains Input 付属の電源コードを接続する端子です。電源コードを差し込む前に、リア・パネルに記 載されている電圧や周波数が日本国内で使用する基準に適しているかを確認してくださ い。不明な場合は、アフターサービスまでお問い合わせください。 2. Speaker Outputs ID:60TVP, ID:100TVP 外部スピーカーキャビネット用で2つのパラレルの端子があります。最少接続負荷は4 Ohmsです。 警告:接続するスピーカーは必ず合計インピーダンスが4 Ohms以上になる組み合わせで ご使用ください。(例:1 台で4 Ohmsのキャビネット、または2台で8 Ohmsのキャビネ ット)。 1ボタンフットスイッチ 1ボタンのラッチ式フットスイッチ(例:FS-4)を接続し、フロントパネルで選択した BANKのCH 1とCH2を切り替えることが出来ます。 ラッチオフ(例 FS-4のLEDが消灯の場合)CH 1が作動。 ラッチオン(例 FS-4のLEDが点灯の場合)CH 2が作動 ブラックスター FS-10フットコントローラ マルチ機能を持たせたフットスイッチで、全パッチへのアクセスが可能で、エフェクト 切替、パッチ切替が行えます。 MIDIフットコントローラ お手持ちのフットコントローラーで機能が決定されます。 誤ったインピーダンスの組み合わせでスピーカーを接続した場合、アンプの故障の原因 となりますのでご注意ください。 5. MP3/Line In 注意:ID412 4 Ohmsキャビネットを2台組み合わせてのご使用はできません。 MP3/CDプレーヤーなどの外部音源を接続する端子です。外部音源の音量は外部機器側で 調節してください。 ID:260TVP 注意:モノラル接続です。 2つの端子(1 x left channel, 1 x right channel)があります。これらは内蔵スピ ーカー用または外部キャビネット用です。 6. Emulated Output 内蔵スピーカーはこれら端子に直接つながっています。最少接続負荷は4 Ohmsです。 警告:接続するスピーカーは必ず合計インピーダンスが4 Ohms以上になる組み合わせで ご使用ください。(例:1 台で4 Ohmsのキャビネット、または2台で8 Ohmsのキャビネ ット)。 誤ったインピーダンスの組み合わせでスピーカーを接続した場合、アンプの故障の原因 となりますのでご注意ください。 ID:60TVP 内蔵スピーカー用または外部キャビネット用に1つの端子があります。 この端子からは、ギターアンプのスピーカーやキャビネットサウンドをシミュレーショ ンした回路を通ったサウンドが出力されます。録音機器やミキサーに直接接続する場合 に使用します。 ステレオ効果をご利用する場合は、ミキサーや録音機器の2つのチャンネルに接続する ためにステレオY字ケーブルをご使用ください(図参照)。 この端子はモノラル・ギター用ケーブルにも対応しています。 高品質ケーブルのご使用を推奨します。 VOLUME (4)でEMULATED OUTの出力を調整します。MASTER VOLUMEは接続されたスピーカ ー・キャビネットのみに作用します。 内蔵スピーカーはこれら端子に直接つながっています。 最少接続負荷は4 Ohmsです。 注意:サイレント状態でレコーディングする場合、MASTER VOLUMEをゼロにセットしま す。 警告:接続するスピーカーは必ず合計インピーダンスが4 Ohms以上になる組み合わせで ご使用ください。(例:1 台で4 Ohmsのキャビネット、または2台で8 Ohmsのキャビネ ット)。 スピーカーを接続せずにEMULATED OUTからレコーディングすることも可能です。 誤ったインピーダンスの組み合わせでスピーカーを接続した場合、アンプの故障の原因 となりますのでご注意ください。 Japanese Japanese 以下のサポートしているフットスイッチをここに接続して下さい。 まず、アンプのスピーカー端子に何も接続されていないことを確認して下さい。 保護回路に負担がかかり故障の原因になります。 3. MIDI In MIDIを使用する場合はここにMIDI機器を接続して下さい。詳しくはMIDIの項目を参照下 さい。常に良質のMIDIケーブルを使いましょう。 96 97 USB Audio 標準的なオーディオ・ドライバーをPCやMacと接続する場合に使用します。 Technical Specification 特定のドライバーは要求されません。 アンプはレコーディング・ソフト内のオーディオ・キャプチャーとして認識されます。 ID:60TVP オーディオ・フォーマットは Blackstar Insider Softwareを通して変更でき、2つのタ イプから選べます。 Power: 60 Watts スピーカーエミュレイテッド・ステレオエフェクト・オーディオ・チャンネル Weight (kg): 18 2 x モノラル・オーディオ・チャンネル Dimensions (mm): 584(W) x 485(H) x 250(D) - 左チャンネル – エフェクトされたアンプからの信号 - 右チャンネル – 未加工のギター・シグナル Footswitch (not supplied): FS-4 latching footswitch, FS-10 footcontroller, MIDI footcontroller リアンプ・モード リアンプ ID:60TVP-H Blackstar Insider Software を経由してアンプはリアンプ・モードにスイッチできま す。 Power: 60 Watts これはプログラムできないセッティングで、USBケーブルを抜くかアンプ本体のスイッ チをオフにした時に、スイッチがオフになります。 Footswitch (not supplied): FS-4 latching footswitch, FS-10 footcontroller, MIDI footcontroller さらにアンプで加工した信号を送り返すことができます。この戻されたデータは接続 されたPCやMacで使用しているレコーディング・ソフトでキャプチャーすることが出来 ます。 ID:260TVP ファームウェアのアップデート Power: 2 x 60 Watts (Stereo) アンプをUSBに接続し旧バージョンのファームウェアと認識されると、最新ファイルを インストールするようメッセージがディスプレイされます。アップデート中、アンプ のコントロールはできません。アップデートの作業中はTAP LEDが点滅します。 Weight (kg): 24.2 Dimensions (mm): 686(W) x 510(H) x 250(D) Footswitch (not supplied): FS-4 latching footswitch, FS-10 footcontroller, MIDI footcontroller ファームウェア・アップデート中はアンプの電源スイッチを切らないでください。 ID:100TVP アップデートの間にアンプの電源がオフになると、再び電源をオンにしてもコントロー ルは効かずアンプから音は出ません。TAP LEDが点滅した場合は、アンプに有効なファー ムウェアが搭載されていないことを示します。 Power: 100 Watts 有効なファームウェアを入手するためにはアンプをブラックスター専用ソフトウェアに 接続しなければなりません。 もしブラックスター専用ソフトウェアがアンプの状態を感知すれば必要に応じて自動的 にアップデートを開始します。 Japanese Japanese Dimensions (mm): 584(W) x 236(H) x 225(D) リアンプ・ モードにした場合、アンプはUSBを経由してパソコンにプリレコードされた ギターのドライ・モノラル信号を受け入れることが出来ます。 ブラックスター専用ソフトウェア(Blackstar Insider Software)を通して、ファームウ ェアのアップデートが行なえます。アップデートに要する時間はおおよそ60-120秒で す。 98 Weight (kg): 10.8 Weight (kg): 12.8 Dimensions (mm): 686(W) x 246(H) x 225 (D) Footswitch (not supplied): FS-4 latching footswitch, FS-10 footcontroller, MIDI footcontroller 99 English Deutsch Français Français Español Español Deutsch Japanese Japanese English 100 Manufacturer: Blackstar Amplification Date: 11-07-12 Model: ID:Series Version: +---------------------+-----------------+----------------+---------------------+-----------------+ : Function ... : Transmitted : Recognized : Remarks : Value : : : : : : : +---------------------+-----------------+----------------+---------------------+-----------------+ :Basic Default : No : YES : Incoming message : 1-6 : :Channel : : : channel. : : : : : : Receiving messages : : : : : : on ALL channels can : : : : : : be set via the GUI : : : +------------+-----------------+----------------+---------------------+-----------------: : Changed : No : No : : : +---------------------+-----------------+----------------+---------------------:-----------------+ :Mode Default : NO : NO : : : : Messages : NO : NO : : : : Altered : NO : NO : : : +---------------------+-----------------+----------------+---------------------:-----------------+ :Note : : : : : :Number True Voice : NO : NO : : : +---------------------+-----------------+----------------+---------------------:-----------------+ :Velocity Note On : NO : NO : : : : Note Off : NO : NO : : : +---------------------+-----------------+----------------+---------------------:-----------------+ :After : : : : : :Touch Keys : NO : NO : : : : Channels : NO : NO : : : +---------------------+-----------------+----------------+---------------------:-----------------+ :Pitch Bender : NO : NO : : : +---------------------+-----------------+----------------+---------------------:-----------------+ :Control : 5 : NO : YES : Voice : 0-5 : :Changes : 6 : NO : YES : Gain : 0-127 : : : 7 : NO : YES : Volume : 0-127 : : : 8 : NO : YES : Bass : 0-127 : : : 9 : NO : YES : Mid : 0-127 : : : 10 : NO : YES : Treble : 0-127 : : : 11 : NO : YES : ISF : 0-127 : : : 12 : NO : YES : TVP : 0-5 : : : 13 : NO : YES : Modulation Effect : 0-3 : : : : : : Select : : : : 14 : NO : YES : Modulation Adjust 1 : 0-127 : : : 15 : NO : YES : Modulation Adjust 2 : 0-127 : : : 16 : NO : YES : Modulation Level : 0-127 : : : 17 : NO : YES : Modulation Rate : 0-127 : : : 18 : NO : YES : Delay Effect Select : 0-3 : : : 19 : NO : YES : Delay Adjust 1 : 0-127 : : : 20 : NO : YES : Delay Adjust 2 : 0-127 : : : 21 : NO : YES : Delay Level : 0-127 : : : 22 : NO : YES : Reverb Effect Select: 0-3 : : : 23 : NO : YES : Reverb Adjust 1 : 0-127 : : : 24 : NO : YES : Reverb Adjust 2 : 0-127 : : : 25 : NO : YES : Reverb Level : 0-127 : : : 26 : NO : YES : Resonance : 0-127 : : : 27 : NO : YES : Presence : 0-127 : : : 64 : NO : YES : Modulation On/Off : 0-63 = OFF : : : : : : : 64-127 = ON : : : 65 : NO : YES : Delay On/Off : 0-63 = OFF : : : : : : : 64-127 = ON : : : 66 : NO : YES : Reverb On/Off : 0-63 = OFF : : : : : : : 64-127 = ON : : : 67 : NO : YES : TVP On/Off : 0-63 = OFF : : : : : : : 64-127 = ON : : : 68 : NO : YES : Delay Tap : DATA IGNORED : : : : : : Duration : (Incoming : : : : : : : message used : : : : : : : as the trigger) : : : 199 : NO : YES : Save Current Patch : DATA IGNORED : : : : : : : (Incoming : : : : : : : message used : : : : : : : as the trigger) : +---------------------+-----------------+----------------+---------------------+-----------------+ :Program : : : : : :Change True# : NO : YES : Patch to recal : : : : : : (Patch # 1-128) : 0-127 : +---------------------+-----------------+----------------+---------------------+-----------------+ :System Exclusive : NO : NO : : : +---------------------+-----------------+----------------+---------------------+-----------------+ :System Song Pos. : NO : NO : : : :Common Song Sel. : NO : NO : : : : Tune : NO : NO : : : +---------------------+-----------------+----------------+---------------------+-----------------+ :System Clock : NO : NO : : : :Real Commands : NO : NO : : : :Time : : : : : +---------------------+-----------------+----------------+---------------------:-----------------+ :AUX Local : NO : NO : : : :Messages ON/OFF : : : : : : : : : : : as the trigger) : : : 199 : NO : YES : Save Current Patch : DATA IGNORED : : : : : : : (Incoming : : : : : : : message used : : : : : : : as the trigger) : +---------------------+-----------------+----------------+---------------------+-----------------+ :Program : : : : : :Change True# : NO : YES : Patch to recal : : : : : : (Patch # 1-128) : 0-127 : +---------------------+-----------------+----------------+---------------------+-----------------+ :System Exclusive : NO : NO : : : +---------------------+-----------------+----------------+---------------------+-----------------+ :System Song Pos. : NO : NO : : : :Common Song Sel. : NO : NO : : : : Tune : NO : NO : : : +---------------------+-----------------+----------------+---------------------+-----------------+ :System Clock : NO : NO : : : :Real Commands : NO : NO : : : :Time : : : : : +---------------------+-----------------+----------------+---------------------:-----------------+ :AUX Local : NO : NO : : : :Messages ON/OFF : : : : : : All Notes : NO : NO : : : : Off : : : : : : Active Sense : NO : NO : : : : Reset : NO : NO : : : +---------------------+-----------------+----------------+---------------------+-----------------+ 101 English English Français GAIN VOLUME EQUALISATION OD 1 KT66 CRUNCH EL34 CLEAN BRIGHT CLEAN WARM 0 10 LEVEL USB 0 10 0 LEVEL MANUAL 0 10 BASS BANK 10 0 MIDDLE CH 1 10 0 TREBLE CH 2 10 POWER 1 3 CH 3 6V6 REV 4 EL84 ISF CH 4 MASTER 2 DLY TYPE TVP 0 10 LEVEL 0 10 RESONANCE 0 10 PRESENCE 0 10 VOLUME ON TAP Español ID:60TVP Rear Panel INSIDE. REFER SERVICING TO QUALIFIED SERVICE PERSONNEL. MAINS INPUT ATTENTION!: POUR EVITER LES RISQUES DE DECHARGES ELECTRIQUES, NE PAS OUVRIR LE COUVERCLE. CET APPAREIL NE COMPORTE AUCUNE PIECE SUSCEPTIBLE D’ETRE REPAREE PAR VOS SOINS. FAITES TOUJOURS APPEL A UN TECHNICIEN QUALIFIE POUR TOUTE REPARATION. WARNING!: SHOCK HAZARD. DO NOT OPEN. TO REDUCE THE RISK OF FIRE OR ELECTRIC SHOCK DO NOT EXPOSE THIS EQUIPMENT TO RAIN OR MOISTURE. THIS APPARATUS MUST BE EARTHED. AVIS!: RISQUE DE CHOC ELECTRIQUE. NE PAS OUVRIR. POUR EVITER LES RISQUES D’INCENDIE ET DE DECHARGES ELECTRIQUES, N’EXPOSEZ JAMAIS CET APPAREIL A L’HUMIDITE OU A LA PLUIE. CONNECTER CET APPAREIL A LA TERRE. FUSE 230V/240V - T630mAL 250V 100V/120V - T1.6AL 250V 220V-230~50/60Hz 85 WATTS WARNING!: RISK OF HAZARDOUS ENERGY AVIS!: ENERGIE ELECTRIQUE DANGEREUSE! CONNECT SPEAKERS BEFORE USE SPEAKER OUTPUT MIDI IN FOOTSWITCH MP3 / LINE IN EMULATED OUTPUT Designed and Engineered by Blackstar Amplification Ltd Northampton, England OUTPUT: 60 WATTS RMS 4 OHM MINIMUM CLASS 2 WIRING WARNING!: DO NOT OBSTRUCT VENTILATION GRILLES ATTENTION!: NE PAS OBSTRUER LES GRILLES DE VENTILATION Made under license in China This device complies with Part 15 of the FCC Rules. Operation is subject to the following two conditions: (1) this device may not cause harmful interference, and (2) this device must accept any interference received, including interference that may cause undesired operation. MODEL: ID:60TVP Japanese Japanese EFFECTS MOD 6L6 SUPER CRUNCH CAUTION!: TO REDUCE THE RISK OF ELECTRIC SHOCK DO NOT REMOVE COVER. NO USER SERVICEABLE PARTS 102 TVP KT88 OD 2 Français Español VOICE INPUT Deutsch Deutsch ID:60TVP Front Panel This Class B digital apparatus complies with Canadian ICES-003. Cet appareil numérique de la classe B estconforme à la norme NMB-003 du Canada. 103 English English Français GAIN VOLUME EQUALISATION OD 1 KT66 CRUNCH EL34 POWER 1 3 DLY CLEAN BRIGHT CLEAN WARM 0 10 0 LEVEL USB 10 0 LEVEL MANUAL 0 10 BASS BANK 10 0 MIDDLE CH 1 10 TREBLE CH 2 0 10 6V6 CH 3 REV 4 EL84 ISF CH 4 MASTER 2 TYPE TVP 0 10 LEVEL 0 10 RESONANCE 0 10 PRESENCE 0 10 VOLUME ON TAP Español ID:60TVP-H Head Rear Panel MAINS INPUT ATTENTION!: POUR EVITER LES RISQUES DE DECHARGES ELECTRIQUES, NE PAS OUVRIR LE COUVERCLE. CET APPAREIL NE COMPORTE AUCUNE PIECE SUSCEPTIBLE D’ETRE REPAREE PAR VOS SOINS. FAITES TOUJOURS APPEL A UN TECHNICIEN QUALIFIE POUR TOUTE REPARATION. WARNING!: SHOCK HAZARD. DO NOT OPEN. TO REDUCE THE RISK OF FIRE OR ELECTRIC SHOCK DO NOT EXPOSE THIS EQUIPMENT TO RAIN OR MOISTURE. THIS APPARATUS MUST BE EARTHED. AVIS!: RISQUE DE CHOC ELECTRIQUE. NE PAS OUVRIR. POUR EVITER LES RISQUES D’INCENDIE ET DE DECHARGES ELECTRIQUES, N’EXPOSEZ JAMAIS CET APPAREIL A L’HUMIDITE OU A LA PLUIE. CONNECTER CET APPAREIL A LA TERRE. FUSE 230V/240V - T630mAL 250V 100V/120V - T1.6AL 250V 220V-230~50/60Hz 85 WATTS WARNING!: RISK OF HAZARDOUS ENERGY AVIS!: ENERGIE ELECTRIQUE DANGEREUSE! CONNECT SPEAKERS BEFORE USE SPEAKER OUTPUTS OUTPUT: 60 WATTS RMS CLASS 2 WIRING WARNING!: DO NOT OBSTRUCT VENTILATION GRILLES ATTENTION!: NE PAS OBSTRUER LES GRILLES DE VENTILATION MIDI IN FOOTSWITCH MP3 / LINE IN EMULATED OUTPUT Designed and Engineered by Blackstar Amplification Ltd Northampton, England Made under license in China This device complies with Part 15 of the FCC Rules. Operation is subject to the following two conditions: (1) this device may not cause harmful interference, and (2) this device must accept any interference received, including interference that may cause undesired operation. MODEL: ID:60TVP-H Japanese Japanese EFFECTS MOD 6L6 SUPER CRUNCH CAUTION!: TO REDUCE THE RISK OF ELECTRIC SHOCK DO NOT REMOVE COVER. NO USER SERVICEABLE PARTS INSIDE. REFER SERVICING TO QUALIFIED SERVICE PERSONNEL. 104 TVP KT88 OD 2 Français Español VOICE INPUT Deutsch Deutsch ID:60TVP-H Head Front Panel This Class B digital apparatus complies with Canadian ICES-003. Cet appareil numérique de la classe B estconforme à la norme NMB-003 du Canada. 105 English English VOICE INPUT GAIN EQUALISATION TVP KT88 SUPER CRUNCH KT66 CRUNCH EL34 10 LEVEL 0 10 0 LEVEL MANUAL 0 10 BASS BANK 10 0 MIDDLE CH 1 10 TREBLE CH 2 0 10 6V6 3 CH 3 REV 4 EL84 ISF CH 4 TYPE TVP 0 0 10 LEVEL 10 RESONANCE 0 10 PRESENCE 0 10 VOLUME ON TAP Español ID:260TVP Combo Rear Panel WARNING!: RISK OF HAZARDOUS ENERGY AVIS!: ENERGIE ELECTRIQUE DANGEREUSE! Designed and Engineered by Blackstar Amplification Ltd Northampton, England Made under license in China FUSE 230V/240V - T1.25AL 250V 100V/120V - T3.15AL 250V 220V-230V~50/60Hz 160 WATTS CONNECT SPEAKERS BEFORE USE OUTPUT: 60 WATTS RMS 4 OHM MINIMUM CLASS 2 WIRING SPEAKER OUTPUT CONNECT SPEAKERS BEFORE USE SPEAKER OUTPUT OUTPUT: 60 WATTS RMS 4 OHM MINIMUM CLASS 2 WIRING WARNING!: DO NOT OBSTRUCT VENTILATION GRILLES ATTENTION!: NE PAS OBSTRUER LES GRILLES DE VENTILATION WARNING!: SHOCK HAZARD. DO NOT OPEN. TO REDUCE THE RISK OF FIRE OR ELECTRIC SHOCK DO NOT EXPOSE THIS EQUIPMENT TO RAIN OR MOISTURE. THIS APPARATUS MUST BE EARTHED. AVIS!: RISQUE DE CHOC ELECTRIQUE. NE PAS OUVRIR. POUR EVITER LES RISQUES D’INCENDIE ET DE DECHARGES ELECTRIQUES, N’EXPOSEZ JAMAIS CET APPAREIL A L’HUMIDITE OU A LA PLUIE. CONNECTER CET APPAREIL A LA TERRE. MODEL: ID:260TVP MIDI IN FOOTSWITCH MP3 / LINE IN EMULATED OUTPUT CAUTION!: TO REDUCE THE RISK OF ELECTRIC SHOCK DO NOT REMOVE COVER. NO USER SERVICEABLE PARTS INSIDE. REFER SERVICING TO QUALIFIED SERVICE PERSONNEL. ATTENTION!: POUR EVITER LES RISQUES DE DECHARGES ELECTRIQUES, NE PAS OUVRIR LE COUVERCLE. CET APPAREIL NE COMPORTE AUCUNE PIECE SUSCEPTIBLE D’ETRE REPAREE PAR VOS SOINS. FAITES TOUJOURS APPEL A UN TECHNICIEN QUALIFIE POUR TOUTE REPARATION. This device complies with Part 15 of the FCC Rules. Operation is subject to the following two conditions: (1) this device may not cause harmful interference, and (2) this device must accept any interference received, including interference that may cause undesired operation. This Class B digital apparatus complies with Canadian ICES-003. Cet appareil numérique de la classe B estconforme à la norme NMB-003 du Canada. Japanese Japanese POWER 1 Français Français 0 MASTER 2 DLY USB MAINS INPUT 106 EFFECTS MOD 6L6 CLEAN BRIGHT CLEAN WARM Español VOLUME OD 2 OD 1 Deutsch Deutsch ID:260TVP Combo Front Panel 107 English English VOICE INPUT VOLUME EQUALISATION TVP KT88 SUPER CRUNCH KT66 CRUNCH EL34 10 LEVEL 0 10 0 LEVEL MANUAL 0 10 BASS BANK 10 0 MIDDLE CH 1 10 TREBLE CH 2 0 10 6V6 3 CH 3 REV 4 EL84 ISF CH 4 TYPE TVP 0 0 10 LEVEL 10 RESONANCE 0 10 PRESENCE 0 10 VOLUME ON TAP Español ID:100TVP Head Rear Panel WARNING!: RISK OF HAZARDOUS ENERGY AVIS!: ENERGIE ELECTRIQUE DANGEREUSE! Designed and Engineered by Blackstar Amplification Ltd Northampton, England Made under license in China FUSE 230V/240V - T1AL 250V 100V/120V - T2.5AL 250V 220V-230~50/60Hz 160 WATTS CONNECT SPEAKERS BEFORE USE SPEAKER OUTPUTS OUTPUT: 100 WATTS RMS CLASS 2 WIRING WARNING!: DO NOT OBSTRUCT VENTILATION GRILLES ATTENTION!: NE PAS OBSTRUER LES GRILLES DE VENTILATION WARNING!: SHOCK HAZARD. DO NOT OPEN. TO REDUCE THE RISK OF FIRE OR ELECTRIC SHOCK DO NOT EXPOSE THIS EQUIPMENT TO RAIN OR MOISTURE. THIS APPARATUS MUST BE EARTHED. AVIS!: RISQUE DE CHOC ELECTRIQUE. NE PAS OUVRIR. POUR EVITER LES RISQUES D’INCENDIE ET DE DECHARGES ELECTRIQUES, N’EXPOSEZ JAMAIS CET APPAREIL A L’HUMIDITE OU A LA PLUIE. CONNECTER CET APPAREIL A LA TERRE. MODEL: ID:100TVP MIDI IN FOOTSWITCH MP3 / LINE IN EMULATED OUTPUT CAUTION!: TO REDUCE THE RISK OF ELECTRIC SHOCK DO NOT REMOVE COVER. NO USER SERVICEABLE PARTS INSIDE. REFER SERVICING TO QUALIFIED SERVICE PERSONNEL. ATTENTION!: POUR EVITER LES RISQUES DE DECHARGES ELECTRIQUES, NE PAS OUVRIR LE COUVERCLE. CET APPAREIL NE COMPORTE AUCUNE PIECE SUSCEPTIBLE D’ETRE REPAREE PAR VOS SOINS. FAITES TOUJOURS APPEL A UN TECHNICIEN QUALIFIE POUR TOUTE REPARATION. This device complies with Part 15 of the FCC Rules. Operation is subject to the following two conditions: (1) this device may not cause harmful interference, and (2) this device must accept any interference received, including interference that may cause undesired operation. This Class B digital apparatus complies with Canadian ICES-003. Cet appareil numérique de la classe B estconforme à la norme NMB-003 du Canada. Japanese Japanese POWER 1 Français Français 0 MASTER 2 DLY USB MAINS INPUT 108 EFFECTS MOD 6L6 CLEAN BRIGHT CLEAN WARM Español GAIN OD 2 OD 1 Deutsch Deutsch ID:100TVP Head Front Panel 109 Français Français Español Español Deutsch Deutsch Japanese Japanese English English 111 110 HBK-1039 10/12 Blackstar Amplification Ltd, Beckett House, 14 Billing Road, Northampton, NN1 5AW, UK For the latest information go to: www.blackstaramps.com Whilst the information contained herein is correct at the time of publication, due to our policy of constant improvement and development, Blackstar Amplification Ltd reserves the right to alter specifications without prior notice.


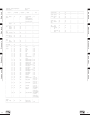
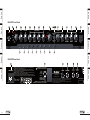

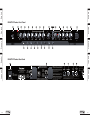
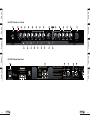


![CAST for PSI user`s manual [v07]](http://vs1.manualzilla.com/store/data/005903758_1-a858c2dfda3ffb28451a6ec48d1cfa02-150x150.png)