1
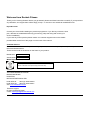
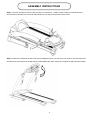
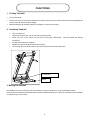
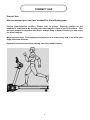
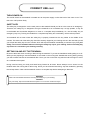
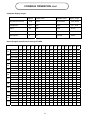
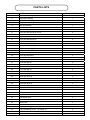
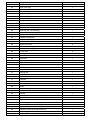
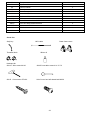
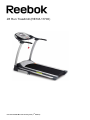
Z8 Run Treadmill (RE1M-11700)
User manual RE1M-11700 January 2011 (1ST Edition)
Welcome from Reebok Fitness
Thank you for choosing Reebok. Before you get started, please read these instructions carefully. If you experience
any difficulties, our support team will be happy to help – or check out our website at reebokfitness.info
Important note:
Consult your doctor before starting any exercise programme. If you feel any sickness, chest
pain, dizziness or breathlessness during your training, stop exercising and consult your
doctor immediately.
If you have any further queries please contact our customer support team on the details
provided either at the foot of this page or on the back of the manual.
Customer Service
In order to assist in the event of a problem with your product, we would ask you to please quote the product Model
Name and Serial Number.
These can be found on the sticker on the frame of your product.
Modelname:
Serialnumber:
Waste Disposal
Reebok products are recyclable. At the end of its useful life please
dispose of this article correctly and safely (local refuse sites).
Contact
RFE UK LTD
THE PERFORMANCE CENTRE
MAIDSTONE ROAD
KINGSTON
MILTON KEYNES MK10 0BD
head office tel:
0044 (0) 1908 793020
head office fax:
0044 (0) 1908 793021
web: www.reebokfitness.info
Technical support:
tel: 0044 (0) 800 440 2459
e-mail: [email protected]
CONTENTS
Assembly………………………………………………Pages 4 - 5
Precautions…………………………………………….Pages 6 - 7
Functions………………………………………………. Page 8
Correct Use……………………………………………. Pages9-10
Warm Up………………………………………………..Page 11
Computer………………………………………………. Pages 12-16
Maintenance……………………………………………Pages 17-18
Parts ID………………………………………………… Pages 19-22
Troubleshooting……………………………………….. Page 23
Limited Warranty……………………………………….Page 24
ASSEMBLY INSTRUCTIONS
Step 1:. Remove the machine from the box and place on a level floor;please ensure to keep your hands free from
the connections between the console and the stand post, the stand post and the bottom frame.
Step 2: Follow the arrowheads to attach the stand post(please ensure you don’t put your hand on the connections),fix
the stand post to the bottom frame with the 2pcs bolts M8*50 each side. Please do not tighten all the bolts at this stage.
4
ASSEMBLY INSTRUCTIONS CONT
Step 3:Follow the arrowhead to put up the console(please don’t put your hand on the connections),fix the console
to the stand post with 2pcs Threaded knob M8*20 . Please tighten all the bolts at this stage..
Step 4: Follow the arrowhead to put the right(mark R) and left(mark L) plastic covers on the stand post, put the
cover down to the bottom frame,make sure the screw holes on the cover and the bottom frame can fit together, fix
the bottom cover with two bolts (ST4*20) on either side,, Please tighten all the bolts to finish the assembly..
5
PRECAUTIONS
These instructions are intended to provide important information for use and maintenance of the equipment as well
as for your personal safety. Keep this user manual in a safe place for future reference.
WARNING!
This product is made for home use only and tested up to a maximum body weight of 110kg.
RFE International Ltd. assumes no responsibility for personal injury or property damage sustained by or through
the use of this equipment. It is the responsibility of the owner to ensure that all users of this equipment are
adequately informed of all warnings and precautions.
SCOPE
• Maximum user weight of 110kg.
• This product is designed for physical exercise by adults. This product is not suitable for use by persons under 14
years of age.
• Never allow more than one person on the equipment at a time.
ENVIRONMENT
• Ensure that those present are aware of possible hazards e.g. moveable parts during training.
• Ensure that sufficient space is available to use the product.
• Please ensure that liquids or perspiration are wiped off the product.
• This product is designed to be used and stored indoors. Do not store the product outside, or in damp/dusty
environments.
• The product is made for home use only. Warranty and manufacturer’s liability do not extend to any product or
damage to the product caused by commercial use.
6
PRECAUTIONS CONT
USER HEALTH
• Consult your doctor before starting any exercise programme to receive advice on the optimal training.
• Ensure the product is on a flat, level surface with at least 0.5m of clear area surrounding the product.
• Incorrect/excessive training can cause health injuries.
• If you feel sickness, chest pain, fits of dizziness or breathlessness during
your training, immediately stop the training and consult your doctor.
PRODUCT PREPARATION
• Ensure that training only starts after correct assembly, adjustment and inspection of the product.
• Follow the steps of the assembly instructions carefully.
• Only use suitable tools for assembly and ask for assistance if necessary.
• Only use original Reebok parts as delivered (see checklist).
SAFETY CHECKS (Before Every Use)
• Tighten all adjustable parts to prevent sudden movement while training.
• Tighten all nuts and bolts.
• Ensure the product is on a flat, level surface.
• Do not use the product without shoes or with loose shoes.
• Be aware of non-fixed or moving parts whilst mounting or dismounting the product.
• Do not wear loose or poorly fitting clothing that may become trapped in the product.
.
7
FUNCTIONS
1. Folding Treadmill
•
Turn off the power
•
Lift the rear of the running deck towards the computer, when the top is reached the shock will lock against the
foot up lock and secure the deck upright.
•
Before releasing pull the deck towards you slightly to ensure it has locked.
2. Unfolding Treadmill
•
Turn the power off
•
Place both hands on the rear of the running deck securely
•
Press your foot on the Shock and foot up lock and push downwards. This will release the locking
mechanism
•
Pull the deck towards you slightly
•
Release the deck and stand clear of the machine
•
The running deck will slowly lower to the ground using the soft drop mechanism
Foot up lock
shock
3. Moving the treadmill
The treadmill can be moved around in house safely in its fold-up position by using the transport wheels
Firmly hold onto handle bars with both hands, pull the treadmill towards you, incline 30-40 degree until it's portable
on wheels, drag or push slowly
8
CORRECT USE
Correct Use
We recommend you use your treadmill in the following way:
Correct biomechanical position: Please refer to picture. Running straight on the
treadmill is made easier by focusing on a fixed object in front of you in the room. Run
as if you wanted to approach the object. Always keep a distance which you can reach
the front hand bar.
Major exercise type: This equipment focuses on your lower body, and it can train your
thigh and shank muscles
Important: Incorrect/excessive training can cause health injuries.
9
CORRECT USE CONT.
TURN POWER ON
The On/Off switch for the treadmill is located next to the power supply cord at the back of the motor cover. Turn
this to the “ON” position firstly.
SAFETY KEY
The safety key is designed to cut the main power to the treadmill should you fall or in the event of an emergency.
Therefore, the safety key is designed to bring the treadmill to an immediate stop. At high speeds, it may be
uncomfortable and somewhat dangerous to come to a complete stop immediately. So, use the safety key as
emergency stop only. To bring the treadmill to a complete stop safely and comfortably, use the red stop button.
Your treadmill will not start unless the safety key is properly inserted into the key holder in the middle of the
console. The other end of the safety key should be securely clipped to your clothing so that in the case that you fall,
you will pull the safety key from the console, which will stop the treadmill immediately to minimize injury. For your
safety, never use the treadmill without securing the safety key clip to your clothing. Pull on the safety key
clip ensure it is secured to your clothing correctly.
GETTING ON AND OFF THE TREADMILL
Be sure to take care when mounting or dismounting the treadmill. Try to use the handlebars while getting on or off.
While you are preparing to use the treadmill, do not stand on the running belt. Straddle the running belt by placing
your feet on both side rails of the treadmill deck. Place your foot on the belt only after the belt has begun to move
at a consistent slow speed.
During exercise, keep your body and head facing forward at all times. Never attempt to turn around on the
treadmill when the running belt is still moving. When you have finished exercising, stop the treadmill by pressing
the red stop button. Wait until the treadmill comes to a complete stop before attempting to dismount.
WARNING!
Never use this treadmill without first securing the safety key to your clothing.
CAUTION!
For your safety, step onto the belt when the speed is no more than 0.8km/h/0.5mph.
10
WARM UP
WARMING UP
It is important to warm up before exercising to prepare your body for the workout it is about to do. The first phase of
a warm up is to increase your heart rate and get blood pumping around your body faster. Choose an activity which
will warm up the same muscles you are going to use during your workout.
• PHASE 1: 5-10 minutes heart raising activity
• PHASE 2: Static stretching
• PHASE 3: Workout
COOL DOWN
Following your workout you should carry out a cool down.
This should gradually bring your heart rate back to a resting level. To do a cool down perform an activity of your
choice at a low intensity e.g. a steady 5 minute cycle. This should be followed by static stretches, similar to those
in the warm up. Again, hold each stretch for 30 seconds.
STRETCHES
Hold each stretch for about 30 seconds.
Stretching should not hurt; only stretch your muscles to as far as is comfortable. If you have a tight or previously
injured muscle stretch the affected muscle group within the warm up. Do not perform any sudden movements
while warming up.
Stretches should include:
Side Stretch
Arm Stretch
Groin Stretch
Hamstring Stretch
Calf Stretch
Quad Stretch
11
CONSOLE OPERATION
LCD DISPLAY
SPEED/PROGRA
PULSE/INCLINE
M DISPLAY
DISPLAY
TIME/DISTANCE/CALORIE
PROGRAM BUTTON
DISPLAY
MODE BUTTON
SPEED BUTTONS
START BUTTON
INCLINE BUTTONS
STOP BUTTON
SAFETY KEY
Ⅰ﹕ Window and key-press instruction
A:“program Button: When the machine is in power on status this can be used to select a program: The programs
available are:manual modeP0->P01->P02->P03->P04->P05->P06->P07->P08->P09->P10->P11->P12
-> test body fat 。
B: mode Button :
1.When the machine is running,press the “mode” key to cycle between distance, time, calories or scan mode. If
scan is selected each segment will be displayed for a period of 6 seconds;2.When in the power on screen it is a
setting mode key :
3. When in the p0 screen ,you can select the time countdown, calorie countdown or distance countdown.
Press mode to select the desired setting, then press speed up + or down – to change the value. Once selected
press start to begin exercise. The speed and incline can be changed manually whilst exercising, when in P1-P12
program ,the time window will display (30 minutes),this is the system default setting. The time will flash, if desired
press speed up + or speed down – to change, then press start to begin. When in the Body Fat function ,this is
used to change the F1,F2,F3,F4,FAT functions .
C: The speed is set to operate in Mph, however if you prefer to work in kph then please follow the processes below
to switch between the two.
1: Remove the safety key, then the computer will show E-07
2: Press and hold “program and mode” buttons together for 2 to 3 seconds
3: The console with change the speed from mph to kph automatically
D:”Start”, Press this key to start an exercise. If no program is selected P0 manual will begin.
E: ”Stop”: When the treadmill is running Press the “stop” key and the machine will slow down and stop. All
functions on the LCD will be reset to zero.
F : Speed+/-,adjusts the speed between 1-16KM
12
CONSOLE OPERATION CONT
F : Incline+/-,adjust the incline between 0-12%
G : Quick speed: 2,4,6,8,10,12,14,16km/h.
H : Quick incline: 2,4,6,8,10,11,12%
Program Instruction:
The computer
1:P0:
Manual program including: normal mode, time countdown, distance countdown, calorie countdown.
2:P1 – P12 are preset programs designed to give a variation of different workouts
3.:Body fat Program.
Powering on instructions:
1:
Plug the power lead into the wall socket. .
2:
Attach the safety key to your clothing securely firstly, then insert into the machine
3:
The computer will then beep and the display will light up
4:
From here you can select your desired program and begin exercise
: When in the p0 screen ,you can select the time countdown, calorie countdown or distance countdown. Press
mode to select the desired setting, then press speed up + or down – to change the value. Once selected press
start to begin exercise. The speed and incline can be changed manually whilst exercising, when in P1-P12
program ,the time window will display (30 minutes),this is the system default setting. The time will flash, if desired
press speed up + or speed down – to change, then press start to begin. When in the Body Fat function ,this is used
to change the F1,F2,F3,F4,FAT functions .
Operation of manual mode
A: When in the power on screen press the START button to begin the manual mode.
speed/distance/time/calories will count up from zero.
The
B: Press speed “+”or “-”to adjust the speed.
C: press the “Stop” to finish at any time.
The belt will slow and stop
D: You can press any of the quick speed keys to change to a desired speed at any time during the workout.
E: To stop the belt immediately the safety key can be removed.
stop. The console will then beep
If done the belt will slow down gradually and
F: If Using the time countdown mode: When the set time elapses the belt speed will decrease and stop, the
console will also beep to indicate the end of the program. To restart the manual mode press START.
NOTE:
The time/speed/distance will restart from zero and count upwards.
G: the distance countdown mode is the same as the above.
H: the calorie countdown mode is the same as the above.
13
CONSOLE OPERATION CONT
Program mode
1: Within all the programs the preset workout time is 30 minutes. You can adjust this between 5:00 - 99:00
minutes by.Pressing the “+””-“ buttons when in the program.
2: Press “start”key, to begin a program..
3: Press the “Stop” to finish at any time.
The belt will slow and stop
4.Press the speed“+”or “-” to adjust the running speed at any time.
5: You can press any of the quick speed keys to change to a desired speed at any time during the workout
6.press the quick incline key” 2,4,6,8,10,12” at any time to adjust the running belt incline level.
7: the program can be divided into16 parts, each part is 1/16 of the designed time.
8: the console will beep 3 times during the transition of every part.
10:The safety key can be removed to stop the belt at any time. When this is done the LCD will display E07
and a beep will be heard.
Safety key functions
1.Remove the safety key at any time to stop the running belt.
will beep.
The belt will slow to a stop and the computer
Body fat function:
1.When in the power on screen press the “Program” key until the body fat function is displayed, then press
enter to confirm selection.
2.The right window “SPEED/PROGRAM” displays the pre-set program number(F1,F2---F5),press the “mode”
key to choose the number you want ; the left window “PULSE/INCLINE” displays the pre-set
parameter ,press “ + ” 、“-”key to select the number you want.
a, F1 is the gender, when the “SPEED/PROGRAM” window displays F1, Press the speed “+””-to change
this: 1(male),2(female). This will be shown in the left window”PULSE/INCLINE”
b. F2 is the Age, Press speed “+””-“ to adjust the age (the range is from 1-100),the preset age is 25
c, F3 is the height, , Press speed “+””-“ to adjust the height from 100cm to 199 cm,the preset height is 170cm
d. F4 is the user weight weight, press speed “+””-“ to adjust the weight from 20 kgs to 150kgs,the preset
weight is 70kg
e. F5 will be shown once the above information has been stored, you will then be entered into the Body Fat
function. At this stage, place both hands on the pulse sensors, the body fat window will then display the test
result in 8 seconds.
14
CONSOLE OPERATION CONT
Computer Display ranges
original
Preset value
Available range
Display range
Time(minute:second)
0:00
30:00
5:00-99:00
0:00~99:59
speed(km/h)
0.0
N/A
N/A
1.0-16.0
Incline
00
N/A
N/A
0-12%
distance(km)
0.00
1.00
1.00-99.00
0.0-99.99
calorie(term)
0
50
20-990
0-999
Preset Program speed/incline settings for MPH
P1
P2
P3
P4
P5
P6
P7
P8
P9
P10
P11
P12
1
2
3
4
5
6
7
8
9
10
11
12
13
14
15
16
SPEED
1.8
4.3
4.3
3.1
3.1
3.1
4.3
4.3
3.1
3.1
3.1
3.1
1.8
1.2
1.8
4.3
INCLINE
6
6
8
8
6
6
4
4
4
6
6
2
2
2
6
6
SPEED
1.8
3.7
3.1
3.1
5.0
3.1
3.1
3.7
5.0
5.0
5.0
3.1
2.5
1.8
1.8
3.7
INCLINE
9
9
9
2
2
8
8
4
1
1
4
4
4
4
9
9
SPEED
3.1
3.1
4.3
4.3
5.0
3.1
3.1
3.1
1.8
1.8
5.0
5.0
2.5
1.8
3.1
3.1
INCLINE
3
4
5
5
7
7
4
4
4
4
6
3
2
2
3
4
SPEED
1.8
3.1
3.1
3.1
5.0
5.0
5.0
5.0
3.1
3.1
3.1
1.8
1.8
1.2
1.8
3.1
INCLINE
6
6
6
9
9
9
9
9
9
6
6
6
2
2
6
6
SPEED
3.1
3.7
4.3
5.0
5.6
6.2
6.2
6.2
5.6
5.0
4.3
3.1
2.5
1.8
3.1
3.7
INCLINE
4
4
8
8
6
6
6
6
8
7
6
5
1
1
4
4
SPEED
3.1
3.1
3.7
3.7
4.3
4.3
4.3
5.6
5.6
6.2
6.2
6.8
3.1
1.8
3.1
3.1
INCLINE
8
8
8
8
7
7
7
7
7
5
5
3
3
1
8
8
SPEED
5.6
2.5
6.8
2.5
6.2
2.5
5.6
2.5
5.0
2.5
6.8
3.1
1.8
1.2
5.6
2.5
INCLINE
4
4
4
6
6
6
8
8
8
10
10
10
6
2
4
4
SPEED
5.0
1.8
3.1
4.3
5.6
1.8
3.1
4.3
6.2
1.8
3.1
4.3
6.8
3.1
5.0
1.8
INCLINE
8
8
3
3
7
7
3
3
6
6
3
3
5
5
8
8
SPEED
5.6
2.5
4.3
6.2
2.5
4.3
6.8
3.1
4.3
7.5
2.5
4.3
7.5
3.7
5.6
2.5
INCLINE
6
3
7
7
3
8
8
3
9
9
3
3
7
7
6
3
SPEED
3.7
3.7
3.7
5.6
6.2
3.7
3.7
5.6
6.2
3.7
3.7
3.7
6.8
1.8
3.7
3.7
INCLINE
7
7
5
5
5
8
8
8
8
8
8
4
4
4
7
7
SPEED
4.3
5.6
6.2
6.8
5.6
3.7
5.0
5.6
6.2
6.2
6.8
5.6
3.7
3.1
4.3
5.6
INCLINE
6
6
3
3
3
7
7
4
4
4
4
6
6
6
6
6
SPEED
6.2
6.2
4.3
6.2
6.2
6.2
4.3
4.3
6.2
6.2
6.2
6.2
3.7
3.1
6.2
6.2
INCLINE
8
6
9
9
5
5
8
8
8
4
4
4
4
4
8
6
15
Program speed/incline settings for KPH
P1
P2
P3
P4
P5
P6
P7
P8
P9
P10
P11
P12
1
2
3
4
5
6
7
8
9
10
11
12
13
14
15
16
SPEED
1.0
3.0
3.0
7.0
7.0
5.0
5.0
5.0
7.0
7.0
5.0
5.0
5.0
5.0
3.0
2.0
INCLINE
2
2
6
6
8
8
6
6
4
4
4
6
6
2
2
2
SPEED
2.0
3.0
3.0
6.0
5.0
5.0
8.0
5.0
5.0
6.0
8.0
8.0
8.0
5.0
4.0
3.0
INCLINE
3
3
9
9
9
2
2
8
8
4
1
1
4
4
4
4
SPEED
2.0
3.0
5.0
5.0
7.0
7.0
8.0
5.0
5.0
5.0
3.0
3.0
8.0
8.0
4.0
3.0
INCLINE
1
2
3
4
5
5
7
7
4
4
4
4
6
3
2
2
SPEED
2.0
2.0
3.0
5.0
5.0
5.0
8.0
8.0
8.0
8.0
5.0
5.0
5.0
3.0
3.0
2.0
INCLINE
3
3
6
6
6
9
9
9
9
9
9
6
6
6
2
2
SPEED
3.0
4.0
5.0
6.0
7.0
8.0
9.0
10.0
10.0
10.0
9.0
8.0
7.0
5.0
4.0
3.0
INCLINE
2
2
4
4
8
8
6
6
6
6
8
7
6
5
1
1
SPEED
3.0
4.0
5.0
5.0
6.0
6.0
7.0
7.0
7.0
9.0
9.0
10.0
10.0
11.0
5.0
3.0
INCLINE
1
8
8
8
8
8
7
7
7
7
7
5
5
3
3
1
SPEED
3.0
4.0
9.0
4.0
11.0
4.0
10.0
4.0
9.0
4.0
8.0
4.0
11.0
5.0
3.0
2.0
INCLINE
1
1
4
4
4
6
6
6
8
8
8
10
10
10
6
2
SPEED
3.0
5.0
8.0
3.0
5.0
7.0
9.0
3.0
5.0
7.0
10.0
3.0
5.0
7.0
11.0
5.0
INCLINE
3
3
8
8
3
3
7
7
3
3
6
6
3
3
5
5
SPEED
3.0
7.0
9.0
4.0
7.0
10.0
4.0
7.0
11.0
5.0
7.0
12.0
4.0
7.0
12.0
6.0
INCLINE
3
6
6
3
7
7
3
8
8
3
9
9
3
3
7
7
SPEED
3.0
5.0
6.0
6.0
6.0
9.0
10.0
6.0
6.0
9.0
10.0
6.0
6.0
6.0
11.0
3.0
INCLINE
2
7
7
7
5
5
5
8
8
8
8
8
8
4
4
4
SPEED
4.0
5.0
7.0
9.0
10.0
11.0
9.0
6.0
8.0
9.0
10.0
10.0
11.0
9.0
6.0
5.0
INCLINE
1
6
6
6
3
3
3
7
7
4
4
4
4
6
6
6
SPEED
4.0
6.0
10.0
10.0
7.0
10.0
10.0
10.0
7.0
7.0
10.0
10.0
10.0
10.0
6.0
5.0
INCLINE
3
8
8
6
9
9
5
5
8
8
8
4
4
4
4
4
16
MAINTENANCE
CLEANING
Remove dust on the treadmill with vacuum or slightly damp cloth. Fold up the deck and clean the floor with
vacuum periodically, this will help to prolong the treadmill life.
Never use solvents on the deck or running belt. Use of solvents can reduce critical lubrication of the
deck and belt.
RUNNING BELT ADJUSTMENT
When you run or walk, you may push off harder with one foot than the other. This will cause the running belt
to run off centre. This treadmill is designed and built to ensure proper tracking of the belt is always centered
on the deck.
Occasionally the belt may need further adjustment to keep it centred. To centre the belt, use
the enclosed Allen wrench to adjust the rear roller position.
RUNNING BELT CENTERING PROCEDURE
1. Do not wear loose clothing, neckties, or loose jewellery while making this adjustment.
2. Never turn the bolts more than 1/4 turn at a time.
3.Run the treadmill. Adjust belt while the treadmill is running at 4 MPH (6.4 Km/H) with
no one on the belt.
After making the adjustment walk on the belt for five minutes to test. If necessary, repeat the procedure but
never turn the bolts more than 1/4 turn at a time. Over tightening the belt can significantly shorten the belt life.
IF BELT TOO FAR TO THE LEFT SIDE:
1. Turn the left roller bolt 1/4 turn clockwise (tighten)
IF BELT TOO FAR TO THE RIGHT SIDE:
1. Turn the right roller bolt 1/4 turn clockwise (tighten)
RUNNING BELT TENSIONING ADJUSTMENT
If when you plant your foot on the belt, you can feel a slipping sensation then the belt
has stretched and is slipping across the rollers. All belts will stretch over time. This is a normal and common
adjustment on any treadmill. To eliminate this slipping, tension both Allen bolts on the rear roller 1/4 turn as
shown. Try the treadmill again to check for slipping. Repeat if necessary, but never turn the roller bolts more
than 1/4 turn at a time.
LUBRICATING THE DECK
A well-lubricated deck will ensure high performance of your treadmill and reduce the level of normal wear and
tear to important components. This treadmill has been pre-lubed at the factory. However, for optimal
performance, the running deck may require periodic lubrication. With average usage ( 30 minute workout
17
MAINTENANCE CONT
session at 5-6km?h 3 times a week for two people) lubricate every three to six months. Your may adjust the
timing of the lubrication based on the intensity of the treadmill use level.
To check the lubrication level, simply lift the running belt, and put your hand as far into the center of the belt
as you can reach. If your hand shows signs of silicone, then it does not need additional lubrication. If the
board feels dry and there is very little evidence of silicone on your hand, then additional lubrication should be
added.
TO LUBRICATE THE DECK:
1. Stop the running belt so that the seam is located on top and in the center of the deck.
2.Insert nozzle into spray head of lubricant can.
3.Lift running belt.
4.Position nozzle between the belt and the board approximately 200mm (8” ) from the front of the treadmill.
5.Apply the silicon from the front to the rear of the treadmill on each side of the treadmill. Try to reach the
spray as far into the center of the running deck as possible. The spray time should be approximately four
seconds for each side.
6.Spread the silicon by running the treadmill at 1 Km/H and step gently on the belt from left to right. Do that
for a few minutes and allow the silicon to soak into the belt.
Silicon oil
18
EXPLODED DIAGRAM
19
PARTS LISTS
PART
NAME
QUANTITY
1
Base frame welding
1
2
Main frame welding
1
3
Incline frame welding
1
4
Upright post welding
2
5
Feet pad welding
1
6
Handle bar welding
1
7
Motor board welding
1
8
Inner hex bolt M12*Φ14*35*19
2
9
Inner hex bolt M10*60*20
1
10
Inner hex bolt M10*35*20
3
11
Inner hex bolt M8*50*20
4
12
Inner hex bolt M8*45*20
2
13
Inner hex bolt M8*40*20
1
14
Inner hex bolt M8*30*20
1
15
Threaded knob M8*20
2
16
Inner hex bolt M8*75
3
17
Inner hex bolt M8*30
2
18
Inner hex bolt M8*15
4
19
Outside hex bolt M8*50
1
20
Outside hex bolt M8*40
1
21
Cross bolt M8*25
2
22
Cross bolt M6*30
4
23
Cross bolt M6*8
4
24
Cross bolt M5*10
6
25
Cross bolt M4*10
8
26
Cross bolt ST5*15
4
27
Cross bolt ST4*30
4
28
Cross bolt ST4*15
40
29
Cross bolt ST4*10
8
30
Cross bolt ST5*15
2
31
Cross bolt ST4*15
4
32
Cross bolt ST3*08
2
33
Nut
3
34
Nut M8
4
35
Flat washer Φ14
2
36
Flat washer Φ10
3
37
Flat washer Φ8
13
38
Washer Φ5
1
39
Flat washer Φ4
4
40
Power metallurgy cover
Φ24*Φ19*Φ14*14*3
2
41
Power metallurgy cover
Φ17*Φ10*12
2
42
Plastic flat washer
φ26*φ20*t5.0
2
43
Plastic flat washer
φ25*φ18*t3.0
4
M10
44
Spring
1
45
Decorate piece
2
46
Motor cover (up)
1
47
Side rail
2
48
Decorate strip
2
49
Rear cover (left)
1
50
Rear cover (right)
1
51
Rear cover feet pad
2
52
Wheel Φ46
2
53
Taper cushion
2
54
Wheel Φ62
2
55
Computer cover
1
56
Place with the computer(big)
1
57
Place with the computer(small)
1
58
Sundries frame(left)
1
59
Sundries frame(right)
1
60
Handle bar cover(up)
1
61
Handle bar cover(down)
1
62
Ellipse round stuff
2
63
Base frame cover(left)
1
64
Base frame cover(right)
1
65
Uncork stuff
2
66
Running board
1
67
Rear roller
1
68
Back roller
1
69
Motor
1
70
Cushion with seat
2
71
Cylinder
1
72
Taper feet pad
4
73
Motor belt
1
74
Running belt
1
75
Foam
2
76
Incline motor
1
77
Controller
1
78
Transformer
1
79
Safety key
1
80
Switch
1
81
Fuse seat with wire
1
82
MP3 connect wire
1
83
Inductor
1
84
Wire L1
1
85
Wire L2
1
86
Wire L3
1
87
Power supply connect wire(red)
1
88
Power supply connect wire(black)
1
89
Speed wire and handle pulse wire set
1
90
Incline wire and handle pulse wire set
1
91
Power supply wire
1
92
Wire buckle
1
93
Wire protect cover
1
94
Square cushion
4
95
Column cushion
4
96
Wire nip
1
97
Filter
1
98
Cross bolt ST4*20
4
999
Hard ware kit
1
999-A
T Allen wrench 6*80
1
999-B
Cross allen wrench 14*17*75
1
999-C
Inner hex half thread bolt M8*50
4
999-D
Cross screw ST4*20
4
100
MP3 Cable
1
101
Silicon oil
1
Check list:
Safty key
Threaded knob
MP3 cable
Base frame coves
Silicon oil
Hardware kit
999-A T Allen wrench 6*80
999-B Cross allen wrench 14*17*75
999-D
999-C Inner hex half thread bolt M8*50
Cross screw ST4*20
22
TROUBLE SHOOTING
Q
My machine is out of the warranty can you still help me?
A Yes we can still help, we have a large network of engineers that cover 98% of the British Isles and can provide replacement parts.
For a quote on parts or engineer call out please contact our Technical Support phone line listed on the back of this manual.
Q
Can I keep my machine in my garage?
A
Yes, but not in a garden shed. Note if your machine is kept in a garage, ensure it is covered and placed on a mat or carpet. It is
important to protect it from being exposed to extremes in temperature, heat, humidity and moisture
Q
I have just ordered my treadmill and there are some parts missing can you help?
A
Yes, if you are missing parts from your new machine these can be ordered on our helpline 0800 440 2459. When you call we will
require your full address, the part numbers (you require) from the user manual that and your machine serial number.
Q
Is there a maximum user weight for my treadmill?
A
There is a maximum user weight with all our treadmills this varies on each machine, this should be printed in your manual, if you
have any questions regarding the user weight, please don’t hesitate to contact our helpline 0800 440 2459.
Q
Why is there a black dust starting to appear under my treadmill?
A
Occasionally a black dust can start to appear under your treadmill this is due to normal wear and tear. You can remove the dust
easily with a vacuum cleaner. If you want to keep the dust away from the floor we would recommend for you to place your treadmill on
a protective mat.
Q
How long is my warranty on my treadmill?
A
All Reebok treadmills come with a manufacturer’s warranty this varies on each machine, this should be printed in your manual, if
you have any questions regarding your warranty please don’t hesitate to contact our helpline 0800 440 2459.
Q
What is the safety key for and where does it go?
A
The safety key is a red plastic key that should be inserted into the front of the computer when using the treadmill, this is an
automatic cut off so if you have any problems or get into any difficulties you can pull the key out to stop the machine. The treadmill will
not work without this key being inserted.
23
WARRANTY
Limited Warranty
RFE International Ltd warrants products to be free from defective workmanship and materials, under normal use
and service conditions, for the period of 2 years from the date of purchase. Details of these service conditions can
be found within the product’s user manual.
In order to validate warranty dates a proof of purchase is required. This warranty only extends to the original
purchaser and will only be covered in the country the machine was purchased.
RFE’s obligation under this warranty is limited to replacing or repairing, at RFE’s discretion, the product through
one of its authorised service centres. All repairs for which warranty claims are made must be pre-authorised by
RFE.
This warranty does not extend to any defect caused by abuse, misuse, additions, modifications or repairs not
provided by an RFE authorised service centre.
This product is designed for home use. Products used for commercial or rental purposes and / or used as store
display models are not covered by this warranty.
No other warranty beyond that specifically set forth above is authorised by RFE.
RFE is not responsible or liable for indirect, special or consequential damages arising out of or in connection with
the use or performance of the product or damages with respect to any economic loss, loss of property, loss of
revenues or profits, loss of enjoyment or use, costs of removal, installation or other consequential damages of
whatsoever nature.
We advise your product is kept in a room with a constant environment; preventing your product from being
exposed to extremes in temperature, heat, humidity and moisture. Guidance on the correct storage of equipment
is contained within the product’s user manual.
PLEASE RETAIN YOUR RECEIPT AS PROOF OF PURCHASE
Your statutory rights remain unaffected.
24