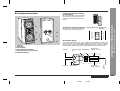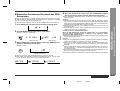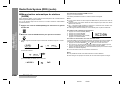
1
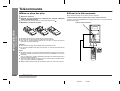
Audio Tower System CD-CH1500H besteht aus CD-CH1500H (Hauptgerät) und
CP-RW5500H (Lautsprechersystem).
Système hi-fi CD-CH1500H composé de CD-CH1500H (appareil principal) et de
CP-RW5500H (enceintes acoustiques).
AUDIO TOWER SYSTEM
SYSTÈME HI-FI
AUDIO TOWER SYSTEM
AUDIO TOWER SYSTEM
SISTEMA AUDIO A TORRE
AUDIO TOWER SYSTEM
AUDIO TOWER SYSTEM
MODELL
MODÈLE
MODELO
MODELL
Audio tower system CD-CH1500H que consta de CD-CH1500H (aparato principal)
y CP-RW5500H (sistema de altavoces).
CD-CH1500H Audio Tower System bestående av CD-CH1500H (huvudenhet) och
CP-RW5500H (högtalarsystem).
Sistema audio a torre CD-CH1500H consiste di CD-CH1500H (apparecchio
principale) e CP-RW5500H (diffusori).
CD-CH1500H audio tower system bestaande uit CD-CH1500H (hoofdtoestel) en
CP-RW5500H (luidsprekersysteem).
CD-CH1500H Audio Tower System consisting of CD-CH1500H (main unit) and
CP-RW5500H (speaker system).
MODELLO
MODEL
MODEL
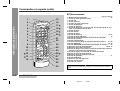
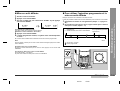
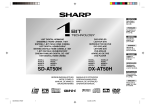
CD-CH1500H
BEDIENUNGSANLEITUNG
MODE D’EMPLOI
MANUAL DE MANEJO
BRUKSANVISNING
MANUALE DI ISTRUZIONI
GEBRUIKSAANWIJZING
OPERATION MANUAL
DEUTSCH
FRANÇAIS
Siehe Seiten i bis v und D-1 bis D-38.
Se reporter aux pages i à v et F-1 à F-38.
ESPAÑOL
Consulte las páginas i al v y S-1 al S-38.
SVENSKA
ITALIANO
Hänvisa till sidorna i till v och V-1 till V-38.
Leggere le pagine i a v e I-1 a I-38.
NEDERLANDS
Raadpleeg de bladzijden i t/m v en N-1 t/m N-38.
ENGLISH
Please refer to pages i to v and E-1 to E-38.
BESONDERE ANMERKUNGEN
REMARQUES SPÉCIALES
NOTAS ESPECIALES
SÄRSKILDA ANMÄRKNINGAR
NOTE PARTICOLARI
BIJZONDERE OPMERKINGEN
SPECIAL NOTES
● Dieses Gerät entspricht den Anforderungen der EG-Richtlinien 89/336/
EWG und 73/23/EWG mit Änderung 93/68/EWG.
● Dette udstyr overholder kravene i direktiv nr. 89/336/EEC og 73/23/EEC
med tillaeg nr. 93/68/EEC.
● Este equipamento obedece às exigências das directivas 89/336/CEE e 73/
23/CEE, na sua versão corrigida pela directiva 93/68/CEE.
● Dette produktet oppfyller betingelsene i direktivene 89/336/EEC og 73/23/
EEC i endringen 93/68/EEC.
● Tämä laite täyttää direktiivien 89/336/EEC ja 73/23/EEC vaatimukset, joita
on muutettu direktiivillä 93/68/EEC.
●
● Ce matériel répond aux exigences contenues dans les directives 89/336/
CEE et 73/23/CEE modifiées par la directive 93/68/CEE.
● Este aparato satisface las exigencias de las Directivas 89/336/CEE y
73/23/CEE, modificadas por medio de la 93/68/CEE.
● Denna utrustning uppfyller kraven enligt riktlinjerna 89/336/EEC och 73/
23/EEC så som kompletteras av 93/68/EEC.
● Quest’apparecchio è conforme ai requisiti delle direttive 89/336/EEC e 73/
23/EEC, come emendata dalla direttiva 93/68/EEC.
● Dichiarazione di conformità
La società SHARP ELECTRONICS EUROPE GmbH dichiara che il prodotto
SHARP SISTEMA AUDIO A TORRE CD-CH1500H è costruito in conformità
alle prescrizioni del D.M.n˚548 del 28/8/95, pubblicato sulla G.U.n˚301 del
28/12/95 ed in particolare è conforme a quanto indicato nell’art. 2, comma
1 dello stesso decreto.
● Audio-visuelles Material kann Urheberrechte umfassen, die ohne
Genehmigung des Eigentümers dieser Urheberrechte nicht aufgenommen
werden dürfen. Siehe die entsprechenden nationalen Gesetze.
● Le matériel audio-visuel peut comporter des oeuvres faisant l’objet de droits
d’auteur qui ne peuvent être enregistrées sans l’autorisation du
possesseur du droit d’auteur, veuillez vous référer aux réglementations
nationales en vigueur.
● El material audiovisual puede consistir en trabajos que tengan derechos
de autor y que no deben grabarse sin la autorización del poseedor de dichos
derechos de autor. Sírvase consultar las leyes aplicables en su país.
● Dit apparaat voldoet aan de eisen van de richtlijnen 89/336/EEG en 73/23/
EEG, gewijzigd door 93/68/EEG.
● Audiovisuellt material kan innehålla upphovsrättsarbete som inte skall
mångfaldigas utan tillstånd av copyrightinnehavaren. Se den tillämpliga
lagen i ditt land.
● This equipment complies with the requirements of Directives 89/336/
EEC and 73/23/EEC as amended by 93/68/EEC.
● Il materiale audio-visivo che fosse soggetto a copyright non può essere
registrato senza l’autorizzazione del possessore del copyright. Si prega
di attenersi alle leggi in vigore sul territorio nazionale.
● Audio-visueel materiaal kan worden beschermd door auteursrechten, in
welk geval het niet mag worden opgenomen zonder de toestemming van
de auteursrechthouder. Zie voor nadere informatie de betreffende wetten
in het land van gebruik.
● Audio-visual material may consist of copyrighted works which must not
be recorded without the authority of the owner of the copyright. Please
refer to relevant law in your country.
i
00/12/29
COMMON_1500.fm
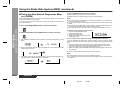
● B e i E i n s t e l l u n g d e r O N / S TA N D -BY-Tas t e auf STAN D -BY is t die
Netzspannung immer noch im Gerät vorhanden.
Wenn die ON/STAND-BY-Taste auf STAND-BY eingestellt wird, kann das
Gerät unter Verwendung der Timer-Betriebsart oder Fernbedienung in
Betrieb gesetzt werden.
Warnung:
In diesem Gerät sind keine vom Benutzer wartbaren Teile vorhanden.
Niemals Abdeckungen entfernen, außer wenn Sie dafür qualifiziert sind. In
diesem Gerät sind gefährliche Spannungen vorhanden. Vor Ausführung
von irgendwelchen Kundendienstarbeiten oder bei längerer Nichtverwendung des Gerätes stets den Netzstecker aus der Netzsteckdose
ziehen.
● Lorsque la touche ON/STAND-BY est mise en STAND-BY, l’appareil est
toujours sous tension.
Lorsque la touche ON/STAND-BY se trouve sur la position STAND-BY,
l’appareil est prêt à fonctionner par la minuterie ou la télécommande.
Avertissement:
Cet appareil contient des pièces non réparables par l’utilisateur. Personne
non qualifiée n’enlèvera jamais les couvercles. L’appareil contenant des
organes portés à haute tension, débrancher l’appareil avant toute réparation
ou en période de non-utilisation.
● Cuando el botón ON/STAND-BY está puesto en la posición STAND-BY,
todavía hay tensión dentro del aparato.
Cuando el botón ON/STAND-BY está puesto en la posición STAND-BY, el
aparato puede ponerse en funcionamiento utilizando el modo del
temporizador o el controlador remoto.
Advertencia:
Tenga en cuenta que dentro de este aparato no hay piezas que pueda
reparar. No quite nunca las tapas a menos que se esté cualificado para
hacerlo. Este aparato tiene en su interior tensiones peligrosas.
Desenchufe siempre la clavija de la red del tomacorriente antes de realizar
cualquier servicio de mantenimiento y cuando no se use el aparato
durante un largo período de tiempo.
● När ON/STAND-BY knappen är i läge STAND-BY, finns nätspänning i
apparaten.
Med ON/STAND-BY knappen i läge STAND-BY kan apparaten startas med
timerfunktion eller fjärrkontrollen.
Varning:
Apparaten innehåller inga delar som kan åtgärdas av kunden. Höljet får
endast öppnas av kvalificerad personal. Apparaten innehåller farliga
spänningar.
Stickkontakten ska därför dras ut från nätuttaget före reparationsarbeten
och bör dras ut om apparaten inte ska användas på mycket länge.
● Quando il tasto ON/STAND-BY si trova in posizione STAND-BY, all’interno
dell’apparecchio c’è ancora la corrente.
Se il tasto ON/STAND-BY si trova nella posizione STAND-BY, l’unità può
venire accesa con il modo timer o con il telecomando.
Avvertenza:
L’apparecchio non contiene parti riparabili dall’utente.
Non togliere mai i coperchi, a meno di non essere qualificati per farlo.
All’interno dell’apparecchio ci sono tensioni pericolose, per cui si deve
sempre staccare la spina del cavo d’alimentazione dalla presa di corrente
prima di qualsiasi intervento di manutenzione e quando non si usa
l’apparecchio per un lungo periodo di tempo.
● Wanneer de ON/STAND-BY toets in de STAND-BY stand staat, loopt er
nog steeds stroom (netspanning) in het toestel.
Wanneer de ON/STAND-BY toets in de STAND-BY stand staat, kan het
toestel ingeschakeld worden via de timerfunctie of de afstandsbediening.
Waarschuwing:
Dit toestel bevat geen door de gebruiker te repareren onderdelen. Verwijder
de behuizing nooit tenzij u deskundig bent op dit gebied. In het toestel
loopt een gevaarlijke spanning; haal de stekker altijd uit het stopcontact
alvorens onderhoud uit te voeren of wanneer het toestel voor langere tijd
niet gebruikt wordt.
● When the ON/STAND-BY button is set at STAND-BY position, mains voltage is still present inside the unit.
When the ON/STAND-BY button is set at STAND-BY position, the unit may
be brought into operation by the timer mode or remote control.
Warning:
This unit contains no user serviceable parts. Never remove covers unless
qualified to do so. This unit contains dangerous voltages, always remove
mains plug from the socket before any service operation and when not
in use for a long period.
● Når ON/STAND-BY-knappen er sat i STAND-BY positionen, er der stadig
netspaending til stede i apparatet.
Når ON/STAND-BY-knappen er sat i STAND-BY position, kan apparatet
startes v.hj.a. timer-funksionen eller fjernbetjeningen.
Advarsel:
Apparatet indeholder ingen dele, der kan repareres af brugeren selv. Fjern
aldrig kabinettet med mindre De er kvalificeret hertil. Apparatet indeholder
farlig strømspaending. Traek altid stikket ud af stikkontakten før der
foretages reparationer, eller hvis apparatet ikke er i brug i laengere tid.
DENNA APPARAT ÄR ANSLUTEN TILL 230 V VÄXELSTRÖM NÄR
STICKPROPPEN ÄR INSKJUTEN I VÄGGUTTAGET. FÖR ATT
FULLSTÄNDIGT KOPPLA IFRÅN APPARATEN, V.G. DRAG UT
STICKPROPPEN.
ii
00/12/29
COMMON_1500.fm
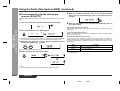
● Vorsicht:
Das Gerät weder Tropf- noch Spritzwasser aussetzen. Ansonsten besteht
die Gefahr eines Brandes oder elektrischen Schlages. Es sollten keine mit
Flüssigkeiten gefüllten Gegenstände wie Vasen auf dem Gerät abgestellt
werden.
● Attention:
Pour éviter un incendie ou une secousse électrique, mettre l’appareil à l’abri
d’eau (éclaboussure, goutte). Ne pas poser sur l’appareil un récipient contenant
du liquide.
● Advertencia:
Para evitar incendios y descargas eléctricas, no exponga el aparato a goteo
o salpicadura de líquidos. No deberán ponerse encima del aparato objetos
que estén llenos de líquido, como por ejemplo un florero.
● Advarsel:
Til at forbygge ild og stød risiko, lad vaere med at undsaette denne
indretning for drypning eller overstaenkning. Der må ikke anbringes nogen
genstande fyldt med vand, som for eksempel vaser, på dette apparat.
● Advarsel:
For å unngå brann eller kortslutning, utsett ikke produktet for vann eller
fuktighet. Gjenstander som inneholder vaeske, feks. en blomstervase, må
ikke plasseres oppå apparatet.
● Varoitus:
Älä vie laitetta sateeseen tai kosteisiin tiloihin. Jos laite on kostunut,
anna sen kuivua ennen kuin käytät sitä verkkovirralla. Nestettä sisältäviä
astioita kuten esim. kukkamaljakoita ei saa asettaa laitteen päälle.
● Varning:
Utsätt inte enheten för dropp eller stänk för att förhindra brand eller
elektriska stötar. Inga vätskefyllda föremål såsom vaser bör placeras
på enheten.
● Attenzione:
Per prevenire incendi o scosse elettriche, non fare gocciolare nessun liquido
sull’apperecchio e non bagnarlo. Non collocarvi sopra nessun oggetto
riempiro d’acqua, come peresempio vasi.
● Waarschuwing:
Stel het toestel niet bloot aan druipend of spattend water om brand en
elektrische schokken te voorkomen. Met vloeistoffen gevulde voorwerpen,
zoals vazen, mogen niet op het toestel geplaatst worden.
● Warning:
To prevent fire or shock hazard, do not expose this appliance to dripping or
splashing. No objects filled with liquids, such as vases, shall be placed on
the apparatus.
iii
00/12/29
COMMON_1500.fm
● VORSICHT
Verwendung von Regelungen oder Einstellungen bzw. Durchführung von
anderen Verfahren als die hierin angegebenen kann zum Aussetzen
gefährlicher Strahlung führen.
Da der in diesem Compact Disc Player verwendete Laserstrahl für die Augen
schädlich ist, ist das Gehäuse unter keinen Umständen zu zerlegen.
Wenden Sie sich für Wartungsarbeiten nur an berechtigten Fachhändler.
● CAUTION
Use of controls, adjustments or performance of procedures other than
those specified herein may result in hazardous radiation exposure.
As the laser beam used in this compact disc player is harmful to the eyes,
do not attempt to disassemble the cabinet. Refer servicing to qualified personnel only.
● ATTENTION
Respecter les indications données relatives à la manipulation, au réglage
et au fonctionnement. En cas de non-respect, on s’exposera à une radiation dangereuse.
Éviter absolument de démonter l’appareil, qui utilise un rayon laser nuisible
aux yeux. Pour toute réparation, s’adresser à une personne qualifiée.
● PRECAUCIÓN
El uso de los controles, ajustes o ejecución de procedimientos distintos de los
especificados podría causar la exposición a radiación peligrosa.
No intente desmontar la caja ya que el haz de láser usado en este tocadiscos
de discos compactos es perjudicial para los ojos. Para el servicio de reparación,
consulte a una persona cualificada.
● OBSERVERA
Användning av reglage eller justeringar eller handhavande på annat sätt
än som anges kan leda till farlig bestrålning.
Försök inte ta isär höljet eftersom CD-spelarens laserstråle är skadlig för
ögonen. Överlåt service endast till kvalificerad personal.
● ATTENZIONE
L’uso dei comandi e l’effettuazione di regolazioni e procedimenti diversi da
quelli specificati nel manuale possono provocare una pericolosa esposizione
alle radiazioni.
Poiché il raggio laser usato in questo giradischi può danneggiare gli occhi,
non smontare l’apparecchio. Per le riparazioni rivolgersi a personale
specializzato.
● LET OP
Gebruik van regelaars, het maken van instellingen, gebruik of handelingen anders
dan in deze gebruiksaanwijzing vermeld, kan gevaarlijke straling blootleggen.
De laserstraal in deze CD-speler kan de ogen beschadigen, Probeer
derhalve de ombouw niet te verwijderen. Laat reparaties alleen over aan
erkend onderhoudspersoneel.
iv
00/12/29
COMMON_1500.fm
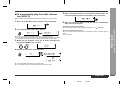
Eigenschaften der Laserdiode
Material: GaAIAs
Wellenlänge: 780 nm
Emissionsdauer: kontinuierlich
Laser-Ausgang: max. 0,6 mW
CAUTION-INVISIBLE LASER RADIATION WHEN OPEN. DO NOT STARE INTO
BEAM OR VIEW DIRECTLY WITH OPTICAL INSTRUMENTS.
VARNING-OSYNLIG LASERSTRALNING NAR DENNA DEL AR OPPNAD. STIRRA
EJ IN I STRALEN OCH BETRAKTA EJ STRALEN MED OPTISKA INSTRUMENT.
ADVERSEL-USYNLIG LASERSTRALING VED ABNING. SE IKKE IND I
STRALEN-HELLER IKKE MED OPTISKE INSTRUMENTER.
VARO! AVATTAESSA OLET ALTTIINA NAKYMATON LASERSATEILYLLE.
ALA TUIJOTA SATEESEEN ALAKA KATSO SITA OPTISEN LAITTEEN LAPI.
Caractéristiques de la diode laser
Matière: GaAIAs
Longueur d’onde: 780 nm
Durée d’émission: ininterrompue
Puissance de sortie laser maximale: 0,6 mW
VARNING-OSYNLIG LASERSTRALNING NAR DENNA DEL AR OPPNAD.
STIRRA EJ IN I STRALEN OCH BETRAKTA EJ STRALEN GENOM OPTISKT
INSTRUMENT.
ADVERSEL-USYNLIG LASERSTRALING NAR DEKSEL APNES. STIRR IKKE
INN I STRALEN ELLER SE DIREKTE MED OPTISKE INSTRUMENTER.
Características del diodo láser
Material: GaAIAs
Longitud de onda: 780 nm
Duración de emisión : continua
Salida de láser: máx. 0,6 mW
Laserdiodens egenskaper
Material: GaAIAs
Våglängd: 780 nm
Utstrålningsvaraktighet: kontinuerlig
Lasereffekt: max. 0,6 mW
Proprietà del diodo laser
Materiale: GaAIAs
Lunghezza d’onda: 780 nm
Durata di emissione: continua
Uscita massima del laser: 0,6 mW
Laser diode specificaties
Materiaal: GaAIAs
Golflengte: 780 nm
Stralingsduur: doorlopend
Laseruitgang: max. 0,6 mW
Laser Diode Properties
Material: GaAIAs
Wavelength: 780 nm
Emission Duration: continuous
Laser Output: max. 0.6 mW
VAROITUS! LAITTEEN KÄYTTÄMINEN MUULLA KUIN TÄSSÄ
KÄYTTÖOHJEESSA MAINITULLA TAVALLA SAATTAA ALTISTAA
KÄYTTÄJÄN TURVALLISUUSLUOKAN 1 YLITTÄVÄLLE NÄKYMÄTTÖMÄLLE
LASERSÄTEILYLLE.
VARNING - OM APPARATEN ANVÄNDS PÅ ANNAT SÄTT ÄN I DENNA
BRUKSANVISNING SPECIFICERAS. KAN ANVÄNDAREN UTSÄTTAS FÖR
OSYNLIG LASERSTRÅLNING, SOM ÖVERSKRIDER GRÄNSEN FÖR
LASERKLASS 1.
v
00/12/29
COMMON_1500.fm
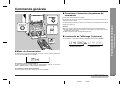
DEUTSCH
Einführung
Vielen Dank für den Kauf dieses SHARP-Produktes. Lesen Sie dieses Handbuch
sorgfältig durch, um eine bestmögliche Leistung zu erreichen. Es führt Sie in den
Betrieb dieses Produkts von SHARP ein.
Seite
Zur Beachtung . . . . . . . . . . . . . . . . . . . . . . . . . . . . . . . . . . . . . . . . . . . . . . . . . . 2 - 3
Zubehör . . . . . . . . . . . . . . . . . . . . . . . . . . . . . . . . . . . . . . . . . . . . . . . . . . . . . . . . . .3
Bedienungselemente und Anzeigen . . . . . . . . . . . . . . . . . . . . . . . . . . . . . . . . 4 - 7
! Vorbereitung für die Inbetriebnahme
Anschluß des Systems . . . . . . . . . . . . . . . . . . . . . . . . . . . . . . . . . . . . . . . . . . . 8 - 9
Fernbedienung . . . . . . . . . . . . . . . . . . . . . . . . . . . . . . . . . . . . . . . . . . . . . . . . . . . .10
Seite
! Rundfunk
Rundfunkempfang . . . . . . . . . . . . . . . . . . . . . . . . . . . . . . . . . . . . . . . . . . . . . . . . . 18
Empfangen des gespeicherten Senders . . . . . . . . . . . . . . . . . . . . . . . . . . . . . . . 19
! RDS-Rundfunk
Benutzen des Radio-Daten-Systems (RDS) . . . . . . . . . . . . . . . . . . . . . . . . 20 - 27
! Bandwiedergabe
! Grundbedienung
Cassettenwiedergabe . . . . . . . . . . . . . . . . . . . . . . . . . . . . . . . . . . . . . . . . . . . . . . 28
Allgemeine Regelung . . . . . . . . . . . . . . . . . . . . . . . . . . . . . . . . . . . . . . . . . . . . . .11
Klangregelung . . . . . . . . . . . . . . . . . . . . . . . . . . . . . . . . . . . . . . . . . . . . . . . . . . . .12
Einstellen der Uhr . . . . . . . . . . . . . . . . . . . . . . . . . . . . . . . . . . . . . . . . . . . . . . . . .13
! Aufnahme
! CD-Wiedergabe
CD-Wiedergabe . . . . . . . . . . . . . . . . . . . . . . . . . . . . . . . . . . . . . . . . . . . . . . . 14 - 15
! Fortgeschrittene CD-Wiedergabe
Bestimmen einer abzuspielenden Disc . . . . . . . . . . . . . . . . . . . . . . . . . . . . . . . .16
Umschalten der Zeitanzeige . . . . . . . . . . . . . . . . . . . . . . . . . . . . . . . . . . . . . . . . .16
Wiederholte Wiedergabe und Zufallswiedergabe . . . . . . . . . . . . . . . . . . . . . . . .16
Programmierte Wiedergabe . . . . . . . . . . . . . . . . . . . . . . . . . . . . . . . . . . . . . . . . .17
Aufnahme von CD auf Cassette . . . . . . . . . . . . . . . . . . . . . . . . . . . . . . . . . . . . . . 29
Aufnahme von Radio auf Cassette . . . . . . . . . . . . . . . . . . . . . . . . . . . . . . . . . . . . 30
! Fortgeschrittene Funktionen
-Einführung/Inhalt-
! Allgemeine Informationen
Wichtige Anweisung
Inhalt
Timer- und Sleep-Funktion . . . . . . . . . . . . . . . . . . . . . . . . . . . . . . . . . . . . . . 31 - 33
Erhöhen des Stereo-Systems . . . . . . . . . . . . . . . . . . . . . . . . . . . . . . . . . . . . 34 - 35
! Referenzen
Fehlersuchtabelle . . . . . . . . . . . . . . . . . . . . . . . . . . . . . . . . . . . . . . . . . . . . . 36 - 37
Wartung . . . . . . . . . . . . . . . . . . . . . . . . . . . . . . . . . . . . . . . . . . . . . . . . . . . . . . . . . 37
Technische Daten . . . . . . . . . . . . . . . . . . . . . . . . . . . . . . . . . . . . . . . . . . . . . . . . . 38
DEUTSCH
01/1/9
D1.fm
D-1
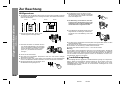
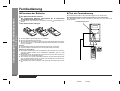
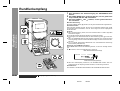
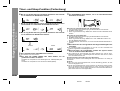
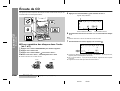
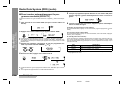
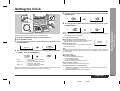
Zur Beachtung
! Allgemeines
" Sicherstellen, daß das Gerät an einem Raum mit guter Lüftung gestellt ist und daß
ein Abstand von mindesten 20 cm entlang den Seiten, dem Oberteil und der Rückseite des Geräts bleibt.
20 cm
20 cm
20 cm
" Das Gerät auf eine feste, ebene und erschütterungsfreie Unterlage stellen.
-Zur Beachtung-
Allgemeine Informationen
20 cm
D-2
" Das Gerät fernhalten von direktem Sonnenlicht, starken Magnetfeldern, sehr staubigen
Orten, Feuchtigkeit und elektronischen/elektrischen Geräten (Heimcomputer, Fernkopierer usw.), die elektrisches Rauschen
erzeugen.
" Nichts auf das Gerät stellen.
" Das Gerät nicht Feuchtigkeit, Temperaturen über 60°C oder extrem niedrigen
Temperaturen aussetzen.
" Wenn das System nicht richtig arbeitet, das Netzkabel von der Netzsteckdose
trennen. Das Netzkabel wieder anschließen und dann das System einschalten.
" Bei einem Gewitter ist es am sichersten, wenn
das Netzkabel herausgezogen wird.
" Das Netzkabel immer am Stecker aus der
Netzsteckdose ziehen, niemals am Kabel ziehen, da das Ziehen des Kabels innere Kabellitzen beschädigen kann.
" Die Abdeckung nicht entfernen, weil dies
zu elektrischem Schlag führen kann. Interne Wartung sollte von Ihrem SHARP-Kundendienstzentrum ausgeführt werden.
" Durch Bedecken der Belüftungsöffnungen mit
Gegenständen wie Zeitungen, Tischtüchern,
Vorhängen usw. ist die Belüftung nicht zu behindern.
" Es sollten keine unbedeckten Flammenquellen wie angezündete Kerzen auf dem
Gerät abgestellt werden.
" Sie sollten auf die Umweltaspekte von Batterieentsorgung achten.
" Das Gerät ist für Verwendung in mildem Klima konstruiert.
" Dieses Gerät sollte im Bereich von 5°C - 35°C benutzt werden.
Warnung:
Die auf diesem Gerät angegebene Spannung muß verwendet werden. Der Betrieb
des Produktes mit einer Spannung, die höher ist als die angegebene, ist gefährlich
und kann zu Brand oder anderem Unfall durch Beschädigung führen. SHARP kann
nicht für Schäden verantwortlich gemacht werden, die aus Betrieb mit einer unvorschriftsmäßigen Spannung resultieren.
! Lautstärkeregelung
Der Schallpegel bei einer gegebenen Lautstärkeeinstellung hängt von Lautsprecherleistung, Stelle und verschiedenen anderen Faktoren ab. Es ist ratsam, hohen Lautstärkepegeln nicht auszusetzen, die beim Einschalten des Geräts mit zu hoher
Lautstärkeeinstellung oder während der kontinuierlichen Wiedergabe bei hohen
Lautstärkepegeln auftreten.
DEUTSCH
01/1/9
D1.fm
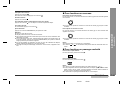
Zubehör
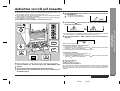
! Pflege der Compact Discs
Prüfen Sie, ob die folgenden Zubehörteile vorhanden sind.
1
"AA"-Batterie (UM/SUM-3, R6, HP-7
oder gleichwertiges) 2
JA
Richtig
MW-Rahmenantenne
1
UKW-Antenne
A
" Für Wiedergabe, zum Erzielen der besten Klangergebnisse Normal- oder
Low-Noise-Bänder verwenden. (Reineisen- oder CrO -Bänder werden nicht
empfohlen.) Für Aufnahme nur Normalbänder verwenden.
" Keine C-120 Bänder oder Bänder unzureichender Qualität verwenden, weil sie zu
Funktionsstörungen führen können.
" Vor Einlegen einer Cassette in das Cassettenfach das Band mit einem Kugelschreiber oder Bleistift straffen.
: Blau
B
! Cassettenband
1
: Schwarz
Lautsprecherkabel für MAIN-Anschlüsse
A
2
: Rot
B
: Schwarz
Lautsprecherkabel für SUBWOOFER-Anschlüsse
2
-Zur Beachtung/Zubehör-
NEIN
Fernbedienung
Allgemeine Informationen
Compact Discs sind ziemlich widerstandsfähig gegen Beschädigungen, aber
Falschabtastungen können infolge einer Ansammlung des Staubs auf der Discoberfläche auftreten.
" Auf die Disc darf nichts geschrieben werden, insbesondere auf die Seite ohne Etikett; davon werden Tonsignale abgetastet.
" Die Discs nicht direkter Sonnenbestrahlung, Hitze oder Feuchtigkeit aussetzen.
" Die CDs immer am Rand halten. Durch Fingerabdrücke, Schmutz oder Wasser
auf den CDs kann Störgeräusch oder falsche Abtastung verursacht werden. Wenn
eine CD schmutzig ist oder nicht einwandfrei abgespielt wird, sie mit einem weichen, trockenen Tuch von der Mitte gerade nach außen dem Radius entlang abwischen.
Hinweis:
Nur die obigen Zubehörteile gehören zum Lieferumfang.
Cassetten haben entfernbare Zungen, die versehentliches Bespielen oder Löschen
verhindern. Entfernt man die Zunge, dann kann die entsprechende Seite nicht
gelöscht werden. Zum Löschen oder erneuten Bespielen die Zungenöffnung mit Klebeband abdecken.
Seite A (1)
Zunge für Seite B (2) Zunge für Seite A (1)
DEUTSCH
01/1/9
D1.fm
D-3
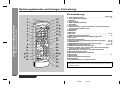
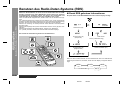
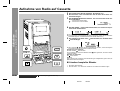
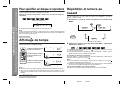
Bedienungselemente und Anzeigen
! Frontplatte
Bezugsseite
2
-Bedienungselemente und Anzeigen-
Allgemeine Informationen
1
3
4
5
6
8
17 18 19 20 21
22
23
24
25
D-4
9
10
11
12
13
7
26
27
28
29
1. Cassettenfach . . . . . . . . . . . . . . . . . . . . . . . . . . . . . . . . . . . . . . . . . .28
2. Lautstärke-Aufwärts-/Demo-Taste . . . . . . . . . . . . . . . . . . . . . . .11, 12
3. Lautstärke-Abwärts-Taste . . . . . . . . . . . . . . . . . . . . . . . . . . . . . . . . .12
4. Timereinstellanzeige . . . . . . . . . . . . . . . . . . . . . . . . . . . . . . . . . . . . .32
5. Netz-/Bereitschaftstaste . . . . . . . . . . . . . . . . . . . . . . . . . . . . . . . . . .11
6. CD-Direktwiedergabetasten (mit Anzeigen)/CD-Auswurftasten . . . . 14, 16
7. Disc-Schubladen. . . . . . . . . . . . . . . . . . . . . . . . . . . . . . . . . . . . . . . . .14
8. Kopfhörerbuchse . . . . . . . . . . . . . . . . . . . . . . . . . . . . . . . . . . . . . . . .35
9. Taste zum Öffnen/Schließen des Bedienungsfeldes . . . . . . . . . . .11
10.CD-Wiedergabe-Betriebsartenwahltaste . . . . . . . . . . . . . . . . . . . . .16
11.Equalizer-Betriebsartenwahltaste . . . . . . . . . . . . . . . . . . . . . . . . . .12
12.Extrabaßtaste . . . . . . . . . . . . . . . . . . . . . . . . . . . . . . . . . . . . . . . . . . .12
13.Anzeigetaste . . . . . . . . . . . . . . . . . . . . . . . . . . . . . . . . . . . . . . . . .13, 31
14.Menütaste . . . . . . . . . . . . . . . . . . . . . . . . . . . . . . . . . . . . . . . .13, 31, 33
15.Jog Shuttle . . . . . . . . . . . . . . . . . . . . . . . . . . . . . .13, 15, 17, 19, 31, 33
16.Eingabetaste . . . . . . . . . . . . . . . . . . . . . . . . . . . . . . . . . .13, 19, 31, 33
17.CD-Taste . . . . . . . . . . . . . . . . . . . . . . . . . . . . . . . . . . . . . . . . .14, 29, 32
18.Band-Taste . . . . . . . . . . . . . . . . . . . . . . . . . . . . . . . . . . . . . . .28, 30, 32
19.Tuner (Wellenbereich)-Taste . . . . . . . . . . . . . . . . . . . . . . . . . . . .18, 32
20.Reserve-Taste . . . . . . . . . . . . . . . . . . . . . . . . . . . . . . . . . . . . . . . . . . .34
21.Band-Rücklauf-Betriebsartenwahltaste . . . . . . . . . . . . . . . . . . .28, 29
22.Löschtaste . . . . . . . . . . . . . . . . . . . . . . . . . . . . . . . . . . . . . . . . . .17, 19
23.Speichertaste . . . . . . . . . . . . . . . . . . . . . . . . . . . . . . . . . . . . . . . . . . .17
24.CD-Schnellrücklauf-, Band-Schnellumspul- oder AbstimmAbwärts-Taste (mit Anzeige) . . . . . . . . . . . . . . . . . . . . . .15, 18, 28, 34
25.Band-Rücklauf-Wiedergabetaste (mit Anzeige) . . . . . . . . .28, 29, 34
26.CD-Schnellvorlauf-, Band-Schnellumspul- oder Abstimm-AufwärtsTaste (mit Anzeige) . . . . . . . . . . . . . . . . . . . . . . . . . . . . .15, 18, 28, 34
27.Bandaufnahmepausentaste . . . . . . . . . . . . . . . . . . . . . . . . . . . .29, 34
28.Stopptaste (mit Anzeige) . . . . . . . . . . . . . . . . . . . . . . . . . . . .15, 17, 29
29.CD-Wiedergabe- oder Pausen-, Band-Vorlauf-Wiedergabetaste
(mit Anzeige) . . . . . . . . . . . . . . . . . . . . . . . . . . . . . . . . . . .15, 28, 29, 30
14 15 16
DEUTSCH
01/1/9
D1.fm
2
3
4
5
6
7
8
9 10 11
12
20
21
22
23
24
1
5
2
3
4
Allgemeine Informationen
13
14
15
16
17
18
19
25
26
27
28
1
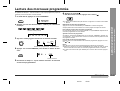
1. Funktionsanzeige
2. Extrabaßanzeige
3. Zufallswiedergabe-Anzeige
4. Speicheranzeige
5. Anzeige für gesamte Anzahl/Zeit
6. Anzeige für verbleibende Zeit
7. Timer-Wiedergabeanzeige
8. Sleep-Anzeige
9. Timer-Aufnahmeanzeige
10.Alldisc-Wiedergabeanzeige
11.Cassetten-Anzeige
12.Pegelanzeigen
13.CD-Anzeigen
14.CD-Wiederholanzeige
15.CD-Pausenanzeige
16.CD-Wiedergabeanzeige
17.UKW-Stereoanzeige
18.Band-Rücklauf-Betriebsartenanzeige
19.UKW-Stereo-Betriebsartenanzeige
20.RDS-Anzeige
21.Radiotext-Anzeige
22.Uhrzeitanzeige
23.Dynamic-PTY-Anzeige
24.Verkehrsfunk-Anzeige
25.EON-Anzeige
26.Verkehrsinformationsanzeige
27.Programmartenanzeige
28.Verkehrsdurchsage-Anzeige
! Rückwand
6
7
-Bedienungselemente und Anzeigen-
! Multifunktions-LCD-Anzeige
Bezugsseite
1. MW-Rahmenantennenbuchse . . . . . . . . . . . . . . . . . . . . . . . . . . . . . . 8
2. UKW-Antennenbuchse (75 Ohm) . . . . . . . . . . . . . . . . . . . . . . . . . . . . 8
3. Reserveeingangsbuchsen . . . . . . . . . . . . . . . . . . . . . . . . . . . . . . . . 34
4. CD-Digital-Ausgangsbuchse . . . . . . . . . . . . . . . . . . . . . . . . . . . . . . . 35
5. Lautsprecheranschlüsse . . . . . . . . . . . . . . . . . . . . . . . . . . . . . . . . . . 8
6. Netzkabel . . . . . . . . . . . . . . . . . . . . . . . . . . . . . . . . . . . . . . . . . . . . . . . 8
7. Transportsicherungsschraube . . . . . . . . . . . . . . . . . . . . . . . . . . . 8, 37
DEUTSCH
01/1/9
D1.fm
D-5
Bedienungselemente und Anzeigen (Fortsetzung)
! Fernbedienung
-Bedienungselemente und Anzeigen-
Allgemeine Informationen
Bezugsseite
1
15
2
16
3
4
17
5
19
6
7
20
18
8
21
22
9
23
10
24
11
25
12
26
13
14
27
28
29
30
D-6
1. Fernbedienungssender . . . . . . . . . . . . . . . . . . . . . . . . . . . . . . . . . . .10
2. Tuner (Wellenbereich)-Taste
3. CD-Taste
4. Reserve-Taste
5. CD-Direktwiedergabetasten
6. Löschtaste
7. Speichertaste
8. CD-Titel-Abwärts- oder Schnellrücklauf-, Band-Schnellumspul-,
Tuner-Voreinstell-Abwärts-Taste
9. Eingabetaste
10.Stopptaste
11.Menütaste
12.Zeit-Taste . . . . . . . . . . . . . . . . . . . . . . . . . . . . . . . . . . . . . . . . . . .16, 27
13.UKW-Stereo-Betriebsartentaste . . . . . . . . . . . . . . . . . . . . . . . . . . . .18
14.Taste zum Öffnen/Schließen des Bedienungsfeldes
15.Band-Taste
16.Netz-/Bereitschaftstaste
17.Taste für RDS-Programmart/Verkehrsinformations-Suchlauf . . . 23 - 25
18.RDS EON-Taste . . . . . . . . . . . . . . . . . . . . . . . . . . . . . . . . . . . . . .24, 25
19.RDS ASPM (Automatischer Senderspeicher)-Taste . . . . . . . . . . . .22
20.RDS-Darstellungsartenwahltaste . . . . . . . . . . . . . . . . . . . . .20, 24, 27
21.CD-Wiedergabe-Betriebsartenwahltaste
22.CD-Titel-Aufwärts- oder Schnellvorlauf-, Band-Schnellumspul-,
Tuner-Voreinstell-Aufwärts-Taste
23.CD-Wiedergabe- oder Pausen-, Band-Wiedergabetaste
24.Bandaufnahmepausentaste
25.Band-Rücklauf-Betriebsartenwahltaste
26.Dimmertaste . . . . . . . . . . . . . . . . . . . . . . . . . . . . . . . . . . . . . . . . . . . .11
27.Anzeigetaste
28.Equalizer-Betriebsartenwahltaste
29.Extrabaßtaste
30.Lautstärke-Aufwärts- und Abwärts-Tasten
Tasten mit " "-Markierung in der Abbildung können nur mit Hilfe der Fernbedienung
betätigt werden. Sonstige Tasten können auf dem Hauptgerät und der Fernbedienung betätigt werden.
DEUTSCH
01/1/9
D1.fm
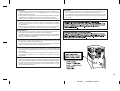
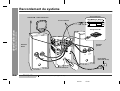
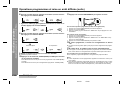
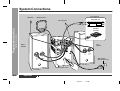
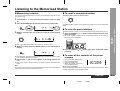
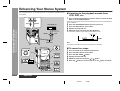
! Lautsprechersystem
Lautsprecher-Frontverkleidungen
sind abnehmbar:
Aufstellen des Lautsprechersystems: Linker Lautsprecher Rechter LautEs gibt keinen Unterschied zwischen dem
rechten und dem linken Lautsprecher.
2
sprecher
4
5
3
6
1. Tieftöner
2. Hochtöner
3. Sub-Tieftöner
4. Sub-Tieftöner-Anschlüsse
5. Haupt-Lautsprecher-Anschlüsse
6. Baßreflex-Öffnung
Bi-Verstärker-System:
Jede Lautsprecher-Einheit hat einen eingebauten Sub-Tieftöner (Tiefen), der
getrennt vom Tief- und Hochtöner (Mitten/Höhen) angetrieben wird. Zwei unabhängige Verstärker, welche individuelle Frequenzgänge haben, werden verwendet.
Durch separates Verstärken der zwei Frequenzbänder wird klarerer Klang erzielt.
Tieftöner
Hochtöner
Leistungsverstär- Vorverstärker
ker
Sub-Tieftöner
Mitten/Höhen
(200 Hz - 20 kHz)
Ultra-Tiefen
(60 Hz - 200 Hz)
Linker
Kanal
DEUTSCH
01/1/9
D1.fm
-Bedienungselemente und Anzeigen-
1
Allgemeine Informationen
Es ist sicherzustellen, daß nichts beim Abnehmen der Frontverkleidungen mit den
Lautsprecher-Membranen in Berührung
kommt.
D-7
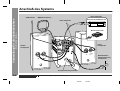
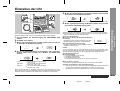
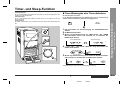
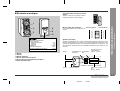
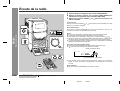
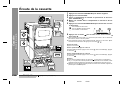
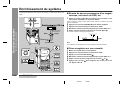
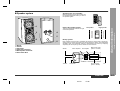
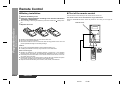
Anschluß des Systems
Nicht mitgeliefert
MW-Rahmenantenne
Videorecorder, DVD-Player usw.
Nicht mitgeliefert
Mini-Disc-Recorder
-Anschluß des Systems-
Vorbereitung für die Inbetriebnahme
UKW-Antenne
Linker
Lautsprecher
Rechter
Lautsprecher
Wandsteckdose
(Wechselspannung
230 V, 50 Hz)
Transportsicherungsschraube
D-8
DEUTSCH
Erhöhen des Stereo-Systems (Siehe Seiten 34 - 35.)
01/1/9
D1.fm
! Anschluß der Antennen
Haupt-Lautsprecher-Anschlüsse:
Das blaue Kabel an (+) und das schwarze an (-) anschließen.
Sub-Tieftöner-Anschlüsse:
Das rote Kabel an (+) und das schwarze an (-) anschließen.
Rechter
Lautsprecher
Linker
Lautsprecher
Mitgelieferte UKW-Antenne:
Den UKW-Antennendraht an die Buchse FM 75 OHMS anschließen und in die Richtung
verlegen, wo das stärkste Empfangssignal erhalten werden kann.
Mitgelieferte MW-Rahmenantenne:
Die MW-Rahmenantenne an die AM LOOP-Buchse anschließen. Danach die MW-Rahmenantenne für optimalen Empfang ausrichten. Die MW-Rahmenantenne auf ein Bord
usw. stellen oder an einen Ständer bzw. eine Wand mit Schrauben (nicht mitgeliefert)
anbringen.
1
Blau
Schwarz
2
3
Rot
Vorsicht:
Hinweise:
" Durch Stellen der Antenne auf das Stereo-System oder in der Nähe des Netzkabels
kann Rauschen aufgefangen werden. Für besseren Empfang die Antenne vom StereoSystem fernhalten.
" Die mitgelieferte UKW-Antenne nicht an die UKW-Außenantenne anschließen. Ansonsten können Störungen eintreten.
" Die Lautsprecherkabel sind zuerst an die Lautsprecher und dann an das Gerät
anzuschließen.
" Niemals die MAIN- und die SUBWOOFER-Anschlüsse verwechseln. Das StereoSystem oder die Lautsprecher können beschädigt werden.
" Nur die mitgelieferten Lautsprecher sollten mit diesem Produkt verwendet werden. Niemals andere Lautsprecher mit diesem Gerät bzw. die mitgelieferten mit anderen Geräten verwenden.
" Beim Anschließen der Lautsprecher am Gerät nicht den rechten und linken Kanal verwechseln. Der rechte Lautsprecher ist derjenige auf der rechten Seite, wenn sich Sie
zum Gerät wenden.
" Den blanken Lautsprecherkabeln wird nicht erlaubt, miteinander in Berührung zu
bringen.
Installieren der MW-Rahmenantenne:
Montage
Montieren an der Wand
Falsch
Wand
Schrauben
UKW-Außenantenne
Durch Verwendung einer UKW-Außenantenne kann ein besserer Empfang erzielt werden.
Wenden Sie sich an Ihren Fachhändler.
UKW-Außenantenne
Falsch
" Sie sollten nicht auf den Lautsprechern stehen oder sitzen. Sie können sich verletzen.
! Anschluß des Netzkabels
-Anschluß des Systems-
Vor dem Einschalten der Stromversorgung unbedingt die Transportsicherungsschraube auf der Rückseite des Gerätes mit einem Schlitzschraubenzieher oder
einer Münze entfernen.
Bei erneutem Transportieren des Gerätes ist diese Schraube erforderlich. Sie aufbewahren
(siehe Seite 37).
! Anschluß der Lautsprecher
Vorbereitung für die Inbetriebnahme
! Entfernen der Transportsicherungsschraube
Prüfen, daß alle Anschlüsse richtig gemacht worden sind, und dann das Netzkabel dieses
Geräts an die Steckdose anschließen. Wenn das Gerät zum ersten Mal angeschlossen
wird, schaltet es in die Demonstrations-Betriebsart.
Hinweis:
Wenn das Gerät längere Zeit nicht verwendet wird, den Stecker herausziehen.
Demonstrations-Betriebsart (Siehe Seite 11.)
01/1/9
D1.fm
DEUTSCH
D-9
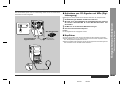
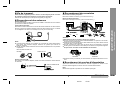
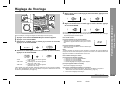
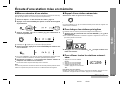
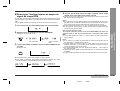
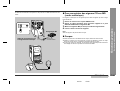
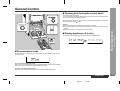
! Einsetzen der Batterien
1 Den Batteriefachdeckel entfernen.
2 Die mitgelieferten Batterien entsprechend
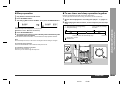
! Test der Fernbedienung
Die Fernbedienung direkt auf den Fernbedienungssensor am Gerät richten.
der im Batteriefach
angegebenen Polarität einsetzen.
" Beim Einsetzen oder Entnehmen der Batterien nach der
drücken.
3
-Fernbedienung-
Vorbereitung für die Inbetriebnahme
Fernbedienung
D-10
Batterieklemme hin
Die Fernbedienung kann im unten gezeigten Bereich verwendet werden:
Die ON/STAND-BY-Taste drücken. Schaltet sich das Gerät ein? Nun können Sie
Musik genießen.
Fernbedienungssensor
Den Deckel wieder anbringen.
Zur Beachtung beim Umgang mit den Batterien:
" Alle alten Batterien gleichzeitig durch neue ersetzen.
" Alte und neue Batterien nicht mischen.
" Wenn die Batterien erschöpft sind oder wenn das Gerät längere Zeit nicht verwendet wird, sie entfernen, um Potentialbeschädigung wegen Auslaufens der Batteriesäure zu verhindern.
Vorsicht:
" Keine aufladbaren Batterien (Nickel-Kadmium-Batterie usw.) verwenden.
" Falsches Einsetzen der Batterien kann Störung des Geräts verursachen.
Hinweise zur Verwendung:
" Die Batterien ersetzen, wenn der Wirkungsbereich abnimmt oder wenn Funktionsstörungen auftreten. Kaufen Sie 2 "AA"-Batterien (UM/SUM-3, R6, HP-7 oder
gleichwertiges).
" Den Sender auf der Fernbedienung und den Sensor auf dem Stereo-System mit
einem weichen Tuch regelmäßig reinigen.
" Wenn starkes Licht auf dem Fernbedienungssensor auf dem Stereo-System fällt,
kann der Betrieb gestört werden. In diesem Falle die Beleuchtung oder die Aufstellung des Stereo-Systems verändern.
" Die Fernbedienung nicht Feuchtigkeit, Hitze, Stoß oder Erschütterungen aussetzen.
0,2 m - 6 m
DEUTSCH
01/1/9
D1.fm
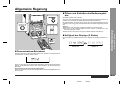
Allgemeine Regelung
! Öffnen und Schließen des Bedienungsfeldes
Das Bedienungsfeld wird motorisiert.
Wenn das Gerät eingeschaltet wird, öffnet sich das Bedienungsfeld automatisch; es
schließt, wenn das Gerät auf die Bereitschafts-Betriebsart gestellt wird.
! Helligkeit des Displays (2 Stufen)
Durch Drücken der DIMMER-Taste kann die Helligkeit des Displays geändert werden.
Dimmer aus
Dimmer an
! Demonstrations-Betriebsart
-Allgemeine Regelung-
Vorsicht:
" Beim Öffnen oder Schließen des Bedienungsfeldes nicht darauf stoßen.
" Die Tasten auf dem Bedienungsfeld nicht stark drücken. Ansonsten kann sein
Scharnier gebrochen werden.
" Darauf achten, daß sich Sie die Finger im Bedienungsfeld nicht klemmen.
Grundbedienung
Bei eingeschalteter Stromversorgung können Sie das Bedienungsfeld öffnen oder
schließen, indem die -Taste zum Öffnen/Schließen des Bedienungsfeldes gedrückt
wird.
Wenn das Gerät zum ersten Mal angeschlossen wird, schaltet es in die Demonstrations-Betriebsart. Sie sehen Wörter scrollen.
Abbrechen der Demonstrations-Betriebsart:
Wenn sich das Gerät in der Bereitschafts-Betriebsart (Demonstrations-Betriebsart)
befindet, die DEMO-Taste drücken. Das Gerät schaltet in die StromeinsparungsBetriebsart.
Zurückschalten in die Demonstrations-Betriebsart:
Wenn sich das Gerät in der Bereitschafts-Betriebsart befindet, die DEMO-Taste noch
einmal drücken.
DEUTSCH
01/1/9
D2.fm
D-11
Klangregelung
! Baßregelung
Wenn die X-BASS-Taste gedrückt wird, schaltet das Gerät in die Extrabaß-Betriebsart, die die Tiefen betont, und "X-BASS" erscheint. Zum Abbrechen der ExtrabaßBetriebsart die X-BASS-Taste betätigen.
Abgebrochen.
! Equalizer
Wenn die EQUALIZER-Taste gedrückt wird, wird die gegenwärtige Betriebsarteneinstellung angezeigt. Zum Schalten auf eine andere Betriebsart die EQUALIZER-Taste
wiederholt drücken, bis die gewünschte Klang-Betriebsart erscheint.
-Klangregelung-
Grundbedienung
Bässe werden betont.
! Lautstärkeregelung
Zum Erhöhen der Lautstärke die VOLUME
VOLUME -Taste drücken.
D-12
Kein Klang wird modifiziert.
Bässe und Höhen werden betont.
Höhen werden reduziert.
Gesangsstimmen (Mitteltöne)
werden betont.
-Taste drücken; zum Vermindern die
DEUTSCH
01/1/9
D2.fm
Einstellen der Uhr
5
Mit der Jog Shuttle-Steuerung die Stunde einstellen und innerhalb
von 2 Minuten die ENTER-Taste drücken.
" Wenn die 12-Stunden-Anzeige gewählt wird, schaltet "AM" automatisch auf "PM".
1
2
3
4
Zum Einschalten der Stromversorgung die ON/STAND-BY-Taste
drücken.
Die MENU-Taste drücken.
Mit der Jog Shuttle-Steuerung "CLOCK" wählen und innerhalb von
10 Sekunden die ENTER-Taste drücken.
Mit der Jog Shuttle-Steuerung die 24-Stunden- oder 12-StundenAnzeige wählen und innerhalb von 2 Minuten die ENTER-Taste
drücken.
"0:00"
"AM 12:00"
"AM 0:00"
Die 24-Stunden-Anzeige erscheint.
(0:00 - 23:59)
Die 12-Stunden-Anzeige erscheint.
(AM 12:00 - PM 11:59)
Die 12-Stunden-Anzeige erscheint.
(AM 0:00 - PM 11:59)
Darauf achten, daß dies nur eingestellt werden kann, wenn das Gerät zum ersten
Mal angeschlossen wird oder rückgesetzt worden ist. [Weitere Einzelheiten sind dem
Abschnitt "Löschen all des Speichers (Rücksetzen)" auf Seite 37 zu entnehmen.]
" Die Stunde geht nicht vorwärts, selbst wenn Minuten von "59" zu "00" vorrücken.
" Die Uhr beginnt ab "0" Sekunden. (Sekunden werden nicht angezeigt.) Die Zeitanzeige verschwindet ein paar Sekunden später.
Überprüfen der Zeitanzeige:
[Wenn sich das Gerät in der Bereitschafts-Betriebsart befindet]
Die DISPLAY-Taste auf der Fernbedienung drücken.
Die Zeitanzeige erscheint etwa 3 Sekunden lang.
[Bei eingeschalteter Stromversorgung]
Die MENU-Taste drücken. Die Zeitanzeige erscheint
ungefähr 10 Sekunden lang.
Hinweis:
"CLOCK" erscheint oder die Uhrzeit blinkt per Druck auf die CLOCK-Taste, wenn
nach einem Stromausfall oder nach dem Herausziehen des Netzsteckers die Stromversorgung wiederhergestellt wird. Die Uhr folgendermaßen wieder einstellen.
Erneutes Einstellen der Uhr:
[Wenn Uhrzeit blinkt]
1 Die ON/STAND-BY-Taste drücken.
2 Die MENU-Taste drücken.
3 Die ENTER-Taste drücken.
4 Den Abschnitt "Einstellen der Uhr" ab Schritt 5 durchführen.
-Einstellen der Uhr-
In diesem Beispiel ist die Uhr für die 24-Stunden-Anzeige (0:00) eingestellt.
Mit der Jog Shuttle-Steuerung die Minuten einstellen und innerhalb
von 2 Minuten die ENTER-Taste drücken.
Grundbedienung
6
[Wenn "CLOCK" erscheint]
Die Schritte im Abschnitt "Einstellen der Uhr" von Anfang an durchführen.
Verändern der 24-Stunden- oder 12-Stunden-Anzeige:
1 All den programmierten Inhalt löschen. [Weitere Einzelheiten sind dem Abschnitt
"Löschen all des Speichers (Rücksetzen)" auf Seite 37 zu entnehmen.]
2 Die Schritte im Abschnitt "Einstellen der Uhr" von Anfang an durchführen.
DEUTSCH
01/1/9
D2.fm
D-13
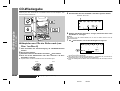
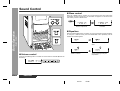
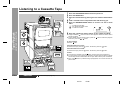
CD-Wiedergabe
Dieses System kann Audio-CD-Rs und CD-RWs ebenso wie CDs abspielen, aber
kann nicht darauf aufzeichnen.
5
Zum Schließen der Disc-Schublade 1 die DISC 1 -Taste drücken.
Gesamtzahl von Titeln
6
-CD-Wiedergabe-
CD-Wiedergabe
Bedeutet "Disc innen".
Dadurch, daß Sie den Schritten 3 - 5 folgen, können Sie Discs in die
Schubladen 2 - 6 einlegen.
Hinweis:
Das System sucht die CD-Schubladen, bis es eine CD findet; danach sucht es
andere Schubladen.
7
Die
-Taste drücken, um mit der Wiedergabe zu beginnen.
! Abspielen von CDs der Reihe nach (von
Disc 1 zu Disc 6)
1 Zum Einschalten der Stromversorgung die ON/STAND-BY-Taste
drücken.
2
3
4
Die CD-Taste drücken.
Zum Öffnen der Disc-Schublade 1 die DISC 1 -Taste drücken.
Eine CD mit der Etikettenseite nach oben weisend in die DiscSchublade 1 einlegen.
" Auf jeden Fall 8 cm CDs in die Mitte der Disc-Schubladen legen.
12 cm
D-14
Gesamte Spielzeit
DEUTSCH
" Wiedergabe beginnt ab Titel 1 auf DISC 1. Nach der Wiedergabe der Disc wird die
nächste automatisch abgespielt.
" Wenn keine CD in einer der Disc-Schubladen 1 - 6 vorhanden ist, wird die Schublade übersprungen, und die nächste CD wird abgespielt.
" Nach der Wiedergabe des letzten Titels auf DISC 6 stoppt der CD-Player automatisch.
8 cm
Klangregelung (Siehe Seite 12.)
01/1/9
D2.fm
Weitergehen zum Anfang des nächsten Titels:
Während der Wiedergabe den Jog Shuttle im Uhrzeigersinn um eine Position langsam drehen.
" Dadurch, daß der Jog Shuttle gedreht wird, bis die gewünschte Titelnummer
erscheint, können Sie zu einem Titel überspringen.
Neustart des laufenden Titels:
Während der Wiedergabe den Jog Shuttle entgegen dem Uhrzeigersinn um eine
Position langsam drehen.
" Dadurch, daß der Jog Shuttle gedreht wird, bis die gewünschte Titelnummer
erscheint, können Sie zu einem Titel überspringen.
Hinweise:
" Sie können den Anfang eines Titels auf einer einzigen Disc auffinden.
" Durch Drücken der
- oder
-Taste auf der Fernbedienung kann der Titelanfang aufgefunden werden.
! Auffinden der gewünschten Stelle
Hörbarer Schnellvorlauf:
Während der Wiedergabe die
-Taste gedrückt halten.
Hörbarer Schnellrücklauf:
Während der Wiedergabe die
-Taste gedrückt halten.
-CD-Wiedergabe-
Vorsicht:
" Zwei CDs nicht in eine Disc-Schublade einlegen.
" Beim Laufen der Disc-Schublade nicht darauf stoßen.
" Wenn bei offener Schublade ein Stromausfall eintritt, warten Sie, bis die Stromversorgung wiederhergestellt wird.
" Wenn die Disc-Schublade gewaltsam gestoppt wird, erscheint "E-CD20" im Display, und das Gerät funktioniert nicht. In diesem Falle die ON/STAND-BY-Taste
drücken, um in die Bereitschafts-Betriebsart zu schalten, und dann die Stromversorgung wieder einschalten.
" Wenn Radio- oder Fernsehempfang durch den CD-Betrieb gestört wird, das Gerät
weiter entfernt vom Radio oder Fernseher aufstellen.
" Wenn eine Disc beschädigt oder schmutzig ist bzw. verkehrtherum eingelegt
wurde, wird sie übersprungen.
! Auffinden des Titelanfangs
CD-Wiedergabe
Unterbrechen der Wiedergabe:
Die
-Taste drücken.
Um die Wiedergabe von derselben Stelle an fortzusetzen, die
-Taste noch einmal
drücken.
Beenden der Wiedergabe:
Die -Taste drücken.
Ersetzen anderer CDs während der Disc-Wiedergabe:
Die -Taste für die gestoppte Disc drücken und Discs ersetzen.
Entnehmen der CDs:
In der Stopp-Betriebsart die gewünschte -Taste drücken.
Nach Gebrauch:
Zum Schalten in die Bereitschafts-Betriebsart die ON/STAND-BY-Taste drücken.
Hinweise:
" Beim Loslassen der
- oder
-Taste beginnt normale Wiedergabe wieder.
" Wenn während des Schnellvorlaufs der letzte Titel das Ende erreicht, erscheint
"DISC END" auf dem Display, und der CD-Betrieb wird unterbrochen. Wenn während des Schnellrücklaufs der erste Titel den Anfang erreicht, beginnt Disc-Wiedergabe automatisch.
" Sie können die gewünschte Stelle auf einer einzigen Disc auffinden.
DEUTSCH
01/1/9
D2.fm
D-15
Fortgeschrittene CD-Wiedergabe
-Bestimmen einer abzuspielenden Disc / Umschalten der Zeitanzeige / Wiederholte Wiedergabe und Zufallswiedergabe-
D-16
Bestimmen einer abzuspielenden Disc
Durch Bestimmen der Discnummer können Sie eine Disc abspielen.
Eine der Tasten DISC 1 - DISC 6 drücken, um die gewünschte Disc abzuspielen.
Wiederholte Wiedergabe und
Zufallswiedergabe
Sie können eine der CD-Wiedergabe-Betriebsarten auswählen: "Wiederholte Wiedergabe", "Zufallswiedergabe" und "Normale Wiedergabe".
1
Gewählte Discnummer
" Nur die ausgewählte Disc wird automatisch abgespielt und gestoppt.
Hinweis:
Wenn eine der Tasten DISC 1 - DISC 6 grün ist, ist es bereit, die Disc abzuspielen. Wenn
keine Disc auf der Schublade vorhanden ist, beginnt Wiedergabe nicht, und die Taste verdunkelt sich.
Beenden der Wiedergabe:
Die -Taste drücken.
Die PLAY MODE-Taste wiederholt drücken, um die WiedergabeBetriebsart zu wählen.
Wiederholte Wiedergabe
Zufallswiedergabe
Umschalten der Zeitanzeige
Normale Wiedergabe
Jedesmal, wenn die TIME-Taste auf der Fernbedienung während der Wiedergabe
oder in der Pausen-Betriebsart gedrückt wird, ändert sich das Display.
Die verstrichene Spielzeit für
den laufenden Titel wird angezeigt.
Die verbleibende Spielzeit für
den laufenden Titel wird angezeigt.
Die gesamte verbleibende
Spielzeit für die Disc wird angezeigt.
2
Die -Taste oder eine der Tasten DISC 1 - DISC 6 drücken, um mit der
Wiedergabe zu beginnen.
" Wenn die Wiedergabe per Druck auf die -Taste gestartet wird, wird wiederholte Wiedergabe oder Zufallswiedergabe auf allen Discs durchgeführt.
" Wenn die Wiedergabe per Druck auf eine der Tasten DISC 1 - DISC 6 gestartet wird,
wird wiederholte Wiedergabe oder Zufallswiedergabe auf der Disc durchgeführt.
Wiederholen einer programmierten Titelfolge:
Die Schritte 1 - 6 im Abschnitt "Programmierte Wiedergabe" durchführen; die wiederholte
Wiedergabe wählen und dann die -Taste drücken.
Hinweise:
" Nach wiederholter Wiedergabe oder der Zufallswiedergabe unbedingt die -Taste drükken. Ansonsten setzt sich die Disc-Wiedergabe fort.
" In der Zufallswiedergabe werden Titel automatisch vom CD-Player gewählt und abgespielt. (Sie können die Titelfolge nicht auswählen.)
Abbrechen wiederholter Wiedergabe oder der Zufallswiedergabe:
Die PLAY MODE-Taste wiederholt drücken, um die normale Wiedergabe zu wählen.
Hinweise:
" Während der Zufallswiedergabe wird die gesamte verbleibende Spielzeit nicht angezeigt.
" Je nach der CD kann die Spielzeitanzeige nicht der auf der CD-Hülle angegebenen,
gesamten Spielzeit entsprechen, weil die Zeit zwischen den Titeln darin nicht eingeschlossen ist.
DEUTSCH
01/1/9
D2.fm
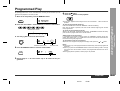
Programmierte Wiedergabe
2
In der Stopp-Betriebsart die MEMORY-Taste drücken.
Eine der Tasten DISC 1 - DISC 6 drücken, um die gewünschte Disc
auszuwählen.
Gewählte Discnummer
3
Mit der Jog Shuttle-Steuerung den gewünschten Titel auswählen.
Gewählte Titelnummer
4
Wiedergabefolge
Die MEMORY-Taste drücken, um die Titelnummer zu sichern.
Die -Taste drücken.
Die -Taste drücken, um mit der Wiedergabe zu beginnen.
" Zu dieser Zeit beginnt Wiedergabe nicht, selbst wenn eine der Tasten DISC 1 DISC 6 gedrückt wird.
Löschen von programmierten Titeln:
Die CLEAR-Taste drücken, indem die "MEMORY"-Anzeige blinkt.
Bei jedem Tastendruck wird ein Titel gelöscht, beginnend mit dem zuletzt programmierten Titel.
Abbrechen der programmierten Wiedergabe:
In der Stopp-Betriebsart die CLEAR-Taste drücken. Die MEMORY-Anzeige verschwindet und all der programmierte Inhalt wird gelöscht.
Hinzufügen von Titeln zum Programm:
Wenn ein Programm früher abgespeichert worden ist, wird die "MEMORY"-Anzeige
angezeigt. Danach die Schritte 1 - 6 durchführen, um Titel hinzuzufügen. Die neuen
Titel werden nach dem letzten Titel des ursprünglichen Programms gespeichert.
Überprüfen von zu programmierenden Titeln:
Während das Gerät in der programmierten Wiedergabe außer Betrieb ist, die
oder -Taste drücken.
Hinweise:
" Durch Öffnen einer Schublade der programmierten Discs wird die programmierte
Reihenfolge automatisch abgebrochen.
" Selbst wenn Sie die ON/STAND-BY-Taste drücken, um in die BereitschaftsBetriebsart zu schalten oder die Funktion von CD auf eine andere Funktion umzuschalten, werden die programmierten Titel nicht gelöscht.
" Während der Programm-Operation ist Zufallswiedergabe nicht möglich.
Wiedergabezeit
5
Für weitere Titel die Schritte 2 - 4 wiederholen. Bis zu 32 Titel können programmiert werden.
DEUTSCH
01/1/9
D2.fm
-Programmierte Wiedergabe-
1
6
7
Fortgeschrittene CD-Wiedergabe
Durch Bestimmen der Discs von 1 bis 6 und der Titel von 1 bis 99 können Sie bis zu
32 Titel zur Wiedergabe in gewünschter Reihenfolge auswählen.
D-17
Rundfunkempfang
1
Zum Einschalten der Stromversorgung die ON/STAND-BY-Taste
drücken.
2
Die TUNER (BAND)-Taste wiederholt drücken, um das gewünschte
Frequenzband (FM oder AM) auszuwählen.
Die Taste TUNING ( oder ) drücken, um den gewünschten Sender einzustellen.
3
Manuelle Abstimmung:
Die Taste TUNING ( oder
) drücken, bis der gewünschte Sender eingestellt wird.
Hinweise:
" Wenn Rundfunkstörung auftritt, kann der Sendersuchlauf im selben Augenblick
automatisch stoppen.
" Der Sendersuchlauf überspringt Sender von schwachem Signal.
" Zum Stoppen der Abstimmautomatik die Taste TUNING ( oder ) erneut drükken.
" Wenn ein RDS(Radio-Daten-System)-Sender eingestellt wird, wird die Frequenz
zuerst angezeigt, und dann leuchtet die RDS-Anzeige. Danach erscheint der Sendername.
" Für mit "ASPM" gespeicherte RDS-Sender kann vollautomatische Abstimmung
erzielt werden (siehe Seite 22).
-Rundfunkempfang-
Rundfunk
Abstimmautomatik:
Wenn die Taste TUNING ( oder ) mehr als 0,5 Sekunden gedrückt wird, startet
der Sendersuchlauf automatisch, und der Tuner stoppt am zuerst empfangbaren
Rundfunksender.
Empfangen einer UKW-Stereosendung:
Die ST-MODE-Taste auf der Fernbedienung drücken, um die "ST"-Anzeige anzuzeigen.
" " " erscheint, wenn eine UKW-Sendung in Stereo ist.
UKW-Stereo-Betriebsartenanzeige
UKW-Stereo-Empfangsanzeige
" Wenn der UKW-Empfang schwach ist, die ST-MODE-Taste drücken. Die "ST"Anzeige erlischt. Der Empfang schaltet auf Mono, und der Klang wird klarer.
Nach Gebrauch:
Zum Schalten in die Bereitschafts-Betriebsart die ON/STAND-BY-Taste drücken.
D-18
DEUTSCH
Klangregelung (Siehe Seite 12.)
01/1/9
D2.fm
Empfangen des gespeicherten Senders
! Abspeichern eines Senders
! Abrufen eines gespeicherten Senders
Sie können 40 MW- und UKW-Sender abspeichern und per Tastendruck abrufen.
(Vorabstimmung)
Mit der Jog Shuttle-Steuerung den gewünschten Sender wählen.
2
Die Schritte 1 - 3 im Abschnitt "Rundfunkempfang" auf Seite 18
durchführen.
Die ENTER-Taste drücken, um in die FestsenderspeicherungsBetriebsart zu schalten.
Hinweis:
Die Taste PRESET ( oder
cherten Sender abzurufen.
) auf der Fernbedienung erlaubt Ihnen, einen gespei-
! Suchlauf der Festsender
Innerhalb von 5 Sekunden mit der Jog Shuttle-Steuerung die Vorwahlkanalnummer wählen.
1
Die Taste PRESET (
Sekunden drücken.
oder
) auf der Fernbedienung mehr als 0,5
" Die Festsendernummer blinkt und die programmierten Sender werden nacheinander folgend je 5 Sekunden lang empfangen.
" Die Sender einspeichern, und dabei der Reihe nach mit dem Vorwahlkanal 1
beginnen.
" Wenn " " angezeigt wird, ist ein Sender bereits abgespeichert worden.
4
Innerhalb von 5 Sekunden die ENTER-Taste drücken, um den Sender abzuspeichern.
2
Die Taste PRESET ( or ) noch einmal drücken, wenn der
gewünschte Sender gefunden wird.
! Löschen allen Festsenderspeicherinhalts
" Wenn vor dem Speichern des Senders die "MEMORY"- und Festsendernummernanzeigen erlöschen, die mit dem Schritt 2 beginnende Bedienung wiederholen.
5
Die Schritte 1 - 4 wiederholen, um andere Sender zu speichern oder
einen Festsender zu ändern.
" Wenn ein neuer Sender abgespeichert wird, wird der früher gespeicherte Sender
gelöscht.
Hinweis:
Die Speicherschutzfunktion bleibt einige Stunden die gespeicherten Sender erhalten,
selbst wenn ein Stromausfall eintreten sollte oder das Netzkabel getrennt wird.
1
2
3
4
Rundfunk
3
Die abgespeicherten Sender können automatisch abgetastet werden. (Festsender
speicher-Suchlauf)
-Empfangen des gespeicherten Senders-
1
Die TUNER (BAND)-Taste drücken.
Die ENTER-Taste drücken.
Die CLEAR-Taste drücken.
Während "ALL CLEAR" auf dem Display erscheint, die ENTER-Taste
drücken.
Löschen nur eines Senders:
Den gespeicherten Sender abrufen. Während er auf dem Display erscheint, die
CLEAR-Taste drücken; beim Anzeige von "CLEAR" die ENTER-Taste betätigen.
DEUTSCH
01/1/9
D2.fm
D-19
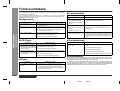
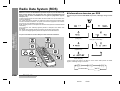
RDS-Rundfunk
-Benutzen des Radio-Daten-Systems (RDS)-
Benutzen des Radio-Daten-Systems (RDS)
RDS ist ein Rundfunkdienst, der heute von einer zunehmenden Zahl von UKWSendern angeboten wird. Diese UKW-Sender senden neben ihren regulären
Programmsignalen zusätzliche Signale. Sie können Ihre Sendernamen und
Information über die Programmart wie Sport oder Musik usw. senden.
Wenn ein RDS-Sender eingestellt wird, werden "RDS" und der Sendername angezeigt.
"TP" (Verkehrsfunkkennung) erscheint auf dem Display, wenn in dem empfangenen
Programm Verkehrsinformation ausgestrahlt wird; "TA" (Verkehrsdurchsagekennung)
erscheint, während eine Verkehrsinformation auf Sendung ist (siehe Seite 26).
Während der Sendung der EON (Enhanced Other Networks information)-Daten
erscheint "EON".
Während des Empfangs des Dynamic-PTY-Senders erscheint "PTYI" (Dynamic PTY
Indicator).
Während des Empfangs der Radiotext-Daten erscheint "RT" (Radiotext).
"CT" (Uhrzeit) erscheint, während das Gerät die RDS CT-Daten empfängt.
! Durch RDS gebotene Informationen
Bei jedem Druck auf die DISP MODE-Taste ändert sich das Display wie folgt:
Sendername (PS)
Frequenz
Programmart (PTY)
(8 Sprachen)
RDS-Uhrzeit
Nur mit Hilfe der Fernbedienung können Sie das RDS steuern.
Datum (3 Sekunden lang)
Programmart (PTY)
(Englisch fixiert)
Uhrzeit und Datum (CT)
Radiotext (RT)
Wenn Sie einen anderen Sender als einen RDS-Sender oder einen RDS-Sender,
dessen Signal schwach ist, einstellen, ändert sich das Display in folgender Reihenfolge:
NO PS
NO PTY
FM 98.00 MHz
D-20
DEUTSCH
01/1/9
D3.fm
NO RT
NO CT
Programme über Soziologie, Geschichte, Geographie, Psychologie und
Gesellschaft.
NEWS
Kurze Beschreibungen über Fakten, Ereignisse und öffentlich ausgedrückte Ansichten, Reportagen und Tatsachen.
RELIGION
Glauben einschließlich eines Gottes oder Göttern, der Natur der Existenz
und Ethik.
AFFAIRS
Programm über aktuelle Nachrichten, im allgemeinen in verschiedener
Behandlungsweise oder Konzeption, einschließlich Debatte oder Analyse.
PHONE IN
Einschließlich Mitgliedern der Öffentlichkeit, die ihre Ansichte telefonisch
oder am öffentlichen Forum äußern.
INFO
Beratungsprogramm (im weitesten Sinne).
TRAVEL
SPORT
Sportprogramm.
Features und Programme über Reise in nahe und ferne Orte, Pauschalreisen sowie Reiseideen und -gelegenheiten. Nicht verwendet für Durchsagen über Probleme, Verzögerungen oder Straßenbauarbeiten, die
augenblickliche Reise beeinflußt, wo TP/TA benutzt werden sollte.
EDUCATE
Bildungsprogramm (fundamental).
LEISURE
DRAMA
Alle Hörspiele und Serien.
CULTURE
Kulturprogramme (national oder regional, einschließlich Sprache, Theater
usw.)
Programme über Freizeitaktivitäten, an denen der Hörer (die Hörerin) teilnehmen könnte. Zum Beispiel Gartenarbeit, Fischen, Antiquitätensammlung, Kochen, Nahrung & Wein usw.
JAZZ
Polyphone, synkopierte Musik, charakterisiert durch Improvisation.
SCIENCE
Programme über Naturwissenschaft und Technik.
COUNTRY
VARIED
Unterhaltungsprogramme wie zum Beispiel Quiz, Ratespiele und Persönlichkeitsinterviews.
Songs, die aus der musikalischen Tradition der Südstaaten von Amerika
entstehen oder sie fortsetzen. Charakterisiert durch eine schlichte Melodie
und narrative Handlung.
POP M
Populäre Musik, oft abhängend von den gegenwärtigen oder letzten Plattenverkaufslisten.
NATION M
Gegenwärtige populäre Musik der Nation oder des Gebiets in Muttersprache, im Gegensatz zu internationalem 'Pop' in Englisch, der normalerweise von Amerika oder Großbritannien inspiriert ist.
ROCK M
Moderne Musik, normalerweise geschrieben und aufgeführt von jungen
Musikern.
EASY M
Unterhaltungsmusik, im Gegensatz zu Pop, Rock oder Klassik, oder Musik
wie Jazz, Folk oder Country (normalerweise mit Gesang und kurzzeitig).
LIGHT M
Populäre, klassische Musik. Zum Beispiel Instrumentalmusik und Vokaloder Chorwerke.
CLASSICS
Aufführungen von hauptsächliche Orchesterstücken, Sinfonien, Kammermusik usw. einschließlich großer Oper.
OTHER M
Musik wie zum Beispiel Rhythm & Blues und Reggae.
WEATHER
Wetterberichte, -vorhersagen und -information.
FINANCE
CHILDREN
Börsenberichten, Handel, Geschäft usw.
Programme, die auf ein junges Publikum abgezielt sind (in erster Linie Unterhaltung und Interesse).
OLDIES
Musik aus dem sogenannten "goldenen Zeitalter" populärer Musik.
FOLK M
Musik, die der musikalischen Kultur einer besonderen Nation entspricht,
normalerweise gespielt auf akustischen Instrumenten. Die Erzählung oder
Story kann sich auf geschichtliche Ereignisse oder Leute stützen.
DOCUMENT
Programme über sachliche Angelegenheiten, präsentiert in einem recherchierenden Stil.
TEST
Sendung beim Prüfen von Notsendegerät oder Empfängern.
ALARM !
Information über Naturkatastrophen.
NONE
Keine Programmart (nur Empfang).
TP
Sendungen, in denen Verkehrsdurchsagen gebracht werden.
TA
Verkehrsdurchsagen sind jetzt ausgestrahlt.
RDS-Rundfunk
SOCIAL
-Benutzen des Radio-Daten-Systems (RDS)-
Beschreibungen der PTY(Programmartenkennung)-Codes, TP (Verkehrsfunkkennung) und TA (Verkehrsdurchsagekennung).
Sie können die folgenden PTY-, TP- und TA-Signale suchen und empfangen.
Hinweis:
Wenn in der EON-Bereitschafts-Betriebsart ein Programm gewählt wird, wird "TI" an
Stelle von "TA" angezeigt.
DEUTSCH
01/1/9
D3.fm
D-21
Benutzen des Radio-Daten-Systems (RDS) (Fortsetzung)
! Benutzen des automatischen Senderspeichers (ASPM)
RDS-Rundfunk
-Benutzen des Radio-Daten-Systems (RDS)-
Während der ASPM-Operation sucht der Tuner automatisch nach neuen RDS-Sendern. Bis zu 40 Sender können gespeichert werden.
Wenn dieselben Sender bereits abgespeichert sind, verringert sich die Zahl der speicherbaren neuen Sender entsprechend.
D-22
1
Die TUNER (BAND)-Taste drücken, um das UKW-Band zu wählen.
2
Die ASPM-Taste mindestens 3 Sekunden gedrückt halten.
1
"ASPM" blinkt etwa 4 Sekunden lang, dann beginnt der Suchlauf (87,50 - 108,00
MHz).
2
Wenn ein RDS-Sender gefunden wird, erscheint "RDS" eine kurze Weile, und der
Sender wird abgespeichert.
Abbrechen der ASPM-Operation:
Während des Sendersuchlaufs die ASPM-Taste drücken.
Die bereits abgespeicherten Sender bleiben im Speicher.
Hinweise:
" Wenn derselbe Sender auf verschiedenen Frequenzen sendet, wird die stärkste
Frequenz abgespeichert.
" Ein Sender, der dieselbe Frequenz hat wie ein bereits abgespeicherter Sender,
wird nicht noch einmal gespeichert.
" Sind bereits 40 Sender abgespeichert, wird der Suchlauf abgebrochen. Wenn Sie
die ASPM-Operation noch einmal durchführen möchten, müssen Sie den Festsenderspeicher löschen.
" Bei sehr schwachen RDS-Signalen können keine Sendernamen abgespeichert
werden.
Löschen allen Festsenderspeicherinhalts:
1 Die TUNER (BAND)-Taste drücken.
2 Die ENTER-Taste drücken.
3 Die CLEAR-Taste drücken.
4 Während "ALL CLEAR" auf dem Display
erscheint, die ENTER-Taste drücken.
Erneutes Speichern eines Sendernamens beim Abspeichern des falschen
Namens:
Es kann möglich sein, mit Hilfe der ASPM-Funktion Sendernamen richtig abzuspeichern, wenn viel Rauschen vorhanden ist oder wenn das Signal zu schwach ist. In
diesem Falle folgendermaßen vorgehen.
1 Durch Drücken der Taste PRESET ( oder ) prüfen, ob die Namen richtig sind.
2 Wenn Sie einen falschen Namen finden, warten Sie, bis der Sender empfangen
wird und der richtige Name angezeigt wird. Und dann die ENTER-Taste drücken.
3 Innerhalb von 5 Sekunden die ENTER-Taste noch einmal drücken, während die
Vorwahlkanalnummer blinkt.
" Der neue Sendername ist richtig abgespeichert worden.
3
Nach Abschluß des Suchlaufs wird die Zahl der abgespeicherten Sender 4 Sekunden lang angezeigt, und dann erscheint "END" 4 Sekunden lang.
Hinweise:
" Derselbe Sendername kann in verschiedenen Kanälen gespeichert werden.
" In einem gewissen Gebiet oder in gewissen Zeiträumen können die Sendernamen
vorübergehend verschieden sein.
DEUTSCH
01/1/9
D3.fm
Bestimmen von Programmarten und Wählen von Sendern (PTY-Suchlauf):
Sie können einen Sender von den abgespeicherten Sendern suchen, indem Sie die
Programmart (Nachrichten, Sport, Verkehrsfunk usw. ... siehe Seite 21) bestimmen.
1
Die TUNER (BAND)-Taste drücken, um das UKW-Band zu wählen.
2
Die PTY.TI-Taste drücken.
Innerhalb von 6 Sekunden die Taste PRESET (
um die Programmart auszuwählen.
oder
) drücken,
" Bei jedem Tastendruck erscheint die Programmart. Wird die Taste länger als 0,5
Sekunden gedrückt gehalten, erscheint die Programmart fortlaufend.
4
Während die ausgewählte Programmart blinkt (innerhalb von 4
Sekunden), die PTY.TI-Taste noch einmal drücken.
Bestimmen von Sendernamen und Wählen von Sendern von Hand:
Sie können einen Sender von den abgespeicherten Sendern empfangen, indem Sie
den Namen (BBC R1, BBC R2 usw.) bestimmen.
Vor dieser Operation müssen Sie einen oder mehr Sendernamen im Speicher aufbewahren.
1 Die TUNER (BAND)-Taste drücken, um das UKW-Band zu wählen.
2 Die Taste PRESET ( oder ) drücken, um einen gewünschten Sender auszuwählen.
3
Der Sendername wird 3 Sekunden lang angezeigt. Danach ändert sich das Display wie folgt.
" Die gewählte Programmart leuchtet 2 Sekunden lang, dann erscheint "SEARCH",
und der Suchlauf beginnt.
DEUTSCH
01/1/9
D3.fm
RDS-Rundfunk
Wenn Sie den Verkehrsfunk auswählen:
Wenn Sie in Schritt 4 den Verkehrsfunk (TP) auswählen, erscheint "TP". (Dies
bedeutet nicht, daß Sie zu der Zeit die Verkehrsinformation hören können.)
Wenn eine Verkehrsinformation gesendet wird, erscheint "TA".
" "PTY TI" und "SELECT" erscheinen etwa 6 Sekunden lang abwechselnd.
3
Hinweise:
" Wenn das Display mit dem Blinken aufgehört hat, das Verfahren ab Schritt 2 wiederholen. Wenn eine gewünschte Programmart herausgefunden wird, blinkt entsprechende Kanalnummer etwa 3 Sekunden lang; danach blinkt der Sendername
7 Sekunden lang und wechselt dann zu ständigem Leuchten.
" Wenn Sie einen anderen Sender hören möchten, der dieselbe Programmart ausstrahlt, die PTY.TI-Taste drücken, während die Kanalnummer oder der Sendername blinkt. Das Gerät sucht dann nach einem nächsten Sender.
" Wenn kein Sender gefunden werden kann, erscheint "NOT FOUND" 4 Sekunden
lang.
-Benutzen des Radio-Daten-Systems (RDS)-
! Abrufen von abgespeicherten Sendern
D-23
Benutzen des Radio-Daten-Systems (RDS) (Fortsetzung)
! Automatisches Empfangen des gewünschten Programms (EON-PTY)
5
Wenn das bestimmte Programm auf einem ON (Other Network)Sender beginnt, schaltet das Gerät automatisch auf den Sender,
und "PTY" blinkt.
6
Wenn das Programm vorüber ist, schaltet das Gerät automatisch
auf den ursprünglichen Sender zurück.
Wenn die gewünschte Programmart gesendet wird, schaltet das Radio automatisch
auf sie.
RDS-Rundfunk
-Benutzen des Radio-Daten-Systems (RDS)-
1
2
Einen RDS-Sender einstellen (wenn ein Sendername angezeigt
wird).
Die EON-Taste drücken, wenn "EON" erscheint.
" "PTY TI" und "SELECT" erscheinen etwa 6 Sekunden lang abwechselnd.
" Falls die EON-Taste gedrückt wird, wenn "EON" nicht angezeigt wird, erscheint
"NO EON" 5 Sekunden lang, um darauf hinzuweisen, daß das Gerät nicht in die
EON-Bereitschafts-Betriebsart schalten kann.
3
Während sie auf dem Display erscheinen, die gewünschte Programmart wählen, indem die Taste PRESET ( oder ) gedrückt
wird.
Überprüfen der Bereitschafts-Betriebsarten-Einstellung:
In der EON-Bereitschafts-Betriebsart die EON-Taste drücken. ("Programmart"
"WAITING")
Abbrechen der EON-Bereitschafts-Betriebsart:
In der EON-Bereitschafts-Betriebsart die EON-Taste drücken. Innerhalb von 4
Sekunden sie noch einmal drücken. ("PTY" erlischt.)
Über die PTYI (Dynamic-PTY-Anzeige):
Während des Dynamic-PTY-Sender-Empfangs erscheint "PTYI" (Dynamic-PTYAnzeige). Dynamic-PTY zeigt an, daß die PTY für den abgestimmten Sender oder
die PTY mit Bezug auf die EON-Daten bei jeden Programmänderungen geschätzt
wird und geändert werden kann.
PTYI
Bedeutung
Leuchtet
Ein Dynamic-PTY-Sender wird eingestellt.
Erlischt
Ein Static-PTY-Sender wird eingestellt.
" Wenn "PTYI" erscheint, die DISP MODE-Taste drücken, um die gegenwärtige
Programmart zu überprüfen.
" Die gewählte Programmart blinkt.
4
Innerhalb von 4 Sekunden die PTY.TI-Taste drücken.
" Die gewählte Programmart und "WAITING" werden je 2 Sekunden lang angezeigt.
" "PTY" erscheint, und das Gerät schaltet in die EON-PTY-Bereitschafts-Betriebsart.
D-24
DEUTSCH
01/1/9
D3.fm
! Automatisches Empfangen der Verkehrsinformation (EON-TI)
5
Wenn eine spezifizierte TA bei einem ON (Other Network)-Sender
beginnt, schaltet das Gerät automatisch auf den Sender, und "TI"
blinkt.
6
Wenn die Verkehrsinformation vorüber ist, schaltet das Gerät automatisch auf den ursprünglichen Sender zurück.
Einen RDS-Sender einstellen (wenn ein Sendername angezeigt
wird).
Überprüfen der Bereitschafts-Betriebsarten-Einstellung:
In der EON-Bereitschafts-Betriebsart die EON-Taste drücken. ("TI"
2
Die EON-Taste drücken, wenn "EON" erscheint.
"WAITING")
Abbrechen der EON-Bereitschafts-Betriebsart:
In der EON-Bereitschafts-Betriebsart die EON-Taste drücken. Innerhalb von 4
Sekunden sie noch einmal drücken.
" "TI" erlischt.
" "PTY TI" und "SELECT" erscheinen etwa 6 Sekunden lang abwechselnd.
" Falls die EON-Taste gedrückt wird, wenn "EON" nicht angezeigt wird, erscheint
"NO EON" 5 Sekunden lang, um darauf hinzuweisen, daß das Gerät nicht in die
EON-Bereitschafts-Betriebsart schalten kann.
3
Während sie auf dem Display erscheinen, die TI (Verkehrsinformation) wählen, indem die Taste PRESET ( oder ) gedrückt wird.
4
Innerhalb von 4 Sekunden die PTY.TI-Taste drücken.
RDS-Rundfunk
1
-Benutzen des Radio-Daten-Systems (RDS)-
Wenn die Verkehrsinformation gesendet wird, schaltet das Radio automatisch auf
sie.
" "TI" und "WAITING" erscheinen je 2 Sekunden lang.
" "TI" erscheint, und das Gerät schaltet in die EON-TI-Bereitschafts-Betriebsart.
DEUTSCH
01/1/9
D3.fm
D-25
Benutzen des Radio-Daten-Systems (RDS) (Fortsetzung)
RDS-Rundfunk
-Benutzen des Radio-Daten-Systems (RDS)-
! Hinweise zum RDS-Betrieb
D-26
Wenn ein der folgenden Ereignisse eintritt, bedeutet dies nicht, daß das Gerät
defekt ist.
" "PS", "NO PS" und ein Sendername erscheinen abwechselnd, und das Gerät
funktioniert nicht richtig.
" Wenn ein spezifischer Sender nicht richtig sendet oder ein Sender Prüfungen
durchführt, kann die RDS-Empfangsfunktion nicht richtig arbeiten.
" Wenn ein RDS-Sender, dessen Signal zu schwach ist, empfangen wird, kann
Information wie Sendername nicht angezeigt wird.
" "NO PS", "NO PTY", "NO RT" oder "NO CT" blinkt etwa 5 Sekunden lang, und
dann wird die Frequenz angezeigt.
Hinweise zum Radiotext:
" Der Radiotext für 10 Zeichen wird ununterbrochen 4 Sekunden lang angezeigt,
und dann scrollt er über das Display.
" Wenn Sie einen RDS-Sender einstellen, der keinen Radiotext sendet, wird beim
Schalten in die Radiotext-Position "NO RT" angezeigt.
" Während des Empfangs der Radiotext-Daten oder beim Ändern des Textinhalts
wird "RT" angezeigt.
Hinweise zu den PTY-Sprachen:
" Wenn Sie nach dem Schalten in PS (Programmname) die DISP MODE-Taste
drücken, wird PTY-Sprachmodus gewählt. In diesem Modus werden PTY-Namen
automatisch in der Sprache der Gegend angezeigt, in der sich ein RDS-Sender
befindet. Acht Sprachen (einschließlich Englisch) sind vorhanden.
" Wenn Sie einen RDS-Sender einstellen, das keine PTY-Sprachdaten sendet, wird
der PTY-Name auf englisch angezeigt.
" Ein PTY-Name kann eine kurze Weile auf englisch angezeigt werden, bis ein
Signal zum Bestimmen der lokalen PTY-Sprache empfangen wird.
" PTY-Sprachen werden ebenfalls für PTY-Suchlauf und EON-PTY-Operation verwendet (bei DISPLAY MODE, außer PTY-Englisch).
Über die "TP"- und "TA"-Anzeigen:
"TP"
"TA"
Nicht
leuchtet
Nicht
leuchtet
Bedeutung
Nicht
leuchtet
Leuchtet Es wird EON-Information über ein anderes Programm ausgestrahlt, das Verkehrsinformation gibt.
Leuchtet
Nicht
leuchtet
Leuchtet
Leuchtet Eine Verkehrsinformation ist jetzt auf Sendung.
Keine Verkehrsdurchsagen werden ausgestrahlt und auch
ein Sender, der Verkehrsdurchsagen sendet, über EON nicht
erkannt.
Verkehrsdurchsagen werden ausgestrahlt, aber keine sind
jetzt gesendet und keine EON-Information über andere Verkehrsdurchsagen kann ebenfalls ausgestrahlt werden.
In den folgenden Fällen wird die EON-Bereitschafts-Betriebsart abgebrochen.
" Wenn Sie die ON/STAND-BY-Taste drücken, um in die Bereitschafts-Betriebsart
zu schalten.
" Wenn in der EON-Bereitschafts-Betriebsart das Gerät auf ein anderes Band
geschaltet wird.
" Wenn in der EON-Bereitschafts-Betriebsart Sie den UKW-Sender ändern.
" Wenn ein Abruf eines Vorwahlkanals gemacht wird.
Hinweise:
" Während dasselbe Programm wie die bestimmte PTY (oder TA) auf Sendung ist,
schaltet das Gerät nicht auf einen ON-Sender.
" Wenn mehr als zwei ON-Sender vorhanden sind, die Signalstärke vergleichen und
den Sender mit stärkstem Signal einstellen (EON-AF). Wenn ein ON-Sender im
Vorwahlkanalspeicher aufbewahrt worden ist, schaltet das Gerät auf den Kanal.
" Möchten Sie einen durch EON eingestellten ON-Sender verlassen und auf den
früher empfangenen Sender zurückschalten, die EON-Taste drücken.
" Nachdem das Gerät auf den ursprünglichen Sender geschaltet hat, ist die Bereitschafts-Betriebsart noch aktiv. ("TI" oder "PTY" leuchtet noch.)
" Das Gerät schaltet nicht zwischen den ON-Sendern. Es schaltet auf den
ursprünglichen Sender zurück.
" Wenn der umgeschaltete ON-Sender ein Problem hat, erscheint "WEAK SIG",
und das Gerät schaltet auf den ursprünglichen Sender zurück.
" Wenn das Signal vom umgeschalteten ON-Sender sehr schwach ist, sucht das
Gerät nach einem anderen Sender mit stärkstem Signal. Jedoch, falls die Signale
von allen Sendern schwach oder nicht gut sind (wegen elektrischen Rauschens),
erscheint "WEAK SIG", und das Gerät schaltet auf den ursprünglichen Sender
zurück.
DEUTSCH
01/1/9
D3.fm
1
Einen RDS-Sender einstellen (wenn sein Name angezeigt wird).
2
Die DISP MODE-Taste drücken, um CT auszuwählen.
(Beispiel: 11:56 am 31. März 2001)
3 Sekunden lang
3
RDS-Uhrzeit
Während RDS-Zeit auf dem Display erscheint, die TIME-Taste mindestens 3 Sekunden gedrückt halten.
(Beispiel: 11:50)
Zeit der internen Uhr
Nach dem Einstellen der internen Uhr wird "COMPLETE" 3 Sekunden lang angezeigt. Danach wird die geänderte Zeit angezeigt.
" Durch Drücken der TIME-Taste prüfen, ob die interne Uhr dieselbe Zeit wie die
RDS-Uhr anzeigt.
Hinweise:
" Während die RDS-Zeit auf dem Display erscheint, falls die TIME-Taste gedrückt
wird, können die RDS-Uhr und die interne Uhr wechselweise angezeigt werden;
dadurch können Sie die gezeigte Zeit vergleichen. Wenn Sie noch nicht die Uhranzeige-Betriebsart eingestellt haben, erscheint "CLOCK".
" Während "NO CT" oder "CT" auf dem Display erscheint, kann die interne Uhr nicht
eingestellt werden.
" Wenn das Signal von einem Sender schwach oder geräuschvoll ist, kann es nicht
möglich sein, die interne Uhr einzustellen.
Hinweis zur Uhrzeit- und Datum-Betriebsart:
Wenn die DISP MODE-Taste wiederholt gedrückt wird, um CT auszuwählen,
wird das Datum (Tag-Monat-Jahr) 3 Sekunden lang angezeigt; danach
erscheint die RDS-Uhrzeitanzeige.
" Die RDS-Uhrzeit erscheint mit "RDS", so daß Sie zwischen ihnen und der internen
Uhrzeit unterscheiden können.
Hinweise:
" Wenn Sie einen RDS-Sender einstellen, der keine Uhrzeit und Datum (CT-Daten)
sendet, und wenn Sie CT auswählen, wird "NO CT" angezeigt.
" Wenn keine CT-Daten empfangen werden, selbst wenn ein RDS-Sender eingestellt wird, wird "CT" angezeigt. Die CT-Daten werden am Anfang jeder Minute
gesendet.
" Wenn ein RDS-Signal schwach ist oder wenn viel Rauschen darin vorhanden ist,
kann die Uhrzeit als "- -" (Bindestriche) angezeigt werden, oder sie kann nicht richtig angezeigt werden.
" Sie müssen die Genauigkeit der Uhr überprüfen, weil das RDS-Zeitzeichen (CTDaten) nicht richtig sein kann, abhängend von dem Sender.
" Das Datum ändert sich um Mitternacht, Greenwischer Zeit (G.M.T), nicht Ortszeit.
" Wenn die interne Uhr nicht eingestellt worden ist, erscheint "CLOCK".
" "RDS TIME" und "WAITING" erscheinen wechselweise. Warten Sie, bis "COMPLETE" erscheint. (Dies erscheint weniger als 60 Sekunden.)
DEUTSCH
01/1/9
D3.fm
RDS-Rundfunk
Mit Hilfe des RDS-Zeitzeichens (RDS CT-Daten) können Sie die interne Uhr einstellen. Dies ist nützlich, weil die interne Uhr automatisch vom Zeitzeichen eingestellt
wird, das von einem RDS-Sender gesendet wird.
Vor Einstellung die 24-Stunden- oder 12-Stunden-Anzeige wählen (siehe Seite 13).
4
-Benutzen des Radio-Daten-Systems (RDS)-
! Einstellen der internen Uhr durch das RDSZeitzeichen
D-27
Cassettenwiedergabe
PUSH EJECT
1
Zum Einschalten der Stromversorgung die ON/STAND-BY-Taste
drücken.
2
3
Die TAPE-Taste drücken.
Die Cassettenfachklappe durch Drücken des mit "PUSH EJECT
bezeichneten Teils öffnen.
4
Eine Cassette mit der Seite A zu Ihnen hinwendend in das Fach einlegen.
Die REVERSE MODE-Taste drücken, um eine Seite oder beide Seiten auszuwählen.
... Abspielen beider Seiten.
... Wiederholte Wiedergabe der beiden
Seiten.
... Abspielen einer Seite.
-Cassettenwiedergabe-
Bandwiedergabe
5
"
6
Zum Abspielen der Seite A die
-Taste betätigen.
-Taste drücken; für die Seite B die
" Zum Abspielen beider Seiten ( ) ab Seite A beginnen. Wenn Wiedergabe ab
Seite B beginnt, wird die Seite A nicht abgespielt.
" Beim Abspielen der Seite B mit Hilfe der Fernbedienung die -Taste drücken, um
die Wiedergabeseite umzuschalten. Danach die
/ -Taste betätigen.
Beenden der Wiedergabe:
Die -Taste drücken.
Schneller Vorlauf/Umspulung auf der Seite A:
Zum Vorspulen des Bandes die
-Taste drücken. Zum Zurückspulen des Bandes
die
-Taste betätigen.
Schneller Vorlauf/Umspulung auf der Seite B:
Zum Vorspulen des Bandes die
-Taste drücken. Zum Zurückspulen des Bandes
die
-Taste betätigen.
Vorsicht:
" Zum Herausnehmen der Cassette die -Taste drücken und dann das Cassettenfach öffnen.
" Sollte ein Stromausfall während des Cassettenbetriebs auftreten, berührt der Tonkopf noch das Band, und die Cassettenfachklappe öffnet sich nicht. Warten Sie,
bis die Stromversorgung wiederhergestellt wird.
" Selbst wenn wärehnd der Cassettenwiedergabe die
-Taste gedrückt wird,
schaltet das Gerät nicht in die Pausen-Betriebsart.
D-28
DEUTSCH
Klangregelung (Siehe Seite 12.)
01/1/9
D3.fm
Aufnahme von CD auf Cassette
4
Die REVERSE MODE-Taste drücken, um eine Seite oder beide Seiten auszuwählen.
... Aufnahme auf beide Seiten.
... Aufnahme nur auf eine Seite.
Die REC PAUSE -Taste wiederholt drücken, um auf die zu bespielende Seite umzuschalten.
" Die Aufnahme wird vorübergehend unterbrochen.
" Zum Aufnehmen auf beide Seiten ab Seite A beginnen. (Wenn Sie die Aufnahme
ab Seite B beginnen, schaltet das Band nicht auf die Seite A um.)
6
Eine der Tasten DISC 1 - DISC 6 drücken, um mit der Aufnahme zu
beginnen.
" Wenn die CD das Ende erreicht, stoppt die Aufnahme.
Kontinuierliche Aufnahme von mehreren CDs:
1 Den obigen Schritten 1 - 5 folgen.
2 Unabhängig von der Einstellung im Schritt 5 die -Taste zur Aufnahme auf Seite
A oder die -Taste für Seite B drücken.
" Aufnahme beginnt ab Disc mit der niedrigsten Nummer.
Programmierte Aufnahme:
1 Discs und Titel programmieren. (Siehe Seite 17.)
2 Die REC PAUSE -Taste drücken.
3 Unabhängig von der Einstellung im Schritt 5 die -Taste zur Aufnahme auf Seite
A oder die -Taste für Seite B drücken.
Mit Hilfe der Tasten DISC 1 - DISC 6 können Sie die gewünschte CD aufnehmen.
1
2
3
Zum Einschalten der Stromversorgung die ON/STAND-BY-Taste
drücken.
Die CD-Taste drücken und die gewünschte Disc einlegen.
Eine Cassette in das Cassettenfach mit der Seite A zu Ihnen hinwendend einlegen.
Aufnahme
5
-Aufnahme von CD auf Cassette-
" Vor wichtigen Aufnahmen sollte eine Probeaufnahme durchgeführt werden, um
sicherzustellen, daß die Aufnahme gut vorgenommen wird.
" Für Beschädigung oder Verlust Ihrer Aufnahme, der aus Funktionsstörung dieses
Gerätes resultiert, ist SHARP nicht haftbar.
" Die Lautstärke- und Klangregelungen haben keinen Einfluß auf das Aufnahmesignal (Regelbare Mithöreinrichtung).
" Keine Reineisen- oder CrO -Bänder zur Aufnahme verwenden.
Beenden von Aufnahme:
Die -Taste drücken.
Die CD und das Band stoppen.
Automatische Neustartfunktion:
Wenn während der Aufnahme die Aufnahmeseite von Seite A auf B umgeschaltet
wird, nimmt das System den unterbrochenen Titel von seinem Anfang an auf Seite B
auf. Die Aufnahme auf Seite B wird gemacht, ohne den Anfang des Titels auszuschließen.
Programmierte Wiedergabe (Siehe Seite 17.)
01/1/9
D3.fm
DEUTSCH
D-29
Aufnahme von Radio auf Cassette
1
2
3
Den gewünschten Sender einstellen. (Siehe Seite 18.)
Eine Cassette in das Cassettenfach mit der Seite A zu Ihnen hinwendend einlegen.
Die REVERSE MODE-Taste drücken, um eine Seite oder beide Seiten auszuwählen.
... Aufnahme auf beide Seiten.
... Aufnahme nur auf eine Seite.
Aufnahme
-Aufnahme von Radio auf Cassette-
4
Die REC PAUSE -Taste wiederholt drücken, um auf die zu bespielende Seite umzuschalten.
" Die Aufnahme wird vorübergehend unterbrochen.
" Zum Aufnehmen auf beide Seiten ab Seite A beginnen. (Wenn Sie die Aufnahme
ab Seite B beginnen, schaltet das Band nicht auf die Seite A um.)
5
Zur Aufnahme auf Seite A die
-Taste betätigen.
-Taste drücken; für die Seite B die
" Wenn Sie die
/ -Taste auf der Fernbedienung drücken, macht das System
eine Aufnahme auf die im Schritt 4 bestimmte Seite.
Unterbrechen der Aufnahme:
Die REC PAUSE -Taste drücken.
Zum Fortsetzen der Aufnahme dieselbe Taste ( oder ) drücken, wie Sie im Schritt
5 gedrückt haben.
Beenden von Aufnahme:
Die -Taste drücken.
Hinweis:
Wenn während der Aufnahme einer MW-Sendung ein Pfeifgeräusch gehört wird, die
MW-Rahmenantenne bewegen.
! Löschen bespielter Bänder
1
2
D-30
DEUTSCH
Die TAPE-Taste drücken.
Den Schritten 2 - 5 im Abschnitt "Aufnahme von Radio auf Cassette" folgen.
Rundfunkempfang (Siehe Seite 18.)
01/1/9
D3.fm
Timer- und Sleep-Funktion
! Timer-Wiedergabe oder Timer-Aufnahme
Vor dem Einstellen des Timers:
1
Zum Einschalten der Stromversorgung die ON/STAND-BY-Taste
drücken.
2
3
Die MENU-Taste drücken.
Mit der Jog Shuttle-Steuerung die "TIMER PLAY"- oder "TIMER
REC"-Betriebsart wählen und innerhalb von 10 Sekunden die
ENTER-Taste drücken.
Timer-Wiedergabe:
4
Timer-Aufnahme:
" PLAY" oder " REC" blinkt 5 Sekunden lang. Beim Blinken die
ENTER-Taste drücken.
oder
5
Mit der Jog Shuttle-Steuerung die zu startende Stunde bestimmen
und innerhalb von 10 Sekunden die ENTER-Taste drücken.
-Timer- und Sleep-Funktion-
In der Bereitschafts-Betriebsart die DISPLAY-Taste auf der Fernbedienung
drücken, damit Sie überprüfen, daß die Uhr richtiggehend ist.
Fortgeschrittene Funktionen
Timer-Wiedergabe:
Zu der voreingestellten Zeit schaltet sich das Gerät ein und gibt die gewünschte Tonquelle (CD, Tuner, Band) wieder.
Timer-Aufnahme:
Zu der voreingestellten Zeit schaltet sich das Gerät ein und beginnt mit der Aufnahme von Tuner.
Sleep-Funktion:
Für Radio, Compact Disc und Cassette können alle automatisch abgeschaltet werden.
" Die Abbildungen zeigen die Timer-Wiedergabe-Einstellung.
Einstellen der Uhr (Siehe Seite 13.)
01/1/9
D4.fm
DEUTSCH
D-31
Timer- und Sleep-Funktion (Fortsetzung)
7
-Timer- und Sleep-Funktion-
Fortgeschrittene Funktionen
6
8
Mit der Jog Shuttle-Steuerung die Minute bestimmen und innerhalb
von 10 Sekunden die ENTER-Taste drücken.
..Betriebsart zu schalten.
Mit der Jog Shuttle-Steuerung die zu stoppende Stunde bestimmen
und innerhalb von 10 Sekunden die ENTER-Taste drücken.
Mit der Jog Shuttle-Steuerung die Minute bestimmen und innerhalb
von 10 Sekunden die ENTER-Taste drücken.
Startzeit
Endzeit
Abbrechen der Timer-Wiedergabe oder Timer-Aufnahme:
1 Zum Einschalten der Stromversorgung die ON/STAND-BY-Taste drücken.
2 Die MENU-Taste drücken.
3 Mit der Jog Shuttle-Steuerung "TIMER OFF" wählen und dann die ENTER-Taste
drücken.
Überprüfen der eingestellten Zeit:
1 Zum Einschalten der Stromversorgung die ON/STAND-BY-Taste drücken.
2 Die MENU-Taste drücken.
3 Mit der Jog Shuttle-Steuerung "TIMER PLAY" oder "TIMER REC" wählen und
dann die ENTER-Taste drücken.
4 Die ON/STAND-BY-Taste drücken, um in die Timer-Bereitschafts-Betriebsart zu
schalten.
12Beim Erreichen der voreingestellten Zeit beginnt Wiedergabe oder
..Aufnahme.
" Die Lautstärke erhöht sich allmählich, bis sie den vor dem Abschalten des
Systems eingestellten Lautstärkepegel erreicht.
13Beim
9
Erreichen der Timer-Endzeit schaltet das System automa
..tisch in die Bereitschafts-Betriebsart.
Die Lautstärke mit den VOLUME-Tasten einstellen.
" Die Lautstärke nicht zu laut stellen.
10Die
Taste CD, TUNER (BAND) oder TAPE drücken, um die
..gewünschte Funktion zu wählen.
Auswählen der Tonquelle zur Timer-Wiedergabe: CD, TUNER (BAND) oder
TAPE.
Auswählen der Tonquelle zur Timer-Aufnahme: TUNER (BAND).
D-32
11Die ON/STAND-BY-Taste drücken, um in die Timer-Bereitschafts-
" Wenn während der Timer-Operation eine Taste gedrückt wird, wird die TimerBetriebsart abgebrochen, und Wiedergabe oder Aufnahme setzt sich fort, selbst
wenn die Endzeit erreicht wird.
Erneutes Einstellen oder Ändern der Timer-Einstellung:
Die Schritte im Abschnitt "Timer-Wiedergabe oder Timer-Aufnahme" von Anfang an
durchführen.
Hinweise:
" Wenn der Timer einmal eingestellt wird, wird die Einstellung gehalten, bis eine
neue Zeit eingegeben wird.
" Bei der Timer-Wiedergabe oder Timer-Aufnahme mit Hilfe eines anderen Geräts,
das an den Buchsen AUX IN angeschlossen ist, "AUX" im Schritt 10 wählen. Zu
dieser Zeit schaltet nur dieses Gerät automatisch in die Bereitschafts-Betriebsart.
(Das andere Gerät wird nicht abgeschaltet.)
DEUTSCH
01/1/9
D4.fm
! Gleichzeitiges Benutzen der Timer- und
Sleep-Funktion
ENTER-Taste drücken.
Beispiel: Einschlafen und Erwachen über denselben Rundfunksender
Sie können nur dieselbe Tonquelle wiedergeben (die Funktion kann nicht umgeschaltet werden).
1
2
Ändern der Einschlafzeit:
Beim Anzeigen der Einschlafzeit den Jog Shuttle drehen.
(Maximum: 2 Stunden - Minimum: 30 Minuten)
4
5
Die ENTER-Taste drücken.
Nach Ablauf der voreingestellten Zeit schaltet das System automatisch in die Bereitschafts-Betriebsart.
" 1 Minute vor dem Abschluß der Sleep-Funktion wird die Lautstärke leiser gestellt.
Hinweis:
Wenn die Einschlafzeit eingestellt wird, bleibt sie unverändert, bis die Einstellung
geändert wird.
Die gewünschte Wiedergabe- oder Aufnahmezeit einstellen
(Schritte 1 - 8, Seiten 31 - 32).
Während der Wiedergabe der gewünschten Tonquelle die Einschlafzeit einstellen (siehe links, Schritte 1 - 4).
1. Timer-Wiedergabe(Aufnahme)-Einstellung
2. Sleep-Timer-Einstellung
Timer-Wiedergabe(Aufnahme)-Startzeit
A
B
Die Sleep-Funktion stoppt automatisch.
Endzeit
: 30 Minuten - 2 Stunden
: Gewünschte Zeit
Abbrechen der Sleep-Funktion:
Die ON/STAND-BY-Taste drücken, indem der Sleep-Timer eingestellt wird.
Überprüfen der verbleibenden Einschlafzeit:
Die obenerwähnten Schritte 2 - 3 durchführen.
Diesmal können Sie ebenfalls die Einschlafzeit ändern.
DEUTSCH
01/1/9
D4.fm
-Timer- und Sleep-Funktion-
wählen. Danach die
Fortgeschrittene Funktionen
! Sleep-Funktion
1 Die gewünschte Tonquelle wiedergeben.
2 Die MENU-Taste drücken.
3 Mit der Jog Shuttle-Steuerung "SLEEP"
D-33
Erhöhen des Stereo-Systems
Das Anschlußkabel gehört nicht zum Lieferumfang. Kaufen Sie ein im Handel erhältliches Kabel wie unten dargestellt.
! Wiedergabe der Töne aus dem Videorecorder, DVD-Player usw.
1 Mit Hilfe eines im Handel erhältlichen Anschlußkabels den Videore-
Rot
Weiß
Videorecorder, DVD-Player usw.
Zum
Line-Ausgang
-Erhöhen des Stereo-Systems-
Fortgeschrittene Funktionen
corder, DVD-Player usw. an die AUX IN-Buchsen anschließen.
Beim Benutzen eines Videogeräts den Tonausgang an dieses Gerät und den Bildausgang an ein Fernsehgerät anschließen.
2
3
4
5
Zum Einschalten der Stromversorgung die ON/STAND-BY-Taste
drücken.
Die AUX-Taste drücken, um "AUX" auszuwählen.
Den Videorecorder, DVD-Player usw. bedienen.
Den Eingangspegel mit der Taste
oder
einstellen.
" Beim Vollpegel sollte die "OVER"-Anzeige nicht leuchten.
Weiß
Rot
-2
+4
OVER
Cinch-Kabel
Hinweis:
Um Brummgeräusch zu verhindern, dieses Gerät von einem Fernsehgerät fernhalten.
! Aufnahme auf Band
1 Eine Cassette in das Cassettenfach einlegen.
2 Die AUX-Taste drücken, um "AUX" auszuwählen.
3 Die REC PAUSE -Taste drücken.
4 Den Videorecorder, DVD-Player usw. bedienen.
5 Den Eingangspegel mit der Taste oder einstellen.
6 Zur Aufnahme auf Seite A die -Taste drücken; für die Seite B die
-Taste betätigen.
D-34
0
DEUTSCH
01/1/9
D4.fm
Das Anschlußkabel gehört nicht zum Lieferumfang. Kaufen Sie ein im Handel erhältliches Kabel wie unten dargestellt.
! Aufnahme von CD-Signalen auf MDs (Digitalausgang)
Die Abdeckung für DIGITAL OUT-Buchse entfernen.
3
4
Die MD usw. in die Aufnahme-Betriebsart bringen.
Eine CD an diesem Gerät abspielen.
Mit Hilfe eines Anschlußkabels für Digitalaufnahme das Gerät an
die Buchse OPTICAL/LINE IN eines Mini-Disc-Recorders usw.
anschließen.
Hinweis:
Nur CD-Signale können ausgegeben werden.
! Kopfhörer
Anschlußkabel für
Digitalaufnahme
Zur OPTICAL/
LINE IN-Buchse
" Vor dem Anschließen oder Trennen des Kopfhörers die Lautstärke vermindern.
" Einen Kopfhörer mit 3,5 mm Stecker und 16 Ohm bis 50 Ohm Impedanz verwenden. Die empfohlene Impedanz ist 32 Ohm.
" Beim Anschließen des Kopfhörers werden die Lautsprecher automatisch getrennt.
Die Lautstärke mit den VOLUME-Tasten einstellen.
DEUTSCH
01/1/9
D4.fm
-Erhöhen des Stereo-Systems-
Mini-Disc-Recorder
1
2
Fortgeschrittene Funktionen
Digitalsignal von diesem Gerät können Mini-Disc-Recorder usw. bespielt werden.
D-35
Fehlersuchtabelle
Viele scheinbare "Probleme" können vom Benutzer ohne Anforderung eines Kundendiensttechnikers gelöst werden.
Falls mit diesem Produkt irgendetwas nicht in Ordnung zu sein scheint, die folgenden
Punkte überprüfen, bevor Sie sich an einen autorisierten SHARP-Fachhändler oder an ein
SHARP-Kundendienstzentrum wenden.
! Allgemeines
Symptom
-Fehlersuchtabelle-
Symptom
" Ist die Löschschutzzunge entfernt?
" Kann keinen Titel mit guter
Tonqualität aufnehmen.
" Ist es ein Normalband? (Sie können auf Reineisenoder CrO -Band nicht aufnehmen.)
" Kann nicht ganz gelöscht
werden.
" Trat ein Stromausfall ein? Die Uhr wieder einstellen.
(Siehe Seite 13.)
" Aussetzer.
" Ist Lockerheit da? Ist das Band gestrafft?
" Das Gerät reagiert nicht auf
Betätigung einer Taste.
" Dieses Gerät auf die Bereitschafts-Betriebsart stellen und dann wieder einschalten.
" Höhen können nicht gehört
werden.
" Sind die Tonwelle, Andruckrolle bzw. Tonköpfe
schmutzig?
" Wenn das Gerät noch nicht richtig funktioniert, es
rücksetzen. (Siehe Seite 37.)
" Klangschwankungen.
" Ist der Lautstärkepegel auf "0" gestellt?
" Die Cassette kann nicht herausgenommen werden.
" Ist der Kopfhörer angeschlossen?
" Sind die Lautsprecherkabel getrennt?
Symptom
" Wiedergabe beginnt nicht.
Mögliche Ursache
" Ist die Disc verkehrtherum eingelegt?
" Wiedergabe stoppt in der Mit- " Entspricht die Disc der Norm?
te eines Titels oder wird nicht
" Ist die Disc verformt oder verkratzt?
richtig gemacht.
" Hat sich im Gerät Kondensation gebildet?
! Tuner
Symptom
" Vom Radio ist ungewöhnliches Rauschen fortlaufend
gehört.
" Wenn während der Wiedergabe ein Stromausfall
eintritt, berühren die Tonköpfe noch das Band. Das
Cassettenfach ist nicht gewaltsam zu öffnen. Warten Sie, bis die Stromversorgung wiederhergestellt
wird.
! Fernbedienung
! CD-Player
Symptom
" Die Fernbedienung funktioniert nicht.
Mögliche Ursache
" Steht das Gerät in der Nähe des Fernsehgeräts
oder Computers?
Mögliche Ursache
" Ist das Netzkabel des Stereo-Systems angeschlossen?
" Ist die Batteriepolarität richtig?
" Sind die Batterien erschöpft?
" Ist das Gerät übermäßigen Erschütterungen ausge" Während der Wiedergabe
setzt?
kommt es zu Aussetzern oder
Wiedergabe stoppt in der MitIst die Disc sehr schmutzig?
"
te eines Titels.
D-36
Mögliche Ursache
" Aufnahme ist nicht möglich.
" Die Uhr stimmt nicht.
" Kein Ton ist zu hören.
Referenzen
Mögliche Ursache
! Cassettendeck
" Ist der Abstand oder Winkel falsch?
" Empfängt der Fernbedienungssensor starkes Licht?
! Kondensation
Plötzliche Temperaturschwankungen, Lagerung oder Betrieb in einer extrem feuchten Umgebung kann Kondensatbildung im Gehäuse (CD-Abtaster, Tonköpfe usw.)
oder auf der Sender-LED der Fernbedienung verursachen.
Kondensat kann zu Funktionsstörungen des Geräts führen. Sollte dieser Fall eintreten, das Gerät eingeschaltet lassen, ohne eine Disc (oder Cassette) einzulegen, bis
normale Wiedergabe möglich ist (ca. 1 Stunde). Vor Handhaben der Fernbedienung
jedes Kondensat auf der Sender-LED mit einem weichen Tuch abwischen.
" Ist die UKW/MW-Rahmenantenne richtig aufgestellt? Das Netzkabel weiter entfernt von der Antenne legen, falls es nah liegt.
DEUTSCH
01/1/9
D4.fm
Wartung
! Wenn Störung auftritt
! Reinigen der das Band berührenden Teilen
Wenn dieses Produkt von starker externer Interferenz (mechanischer Stoß, übermäßige statische Elektrizität, anormale Speisespannung infolge von Blitz usw.) beeinflußt oder falsch betrieben wird, kann es nicht korrekt funktionieren.
Wenn derartige Störungen auftreten, wie folgt verfahren:
1 Das Gerät auf die Bereitschafts-Betriebsart stellen und wieder einschalten.
2 Wenn das Gerät durch den vorhergehenden Bedienungsschritt nicht wiederhergestellt wird, den Netzstecker herausziehen und anschließen; danach das Gerät
einschalten.
" Durch Verschmutztung von Tonköpfen, Tonwellen oder Andruckrollen wird die
Klangqualität verschlechtert, außerdem kann dadurch "Bandsalat" verursacht werden. Diese Teile mit einem Wattestäbchen reinigen, welches mit einer im Fachhandel erhältlichen Tonkopf-Reinigungsflüssigkeit oder Isopropylalkohol angefeuchtet wurde.
" Beim Reinigen der Tonköpfe, Andruckrollen usw. den Netzstecker des Gerät herausziehen, in dem hohe Spannungen vorhanden sind.
C
C
B
A
D
! Vor dem Transportieren des Geräts
Dieses Gerät ist auf seiner Rückseite mit einer Transportsicherungsschraube versehen, um Beschädigungen beim Transport zu verhindern.
1 Zum Einschalten des Gerätes die ON/STAND-BY-Taste drücken.
2 Alle Discs aus dem Gerät herausnehmen und die Disc-Schublade schließen. "CD
NO DISC" wird angezeigt.
3 Zum Schalten in die Bereitschafts-Betriebsart die ON/STAND-BY-Taste drücken.
"GOOD-BYE" wird angezeigt.
4 Wenn "GOOD-BYE" verschwindet, das Netzkabel aus der Steckdose ziehen.
5 Die Transportsicherungsschraube in die Rückseite des Gerätes einführen und mit
einer Schlitzschraubenzieher anziehen.
:
Löschkopf
:
Tonwelle
:
Aufnahme-/Wiedergabekopf
:
Andruckrolle
" Nach längerer Benutzung können die Tonköpfe und Tonwellen aufmagnetisiert
werden, wodurch sich eine Klangverschlechterung bemerkbar macht. Diese Teile
sollten daher alle 30 Betriebsstunden mit einem im Fachhandel erhältlichen Tonkopf-Entmagnetisierer entmagnetisiert werden. Die Bedienungsanleitung des Entmagnetisierers sollte sorgfältig durchgelesen werden.
-Wartung-
D
Wenn das Gerät durch die obigen Bedienungsschritte nicht wiederhergestellt
wird, all den Speicher löschen, indem man die untenstehende Anweisung
befolgt.
1 Zum Schalten in die Bereitschafts-Betriebsart die ON/STAND-BY-Taste drücken.
2 Indem Sie die VOLUME -Taste drücken, die ON/STAND-BY-Taste betätigen, bis
"ALL CLEAR" erscheint.
Vorsicht:
Durch diese Bedienungsschritte werden alle abgespeicherten Daten einschließlich
Uhr- und Timer-Einstellungen, Tuner-Voreinstellung sowie CD-Programm gelöscht.
Referenzen
! Löschen all des Speichers (Rücksetzen)
! Reinigen des Gehäuses
Das Gehäuse mit einem weichen Tuch und einem verdünnten Seifenwasser regelmäßig reinigen und dann mit einem trockenen Tuch nachwischen.
Vorsicht:
" Zum Reinigen keine Chemikalien (Benzin, Farbverdünnungsmittel usw.) verwenden. Es kann zur Beeinflussung von Oberfläche und Farbe führen.
" Das Geräteinnere nicht mit Schmieröl versorgen. Dies kann zu Betriebsstörungen
führen.
DEUTSCH
01/1/9
D4.fm
D-37
Technische Daten
Bedingt durch fortlaufende technische Verbesserungen behält sich SHARP das
Recht vor, das Design und die Spezifikationen ohne vorherige Ankündigung ändern
zu können. Die angegebenen Leistungswerte stellen die Nennwerte einer in Serienherstellung produzierten Einheit dar. Geringe Abweichungen bei einzelnen Geräten
sind möglich.
! Allgemeines
Spannungsversorgung
Wechselspannung 230 V, 50 Hz
Leistungsaufnahme
Einschalten: 175 W
Bereitschaft: 0,6 W (*)
Abmessungen
-Technische Daten-
Referenzen
Gewicht
(*)
Breite: 200 mm
Höhe: 352 mm
Tiefe: 377 mm
9,8 kg
Dieser Leistungsaufnahmewert wird erhalten, wenn die Demonstrations-Betriebsart in der Bereitschafts-Betriebsart abgebrochen wird. Siehe Seite 11 zum
Abbrechen der Demonstrations-Betriebsart.
6-Disc Multi-Mode Compact Disc Wechsler
Signalabtastung
Kontaktloser 3-Strahl-Halbleiter-Laser-Abtaster
D/A-Umsetzer
1-Bit-D/A-Umsetzer
Frequenzgang
20 - 20.000 Hz
Dynamikbereich
90 dB (1 kHz)
! Cassettendeck
Frequenzgang
50 - 14.000 Hz (Normalband)
Rauschabstand
50 dB (Aufnahme/Wiedergabe)
Gleichlaufschwankungen
0,35 % (DIN 45 511)
! Tuner
UKW: 87,5 - 108,0 MHz
MW: 522 - 1.620 kHz
Spitzenmusikleistung: 668 W
Musikleistung: 334 W (167 W + 167 W) (DIN 45 324)
Haupt-Lautsprecher (Tieftöner und Hochtöner): 134 W (67
W + 67 W)
! Lautsprecher
Typ
3-Wege-Lautsprechersystem
Sub-Tieftöner: 200 W (100 W + 100 W)
5 cm-Hochtöner
Sinusleistung: 200 W (100 W + 100 W) (DIN 45 324)
13 cm-Tieftöner
Haupt-Lautsprecher (Tieftöner und Hochtöner): 80 W (40
W + 40 W)
13 cm-Sub-Tieftöner
Max. Belastbarkeit (gesamt)
200 W
Sinusleistung: 184 W (92 W + 92 W) (DIN 45 500)
Nennbelastbarkeit (gesamt)
100 W
Haupt-Lautsprecher (Tieftöner und Hochtöner): 74 W (37
W + 37 W)
Impedanz
6 Ohm
Sub-Tieftöner: 110 W (55 W + 55 W)
Abmessungen
Breite: 185 mm
Höhe: 417 mm
Tiefe: 311 mm
Gewicht
je 4,8 kg
Sub-Tieftöner: 120 W (60 W + 60 W)
Ausgänge
Typ
Frequenzbereich
! Verstärker
Ausgangsleistung
! CD-Player
Lautsprecher: 6 Ohm
Kopfhörer: 16 - 50 Ohm (empfohlen: 32 Ohm)
CD-Digitalausgang (optisch)
Eingänge
D-38
Reserve: 500 mV/47 kOhm
DEUTSCH
01/1/9
D4.fm
FRANÇAIS
Introduction
Nous vous remercions d'avoir porté votre choix sur ce produit SHARP. Pour en tirer le
meilleur parti, veuillez lire ce mode d'emploi très attentivement.
Page
Précautions . . . . . . . . . . . . . . . . . . . . . . . . . . . . . . . . . . . . . . . . . . . . . . . . . . . . 2 - 3
Accessoires . . . . . . . . . . . . . . . . . . . . . . . . . . . . . . . . . . . . . . . . . . . . . . . . . . . . . . .3
Commandes et voyants . . . . . . . . . . . . . . . . . . . . . . . . . . . . . . . . . . . . . . . . . . . 4 - 7
! Avant l'utilisation
Raccordement du système . . . . . . . . . . . . . . . . . . . . . . . . . . . . . . . . . . . . . . . . 8 - 9
Télécommande . . . . . . . . . . . . . . . . . . . . . . . . . . . . . . . . . . . . . . . . . . . . . . . . . . . .10
Page
! Radio
Écoute de la radio . . . . . . . . . . . . . . . . . . . . . . . . . . . . . . . . . . . . . . . . . . . . . . . . . 18
Écoute d'une station mise en mémoire . . . . . . . . . . . . . . . . . . . . . . . . . . . . . . . . 19
! Radio RDS
Radio Data System (RDS) . . . . . . . . . . . . . . . . . . . . . . . . . . . . . . . . . . . . . . . 20 - 27
! Cassette
! Fonctionnement de base
Écoute de la cassette . . . . . . . . . . . . . . . . . . . . . . . . . . . . . . . . . . . . . . . . . . . . . . 28
Commande générale . . . . . . . . . . . . . . . . . . . . . . . . . . . . . . . . . . . . . . . . . . . . . . .11
Réglage du son . . . . . . . . . . . . . . . . . . . . . . . . . . . . . . . . . . . . . . . . . . . . . . . . . . .12
Réglage de l'horloge . . . . . . . . . . . . . . . . . . . . . . . . . . . . . . . . . . . . . . . . . . . . . . .13
! Enregistrement
! Lecture CD
Écoute de CD . . . . . . . . . . . . . . . . . . . . . . . . . . . . . . . . . . . . . . . . . . . . . . . . . 14 - 15
! Lecture avancée de CD
Pour spécifier un disque à reproduire . . . . . . . . . . . . . . . . . . . . . . . . . . . . . . . . .16
Affichage de temps . . . . . . . . . . . . . . . . . . . . . . . . . . . . . . . . . . . . . . . . . . . . . . . .16
Répétition et lecture au hasard . . . . . . . . . . . . . . . . . . . . . . . . . . . . . . . . . . . . . .16
Lecture des morceaux programmés . . . . . . . . . . . . . . . . . . . . . . . . . . . . . . . . . .17
Enregistrement d'un CD vers une cassette . . . . . . . . . . . . . . . . . . . . . . . . . . . . . 29
Enregistrement de la radio vers une cassette . . . . . . . . . . . . . . . . . . . . . . . . . . 30
! Fonctions avancées
-Introduction/Table des matières-
! Informations générales
Instructions importantes
Table des matières
Opérations programmées et mise en arrêt différée . . . . . . . . . . . . . . . . . . 31 - 33
Enrichissement du système . . . . . . . . . . . . . . . . . . . . . . . . . . . . . . . . . . . . . 34 - 35
! Références
Dépannage . . . . . . . . . . . . . . . . . . . . . . . . . . . . . . . . . . . . . . . . . . . . . . . . . . . 36 - 37
Entretien . . . . . . . . . . . . . . . . . . . . . . . . . . . . . . . . . . . . . . . . . . . . . . . . . . . . . . . . . 37
Fiche technique . . . . . . . . . . . . . . . . . . . . . . . . . . . . . . . . . . . . . . . . . . . . . . . . . . . 38
FRANÇAIS
01/1/9
F1.fm
F-1
Précautions
! Général
" Vérifier que l'appareil est installé dans un lieu bien aéré et qu'il est dégagé de tous
côtés (pas d'obstacle à moins de 20 cm de l'appareil.
20 cm
20 cm
20 cm
" Débrancher le cordon d'alimentation en le tenant par la fiche pour ne pas abîmer les fils internes.
20 cm
" Installer l'appareil sur un socle stable, horizontale et exempt de vibrations.
-Précautions-
Informations générales
" Ne pas ôter l'enveloppe, on s'exposera à la
secousse électrique. Pour toute réparation
interne, s'adresser au revendeur SHARP.
F-2
" Mettre l'appareil à l'abri du soleil, du champ
magnétique, de la poussière excessive ou
de l'humidité. On l'écartera aussi d'un appareil électronique (ordinateur domestique, télécopieur, etc.) qui provoquerait des
parasites.
" Ne rien placer sur l'appareil.
" Mettre l'appareil à l'abri de l'humidité, de la chaleur excessive (supérieure à 60°C)
ou du froid excessif.
" Si le système ne fonctionne pas correctement, débrancher et rebrancher le système. Puis on le rallumera.
" En cas d'orage, débrancher l'appareil.
" Veiller à ne pas couvrir les ouvertures de ventilation de journaux, de nappes, de rideaux,
etc.
"
"
"
"
Éviter de placer sur l'appareil une bougie qui brûle.
Il faut traiter une pile usée selon la réglementation environnementale.
L'appareil a été conçu pour l'usage par temps modéré.
Utiliser ce produit dans une plage de température comprise entre 5 et 35°C.
Avertissement:
Respecter la tension indiquée sur l'appareil. Le fonctionnement sur une tension plus
élevée est dangereux et risque de provoquer un incendie ou tout autre type d'accident. SHARP ne sera pas tenu pour responsable des dommages causés par le nonrespect de la tension spécifiée.
! Commande de volume
Le niveau sonore réel dans un réglage donné dépend de divers éléments: rendement
des enceintes, lieu d'écoute, etc. Éviter une augmentation brusque du volume. Elle
se produit, par exemple, lors de la mise sous tension avec un réglage du volume
élevé. Éviter aussi une longue écoute à niveau élevé.
FRANÇAIS
01/1/9
F1.fm
Accessoires
! Entretien des compact discs
Vérifier que les accessoires ci-dessous sont présents dans l'emballage.
1
Pile "AA" (UM/SUM-3, R6, HP-7 ou
équivalent) 2
OUI
correct
Cadre-antenne PO
1
Antenne FM
A
! Cassette
: Bleu
B
" Pour obtenir la meilleure qualité sonore, utiliser une cassette normale ou à
faible bruit (les cassettes métal ou CrO sont déconseillées). Pour l'enregistrement, utiliser seulement des cassettes normales.
" Éviter d'utiliser les cassettes C-120 ou les cassettes de mauvaise qualité. L'appareil risque de mal fonctionner.
" Avant de mettre une cassette dans le compartiment, tendre la bande magnétique
avec un crayon ou un stylo à bille.
: Noir
Fil d'enceinte pour les bornes MAIN
A
2
: Rouge
B
: Noir
Fil d'enceinte pour les bornes SUBWOOFER
Les cassettes sont dotées de languettes qui, une fois retirées, les protégeraient contre un enregistrement ou un effacement accidentel. Pour protéger l'enregistrement,
retirer donc la languette qui correspond à la face. Pour effectuer de nouveau l'enregistrement ou l'effacement, coller un morceau de bande adhésive sur le trou.
1
2
-Précautions/Accessoires-
NON
Télécommande
Informations générales
Le compact disc résiste bien aux dommages, mais il peut se produire un mauvais alignement dû à l'encrassement de la surface du disque. Afin de profiter au maximum
des disques et de ce lecteur, suivre les conseils ci-dessous.
" Éviter d'écrire sur le disque, notamment sur la face non munie d'une étiquette. La
lecture se fait sur la face non munie d'une étiquette.
" Éviter d'exposer les disques directement au soleil, à la chaleur et à l'humidité.
" Tenir le compact disc par les bords. Les traces de doigts, la saleté et l'eau sur le
compact disc sont à l'origine de bruit ou d'un alignement erroné. Si le compact
disc est encrassé ou ne fonctionne pas correctement, nettoyer le disque avec un
chiffon doux et sec. Essuyer du centre vers la périphérie, en ligne droite.
Note:
L'appareil est livré seulement avec les accessoires ci-dessus.
Face A (1)
Languette pour
la face B (2)
Languette pour
la face A (1)
FRANÇAIS
01/1/9
F1.fm
F-3
Commandes et voyants
! Façade
Page de référence
2
3
4
-Commandes et voyants-
Informations générales
1
5
6
8
17 18 19 20 21
22
23
24
25
F-4
9
10
11
12
13
7
26
27
28
29
1. Compartiment de cassette . . . . . . . . . . . . . . . . . . . . . . . . . . . . . . . .28
2. Touche de volume haut/démonstration . . . . . . . . . . . . . . . . . . .11, 12
3. Touche de volume bas . . . . . . . . . . . . . . . . . . . . . . . . . . . . . . . . . . . .12
4. Voyant de réglage de la minuterie . . . . . . . . . . . . . . . . . . . . . . . . . .32
5. Touche marche/attente . . . . . . . . . . . . . . . . . . . . . . . . . . . . . . . . . . .11
6. Touches de lecture directe CD (avec voyant)/éjection de disque . . . . 14, 16
7. Tiroirs de disque . . . . . . . . . . . . . . . . . . . . . . . . . . . . . . . . . . . . . . . . .14
8. Prise de casque . . . . . . . . . . . . . . . . . . . . . . . . . . . . . . . . . . . . . . . . .35
9. Touche d'ouverture/fermeture du panneau de commande . . . . . .11
10.Sélecteur de mode de lecture CD . . . . . . . . . . . . . . . . . . . . . . . . . . .16
11.Sélecteur de mode d'égaliseur . . . . . . . . . . . . . . . . . . . . . . . . . . . . .12
12.Touche d'extra-graves . . . . . . . . . . . . . . . . . . . . . . . . . . . . . . . . . . . .12
13.Touche d'affichage . . . . . . . . . . . . . . . . . . . . . . . . . . . . . . . . . . . .13, 31
14.Touche de menu . . . . . . . . . . . . . . . . . . . . . . . . . . . . . . . . . . .13, 31, 33
15.Cadran jog . . . . . . . . . . . . . . . . . . . . . . . . . . . . . .13, 15, 17, 19, 31, 33
16.Touche d'entrée . . . . . . . . . . . . . . . . . . . . . . . . . . . . . . . .13, 19, 31, 33
17.Touche CD . . . . . . . . . . . . . . . . . . . . . . . . . . . . . . . . . . . . . . .14, 29, 32
18.Touche de cassette . . . . . . . . . . . . . . . . . . . . . . . . . . . . . . . .28, 30, 32
19.Touche de tuner (gamme d'ondes) . . . . . . . . . . . . . . . . . . . . . . .18, 32
20.Touche auxiliaire . . . . . . . . . . . . . . . . . . . . . . . . . . . . . . . . . . . . . . . .34
21.Sélecteur de mode d'inversion cassette . . . . . . . . . . . . . . . . . .28, 29
22.Touche d'effacement . . . . . . . . . . . . . . . . . . . . . . . . . . . . . . . . . .17, 19
23.Touche de mémoire . . . . . . . . . . . . . . . . . . . . . . . . . . . . . . . . . . . . . .17
24.Touche d'inversion CD, de bobinage rapide de cassette
ou d'accord bas (avec voyant) . . . . . . . . . . . . . . . . . . . .15, 18, 28, 34
25.Touche de lecture inversée de cassette (avec voyant) . . . .28, 29, 34
26.Touche d'avance rapide CD, de bobinage rapide de cassette ou
d'accord haut (avec voyant) . . . . . . . . . . . . . . . . . . . . . .15, 18, 28, 34
27.Touche de pause d'enregistrement . . . . . . . . . . . . . . . . . . . . . .29, 34
28.Touche d'arrêt (avec voyant) . . . . . . . . . . . . . . . . . . . . . . . . .15, 17, 29
29.Touche de lecture ou pause CD, de lecture avant de cassette
(avec voyant) . . . . . . . . . . . . . . . . . . . . . . . . . . . . . . . . . .15, 28, 29, 30
14 15 16
FRANÇAIS
01/1/9
F1.fm
17
18
19
8 9 10 11
1
12
20
21
22
23
24
25
26
27
28
5
2
3
4
6
7
1. Voyant de fonction
2. Voyant extra-graves
3. Voyant de lecture au hasard
4. Voyant de mémoire
5. Voyant total
6. Voyant de temps restant
7. Voyant de lecture programmée
8. Voyant de mise en arrêt différée
9. Voyant d'enregistrement programmé
10.Voyant de lecture de disque entier
11.Voyant de cassette
12.Compteur de niveau
13.Voyants CD
14.Voyant de répétition CD
15.Voyant de pause CD
16.Voyant de lecture CD
17.Voyant de FM stéréo
18.Voyant de mode d'inversion cassette
19.Voyant de mode FM stéréo
20.Voyant RDS
21.Voyant de texte radio
22.Voyant d'heure
23.Voyant PTY dynamique
24.Voyant de programme routier
25.Voyant EON
26.Voyant d'informations routières
27.Voyant de type de programme
28.Voyant d'annonce d'informations routières
-Commandes et voyants-
2
3
4
5
6
7
! Afficheur LCD multi-fonction
Informations générales
13
14
15
16
1
! Panneau arrière
Page de référence
MODÈLE N˚ CD-CH1500H
SYSTÈME HI-FI
230V ~ 50Hz 175W
N˚ DE SÉRIE
SHARP CORPORATION
1. Prise de cadre-antenne PO . . . . . . . . . . . . . . . . . . . . . . . . . . . . . . . . 8
2. Prise d'antenne FM de 75 ohms . . . . . . . . . . . . . . . . . . . . . . . . . . . . . 8
3. Prises d'entrée auxiliaire . . . . . . . . . . . . . . . . . . . . . . . . . . . . . . . . . 34
4. Prise de sortie numérique CD . . . . . . . . . . . . . . . . . . . . . . . . . . . . . 35
5. Bornes d'enceinte . . . . . . . . . . . . . . . . . . . . . . . . . . . . . . . . . . . . . . . . 8
6. Cordon d'alimentation . . . . . . . . . . . . . . . . . . . . . . . . . . . . . . . . . . . . 8
7. Vis de transport . . . . . . . . . . . . . . . . . . . . . . . . . . . . . . . . . . . . . . . 8, 37
FRANÇAIS
01/1/9
F1.fm
F-5
Commandes et voyants (suite)
! Télécommande
-Commandes et voyants-
Informations générales
Page de référence
1
15
2
16
3
4
17
5
19
6
7
20
18
8
21
22
9
23
10
24
11
25
12
26
13
14
27
28
29
30
F-6
1. Émetteur de télécommande . . . . . . . . . . . . . . . . . . . . . . . . . . . . . . .10
2. Touche de tuner (gamme d'ondes)
3. Touche CD
4. Touche auxiliaire
5. Touches de lecture directe CD
6. Touche d'effacement
7. Touche de mémoire
8. Touche de plage bas ou inversion CD, de bobinage rapide de cassette, de présélection bas de tuner
9. Touche d'entrée
10.Touche d'arrêt
11.Touche de menu
12.Touche de minuterie . . . . . . . . . . . . . . . . . . . . . . . . . . . . . . . . . .16, 27
13.Touche de mode FM stéréo . . . . . . . . . . . . . . . . . . . . . . . . . . . . . . . .18
14.Touche d'ouverture/fermeture du panneau de commande
15.Touche de cassette
16.Touche marche/attente
17.Touche de recherche de type de programme/informations routières . . 23 - 25
18.Touche RDS EON . . . . . . . . . . . . . . . . . . . . . . . . . . . . . . . . . . . . .24, 25
19.Touche RDS ASPM (mémorisation automatique de stations) . . . .22
20.Sélecteur de mode d'affichage RDS . . . . . . . . . . . . . . . . . .20, 24, 27
21.Sélecteur de mode de lecture CD
22.Touche de plage haut ou avance rapide CD, de bobinage rapide de
cassette ou de présélection haut de tuner
23.Touche de lecture ou pause CD, de lecture de cassette
24.Touche de pause d'enregistrement
25.Sélecteur de mode d'inversion cassette
26.Touche de gradateur . . . . . . . . . . . . . . . . . . . . . . . . . . . . . . . . . . . . .11
27.Touche d'affichage
28.Sélecteur de mode d'égaliseur
29.Touche d'extra-graves
30.Touches de volume
Les touches portant le symbole " " ne peuvent être manipulées que sur la télécommande. Les autres peuvent être manipulées sur l'appareil principal et la télécommande.
FRANÇAIS
01/1/9
F1.fm
! Enceinte acoustique
Les façades des enceintes sont amovibles:
Veiller à ce que rien ne se heurte contre le
diaphragme lorsqu'on retire la façade.
4
3
5
6
MODÈLE N˚ CP-RW5500H
ENCEINTES ACOUSTIQUES
HAUT-PARLEURS:
WOOFER AUXILIAIRE
13 cm
WOOFER
13 cm
TWEETER
5 cm
IMPÉDANCE
6 OHMS
PUISSANCE NOMINALE
100 W
PUISSANCE NOMINALE MAXIMALE
200 W
Mise en place des enceintes:
Enceinte gauche
Enceinte droite
Il n'y a pas de différence entre les deux enceintes.
Système à bi-ampli:
Chaque enceinte dispose d'un woofer auxiliaire intégré (basses fréquences) qui est
entraîné indépendamment du woofer et du tweeter (fréquences moyennes et élevées). Deux amplificateurs ayant des caractéristiques différentes ont été prévus. Les
deux bandes de fréquences sont ainsi amplifiées séparément pour réaliser un son
plus clair.
SHARP CORPORATION
Woofer
1. Woofer
2. Tweeter
3. Woofer auxiliaire
4. Bornes pour woofer auxiliaire
5. Bornes pour les haut-parleurs principaux
6. Évent de baffle réflex
Tweeter
Amplificateur de
puissance
Pré-amplificateur
Woofer auxiliaire
Fréquences moyennes et élevées
(200 Hz - 20 kHz)
Fréquences ultra-bas- L-ch
ses
(60 Hz - 200 Hz)
FRANÇAIS
01/1/9
-Commandes et voyants-
2
Informations générales
1
F1.fm
F-7
Raccordement du système
Vis non fournies
Antenne FM Cadre-antenne PO
Enregistreur MD
-Raccordement du système-
Avant l'utilisation
Vis non fournies
Enceinte
gauche
Enceinte
droite
Prise murale
(230 V CA, 50 Hz)
Vis de transport
F-8
FRANÇAIS
Enrichissement du système (Voir pages 34 - 35.)
01/1/9
F1.fm
! Vis de transport
! Raccordement des enceintes
Avant d'allumer l'appareil, penser à retirer la vis de transport placée à l'arrière
de l'appareil au moyen d'un tournevis ou d'une pièce de monnaie.
Cette vis est nécessaire pour retransporter l'appareil (voir page 37).
Bornes des enceintes principales:
Raccorder le fil bleu à la borne (+) et le noir à la borne (-).
! Raccordement des antennes
Antenne FM fournie:
On raccordera l'antenne FM à la prise FM 75 OHMS et l'orientera vers une direction
qui assurera la meilleure réception.
Bornes de woofer auxiliaire:
Raccorder le fil rouge à la borne (+) et le noir à la borne (-).
Enceinte droite
Enceinte gauche
Notes:
" Le fait de placer l'antenne sur le système ou à proximité du cordon d'alimentation
peut causer des parasites. Éloigner l'antenne du système pour assurer la
meilleure réception.
" Ne pas raccorder l'antenne FM fournie à une antenne extérieure FM. Il se produira
un problème.
Mise en place du cadre PO:
Montage
Noir
2
3
Rouge
Attention:
" Raccorder les fils aux enceintes et puis sur l'appareil.
" Ne pas confondre les bornes MAIN et SUBWOOFER. Le système ou les enceintes risquent de s'endommager.
" Seules les enceintes livrées devront être utilisées avec ce produit. Éviter aussi de
les utiliser avec un autre appareil.
" Ne pas confondre les canaux droit et gauche lors du raccordement. L'enceinte
droite signifie ici celle située à droite lorsque l'on fait face à la façade de l'appareil.
" Ne pas laisser se toucher les fils dénudés des enceintes.
Fixation au mur
Incorrect
Mur
Vis
Antenne extérieure FM:
Pour obtenir une meilleure réception, utiliser une antenne extérieure FM. S'adresser
au revendeur.
Antenne extérieure FM
-Raccordement du système-
1
Bleu
Avant l'utilisation
Cadre-antenne PO fourni:
Raccorder le cadre-antenne PO aux bornes AM LOOP. Positionner le cadre-antenne
de façon à assurer la meilleure réception. Placer le cadre-antenne PO sur un meuble
ou une étagère ou le visser sur une lampe ou au mur (vis non fournies).
Incorrect
" Éviter de monter (ou s'asseoir) sur les enceintes. On risque de se blesser en tom-
bant.
! Branchement du cordon d'alimentation
Après avoir vérifié tous les raccordements, brancher l'appareil sur secteur. Si l'on
branche d'abord l'appareil, ce dernier entre en mode de démonstration.
Note:
Débrancher l'appareil en période de non-utilisation prolongée.
Mode de démonstration (Voir page 11.)
01/1/9
F1.fm
FRANÇAIS
F-9
Télécommande
! Mise en place des piles
1 Retirer le couvercle.
2 Installer les piles fournies en respectant
! Essai de la télécommande
Diriger la télécommande vers le capteur placé sur l'appareil.
les polarités indiquées
dans le logement de piles.
" Pour introduire ou retirer les piles, on les poussera vers la borne .
-Télécommande-
Avant l'utilisation
3
F-10
Remettre le couvercle en place.
La télécommande peut être utilisée dans le rayon illustré ci-dessous:
Appuyer sur la touche ON/STAND-BY. Le système s'est allumé ? On peut maintenant
écouter de la musique.
Capteur de télécommande
Précautions à prendre:
" Remplacer en même temps toutes les piles par des neuves.
" Ne pas utiliser en même temps des piles neuves et anciennes.
" Pour éviter un endommagement éventuel dû à la fuite, on retirera les piles en
période de non-emploi prolongée.
Attention:
" Éviter d'utiliser des piles rechargeables (pile nickel-cadmium, etc.).
" La mauvaise installation des piles peut entraîner un mauvais fonctionnement de
l'appareil.
Notes:
" Remplacer les piles si la distance télécommandable est réduite ou si le fonctionnement est irrégulier. Se procurer 2 piles au format "AA" (UM/SUM-3, R6, HP-7 ou
équivalent).
" Avec un chiffon doux, nettoyer régulièrement l'émetteur de la télécommande et le
capteur de l'appareil principal.
" Une forte lumière frappant le capteur gênera le fonctionnement. Modifier l'éclairage ou changer l'orientation de l'appareil.
" Mettre la télécommande à l'abri de l'humidité, la chaleur, le choc et les vibrations.
0,2 m - 6 m
FRANÇAIS
01/1/9
F1.fm
Commande générale
! Ouverture et fermeture du panneau de
commande
Le panneau de commande est motorisé.
Le panneau de commande s'ouvre automatiquement à la mise sous tension et se
referme à la mise en veille.
! Luminosité de l'affichage (2 niveaux)
On peut éclaircir ou assombrir l'afficheur en agissant sur la touche DIMMER.
Gradateur désactivé
Gradateur activé
! Mode de démonstration
La première fois qu'on branche l'appareil, ce dernier entre en mode de démonstration. Des mots se déplacent sur l'afficheur.
-Commande générale-
Attention:
" Ne pas toucher le panneau de commande pendant son ouverture/fermeture.
" Ne pas presser les touches avec force. La charnière fixant le panneau de commande risque de se casser.
" Veiller à ne pas se pincer le doigt dans le panneau.
Fonctionnement de base
Le système une fois allumé, on peut ouvrir ou refermer le panneau de commande au
moyen de la touche .
Pour annuler le mode de démonstration:
Lorsque l'appareil est en veille (mode de démonstration), appuyer sur la touche
DEMO. L'appareil passe en mode de faible consommation.
Pour repasser au mode de démonstration:
Lorsque l'appareil est en veille, réappuyer sur la touche DEMO.
FRANÇAIS
01/1/9
F2.fm
F-11
Réglage du son
! Commande de graves
Les graves sont amplifiés.
Annulé.
! Égaliseur
La pression sur la touche EQUALIZER permet de visualiser le mode d'égaliseur en
cours. Pour passer à un autre mode, on le sélectionnera en agissant à plusieurs
reprises sur la touche EQUALIZER.
-Réglage du son-
Fonctionnement de base
Dès la pression de la touche X-BASS, l'appareil entre en mode d'extra-graves qui
suramplifie les basses fréquences et affiche "X-BASS". Pour annuler ce mode,
appuyer sur la touche X-BASS.
F-12
! Commande de volume
Appuyer sur la touche VOLUME
pour l'effet contraire.
Le son n'est pas modifié.
Les graves et les aigus sont amplifiés.
Les aigus sont réduits.
Les voix (plage moyenne) sont
amplifiées.
pour augmenter le volume et la touche VOLUME
FRANÇAIS
01/1/9
F2.fm
Réglage de l'horloge
5
Régler l'heure avec le cadran jog et, avant 2 minutes, appuyer sur la
touche ENTER.
Dans cet exemple, l'horloge est réglée sur l'affichage 24 heures (0:00).
1
2
3
Appuyer sur la touche ON/STAND-BY pour allumer l'appareil.
Appuyer sur la touche MENU.
Sélectionner "CLOCK" avec le cadran jog et, avant 10 secondes,
appuyer sur la touche ENTER.
Régler les minutes avec le cadran jog et, avant 2 minutes, appuyer
sur la touche ENTER.
" L'heure n'avance pas même si les minutes passent de "59" à "00".
" L'horloge part à partir de "0" seconde (les secondes ne s'affichent pas). L'horloge
disparaît quelques secondes après.
Pour vérifier l'heure:
[Lorsque l'appareil est en mode d'attente]
Appuyer sur la touche DISPLAY prévue sur la télécommande. L'appareil affiche l'heure pour 3 secondes.
[Lorsque l'appareil est allumé]
Appuyer sur la touche MENU. L'heure s'affiche pendant 10 secondes.
4
Sélectionner l'affichage 24 heures ou 12 heures et, avant 2 minutes,
appuyer sur la touche ENTER.
"0:00"
"AM 12:00"
"AM 0:00"
L'affichage sur 24 heures apparaît.
(0:00 - 23:59)
L'affichage sur 12 heures apparaît.
(AM 12:00 - PM 11:59)
L'affichage sur 12 heures apparaît.
(AM 0:00 - PM 11:59)
Il faut rappeler que cette opération s'effectue seulement lors de la première installation ou de la réinitialisation. [Pour plus de détails, se reporter à "Effacement de toute
la mémoire (réinitialisation) à la page 37.]
Note:
"CLOCK" apparaît ou l'heure se met à clignoter à la pression de la touche DISPLAY
lorsque le courant sera rétabli après une panne de courant ou un débranchement de
l'appareil. Procéder à la réinitialisation comme suit.
Pour remettre l'horloge à l'heure:
[Lorsque l'heure affichée clignote]
1 Appuyer sur la touche ON/STAND-BY.
2 Appuyer sur la touche MENU.
3 Appuyer sur la touche ENTER.
4 Suivre "Réglage de l'horloge" depuis l'étape 5.
-Réglage de l'horloge-
6
Fonctionnement de base
" S'il s'agit de l'affichage 12 heures, "AM" passe automatiquement à "PM".
[Lorsque l'appareil affiche "CLOCK"]
Renouveler "Réglage de l'horloge".
Pour passer à l'affichage 24 heures ou 12 heures:
1 Effacer tout le contenu programmé. [Pour plus de détails, se reporter à
"Effacement de toute la mémoire (réinitialisation)", page 37.]
2 Renouveler "Réglage de l'horloge".
FRANÇAIS
01/1/9
F2.fm
F-13
Écoute de CD
Cet appareil permet de reproduire des disques CD-R et CD-RW audio ainsi que CD
conventionnels et non d'enregistrer dessus.
5
Appuyer sur la touche DISC 1
pour refermer le tiroir 1.
Signifie "disque dedans".
6
-Écoute de CD-
Lecture CD
Nombre total de morceaux
On peut mettre des CD sur les tiroirs 2 - 6 en renouvelant les étapes
3 - 5.
Note:
Le système recherche un CD sur les tiroirs et se cale sur le CD.
7
! Pour reproduire des disques dans l'ordre
(de 1 à 6)
1 Appuyer sur la touche ON/STAND-BY pour allumer l'appareil.
2 Appuyer sur la touche CD.
3 Appuyer sur la touche DISC 1 pour ouvrir le tiroir 1.
4 Mettre un CD sur le tiroir 1, côté d'étiquette vers le haut.
" Placer le CD de 8 cm au milieu du tiroir.
12 cm
F-14
Durée totale de lecture
FRANÇAIS
8 cm
Pour déclencher la lecture, appuyer sur la touche
.
" La lecture se déclenche à partir du morceau 1 sur le DISC 1. Ce disque terminé,
l'appareil passe automatiquement au suivant.
" S'il y a l'un des tiroirs (1 - 6) ne portant pas de disque, l'appareil le saute et passe
au suivant.
" L'appareil se met en arrêt après avoir terminé le DISC 6.
Réglage du son (Voir page 12.)
01/1/9
F2.fm
Interruption de la lecture:
Appuyer sur la touche
.
Pour relancer la lecture, réappuyer sur la touche
! Pour localiser un morceau
.
Arrêt de la lecture:
Appuyer sur la touche .
Pour passer au morceau suivant:
En cours de lecture, on tournera doucement le cadran jog dans le sens des aiguilles
d'une montre.
Pour remplacer d'autres CD pendant la lecture d'un disque:
Appuyer sur la touche pour un disque en arrêt et remplacer le disque.
Après utilisation:
Appuyer sur la touche ON/STAND-BY pour passer en veille.
Attention:
" Placer un seul CD sur le tiroir.
" Ne pas pousser le tiroir en cours de mouvement.
" S'il se produit une panne de courant alors que le tiroir est ouvert, attendre le rétablissement du courant.
" Si on arrête le tiroir avec force, l'appareil affiche "E-CD20" et ne fonctionne plus. Si
le cas se présente, appuyer sur la touche ON/STAND-BY pour passer en veille et
réappuyer dessus pour rallumer l'appareil.
" En cas de parasites sur télévision ou radio au cours de l'utilisation de disques,
éloigner l'appareil du téléviseur ou du poste de radio.
" S'il s'agit d'un disque endommagé, encrassé ou mis à l'envers, l'appareil le sautera.
" On peut sauter plusieurs morceaux en tournant le cadran jog jusqu'au numéro
souhaité.
Pour repasser le morceau en cours:
En cours de lecture, on tournera doucement le cadran jog en sens contraire des
aiguilles d'une montre.
" On peut sauter plusieurs morceaux en tournant le cadran jog jusqu'au numéro
souhaité.
Notes:
" On peut localiser un morceau sur un seul disque.
" La touche
ou
sur la télécommande permet aussi de rechercher des morceaux.
-Écoute de CD-
.
Lecture CD
Pour retirer des CD:
En mode d'arrêt, appuyer sur la touche
! Pour localiser un passage souhaité
Pour l'avance rapide audible:
En cours de lecture, presser la touche
.
Pour l'inversion audible:
En cours de lecture, presser la touche
.
Notes:
" La lecture normale se déclenche dès qu'on relâche la touche
ou
.
" Lorsque l'opération d'avance rapide atteint la fin du disque, l'appareil affiche "DISC
END" et met le CD en pause. Lorsque l'opération d'inversion atteint le début du
disque, la lecture se déclenche automatiquement.
" La recherche d'un passage souhaité se fait sur un seul disque.
FRANÇAIS
01/1/9
F2.fm
F-15
Lecture avancée de CD
-Pour spécifier un disque à reproduire / Affichage de temps / Répétition et lecture au hasard-
F-16
Pour spécifier un disque à reproduire Répétition et lecture au
hasard
On peut reproduire un disque en spécifiant son numéro.
Appuyer sur l'une des touches DISC 1 - DISC 6 pour reproduire un disque correspondant.
Numéro du disque choisi
On peut sélectionner l'un des modes de lecture CD: "Répétition", "Lecture au
hasard", "Lecture normale".
1
Sélectionner un mode de lecture en agissant sur la touche PLAY
MODE.
" Seulement le disque ainsi choisi sera lu automatiquement.
Note:
Lorsque l'une des touches DISC 1 - DISC 6 est en vert, le disque correspondant est
prêt à être reproduit. S'il n'y a pas de disque dans le tiroir, la lecture ne se déclenche
pas et la touche ne s'allume plus.
Mode de répétition
Mode de lecture au hasard
Arrêt de la lecture:
Appuyer sur la touche .
Affichage de temps
Chaque fois que la touche TIME sur la télécommande est pressée en cours de
lecture ou de pause, l'affichage change.
L'afficheur indique le temps
écoulé sur le morceau.
L'appareil affiche le temps
de lecture restant sur le
morceau.
L'afficheur indique le temps
restant sur le morceau.
Notes:
" Pendant la lecture au hasard, l'appareil n'affiche pas le temps de lecture restant.
" Selon les CD, le temps de lecture total affiché peut ne pas coïncider avec celui
indiqué sur la pochette de CD. Le temps entre morceaux n'est pas pris en considération.
Mode de lecture ordinaire
2
Appuyer sur la touche
déclencher la lecture.
ou l'une des touches DISC 1 - DISC 6 pour
" Si la lecture est déclenchée par la touche , la répétition ou la lecture au hasard
se fait sur tous les disques.
" Si on déclenche la lecture en pressant une des touches DISC 1 - DISC 6, ces opérations ne se font que sur le disque correspondant.
Pour répéter une séquence programmée:
Suivre les étapes 1 - 6 dans "Lecture des morceaux programmés", sélectionner la
répétition et enfin appuyer sur la touche .
Notes:
" En fin de répétition ou de lecture au hasard, penser à appuyer sur la touche .
L'appareil lira le(s) disque(s) indéfiniment.
" La lecture au hasard consiste à reproduire les morceaux dans un ordre aléatoire.
(Il n'est donc pas possible de désigner l'ordre de la lecture.)
Pour annuler la répétition ou la lecture au hasard:
Sélectionner une lecture ordinaire en agissant sur la touche PLAY MODE.
FRANÇAIS
01/1/9
F2.fm
Lecture des morceaux programmés
En spécifiant les disques 1 - 6 et les morceaux 1 - 99, on peut programmer jusqu'à 32
morceaux pour la lecture dans un ordre souhaité.
1
6
7
Appuyer sur la touche .
Pour déclencher la lecture, appuyer sur la touche
.
En mode d'arrêt, appuyer sur la touche MEMORY.
Appuyer sur l'une des touches DISC 1 - DISC 6 pour sélectionner
un disque.
Pour annuler la lecture des morceaux programmés:
En mode d'arrêt, appuyer sur la touche CLEAR. Le voyant MEMORY disparaît et les
morceaux programmés sont tous effacés.
Numéro du disque choisi
3
Effacement des morceaux programmés:
Appuyer sur la touche CLEAR avant que "MEMORY" ne cesse de clignoter.
Chaque pression de la touche efface un morceau programmé à partir du dernier.
Agir sur le cadran jog pour sélectionner un morceau souhaité.
Ajout de morceaux au programme:
S'il existe un programme préalablement mis en mémoire, "MEMORY" apparaît. Suivre les étapes 1 - 6 pour ajouter des morceaux. Ces derniers seront placés à la suite
du programme existant.
Pour vérifier les morceaux programmés:
Pendant l'arrêt ou le mode de lecture des morceaux programmés, appuyer sur la touche
ou .
Numéro de la plage choisie
4
Ordre de lecture
Appuyer sur la touche MEMORY pour stocker le numéro de morceau.
Notes:
" Le fait d'ouvrir le tiroir annule automatiquement la séquence programmée.
" Même si on appuie sur la touche ON/STAND-BY pour passer en veille ou passe
d'une fonction CD à une autre, les morceaux programmés restent en mémoire.
" La lecture au hasard n'est pas utilisable pour la lecture des morceaux programmés.
-Lecture des morceaux programmés-
2
Lecture avancée de CD
" La lecture ne se déclenchera pas même si on appuie sur l'une des touches DISC
1 - DISC 6.
Temps de lecture
5
Renouveler les étapes 2 - 4 pour d'autres morceaux. 32 morceaux
au total sont programmables.
FRANÇAIS
01/1/9
F2.fm
F-17
Écoute de la radio
1
2
Allumer l'appareil en appuyant sur la touche ON/STAND-BY.
3
Appuyer sur la touche TUNING (
station souhaitée.
Appuyer à plusieurs reprises sur la touche TUNER (BAND) pour
sélectionner une gamme d'ondes souhaitée (FM ou AM).
Accord manuel:
Appuyer sur la touche TUNING ( ou
l'accord sur une station souhaitée.
ou
) pour faire l'accord sur une
) autant de fois qu'il est nécessaire pour faire
Notes:
" La recherche automatique s'arrêtera dès qu'il se produira des parasites.
" Le balayage automatique sautera des stations à faible puissance.
" Pour arrêter l'accord automatique, réappuyer sur la touche TUNING ( ou ).
" Lorsque l'appareil capte une station RDS (Radio Data System), la fréquence en
est affiché, puis le voyant RDS s'allume. Le nom de la station apparaît ensuite.
" L'accord automatique s'achève complètement pour la mémorisation automatique
(ASPM) de stations RDS (voir page 22).
-Écoute de la radio-
Radio
Accord automatique:
Si on presse la touche TUNING ( ou ) plus de 0,5 seconde, le tuner part en
recherche et se cale sur la première station qu'il capte.
Pour capter une émission FM en stéréo:
Appuyer sur la touche ST-MODE de la télécommande pour afficher "ST".
" " " apparaît lorsque l'émission FM captée est en stéréo.
Voyant de mode FM stéréo
Voyant de réception en FM stéréo
" Si la réception d'une émission FM n'est pas bonne, appuyer sur la touche STMODE. Le voyant "ST" s'éteint. L'émission passe en monaural et le son devient
plus clair.
Après utilisation:
Appuyer sur la touche ON/STAND-BY pour passer en veille.
F-18
FRANÇAIS
Réglage du son (Voir page 12.)
01/1/9
F2.fm
Écoute d'une station mise en mémoire
! Mise en mémoire d'une station
! Rappel d'une station mémorisée
Il est possible de stocker 40 stations en PO et en FM dans la mémoire et de les rappeler par simple pression sur une touche (accord de présélection).
Sélectionner la station en agissant sur le cadran jog.
Suivre les étapes 1 - 3 dans "Écoute de la radio", page 18.
Appuyer sur la touche ENTER pour passer en mode de sauvegarde
de présélection.
Note:
La touche PRESET ( ou
station stocké en mémoire.
) sur la télécommande permet aussi de rappeler une
! Pour balayer les stations préréglées
Avant 5 secondes, agir sur le cadran jog pour sélectionner le
numéro de présélection.
Les stations mises en mémoire peuvent être balayées automatiquement.
1
Appuyer plus de 0,5 seconde sur la touche PRESET (
télécommande.
ou
) de la
" Les numéros de présélection se mettent à clignoter et l'appareil se cale sur chaque station pendant 5 secondes.
" Stocker des stations en mémoire dans l'ordre à partir du canal de présélection 1.
" L'affichage de " " signifie qu'il y a une station déjà programmée.
4
Avant 5 secondes, appuyer sur la touche ENTER pour mettre la station en mémoire.
2
" Si le voyant "MEMORY" et le voyant de numéro de présélection s'éteignent avant
la mise en mémoire de la station, renouveler l'opération depuis l'étape 2.
5
Renouveler les étapes 1 - 4 pour mémoriser d'autres stations ou
remplacer une station mise en mémoire.
" Une nouvelle station remplace celle déjà mise en mémoire.
Note:
La fonction de protection conserve les stations en mémoire pendant plusieurs heures
même s'il se produit une panne de courant ou un débranchement de l'appareil.
Réappuyer sur la touche PRESET (
haitée est localisée.
ou
) lorsque la station sou-
! Pour effacer toutes les stations mémorisées
1
2
3
4
Radio
3
-Écoute d'une station mise en mémoire-
1
2
Appuyer sur la touche TUNER
(BAND).
Appuyer sur la touche ENTER.
Appuyer sur la touche CLEAR.
Lorsque l'appareil affiche "ALL
CLEAR", appuyer sur la touche ENTER.
Pour effacer une seule station:
Rappeler une station mise en mémoire. Lorsqu'elle est affichée, appuyer sur la touche CLEAR. Si l'appareil affiche "CLEAR", appuyer sur la touche ENTER.
FRANÇAIS
01/1/9
F2.fm
F-19
Radio Data System (RDS)
Radio RDS
-Radio Data System (RDS)-
RDS est un service de radiodiffusion qu'offrent de plus en plus de stations FM.
Elles peuvent diffuser leurs programmes avec signaux supplémentaires tels
que leur nom de station, informations sur les types de programmes (sports,
musiques, etc.).
Lorsque l'appareil capte une station RDS, les lettres "RDS" et le nom de station s'inscrivent sur l'afficheur.
"TP" (Traffic Programme) apparaît sur l'afficheur lorsqu'il s'agit d'une émission diffusant des informations routières. "TA" (Traffic Announcement) apparaît si les informations sont en cours de diffusion (voir page 26).
"EON" apparaît pendant la réception des données EON (Enhanced Other Networks
information).
"PTYI" (Dynamic PTY Indicator) apparaît pendant la réception d'une station PTY
dynamique.
"RT" (Radio Text) apparaît pendant la réception de données de texte radio.
"CT" (heure d'horloge) apparaît pendant la réception de données RDS CT.
! Informations données par RDS
Chaque fois que la touche DISP MODE est pressée, l'affichage change comme
suit:
Nom de station (PS)
Fréquence
Type de programme (PTY)
(8 langues)
Heure à l'horloge RDS
On peut commander la fonction RDS par la télécommande seulement.
Date (pour 3 secondes)
Type de programme (PTY)
(anglais fixe)
Heure et date (CT)
Texte radio (RT)
Lorsqu'il s'agit d'une station non-RDS ou d'une station RDS portant de faibles
signaux, l'affichage change comme suit:
NO PS
NO PTY
FM 98.00 MHz
F-20
FRANÇAIS
01/1/9
F3.fm
NO RT
NO CT
Programme d'informations, dépêches, événements, reportages et actualités.
AFFAIRS
Programmes approfondis sur actualités, généralement avec une présentation ou conception différente, y compris un débat ou une analyse.
INFO
Programme pour conseils dans un sens très large.
SPORT
Programme sur les sports.
EDUCATE
Programme éducatif, fondamental.
DRAMA
Feuilletons.
CULTURE
Programmes de la culture nationale ou régionale, comprenant les langues, le théâtre, etc.
SCIENCE
Programmes sur la science naturelle et la technologie.
VARIED
Programmes de conversation de type divertissement, non classables
dans d'autres catégories. Par exemple, jeux, interview, etc.
POP M
Programmes musicaux, variétés, hit-parade, etc.
ROCK M
Musiques modernes contemporaines, écrites et jouées par de jeunes musiciens.
Programmes sur les personnages et les choses, y compris la sociologie,
l'histoire, la géographie, la psychologie et la société.
RELIGION
Programmes relatifs aux religions. Foi, Dieu, dieux, l'existence et l'éthique.
PHONE IN
Programmes ouverts au public. Entretien par téléphone ou au forum.
TRAVEL
Programmes sur tous les types de voyages: proximité, lointain, forfait, astuce, etc. Non pour les informations routières (travaux, délai, etc.) affectant un voyage immédiat qui utilise TP/TA.
LEISURE
Programmes concernant les loisirs auxquelles les auditeurs peuvent participer. Jardinage, pêche, antiquités, cuisine, vins, etc.
JAZZ
Musique polyphonique et syncopée, caractérisée par improvisation.
COUNTRY
Musique populaire issue de la tradition musicale dans le sud des ÉtatsUnis. Caractérisée par une mélodie directe et une façon narrative.
NATION M
Musique populaire du monde en version originale et non en anglais.
OLDIES
Musique populaire, vieux succès.
FOLK M
Musique qui a l'origine de la culture musicale d'un pays particulier, souvent
accompagnée d'instruments acoustiques. Les paroles peuvent être basées sur une affaire historique ou le peuple.
DOCUMENT
Programme documentaire, présenté dans un style d'enquête.
TEST
Émission pour l'essai d'un émetteur ou d'un récepteur d'urgence.
ALARM !
Annonce urgente, dans un cas exceptionnel, qui avertit d'un danger à venir.
EASY M
Musique contemporaine de type "écoute facile", opposée à pop, rock,
classique. Ou une musique spéciale comme jazz, folk et country. La musique de cette catégorie est souvent vocale et de courte durée.
LIGHT M
Musique classique générale, non spécialisée. Instrumentale, vocale ou
choeur.
NONE
Pas de type de programme (réception seulement).
TP
Indique qu'il s'agit d'une station émettant d'informations routières.
TA
Informations routières en cours de diffusion.
CLASSICS
Musique orchestrale, symphonies, musique de chambre, opéra, etc.
OTHER M
Musique non classable comme Rhythm & Blues, Reggae, etc.
WEATHER
Programme météo.
FINANCE
Commerce, marketing, stocks, etc.
CHILDREN
Programmes visées aux jeunes, divertissement, renseignements utiles.
Radio RDS
NEWS
SOCIAL
-Radio Data System (RDS)-
Codes PTY (type de programme), TP (information routière) et TA (annonce routière).
On peut rechercher et recevoir les signaux PTY, TP et TA suivants.
Note:
Lorsqu'on sélectionne un programme en attente EON, l'appareil affiche "TI" au lieu
de "TA".
FRANÇAIS
01/1/9
F3.fm
F-21
Radio Data System (RDS) (suite)
! Mémorisation automatique de stations
(ASPM)
Pour interrompre l'opération ASPM en cours:
Appuyer sur la touche ASPM.
Les stations préalablement mises en mémoire restent inchangées.
Dans l'opération ASPM, le tuner recherche automatiquement de nouvelles stations
RDS. Programmables jusqu'à 40 stations.
S'il y a des stations déjà mises en mémoire, le nombre de stations mémorisables
sont réduit d'autant.
Notes:
" Si une station diffuse sur deux fréquences différentes, la plus forte sera mise en
mémoire.
" L'appareil ignore une station utilisant la même fréquence que celle de la station
déjà mise en mémoire.
" S'il y a 40 stations déjà stockées en mémoire, la recherche sera annulée. Pour
refaire l'opération ASPM, effacer des stations.
" Si des signaux RDS sont faibles, le nom de station peut ne pas être mémorisé.
Radio RDS
-Radio Data System (RDS)-
1
2
Appuyer sur la touche TUNER (BAND) pour sélectionner la gamme
d'ondes FM.
Maintenir la touche ASPM enfoncée pour plus de 3 secondes.
1
"ASPM" clignote 4 secondes et puis la recherche se déclenche (87,50 - 108,00
MHz).
2
Lorsqu'une station RDS est détectée, "RDS" s'affiche un instant et puis la station
est mise en mémoire.
Pour effacer toute la mémoire de présélection:
1 Appuyer sur la touche TUNER (BAND).
2 Appuyer sur la touche ENTER.
3 Appuyer sur la touche CLEAR.
4 Lorsque l'appareil affiche "ALL CLEAR",
appuyer sur la touche ENTER.
Pour refaire la mémorisation d'un nom de station erroné:
La fonction ASPM ne permettra pas de stocker correctement des noms de station en
mémoire si la réception est parasitée ou trop faible. Procéder alors comme suit.
1 Appuyer sur la touche PRESET ( ou ) pour voir si le nom est correct.
2 Si on trouve un nom erroné, attendre que la station soit bien captée et que son
nom soit correctement affiché. On pressera alors la touche ENTER.
3 Avant 5 secondes, réappuyer sur la touche ENTER (avant que le numéro de présélection ne cesse de clignoter).
" Le nom de station a été mis en mémoire correctement.
Notes:
" Il est possible de stocker une station dans deux canaux différents.
" Selon la région ou l'époque de l'année, les noms de stations peuvent changer.
3
F-22
Après le balayage, l'appareil affiche le nombre des stations mises en mémoire
pour 4 secondes puis "END" pour 4 secondes.
FRANÇAIS
01/1/9
F3.fm
! Pour rappeler une station en mémoire
Pour écouter une station souhaitée en spécifiant le type de programme (recherche PTY):
On peut rechercher une des stations mises en mémoire en désignant le type de programme (actualités, sports, informations routières, etc. ... voir page 21).
Si on choisit le programme d'informations routières:
Si on désigne le programme routier (TP) à l'étape 4, "TP" apparaît. (Cela ne signifie
pas que les informations routières sont en cours de diffusion.)
Si les informations routières sont en cours de diffusion, "TA" apparaît.
Appuyer sur la touche PTY.TI.
" L'appareil affiche alternativement "PTY TI" et "SELECT" pendant 6 secondes.
3
Avant 6 secondes, appuyer sur la touche PRESET (
sélectionner le type de programme.
ou
) pour
Pour sélectionner une station en spécifiant son nom:
On peut sélectionner l'une des stations mises en mémoire en indiquant son nom
(BBC R1, BBC R2, etc.).
Avant de déclencher cette opération, il faut stocker le nom d'une station (au moins)
en mémoire.
1 Appuyer sur la touche TUNER (BAND) pour sélectionner la gamme d'ondes FM.
2 Appuyer sur la touche PRESET ( ou ) pour sélectionner une station souhaitée.
3
" Chaque fois que la touche est pressée, le type de programme se modifie. Si on
maintient la touche enfoncée plus de 0,5 seconde, le type affiché change rapidement.
4
Le nom de la station s'affiche pour 3 secondes. L'affichage change ensuite comme
suit.
Radio RDS
2
Appuyer sur la touche TUNER (BAND) pour sélectionner la bande
FM.
-Radio Data System (RDS)-
1
Notes:
" Si l'affichage arrête de clignoter, renouveler l'opération depuis l'étape 2. Lorsque
l'appareil trouve le type souhaité, le numéro du canal correspondant clignote pour
3 secondes et le nom de la station clignote pour 7 secondes pour rester allumé
ensuite.
" Pour écouter le même type de programme d'une autre station, appuyer sur la touche PTY.TI avant que le numéro de canal (ou le nom de station) ne cesse de clignoter. L'appareil recherche alors une autre station.
" Si aucune station n'est détectée, "NOT FOUND" apparaît pour 4 secondes.
Pendant le clignotement du type de programme (c.-à-d. avant 4
secondes), appuyer sur la touche PTY.TI.
" Le type choisi s'allume pour 2 secondes et "SEARCH" apparaît. La recherche se
déclenche ensuite.
FRANÇAIS
01/1/9
F3.fm
F-23
Radio Data System (RDS) (suite)
! Pour écouter automatiquement le programme souhaité (EON-PTY)
5
Lorsque le programmé spécifié démarre sur une station ON (autre
réseau), l'appareil y passe automatiquement et "PTY" se met à clignoter.
6
Lorsque le programmé est terminé, l'appareil repasse automatiquement à la station d'origine.
Lorsqu'une émission du type souhaité commence, l'appareil y passe automatiquement.
1
Faire l'accord sur une station RDS (lorsqu'un nom de station est
affiché).
Radio RDS
-Radio Data System (RDS)-
Vérification du paramétrage du mode d'attente:
En mode d'attente EON, appuyer sur la touche EON. ("Type de programme"
TING")
2
Appuyer sur la touche EON lorsque l'appareil affiche "EON".
" L'appareil affiche alternativement "PTY TI" et "SELECT" pendant 6 secondes.
" Si on appuie sur la touche EON alors que le "EON" reste éteint, "NO EON" s'inscrit pendant 5 secondes pour indiquer que l'appareil n'arrive pas à entrer en mode
d'attente EON.
3
Pendant leur affichage, sélectionner le type de programme souhaité en pressant la touche PRESET ( ou ).
" Le type sélectionné clignote sur l'afficheur.
4
Pour annuler le mode d'attente EON:
En mode d'attente EON, appuyer sur la touche EON et, avant 4 secondes, réappuyer
dessus. ("PTY" disparaît.)
Du PTYI (Dynamic PTY Indicator):
"PTYI" (Dynamic PTY Indicator) apparaît lorsqu'une station PTY dynamique est captée. Le PTY dynamique indique que le PTY sur la station captée ou le PTY classé
dans les données EON est jugé chaque fois que le programme est changé et qu'il
peut être commuté.
PTYI
Signification
S'allume
Réglé sur une station PTY dynamique.
S'éteint
Réglé sur une station PTY statique.
" Dès l'apparition de "PTYI", appuyer sur la touche DISP MODE pour vérifier le type
du programme en cours.
Avant 4 secondes, appuyer sur la touche PTY.TI.
" L'appareil affiche le type de programme sélectionné et "WAITING" pour 2 secondes.
" "PTY" apparaît et l'appareil entre en mode d'attente EON-PTY.
F-24
"WAI-
FRANÇAIS
01/1/9
F3.fm
! Pour écouter automatiquement les informations routières (EON-TI)
5
Lorsqu'une station ON (autre réseau) diffuse une émission TA,
l'appareil passe automatiquement à cette station et "TI" clignote.
6
Lorsque les informations routières sont terminées, l'appareil
repasse automatiquement à la station d'origine.
Lorsque les informations routières commencent, le tuner y passe automatiquement.
Vérification du paramétrage du mode d'attente:
En mode d'attente EON, appuyer sur la touche EON. ("TI"
2
Appuyer sur la touche EON lorsque l'appareil affiche "EON".
"WAITING")
Pour annuler le mode d'attente EON:
En mode d'attente EON, appuyer sur la touche EON. Dans les 4 secondes qui suivent, réappuyer dessus.
" "TI" s'éteint.
" L'appareil affiche alternativement "PTY TI" et "SELECT" pendant 6 secondes.
" Si on appuie sur la touche EON alors que le "EON" reste éteint, "NO EON" s'inscrit pendant 5 secondes pour indiquer que l'appareil n'arrive pas à entrer en mode
d'attente EON.
3
Pendant leur affichage, sélectionner TI (Traffic Information) en
pressant sur la touche PRESET ( ou ).
4
Avant 4 secondes, appuyer sur la touche PTY.TI.
Radio RDS
Faire l'accord sur une station RDS (lorsqu'un nom de station est
affiché).
-Radio Data System (RDS)-
1
" L'appareil affiche respectivement "TI" et "WAITING" pour 2 secondes.
" "TI" apparaît et l'appareil entre en mode d'attente EON-TI.
FRANÇAIS
01/1/9
F3.fm
F-25
Radio Data System (RDS) (suite)
! Notes pour le fonctionnement RDS
Radio RDS
-Radio Data System (RDS)-
Il ne s'agit pas d'un mauvais fonctionnement même si l'un des cas suivants se
présente:
" L'appareil affiche alternativement "PS", "NO PS" et un nom de station.
" Lorsqu'il s'agit d'une station ne diffusant pas correctement ou d'une station en
cours d'essai, la fonction RDS ne fonctionne pas de façon souhaitée.
" S'il s'agit d'une station RDS portant de faibles signaux, l'appareil n'arrive pas à
afficher le nom de la station.
" Les lettres "NO PS", "NO PTY", "NO RT" ou "NO CT" clignotent pour 5 secondes
et puis l'appareil affiche la fréquence.
F-26
Notes pour le texte radio:
" Le texte radio en 10 caractères reste affiché pendant 4 secondes, puis il se
déplace sur l'afficheur.
" Si on capte une station RDS n'émettant pas de texte radio, l'appareil affiche "NO
RT" au passage en position de texte radio.
" L'appareil affiche "RT" pendant la réception de texte radio ou chaque fois que le
texte change.
Notes pour langues PTY:
" Si on appuie sur la touche DISP MODE après être passé en PS (Program Service), l'appareil passe en mode de langues PTY. L'appareil affiche alors les noms
PTY en langue locale à la réception d'une station. Huit langues (anglais compris)
disponibles.
" S'il s'agit d'une station RDS n'émettant pas de données de langues PTY, l'affichage se fait en anglais.
" L'affichage du nom PTY se fait en anglais jusqu'à la réception de données qui
déterminent la langue locale.
" La fonction de langues PTY est utilisée pour la recherche PTY ou l'opération
EON-PTY dans tous les modes DISPLAY MODE sauf "PTY English".
Voyants "TP" et "TA":
"TP"
"TA"
Signification
Non allu- Non allu- Ce programme ne porte pas d'informations routières et ne dimé
mé
rige pas, via EON, vers une station qui en diffuse.
Non allumé
Allumé
Allumé
Allumé
Ce programme porte l'information EON sur un autre programme qui diffuse des informations routières.
Non allu- Ce programme diffuse des informations routières mais pas
mé
pour l'instant. Il porte aussi l'information EON sur un autre.
Allumé
Les informations routières sont en cours de diffusion.
Le mode d'attente EON est annulé dans les cas suivants.
" Lorsqu'on appuie sur la touche ON/STAND-BY pour passer en attente.
" Lorsque, en mode d'attente EON, l'appareil est passé à une autre gamme
d'ondes.
" Lorsque, en mode d'attente EON, on est passé à une autre station FM.
" Lorsqu'un appel de présélection est fait.
Notes:
" Si la station est en train de diffuser le programme PTY spécifié (ou TA), l'appareil
ne passera pas à une station ON (autre réseau).
" S'il y a plusieurs stations (ON), on les comparera et choisira l'une qui porte les
signaux les plus forts (EON-AF). S'il y a une station déjà programmée en
mémoire, l'appareil y passera.
" Pour quitter la station ON captée par EON et revenir à celle qu'on écoutait,
appuyer sur la touche EON.
" Même après le retour à la station d'origine, le mode d'attente reste activé. (Le
voyant "TI" ou "PTY" demeure allumé.)
" L'appareil ne bascule pas entre les stations ON. Il repasse à la station d'origine.
" S'il y a un problème sur la station ON à laquelle l'appareil est passé, l'appareil affiche "WEAK SIG" et repasse à la station d'origine.
" Si le signal en provenance de la station ON à laquelle l'appareil est passé, ce dernier recherche une autre qui porte de plus forts signaux. Si toutes les autres stations sont faibles ou parasités, l'appareil repasse à la station d'origine en affichant
"WEAK SIG".
FRANÇAIS
01/1/9
F3.fm
1
Faire l'accord sur une station RDS (lorsque son nom est affiché).
2
Sélectionner CT en appuyant sur la touche DISP MODE.
(Exemple: le 31 mars 2001, 11:56)
Pour 3 secondes
3
Heure à l'horloge
RDS
Lorsque l'heure RDS est affichée, presser la touche TIME plus de 3
secondes.
(Exemple: 11:50)
Une fois que l'horloge interne est réglée, l'appareil affiche "COMPLETE" pour 3 secondes et puis l'heure correcte.
" Appuyer sur la touche TIME pour voir si l'horloge interne indique la même heure
que celle donnée par l'horloge RDS.
Notes:
" Si on appuie sur la touche TIME en laissant l'heure RDS affichée, les deux horloges (RDS et interne) s'affichent alternativement pour permettre de les comparer.
Si on n'a pas encore choisi le mode d'affichage, l'appareil affiche "CLOCK".
" Lorsque l'appareil affiche "NO CT" ou "CT", l'horloge interne n'est pas réglable.
" Si les signaux en provenance de la station est trop faibles ou parasités, l'horloge
interne n'est pas possible à régler.
Note pour le mode heure et date:
Si on appuie à plusieurs reprises sur la touche DISP MODE pour choisir CT,
l'appareil affiche la date (jour-mois-année) pour 3 secondes et puis l'heure
RDS.
" L'heure RDS apparaît avec "RDS". Il n'y a donc pas de risque de la prendre pour
l'horloge interne.
Notes:
" Si on choisit CT en captant une station RDS qui n'émet pas de signaux heure et
date (données CT), l'appareil affiche "NO CT".
" L'appareil affiche "CT" lorsqu'il capte une station RDS et ceci même avant la
réception de données CT. Les données CT sont envoyées une fois par minute, au
moment du passage d'une minute à l'autre.
" Si le signal RDS est faible ou bruyant, l'appareil peut afficher "- -" (deux traits) ou
une heure incorrecte.
" Il faut vérifier l'heure réglée. Le signal RDS (données CT) peut être erroné selon
les stations.
" La date change ordinairement à minuit, heure de Greenwich et non heure locale.
Radio RDS
On peut régler l'horloge interne selon le signal de temps (données RDS CT) émis par
une station RDS. C'est pratique, car l'horloge interne se met à l'heure automatiquement.
Avant le réglage, sélectionner l'affichage 24 heures ou 12 heures (voir page 13).
4
-Radio Data System (RDS)-
! Pour régler l'horloge interne au moyen du
signal de temps RDS
Heure à l'horloge interne
" Si l'horloge interne n'est pas encore réglée, "CLOCK" apparaît.
" "RDS TIME" et "WAITING" apparaissent alternativement. Attendre que "COMPLETE" apparaisse. (Il apparaît dans les 60 secondes suivantes.)
FRANÇAIS
01/1/9
F3.fm
F-27
Écoute de la cassette
PUSH EJECT
1
2
3
Appuyer sur la touche ON/STAND-BY pour allumer l'appareil.
4
Mettre une cassette dans le compartiment en tournant la face A
vers soi.
5
Appuyer sur la touche REVERSE MODE pour sélectionner une face
ou deux faces.
Appuyer sur la touche TAPE.
Ouvrir le compartiment de cassette en pressant sur la zone marquée "PUSH EJECT ".
Cassette
-Écoute de la cassette-
... Pour écouter les deux faces.
... Pour la répétition des deux faces.
... Pour écouter une seule face.
6
Appuyer sur la touche
pour la face B.
pour écouter la face A ou la touche
" Pour reproduire les deux faces ( ), commencer par la face A. Si on commence
par la face B, la face A ne sera pas lue.
" Pour reproduire la face B avec la télécommande, appuyer sur la touche pour
commuter la face de lecture. Et appuyer sur la touche
/ .
Arrêt de la lecture:
Appuyer sur la touche .
Avance rapide/rebobinage sur la face A:
Pour faire défiler la bande, appuyer sur la touche
sur la touche
.
. Pour le rembobinage, appuyer
Avance rapide/rebobinage sur la face B:
Pour faire défiler la bande, appuyer sur la touche
sur la touche
.
. Pour le rembobinage, appuyer
Attention:
" Pour retirer la cassette, appuyer sur la touche et puis ouvrir le compartiment.
" S'il y a une panne de courant pendant le fonctionnement de la cassette, la tête
magnétique reste engagée avec la bande et le compartiment refuse de s'ouvrir.
" Même si la touche
est pressée pendant la lecture de la cassette, l'appareil ne
passera pas en mode de pause.
F-28
FRANÇAIS
Réglage du son (Voir page 12.)
01/1/9
F3.fm
Enregistrement d'un CD vers une cassette
4
Appuyer sur la touche REVERSE MODE pour sélectionner une face
ou deux faces.
... Pour enregistrer sur les deux faces.
... Pour enregistrer sur une seule face.
Appuyer sur la touche REC PAUSE
laquelle on enregistre.
pour passer à la face sur
" L'enregistrement est mis en pause.
" Pour enregistrer sur les deux faces, commencer par la face A. (Si on commence
par la face B, l'appareil ne passera pas à la face A.)
6
Appuyer sur l'une des touches DISC 1 - DISC 6 pour déclencher
l'enregistrement.
" Lorsque le CD atteint la fin, l'enregistrement se met en arrêt.
Enregistrement consécutif de plusieurs CD:
1 Suivre les étapes 1 - 5.
2 Quel que soit le réglage à l'étape 5, appuyer sur la touche
pour enregistrer sur
la face A ou la touche pour la face B.
" L'enregistrement commence par le disque portant le plus petit numéro.
Pour enregistrer des morceaux en les programmant:
1
2
3
On peut enregistrer un CD souhaité au moyen des touches DISC 1 - DISC 6.
1
2
3
Appuyer sur la touche ON/STAND-BY pour allumer l'appareil.
Appuyer sur la touche CD et mettre le disque souhaité en place.
Mettre une cassette dans le compartiment en tournant la face A ver
soi.
Programmer des disques et des morceaux (voir page 17).
Appuyer sur la touche REC PAUSE .
Quel que soit le réglage à l'étape 5, appuyer sur la touche
la face A ou la touche pour la face B.
Enregistrement
5
-Enregistrement d'un CD vers une cassette
" Avant tout enregistrement important, faire un essai pour s'assurer que l'enregistrement se fait correctement.
" SHARP n'est pas tenu responsable de tout dommage (ou perte d'enregistrement)
qui pourrait résulter d'un mauvais fonctionnement de l'appareil.
" On peut agir sur les commandes de volume ou de son sans affecter le niveau
d'enregistrement (contrôle sonore variable).
" Éviter d'utiliser des cassettes métal ou CrO pour l'enregistrement.
pour enregistrer sur
Arrêt de l'enregistrement:
Appuyer sur la touche .
Le CD s'arrête ainsi que la cassette.
Redémarrage automatique:
Si la face A termine au cours de l'enregistrement d'un morceau, ce dernier sera enregistré sur la face B depuis son début. On n'aura donc aucune partie perdue.
Lecture des morceaux programmés (Voir page 17.)
01/1/9
F3.fm
FRANÇAIS
F-29
Enregistrement de la radio vers une cassette
1
2
3
Faire l'accord sur une station souhaitée (voir page 18).
Mettre une cassette dans le compartiment en tournant la face A ver
soi.
Appuyer sur la touche REVERSE MODE pour sélectionner une face
ou deux faces.
Enregistrement
-Enregistrement de la radio vers une cassette-
... Pour enregistrer sur les deux faces.
... Pour enregistrer sur une seule face.
4
Appuyer sur la touche REC PAUSE
laquelle on enregistre.
pour passer à la face sur
" L'enregistrement est mis en pause.
" Pour enregistrer sur les deux faces, commencer par la face A. (Si on commence
par la face B, l'appareil ne passera pas à la face A.)
5
Appuyer sur la touche
pour la face B.
pour enregistrer sur la face A ou la touche
" Lorsque l'on appuie sur la touche
/
tre sur la face spécifiée à l'étape 4.
de la télécommande, le système enregis-
Pour interrompre l'enregistrement:
Appuyer sur la touche REC PAUSE .
Pour reprendre l'enregistrement, appuyer sur la même touche (
sée à l'étape 5.
ou ) qu'on a pres-
Arrêt de l'enregistrement:
Appuyer sur la touche .
Note:
S'il se produit un sifflement au cours de l'enregistrement d'une émission PO, éloigner
le cadre-antenne PO.
! Effacement de cassettes enregistrées
1
2
F-30
FRANÇAIS
Appuyer sur la touche TAPE.
Suivre les étapes 2 - 5 dans "Enregistrement de la radio vers une cassette".
Écoute de la radio (Voir page 18.)
01/1/9
F3.fm
Opérations programmées et mise en arrêt différée
Lecture programmée:
L'appareil s'allume et reproduit une source souhaitée (CD, tuner, cassette) à l'heure
programmée.
! Opération programmée (lecture ou enregistrement)
Enregistrement programmé:
L'appareil s'allume et déclenche l'enregistrement d'une émission radiodiffusée à
l'heure programmée.
Avant de régler la minuterie:
1
2
3
Appuyer sur la touche ON/STAND-BY pour allumer l'appareil.
Appuyer sur la touche MENU.
Agir sur le cadran jog pour sélectionner "TIMER PLAY" ou "TIMER
REC" et, avant 10 secondes, appuyer sur la touche ENTER.
Pour la lecture programmée:
4
Pour l'enregistrement programmé:
" PLAY" ou " REC" clignote pour 5 secondes. Appuyer sur la touche ENTER avant que le clignotement ne s'arrête.
ou
5
Agir sur le cadran jog pour spécifier l'heure de départ et, avant 10
secondes, appuyer sur la touche ENTER.
Fonctions avancées
Mise en arrêt différée:
Cette fonction permet d'éteindre automatiquement la radio, le lecteur CD et la platine
à cassette.
-Opérations programmées et mise en arrêt différée-
Mettre le système en attente et appuyer sur la touche DISPLAY pour vérifier que
l'horloge est à l'heure.
" Les illustrations indiquent le réglage de la lecture programmée.
Réglage de l'horloge (Voir page 13.)
01/1/9
F4.fm
FRANÇAIS
F-31
Fonctions avancées
-Opérations programmées et mise en arrêt différée-
Opérations programmées et mise en arrêt différée (suite)
6
Agir sur le cadran jog pour spécifier les minutes et, avant 10 secondes, appuyer sur la touche ENTER.
7
Agir sur le cadran jog pour spécifier l'heure de fin et, avant 10 secondes, appuyer sur la touche ENTER.
8
Pour annuler l'opération programmée (lecture ou enregistrement)
1 Appuyer sur la touche ON/STAND-BY pour allumer l'appareil.
2 Appuyer sur la touche MENU.
3 Agir sur le cadran jog pour sélectionner "TIMER OFF" et puis appuyer sur la touche ENTER.
Agir sur le cadran jog pour spécifier les minutes et, avant 10 secondes, appuyer sur la touche ENTER.
Pour vérifier l'heure programmée:
1 Appuyer sur la touche ON/STAND-BY pour allumer l'appareil.
2 Appuyer sur la touche MENU.
3 Agir sur le cadran jog pour sélectionner "TIMER PLAY" ou "TIMER REC" et appuyer sur la touche ENTER.
4 Appuyer sur la touche ON/STAND-BY pour passer en veille.
12À
l'heure programmée, la lecture ou l'enregistrement se déclen
.che.
Heure de départ
Fin d'opération
" Le niveau sonore augmente petit à petit jusqu'au niveau réglé lors de la programmation.
13À l'heure de fin, le système se met en veille automatiquement.
" Si on appuie une touche pendant l'opération programmée, la minuterie est désactivée, mais la lecture ou l'enregistrement se poursuit même après l'heure de fin.
9
Régler le volume en pressant sur les touches VOLUME.
" Éviter de trop élever le volume.
10Appuyer sur la touche CD, TUNER (BAND) ou TAPE pour sélection
.ner une fonction souhaitée.
Pour sélectionner une source pour la lecture programmée: CD, TUNER (BAND)
ou TAPE.
Pour sélectionner la source pour l'enregistrement programmé: TUNER (BAND).
F-32
11Appuyer sur la touche ON/STAND-BY pour passer en veille.
Pour remettre à zéro ou reprogrammer la minuterie:
Suivre "Opération programmée (lecture ou enregistrement)" depuis le début.
Notes:
" L'heure d'opération une fois programmée, l'appareil la conservera à moins qu'on
ne la modifie.
" Pour effectuer l'opération programmée (lecture ou enregistrement) avec un autre
élément raccordé aux prises AUX IN, sélectionner "AUX" à l'étape 10. Seul ce système hi-fi entre alors en veille automatiquement. (L'autre élément reste allumé.)
FRANÇAIS
01/1/9
F4.fm
Exemple: s'endormir et se réveiller en écoutant la radio
Il n'est pas possible d'utiliser deux sources différentes pour s'endormir et se réveiller.
1
2
Changement de la durée d'écoute:
Tourner le cadran jog en laissant la durée affichée.
(Maximum: 2 heures - Minimum: 30 minutes)
4
5
Programmer la lecture ou l'enregistrement (étapes 1 - 8, pages 31 32).
En écoutant la source de son choix, régler la durée pour la mise en
arrêt (voir ci-contre, étapes 1 - 4).
1. Réglage de l'opération programmée (lecture/en-Heure de départ pour l'opéraregistrement)
tion programmée (lecture/en2. Déclenchement de la mise en arrêt différée
registrement)
Appuyer sur la touche ENTER.
La durée programmée écoulée, le système entre automatiquement
en veille.
" Le niveau sonore baisse dans la dernière minute de la lecture programmée.
Note:
Une fois réglée, la durée pour la mise en arrêt restera inchangée jusqu'à une modification ultérieure.
A
B
La mise en arrêt différée s'arrête automatiquement.
Fin d'opération
: 30 minutes - 2 heures
: Durée programmée
Annulation de la mise en arrêt différée:
Pendant la lecture déclenchée pour la mise en arrêt, appuyer sur la touche ON/
STAND-BY.
Pour vérifier la durée pour la mise en arrêt différée:
Suivre les étapes 2 - 3 ci-dessus.
On peut alors modifier la durée pour la mise en arrêt différé.
FRANÇAIS
01/1/9
F4.fm
Fonctions avancées
sur la touche ENTER.
! Pour utiliser l'opération programmée et la
mise en arrêt différée
-Opérations programmées et mise en arrêt différée-
! Mise en arrêt différée
1 Allumer la source souhaitée.
2 Appuyer sur la touche MENU.
3 Agir sur le cadran jog pour sélectionner "SLEEP" et puis appuyer
F-33
Enrichissement du système
Le câble de raccordement n'est pas fourni. Se procurer un câble vendu dans le commerce.
! Écoute du son en provenance d'un magnétoscope, un lecteur de DVD, etc.
1 Utiliser un cordon vendu dans le commerce pour raccorder un élément externe VCR, DVD, etc. aux prises AUX IN.
Blanc
Vers la prise de
sortie de ligne
-Enrichissement du système-
Fonctions avancées
Rouge
Lorsqu'il s'agit d'un élément vidéo, relier la sortie audio à ce système et la sortie
vidéo à un téléviseur.
Blanc
2
3
4
5
Appuyer sur la touche ON/STAND-BY pour allumer l'appareil.
Appuyer sur la touche AUX pour sélectionner "AUX".
Manoeuvrer l'élément externe (magnétoscope, lecteur DVD, etc.).
Régler le niveau d'entrée en agissant sur la touche
Rouge
-2
.
0
+4
OVER
Cordon RCA
Note:
Pour supprimer un bourdonnement, mettre l'appareil à l'écart du téléviseur.
! Pour enregistrer sur une cassette
1 Mettre une cassette dans le compartiment.
2 Appuyer sur la touche AUX pour sélectionner "AUX".
3 Appuyer sur la touche REC PAUSE .
4 Manoeuvrer l'élément externe (magnétoscope, lecteur DVD, etc.).
5 Régler le niveau d'entrée en agissant sur la touche ou .
6 Appuyer sur la touche pour enregistrer sur la face A ou la touche
F-34
ou
" Le voyant "OVER" ne devra pas alors s'allumer.
pour la face B.
FRANÇAIS
01/1/9
F4.fm
Le câble de raccordement n'est pas fourni. Se procurer un câble vendu dans le commerce.
! Pour enregistrer des signaux CD sur MD
(sortie numérique)
Les signaux numériques de cet appareil peuvent être enregistrés par des enregistreurs de MD etc.
Enlever le couvercle sur la prise DIGITAL OUT.
3
4
Mettre l'enregistreur MD (ou autre) en mode d'enregistrement.
Lancer la lecture du CD sur l'appareil.
Note:
Seuls les signaux CD peuvent être envoyés.
! Casque
Câble de raccordement pour
l'enregistrement numérique
Vers la prise
OPTICAL/LINE IN
" Avant de brancher ou de débrancher le casque, réduire le niveau sonore.
" Utiliser un casque muni d'une fiche de 3,5 mm de diamètre et ayant une impédance de 16 à 50 ohms. L'impédance préconisée est de 32 ohms.
" Lorsque le casque est branché, les enceintes sont automatiquement déconnectées. Régler le volume en pressant les touches VOLUME.
FRANÇAIS
01/1/9
F4.fm
-Enrichissement du système-
Utiliser un câble spécifique pour raccorder l'appareil à la prise
OPTICAL/LINE IN d'un enregistreur MD.
Fonctions avancées
Enregistreur MD
1
2
F-35
Dépannage
L'utilisateur peut résoudre pas mal de problèmes sans faire appel à un dépanneur.
Si le cas se présente, se reporter au tableau ci-dessous avant de prendre contact avec un
revendeur ou un centre de réparation agréés par SHARP.
! Général
Problème
Cause
" L'horloge n'est pas à l'heure.
" Y a-t-il eu une panne de courant ? Remettre l'horloge à l'heure (voir page 13).
" L'appareil ne répond pas à la
pression d'une touche.
" Mettre l'appareil en veille et le rallumer.
" Aucun son n'est entendu.
" Le volume est-il réglé sur "0" ?
" S'il fonctionne toujours mal, réinitialiser (voir page
37).
! Platine à cassette
Problème
" La languette de protection est-elle enlevée ?
" La qualité sonore n'est pas
assurée à l'enregistrement.
" S'agit-il d'une cassette normale ? (La cassette métal
ou CrO n'est pas utilisable.)
" Effacement incomplet.
" Le son saute.
" La bande est-elle détendue ?
" Les aigus sont faibles.
" Le cabestan, le galet et les têtes sont-ils propres ?
" Fluctuation de son.
" La cassette refuse de sortir.
" Les fils des enceintes sont-ils débranchés ?
-Dépannage-
Références
" Le casque est-il branché ?
Cause
" La lecture ne démarre pas.
" Le disque est-il mis à l'envers?
" La lecture s'arrête au milieu
ou ne se fait pas correctement.
" Le disque est-il conforme à la norme?
! Tuner
" L'émission radiodiffusée est
parasitée consécutivement.
Cause
" L'appareil est-il placé à proximité d'un téléviseur ou
d'un PC?
" L'antenne FM/PO est-elle placée correctement? On
le mettra à l'écart du cordon d'alimentation.
Cause
" Le système est-il bien branché ?
" Les polarités de la batterie sont-elles respectées?
" Les piles sont-elles mortes?
" Le disque est-il distordu ou rayé?
" Une condensation est-elle formée dans l'appareil ?
F-36
Problème
" La télécommande ne fonctionne pas.
" La distance ou l'angle est-il correct?
" La lecture est intermittente ou " L'appareil subit-il des vibrations ?
s'arrête.
" Le disque est-il encrassé?
Problème
" S'il se produit une panne de courant en cours d'opération cassette, la tête magnétique reste engagée
avec la bande et le compartiment refuse de s'ouvrir.
On attendra alors le rétablissement de courant.
! Télécommande
! Lecteur CD
Problème
Cause
" Enregistrement impossible.
" Le capteur de télécommande reçoit-il une forte lumière ?
! Condensation
Le changement brusque de température, la conservation ou l'utilisation dans un lieu
très humide peuvent occasionner une formation de condensation à l'intérieur de
l'appareil (cellule porte-laser, têtes magnétiques, etc.) ou sur l'émetteur (LED) de la
télécommande.
La condensation peut entraîner un mauvais fonctionnement de l'appareil. Si cela se
produit, laisser l'appareil sous tension, sans disque (ou cassette) dans le compartiment, pour 1 heure environ afin d'assurer la lecture normale. Essuyer l'émetteur
(LED) de la télécommande avec un chiffon doux.
FRANÇAIS
01/1/9
F4.fm
Entretien
! En cas de dérangement
! Nettoyage des pièces relatives à la bande
Si l'appareil a subi une force extérieure (chocs, électricité statique, surtension due à
un foudre, etc.) ou une mauvaise manipulation, il peut mal fonctionner.
" L'encrassement des têtes, cabestans ou galets est à l'origine de la mauvaise qualité sonore et de l'emmêlement de la bande. Nettoyer ces pièces à l'aide d'un
coton-tige imbibé d'un produit spécial en vente dans le commerce.
" Avant le nettoyage, débrancher l'appareil qui renferme des organes portés à haute
tension.
D
C
A
C
B
D
Si, malgré les opérations ci-dessus, l'appareil n'est pas remis en état, effacer
toute la mémoire comme suit.
1 Appuyer sur la touche ON/STAND-BY pour passer en veille.
2 Tout en pressant sur la touche VOLUME , appuyer sur la touche ON/STAND-BY
jusqu'à ce que "ALL CLEAR" apparaisse.
Attention:
Cette opération efface toutes les données en mémoire: réglage pour l'horloge et la
minuterie, présélections pour tuner et des programmes pour CD.
! Avant de transporter l'appareil
Au dos de l'appareil se trouve une vis de sécurité qui protège l'appareil pendant le
transport.
1
2
3
4
5
Appuyer sur la touche ON/STAND-BY pour allumer l'appareil.
Retirer tous les disques de l'appareil et refermer le tiroir. L'appareil affiche "CD
NO DISC".
Appuyer sur la touche ON/STAND-BY pour passer en attente. L'appareil affiche
"GOOD-BYE".
Lorsque "GOOD-BYE" disparaît, débrancher l'appareil.
Remettre la vis de sécurité en place à l'arrière de l'appareil et la resserrer avec un
tournevis.
:
Tête d'effacement
:
Cabestan
:
Tête d'enregistrement/lecture
:
Galet
" Après une période d'utilisation prolongée, les têtes et les cabestans se magnétisent, causant un son médiocre. Démagnétiser ces pièces toutes les 30 heures de
lecture/enregistrement à l'aide d'un démagnétiseur de tête en vente dans le commerce. Avant utilisation, lire attentivement la notice du démagnétiseur.
-Entretien-
! Effacement de toute la mémoire (réinitialisation)
Références
Procéder alors comme suit:
1 Mettre l'appareil en attente et puis le rallumer.
2 Si l'appareil n'est pas remis en état, on le débranchera et rebranchera. Et enfin,
on le rallumera.
! Nettoyage du coffret
Essuyer régulièrement le coffret à l'aide d'un chiffon doux et d'une solution d'eau
savonneuse, puis essuyer à l'aide d'un chiffon sec.
Attention:
" Éviter d'utiliser des produits chimiques pour le nettoyage (essence, diluant, etc.).
La finition de l'enveloppe peut s'abîmer.
" Ne pas lubrifier l'intérieur de l'appareil, qui pourrait mal fonctionner.
FRANÇAIS
01/1/9
F4.fm
F-37
Fiche technique
SHARP se réserve le droit d'apporter des modifications à la présentation et aux
caractéristiques des appareils à fin d'amélioration. Les valeurs indiquées dans ce
document sont les valeurs nominales des appareils de série mais de légères différences peuvent être constatées d'un appareil à l'autre.
Type
Lecteur avec changeur de 6 disques
Procédé de lecture
Sans contact, par laser à semi-conducteur à 3 faisceaux
Convertisseur N/A
1 bit
230 V CA, 50 Hz
Réponse en fréquence
20 - 20.000 Hz
Allumé: 175 W
Gamme dynamique
90 dB (1 kHz)
! Général
Alimentation
Consommation
! Lecteur CD
Largeur: 200 mm
Hauteur: 352 mm
Profondeur: 377 mm
Poids
9,8 kg
(*)
-Fiche technique-
Références
En veille: 0,6 W (*)
Dimensions
Cette valeur de consommation est obtenue lorsque le mode de démonstration
est annulé en veille. Se reporter à la page 11 pour désactiver le mode de démonstration.
! Amplificateur
Puissance de sortie
Réponse en fréquence
50 - 14.000 Hz (Bande normale)
Rapport signal/bruit
50 dB (enregistrement/lecture)
Pleurage et scintillement
0,35 % (DIN 45 511)
! Tuner
Gamme de fréquences
FM: 87,5 - 108,0 MHz
PO: 522 - 1.620 kHz
PMPO: 668 W
MPO: 334 W (167 W + 167 W) (DIN 45 324)
Haut-parleurs principaux (woofer et tweeter): 134 W (67 W
+ 67 W)
! Enceintes
Type
À trois voies
Woofer auxiliaire: 200 W (100 W + 100 W)
Tweeter de 5 cm
RMS: 200 W (100 W + 100 W) (DIN 45 324)
Woofer de 13 cm
Haut-parleurs principaux (woofer et tweeter): 80 W (40 W +
40 W)
Woofer auxiliaire: 120 W (60 W + 60 W)
RMS: 184 W (92 W + 92 W) (DIN 45 500)
Haut-parleurs principaux (woofer et tweeter): 74 W (37 W +
37 W)
Woofer auxiliaire: 110 W (55 W + 55 W)
Bornes de sortie
! Platine à cassette
Woofer auxiliaire de 13 cm
Puissance d'entrée maximale (Totale)
200 W
Puissance d'entrée nominale (total)
100 W
Impédance
6 ohms
Dimensions
Largeur: 185 mm
Hauteur: 417 mm
Profondeur: 311 mm
Poids
4,8 kg/chacune
Enceintes: 6 ohms
Casque: 16 - 50 ohms (recommandé: 32 ohms)
Sortie numérique CD (optique)
Bornes d'entrée
F-38
Auxiliaire: 500 mV/47 kilohms
FRANÇAIS
01/1/9
F4.fm
ENGLISH
Introduction
Thank you for purchasing this SHARP product. To obtain the best performance from
this product, please read this manual carefully. It will guide you in operating your
SHARP product.
Page
Precautions . . . . . . . . . . . . . . . . . . . . . . . . . . . . . . . . . . . . . . . . . . . . . . . . . . . . 2 - 3
Accessories . . . . . . . . . . . . . . . . . . . . . . . . . . . . . . . . . . . . . . . . . . . . . . . . . . . . . . .3
Controls and Indicators . . . . . . . . . . . . . . . . . . . . . . . . . . . . . . . . . . . . . . . . . . . 4 - 7
„ Preparation for Use
System Connections . . . . . . . . . . . . . . . . . . . . . . . . . . . . . . . . . . . . . . . . . . . . . 8 - 9
Remote Control . . . . . . . . . . . . . . . . . . . . . . . . . . . . . . . . . . . . . . . . . . . . . . . . . . .10
„ Basic Operation
General Control . . . . . . . . . . . . . . . . . . . . . . . . . . . . . . . . . . . . . . . . . . . . . . . . . . .11
Sound Control . . . . . . . . . . . . . . . . . . . . . . . . . . . . . . . . . . . . . . . . . . . . . . . . . . . .12
Setting the Clock . . . . . . . . . . . . . . . . . . . . . . . . . . . . . . . . . . . . . . . . . . . . . . . . . .13
„ CD Playback
Listening to a CD (CDs) . . . . . . . . . . . . . . . . . . . . . . . . . . . . . . . . . . . . . . . . . 14 - 15
„ Advanced CD Playback
To Specify a Disc to Play . . . . . . . . . . . . . . . . . . . . . . . . . . . . . . . . . . . . . . . . . . . .16
Switching the Time Display . . . . . . . . . . . . . . . . . . . . . . . . . . . . . . . . . . . . . . . . .16
Repeat or Random Play . . . . . . . . . . . . . . . . . . . . . . . . . . . . . . . . . . . . . . . . . . . . .16
Programmed Play . . . . . . . . . . . . . . . . . . . . . . . . . . . . . . . . . . . . . . . . . . . . . . . . .17
Page
„ Radio
Listening to the Radio . . . . . . . . . . . . . . . . . . . . . . . . . . . . . . . . . . . . . . . . . . . . . . 18
Listening to the Memorised Station . . . . . . . . . . . . . . . . . . . . . . . . . . . . . . . . . . . 19
„ RDS Radio
Using the Radio Data System (RDS) . . . . . . . . . . . . . . . . . . . . . . . . . . . . . . 20 - 27
„ Tape Playback
Listening to a Cassette Tape . . . . . . . . . . . . . . . . . . . . . . . . . . . . . . . . . . . . . . . . 28
„ Recording
Recording to a Cassette Tape from a CD . . . . . . . . . . . . . . . . . . . . . . . . . . . . . . 29
Recording to a Cassette Tape from the Radio . . . . . . . . . . . . . . . . . . . . . . . . . . 30
-Introduction/Contents-
„ General Information
Important Instruction
Contents
„ Advanced Features
Timer and Sleep Operation . . . . . . . . . . . . . . . . . . . . . . . . . . . . . . . . . . . . . . 31 - 33
Enhancing Your Stereo System . . . . . . . . . . . . . . . . . . . . . . . . . . . . . . . . . . 34 - 35
„ References
Troubleshooting Chart . . . . . . . . . . . . . . . . . . . . . . . . . . . . . . . . . . . . . . . . . 36 - 37
Maintenance . . . . . . . . . . . . . . . . . . . . . . . . . . . . . . . . . . . . . . . . . . . . . . . . . . . . . . 37
Specifications . . . . . . . . . . . . . . . . . . . . . . . . . . . . . . . . . . . . . . . . . . . . . . . . . . . . 38
ENGLISH
01/1/9
E1.fm
E-1
Precautions
„ General
z Please ensure that the equipment is positioned in a well-ventilated area and
ensure that there is at least 20 cm (8") of free space along the sides, top and back
of the equipment.
20 cm (8")
20 cm (8")
20 cm (8")
z Use the unit on a firm, level surface free from
vibration.
-Precautions-
General Information
20 cm (8")
z Keep the unit away from direct sunlight,
strong magnetic fields, excessive dust, humidity and electronic/electrical equipment
(home computers, facsimiles, etc.) which
generates electrical noise.
z Do not place anything on top of the unit.
z Do not expose the unit to moisture, to temperatures higher than 60°C (140°F) or to
extremely low temperatures.
z If your system does not work properly, disconnect the AC power lead from the wall
socket. Plug the AC power lead back in, and then turn on your system.
z In case of an electrical storm, unplug the unit
for safety.
E-2
z Hold the AC power plug by the head when removing it from the wall socket, as pulling the
lead can damage internal wires.
z Do not remove the outer cover, as this may
result in electric shock. Refer internal service to your local SHARP service facility.
z The ventilation should not be impeded by covering the ventilation openings with items, such
as newspapers, tablecloths, curtains, etc.
z No naked flame sources, such as lighted candles, should be placed on the apparatus.
z Attention should be drawn to the environmental aspects of battery disposal.
z The apparatus is designed for use in moderate climate.
z This unit should only be used within the range of 5°C - 35°C (41°F - 95°F).
Warning:
The voltage used must be the same as that specified on this unit. Using this product
with a higher voltage other than that which is specified is dangerous and may result in
a fire or other type of accident causing damage. SHARP will not be held responsible
for any damage resulting from use of this unit with a voltage other than that which is
specified.
„ Volume control
The sound level at a given volume setting depends on speaker efficiency, location,
and various other factors. It is advisable to avoid exposure to high volume levels,
which occur whilst turning the unit on with the volume control setting up high, or
whilst continually listening at high volumes.
ENGLISH
01/1/9
E1.fm
Accessories
„ Care of compact discs
Please confirm that the following accessories are included.
Compact discs are fairly resistant to damage, however mistracking can occur due to
an accumulation of dirt on the disc surface. Follow the guidelines below for maximum
enjoyment from your CD collection and player.
z Do not write on either side of the disc, particularly the non-label side from which
signals are read. Do not mark this surface.
z Keep your discs away from direct sunlight, heat, and excessive moisture.
z Always hold the CDs by the edges. Fingerprints, dirt, or water on the CDs can
cause noise or mistracking. If a CD is dirty or does not play properly, clean it with a
soft, dry cloth, wiping straight out from the centre, along the radius.
1
AM loop aerial
1
"AA" size battery (UM/SUM-3, R6, HP-7
or similar) 2
FM aerial
A
„ Cassette tape
: Blue
B
z For playback, use normal or low-noise tapes for the best sound. (Metal or
CrO tapes are not recommended.) For recording, use only normal tapes.
z Do not use C-120 tapes or poor-quality tapes, as they may cause malfunctions.
z Before loading a tape into the cassette compartment, tighten the slack with a pen
or a pencil.
: Black
Speaker wire for MAIN terminals
A
2
: Red
B
: Black
Speaker wire for SUBWOOFER terminals
Cassettes have removable tabs which prevent accidental recording or erasing.
Removing the tab will protect the corresponding side. Cover the tab holes with adhesive tape to erase or record again.
1
-Precautions/Accessories-
YES
correct
General Information
NO
Remote control
2
Note:
Only the above accessories are included.
Side A (1)
Tab for side B (2)
Tab for side A (1)
ENGLISH
01/1/9
E1.fm
E-3
Controls and Indicators
„ Front panel
Reference page
1
3
4
-Controls and Indicators-
General Information
2
5
6
9
10
11
12
13
7
8
17 18 19 20 21
22
23
24
25
E-4
26
27
28
29
1. Cassette Compartment . . . . . . . . . . . . . . . . . . . . . . . . . . . . . . . . . . .28
2. Volume Up/Demo Button . . . . . . . . . . . . . . . . . . . . . . . . . . . . . . .11, 12
3. Volume Down Button . . . . . . . . . . . . . . . . . . . . . . . . . . . . . . . . . . . . .12
4. Timer Set Indicator . . . . . . . . . . . . . . . . . . . . . . . . . . . . . . . . . . . . . .32
5. On/Stand-by Button . . . . . . . . . . . . . . . . . . . . . . . . . . . . . . . . . . . . . .11
6. CD Direct Play Buttons (with Indicator)/CD Eject Buttons . . .14, 16
7. Disc Trays . . . . . . . . . . . . . . . . . . . . . . . . . . . . . . . . . . . . . . . . . . . . . .14
8. Headphone Socket . . . . . . . . . . . . . . . . . . . . . . . . . . . . . . . . . . . . . . .35
9. Control Panel Open/Close Button . . . . . . . . . . . . . . . . . . . . . . . . . .11
10.CD Play Mode Select Button . . . . . . . . . . . . . . . . . . . . . . . . . . . . . . .16
11.Equalizer Mode Select Button . . . . . . . . . . . . . . . . . . . . . . . . . . . . .12
12.Extra Bass Button . . . . . . . . . . . . . . . . . . . . . . . . . . . . . . . . . . . . . . .12
13.Display Button . . . . . . . . . . . . . . . . . . . . . . . . . . . . . . . . . . . . . . .13, 31
14.Menu Button . . . . . . . . . . . . . . . . . . . . . . . . . . . . . . . . . . . . . .13, 31, 33
15.Jog Dial . . . . . . . . . . . . . . . . . . . . . . . . . . . . . . . . .13, 15, 17, 19, 31, 33
16.Enter Button . . . . . . . . . . . . . . . . . . . . . . . . . . . . . . . . . . .13, 19, 31, 33
17.CD Button . . . . . . . . . . . . . . . . . . . . . . . . . . . . . . . . . . . . . . . .14, 29, 32
18.Tape Button . . . . . . . . . . . . . . . . . . . . . . . . . . . . . . . . . . . . . .28, 30, 32
19.Tuner (Band) Button . . . . . . . . . . . . . . . . . . . . . . . . . . . . . . . . . .18, 32
20.Auxiliary Button . . . . . . . . . . . . . . . . . . . . . . . . . . . . . . . . . . . . . . . . .34
21.Tape Reverse Mode Select Button . . . . . . . . . . . . . . . . . . . . . . .28, 29
22.Clear Button . . . . . . . . . . . . . . . . . . . . . . . . . . . . . . . . . . . . . . . . .17, 19
23.Memory Button . . . . . . . . . . . . . . . . . . . . . . . . . . . . . . . . . . . . . . . . .17
24.CD Fast Reverse, Tape Fast Wind or Tuning Down Button
(with Indicator) . . . . . . . . . . . . . . . . . . . . . . . . . . . . . . . . .15, 18, 28, 34
25.Tape Reverse Play Button (with Indicator) . . . . . . . . . . . . .28, 29, 34
26.CD Fast Forward, Tape Fast Wind or Tuning Up Button
(with Indicator) . . . . . . . . . . . . . . . . . . . . . . . . . . . . . . . . .15, 18, 28, 34
27.Tape Record Pause Button . . . . . . . . . . . . . . . . . . . . . . . . . . . . .29, 34
28.Stop Button (with Indicator) . . . . . . . . . . . . . . . . . . . . . . . . .15, 17, 29
29.CD Play or Pause, Tape Forward Play Button
(with Indicator) . . . . . . . . . . . . . . . . . . . . . . . . . . . . . . . . .15, 28, 29, 30
14 15 16
ENGLISH
01/1/9
E1.fm
2
3
4
5
6
7
8
9 10 11
12
20
21
22
23
24
1
5
2
3
4
6
General Information
13
14
15
16
17
18
19
25
26
27
28
1
1. Function Indicator
2. Extra Bass Indicator
3. Random Play Indicator
4. Memory Indicator
5. Total Indicator
6. Remain Indicator
7. Timer Play Indicator
8. Sleep Indicator
9. Timer Recording Indicator
10.All Disc Play Indicator
11.Cassette Indicator
12.Level Meter
13.CD Indicators
14.CD Repeat Indicator
15.CD Pause Indicator
16.CD Play Indicator
17.FM Stereo Indicator
18.Tape Reverse Mode Indicator
19.FM Stereo Mode Indicator
20.RDS Indicator
21.Radio Text Indicator
22.Clock Time Indicator
23.Dynamic PTY Indicator
24.Traffic Programme Indicator
25.EON Indicator
26.Traffic Information Indicator
27.Programme Type Indicator
28.Traffic Announcement Indicator
-Controls and Indicators-
„ Multi-function LCD display
„ Rear panel
Reference page
7
1. AM Loop Aerial Socket . . . . . . . . . . . . . . . . . . . . . . . . . . . . . . . . . . . . 8
2. FM Aerial Terminal . . . . . . . . . . . . . . . . . . . . . . . . . . . . . . . . . . . . . . . 8
3. Auxiliary Input Sockets . . . . . . . . . . . . . . . . . . . . . . . . . . . . . . . . . . . 34
4. CD Digital Output Socket . . . . . . . . . . . . . . . . . . . . . . . . . . . . . . . . . 35
5. Speaker Terminals . . . . . . . . . . . . . . . . . . . . . . . . . . . . . . . . . . . . . . . 8
6. AC Power Lead . . . . . . . . . . . . . . . . . . . . . . . . . . . . . . . . . . . . . . . . . . 8
7. Transport screw . . . . . . . . . . . . . . . . . . . . . . . . . . . . . . . . . . . . . . . 8, 37
ENGLISH
01/1/9
E1.fm
E-5
Controls and Indicators (continued)
„ Remote control
-Controls and Indicators-
General Information
Reference page
1
15
2
16
3
4
17
5
19
6
7
20
8
9
18
21
22
11
23
24
25
12
26
13
14
27
28
10
29
30
E-6
1. Remote Control Transmitter . . . . . . . . . . . . . . . . . . . . . . . . . . . . . . .10
2. Tuner (Band) Button
3. CD Button
4. Auxiliary Button
5. CD Direct Play Buttons
6. Clear Button
7. Memory Button
8. CD Track Down or Fast Reverse, Tape Fast Wind, Tuner Preset
Down Button
9. Enter Button
10.Stop Button
11.Menu Button
12.Time Button . . . . . . . . . . . . . . . . . . . . . . . . . . . . . . . . . . . . . . . . .16, 27
13.FM Stereo Mode Button . . . . . . . . . . . . . . . . . . . . . . . . . . . . . . . . . .18
14.Control Panel Open/Close Button
15.Tape Button
16.On/Stand-by Button
17.RDS Programme Type/Traffic Information Search Button . . . 23 - 25
18.RDS EON Button . . . . . . . . . . . . . . . . . . . . . . . . . . . . . . . . . . . . .24, 25
19.RDS ASPM (Auto Station Programme Memory) Button . . . . . . . . .22
20.RDS Display Mode Selector Button . . . . . . . . . . . . . . . . . . .20, 24, 27
21.CD Play Mode Select Button
22.CD Track Up or Fast Forward, Tape Fast Wind, Tuner Preset Up Button
23.CD Play or Pause, Tape Play Button
24.Tape Record Pause Button
25.Tape Reverse Mode Select Button
26.Dimmer Button . . . . . . . . . . . . . . . . . . . . . . . . . . . . . . . . . . . . . . . . . .11
27.Display Button
28.Equalizer Mode Select Button
29.Extra Bass Button
30.Volume Up or Down Buttons
Buttons with " " mark in the illustration can be operated on the remote control only.
Other buttons can be operated both on the main unit and the remote control.
ENGLISH
01/1/9
E1.fm
„ Speaker system
Speaker grilles are removable:
Make sure nothing comes into contact with
the speaker diaphragms when you remove
the speakers grilles.
Left speaker
Right speaker
2
4
5
3
Bi-amp system:
6
1. Woofer
2. Tweeter
3. Subwoofer
4. Subwoofer Terminals
5. Main Speaker Terminals
6. Bass Reflex Duct
Each speaker unit has a built-in subwoofer (low frequency range) which is driven separately from the woofer and tweeter (mid-to-high frequency range). Two independent
amplifiers which have individual frequency characteristics are used. By amplifying
separately the two frequency bands, clearer sound is achieved.
Woofer
Tweeter
Power amplifier
Pre-amplifier
Subwoofer
Mid-to-high range
(200 Hz - 20 kHz)
Ultra-low range
(60 Hz - 200 Hz)
L-ch
ENGLISH
01/1/9
E1.fm
-Controls and Indicators-
Placing the speaker system:
There is no distinction between the right
and the left speakers.
General Information
1
E-7
System Connections
Not supplied
FM aerial
AM loop aerial
VCR, DVD, etc.
MiniDisc
Recorder
-System Connections-
Preparation for Use
Not supplied
Left
speaker
Right
speaker
Wall socket
(AC 230 V, 50 Hz)
Transport screw
E-8
ENGLISH
Enhancing Your Stereo System (See pages 34 - 35.)
01/1/9
E1.fm
„ Removing the transport screw
„ Speaker connection
„ Aerial connection
Subwoofer terminals:
Connect the red wire to the (+) and the black one to the (-).
Main terminals:
Connect the blue wire to the (+) and the black one to the (-).
Right speaker
Left speaker
Supplied AM loop aerial:
Connect the AM loop aerial to the AM LOOP socket. Position the AM loop aerial for
optimum reception. Place the AM loop aerial on a shelf, etc., or attach it to a stand or
a wall with screws (not supplied).
1
Blue
Notes:
z Placing the aerial on the stereo system or near the AC power lead may cause
noise pickup. Place the aerial away from the stereo system for better reception.
z Do not connect the attached FM aerial to an external FM aerial. Otherwise, trouble
may occur.
Installing the AM loop aerial:
Assembling
Black
2
3
Red
Caution:
z Connect the speaker wires to the speakers first, then to the unit.
z Never mistake the MAIN and the SUBWOOFER terminals. The stereo system or
the speakers may be damaged.
z Only the included speakers should be used with this product. Do not use other
speakers with this unit or use the supplied speakers with other units.
z Do not mistake the right channel for the left channel when connecting the speakers
to the unit. The right speaker is the one on the right side when you are facing the
front of the unit.
z Do not let the bare speaker wires touch each other.
Attaching to the wall
Wall
Screws
External FM aerial:
Use an external FM aerial if you require better reception. Consult your dealer.
External FM aerial
Incorrect
-System Connections-
Supplied FM aerial:
Connect the FM aerial wire to the FM 75 OHMS socket and position the FM aerial
wire in the direction where the strongest signal can be received.
Preparation for Use
Before turning the power on, be sure to remove the transport screw on the
back of the unit using a flat-blade screwdriver or a coin.
This screw is required when transporting the unit again. Please keep it (see page 37).
Incorrect
z Do not stand or sit on the speakers. You may be injured.
„ Connecting the AC power lead
After checking all the connections have been made correctly, plug the AC power lead of this
unit into the AC socket. If you plug in the unit first, the unit will enter the demonstration
mode.
Note:
Unplug the unit if it will not be used for a prolonged period of time.
Demonstration mode (See page 11.)
01/1/9
E1.fm
ENGLISH
E-9
Remote Control
„ Battery installation
1 Remove the battery cover.
2 Insert the supplied batteries according to the direction indicated in
the battery compartment.
z When inserting or removing the batteries, push them towards the
nal.
-Remote Control-
Preparation for Use
3
E-10
battery termi-
„ Test of the remote control
Face the remote control directly to the remote sensor on the unit.
The remote control can be used within the range shown below:
Press the ON/STAND-BY button. Does the power turn on? Now, you can enjoy the
music.
Remote sensor
Replace the cover.
Precautions for battery use:
z Replace all old batteries with new ones at the same time.
z Do not mix old and new batteries.
z Remove the batteries if the unit will not be used for long periods of time. This will
prevent potential damage due to battery leakage.
Caution:
z Do not use rechargeable batteries (nickel-cadmium battery, etc.).
z Installing the batteries incorrectly may cause the unit to malfunction.
Notes concerning use:
z Replace the batteries if the operating distance is reduced or if the operation
becomes erratic. Purchase 2 "AA" size batteries (UM/SUM-3, R6, HP-7 or similar).
z Periodically clean the transmitter on the remote control and the sensor on the stereo system with a soft cloth.
z Exposing the sensor on the stereo system to strong light may interfere with operation. Change the lighting or the direction of the stereo system.
z Keep the remote control away from moisture, heat, shock, and vibrations.
0.2 m - 6 m (8" - 20')
ENGLISH
01/1/9
E1.fm
General Control
„ Opening and closing the control panel
The control panel is motorised.
The control panel automatically opens when the power is turned on, and closes when
the unit is set to the power stand-by mode.
When the power is turned on, you can open or close the control panel by pressing the
control panel open/close button.
You can switch the display brightness by pressing the DIMMER button.
Dimmer off
Dimmer on
„ Demonstration mode
-General Control-
„ Display brightness (2 levels)
Basic Operation
Caution:
z Do not push the control panel whilst it is opening or closing.
z Do not press buttons on the control panel strongly. The hinge of the panel may be
broken.
z Be careful not to jam your fingers in the control panel.
The first time the unit is plugged, the unit will enter the demonstration mode. You will
see words scroll.
To cancel the demonstration mode:
When the unit is in the power stand-by mode (demonstration mode), press the DEMO
button. The unit will enter the low power consumption mode.
To return to the demonstration mode:
When the unit is in the power stand-by mode, press the DEMO button again.
ENGLISH
01/1/9
E2.fm
E-11
Sound Control
„ Bass control
When the X-BASS button is pressed, the unit will enter the extra bass mode which
emphasises the bass frequencies, and "X-BASS" will appear. To cancel the extra
bass mode, press the X-BASS button.
Cancelled.
„ Equalizer
When the EQUALIZER button is pressed, the current mode setting will be displayed.
To change to a different mode, press the EQUALIZER button repeatedly until the
desired sound mode appears.
-Sound Control-
Basic Operation
Bass is emphasised.
„ Volume control
Press the VOLUME
decreasing.
E-12
button to increase the volume and the VOLUME
The sound is not modified.
Bass and treble are emphasised.
Treble is reduced.
Vocals (midrange tones) are
emphasised.
button for
ENGLISH
01/1/9
E2.fm
Setting the Clock
5
Turn the jog dial to adjust the hour and within 2 minutes, press the
ENTER button.
z When the 12-hour display is selected, "AM" will change automatically to "PM".
In this example, the clock is set for the 24-hour (0:00) display.
z The hour will not advance even if minutes advance from "59" to "00".
z The clock starts from "0" second. (Seconds are not displayed.) The time display
will disappear after a few seconds.
1
2
3
To confirm the time display:
[When the unit is in the stand-by mode]
Press the DISPLAY button on the remote control. The
time display will appear for about 3 seconds.
4
Press the ON/STAND-BY button to turn the power on.
Press the MENU button.
Turn the jog dial to select "CLOCK" and within 10 seconds, press
the ENTER button.
Turn the jog dial to select the 24-hour or 12-hour display and within
2 minutes, press the ENTER button.
"0:00"
"AM 12:00"
"AM 0:00"
The 24-hour display will appear.
(0:00 - 23:59)
The 12-hour display will appear.
(AM 12:00 - PM 11:59)
The 12-hour display will appear.
(AM 0:00 - PM 11:59)
Note that this can only be set when the unit is first installed or it has been reset.
[Refer to "Clearing all the memory (reset)" on page 37 for details.]
[When the power is on]
Press the MENU button. The time display will appear
for about 10 seconds.
Note:
"CLOCK" will appear or time will flash at the push of the DISPLAY button when the
AC power supply is restored after a power failure or unplugging the unit. Reset the
clock as follows.
-Setting the Clock-
Turn the jog dial to adjust the minutes and within 2 minutes, press
the ENTER button.
Basic Operation
6
To reset the clock:
[When time is flashing]
1 Press the ON/STAND-BY button.
2 Press the MENU button.
3 Press the ENTER button.
4 Perform "Setting the Clock" from step 5.
[When "CLOCK" appears]
Perform "Setting the Clock" from the beginning.
To change the 24-hour or 12-hour display:
1 Clear all the programmed contents. [Refer to "Clearing all the memory (reset)"
on page 37 for details.]
2 Perform "Setting the Clock" from the beginning.
ENGLISH
01/1/9
E2.fm
E-13
Listening to a CD (CDs)
This system can play audio CD-R and CD-RW discs just as CD discs, but cannot perform recording.
5
Press the DISC 1
button to close the disc tray 1.
Means "disc inside"
CD Playback
-Listening to a CD (CDs)-
Total number of tracks
6
You can place discs on the trays 2 - 6 by following steps 3 - 5.
Note:
The system will search CD trays until it finds a CD and will not search the rest of
trays.
7
Press the
button to start playback.
„ To play discs in turn (from Disc 1 to Disc 6)
1 Press the ON/STAND-BY button to turn the power on.
2 Press the CD button.
3 Press the DISC 1 button to open the disc tray 1.
4 Place a CD on the disc tray 1, label side up.
z Be sure to place 8 cm (3") CD in the middle of the disc trays.
12 cm (5")
E-14
Total playing time
ENGLISH
8 cm (3")
z Playback will begin from track 1 on the DISC 1. After that disc finishes playing, the
next disc will automatically start playback.
z When there is no CD in one of the disc tray 1 - 6 positions, that position will be
skipped and the next CD will be played.
z When the last track on the DISC 6 has finished playing, the CD player will stop
automatically.
Sound Control (See page 12.)
01/1/9
E2.fm
To interrupt playback:
Press the
button.
To resume playback from the same point, press the
„ To locate the beginning of a track
button again.
To move to the beginning of the next track:
Turn the jog dial slowly clockwise by one position during playback.
To stop playback:
Press the button.
To exchange other CDs whilst playing a disc:
Press the button for the stopped disc and exchange discs.
z You can skip to any track by turning the jog dial until the desired track number
appears.
button.
Caution:
z Do not place two CDs in one disc tray.
z Do not push the disc tray whilst it is moving.
z If the power fails whilst the tray is open, wait until the power is restored.
z If the disc tray is stopped forcibly, "E-CD20" will appear in the display and the unit
will not function. If this occurs, press the ON/STAND-BY button to enter the power
stand-by mode and then turn the power on again.
z If TV or radio interference occurs during CD operation, move the unit away from
the TV or radio.
z If a disc is damaged, dirty, or loaded upside down, the disc will be skipped.
To restart the track being played:
Turn the jog dial slowly anti-clockwise by one position during playback.
z You can skip to any track by turning the jog dial until the desired track number
appears.
Notes:
z You can locate the beginning of a track on a single disc only.
z The
or
button on the remote control allows you to locate the beginning of a
track.
„ To locate the desired portion
For audible fast forward:
Press and hold down the
button during playback.
For audible fast reverse:
Press and hold down the
button during playback.
CD Playback
After use:
Press the ON/STAND-BY button to enter the power stand-by mode.
-Listening to a CD (CDs)-
To remove the CDs:
Whilst in the stop mode, press the desired
Notes:
z Normal playback will resume when the
or
button is released.
z When the end of the last track is reached during fast forward, "DISC END" will
appear on the display and CD operation will be paused. When the beginning of the
first track is reached during fast reverse, the disc will start playback automatically.
z You can locate the desired portion on a single disc only.
ENGLISH
01/1/9
E2.fm
E-15
Advanced CD Playback
-To Specify a Disc to Play / Switching the Time Display / Repeat or Random Play-
E-16
To Specify a Disc to Play
Repeat or Random Play
You can play a disc by specifying the disc number.
You can select one of the CD playback modes; "Repeat play", "Random play" and
"Normal play".
Press one of the DISC 1 - DISC 6 buttons to play the desired disc.
1
Press the PLAY MODE button repeatedly to select the playback
mode.
Selected disc number
z Only the chosen disc will be played and stopped automatically.
Repeat playback mode
Random playback mode
Note:
When one of the DISC 1 - DISC 6 buttons is green, it is ready to play that disc. If
there is not a disc on the tray, playback will not begin and the button will turn dark.
To stop playback:
Press the button.
Switching the Time Display
Normal playback mode
2
Press the
or one of the DISC 1 - DISC 6 buttons to start playback.
Each time the TIME button on the remote control is pressed during playback or
when in the pause mode, the display will change.
The elapsed playing time for
the current track will be displayed.
The remaining playing time
for the current track will be
displayed.
The total remaining playing
time for the disc will be displayed.
z If playback is started by pressing the
button, repeat or random play will be performed on all discs.
z If playback is started by pressing one of the DISC 1 - DISC 6 buttons, repeat or
random play will be performed on that disc.
To repeat a programmed sequence:
Perform steps 1 - 6 in the "Programmed Play" section, select the repeat playback and
then press the
button.
Notes:
z After performing repeat or random play, be sure to press the button. Otherwise,
the disc(s) will play continuously.
z In random play, the CD player will select and play tracks automatically. (You cannot
select the order of the tracks.)
To cancel repeat or random play:
Press the PLAY MODE button repeatedly to select the normal play mode.
Notes:
z During random play, the total remaining playing time will not be displayed.
z Depending on the CD, the playing time display may not match the total playing
time which is indicated on the CD jacket, as the time between tracks is not
included.
ENGLISH
01/1/9
E2.fm
Programmed Play
By specifying discs from 1 to 6, and tracks from 1 to 99, you can choose up to 32
selections for playback in the order you like.
1
6
7
Press the
Press the
button.
button to start playback.
When in the stop mode, press the MEMORY button.
Press one of the DISC 1 - DISC 6 buttons to select the desired disc.
Selected disc number
To clear the programmed selections:
Press the CLEAR button whilst the "MEMORY" indicator is flashing.
Each time the button is pressed, one track will be cleared, beginning with the last
track programmed.
To cancel the programmed play mode:
Whilst in the stop mode, press the CLEAR button. The MEMORY indicator will disappear and all the programmed content will be cleared.
3
Adding tracks to the programme:
If a programme has been previously stored, the "MEMORY" indicator will be displayed. Then follow steps 1 - 6 to add tracks. The new tracks will be stored after the
last track of the original programme.
Turn the jog dial to select the desired track.
To check which tracks are programmed:
Whilst the unit is stopped in the programmed play mode, press the
Selected track number
4
Playback order
Press the MEMORY button to save the track number.
or
button.
Notes:
z Opening any tray of the programmed discs automatically cancels the programmed
sequence.
z Even if you press the ON/STAND-BY button to enter the stand-by mode or change
the function from CD to another function, the programmed selections will not be
cleared.
z During programme operation, random play is not possible.
-Programmed Play-
2
Advanced CD Playback
z At this time, playback will not begin even if one of the DISC 1 - DISC 6 buttons is
pressed.
Playback time
5
Repeat steps 2 - 4 for other tracks. Up to 32 tracks can be programmed.
ENGLISH
01/1/9
E2.fm
E-17
Listening to the Radio
1
2
Press the ON/STAND-BY button to turn the power on.
3
Press the TUNING (
Press the TUNER (BAND) button repeatedly to select the desired
frequency band (FM or AM).
Manual tuning:
Press the TUNING (
desired station.
or
or
) button to tune in to the desired station.
) button as many times as required to tune in to the
Notes:
z When radio interference occurs, auto scan tuning may stop automatically at that
point.
z Auto scan tuning will skip weak signal stations.
z To stop the auto tuning, press the TUNING ( or ) button again.
z When an RDS (Radio Data System) station is tuned in, the frequency will be displayed first, and then the RDS indicator will light. Finally, the station name will
appear.
z Full auto tuning can be achieved for RDS stations "ASPM", see page 22.
-Listening to the Radio-
Radio
Auto tuning:
When the TUNING ( or ) button is pressed for more than 0.5 seconds, scanning
will start automatically and the tuner will stop at the first receivable broadcast station.
To receive an FM stereo transmission:
Press the ST-MODE button on the remote control to display the "ST" indicator.
z " " will appear when an FM broadcast is in stereo.
FM Stereo Mode Indicator
FM stereo receiving indicator
z If the FM reception is weak, press the ST-MODE button. The "ST" indicator goes
out. The reception changes to monaural, and the sound becomes clearer.
After use:
Press the ON/STAND-BY button to enter the power stand-by mode.
E-18
ENGLISH
Sound Control (See page 12.)
01/1/9
E2.fm
Listening to the Memorised Station
„ Memorising a station
„ To recall a memorised station
You can store 40 AM and FM stations in memory and recall them at the push of a button. (Preset tuning)
Turn the jog dial to select the desired station.
Perform steps 1 - 3 in the "Listening to the Radio" section on page
18.
2
Press the ENTER button to enter the preset tuning saving mode.
Note:
The PRESET (
station.
or
) button on the remote control allows you to recall a memorised
„ To scan the preset stations
Within 5 seconds, turn the jog dial to select the preset channel
number.
The stations saved in memory can be scanned automatically. (Preset memory scan)
1
Press the PRESET (
than 0.5 seconds.
or
Press the PRESET (
is located.
or
) button on the remote control for more
z The preset number will flash and the programmed stations will be tuned in
sequentially, for 5 seconds each.
z Store the stations in memory, in order, starting with preset channel 1.
z When " " is displayed, a station has already been stored in memory.
4
Within 5 seconds, press the ENTER button to store that station in
memory.
2
z If the "MEMORY" and preset number indicators go out before the station is memorised, repeat the operation from step 2.
5
Repeat steps 1 - 4 to set other stations, or to change a preset station.
z When a new station is stored in memory, the station previously memorised will be
erased.
Note:
The backup function protects the memorised stations for a few hours should there be
a power failure or the AC power lead disconnection.
) button again when the desired station
Radio
3
-Listening to the Memorised Station-
1
„ To erase all the contents of the preset
memory
1
2
3
4
Press the TUNER (BAND) button.
Press the ENTER button.
Press the CLEAR button.
Whilst "ALL CLEAR" is displayed,
press the ENTER button.
To erase only one station:
Recall the memorised station. Whilst it is displayed, press the CLEAR button. Whilst
"CLEAR" is displayed, press the ENTER button.
ENGLISH
01/1/9
E2.fm
E-19
RDS Radio
-Using the Radio Data System (RDS)-
Using the Radio Data System (RDS)
RDS is a broadcasting service which a growing number of FM stations provide.
These FM stations send additional signals along with their regular programme
signals. They send their station names, and information about the type of programme such as sports or music, etc.
When tuned to an RDS station, "RDS" and the station name will be displayed.
"TP" (Traffic Programme) will appear on the display when the received broadcast carries traffic information, and "TA" (Traffic Announcement) will appear whilst a traffic
information is on air (see page 26).
"EON" will appear whilst the EON (Enhanced Other Networks information) data is
broadcast.
"PTYI" (Dynamic PTY Indicator) will appear whilst the Dynamic PTY station is
received.
"RT" (Radio Text) will appear whilst the unit receives the Radio text data.
"CT" (Clock Time) will appear whilst the unit receives the RDS CT data.
„ Information provided by RDS
Each time the DISP MODE button is pressed, the display will switch as follows:
Station name (PS)
Frequency
Programme type (PTY)
(8 Languages)
RDS clock time
You can control the RDS by using the remote control only.
Date (for 3 seconds)
Programme type (PTY)
(English fixed)
Clock-time and date (CT)
Radio text (RT)
When you are tuning in to a station other than an RDS station or to an RDS station
which sends weak signal, the display will change in the following order:
NO PS
NO PTY
FM 98.00 MHz
E-20
ENGLISH
01/1/9
E3.fm
NO RT
NO CT
Short accounts of facts, events and publicly expressed views, reportage
and actuality.
AFFAIRS
Topical programme expanding or enlarging upon the news, generally in
different presentation style or concept, including debate, or analysis.
INFO
Programmes whose purpose is to impart advice in the widest sense.
SPORT
Programme concerned with any aspect of sport.
EDUCATE
Programme intended primarily to educate, of which the formal element is
fundamental.
DRAMA
All radio plays and serials.
CULTURE
Programmes concerned with any aspect of national or regional culture, including language, theatre, etc.
SCIENCE
Programmes about the natural sciences and technology.
VARIED
Used for mainly speech-based programmes usually of light-entertainment
nature, not covered by other categories. Examples include: quizzes, panel
games, personality interviews.
Programmes about people and things that influence them individually or in
groups. Includes: sociology, history, geography, psychology and society.
RELIGION
Any aspect of beliefs and faiths, involving a God or Gods, the nature of existence and ethics.
PHONE IN
Involving members of the public expressing their views either by phone or
at a public forum.
TRAVEL
Features and programmes concerned with travel to near and far destinations, package tours and travel ideas and opportunities. Not for use for announcements about problems, delays, or roadworks affecting immediate
travel where TP/TA should be used.
LEISURE
Programmes concerned with recreational activities in which the listener
might participate. Examples include, Gardening, Fishing, Antique collecting, Cooking, Food & Wine, etc.
JAZZ
Polyphonic, syncopated music characterised by improvisation.
COUNTRY
Songs which originate from, or continue the musical tradition of the American Southern States. Characterised by a straightforward melody and narrative story line.
NATION M
Current Popular Music of the Nation or Region in that country's language,
as opposed to International 'Pop' which is usually US or UK inspired and
in English.
POP M
Commercial music, which would generally be considered to be of current
popular appeal, often featuring in current or recent record sales charts.
OLDIES
Music from the so-called "golden age" of popular music.
ROCK M
Contemporary modern music, usually written and performed by young musicians.
FOLK M
EASY M
Current contemporary music considered to be "easy-listening", as opposed to Pop, Rock or Classical, or one of the specialised music styles,
Jazz, Folk or Country. Music in this category is often but not always, vocal,
and usually of short duration.
Music which has its roots in the musical culture of a particular nation, usually played on acoustic instruments. The narrative or story may be based
on historical events or people.
DOCUMENT
Programme concerned with factual matters, presented in an investigative
style.
LIGHT M
Classical music for general, rather than specialist appreciation. Examples
of music in this category are instrumental music, and vocal or choral
works.
TEST
Broadcast when testing emergency broadcast equipment or receivers.
ALARM !
Emergency announcement made under exceptional circumstances to give
warning of events causing danger of a general nature.
CLASSICS
Performances of major orchestral works, symphonies, chamber music,
etc., and including Grand Opera.
NONE
No programme type (receive only).
TP
Broadcasts which carry traffic announcements.
OTHER M
Musical styles not fitting into any of the other categories. Particularly used
for specialist music of which Rhythm & Blues and Reggae are examples.
TA
Traffic announcements are currently on air.
WEATHER
Weather reports and forecasts and meteorological information.
FINANCE
Stock Market reports, commerce, trading, etc.
CHILDREN
For programmes targeted at a young audience, primarily for entertainment
and interest, rather than where the objective is to educate.
RDS Radio
NEWS
SOCIAL
-Using the Radio Data System (RDS)-
Descriptions of the PTY (Programme Type) codes, TP (Traffic Programme) and
TA (Traffic Announcement).
You can search for and receive the following PTY, TP and TA signals.
Note:
When you select a programme in the EON stand-by mode, the unit will display "TI"
instead of "TA".
ENGLISH
01/1/9
E3.fm
E-21
Using the Radio Data System (RDS) (continued)
„ Using the Auto Station Programme Memory (ASPM)
To stop the ASPM operation before it is complete:
Press the ASPM button whilst it is scanning for stations.
The stations which are already stored in memory will be kept there.
Whilst in the ASPM operation, the tuner will automatically search for new RDS stations. Up to 40 stations can be stored.
If you have already stored some stations in memory, the number of new stations you
can store will be less.
Notes:
z If the same station is broadcasting on different frequencies, the strongest frequency will be stored in memory.
z Any station which has the same frequency as the one stored in memory will not be
stored.
z If 40 stations have already been stored in memory, the scan will be aborted. If you
want to redo the ASPM operation, erase the preset memory.
z If the RDS signals are very weak, station names may not be stored in memory.
RDS Radio
-Using the Radio Data System (RDS)-
1
2
Press and hold down the ASPM button for at least 3 seconds.
1
After "ASPM" has flashed for about 4 seconds, scanning will start (87.50 - 108.00
MHz).
2
When an RDS station is found, "RDS" will appear for a short time and the station
will be stored in memory.
To erase all of the contents of preset memory:
1 Press the TUNER (BAND) button.
2 Press the ENTER button.
3 Press the CLEAR button.
4 Whilst "ALL CLEAR" is displayed, press
the ENTER button.
To store a station name again if the wrong name was stored in memory:
It may be impossible to store station names correctly in memory using the ASPM
function if there is lots of noise or if the signal is too weak. In this case, perform as follows.
1 Press the PRESET ( or ) button to check whether the names are correct.
2 If you find a wrong name, wait until the station will be received and the correct
name will be displayed. And then press the ENTER button.
3 Within 5 seconds, press the ENTER button again whilst the preset channel number is flashing.
z The new station name has been stored in memory correctly.
3
E-22
Press the TUNER (BAND) button to select the FM band.
After scanning, the number of stations stored in memory will be displayed for 4
seconds, and then "END" will appear for 4 seconds.
Notes:
z The same station name can be stored in different channels.
z In a certain area or during certain time periods, the station names may temporarily
be different.
ENGLISH
01/1/9
E3.fm
To specify programmed types and select stations (PTY search):
You can search a station by specifying the programme type (news, sports, traffic programme, etc. ... see page 21) from the stations in memory.
2
Press the TUNER (BAND) button to select the FM.
If you select the traffic programme:
If you select the traffic programme (TP) in step 4, "TP" will appear. (This does not
mean that you can listen to the traffic information at that time.)
When a traffic information is broadcast, "TA" will appear.
Press the PTY.TI button.
z "PTY TI" and "SELECT" will appear alternately for about 6 seconds.
3
Within 6 seconds, press the PRESET (
programme type.
or
) button to select the
To specify station names and select stations manually:
You can select a station by specifying the name (BBC R1, BBC R2, etc.) from the stations stored in memory.
Before starting this operation, you must store one or more station names in memory.
1 Press the TUNER (BAND) button to select the FM band.
2 Press the PRESET ( or ) button to select a desired station.
3
z Each time the button is pressed, the programme type will appear. If the button is
held down for more than 0.5 seconds, the programme type will appear continuously.
4
The station name will be displayed for 3 seconds. Then the display will change as
follows.
Whilst the selected programme type is flashing (within 4 seconds),
press the PTY.TI button again.
RDS Radio
1
Notes:
z If the display has stopped flashing, start again from step 2. If the unit finds out a
desired programme type, corresponding channel number will flash for about 3 seconds, and then the station name will flash for 7 seconds, and then will remain lit.
z If you want to listen to the same programmed type of another station, press the
PTY.TI button whilst the channel number or station name is flashing. The unit will
look for the next station.
z If no station can be found, "NOT FOUND" will appear for 4 seconds.
-Using the Radio Data System (RDS)-
„ To recall stations in memory
z After the selected programme type has been lit for 2 seconds, "SEARCH" will
appear, and the search operation will start.
ENGLISH
01/1/9
E3.fm
E-23
Using the Radio Data System (RDS) (continued)
„ To automatically play the desired programme (EON-PTY)
5
When the specified programme starts on an ON (other network)
station, the unit will automatically switch to the station and "PTY"
will flash.
6
When the programme is over, the unit will automatically return to
the original station.
When the desired type of programme is broadcast, the radio switches to it automatically.
RDS Radio
-Using the Radio Data System (RDS)-
1
2
Tune in to an RDS station (when a station name is displayed).
Press the EON button when "EON" appears.
Checking the stand-by mode setting:
When in the EON stand-by mode, press the EON button. ("Programme type"
"WAITING")
To cancel the EON stand-by mode:
When in the EON stand-by mode, press the EON button. Within 4 seconds, press it
again. ("PTY" will go out.)
z "PTY TI" and "SELECT" will appear alternately for about 6 seconds.
z If the EON button is pressed when "EON" is not displayed, "NO EON" will appear
for 5 seconds to indicate that the unit cannot enter the EON stand-by mode.
3
Whilst they are displayed, select the desired programme type by
pressing the PRESET ( or ) button.
About the PTYI (Dynamic PTY Indicator):
"PTYI" (Dynamic PTY Indicator) will appear whilst the Dynamic PTY station is
received. Dynamic PTY indicates that the PTY for the station tuned in, or the PTY referenced in the EON data, is assessed whenever the programme changes and may
be changed.
PTYI
z The selected programme type will flash.
4
Within 4 seconds, press the PTY.TI button.
Meaning
Lights up
Tuned into a dynamic PTY station.
Goes out
Tuned into a static PTY.
z When "PTYI" appears, press the DISP MODE button to check the type of the current programme.
z The selected programme type and "WAITING" will be displayed for 2 seconds
each.
z "PTY" will appear, and the unit will enter the EON-PTY stand-by mode.
E-24
ENGLISH
01/1/9
E3.fm
„ To automatically play the traffic information (EON-TI)
5
When a TA specified starts on an ON (other network) station, the
unit will automatically switch to that station, and "TI" will flash.
6
When the traffic information is over, the unit will automatically
return to the original station.
When the traffic information is broadcast, the radio switches to it automatically.
Checking the stand-by mode setting:
When in the EON stand-by mode, press the EON button. ("TI"
"WAITING")
Press the EON button when "EON" appears.
To cancel the EON stand-by mode:
When in the EON stand-by mode, press the EON button. Within 4 seconds, press it
again.
z "TI" will go out.
z "PTY TI" and "SELECT" will appear alternately for about 6 seconds.
z If the EON button is pressed when "EON" is not displayed, "NO EON" will appear
for 5 seconds to indicate that the unit cannot enter the EON stand-by mode.
3
Whilst they are displayed, select the TI (Traffic Information) by
pressing the PRESET ( or ) button.
4
Within 4 seconds, press the PTY.TI button.
RDS Radio
2
Tune in to an RDS station (when a station name is displayed).
-Using the Radio Data System (RDS)-
1
z "TI" and "WAITING" will appear for 2 seconds each.
z "TI" will appear, and the unit will enter the EON-TI stand-by mode.
ENGLISH
01/1/9
E3.fm
E-25
Using the Radio Data System (RDS) (continued)
„ Notes for RDS operation
RDS Radio
-Using the Radio Data System (RDS)-
If any of the following events occur, it does not mean that the unit is faulty:
z "PS", "NO PS" and a station name appear alternately, and the unit does not operate properly.
z If a particular station is not broadcasting properly or a station is conducting tests,
the RDS reception function may not work properly.
z When you receive an RDS station whose signal it too weak, information like the
station name may not be displayed.
z "NO PS", "NO PTY", "NO RT" or "NO CT" will flash for about 5 seconds, and then
the frequency will be displayed.
E-26
Notes for Radio text:
z The radio text for 10 characters will be displayed steadily for 4 seconds and then it
will scroll across the display.
z If you tune in to an RDS station which is not broadcasting any radio text, "NO RT"
will be displayed when you switch to the radio text position.
z Whilst radio text data is received or when the text contents change, "RT" will be
displayed.
Notes for PTY Languages:
z When you press the DISP MODE button after entering the PS (Programme Service), PTY Languages mode will be selected. In this mode, PTY names will be displayed automatically in the local language where an RDS station is located. Eight
languages (including English) are available.
z If you tune in to an RDS station which is not broadcasting PTY language data, the
PTY name will be displayed in English.
z A PTY name may be displayed in English for a short time, until a signal determining the local PTY language is received.
z PTY languages are also used for PTY-Search and EON-PTY operation at any DISPLAY MODE except PTY English.
About the "TP" and "TA" indicators:
"TP"
"TA"
Meaning
Not lit
Not lit
Does not carry traffic announcements nor does it refer, via
EON, to a programme that does.
Not lit
Lit
Carries EON information about another programme which
gives traffic information.
Lit
Not lit
Carries traffic announcements but not at present and may
also carry EON information about other traffic announcements.
Lit
Lit
A traffic information is currently on air.
In the following cases, the EON stand-by mode will be cancelled.
z When you press the ON/STAND-BY button to enter the stand-by mode.
z When the unit is switched to another band in the EON stand-by mode.
z When you change the FM station whilst in the EON stand-by mode.
z When a preset call is made.
Notes:
z Whilst the same programme as the specified PTY (or TA) is being broadcast, the
unit will not switch to an ON (other network) station.
z If there are more than two other network stations, compare the strength of signal
and tune in to the station with the strongest signal (EON-AF). If other network station has been stored in the preset channel memory, the unit will switch to that
channel.
z If you want to leave an ON (other network) station tuned in by the EON and return
to the station you were receiving, press the EON button.
z After the unit returns to the original station, the stand-by mode will still be active.
(The "TI" or "PTY" will remain lit.)
z The unit does not switch between ON stations. It returns to the original station.
z If there is any problem with the ON station the unit switched to, "WEAK SIG" will
appear and the unit will return to the original station.
z If the signal from the ON station the unit switched to is very weak, the unit will
search for another station with the strongest signal. However, if the signals from all
stations are weak or not good (due to electrical noise), the unit displays "WEAK
SIG" and returns to the original station.
ENGLISH
01/1/9
E3.fm
1
Tune in to an RDS station (when its name is displayed).
2
Press the DISP MODE button to select CT.
3
z Press the TIME button to check whether the internal clock is displaying the same
time as the RDS clock.
Notes:
z When the TIME button is pressed whilst the RDS time is displayed, the RDS clock
and the internal clock can be displayed alternately, which allows you to compare
the time shown. If you have not yet set the clock display mode, "CLOCK" will
appear.
z Whilst "NO CT" or "CT" is displayed, the internal clock cannot be set.
z If the signal from a station is weak or noisy, you may not be able to set the internal
clock.
Note for clock-time and date mode:
When the DISP MODE button is pressed repeatedly to select CT, the data (DayMonth-Year) will be displayed for 3 seconds, and then the RDS clock time display will appear.
z The RDS clock time appears with "RDS", so that you will know it is not the internal
clock time.
(Example: 11:56 on March 31, 2001)
For 3 seconds
After the internal clock has been set, "COMPLETE" will be displayed for 3 seconds. Then the updated time will be displayed.
RDS clock time
Whilst RDS time is displayed, hold down the TIME button for at
least 3 seconds.
(Example: 11:50)
Internal clock time
Notes:
z If you tune in to an RDS station which is not sending clock-time and date (CT data)
and you select CT, "NO CT" will be displayed.
z If you are not receiving CT data, even though you are tuned in to an RDS station,
"CT" will be displayed. The CT data is sent at the top of each minute.
z If an RDS signal is weak or noisy, the clock time may be displayed as "- -"
(hyphens) or it may not be displayed correctly.
z You must check the clock's accuracy because the RDS time signal (CT data) may
not be correct, depending on the station.
z The data normally changes at midnight, Greenwich Mean Time (G.M.T.), not local
time.
RDS Radio
You can set the internal clock using the RDS time signal (RDS CT data). This is useful because the internal clock is set automatically from the time signal sent by an
RDS station.
Before setting, select one of the 24-hour or 12-hour display as shown on page 13.
4
-Using the Radio Data System (RDS)-
„ To set the internal clock by the RDS time
signal
z If the internal clock has not been set, "CLOCK" will appear.
z "RDS TIME" and "WAITING" will appear alternately. Wait until "COMPLETE"
appears. (It will appear in less than 60 seconds.)
ENGLISH
01/1/9
E3.fm
E-27
Listening to a Cassette Tape
PUSH EJECT
1
2
3
Press the ON/STAND-BY button to turn the power on.
4
5
Load a cassette into the compartment with side A facing you.
Press the TAPE button.
Open the cassette door by pushing the area marked "PUSH EJECT
".
Press the REVERSE MODE button to choose one side or both
sides.
Tape Playback
-Listening to a Cassette Tape-
... To listen to both sides.
... For repeat play of both sides.
... To listen to one side.
6
Press the
button to listen to side A, or the
button for side B.
z To play both sides ( ), start from side A. When playback starts from side B, side A
will not be played.
z To play side B using the remote control, press the button to switch the playback
side. Then, press the
/
button.
To stop playback:
Press the button.
Fast forward/rewind on side A:
To advance the tape, press the
button. To rewind it, press the
button.
Fast forward/rewind on side B:
To advance the tape, press the
button. To rewind it, press the
button.
Caution:
z To remove the cassette, press the button, and then open the compartment.
z If a power failure occurs during tape operation, the tape head will remain engaged
with the tape and the cassette door will not open. Wait until the power is restored.
z Even if the
button is pressed during tape playback, the unit will not enter the
pause mode.
E-28
ENGLISH
Sound Control (See page 12.)
01/1/9
E3.fm
Recording to a Cassette Tape from a CD
4
Press the REVERSE MODE button to choose one side or both
sides.
... To record on both sides.
... To record on only one side.
Press the REC PAUSE
you record on.
button repeatedly to switch to the side
z Recording will be paused.
z To record on both sides, begin on side A. (If recording is started from side B, the
tape will not switch over to side A.)
6
Press one of the DISC 1 - DISC 6 buttons to start recording.
z When the CD reaches the end, recording will stop.
Recording from several CDs continuously:
1 Follow the above steps 1 - 5.
2 Regardless of the setting in step 5, press the
button to record on side A, or the
button for side B.
z Recording will start from the disc of the lowest number.
To perform programmed recording:
1 Programme discs and tracks. (See page 17.)
2 Press the REC PAUSE
button.
3 Regardless of the setting in step 5, press the
button for side B.
button to record on side A, or the
Recording
5
-Recording to a Cassette Tape from a CD-
z When recording important selections, make a preliminary test to ensure that the
desired material is properly recorded.
z SHARP is not liable for damage or loss of your recording arising from malfunction
of this unit.
z The volume and sound controls can be adjusted with no effect on the recorded
signal (Variable Sound Monitor).
z Do not use metal or CrO tapes for recording.
To stop recording:
Press the button.
The CD and tape will stop.
You can record the desired CD using the DISC 1 - DISC 6 buttons.
1
2
3
Press the ON/STAND-BY button to turn the power on.
Press the CD button and load the desired disc.
Load a cassette into the compartment with side A facing you.
Auto restart function:
If the recording side is switched from side A to B during recording, the system will
record the interrupted track on side B from its beginning. The recording will be made
without cutting the beginning of the track on side B.
Programmed Play (See page 17.)
01/1/9
E3.fm
ENGLISH
E-29
Recording to a Cassette Tape from the Radio
1
2
3
Tune in to the desired station. (See page 18.)
Load a cassette into the compartment with side A facing you.
Press the REVERSE MODE button to choose one side or both
sides.
4
-Recording to a Cassette Tape from the Radio-
Recording
... To record on both sides.
... To record on only one side.
Press the REC PAUSE
you record on.
button repeatedly to switch to the side
z Recording will be paused.
z To record on both sides, begin on side A. (If recording is started from side B, the
tape will not switch over to side A.)
5
Press the
button to record on side A, or the
button for side B.
z When you press the
/
button on the remote control, the system will record on
the side specified in step 4.
To interrupt recording:
Press the REC PAUSE
button.
To resume recording, press the same button (
or
) you pressed in step 5.
To stop recording:
Press the button.
Note:
If you hear a whistling noise whilst recording an AM station, move the AM loop aerial.
„ Erasing recorded tapes
1
2
E-30
ENGLISH
Press the TAPE button.
Follow steps 2 - 5 in "Recording to a Cassette Tape from the Radio".
Listening to the Radio (See page 18.)
01/1/9
E3.fm
Timer and Sleep Operation
Timer playback:
The unit turns on and plays the desired source (CD, tuner, tape) at the preset time.
„ Timer playback or timer recording
Before setting the timer:
Timer recording:
The unit turns on and starts recording from the tuner at the preset time.
Whilst the power is in the stand-by mode, press the DISPLAY button on the
remote control to check that the clock is on time.
Press the ON/STAND-BY button to turn the power on.
Press the MENU button.
Turn the jog dial to select "TIMER PLAY" or "TIMER REC" mode and
within 10 seconds, press the ENTER button.
For timer playback:
4
For timer recording:
" PLAY" or " REC" will flash for 5 seconds. Press the ENTER button during the flash.
or
5
-Timer and Sleep Operation-
1
2
3
Advanced Features
Sleep operation:
The radio, compact disc and cassette tape can be turned off automatically.
Turn the jog dial to specify the hour to start and within 10 seconds,
press the ENTER button.
z The illustrations show the timer playback setting.
Setting the Clock (See page 13.)
01/1/9
E4.fm
ENGLISH
E-31
6
Turn the jog dial to specify the minute and within 10 seconds, press
the ENTER button.
7
Turn the jog dial to specify the hour to stop and within 10 seconds,
press the ENTER button.
11Press the ON/STAND-BY button to enter the timer stand-by mode.
To cancel the timer playback or timer recording:
1 Press the ON/STAND-BY button to turn the power on.
2 Press the MENU button.
3 Turn the jog dial to select "TIMER OFF" and then press the ENTER button.
-Timer and Sleep Operation-
Advanced Features
Timer and Sleep Operation (continued)
8
Turn the jog dial to specify the minute and within 10 seconds, press
the ENTER button.
12When the preset time is reached, playback or recording will start.
z The volume will increase gradually until it reaches the volume you were listening to
before turning off your system.
Start time
End time
13When
the timer end time is reached, the system will enter the
..power stand-by mode automatically.
z If you press any button during timer operation, the timer mode is cancelled and
playback or recording will last even when the end time is reached.
9
Adjust the volume using the VOLUME buttons.
z Do not turn the volume up too high.
10Press the CD, TUNER (BAND) or TAPE button to select the desired
..function.
To select the timer playback source: CD, TUNER (BAND) or TAPE.
To select the timer recording source: TUNER (BAND).
E-32
To check the setting time:
1 Press the ON/STAND-BY button to turn the power on.
2 Press the MENU button.
3 Turn the jog dial to select "TIMER PLAY" or "TIMER REC" and then press the ENTER button.
4 Press the ON/STAND-BY button to enter the timer stand-by mode.
To reset or change the timer setting:
Perform "Timer playback or timer recording" from the beginning.
Notes:
z Once the time is set, the setting will be retained until a new time is entered.
z When performing timer playback or recording using another unit connected to the
AUX IN sockets, select "AUX" in step 10. At this time, only this stereo system will
enter the power stand-by mode automatically. (Another unit will not be turned off.)
ENGLISH
01/1/9
E4.fm
„ To use timer and sleep operation together
Example: To fall asleep and wake to the same radio station
You can play back the same source only (the function cannot be switched).
2
To change the sleep time:
Whilst the sleep time is displayed, turn the jog dial.
(Maximum: 2 hours - Minimum: 30 minutes)
4
5
Press the ENTER button.
Your system will enter the power stand-by mode automatically after
the preset time has elapsed.
z The volume will be turned down 1 minute before the sleep operation finishes.
Note:
Once the sleep time is set, it will remain unchanged until the setting is changed.
Set the desired playback or recording time (steps 1 - 8, pages 31 32).
Whilst playing the desired source, set the sleep time (see left, steps
1 - 4).
1. Timer playback (recording) setting
2. Sleep timer setting
Timer playback (recording)
start time
A
B
Sleep operation will automatically stop.
End time
: 30 minutes - 2 hours
: Desired time
To cancel the sleep operation:
Press the ON/STAND-BY button whilst the sleep timer is set.
To confirm the remaining sleep time:
Perform the above steps 2 - 3.
This time you can also change the sleep time.
ENGLISH
01/1/9
E4.fm
-Timer and Sleep Operation-
1
Advanced Features
„ Sleep operation
1 Play back the desired sound source.
2 Press the MENU button.
3 Turn the jog dial to select "SLEEP". Then press the ENTER button.
E-33
Enhancing Your Stereo System
The connection lead is not included. Purchase a commercially available lead as
shown below.
„ Listening to the playback sounds from
VCR, DVD, etc.
1 Use a commercially available connection lead to connect the VCR,
DVD, etc. to the AUX IN sockets.
Red
When using video equipment, connect the audio output to this unit and the video output to a television.
White
To the line
output socket
-Enhancing Your Stereo System-
Advanced Features
VCR, DVD, etc.
E-34
White
2
3
4
5
Press the ON/STAND-BY button to turn the power on.
Press the AUX button to select "AUX".
Operate the VCR, DVD, etc.
Adjust the input level using the
or
button.
z The "OVER" indicator should not light at the maximum level.
Red
-2
0
+4
OVER
RCA lead
Note:
To prevent hum interference, place this unit away from a television.
„ To record on a tape
1 Insert a cassette in the cassette compartment.
2 Press the AUX button to select "AUX".
3 Press the REC PAUSE button.
4 Operate the VCR, DVD, etc.
5 Adjust the input level using the or button.
6 Press the button to record on side A, or the
ENGLISH
01/1/9
E4.fm
button for side B.
The connection lead is not included. Purchase a commercially available lead as
shown below.
„ To record CD signals on MDs (digital output)
The digital signal from this unit can be recorded by MiniDisc recorders, etc.
Remove the DIGITAL OUT socket cover.
3
4
Put the MD, etc. in the recording mode.
Use a connection cable for digital recording to connect the unit to
the OPTICAL/LINE IN socket of a MiniDisc recorder, etc.
Note:
Only CD signals can be output.
„ Headphones
Connection cable for
digital recording
To the OPTICAL/
LINE IN socket
z Before plugging in or unplugging the headphones, reduce the volume.
z Be sure your headphones have a 3.5 mm (1/8") diameter plug and are between 16
ohms and 50 ohms impedance. The recommended impedance is 32 ohms.
z Plugging in the headphones disconnects the speakers automatically. Adjust the
volume using the VOLUME buttons.
ENGLISH
01/1/9
E4.fm
-Enhancing Your Stereo System-
Play a CD on this unit.
Advanced Features
MiniDisc
Recorder
1
2
E-35
Troubleshooting Chart
Many potential "problems" can be resolved by the owner without calling a service technician.
If something is wrong with this product, check the following before calling your authorised
SHARP dealer or service centre.
„ General
Symptom
z The clock is not on time.
Possible cause
z Did a power failure occur? Reset the clock. (Refer to
page 13.)
z When a button is pressed, the z Set this unit to the power stand-by mode and then
unit does not respond.
turn it back on.
z If the unit still malfunctions, reset it. (Refer to page
37.)
References
-Troubleshooting Chart-
z No sound is heard.
Symptom
Possible cause
z Cannot record.
z Is the erase-protection tab removed?
z Cannot record tracks with
proper sound quality.
z Is it a normal tape? (You cannot record on a metal
or CrO tape.)
z Cannot erase completely.
z Sound skipping.
z Is there any slack? Is the tape stretched?
z Cannot hear treble.
z Are the capstan, pinch roller, or heads dirty?
z Sound fluctuation.
z Cannot remove the tape.
z Is the volume level set to "0"?
z If a power failure occurs during playback, the heads
remain engaged with the tape. Do not open the
compartment forcibly. Wait until electricity resumes.
z Are the headphones connected?
z Are the speaker wires disconnected?
„ CD player
Symptom
Possible cause
z Playback does not start.
z Is the disc loaded upside-down?
z Playback stops in the middle
or is not performed properly.
z Does the disc satisfy the standards?
z Playback sounds are
skipped, or stopped in the
middle of a track.
z Is the unit located near excessive vibrations?
z Is the disc very dirty?
„ Tuner
Symptom
z Radio makes unusual noise
consecutively.
„ Remote control
Symptom
Possible cause
z The remote control does not
operate.
z Is the AC power lead of the stereo system plugged
in?
z Is the battery polarity correct?
z Are the batteries dead?
z Is the distance or angle incorrect?
z Is the disc distorted or scratched?
z Has condensation formed inside the unit?
E-36
„ Cassette deck
Possible cause
z Is the unit placed near the TV or computer?
z Does the remote control sensor receive strong
light?
„ Condensation
Sudden temperature changes, storage or operation in an extremely humid environment may cause condensation inside the cabinet (CD pickup, tape heads, etc.) or on
the transmitter LED on the remote control.
Condensation can cause the unit to malfunction. If this happens, leave the power on
with no disc (or cassette) in the unit until normal playback is possible (about 1 hour).
Wipe off any condensation on the transmitter LED with a soft cloth before operating
the unit.
z Is the FM/AM loop aerial placed properly? Move the
AC power lead away from the aerial if located near.
ENGLISH
01/1/9
E4.fm
Maintenance
„ If trouble occurs
„ Cleaning the tape-handling parts
When this product is subjected to strong external interference (mechanical shock,
excessive static electricity, abnormal supply voltage due to lightning, etc.) or if it is
operated incorrectly, it may malfunction.
z Dirty heads, capstans or pinch rollers can cause poor sound and tape jams. Clean
these parts with a cotton swab moistened with commercial head/pinch roller
cleaner or isopropyl alcohol.
z When cleaning the heads, pinch rollers, etc., unplug the unit which contains high
voltages.
C
„ Clearing all the memory (reset)
A
C
B
D
If neither operation above restores the unit, clear all the memory by following
the instructions below.
1 Press the ON/STAND-BY button to enter the power stand-by mode.
2 Whilst pressing down the VOLUME
button, press the ON/STAND-BY button
until "ALL CLEAR" appears.
Caution:
This operation will erase all data stored in memory including clock, timer settings,
tuner preset and CD programme.
„ Before transporting the unit
On the back of this unit is equipped with a transport safety screw in order to prevent
damage during transportation.
1
2
3
4
5
Press the ON/STAND-BY button to turn the power on.
Remove all discs from the unit, close the disc tray. "CD NO DISC" is displayed.
Press the ON/STAND-BY button to enter the stand-by mode. "GOOD-BYE" is displayed.
When "GOOD-BYE" disappears, unplug the AC power lead from the AC socket.
Insert the transport safety screw into the back of the unit and tighten it with a flatblade screwdriver.
:
Erase head
:
Capstan
:
Recording/Playback head
:
Pinch roller
z After long use, the deck's heads and capstans may become magnetised, causing
poor sound. Demagnetise these parts once every 30 hours of playing/recording
time by using a commercial tape head demagnetiser. Read the demagnetiser's
instructions carefully before use.
-Maintenance-
D
References
If such a problem occurs, do the following:
1 Set the unit to the stand-by mode and turn the power on again.
2 If the unit is not restored in the previous operation, unplug and plug in the unit,
and then turn the power on.
„ Cleaning the cabinet
Periodically wipe the cabinet with a soft cloth and a diluted soap solution, then with a
dry cloth.
Caution:
z Do not use chemicals for cleaning (petrol, paint thinner, etc.). It may damage the
cabinet finish.
z Do not apply oil to the inside of the unit. It may cause malfunctions.
ENGLISH
01/1/9
E4.fm
E-37
Specifications
As part of our policy of continuous improvement, SHARP reserves the right to make
design and specification changes for product improvement without prior notice. The
performance specification figures indicated are nominal values of production units.
There may be some deviations from these values in individual units.
Type
6-disc multi-play compact disc changer player
Signal readout
Non-contact, 3-beam semiconductor laser pickup
D/A converter
1-bit D/A converter
AC 230 V, 50 Hz
Frequency response
20 - 20,000 Hz
Power on: 175 W
Dynamic range
90 dB (1 kHz)
„ General
Power source
Power consumption
-Specifications-
References
Power stand-by: 0.6 W (*)
Dimensions
Width: 200 mm (7-7/8")
Height: 352 mm (13-7/8")
Depth: 377 mm (14-7/8")
Weight
9.8 kg ( 21.6 lbs.)
(*)
This power consumption value is obtained when the demonstration mode is cancelled in the power stand-by mode. Refer to page 11 to cancel the demonstration
mode.
„ Amplifier
Output power
„ CD player
„ Cassette deck
Frequency response
50 - 14,000 Hz (Normal tape)
Signal/noise ratio
50 dB (recording/playback)
Wow and flutter
0.35 % (DIN 45 511)
„ Tuner
Frequency range
FM: 87.5 - 108.0 MHz
AM: 522 - 1,620 kHz
PMPO: 668 W
MPO: 334 W (167 W + 167 W) (DIN 45 324)
Main speaker (woofer and tweeter): 134 W (67 W + 67 W)
Subwoofer: 200 W (100 W + 100 W)
„ Speaker
Type
3-way type speaker system
5 cm (2") Tweeter
RMS: 200 W (100 W + 100 W) (DIN 45 324)
13 cm (5-1/4") Woofer
Main speaker (woofer and tweeter): 80 W (40 W + 40 W)
13 cm (5-1/4") Subwoofer
Subwoofer: 120 W (60 W + 60 W)
Output terminals
RMS: 184 W (92 W + 92 W) (DIN 45 500)
Maximum input power
(Total)
200 W
Main speaker (woofer and tweeter): 74 W (37 W + 37 W)
Rated input power (Total)
100 W
Subwoofer: 110 W (55 W + 55 W)
Impedance
6 ohms
Speakers: 6 ohms
Dimensions
Width: 185 mm (7-5/16")
Height: 417 mm (16-7/16")
Depth: 311 mm (12-1/4")
Weight
4.8 kg (10.6 lbs.)/each
Headphones: 16 - 50 ohms (recommended: 32 ohms)
CD digital output (optical)
Input terminals
E-38
Auxiliary: 500 mV/47 kohms
ENGLISH
01/1/9
E4.fm
MEMORANDUM/MÉMORANDUM/MEMORÁNDUM/ANTECKNINGAR/ANNOTAZIONI/MEMORANDUM/MEMO
00/12/29
MEMO_1500.fm
MEMORANDUM/MÉMORANDUM/MEMORÁNDUM/ANTECKNINGAR/ANNOTAZIONI/MEMORANDUM/MEMO
00/12/29
MEMO_1500.fm
MEMORANDUM/MÉMORANDUM/MEMORÁNDUM/ANTECKNINGAR/ANNOTAZIONI/MEMORANDUM/MEMO
00/12/29
MEMO_1500.fm
SHARP CORPORATION
9906
TINSZ0653AWZZ
A0101.YT
00/12/29
BACK_1500.fm