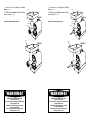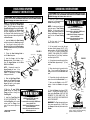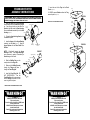
1
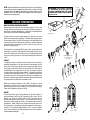
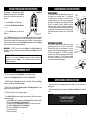
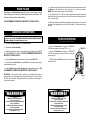
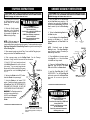
u.s.a.
LLC
ATTENTION
If any components of this unit are broken,
do not operate properly, or for product returns,
please contact Pragotrade LLC at
1-800-814-4895
Outside the U.S. call 440-638-3131.
For the online catalog, log onto www.westonsupply.com.
Exclusively imported by Pragotrade LLC Strongsville, Ohio
www.pragotrade.com
SAVE
THESE INSTRUCTIONS!
REFER TO THEM OFTEN AND USE THEM TO INSTRUCT OTHERS.
WARNING!
NEVER operate Grinder without the
Tray secured in place.
To avoid serious or fatal injury, NEVER reach
into any Grinder inlet.
ALWAYS use the Stomper to push meat
into the Grinder Head.
Read & fully understand all instructions
& warnings prior to use.
WARNING!
NEVER operate Grinder
without the Tray
secured in place.
To avoid serious or fatal injury,
NEVER reach into any
Grinder inlet.
ALWAYS use the Stomper to
push meat into the Grinder Head.
Read & fully understand
all instructions
& warnings prior to use.
WARNING!
IMPORTANT
SAFEGUARDS
When using electrical appliances, basic safety precautions should always be followed
including the following:
1. READ ALL INSTRUCTIONS BEFORE USING THE APPLIANCE.
2. To protect against risk of electrical shock, do not submerge or use this appliance near water
or other liquid.
3. Unplug this appliance from the electrical outlet when not in use or before putting on or taking off
parts and before cleaning.
4. Close adult supervision is necessary when any appliance is used near children. This appliance
is NOT to be used by children.
5. NEVER use any accessories or parts from other manufacturers. Doing so will VOID YOUR
WARRANTY and may cause fire, electrical shock or injury.
6. DO NOT operate any appliance with a damaged cord, plug or after the appliance malfunctions,
or is dropped or damaged in any manner. Return appliance to the nearest authorized service facility
for repair or adjustment.
7. Keep these instructions for use for future reference.
8. Check if the voltage indicated on the appliance corresponds to the local voltage before you
connect the appliance.
9. Thoroughly clean the parts that will come into contact with food before you use the appliance for
the first time.
10.DO NOT use outdoors.
11.DO NOT let cord hang over edge of table or counter.
12.DO NOT let cord come in contact with a hot surface. DO NOT use on an oven or stove.
13.DO NOT use fingers to scrape food away from the output chute while the appliance is operating.
Never feed food into the appliance by hand. NEVER reach into the appliance. ALWAYS use the
provided Stomper.
14.DO NOT operate the Grinder without the Tray in place.
15.Avoid contacting moving parts. Wait until moving parts have stopped running before you remove
the parts of the appliance.
16.NEVER let the appliance run unattended.
17.Switch the appliance off before detaching any accessory.
18.DO NOT attempt to grind bones, nuts or other hard items.
19.DO NOT operate the appliance for more than 15 minutes at one time. After 15 minutes of
continuous use, allow a few minutes for the appliance to rest before next use.
20.This appliance has a polarized plug (one blade of the plug is wider than the other). To reduce the
risk of electric shock, this plug will fit in a polarized outlet only one way. If the plug does not fit fully in
the outlet, reverse the plug. If it still does not fit, contact a qualified electrician. DO NOT modify the
plug in any way.
21. CAUTION: In order to avoid a hazardous situation, this appliance must never be connected to
a timer switch.
SAVE THESE INSTRUCTIONS!
Refer to them often and use them to instruct others.
-2-
WARRANTY INFORMATION
SAVE THIS WARRANTY INFORMATION FOR YOUR RECORDS!
Pragotrade LLC warrants to the ORIGINAL RETAIL PURCHASER of this product that if operated in accordance
with the printed instruction accompanying it, then for a period of 1 year from the date of purchase, the product shall be
free from defects in material and workmanship.
The Warranty Card, along with a copy of the original receipt, must be received by Pragotrade LLC within 30 days
from purchase date for the warranty to apply. Failure to send the completely filled out Warranty Card, along with a copy
of the original receipt, will void the warranty.
The product must be delivered to or shipped freight prepaid to Pragotrade LLC for warranty services, in either its
original packaging or similar packaging affording an equal degree of protection. Damage due to shipping is not the
responsibility of the company. Pragotrade LLC charges a $35.00 per hour bench charge. NOTE: No repairs will be
started without the authorization of the customer. The return shipping cost to the customer will be added to the repair
invoice.
Pragotrade LLC will repair (or at its discretion, replace) the product free of charge, if in the judgment of the company,
it has been proven to be defective as to seller’s labor and material, within the warranty period.
New or rebuilt replacements for factory defective parts will be supplied for one (1) year from the date of purchase.
Replacement parts are warranted for the remainder of the original warranty period.
For non-warranty repairs, contact Pragotrade’s Customer Service at 1-800-814-4895 M-F 8am-5pm EST (outside of
the United States 440-638-3131) to obtain a Return Authorization Number (RMA Number). Pragotrade will refuse all
returns that do not contain this number. DO NOT RETURN THE UNIT WITHOUT PROPER AUTHORIZATION
FROM PRAGOTRADE LLC.
LIMITATIONS: The warranty is void if the product is used for any purpose other than that for which it is designed.
The product must not have been previously altered, repaired, or serviced by anyone else other than Pragotrade LLC.
If applicable, the serial number must not have been altered or removed. The product must not have been subjected
to accident in transit or while in the customer’s possession, misused, abused, or operated contrary to the instructions
contained in the instruction manual. This includes failure caused by neglect of reasonable and necessary maintenance,
improper line voltage and acts of nature. This warranty is not transferable and applies only to U.S. and Canadian sales.
Except to the extent prohibited by applicable law, no other warranties whether expressed or implied, including
warranty merchantability and fitness for a particular purpose, shall apply to this product. Under no circumstances shall
Pragotrade LLC be liable for consequential damages sustained in connection with said product and Pragotrade LLC
neither assumes nor authorizes any representative or other person to assume for it any obligation or liability other than
such as is expressly set forth herein. Any applicable implied warranties are also limited to the one (1) year period of
the limited warranty.
This warranty covers only the product and its specific parts, not the food or other products processed in it.
CUT ALONG THE DOTTED LINE AND SEND THE WARRANTY CARD ALONG WITH A
COPY OF YOUR ORIGINAL PURCHASE RECEIPT TO:
Pragotrade LLC
20365 Progress Drive, Strongsville, OH 44149
WARRANTY CARD
SEND THIS CARD ALONG WITH A COPY OF YOUR ORIGINAL PURCHASE RECEIPT
Customer Name: ________________________________
Address:
______________________________________
City/State/Zip: ___________________________________
Telephone Number: (_________) ___________________
E-Mail Address: ___________________________________
Original Date of Purchase: _______/_________/__________
Product Model #: __________________________________
Serial # (if applicable): ____________________________
-23-
REV021810
RECIPES
COMMERCIAL GRADE
ELECTRIC
MEAT GRINDER
VENISON SAUSAGE
6 lb venison
½ tsp cayenne pepper
2 tsp pepper
.
.
.
.
6 lb lean pork
½ tsp sage
2 tsp salt
½ cup honey
Sausage Casings (optional)
Grind the venison and pork through the coarse grinder plate using the grinding
instructions
Add all the ingredients to the meat and mix well
Regrind the mixed meat through the fine grinding plate using the grinding instructions
Stuff the sausage into casings or shape into patties
and Sausage Stuffer
#8 MODEL NO. 08-0801-W
#12 MODEL NO. 08-1201-W
#22 MODEL NO. 08-2201-W
#32 MODEL NO. 08-3201-W
VENISON BREAKFAST SAUSAGE PATTIES
6 lb venison ½ tsp sage
.
.
.
.
.
.
½ lb bacon
1 tsp pepper
1 tsp salt
Grind the venison and bacon through the fine grinder plate using the grinding instructions
Add all the ingredients to the meat and mix well
Refrigerate the mixture for a few hours before use
Shape the mixture into thin patties
Pour a little oil into a skillet or onto a griddle and heat to medium high
Grill the patties for a few minutes on each side
CHORIZO (MEXICAN) SAUSAGE
2 lb lean pork trimming
1 tbsp ground oregano
¼ cup ground red chili (mild or hot)
8 cloves garlic, pressed
.
.
.
.
2 medium onions, minced ½ cup cider vinegar
8 oz beef/pork fat
Sausage casings
1 tsp. ground cinnamon
Grind the meat and fat through coarse grinder plate using the grinding instructions
Add the onions, garlic, vinegar and seasonings (use chili to taste)
Mix the ground meat and the seasonings, then place in a covered bowl and
refrigerate for at least one hour
Stuff the sausage into casings to make 4” (10.2 cm) links
-22-
-3-
DIAGRAM
NUMBER
TYPES OF SAUSAGE
Most sausages fall into one of four categories: Fresh, Smoked, Cooked or Dried. All
sausages, except dried, require refrigerated storage. There is also a sub-category
of uncooked smoked sausages.
COMPONENT LIST
PART
DESCRIPTION
#08
08-0801-W
#12
08-1201-W
#22
08-2201-W
#32
08-3201-W
1
Front Ring Nut
08-0842
08-1242
08-2242 08-3242
2
4.5 mm Grinder Plate
29-0804
29-1204
29-2204
29-3204
3
7 mm Grinder Plate
29-0807
29-1207
29-2207
29-3207
4
Grinding Knife
29-0850
29-1250
29-2250
29-3250
5
Auger Pin
08-0846
08-1246
08-2246
08-3246
6
Auger
08-0802-U 08-1202
08-2202-N 08-3202-N
7
Auger Bearing
08-0847
08-2247
8
Stainless Steel Head
08-0809-N 08-1209
08-2209-N 08-3209-N
9
Rubber Feet with Nuts (4)
08-2007
08-2007
08-2007
08-2007
10
Head Locking Knob
08-2005
08-2005
08-2005
08-2005
11
Stainless Steel Tray
08-0824-S 08-1224-S
08-2224-S 08-3224-A
12
Safety Stomper
08-0877
08-0877
08-2277-N 08-2277-N
13
Funnel 40 mm
08-1040
08-1040
08-1040
08-1040
14
Funnel 30 mm
08-1030
08-1030
08-1030
08-1030
15
Funnel 20 mm
08-1020
08-1020
08-1020
08-1020
16
Flange for Stuffing Funnel
08-0829
08-1229
08-2229
08-3229
17
Funnel 10 mm SS High Speed
08-1011
08-1011
08-1011
08-1011
18
Stainless Steel Stuffing Star
08-0876
08-1276
08-2276
08-3276
19
High Speed Plastic Auger
08-0812
08-1212
08-2212
08-3212
Patented
08-1247
08-3247
Among the fresh and uncooked smoked sausages, you will find such flavors as
kielbasa or Polish sausage, Italian sausage, breakfast sausage and many others.
Both fresh and uncooked smoked sausages require cooking before eating and also
require refrigerated storage.
Smoked and cooked sausages include salami, bologna, the ever-popular hot dogs
and many others. Proper smoking requires a smokehouse or smoker. These can be
simple home-built structures made from metal drums or even old refrigerators or they
can be elaborate manufactured units. Most smoked sausages are warmed before
serving. Many people think that a smoked sausage will last much longer without
spoilage, but this is not true. Smoked sausages should be treated the same as fresh
sausage in terms of storage.
Dried sausages require the longest processing time, as they are air dried over a long
period of time. Some types of dry sausages are pepperoni, prosciutto and a variety
of ham products, just to name a few. The conditions under which the meat is dried
are very exacting; temperature, time and humidity must all be carefully monitored for
a safe and delicious product.
STORAGE
It is important to remember that sausage will lose its flavor the longer that it is stored.
It is recommended that you only make as much sausage as you will need for 46 weeks. Even frozen sausage will begin to lose flavor noticeably after 6 weeks.
Frozen sausage should be thawed slowly in the refrigerator before cooking or serving.
Quick thawing of the product will degrade the taste as well.
If any components of this unit are broken or the unit does not operate
properly, call Pragotrade LLC Toll Free at
1-800-814-4895
Monday thru Friday 8:00am-5:00pm EST.
Outside the U.S. call 440-638-3131
ADDITIONAL ACCESSORIES AVAILABLE
Jerky Slicer Attachment
07-3301-W
Meat Cuber/Tenderizer Attachment
07-3201-W-A
44 lb Meat Mixer Attachment
36-2001-W
Rapid Patty Grinder Attachment
07-0901-W
Freezer Paper Kit
(Includes Freezer Paper, Tape and Dispenser)
83-4030-W
Food Grade Silicone Spray
03-0101-W
These products and many more products can be ordered by visiting
WestonSupply.com
or by calling Pragotrade LLC Toll Free at 1-800-814-4895
Monday thru Friday 8:00am-5:00pm EST. Outside the U.S. call 440-638-3131
-21-
NOTE: Special considerations must be made when using venison or other wild game,
since it can become heavily contaminated during field dressing. Venison is often held
at temperatures that could potentially allow bacteria to grow, such as when it is being
transported. Refer to the USDA Meat and Poultry Department for further questions or
information on meat and food safety.
WARNING!
#8 & #12
Stomper
Before cleaning, assembling
or disassembling the Grinder, make sure
the PLUG IS REMOVED FROM THE OUTLET/
POWER SOURCE! ALWAYS unplug the Grinder
when not in use.
12
#22 & #32
Stomper
11
SAUSAGE INFORMATION
MEAT SELECTION FOR SAUSAGE MAKING
Sausage making has evolved over many years and generations, and as a result
there are countless types of sausage you can make using the basic ingredients of
meat, fat and a few carefully blended spices. Following are a few simple guidelines
that will help you make the best tasting sausage possible.
#8 & #12
Tray
#22 & #32
Tray
with Safety Guard
Any type of meat can be used for making sausage: pork, beef, bison, moose and
caribou, even antelope make great sausage. It is important when preparing venison
or other red game meats to trim all the fat from the meat, as red game tallow will turn
rancid in as few as five days. Replace the fat with either pork or beef fat, depending
on the type of product you are making, at a ratio of 1 pound (0.5 kg) of fat for every
4 pounds (1.8 kg) of game meat.
Power
Cord
8
The fat content of your sausage will affect the taste, texture, cooking characteristics
and shelf life of your product. Most commercially made sausage has a fat content
of about 20%. Using less than 12% fat will result in a very dry tasting sausage, while
using more than 20% may result in a sticky flavorless sausage that will be difficult
to cook.
Modern curing is based on Nitrates and is very scientific. The best way to ensure
proper curing is to purchase one of the many commercially available curing agents
from either a grocery store or your local butcher. A very common cure is Prague
Powder, which is available in two types (#1 and #2).
CASING
There are many different types of casings available, the right choice depends on
personal preference as well as the type of sausage you wish to make. For most
sausages, your choices are natural or collagen. Don’t let the names fool you;
collagen casings are not a synthetic product . They are made from beef skin and
other tissues. Collagen casings are uniform in size and texture and require almost
no preparation. “Natural” casings are the intestines of lamb, sheep, hogs or beef.
They are less uniform in size and require substantial preparation. For those reasons,
more than 75% of commercially made sausage in the U.S. is made with collagen
casing. There are also fibrous non-edible casings that are used for some varieties of
smoked sausages and bolognas.
-20-
10
7
4
1
6
5
9
NOTE: #8 & #12 Grinders
have a flat washer style
Auger Bearing
3
19
#8 & #12
Grinders
13
14
15
16
17
#22 & #32
Grinders
O
I
CURING
It is important to properly cure meats to preserve meat and poultry, and to destroy
undesirable microorganisms on the meat surfaces that cause spoilage and food
born illnesses. There are many steps that help in this process, including smoking,
cooking, drying, chilling and the addition of cure ingredients. The oldest means of
accomplishing this is by introducing salt into the meat. The resistance of bacteria
to salt varies widely among different types of bacteria. The growth of some bacteria
is inhibited by salt concentrations as low as 3%, e.g., Salmonella, whereas other
types are able to survive in much higher salt concentrations, e.g., Staphylococcus.
Fortunately, the growth of many undesirable organisms normally found in cured meat
and poultry products is inhibited at low concentrations of salt.
Motor
Cover
On/Off
Circuit Power
Breaker Switch
Circuit
Breaker
-5-
On/Off/Reverse
Power
Switch
18
2
IMPORTANT SAFETY RULES
WARNING!
READ AND FULLY UNDERSTAND ALL INSTRUCTIONS
AND WARNINGS PRIOR TO USING THIS UNIT. YOUR
SAFETY IS MOST IMPORTANT! FAILURE TO COMPLY
WITH PROCEDURES AND SAFEGUARDS MAY RESULT
IN SERIOUS INJURY OR PROPERTY DAMAGE.
REMEMBER: YOUR PERSONAL SAFETY IS YOUR
RESPONSIBILITY!
1. DO NOT use the Grinder without the Tray
secured into place.
2. ALWAYS DISCONNECT Grinder from
power source before servicing, changing
accessories or cleaning the unit.
10. NEVER
LEAVE
THE
GRINDER
UNATTENDED. Be safe, DISCONNECT the
Grinder from power source before leaving the
work area. Close supervision is necessary
when any appliance is used near children. This
appliance is NOT to be used by children.
3. Plug the Grinder into a standard 120 Volt,
60 Hz wall outlet.
11. Wait until all moving parts have stopped
before you remove any part of the Grinder.
4. DO NOT USE the Grinder if the Power
Cord, Plug or any other parts are damaged. If
the Power Cord or the Grinder is damaged,
call Customer Service. DO NOT ATTEMPT TO
REPLACE THE CORD. Be sure to not allow
the Power Cord to drape into your work area.
Check that all parts are operating properly,
and perform the intended functions. Check
for alignment of moving parts or any other
conditions that may affect the operation.
12. TIE BACK loose hair and clothing, and roll
up long sleeves before operating the Grinder.
REMOVE ties, rings, watches, bracelets, or
other jewelry before operating the Grinder.
5. NEVER use any accessories or parts from
other manufacturers. Doing so will VOID YOUR
WARRANTY and may cause fire, electrical
shock or injury.
6. TO PROTECT AGAINST RISK OF
ELECTRICAL SHOCK: DO NOT SUBMERGE
THE MAIN GRINDER BODY INTO WATER
OR LIQUID. BE SURE THE GRINDER IS
DISCONNECTED FROM THE POWER
SOURCE BEFORE CLEANING. Wash all
parts by hand and thoroughly dry. Thoroughly
clean all parts that will come in contact with
food before using the appliance. NEVER rinse
appliance Grinder Motor under tap, only use a
moist cloth to clean the Grinder Motor Unit.
7. Reduce risk of unintentional starting. Make
sure the Power Switch is in the “OFF” position
before attaching to the power source.
8. KEEP FINGERS CLEAR of the Auger
and Cutting Blades AT ALL TIMES. NEVER
REACH INTO THE GRINDER, doing so may
cause serious injury. ALWAYS USE THE
PROVIDED STOMPER, NEVER FEED FOOD
BY HAND.
9. NEVER use fingers to scrape food away
from the Grinding Plate while the Grinder is in
operation. SEVERE INJURY MAY RESULT.
13. Be sure the Grinder is on a stable work
surface. Be sure all the Grinder Feet are
stable.
14. DO NOT attempt to grind bones, nuts or
other hard items.
15. DO NOT run Grinder without meat in the
Head. Severe damage to the Head and Auger
may occur.
16. WEAR EYE PROTECTION. Wear safety
glasses. Everyday eye glasses are not safety
glasses. Safety glasses conform to ANSI Z87.1
requirements. Note: approved safety glasses
have Z87 printed or stamped on them.
17. DO NOT use outdoors.
There are basic rules to follow when handling food.
They are COOK, SEPARATE, CLEAN, and CHILL.
COOK
It’s crucial to cook food to a safe internal temperature to destroy bacteria that is
present. The safety of hamburgers and other foods made with ground meat has
been receiving a lot of attention lately, and with good reason. When meat is ground,
the bacteria present on the surface is mixed
throughout
the ground
mixture. If this
o
o
o
o
ground meat is not cooked to at least 160 F to 165 F (71 C to 74 C), bacteria will not
be destroyed and there’s a good chance you will get sick.
Solid pieces of meat like steaks and chops don’t have dangerous bacteria like E.
coli on the inside, so they can be served more rare.
Still,
any beef cut should be
o
o
F (63 C) (medium rare). The safe
cooked to an internal temperature
of
at
least
145
o
o
temperature
for poultry is 180 F (82 C) and solid cuts of pork should be cooked to
o
o
160 F (71 C). Eggs should be thoroughly cooked too. If you are making a meringue
or other recipe that uses uncooked eggs, buy specially pasteurized eggs or use
prepared meringue powder.
SEPARATE
Foods that will be eaten uncooked and foods that will be cooked before eating MUST
ALWAYS be separated. Cross-contamination occurs when raw meats or eggs come
in contact with foods that will be eaten uncooked. This is a major source of food
poisoning. Always double-wrap raw meats and place them on the lowest shelf in the
refrigerator so there is no way juices can drip onto fresh produce. Then use the raw
meats within 1-2 days of purchase, or freeze for longer storage. Defrost frozen meats
in the refrigerator, not on the counter.
When grilling or cooking raw meats or fish, make sure to place the cooked meat on
a clean platter. Don’t use the same platter you used to carry the food out to the grill.
Wash the utensils used in grilling after the food is turned for the last time on the grill,
as well as spatulas and spoons used for stir-frying or turning meat as it cooks.
19. DO NOT let the Power Cord hang over
edge of work surface.
Make sure to wash your hands after handling raw meats or raw eggs. Washing hands
with soap and water, or using a pre-moistened antibacterial towelette is absolutely
necessary after you have touched raw meat or raw eggs. Not washing hands and
surfaces while cooking is a major cause of cross-contamination.
20. DO NOT attempt to operate the Grinder
if the Grinder itself is cold. The Grinder
temperature should be at least 45oF (7oC)
before beginning.
CLEAN
Wash your hands and work surfaces frequently when you are cooking. Washing with
soap and warm water for at least 15 seconds, then dry with a paper towel.
21. The Gear Housing and the Motor Cover
may become HOT during operation. This is
normal. DO NOT touch these parts during
operation or until they cool after use.
CHILL
Chilling
food is
very
important.
The danger zone where bacteria multiply
is between
o
o
o
o
o
o
6 C). Your refrigerator should be set to 40 F (4 C) or below;
40 F and 140 F (4 C and
o
o
your freezer should be 0 F (-17 C) or below. Simple rule: serve hot foods hot, cold foods
cold. Use chafing dishes or hot plates to keep food hot while serving. Use ice water
baths to keep cold foods cold. Never let any food sito at room
temperature for more than
o
2 hours - 1 hour if the ambient temperature is 90 F (32 C) or above. When packing
for a picnic, make sure the foods are already chilled when they go into the insulated
hamper. The hamper won’t chill food - it just keeps food cold when properly packed
with ice. Hot cooked foods should be placed in shallow containers and immediately
refrigerated so they cool rapidly. Make sure to cover foods after they are cool.
18. DO NOT use the Grinder while under the
influence of drugs, medications or alcohol.
SAVE THESE INSTRUCTIONS!
Refer to them often and use them to instruct others.
-6-
FOOD SAFETY
-19-
CIRCUIT BREAKER INSTRUCTIONS
FIGURE 16
This Grinder is equipped with a Circuit
Breaker as a safety precaution. If the Grinder
should stop running follow these steps to
remedy:
1. Turn the Grinder to the “Off” position.
2. Press the Circuit Breaker Reset Button
O
I
(Figure 16).
3. Turn the Grinder back on and resume
grinding.
Circuit Breaker
Reset Button
4. If the Grinder still does not turn on, check that the electrical wall outlet is properly
working. Plug in another appliance to see if that appliance works from the wall outlet.
Check that the household circuit breaker has not been tripped. If none of the above
steps remedy the situation, or if the Circuit Breaker repeatedly shuts off the Grinder
contact a customer service for further assistance.
WARNING! DO NOT continue to use the Grinder if the Circuit Breaker trips
repeatedly. Continued use may cause permanent damage to the Grinder and will void
the warranty.
PLEASE NOTE:
This Grinder features an all hardened steel gear
transmission. This causes the Grinder to operate at a higher volume and
temperature than other Grinders. This is normal and will not affect the
Grinder’s performance.
GRINDING TIPS
. DO NOT over-tighten the Front Ring Nut. It should be firmly tight.
. Make sure the Grinding Knife blades lay flat on the Grinder Plate.
. DO NOT operate the Grinder without meat in the Head. Running the Grinder
while dry could damage the Head and Auger.
. ALWAYS lubricate the Head, Grinding Plate and Grinding Knife with a foodgrade silicone spray after cleaning.
. DO NOT grind bones, nuts or other hard objects.
. If the Grinder Plate becomes clogged during operation, follow these steps to
restore normal output.
. Turn the Grinder “OFF” and disconnect the Power Cord from the electrical outlet.
. Remove the Front Ring Nut and Grinding Plate.
. Thoroughly clean the Grinding Plate. Make sure all of the holes are clear.
. Re-install the Grinding Plate and Front Ring Nut.
. Re-connect the Grinder to the electrical outlet.
. Continue with grinding.
. Repeat as necessary.
-18-
GROUNDING INSTRUCTIONS
GROUNDING
This appliance must be grounded while in use to protect
the operator from electrical shock. The appliance
is equipped with a 3-conductor cord and a 3-prong
grounding type plug to fit the proper grounding-type
receptacle. The appliance has a plug that looks like
Figure A. An adaptor, Figure B, should be used for
connecting Figure A plugs to two-prong receptacles.
The grounding tab which extends from the adaptor must
be connected to a permanent ground such as a properly
grounded outlet box as shown in Figure C using a metal
screw.
Circuit
Grounding
Conductor
Figure A
Grounding
Prong
Figure B
EXTENSION CORDS
Use only 3-wire extension cords which have 3-prong
grounding-type plugs and a 3-pole cord connector
that accepts the plug from the appliance. Use only
extension cords having an electrical rating not less than
the rating of the appliance. DO NOT use damaged
extension cords. Examine extension cord before using
and replace if damaged. DO NOT abuse extension
cord and do not yank on any cord to disconnect. Keep
cord away from heat and sharp edges.
Metal
Grounding
Screw
Cover of
Grounded
Outlet Box
Figure C
Grounding
Means
AA2220
.
UNPACKING INSTRUCTIONS
Remove all parts from packaging material and check to be sure there are no
missing parts.
. Retain packaging material for storage of the Grinder and Grinder parts when not
in use.
If any components of this unit are broken or the unit does not operate
properly, call Pragotrade LLC Toll Free at
1-800-814-4895
Monday thru Friday 8:00am-5:00pm EST.
Outside the U.S. call 440-638-3131
-7-
PRIOR TO USE
Disassemble the Grinder Head and wash each part thoroughly in warm
water, taking particular care to remove all grease and oil from surfaces. Dry
all parts thoroughly before re-assembling.
DO NOT IMMERSE THE MOTOR IN WATER OR OTHER LIQUIDS!
8. Hold the casing in place with one hand while feeding the sausage mixture through
the Grinder. As the meat fills the casing, gently lay it on a clean, dry surface.
NOTE: When using natural casings, use a wet surface.
9. Do not fill the last 3”-4” (7.5-10 cm) of casing. After the entire length of casing has
been stuffed, twist the open end to close, then tie off the ends of the casing tightly to
close. Twist into links.
10.Whenever stuffing sausage, fill the casing slowly to avoid air pockets. If air pockets
do appear in the sausage use a pin to prick the bubbles. The small holes will seal
naturally.
CLEANING INSTRUCTIONS
WARNING!
Before cleaning, assembling or disassembling the Grinder,
make sure the PLUG IS REMOVED FROM THE OUTLET/POWER SOURCE!
ALWAYS unplug the Grinder when not in use.
1. Remove the Head Assembly from the Grinder Motor.
REVERSE FUNCTION
(Only equipped on#22 & #32 Grinders)
.
Allow the Grinder Motor to come to a COMPLETE
STOP before engaging into reverse “REV” (Figure 15).
2. Disassemble the Head Assembly.
3. Wash all parts that have come in contact with meat in hot soapy water. BE SURE
TO CLEAN IMMEDIATELY AFTER USE. DO NOT IMMERSE THE MOTOR IN
WATER OR OTHER LIQUIDS!
4. Rinse the Grinder parts with clear hot water, then dry them IMMEDIATELY.
5. Fully lubricate the Head, Plates and the Knife with a food-grade silicone spray
before and after each use.
.
FIGURE 15
Allow the Grinder Motor to come to a COMPLETE
STOP before engaging in forward “FWD” after using the
reverse function.
.
NEVER operate the Grinder in reverse for more than 5
seconds at a time.
6. Clean the Motor Cover and Gear Housing with a damp towel and wipe dry. DO
NOT IMMERSE THE MOTOR IN WATER OR OTHER LIQUIDS!
IMPORTANT: Any metal parts must be coated with a food-safe silicone spray to
prevent rusting; if not properly protected, these parts will begin to rust very quickly.
DO NOT use rusted parts. Ordering information can be found on the last page of
this instruction manual.
On/Off/Reverse
Power
Switch
WARNING!
WARNING!
NEVER operate Grinder without the
Tray secured in place.
To avoid serious or fatal injury, NEVER reach
into any Grinder inlet.
ALWAYS use the Stomper to push meat
into the Grinder Head.
Read & fully understand all instructions
& warnings prior to use.
NEVER operate Grinder without the
Tray secured in place.
To avoid serious or fatal injury, NEVER reach
into any Grinder inlet.
ALWAYS use the Stomper to push meat
into the Grinder Head.
Read & fully understand all instructions
& warnings prior to use.
-8-
-17-
STUFFING INSTRUCTIONS
GRINDER ASSEMBLY INSTRUCTIONS
WARNING!
Before cleaning, assembling or disassembling the Grinder,
make sure the PLUG IS REMOVED FROM THE OUTLET/POWER SOURCE!
ALWAYS unplug the Grinder when not in use.
1. After grinding the meat following
the “Grinding Instructions”, mix the
ground meat with the sausage
seasonings.
2. Follow the “Stuffer Assembly
Instructions” or the “High-Speed
Stuffer Assembly Instructions” to
fully assemble the Grinder as a
Stuffer including the Tray.
WARNING!
NEVER operate Grinder without the
Tray secured in place.
To avoid serious or fatal injury, NEVER reach
into any Grinder inlet.
ALWAYS use the Stomper to push meat
into the Grinder Head.
Read & fully understand all instructions
& warnings prior to use.
NOTE: While one person can
stuff sausage with this Grinder, it
is recommended that two people perform this operation. For best results when using the
High-Speed Stainless Steel 10 mm Stuffing Funnel do not grind the meat through the
4.5 mm Grinding Plate.
3. Place seasoned ground meat into the Tray. Do not overfill the Tray, place just
enough meat to leave the Feed Chute area open.
4. Slide a sausage casing over the Stuffing Funnel. See the “Sausage
Information / Casing” section of this manual for more information.
5. Slide 4”-6” (10-15 cm) of casing from the end
of the Stuffing Funnel and tie a knot in the end
of the casing. If you are using large diameter
fibrous casing, hold the closed end of the casing
tightly against the end of the Stuffing Funnel
(Figure 14).
6. Make sure the Grinder is in the “OFF” position.
Attach the Grinder to the power supply.
Stomper
FIGURE 14
Tray
Feed
Chute
7. Switch the Grinder to the forward “FWD”
position. Carefully start feeding ground meat into
the Feed Chute. ONLY USE THE STOMPER TO
PUSH MEAT INTO THE HEAD, DO NOT USE
YOUR FINGERS OR ANY OTHER OBJECT.
Motor
Cover
Gear
Housing
HOT
DO NO T T OUCH!
The Motor Cover may become HOT during
operation. This is normal. DO NOT touch
these parts during operation or until they cool
after use.
-16-
Before cleaning, assembling or disassembling the Grinder,
make sure the PLUG IS REMOVED FROM THE OUTLET/POWER SOURCE!
ALWAYS unplug the Grinder when not in use.
1. Insert the Head into the Gear Housing
with the Feed Chute facing straight up. You
will need to line up the slot in the Head with
Feed
Chute
the Pin inside the Gear Housing. Be sure the
Head is seated fully into the Gear Housing
(Figure 1).
Head
Slot in Head
FIGURE 1
2. Tighten the Head Locking Knob to lock
the Head into place.
3. Insert the Auger, with the Auger Bearing
attached, into the Head (Figure 2). Align the
Auger Splines with the Drive Shaft of the
Grinder.
NOTE:
Periodically inspect the Auger
Bearing for wear. If the Auger Bearing is
worn excessively, replace it immediately or
Head damage could result.
4. Place the Knife onto the square portion
of the Auger Pin (Figure 2). Be sure the blades
of the Knife are facing outward.
5. Place one of the Grinder Plates onto the
Auger Pin; align the notch in the Grinder
Plate with the Pin in the Grinder Head.
6. Install the Front Ring Nut, DO NOT
OVERTIGHTEN. Turn the Front Ring Nut
untilit makes contact with the Grinder Plate,
then make 1/4 turn more to tighten into
place.
...INSTRUCTIONS CONTINUED ON NEXT PAGE
WARNING! The Tray helps protect the
user from serious personal injury.
ALWAYS use the Stomper to
feed and push meat into the
Grinder.
...INSTRUCTIONS CONTINUED ON NEXT PAGE
WARNING!
WARNING!
NEVER operate Grinder without the
Tray secured in place.
To avoid serious or fatal injury, NEVER reach
into any Grinder inlet.
ALWAYS use the Stomper to push meat
into the Grinder Head.
Read & fully understand all instructions
& warnings prior to use.
-9-
Gear
Housing
Head Locking
Knob
FIGURE 2
Auger Bearing
Head
Auger Splines
Auger
Auger Pin
Knife
Grinder Plate
Front Ring
Nut
NOTE! Be sure the blades
of the Knife are facing out.
7. Insert the neck of the Tray into the Feed
Chute (Figure 3).
7. Insert the neck of the Tray into the Feed
Chute (Figure 12).
Tray
8. NEVER operate Grinder without the Tray
secured in place (Figure 4).
Neck
REFER TO “GRINDING INSTRUCTIONS”
FIGURE 3
8. NEVER operate Grinder without the Tray
secured in place (Figure 13).
Neck
REFER TO “STUFFING INSTRUCTIONS”
Feed
Chute
FIGURE 12
Feed
Chute
Head
Head
Tray
Tray
FIGURE 4
WARNING!
WARNING!
NEVER operate Grinder without the
Tray secured in place.
To avoid serious or fatal injury, NEVER reach
into any Grinder inlet.
ALWAYS use the Stomper to push meat
into the Grinder Head.
Read & fully understand all instructions
& warnings prior to use.
NEVER operate Grinder without the
Tray secured in place.
To avoid serious or fatal injury, NEVER reach
into any Grinder inlet.
ALWAYS use the Stomper to push meat
into the Grinder Head.
Read & fully understand all instructions
& warnings prior to use.
-10-
Tray
-15-
FIGURE 13
HIGH-SPEED STUFFER
ASSEMBLY INSTRUCTIONS
GRINDING INSTRUCTIONS
WARNING!
WARNING!
Before cleaning, assembling or disassembling the Grinder,
make sure the PLUG IS REMOVED FROM THE OUTLET/POWER SOURCE!
ALWAYS unplug the Grinder when not in use.
NOTE: The High-Speed Stuffing System
is designed for use with the 10 mm Funnel
ONLY. DO NOT attempt to use the HighFeed
Speed Plastic Auger with any other Funnels. Chute
SERIOUS DAMAGE to the Grinder Head
and other components may occur. Follow Head
the “Standard Stuffer Assembly Instructions”
located in this manual, when using the 20, 30,
or 40 mm Funnels.
1. Insert the Head into the Gear Housing
with the feed chute of the Head facing straight
up. You will need to line up the slot in the
Head with the Pin inside the Gear Housing.
Be sure the Head is seated fully into the Gear
Housing (Figure 10).
NOTE: Periodically inspect the
Auger Bearing for wear. If the
Auger Bearing is worn excessively,
replace it immediately or Head
damage could result.
4. Slide the High Speed Plastic
Auger onto the Auger Pin making
sure the square part of the Plastic
Auger fully seats on to the square
portion of the Auger Pin.
5. Slide the 10 mm Stuffing
Funnel through the through the
Flange and place it through the
Front Ring Nut.
6. Install the Front Ring Nut,
DO NOT OVERTIGHTEN. Turn
the Front Ring Nut until it makes
contact with the Flange, then
make 1/4 turn more to tighten into
place.
...INSTRUCTIONS CONTINUED
ON NEXT PAGE
1. Follow the “Grinder Assembly
Instructions” to fully assemble the
Grinder including the Tray.
NOTE: It is best to grind the meat
using the coarse, 7 mm Grinding
Plate first. If a finer grind of meat is
desired, run the coarse ground meat
through the Grinder a second time
using the fine, 4.5 mm Grinding
Plate.
Gear
Housing
Head Locking
Knob
FIGURE 11
2. Tighten the Head Locking Knob to
lock the Head into place.
3. Insert the Auger, with the Auger
Bearing attached, into the Head (Figure 11).
Align the Auger Splines with the Drive
Shaft of the Grinder.
FIGURE 10
Slot in Head
Before cleaning, assembling or disassembling the Grinder,
make sure the PLUG IS REMOVED FROM THE OUTLET/POWER SOURCE!
ALWAYS unplug the Grinder when not in use.
Auger Bearing
Head
Auger Splines
Auger
Auger Pin
2. Trim the meat of all cords,
tendons, bones, shot, etc.
WARNING!
NEVER operate Grinder without the
Tray secured in place.
To avoid serious or fatal injury, NEVER reach
into any Grinder inlet.
ALWAYS use the Stomper to push meat
into the Grinder Head.
Read & fully understand all instructions
& warnings prior to use.
Stomper
3. For best results, be sure that all meat
has been chilled to between 32-34oF (0-1oC)
before grinding. DO NOT ALLOW MEAT
TO SIT OUT AT ROOM TEMPERATURE
LONGER THAN ABSOLUTELY NEEDED.
Closely follow the “Food Safety” instructions
as outlined by the USDA.
4. Cut meat into sizes small enough to fit into
the Feed Chute. Approximately 1” (2.5 cm)
cubes.
High-Speed
Plastic Auger
Flange
Front Ring
Nut
5. Place cubed meat to be ground into the
Tray. Do not overfill the Tray, place just
enough meat to leave the Feed Chute area
open.
Tray
FIGURE 5
Feed
Chute
Grinder
Head
6. Place a dish or bowl to collect the ground
meat at the end of the Grinder Head (Figure 5).
7. Make sure the Grinder is in the “OFF”
position. Attach the Grinder to the power
supply.
WARNING!
NEVER operate Grinder without the
Tray secured in place.
To avoid serious or fatal injury, NEVER reach
into any Grinder inlet.
ALWAYS use the Stomper to push meat
into the Grinder Head.
Read & fully understand all instructions
& warnings prior to use.
-14-
8. Switch the Grinder to the forward “FWD”
position. Carefully start feeding cubes of
meat into the Feed Chute. ONLY USE THE
STOMPER TO PUSH MEAT INTO THE
HEAD, DO NOT USE YOUR FINGERS OR
ANY OTHER OBJECT.
WARNING! The Tray helps protect the user
from serious personal injury. ALWAYS use
the Stomper to feed and push meat into the
Grinder.
-11-
Bowl for
ground meat
Motor
Cover
Gear
Housing
HOT
DO NO T T OUCH!
The Gear Housing and the Motor Cover
may become HOT during operation. This is
normal. DO NOT touch these parts during
operation or until they cool after use.
7. Insert the neck of the Tray into the Feed
Chute (Figure 8).
STANDARD STUFFER
ASSEMBLY INSTRUCTIONS
8. NEVER operate Grinder without the Tray
secured in place (Figure 9).
WARNING!
Before cleaning, assembling or disassembling the Grinder,
make sure the PLUG IS REMOVED FROM THE OUTLET/POWER SOURCE!
ALWAYS unplug the Grinder when not in use.
1. Insert the Head into the Gear Housing
with the feed chute of the Head facing straight
Feed
up. You will need to line up the slot in the
Chute
Head with the Pin inside the Gear Housing.
Be sure the Head is seated fully into the Gear
Head
Housing (Figure 6).
Slot in Head
Tray
FIGURE 6
FIGURE 8
Neck
Feed
Chute
REFER TO “STUFFING INSTRUCTIONS”
Head
2. Tighten the Head Locking Knob to lock
the Head into place.
3. Insert the Auger, with the Auger Bearing
attached, into the Head (Figure 7). Align the
Auger Splines with the Drive Shaft of the
Grinder.
Gear
Housing
NOTE:
Periodically inspect the Auger
Bearing for wear. If the Auger Bearing is
worn excessively, replace it immediately or
Head damage could result.
Tray
Head Locking
Knob
FIGURE 7
Auger Bearing
Head
Auger Splines
Auger
Auger Pin
4. Slide the Stuffing Star over the
round portion of the Auger Pin.
5. Slide one of the Stuffing Funnels
through the Flange and place it
through the Front Ring Nut.
6. Install the Front Ring Nut, DO
NOT OVERTIGHTEN.
Turn the
Front Ring Nut until it makes contact
with the Flange, then make 1/4 turn
more to tighten into place.
Flange
Front Ring
Nut
...INSTRUCTIONS CONTINUED ON NEXT PAGE
WARNING!
WARNING!
NEVER operate Grinder without the
Tray secured in place.
To avoid serious or fatal injury, NEVER reach
into any Grinder inlet.
ALWAYS use the Stomper to push meat
into the Grinder Head.
Read & fully understand all instructions
& warnings prior to use.
NEVER operate Grinder without the
Tray secured in place.
To avoid serious or fatal injury, NEVER reach
into any Grinder inlet.
ALWAYS use the Stomper to push meat
into the Grinder Head.
Read & fully understand all instructions
& warnings prior to use.
-12-
-13-
FIGURE 9