1
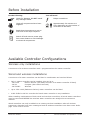
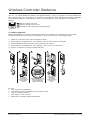
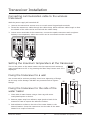
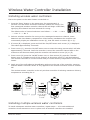
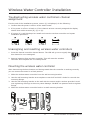
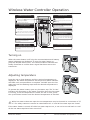
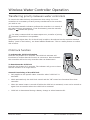
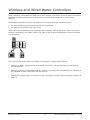
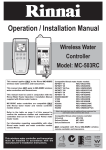
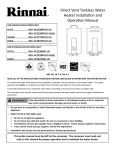
WIRELESS WATER CONTROLLER MC-503RC Installation and Operation Manual Suitability Suitable for the following Rinnai continuous flow water heaters with Quick Connect cable connector and controllers: Water Heater On/Off Temp. Volume Max Temp. Maintenance • • • Rinnai Infinity XR models Rinnai Heavy Duty models Rinnai Efficiency models • • • Compact Controller Deluxe Kitchen Deluxe Bathroom Entry Controllers MC No. 1 No. 2 No. 3 MC-91 (Universal) MC-100V MC-BC-100V NOT compatible with Rinnai MC-502RC Wireless Controllers and Transceivers. Before starting, to avoid damage to electrical components, switch off and remove the power plug of the water heater. Do not fix or permanently attach either the transceiver or controller until you have tested that both are working correctly. Rinnai Wireless Transceivers can be connected to the water heater models listed by the end user in accordance with these instructions. A licensed tradesperson is not required. A licensed tradesperson is only required if connecting more than 2 cables. This installation would normally be a wired/wireless installation, where more than 1 wired controller is fitted in combination with a wireless controller. Please retain this manual for future reference. Rinnai New Zealand Wireless Installation and Operation: C 03-09 Limited Warranty Rinnai brings you peace of mind with a 2 year minimum warranty. TERMS AND CONDITIONS 1. During the 24 month period from date of purchase and subject to clauses 2 and 3 below, Rinnai New Zealand Limited (“Rinnai”) will, at its own discretion, either replace or repair any defective product at no charge to the customer. 3. Warranty claims may be invalid if not accompanied by details of the installing or supervising gas fitter’s registration number and the gas fitting certification number. 4. This warranty commences from the date of purchase. Proof of purchase is required at the time of any warranty claim. 2. This warranty covers manufacturing defects only. This warranty will not apply if (for example) the product has been improperly installed or is otherwise installed contrary to manufacturer’s recommendations, has been damaged during or after installation, has not been operated in accordance with operating instructions, or has been subjected to damage or abuse beyond that expected from conditions of normal use. 5. Servicing of the product is to be carried out by a Rinnai authorised service centre. All Rinnai appliances meet or exceed the safety standards required by New Zealand gas and electrical regulations. The company is constantly improving its products and as such specifications are subject to change or variation without notice. Please keep these instructions in a safe place for future reference. RECORD AND ATTACH YOUR PROOF OF PURCHASE BELOW: Your Retailer:__________________________________________________ Name:________________________________________________________ Address:______________________________________________________ _____________________________________________________________ Telephone:( _______ ) __________________________________________ Date of Purchase: ______ / ______ / _________ Rinnai New Zealand Wireless Installation and Operation: C 03-09 Contents Before Installation 4 Available Controller Configurations 4 General Information 5 Wireless Controller Batteries 7 Quick Start Instructions 8 Communication Cable 9 Transceiver Installation 10 Wireless Water Controller Installation 11 Wireless Water Controller Operation 13 Wireless and Wired Water Controllers 15 Troubleshooting 16 Customer Contacts 16 WARNING Improper installation, adjustment, alteration, service or maintenance can cause property damage, personal injury or loss of life. For assistance or additional information contact Rinnai on 0800 RINNAI (0800 746 624). Rinnai New Zealand Wireless Installation and Operation: C 03-09 Before Installation Do the following You will need Check for damage. DO NOT install any damaged items. Philips screwdriver Check all components have been supplied. Approximately 30 minutes to 1 hour depending on the number of controllers to be fitted. Read these instructions to get an overview of the steps required. Switch off and remove power plug from water heater to avoid damage to electrical components. Available Controller Configurations Wireless only installations A maximum of 4 wireless controllers with 1 programmed as the master controller. Wired and wireless installations A maximum of 4 water controllers can be fitted in combination and used as follows: • Only 1 master controller can be installed, this can be a: ∙ MC-100V Kitchen Deluxe (will always function as a master controller if fitted) ∙ MC-91 Compact (also called Universal) ∙ MC-503RC Wireless • Up to 2 BC-100V (Bathroom Deluxe) water controllers can be fitted • A MC-503RC or MC-91 must be the fourth water controller in any installation When installing combinations of both wired and wireless controllers, all wired water controllers must be connected BEFORE the wireless water controllers are assigned to a transceiver channel. Wired controllers can only be added to an existing wireless installation when all wireless transceiver channels have been unassigned and all wireless controllers have been reset. Refer page 12 for how to do this. Rinnai New Zealand Wireless Installation and Operation: C 03-09 General Information Location and positioning Signal strength Take signal strength into consideration when determining the best location for the transceiver and controller. In some cases building construction and design can reduce signal strength. It may be necessary to locate the transceiver in a central location inside the building. For such locations extended lengths of communication cable are available from Rinnai. Alternatively double insulated flex with a minimum area of 0.5 mm2 may be used. Metallic structures, appliances or magnetic fields in the vicinity of the transceiver or controller may reduce signal strength. The transceiver’s atenna is located in the top. For best results mount the transceiver so the top is higher than the top of the water heater. If mounted to the side or below the water heater the signal strength may be reduced. The transceiver may be mounted inside a metal recess box or pipe cover, however this may reduce signal strength. ALWAYS test the signal before permanently attaching the transceiver and controller. The signal strength indicator for the wireless water controller should be at least 2 bars during installation. Distances Distance between water heater and transceiver must not exceed 20 m. The water controller and transceiver should be fitted out of reach of children, suggested height from floor to be at least 1.5 m. They must also be installed at least 400 mm above the highest part of a sink, basin or bath. Sunlight and LCD display Do not install wireless controllers in direct sunlight as light reflections make the LCD difficult to see at eye level. Mount lower than eye level to avoid these reflections. Chemicals and heat Do not install near: • a heat source such as a cook top, stove or oven • where chemicals such as benzine, turpentine, hydrogen sulphide, ammonia, chlorine or similar chemicals are in use Specific to water controllers They must be installed in a clean and shaded location. They are water resistant, however durability is improved when positioned outside the shower recess. Refer next page for further details. Rinnai New Zealand Wireless Installation and Operation: C 03-09 General Information Principle of operation A wireless controller installation utilises a transceiver and up to 4 wireless controllers. There is a ‘two way’ communication between the transceiver and controllers. The transceiver is connected by electrical cable to the water heater. The transceiver transmits control signals received from the wireless controllers operated by the user to the water heater. The transceiver transmits operational status signals from the water heater to the controllers. Water controllers allow precise temperature control by the user. When used correctly, the hot water unit will deliver the selected temperature, even when the water flow is varied, or more than 1 tap is in use. Each remote controller can be individually programmed, however the water heater can only deliver 1 set temperature at any time. Radio communications The wireless controllers are classified as short range radio communications devices and referred to as ‘Low Interference Potential Devices’ (LIPD’s). They operate in the same radio frequency as garage door openers and keyless automobile entry systems. Although interference with other LIPD’s is unlikely, it is not guaranteed interference will not occur. They should not be used if there is a chance of interference with other devices such as medical devices and fire alarms. Please verify this before installation. Safety features While the hot water outlets are open the set temperature may be lowered but not raised above 43 °C. Also transfer of priority between controllers is not possible. These are safety features. Servicing Water controllers and transceivers do not contain serviceable parts and must only be serviced and repaired by an authorised Rinnai Service Centre. Water resistance The MC-503RC Wireless Water Controller is a water resistant device, however excessive exposure to water may result in damage to the controller. • • • Do not immerse the controller in water Avoid direct exposure to water or steam as these conditions may cause a malfunction Always avoid exposure to water when the battery compartment is open When cleaning your controller use only a damp cloth and mild detergent. Rinnai New Zealand Wireless Installation and Operation: C 03-09 Wireless Controller Batteries Use 2 x 1.5 V AAA batteries (battery life approximately 1 year). It is best to remove batteries if the remote control is not going to be used for a long period. This will assist in avoiding damage from leaking batteries. The battery symbol in the display monitor indicates the remaining charge. Battery charge level ok Battery charge level is low Batteries need replacing (when flashing) To replace batteries Before attempting to change the batteries ensure all moisture is removed from the water controller. Failure to do so may allow water to enter the controller causing damage. . 2. 3. 4. 5. 1 Remove controller from wall mounting bracket. Open battery compartment, turn battery cover a full turn anti-clockwise. Insert batteries observing the correct polarity as shown. Close battery compartment, turn battery cover a full turn clockwise. Return controller to wall mounting bracket. 2 Turn battery compartment cover one full turn anti-clockwise to open Do • • • • • 3 4 Insert batteries observing the correct polarity as indicated inside the battery compartment Align marks and turn battery compartment cover one full turn clockwise to close 5 not: mix old and new batteries use different types of batteries at the same time heat or expose to flame take apart or short circuit attempt to recharge alkaline batteries Rinnai New Zealand Wireless Installation and Operation: C 03-09 Quick Start Instructions Do not fix or permanently attach either the transceiver or controller until you have tested that both are working correctly. Do not put batteries into the wireless controllers until directed to do so. Quick start guide . Ensure the power to the water heater is switched off. 2. Install any wired controllers BEFORE the wireless controller. 3. Wire the transceiver to the water heater via the Quick Connect cable connector. To get best reception the distance between the controller and transceiver must not exceed 20 m. 4. Turn on the power to the water heater. 5. The transceiver automatically assigns channels to any wired controllers. 6. Press the entry button on the transceiver for 3 seconds, the next available channel light will flash. 7. Insert batteries into the wireless controller. 8. After battery installation the wireless controller will momentarily display an initialisation screen (A). This will switch to either screen (B) or (C). 9. Following remaining programmed sequence as shown below. 0. Repeat from step 6 for any remaining wireless controllers. (D) (B) Press Press for approximately 3 seconds OR Rinnai New Zealand (F) (C) (A) once OR (E) Press once to start the tuning process, this takes approximately 5 seconds Press once Wireless Installation and Operation: C 03-09 Communication Cable Connecting communications cables to the water heater Up to 2 cables can be connected directly to the Quick Connect cable connector at the water heater (i.e. wireless transceiver plus 1 wired controller). . Ensure the power to the water heater is switched off. 2. Remove the retaining screw of the Quick Connect cable connector at the base of the appliance. 3. Swing the Quick Connect cable connector door open and thread the cable through the weather seal of the access hole. Allow sufficient cable length so that the sheath of the cable can be secured with the cable clamp supplied with the transceiver. 4. Loosen screw terminals, connect the cable spade connectors and re-tighten. Polarity is not important, either wire colour can be connected to either terminal. 5. Return Quick Connect cable connector to original position taking care not to damage cable wires in the process and replace retaining screw. 2. 3. 4. Positioning of various components pictured may differ depending on the water heater model Rinnai New Zealand Wireless Installation and Operation: C 03-09 Transceiver Installation Connecting communication cable to the wireless transceiver With the power supply still switched off: . Unscrew the transceiver access cover to reveal control keypad and terminals. 2. Thread the transceiver cable through the cable clamp. Allow sufficient cable length so that the sheath of the cable can be secured with the cable clamp. 3. Loosen screw terminals of the transceiver, connect the spade connectors and re-tighten. Polarity is not important, either wire colour can be connected to either terminal. Water Heater Water Heater On/Off Temp. Volume Max Temp. On/Off Maimtenance Entry Entry Controllers Controllers MC No. 1 No. 2 No. 3 Temp. Volume Max Temp. MC No. 1 No. 2 Maimtenance No. 3 3. 2. Setting the maximum temperature at the transceiver Turn on the power to the water heater. Set the transceivers’s maximum water temperature to 55 °C by pressing the ‘Max Temp’ button until 55 is displayed. Temp. Volume Max Temp. Maimtenance Fixing the transceiver to a wall . Clean side of water heater using a clean rag with some methylated spirits or alcohol. 157 Fixing the transceiver to the side of the water heater 58 25 35 167 Use screws and/or anchors provided. Avoid over-tightening of fixings as this may cause damage. DO NOT use powered tools to tighten fittings. 2. Remove paper strip from adhesive tape glued to back of the transceiver case to expose the adhesive surface. 3. Push adhesive surface to the side of the water heater in the desired location. Press the transceiver into the side of the water heater for a couple of seconds. Rinnai New Zealand 10 (mm) Wireless Installation and Operation: C 03-09 Wireless Water Controller Installation Installing wireless water controllers Ensure the power to the water heater is switched on. . Press the ‘Entry’ button on the transceiver for approximately 2 seconds. This will select a wireless controller channel for tuning. The first unassigned wireless controller channel LED will begin a fast flash, signifying this channel has been selected for tuning. Entry Controllers MC No. 1 No. 2 No. 3 The default order of channel selection is as follows: ---> MC ---> No.1 ---> No. 2 ---> No. 3 2. Select a wireless controller for tuning to the unassigned transceiver channel, insert batteries and close battery compartment. After battery installation the controller will momentarily display an initialisation screen (A), that will switch to screen (B) or (C). 3. If screen (B) is displayed, press and hold the ‘On/Off’ button until screen (C) is displayed. This takes approximately 2 seconds. 4. From screen (C), press the ‘On/Off’ button once to start the tuning process which will take approximately 5 seconds. Once the controller is tuned the controller channel LED on the transceiver will become steady and the controller will switch to screen (D) or (E). 5. From screen (D) press the ‘On/Off’ button once or from screen (E) press the ‘Transfer’ button once to complete tuning of this channel. At this point screen (F) will be displayed. The wireless controller is now tuned and ready to control delivery temperature of the water heater. 6. Apply one of the self-adhesive identification stickers to the rear of the controller, ensuring that the Master Controller sticker is only applied to the wireless controller tuned to channel MC. The wireless master controller is the only wireless controller of selecting maximum delivery temperatures exceeding 50 °C. (D) (B) (F) (C) (A) Press Press for approximately 3 seconds OR once OR (E) Press once to start the tuning process, this takes approximately 5 seconds Press once Installing multiple wireless water controllers To install subsequent wireless water controllers, repeat steps 1 - 6 for each additional controller. Screw transceiver cover in place once all wireless controllers are installed. Rinnai New Zealand 11 Wireless Installation and Operation: C 03-09 Wireless Water Controller Installation Troubleshooting wireless water controllers channel assignment If at the end of the installation process, screen (C) is displayed, do the following: . Confirm that the power is still on at the water heater. 2. If the power is off turn it back on. If the channel as been correctly assigned the display should show either screens (E), (F) or (G). 3. If screen (C) is still displayed un-install and reset the wireless controller and repeat installation procedure. (C) (G) (F) (E) Unassigning and resetting wireless water controllers . Press the desired controller channel button. The LED will go out to signify that this channel is now unassigned. MC No. 1 No. 2 No. 3 2. Remove batteries from wireless controller. This will reset the wireless controller and complete the un-install process. Mounting the wireless water controller After determining the best location and having tested that the controller is working correctly you can mount the control in a fixed position. . Slide the wireless water controller from the wall mounting bracket. 2. Use the wall mounting bracket as a template to mark off and drill 2 holes for use with the mounting fixings. 3. Use the wall mounting bracket to the wall with the screws and/or anchors provided. Avoid over-tightening of fixings as this may cause damage. DO NOT use powered tools to tighten fixings. 4. Slide the wireless water controller back to its wall mounting bracket 81.7 142 31.5 13.8 (mm) Rinnai New Zealand 66.6 28 12 Wireless Installation and Operation: C 03-09 Wireless Water Controller Operation BATTERY STATUS COMMUNICATIONS STATUS Full battery indicator. Signal strength indicator Strong signal Low battery indicator. Weak signal Replace battery indicator, when flashing. Out of range indicator Communications indicator WATER HEATER 'In Use' INDICATOR WATER CONTROLLER STATUS INDICATORS Indicates that the water heater is in operation and delivering hot water. This indicator illuminates when the water controller is in control of water delivery temperature. ON/OFF BUTTON Used to switch the water heater on and off. This Child Lock indicator illuminates when the child lock has been activated. TRANSFER BUTTON Used to transfer control priority between the water controllers. The controller with priority has command of the hot water delivery temperature. WATER TEMPERATURE INDICATOR Indicates the selected hot water temperature. WATER TEMPERATURE UP AND DOWN BUTTONS CHILD LOCK BUTTON Used to switch Child Lock function on and off. These buttons are used to select the water temperature. Turning on When the water heater is off only the communications and battery status indicators are displayed. To turn the water heater on, press the On/Off button once. The communications indicator will briefly illuminate to confirm that a signal has been sent to the transceiver. Ready to use Adjusting temperature Press the up or down buttons until the required temperature is displayed. The water temperature and any active status indicator will flash until communication is complete. DO NOT open the hot water tap until the flashing stops and the desired temperature is displayed. Ready to use To operate the water heater, open any hot water tap. The ‘In Use’ indicator will illuminate on the water controller. Once the hot water is running, if the set temperature is either too hot or cold, press the up and down buttons until the desired temperature is reached. While hot water outlets are open the set temperature may be lowered to a minimum of 37 °C. For safety reasons is cannot be raised above 43 °C until all hot water taps are closed. If the water heater is turned off while hot water taps are on, it can not be turned back on until all the hot water taps have been turned off. Rinnai New Zealand 13 Wireless Installation and Operation: C 03-09 Wireless Water Controller Operation Transferring priority between water controllers To control the water delivery temperatures when using 2 or more controllers it is necessary to have priority transferred to the controller you wish to use. An illuminated transfer indicator confirms the controller is in control of the water delivery temperature. If not illuminated, press the transfer button to transfer the priority. For safety reasons while hot water taps are on, transfer of priority between controllers is not possible. Temperatures higher than 50 °C should only be able to be selected on the controller labelled ‘Master’ (used in the kitchen), not those labelled ‘Bathroom’. This is a safety feature to reduce risk of burns. Child lock function To activate the child lock function Press the key button for 3 seconds. The child lock indicator will illuminate to confirm that the function is now active. Once activated this controller will be the only controller that can deactivate it. 3 seconds To deactivate the child lock Press the key button for 3 seconds. The indicator will go out to show that the function is no longer active. General functioning of the child lock • Only applies to the specific water controller where ‘child lock’ is activated • While activated only the child lock control and the ‘Off’ control are functional from that controller • When the water heater is turned off while the child lock is activated, it can not be turned on again from a controller where the child lock is activated • Child lock is deactivated during a battery change or when batteries fail Rinnai New Zealand 14 Wireless Installation and Operation: C 03-09 Wireless and Wired Water Controllers When installing combinations of both wired and wireless controllers, all wired water controllers MUST BE connected before the wireless water controllers are assigned to a transceiver channel. Wired water controllers can only be added to an existing wireless installation when: • • all wireless transceiver channels have been unassigned all wireless controllers have been reset When the wireless transceiver is installed it automatically detects any wired water controllers already connected to the water heater. The LEDs of the channels assigned to wired controllers will slow flash. The channels for wired water controllers are assigned in sequence as follows: • MC100V or MC91 (programmed as a master controller) will automatically be assigned to the MC channel • BC100V or MC91 (not programmed as a master controller) will automatically be assigned to an available channel other than the MC channel • Install the wireless water controllers to any unassigned channels following steps outlined on page 11 Rinnai New Zealand 15 Wireless Installation and Operation: C 03-09 Troubleshooting The Rinnai continuous flow water heaters have a self diagnostic capability. If a fault occurs, an error code will flash on the digital monitor of your water controllers. Error Code Fault Remedy ‘Out of Range’ due to distance from transceiver or an obstruction. Move controller, transceiver or obstruction. Noticeable reduction in water flow. Inlet water filter needs to be cleaned - service call. 03 Power interruption during bath fill (water will not flow when switching the power back on). Turn off all hot water taps. Press On/Off twice. 10 Air intake or flue blocked. Service call. 11 No ignition/no gas supply. Check gas is turned on at water heater and gas meter/ cylinder. 12 Flame failure/low gas flow Check gas is turned on at water heater and gas meter/ cylinder. Check there are no obstructions to the flue outlet. 14 Remaining flame safety device. Service call. 16 Over temperature warning. Service call. 32 Outgoing water temperature sensor faulty. Service call. 33 Heat exchanger outlet sensor faulty. Service call. 34 Combustion air temperature sensor faulty. Service call. 52 Gas modulating valve faulty. Service call. 61 Combustion fan failure. Service call. 65 Water flow control faulty (does not stop flow properly). Service call. 71 Micro-processor fault. Service call. 72 Micro-processor fault. Service call. Scale build-up inside heat exchanger. Service call. (* only available for Rinnai HD models) - LC* In all cases, you may be able to clear the error code by turning the hot water tap off and then on again. If this does not clear the error, try pushing the controller off then on again. If the error code still remains, contact Rinnai for advice. Faults caused by insufficient gas/water supply, gas quality, water quality, installation errors or operation errors are not covered by the Rinnai warranty. No power display When power to the water heater is disconnected, the LCD of all wireless controllers will display as shown. Check that power is available, the water heater is plugged in and power is turned on. Rinnai New Zealand Consumers: Installers: 0800 RINNAI (746 624) 0800 TO RINNAI (86 746 624) Address: 105 Pavilion Drive, Airport Oaks, Mangere, Manukau PO Box 53177, Auckland Airport, Manukau 2150 Phone: Fax: (09) 257 3800 (09) 257 3899 Email: Websites: [email protected] www.rinnai.co.nz and www.rinnai-tradesmart.co.nz 16 Wireless Installation and Operation: C 03-09