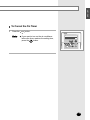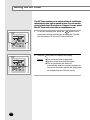
1
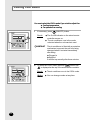
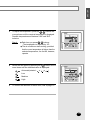
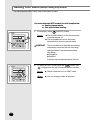
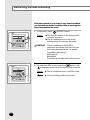
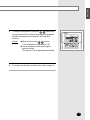
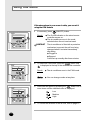
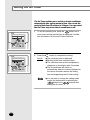
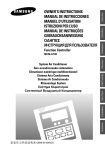
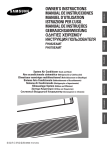
ESPAÑOL RUSSIAN E§§HNIKA System Air Conditioner Aire acondicionado sistemático Climatiseur numérique multifonctionnel Sistema Aria Condizionata Sistema Ar Condicionado Klimaanlage System ™‡ÛÙËÌ· ∫ÏÈÌ·ÙÈÛÌÔ‡ ëËÒÚÂÏÌ˚È ÇÓÁ‰Û¯Ì˚È äÓ̉ˈËÓÌ FRANÇAIS Wired Remote Controller MWR-TH00 MWR-TH01 ITALIANO OWNER’S INSTRUCTIONS MANUAL DE INSTRUCCIONES MANUEL D’UTILISATION ISTRUZIONI PER L’USO MANUAL DE INSTRUÇÕES GEBRAUCHSANWEISUNG √¢∏°π∂™ Ã∏™∆∏ àçëíêìäñàü èéãúáéÇÄíÖãü ENGLISH Page 21 PORTUGUÊS 3/9/06 2:05 PM DEUTSCH MWR-TH00 IB_E_15731 E S F I P D G R A DB98-15731A(3) Safety Precautions ● Before using the wired remote controller, read carefully this instructions. reading the instructions, keep this owner's instructions and the installation manual in a handy and safe place. If a user is changed, you must hand over the manuals. ● Never attempt to install the air conditioning system or to move the wired remote controller by yourself. ● After WARNING CAUTION E-2 ◆ Do not attempt to install or repair this wired remote controller by yourself. ◆ This remote controller contains no user-serviceable parts. Always consult authorized service personnel for repairs. ◆ When moving, consult authorized service personnel for disconnection and installation of the remote controller. ◆ Ensure that the wall is strong enough to support the weight of the remote controller. ◆ Must install the remote controller with rated power supply. ◆ In the event of a malfunction (burning smell, etc.), immediately stop operation, turn off the electrical breaker, and consult authorized service personnel. ◆ Do not use inflammable gases near the remote controller. ◆ Do not spill water into the wired remote controller. ◆ Do not operate the remote controller with wet hands. ◆ Do not install the remote controller in a location where it will come into contact with the combustible gases, machine oil, sulphide gas, etc. ◆ Do not press buttons with a pointed thing. ◆ Do not pull or bend the wired remote controller cable excessively. ◆ Do not use this wired remote controller for other purpose. ◆ Do not spray an insecticide or other combustible things on the wired remote controller. ◆ Do not clean the wired remote controller with benzene, solvents or other chemicals. ◆ Do not give a shock to the wired remote controller or disassemble it by yourself. ENGLISH Contents ◆ VIEW OF THE WIRED REMOTE CONTROLLER 4 ◆ GETTING STARTED 5 ◆ SELECTING THE AUTOMATIC OPERATING MODE 6 ◆ COOLING YOUR ROOM 8 ◆ HEATING YOUR ROOM 10 (EXCEPT COOLING ONLY MODELS) ◆ REMOVING EXCESS HUMIDITY 12 ◆ AIRING YOUR ROOM 14 ◆ ADJUSTING THE AIR FLOW DIRECTION 15 (EXCEPT DUCT TYPE) ◆ SETTING THE ON TIMER 16 ◆ SETTING THE OFF TIMER 18 E-3 View of the Wired Remote Controller The wired remote controller is installed on the wall. Operating mode Removing frost indicator Centralized controller indicator (In case of installing the Centralized controller) Communication error indicator Temperature setting Fan speed Air flow direction Filter Sign indicator On Timer setting Off Timer setting Test indicator On/Off button Temperature adjustment buttons Timer button On/Off indicator Fan speed adjustment button Swing button (Except Duct type) Timer Set/Cancel button Test button Filter Reset button Mode selection button Note E-4 ◆ The button is for your installation specialist. You must NOT press it. ◆ After cleaning the air filter, press the button. Then the wired remote controller will display the FILTER SIGN indicator when the time to clean the air filter. ◆ Duct type air conditioner does not have function of adjusting air flow direction. Therefore, the function is not operated even if you press the button. ENGLISH Getting Started You have just purchased a wired remote controller and it has been installed by your installation specialist. Your Owner’s Instructions contain much valuable information on using your wired remote controller. Please take the time to read them as they will help you take full advantage of the unit’s features. In the manual, you will find a series of step-by-step procedures for each function available. The illustrations in the step-by-step procedures use three different symbols: PRESS PUSH HOLD DOWN E-5 Selecting the Automatic Operating Mode In the Automatic mode, the room temperature and the fan speed are controlled automatically. 1 If necessary, press (ON/OFF) button. Result: : ◆ The On/Off indicator on the wired remote controller comes on. ◆ The air conditioner runs in the mode selected when the unit was last used. IMPORTANT 2 The air conditioner is fitted with a protection mechanism to prevent the unit from being damaged when it is started immediately after being: ◆ Plugged in ◆ Stopped lt will start up normally after three minutes. To select the AUTO mode, press the button until is displayed at the top of the wired remote controller. Result: : ◆ The air conditioner runs in the AUTO mode. Note E-6 ◆ You can change modes at any time. ENGLISH 3 To adjust the temperature, press the buttons one or more times until the required temperature is displayed. Possible temperatures are between 18°C and 30°C inclusive. Result: ◆ Each time you press buttons: - The temperature is adjusted by 1°C. ◆ The air conditioner starts cooling, provided that the room temperature is than the selected temperature. - The quantity of air is adjusted automatically. E-7 Cooling Your Room You must select the COOL mode if you wish to adjust the : ◆ Cooling temperature ◆ Fan speed when cooling 1 If necessary, press (ON/OFF) button. Result: : ◆ The On/Off indicator on the wired remote controller comes on. ◆ The air conditioner runs in the mode selected when the unit was last used. IMPORTANT 2 The air conditioner is fitted with a protection mechanism to prevent the unit from being damaged when it is started immediately after being: ◆ Plugged in ◆ Stopped lt will start up normally after three minutes. To select the COOL mode, press the button until is displayed at the top of the wired remote controller. Result: : ◆ The air conditioner runs in the COOL mode. Note E-8 ◆ You can change modes at any time. ENGLISH 3 To adjust the temperature, press the buttons one or more times until the required temperature is displayed. Possible temperatures are between 18°C and 30°C inclusive. Result: 4 ◆ Each time you press buttons: - The temperature is adjusted by 1°C. ◆ The air conditioner starts cooling, provided that the room temperature is higher than the selected temperature ; the fan will, however, operate. Select the fan speed by pressing the button one or more times until the intended value is displayed : Automatic(rotated : ➔ ➔ ) Low Medium High 5 To control the direction of the air flow, refer to page 15. E-9 Heating Your Room (Except cooling only models) You can select the HEAT mode only in heat pump models. You must select the HEAT mode if you wish to adjust the : ◆ Heating temperature ◆ Fan speed when heating 1 If necessary, press (ON/OFF) button. Result: : ◆ The On/Off indicator on the wired remote controller comes on. ◆ The air conditioner runs in the mode selected when the unit was last used. IMPORTANT 2 The air conditioner is fitted with a protection mechanism to prevent the unit from being damaged when it is started immediately after being: ◆ Plugged in ◆ Stopped lt will start up normally after three minutes. To select the HEAT mode, press the button until is displayed at the top of the wired remote controller. Result: : ◆ The air conditioner runs in HEAT mode. Note E-10 ◆ You can change modes at any time. ENGLISH 3 To adjust the temperature, press the buttons one or more times until the required temperature is displayed. Possible temperatures are between 16°C and 30°C inclusive. Result: 4 ◆ Each time you press buttons: - The temperature is adjusted by 1°C. ◆ The air conditioner starts heating, provided that the room temperature is lower than the selected temperature ; the fan will, however, operate. Select the fan speed by pressing the button one or more times until the intended value is displayed : Automatic(rotated : ➔ ➔ ) Low Medium High 5 To control the direction of the air flow, refer to page 15. E-11 Removing Excess Humidity If the atmosphere in your room is very humid or damp, you can remove excess humidity without lowering the room temperature too much. 1 If necessary, press (ON/OFF) button. Result: : ◆ The On/Off indicator on the wired remote controller comes on. ◆ The air conditioner runs in the mode selected when the unit was last used. IMPORTANT 2 The air conditioner is fitted with a protection mechanism to prevent the unit from being damaged when it is started immediately after being: ◆ Plugged in ◆ Stopped It will start up normally after three minutes. To select the DRY mode, press the button until is displayed at the top of the wired remote controller. Result: : ◆ The air conditioner runs in the DRY mode. Note E-12 ◆ You can change modes at any time. ENGLISH 3 To adjust the temperature, press the buttons one or more times until the required temperature is displayed. Possible temperatures are between 18°C and 30°C inclusive. Result: : ◆ Each time you press buttons: - The temperature is adjusted by 1°C. ◆ The air conditioner starts removing the excess humidity. The quantity of air is adjusted automatically. 4 To control the direction of the air flow, refer to page 15. E-13 Airing Your Room If the atmosphere in your room is stale, you can air it using the FAN feature. 1 If necessary, press (ON/OFF) button. Result: : ◆ The On/Off indicator on the wired remote controller comes on. ◆ The air conditioner runs in the mode selected when the unit was last used. IMPORTANT 2 The air conditioner is fitted with a protection mechanism to prevent the unit from being damaged when it is started immediately after being: ◆ Plugged in ◆ Stopped It will start up normally after three minutes. To select the FAN mode, press the button until is displayed at the top of the wired remote controller. Result: : ◆ The air conditioner runs in the FAN mode. Note 3 ◆ You can change modes at any time. Select the fan speed by pressing the button one or more times until the intended value is displayed: Low Medium High 4 E-14 To control the direction of the air flow, refer to page 15. ENGLISH Adjusting the Air Flow Direction (Except Duct Type) Depending on the position of the indoor unit, you can adjust the position of the air flow blade, thus increasing the efficiency of the air conditioner. 1 Press the button. Result: The blade is moving between up and down. IMPORTANT 2 When the air conditioner is first turned on, the blade is moved. To stop the blade, press the button again. To set to the required position, press the button again when the blade is in the required position. E-15 Setting the On Timer The On Timer enables you to switch on the air conditioner automatically after a given period of time. You can set the period of time from 30 minutes to 24 hours. You can select the On Timer only when the air conditioner is off. 1 To set the operating time, press the button one or more times until the required time is displayed. Possible time is between 0.5 hour and 24 hours inclusive. 2 Press the Result: Note E-16 button to complete the setting. ◆ The remaining time is displayed. ◆ Blinking of the timer indicator stops. ◆ The selected mode and the temperature disappear on the display after 5 seconds. ◆ The air conditioner will switch on automatically when the counter displayed on the remote controller reaches the setting time as disappearing the On timer setting. ◆ You can see or change the setting mode and/or the temperature by pressing the button or the buttons after setting the On timer. ENGLISH To Cancel the On Timer 1 Press the Note button. ◆ If you want to turn on the air conditioner before the timer reaches the setting time, press the button. E-17 Setting the Off Timer The Off Timer enables you to switch off the air conditioner automatically after a given period of time. You can set the period of time from 30 minutes to 24 hours. You can select the Off Timer only when the air conditioner is on. 1 To set the operating time, press the button one or more times until the required time is displayed. Possible time is between 0.5 hour and 24 hours inclusive. 2 Press the Result: E-18 button to complete the setting. ◆ The remaining time is displayed. ◆ Blinking of the timer indicator stops. ◆ The air conditioner will switch off automatically when the counter displayed on the remote controller reaches the setting time as disappearing the Off timer setting. ENGLISH To Cancel the Off Timer 1 Press the Note button. ◆ If you want to turn off the air conditioner before the timer reaches the setting time, press the button. E-19 THIS AIR CONDITIONER IS MANUFACTURED BY: ESTE AIRE ACONDICIONADO HA SIDO FABRICADO POR: CE CLIMATISEUR EST FABRIQUE PAR: QUESTO CONDIZIONATORE D’ARIA È PRODOTTO DA: ESTE APARELHO DE AR CONDICIONADO É FABRICADO POR: DIESE KLIMAANLAGE IST FABRIZIERT VON: AYTH H ™Y™KEYH KATA™KEYA™THKE A¶O: ùíéí äéçÑàñàéçÖê àáÉéíéÇãÖç îàêåéâ: ELECTRONICS Printed in Korea