1
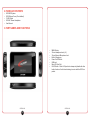
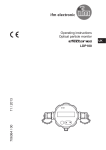
8200
MP4 System
User Manual
Table of Contents
1. IMPORTANT SAFETY INSTRUCTIONS
2. PACKAGE CONTENTS
3. PART NAMES AND FUNCTIONS
4. SETUP AND INSTALLATION
4.1 RECHARGING
4.2 POWER ON AND OFF
4.3 SETTING THE DATE/TIME
4.4 COPYING MEDIA FILES TO THE 8200
4.5 CONNECTING HEADPHONES
5.1 MAIN MENU
5.2 MUSIC APP
5.3 MOVIES APP
5.4 IMAGES APP
5.5 EBOOKS APP
5.6 VOICE RECORDER APP
5.7 FILE MANAGER
5.8 ALARM
5.9 SYSTEM SETTINGS
5. BASIC OPERATION
6. TROUBLESHOOTING
7. SPECIFICATIONS & FEATURES
8. WARRANTY
2
4
4
6
6
6
6
6
7
7
7
8
9
10
10
10
11
11
11
8200 MP4 System
Thank you for purchasing the Califone® 8200 MP4 System.
We encourage you to visit our website www.califone.com to register
your product for its warranty coverage, sign up to receive our newsletter,
download our catalog, and learn more about the complete line of
Califone® audio visual products, including portable and installed wireless
PA systems, multimedia players and recorders, headphones and
headsets, computer peripheral equipment, visual presentation products
and language learning materials.
12
12
13
califone.com
1
1. IMPORTANT SAFETY INSTRUCTIONS
Before using this product, read the instruction manual for important safety
information. Please retain this manual for future reference and warranty
information.
Troubleshooting & Servicing
Do not attempt to service or repair the device yourself. Refer all servicing
to qualified service personnel. Do not attempt to modify the device in any
way. Doing so could invalidate your warranty.
Moisture and heat sources
Do not use this apparatus near water (for example, sinks, baths, pools) or
expose it to rain, moisture, dripping or splashing liquids. Do not expose
the unit to high temperatures, high humidity or direct sunlight.
Cleaning
When cleaning the device, please use a soft, dry cloth. Never use
benzene, paint-thinner, or other chemicals on the device.
Location
Place the device in stable location, so it will not fall causing damage to
the device or bodily harm.
Intended use
The product may only be used with the original parts intended for it.
The product may only be used in closed and dry rooms. The intended
use includes adherence to the specified installation instructions. The
manufacturer accepts no liability for damage arising due to improper use.
WARNING: Changes or modifications to this unit not expressly approved
by the party responsible for compliance could void the user’s authority to
operate the equipment.
IMPORTANT
This device complies with Part 15 of the FCC Rules. Operation is subject
to the following two conditions:
(1) This device may not cause harmful interference, and (2) this device
must accept any interference received, including interference that may
cause undesired operation.
The unit’s circuitry may cause interference to nearby radios. To prevent
interference, either switch the unit off or move away from the affected
radio.
NOTE: This equipment has been tested and found to comply within
the limits for a class B digital device, pursuant to Part 15 of the FCC
Rules. These limits are designed to provide reasonable protection
against harmful interference in a residential installation. This equipment
generates, uses and can radiate radio frequency energy and, if not
installed and used in accordance with the instructions, may cause harmful
interference to radio communications. However, there is no guarantee
that interference will not occur in a particular installation. If this equipment
does cause harmful interference to radio or television reception, which
can be determined by turning the equipment off and on, the user is
encouraged to try to correct the interference by one or more of the
following measures:
•
•
•
•
Reorient or relocate the receiving antenna.
Increase the separation between the equipment and receiver.
Connect the equipment into an outlet on a circuit different from
that to which the receiver is connected.
Consult the dealer or an experienced radio / TV technician for
help.
NOTE: Shielded cables may be required to be used with this unit to
ensure compliance with the Class B FCC limits.
califone.com
califone.com
2
3
2. PACKAGE CONTENTS
•
•
•
•
•
8200 MP4 System
8200 Silicone Cover (Pre-installed)
3’ USB Cable
8200-HP Stereo Headphone
User Manual
3. PART NAMES AND FUNCTIONS
•
•
•
•
•
•
•
•
MENU Button
3.5mm Headphone Jack (x 2)
3.5mm External Microphone Jack
Built-in Microphone
Power On/Off Switch
USB Jack
Micro-SD Card Slot
HOLD Switch - Slide to ON position to temporarily disable all other
button functions. Useful when listening to music with the 8200 in a
pocket.
califone.com
califone.com
4
5
4. SETUP AND INSTALLATION
4.1 RECHARGING
1. Before use, for best performance be sure to recharge the 8200
using the USB connection to a PC.
2. Turn on the PC and connect the 8200 to one of the PC’s USB
jacks using the included cable.
3. The 8200 will immediately begin charging. An indicator on the
screen will show the charging status.
4. While in use, the battery level indicator in the upper right of the
LCD screen indicates how much battery power is available.
When the indicator is low, the battery should be recharged.
NOTES:
• The 8200 may be operated while recharging using the wall
power adapter.
• The 8200 cannot be operated while recharging using a PC.
4.2 POWER ON AND OFF
1. First, remove the plastic LCD screen protector.
2. To turn on the 8200 power, switch the power switch to the on
position. The LCD will then show the startup screen followed by
the main menu.
3. To turn off the 8200 power, switch the power switch to the off
position. The LCD will then show the shutdown screen and then
go black.
4.3 SETTING THE DATE/TIME
4.5 CONNECTING HEADPHONES
1. Connect the included 8200-HP headphone to one of the
headphone jacks on the side of the 8200.
2. Adjust the volume to the desired level in the Music or Movie
mode by playing music or a movie file and using the D-Pad Up
and Down to increase or decrease the volume level.
3. By default, the 85 dB limiter is enabled and set for the included
8200-HP headphones. To disable or change the 85 dB SPL
limiter setting, go to Settings -> System settings -> Audio Limiter.
Then select the desired preset. By default, Preset 1 is enabled
and set for the 8200-HP headphone included with the 8200.
Preset 2 is set for use with the 3065AV headset and Preset 3
turns off the limiter. To use the limiter function with other Califone
headphones, contact Califone Technical Support.
CAUTION: Avoid excessive volume for long periods of time as
this can result in hearing damage.
CAUTION: The 85 dB SPL Limiter will only work with
headphones/headsets specifically sold by Califone for use with
the 8200. Check with Califone to see if your headphone/headset
is compatible with this feature.
5. BASIC OPERATION
5.1 MAIN MENU
Use the touchscreen to operate the 8200. Press the MENU button to
return to a previous menu.
1. To set the date/time, go to Settings -> System settings -> Set
Date/Time.
2. Then set the time zone and Date/Time as appropriate.
4.4 COPYING MEDIA FILES TO THE 8200
3. Plug the 8200 into a PC using the included USB cord.
4. The PC will automatically recognize the device and the internal
flash memory will be listed as a removable external drive.
5. If an SD card is installed, it will also show up as a removable
external drive on the PC.
6. Note the 8200 content directories are as follows: EBOOKS,
GAMES, IMAGES, MOVIES, MUSIC.
7. Copy media files such as music (mp3) and movies (avi, mpg,
etc.) into the appropriate directory in the 8200 memory.
califone.com
califone.com
6
7
5.2 MUSIC APP
There are many ways to play music files once in the Music App. The
following submenus are available:
• Now Playing: Opens the Music Player to the song currently
playing.
• All Music: Shows a list of all the music files in the MUSIC folder
on the device.
• Artist: Lists all the music files by artist.
• Album: Lists all the music files by album.
• Genre: Lists all the music files by genre.
• Favorites: Lists only those files that have been selected as
favorites from the Music Player.
• Directory List: View the files by directory on the internal memory
or SD card.
• Playlists: Lists all the music playlists in the Music directory.
• Play Mode: Allows different playback such as normal playback
(no repeat), Repeat (repeats one song), Repeat All (repeats all
songs in the current list continuously, Shuffle (plays songs from
the current list at random.
• Background Play: Enable or disable this function as desired.
When enabled, the song will play even when exiting to the main
menu and performing other functions on the device. Playback
will stop when playing a movie/game/etc.
• Equalizer: Select different equalizer settings between Normal,
Pop, Rock, Country, Jazz, Speech.
MUSIC PLAYER
Once playback of a music file starts, the Music Player will open.
• Press on the bar on the bottom to ‘scrub’ or skip to different
locations in the music file.
• Press MENU to enter the Music Player submenu. The submenu
includes functions to set the current song as a favorite, enable/
disable Background Play, and return to the previous menu.
PLAYLISTS
This section describes the playlist files that can be used to play audio
and video files in a specific order. Create playlist files on a computer
by creating a plain txt file with a name such as: “playlist1.txt”. Open
the file and put the text in the same exact format as the example
here:
[Playlist]
NumberOfEntries=3
File1=nfl:\MUSIC\file1.mp3
File2=nfl:\MUSIC\Folder1\file2.mp3
File3=nfl:\MUSIC\file3.wav
1. Replace the folder/file names in the example above with the
actual folder/file names.
2. Ensure the files are in the location specified in the 8200 internal
memory or SD card.
3. Once finished editing the playlist, rename the txt file with a “pls”
extension, such as “playlist1.pls” and then put it into the MUSIC
folder on the device.
NOTES:
• For video files, replace “MUSIC” with “MOVIES” and put the
video files and playlist file into the MOVIES folder instead.
• Adjust the NumberOfEntries as appropriate to the correct
number of files.
• Continue to increment the X in FileX based on the number of
files in the playlist.
• For files located on an SD card, replace “nfl:\” with “mmc:\”.
5.3 MOVIES APP
The Movie App allows playback of movie /video files. Upon entering
the app, the following submenus are available:
• All Movies: Shows a list of all the movie/video files in the Movie
folder on the device. Use the OK button to start playing a file.
• Playlists: Lists all the movie playlists in the MOVIE directory.
• Resume Playback on Shutdown: Enable this function so that
the movie will resume from the point that playback was stopped/
paused even after the 8200 power is turned off.
• Display Mode: Change the setting between Original, Normal, or
Full Screen to best fit the display or TV. Default is Normal.
• Display Bar Option: Switch between displaying the Play Bar
with the play buttons, the Time (shown in the upper part of the
screen), or Subtitle (when available).
MOVIE PLAYER
Once playback of a movie file starts, the Movie Player will open.
• Press anywhere on the screen to open the Movie Player control
bar. The control bar includes volume up/down and play/pause
buttons. Quickly press the skip forward/reverse buttons to skip
to the next or previous movie file. Hold down the skip buttons to
fast forward or rewind within the current movie file.
• Press the MENU button to enter the Movie Player submenu. The
submenu includes functions to change the video size setting
(Original, Normal, or Full Screen), change the display bar, and
Return to the Movie Menu.
PLAYLISTS
For information, see PLAYLISTS section in 5.2 MUSIC APP.
califone.com
califone.com
8
9
5.4 IMAGES APP
1. Upon entering the Images App, the thumbnail images of all the
files in the Images directory will be displayed.
2. To view an image, use the touchscreen to lightly press on the
desired image.
3. Lightly press on the screen to rotate the image.
4. Use the MENU button to open the Images Submenu. From the
submenu, select Play Slideshow, Adjust the Slideshow speed,
set the current image as the background, or return to the main
Images Menu.
5. Once in the Main Images menu, to return to the main menu,
press the MENU button until the main menu appears.
5.5 EBOOKS APP
1. Upon entering the eBooks App, a list of all the files in the eBooks
directory will be displayed.
2. To begin reading, simply select the desired file using the
touchscreen.
3. Press the MENU button to open the eBooks submenu. From the
submenu, many items are available. Go to a saved bookmark,
or create a new one. Change the scroll speed, auto scroll speed,
background, text color/size/etc., or go to a specific page.
4. Press the Play icon to Auto-scroll. Press the touchscreen
anywhere to stop.
5.6 VOICE RECORDER APP
The Voice Recorder App allows recording of audio using the built-in
or external microphone. The following options are available in the
menu:
• Start Recording: Select to start recording audio from the builtin microphone. Recording will start immediately. Press Stop
Recording to stop and automatically save the file. To start a new
recording, press the OK button again. Press the MENU button
to exit. NOTE: Audio recordings are saved in mp3 format in the
VOICE folder inside the MUSIC folder.
• My Recordings: List all the saved audio recordings.
• Save Path: Select this item to choose between saving audio files
to the internal memory or SD card.
5.7 FILE MANAGER
The file manager allows basic manipulation of the files on the internal
of SD card memory.
• Once inside the File Manager, locate the files to modify/delete.
• Press the desired file(s) to put a check mark next to those files.
• Once done selecting files, press the icon in the bottom right to
open the menu.
• If a single file is selected, the menu options are “open”,
“copy”, “delete”, or “move to”.
• If multiple files are selected, the options are “copy”,
“delete”, or “move to”.
5.8 ALARM
Under the settings menu, the alarm allows the user to set a built-in
alarm clock. The menu options are as follows:
• Enable Alarm: Enable/Disable the alarm clock.
• Alarm Time: Set the time for the alarm to activate.
• Alarm Sound: Set the audio file to be used for the alarm.
Note: The device power must be on for the alarm to activate.
Also, since the 8200 does not have a built-in s[peaker, an external
headphone/speaker must be connected to hear the alarm.
5.9 SYSTEM SETTINGS
Under the settings menu, the System Settings allows modification to
basic system settings. The menu options are as follows:
• Menu Animation: Modify the animation when opening the
menus.
• Backlight Auto Off: To save battery, automatically turns off
the backlight after non-use. Set to 5, 10, 15, 20, 30 seconds, or
Always On. (Default: Always On). When the LCD Backlight is off,
use the MENU button to wake up the device.
• Brightness: Set from 1 to 5 (Default: 4)
• Audio Limiter: Set to one of 3 presets to limit the audio output
level.
• Bootup Screen: Set to always load the Home Screen or go to
the previous screen when the device is powered on.
• Set Date/Time: Menu for setting the date and time as well as
Date/Time display formats.
• Languages: The device currently only supports English menus.
• Reset to Default Background: Select to reset the menu
backgrounds to their default.
• System: View System Information, reset the device, format the
memory, or update the firmware.
califone.com
califone.com
10
11
6. TROUBLESHOOTING
8. WARRANTY
Issue
Resolution
The unit does not power on.
Slide the power switch to the off position
and then to the on position. Wait for 3-5
seconds. If the unit still does not power
on, the unit may need to be recharged.
The buttons don’t function.
Check if the HOLD switch is in the
ON position. If so, switch it to the OFF
position.
7. SPECIFICATIONS & FEATURES
Features
•
•
•
•
•
•
•
•
•
3” 400x240 LCD Touchscreen
4GB built-in flash memory
Built-in microphone for audio recording
2 x headphone jacks
1 x external microphone jack
Micro-SD Card Slot
Support for many audio and video formats
Supports pls format playlists for audio/video
files
Rechargeable via USB
Power Requirements
•
Uses 3.7 V / 1000 mAh Li-Ion battery.
Supported Video Files/Codecs
MPG, MP4, WMV, RealVideo, ASF, AVI
** Note that some files with these extensions/codecs
may not be supported.
Supported Audio Files/Codecs
MP3, AAC, WMA, RealAudio, Quicktime, wav
** Note that some files with these extensions/codecs
may not be supported.
Supported eBook Formats
TXT files
Operating System Compatibility
Windows 2000/XP/Vista/Windows 7 32-bit & 64-bit,
Mac OS
USB Compatibility
USB 2.0
Photo Format
JPG format (Resolution selectable from 320x240 to
1600x1200)
Audio Recording Format
MP3 format (128 kbps stereo)
Battery Usage Time
> 5.5 hours
Battery Recharge Time
< 3.5 hours (power on or off while charging)
Product Dimensions
4” x 2.25” x 0.75”
Product Weight (incl.
accessories)
7 oz
Califone warrants this product to be free from defective material
and workmanship for one year from the purchase date. Our “Project
Intercept” Customer Satisfaction program will replace defective parts and
repair malfunctioning equipment under this warranty when the defect
occurs under normal use.
All Damage Claims Must Be Made With the Freight Carrier
Notify the freight carrier immediately if you observe any damage to the
shipping carton or product. Repack the unit in the carton and await
inspection by the carrier’s claim agent. Notify your dealer of the pending
freight claim.
Returning Your Unit for Service or Repairs
Should your unit require service, contact our Customer Service
Department online at califone.com/techsupport or via email warranty@
califone.com or by phone at 800-722-0500 / 818-407-2400 to first obtain
an RA (Return Authorization) number before returning it to Califone. The
unit must be returned to our factory via prepaid transportation only after
the factory issues an RA number, which must be clearly written on the
outside of the box.
califone.com
califone.com
12
13
Califone® International, Inc.
1145 Arroyo Avenue, #A
San Fernando, CA 91340 USA
Toll Free 800.722.0500 | Toll Free Fax 877.402.2248
International Customers call 818.407.2400 or Fax 818.407.2405
califone.com
Califone 8200 Rev 01 0212