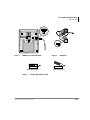
1
Telecommunication Systems Division
Digital Business Telephone Systems
Digital Telephone
User Guide
(includes LCD, Add-on Module, and Direct Station Selection Console)
June 2000
Publication Information
Toshiba America Information Systems, Inc.,
Telecommunication Systems Division, reserves the right,
without prior notice, to revise this information publication for
any reason, including, but not limited to, utilization of new
advances in the state of technical arts or to simply change the
design of this document.
Further, Toshiba America Information Systems, Inc.,
Telecommunication Systems Division, also reserves the right,
without prior notice, to make such changes in equipment
design or components as engineering or manufacturing
methods may warrant.
DKA-UG-DKTEL-VD
4016168
Version D.1, June 2000
Version D, August 1999
Version C.1, May 1999
Version C, April 1998
Version B, October 1997
Version A, September 1996
© Copyright 2000
Toshiba America Information Systems, Inc.
Telecommunication Systems Division
All rights reserved. No part of this manual, covered by the
copyrights hereon, may be reproduced in any form or by any
means—graphic, electronic, or mechanical, including
recording, taping, photocopying, or information retrieval
systems—without express written permission of the publisher
of this material.
Strata is a registered trademark of Toshiba Corporation.
Stratagy is a registered trademark of Toshiba America
Information Systems, Inc.
Trademarks, registered trademarks, and service marks are the
property of their respective owners.
Contents
Introduction
Organization..................................................................................................................... viii
How to Use This Guide.................................................................................................... viii
Action/Response ...............................................................................................................x
Related Documents/Media...................................................................................................x
Chapter 1 – The Grand Tour
Digital Telephone Models....................................................................................................2
Buttons .................................................................................................................................4
Fixed Buttons....................................................................................................................4
Flexible Buttons................................................................................................................6
LCD......................................................................................................................................9
LCD Buttons.....................................................................................................................9
LED Indicators...................................................................................................................10
On-hook/Off-hook .............................................................................................................11
Volume Controls ................................................................................................................12
Chapter 2 – Features
Before You Begin ..............................................................................................................15
Automatic Line Selection ...............................................................................................16
Ringing Line Preference .................................................................................................16
Signaling .........................................................................................................................16
Strata DK Digital Telephone 6/00
i
Contents
Chapter 2 – Features
Quick Reference.................................................................................................................17
Making an Internal Call ..................................................................................................17
Making an Outside Call ..................................................................................................17
Making an Outside Call to an ISDN Trunk ....................................................................18
On-Hook Dialing ............................................................................................................19
Answering Calls..............................................................................................................19
Incoming Call Notification .............................................................................................20
Account Code Calls ...........................................................................................................20
Forced Account Codes (Verified/Non-Verified) ............................................................20
Voluntary Account Codes (Verified/Non-Verified).......................................................21
Alarm Reset .......................................................................................................................22
Alert Signaling ...................................................................................................................22
Attendant Console Calling .................................................................................................23
Automatic Busy Redial (ABR) ..........................................................................................23
Automatic Callback (ACB)................................................................................................25
Automatic Hold..................................................................................................................26
BGM Over Telephone Speakers ........................................................................................27
Call Forward ......................................................................................................................27
Call Forward Modes .......................................................................................................28
Using Call Forward Buttons ...........................................................................................29
Using Access Codes .......................................................................................................29
LCD Telephones.............................................................................................................29
Call Forward–All Calls...................................................................................................30
Call Forward–Busy.........................................................................................................31
Call Forward–No Answer...............................................................................................31
Call Forward–Busy/No Answer .....................................................................................32
Call Forward–Fixed ........................................................................................................33
Call Forward—External..................................................................................................34
Call Park Orbits..................................................................................................................36
Call Park and Page .............................................................................................................38
Call Pickup.........................................................................................................................40
[DN] Pickup....................................................................................................................40
Directed Call Pickup.......................................................................................................40
Group Pickup ..................................................................................................................41
Page/Internal Call Pickup ...............................................................................................42
Call Transfer with Camp-on ..............................................................................................42
ii
Strata DK Digital Telephone 6/00
Contents
Chapter 2 – Features
Call Waiting .......................................................................................................................44
Conference Calls ................................................................................................................45
Date/Time/Day Adjustment ...............................................................................................46
Direct Inward System Access (DISA) ...............................................................................46
DISA Calls - Internal .....................................................................................................46
DISA Calls - External....................................................................................................47
Direct Station Selection (DSS) Buttons (Hotline) .............................................................48
Do Not Disturb (DND) ......................................................................................................48
Door Lock(s) ......................................................................................................................49
Door Phone(s) ....................................................................................................................50
DTMF Tone Dialing with * and # .....................................................................................52
Emergency Ringdown/Hotline Service..............................................................................53
Group Listening .................................................................................................................53
Handsfree Answerback ......................................................................................................54
Handsfree Monitoring ........................................................................................................55
ISDN Outgoing Calling .....................................................................................................56
Subaddress ......................................................................................................................56
Message Waiting................................................................................................................57
Message Waiting Light on [PDN] ..................................................................................57
Message Waiting Light on [PhDN/MW]........................................................................59
Message Waiting Light on Another Telephone..............................................................59
Microphone Cut-Off ..........................................................................................................60
Off-hook Call Announce (OCA) .......................................................................................60
HS-OCA .........................................................................................................................62
SP-OCA ..........................................................................................................................62
Override Calls ....................................................................................................................63
Busy Override.................................................................................................................64
Do Not Disturb Override ................................................................................................64
Executive Override .........................................................................................................64
Privacy Override.............................................................................................................65
Toll Restriction Override................................................................................................65
Page Announcements.........................................................................................................66
All Call Page...................................................................................................................66
Privacy On-Line.................................................................................................................67
Privacy Release ..................................................................................................................67
Release and Answer ...........................................................................................................68
Saved Number Redial ........................................................................................................68
Strata DK Digital Telephone 6/00
iii
Contents
Chapter 3 – LCD Operation
Speakerphone .....................................................................................................................69
Speed Dial..........................................................................................................................70
Speed Dial–Advanced Features .........................................................................................72
Feature Access Codes .....................................................................................................72
Speed Dial Pause and Flash Storage...............................................................................75
Speed Dial Number Linking...........................................................................................75
Chain Dialing Speed Dial Numbers ...............................................................................77
Timed Reminders...............................................................................................................78
Tone/Pulse Dialing.............................................................................................................80
Two (Tandem) CO Line Connection .................................................................................80
[DN] Button ....................................................................................................................80
CO Buttons .....................................................................................................................81
Supervision .....................................................................................................................83
Voice Mail Integration .......................................................................................................84
Message Mailbox............................................................................................................84
Message Retrieval...........................................................................................................85
Call Forward to Voice Systems ......................................................................................87
Chapter 3 – LCD Operation
Control Buttons..................................................................................................................90
Soft Keys............................................................................................................................91
Soft Key Display.............................................................................................................92
How to Use Soft Keys ....................................................................................................92
Soft Key Prompts............................................................................................................95
Busy Lamp Field (BLF) Display .......................................................................................96
Caller ID/ANI/DNIS Information Mode ...........................................................................97
DNIS ...............................................................................................................................97
ANI/Caller ID .................................................................................................................97
Call Park Orbit List Display ..............................................................................................99
Retrieve and Auto Dial Lost Calls .....................................................................................99
Messages, Memos, and Name Display ............................................................................101
Messages ..........................................................................................................................103
System Messages 60~64...............................................................................................104
System Messages 65~99...............................................................................................104
Station Messages ..........................................................................................................104
Message Notifications ..................................................................................................107
iv
Strata DK Digital Telephone 6/00
Contents
Chapter 4 – Full Duplex Speakerphone
Silent Messaging (Busy Station) ..................................................................................110
Memos..............................................................................................................................111
Speed Dial Memos........................................................................................................111
Timed Reminders..........................................................................................................113
Name/Number Display ....................................................................................................113
Chapter 4 – Full Duplex Speakerphone
Dip Switches ....................................................................................................................118
Speech Training Mode..................................................................................................122
Special Button Operation (Button 10) ..........................................................................123
Chapter 5 – Add-on Module/DSS Console
DADM .............................................................................................................................125
DSS Console ....................................................................................................................127
[DSS] Button....................................................................................................................128
Features ............................................................................................................................128
Calling a Station ...........................................................................................................128
Transfer to an Idle Station ............................................................................................128
Call Transfer with Camp-on .........................................................................................129
Call Answering (CO Line)............................................................................................130
Speed Dial.....................................................................................................................130
Paging ...........................................................................................................................131
Call Forward Override ([DSS] Override) .....................................................................131
Night Transfer...............................................................................................................131
Appendix A – Access Codes
CO Line Access Codes ....................................................................................................133
Feature Access Codes ......................................................................................................134
Paging Access Codes .......................................................................................................134
Speed Dial Access Codes.................................................................................................136
Strata DK Digital Telephone 6/00
v
Contents
Chapter 5 – Add-on Module/DSS Console
Appendix B – Centrex Application
Flexible Directory Numbering .........................................................................................137
Centrex Feature Buttons ..................................................................................................137
Ringing Repeat.................................................................................................................138
Delayed Ringing ..............................................................................................................138
Appendix C – Button Labels ......................................................................................139
Appendix D – International Settings ......................................................................145
Index ....................................................................................................................................147
vi
Strata DK Digital Telephone 6/00
Introduction
This guide describes how to use the 2000-series digital telephones for Strata DK
systems. Models covered in this user guide include digital telephones equipped with a
Liquid Crystal Display (LCD) and/or speakerphone, as well as the full-duplex digital
speakerphone. Also discussed are Digital Add-on Modules (DADMs) and the Direct
Station Selection (DSS) Console. The Strata DK systems which support this
equipment are:
♦
DK14
♦
DK16e/16
♦
DK40i/40
♦
DK424i/DK424/DK280 (Release 3.0 or higher)
Note
This user guide incorporates the information in the Strata DK’s Liquid Crystal
Display Digital Telephone User Guide and the Add-on Module and Direct
Station Selection Console User Guide. Those guides are discontinued.
Strata DK Digital Telephone 6/00
vii
Introduction
Organization
Organization
♦
Chapter 1 – The Grand Tour provides an overview of the equipment, buttons,
Light Emitting Diodes (LEDs), and LCDs.
♦
Chapter 2 – Features describes the available digital telephone features in
alphabetical order. Detailed instructions on using each feature are covered.
♦
Chapter 3 – LCD Operation includes an explanation of the Control button and
Soft Key operations. Features which are available only on the LCD digital
telephone are presented alphabetically and include detailed LCD displays.
♦
Chapter 4 – Full-duplex Speakerphone describes the DADM and DSS console
features and buttons.
♦
Appendix A – Access Codes provides instructions for programming a sequence
of steps or access codes onto feature buttons. It includes CO Line Access Codes,
Paging Group Codes, Feature Access Codes (User Programmable Buttons), and
Speed Dial Access Codes.
♦
Appendix B – Centrex Application describes the Centrex features which may be
available with your Strata DK system.
♦
Appendix C – Button Labels lists the feature button designations of the 2000series digital telephone models.
♦
Appendix D – International Settings shows the proper DIP switch settings for
various countries.
How to Use This Guide
We suggest that you read this entire guide and get acquainted with the Strata DK
digital telephones and its features. Once you become acquainted with the basic
features, you can use this guide in conjunction with the Digital Telephone Quick
Reference Guide.
viii
Strata DK Digital Telephone 6/00
Introduction
How to Use This Guide
Conventions
Letters in [brackets] represent buttons which have Directory Numbers on them. For
example:
Conventions
Note
Important!
CAUTION!
WARNING!
[DN]
[PDN]
[SDN]
[PhDN]
$ULDO%ROG
Plus (+)
Tilde (~)
➤
➤
See Figure 10
Description
Elaborates specific items or references other information. Within
some tables, general notes apply to the entire table and numbered
notes apply to specific items.
Calls attention to important instructions or information.
Advises you that hardware, software applications, or data could
be damaged if the instructions are not followed closely.
Alerts you when the given task could cause personal injury or
death.
Represents any Directory Number button, also known as an
extension or intercom number.
Represents any Primary Directory Number button (the extension
number for the telephone).
Represents any Secondary appearance of a PDN. A PDN which
appears on another telephone is considered an SDN.
Represents any Phantom Directory Number button (an additional
DN).
Represents telephone buttons.
Shows a multiple PC keyboard or phone button entry. Entries
without spaces between them show a simultaneous entry. Example:
Esc+Enter. Entries with spaces between them show a sequential
entry. Example: # + 5.
Means “through.” Example: 350~640 Hz frequency range.
Denotes the step in a one-step procedure.
Denotes a procedure.
Grey words within the printed text denote cross-references. In the
electronic version of this document (Strata DK Library CD-ROM or
FYI Internet download), cross-references appear in blue hypertext.
Strata DK Digital Telephone 6/00
ix
Introduction
Related Documents/Media
Action/Response
The left column gives you
single or numbered steps
that you need to perform a
procedure.
The right column gives the immediate response to your
action. This column also includes additional notes and
comments.
Related Documents/Media
Note
Some documents listed here may appear in different versions on the
CD-ROM, FYI, or in print. To find the most current version, check the
version/date in the Publication Information on the back of the document’s title
page.
Refer to the following documents for more information:
♦
Digital Telephone Quick Reference Guide provides a quick reference for
frequently-used digital telephone features.
♦
PC/Data Interface User Guide explains all the procedures necessary to operate
stand-alone data interface units in the data mode for printer sharing and modem
pooling. Also covers connection to a PC with a Telephone Application
Programming Interface (TAPI).
♦
System Administrator Guide gives instructions for the System Administrator to
manage the system. Contains instructions for Station Relocation, System Speed
Dial, and other features only activated by the System Administrator.
For authorized users, Internet site FYI (http://fyi.tsd.toshiba.com) contains all current
Strata DK documentation and enables you to view, print, and download current
publications.
x
Strata DK Digital Telephone 6/00
The Grand Tour
1
This chapter familiarizes you with the controls and indicators located on your digital
telephone. Understanding the function of the feature buttons and their associated
LEDs will improve your efficiency in using the telephone and will help you take
advantage of all of the benefits your telephone offers.
Toshiba digital telephones incorporate state-of-the-art telecommunications technology
and provide a vast array of calling features. They are easy to operate, and all features
are accessed with a feature button or a brief access code.
If your telephone is equipped with an LCD, information and feature prompting makes
call handling more efficient and provides easy access to frequently-used features.
Abbreviated feature prompts guide you through specific tasks.
In addition to the standard features, the LCD telephones provide Alphanumeric
Messaging, Busy Lamp Field (BLF) Identification, Central Office (CO) Line
Identification, Timed Reminders with Messaging, Speed Dial Memo Directory
Dialing, User Name/Number, Call Duration, Date/Time of Day displays, and the
ability to display names and telephone numbers of outside, incoming callers.
Telephones equipped with a speakerphone, enable you to make and receive outside
and internal calls without lifting the handset.
Strata DK Digital Telephone 6/00
1
The Grand Tour
Digital Telephone Models
Digital Telephone Models
Feature operations in this guide use the button designations for the 2000-series
models.
The following telephone models belong to the 2000-series (see Figure 1 on Page 3):
2
♦
DKT2010-H (10-button model that enables users to answer internal calls without
lifting the handset)
♦
DKT2010-SD (10-button model equipped with a LCD and a speakerphone which
enables users to make and receive outside and internal calls without lifting the
handset)
♦
DKT2020-S (20-button speakerphone model which enables users to make and
receive outside and internal calls without lifting the handset)
♦
DKT2020-SD (20-button speakerphone model equipped with an LCD, and a
speakerphone which enables users to make and receive outside and internal calls
without lifting the handset).
♦
DKT2020-FDSP (20-button speakerphone model equipped with an LCD, a
speakerphone, and a jack for an External Microphone).
Strata DK Digital Telephone 6/00
The Grand Tour
Buttons
Buttons
LCD Display
Handset
LCD Control/Soft
Key Buttons
Red/Green
LED Indicators
Dial Pad
Flexible Buttons
0539
Fixed Buttons
Figure 1
Microphone Location
20-button Digital Speakerphone with LCD
Strata DK Digital Telephone 6/00
3
The Grand Tour
Buttons
Buttons
There are two sets of buttons, fixed and flexible. The fixed buttons (e.g., 0LF, 0VJ,
5HGLDO, +ROG, &RQI7UQ, 9RO▲, and9RO▼) are standard to every Strata DK 2000series telephone (see Table 1). The flexible buttons consist of Directory Number
(Primary, Secondary, Phantom) and feature buttons. The number of preprogrammed
flexible buttons varies by telephone.
Fixed Buttons
The fixed buttons are located on your dial pad and enable you to perform standard
functions quickly and easily.
Table 1
Fixed Button Definitions
Button
Definitions
&QI7UQ
(Conference/
Transfer)
Press to set up conference and transfer calls (see “Conference Calls” on Page
45).
Press once to hold internal or outside calls. The Line
LED flashes green at the internal hold rate.
HOLD LINE 10
JAN 01 SUN 12:19
...or press twice to enable Exclusive Hold. The Line
LED flashes green at the exclusive hold rate.
Exclusive Hold enables you to place a call on hold so that only you or somebody
using a Call Pickup code at another station can retrieve it.
+ROG
To retrieve a call on hold:
Press /LQH or [DN] which is on hold
...or if the call is on Exclusive Hold, from another station dial plus your [DN],
or dial plus the CO line number (001~200) that the call is held on.
If a call is not retrieved by a certain time (set in
system programming), it recalls back to your phone.
You hear repeated recall tone (or if you are on the
phone, you hear recall tone twice).
4
HOLD LINE 201
LINE 10 RECALL
Strata DK Digital Telephone 6/00
The Grand Tour
Buttons
Table 1
Fixed Button Definitions (continued)
Button
Definitions
If the held party hangs up, the call is released and the CO provides a holdrelease signal.
+ROG(continued)
If your telephone is programmed for Automatic Hold, existing calls are
automatically placed on hold when you answer a call or make another call. (See
“Automatic Hold” on Page 26.)
A different call can be held on each [DN] or
/LQH button on your phone. Each time you
press 6FUROO, a different [DN] or /LQH is
selected. The selected button’s LED flashes
rapidly and your LCD displays information for
the call holding on that button (samples shown
at right).
CO LINE 02
HOLD
DN
202
HOLD
Press to toggle the microphone ON/OFF while the telephone is in use. The LED
indicates the status of the microphone.
0LF
(Microphone)
The microphone and accompanying LED are always ON when receiving “voice
first” internal [DN] calls to enable Handsfree Answerback and OFF if you receive
a ring-first call. Mic may be ON/OFF when placing an on-hook CO line or
internal [DN] call.
Each station’s Mic can be set in system programming to switch ON/OFF with
one touch, to switch OFF only while pressed and held, or to be either ON/OFF
at the start of handsfree dialing.
To talkback to an HS-OCA call, press and hold Mic and talk over your telephone
handset/headset. The LED and microphone remain OFF during OCA talkback
operation (see “HS-OCA” on Page 62).
Mic functions on Handsfree Answerback and OCA calls for privacy.
0VJ
(Message)
5HGLDO
When Msg LED flashes, press 0VJ to call back the station or voice mail device
that activated the LED (see “Message Waiting” on Page 57). This is the
telephone’s [PDN] message waiting button.
Press the same [DN] or /LQH that you used to dial the original number. Press
5HGLDO. The last number called is redialed.
If you have Automatic Line Selection, you must first lift the handset.
Strata DK Digital Telephone 6/00
5
The Grand Tour
Buttons
Table 1
Fixed Button Definitions (continued)
Button
Definitions
Press to toggle the speaker ON/OFF. The LED indicates the status of the
speaker.
6SNU
(Speaker)
6SNU must be pressed and held down when switching from Handset to
Speakerphone mode.
Also selects a line or the internal [PDN] if programmed for auto preference in
system programming. Can be used to disconnect on-hook speakerphone calls.
9RO▲
9RO▼
Press to adjust volume levels (see “Volume Controls” on Page 12).
Flexible Buttons
All flexible buttons must be programmed for your telephone in system programming
and vary for individual telephones. If a button does not appear on your display or
telephone keystrip label, see your System Administrator for button assignments.
Line Buttons
You may have buttons designated as /LQH and/or 3RROHG/LQH*US which enable
you to directly access outside Central Office (CO) lines. 3RROHG/LQH*US enables
you to access available CO Lines from a group of lines appearing under one button.
If your telephone does not have a /LQH or 3RROHG/LQH*US button and you want to
access outside CO lines, you can use access codes. For a listing of these codes, see
“Access Codes” on Page 133.
6
Strata DK Digital Telephone 6/00
The Grand Tour
Buttons
Directory Number [DN] Buttons
The [DN] buttons consist of: [PDNs], [SDNs], and [PhDNs]. They are used to initiate
or answer a call and are known as your extension or intercom number(s). You can
have multiple [DN] buttons on your telephone (see Figure 2), including [DNs]
belonging to another telephone, [SDNs].
Incoming calls ring your telephone’s [PDNs] from the top down. For example,
incoming calls to Station 10’s [PDNs] first ring the “10-1” button, then “10-2,” and
finally “10-3.” Your [PDN] is considered busy only when all of the [PDNs] are being
used by your telephone or other telephones, and/or when your telephone is on any type
of CO Line or [DN] call.
If you have an LCD telephone, you can find out the actual
Directory Number of a [DN] button by pressing the [DN] you
want to display and dialing . The number ()
displays.
Table 2
DN = 210
Directory Button Definitions
Button
Definitions
[PDN]
Primary Directory
Number
Press to answer a call to the Primary Directory Number or to initiate a
phone call. The [PDN] is specifically your Extension Number or Intercom
Number. Your telephone can have up to four [PDN] buttons with your
number. You can set Call Forward and Voice Mail ID code for your [PDN].
[SDN]
Secondary Directory
Number
A [PDN] of another telephone which appears on your telephone is
considered a [SDN]. You cannot set Call Forward and Voice Mail ID code
for [SDNs] on your telephone.
[PhDN]
Phantom Directory
Number
Up to eight Phantom Directory Numbers can be dedicated to a station or
shared by a group of stations. One example of a Phantom Directory
Number application is when it is used as a common phone number for an
entire department. For instance, when the [PhDN] appears on a group of
telephones, such as the Sales Department, it will ring on all of the
telephones of the group when it is called. You can only set Call Forward
and Voice Mail ID code for [PhDNs] that are owned by your telephone. You
can have a separate message waiting button and mailbox for up to four
[PhDNs] on your telephone.
Strata DK Digital Telephone 6/00
7
The Grand Tour
2516
Buttons
Phantom Directory Numbers
[PhDNs]
54
58
51
51
50
Secondary Directory Numbers
[SDNs] of Station 11
Calls to Station 11 can be originated
or answered by Station 10 by
pressing the 11-1 or 11-2 button.
50
11-1
10-1
11-2
10-2
10-1
10-3
10-2
11-1
10-3
11-2
Station 10's Primary Directory
Numbers [PDNs]
Figure 2
MW/50
Station 10
Station 11
Multiple Directory Numbers Example
Feature Buttons
Preprogrammed feature buttons can be assigned to your telephone and vary for
individual telephones. See Table 18 on Page 139 for a list of all the possible feature
buttons.
If a button does not appear on your display or telephone keystrip label, see your
System Administrator for button assignments.
If your telephone has not been programmed for a 6SHHG'LDO button, you can
substitute thekey in any of the procedures that appear in this guide.
8
Strata DK Digital Telephone 6/00
The Grand Tour
LCD
LCD
In its idle state, the 32-character LCD feature on your digital telephone gives you an
accurate desk clock and calendar combination. When you have an outside call in
progress, an elapsed time display gives a constant reminder of the call duration.
Alphanumeric messaging capability is also provided (see “Messages, Memos, and
Name Display” on Page 101). All display functions occur automatically as call
processing proceeds.
A “+” next to the LCD readout (sample shown at right) on
your telephone indicates there is more data in memory. Press
6FUROO to advance through the information. Press 3DJH to
switch from the CF display to the User Name display.
CF-A 201-203+
JAN 01 TUE 12: 19
All LCD examples in this user guide are shown with Soft Keys turned OFF. If your
telephone has Soft Keys turned ON, the displays may be different (e.g., the
information on rows 1 and 2 is reversed), but they still enable you to follow the steps
in this guide.
LCD Buttons
There are two sets of buttons available with the LCD, Control and Soft Key (see
Figure 3). The Control buttons consist of the Mode, Page and Scroll functions, while
the Soft Keys offer access to frequently-used features that appear as abbreviated
prompts above the Control buttons.
Soft Key Prompts
TRNS
CONF
PGE
Mode
Page
Scroll
Soft Key and Control Buttons
0622
Figure 3
LCD Buttons (with sample Soft Keys)
Strata DK Digital Telephone 6/00
9
The Grand Tour
LED Indicators
Both sets of buttons cannot be active at the same time.
♦
Soft Keys are active when the Soft Keys are turned on and the telephone is active
(on a call).
♦
Control buttons are active when the Soft Keys are turned off and/or the telephone
is idle.
(See Chapter 3 – LCD Operation for an explanation of how to use these buttons.)
LED Indicators
Each line and feature button has a LED next to it which indicates the status of the line
or feature associated with the button.
Line LEDs light red or green and flash at varying rates to indicate call status (see
Table 3).
Table 3
LED Indicators
Use
Your Station (Green)
Other Station (Red)
Interval Rates
Line or [DN] In-Use
(access outside line)
2 seconds on, 1/8 second off
— 1/8 second ON/OFF
steady
Incoming Call
(while ringing)
1 second on at 10 pulses/second
—1 second OFF
one second ON/OFF
4 pulses/second for 1/8 second
ON/OFF
1/2 second ON/OFF
Hold – Consultation
(during consultation/transfer to another
station)
10 pulses/second
steady
Hold – Exclusive (outside line)
10 pulses/second
steady
Hold – Recall
(when held call recalls your idle
station)
1 second at 2 pulses/second,
1 second at 10 pulses/second
flashes
Hold (outside line)
If using 3RROHG/LQH*US, the hold
indication is only at the station that
places the call on hold.
10
Strata DK Digital Telephone 6/00
The Grand Tour
On-hook/Off-hook
Table 3
LED Indicators (continued)
Use
Your Station (Green)
Other Station (Red)
Interval Rates
Hold – Exclusive Recall
1 second at 2 pulses/second, 1
second at 10 pulses/second
steady
Internal Call
(while station ringing)
Your [PDN] flashes 10 pulses/
second—1 second off
[SDN] red flashing or
green ringing
Busy Station Transfer
(outside call transferred to your busy
station from a designated station or
AA)
4 pulses/second, 1/8 second ON/
OFF
3/4 second on, 1/8
second OFF
After disconnecting first call...
10 pulses/second
2 pulses/second
Alert Signal
.5 seconds
4 seconds
Conference
10 pulses/second
steady
On-hook/Off-hook
Some procedures in this user guide instruct you to perform a step while “on-hook” or
“off-hook.” These terms refer to the position of the handset. “Off-hook” indicates that
the handset should be lifted off of the telephone cradle. “On-hook” indicates that the
handset should remain in the cradle and should not be lifted.
Strata DK Digital Telephone 6/00
11
The Grand Tour
Volume Controls
Volume Controls
Your telephone has a volume increase and decrease button for controlling speaker and
handset volume levels.
You must hold down either button (9RO ▲/9RO ▼) for at least 1/8 second for any
volume change to occur. If you continually hold down either button, the volume
continually changes about every half second until the level limit is reached.You hear
ring tone as long as you press a Volume button when your telephone is idle.
The method for changing feature volume varies. Some features can be adjusted using
only the 9RO ▲/9RO ▼ (see Table 4) and others require additional buttons (see Table 5
on Page 13).
Table 4
Using only Vol ▲/Vol ▼
Feature
Ring Tone Volume/Incoming
Handsfree Answerback and
Speaker OCA
Handset Receiver
12
Phone
Status
Comments
On-hook,
Idle
Adjusting the ring tone volume also changes the volume
level of incoming Handsfree Answerback and Speaker
OCA calls before they are answered by pressing a [DN].
Off-hook
After a call is terminated and the handset is on-hook, the
volume level returns to the “original” level for the next call.
This “original” level can be adjusted to higher/lower in
system programming.
Strata DK Digital Telephone 6/00
The Grand Tour
Volume Controls
Table 5
Using Vol ▲/Vol ▼ with Other Buttons
Feature
Microphone Sensitivity
Handset/Headset Call
Waiting Tone
Phone
Status
Press
Comments
On-hook/
Off-hook
While pressing,
hold 0LF and 9RO
▲9RO▼ for three
seconds.
The Mic LED flashes about six times
while setting the sensitivity. When the
microphone is set for the lowest or
normal sensitivity, the Mic LED lights
steady when the telephone is busy on a
speakerphone call.
On-hook/
Off-hook
While pressing,
hold 5HGLDO and
9RO▲
The tones are received over the
handset/headset and speaker.
On-hook/
Off-hook
While pressing,
hold 5HGLDO and
9RO▼
The tones are received over the
speaker.
On-hook
[DN] followed by
then
9RO▲/9RO▼
You hear the muted tone for 15 seconds
or until disconnected by pressing 6SNU.
Your phone rings for 15 seconds or until
disconnected by pressing 6SNU.
Enables you to check if you can hear
ringing at a distance from your
telephone.
Muted Tone Burst
Tone sent for Busy or DND
Override, Call Transfer
with Camp-on, etc.
Ringing, Handsfree
Answerback, and Speaker
OCA.
On-hook
followed
by 9RO▲/9RO▼
Speaker
On-hook,
idle
[DN] followed by
9RO▲/9RO▼
Strata DK Digital Telephone 6/00
After you press a [DN], you hear dial
tone.
Adjusts Internal and CO Dial Tone,
Background Music.
13
The Grand Tour
Volume Controls
14
Strata DK Digital Telephone 6/00
Features
2
This chapter lists all the digital telephone features in alphabetical order beginning on
Page 20. These features can be performed on 2000-series digital telephones equipped
with or without LCDs. Features which require a telephone equipped with a
speakerphone are noted.
Before You Begin
If you are a new user of the Strata DK digital telephone, you need to find out if your
telephone has been set up for Automatic Line Selection and Ringing Line Preference.
You will also need to know if your telephone has tone or voice first signaling when
you receive an internal call:
♦
Tone Signaling rings.
♦
Voice First Signaling does not ring; instead you hear a long tone, then the caller’s
voice.
Each of these features are enabled in system programming and determine how you
will make and answer calls on your telephone.
Strata DK Digital Telephone 6/00
15
Features
Before You Begin
Automatic Line Selection
You have Automatic Line Selection, if you hear dial tone and
the [DN], Line, or Pooled Line Grp LED lights steady green.
The LCD displays the station number (201) and the seized CO
line (sample shown at right).
NO. 201
USING LINE 11
➤ Lift the handset or press 6SNU.
You do not have Automatic Line Selection, if you hear silence.
➤ Press an available [DN] or /LQH before dialing.
Ringing Line Preference
You have Ringing Line Preference, if you can answer a line ringing your station by
lifting the handset or pressing 6SNU. You do not have Ringing Line Preference, if you
have to press the button associated with the ringing call (flashing LED) to answer the
call.
If your telephone does not have Automatic Line Selection, press the flashing [DN] or
/LQH first, before using the handset or 6SNU.
Signaling
If you hear a long tone, followed by a caller’s voice, you have Voice First Signaling.
➤ Talk in the direction of your telephone
...or answer the call as you normally would using either the handset or 6SNU.
If you hear successive ring tones, you have Tone First Signaling.
➤ Lift the handset or press 6SNU.
Note
16
You can change to the alternate signaling method when making a call on a
call-by-call basis by pressing after dialing an internal telephone number.
Strata DK Digital Telephone 6/00
Features
Quick Reference
Quick Reference
The following is a quick reference chart for using your telephone’s standard features.
Making an Internal Call
1. Lift the handset or
press 6SNU
...or if you do not
have Automatic Line
Selection, press a
[DN].
2. Dial a directory
number (201).
NO. 203
201
3. When finished with
the call, hang up or
press 6SNU.
Making an Outside Call
1. Lift the handset or
press 6SNU
NO. 203
USING LINE 6
...or if you do not
have Automatic Line
Selection, you must
also:
Strata DK Digital Telephone 6/00
17
Features
Quick Reference
press /LQH
...or 3RROHG/LQH
*US
...or [DN], then enter
a CO line or line
group access code
(see “CO Line Access
Codes” on Page 133).
2. Dial the telephone
number.
The LED flashes green and
the digits are displayed as you
dial.
The display automatically
changes from dialed number
to elapsed time after a
programmed period. After
you hang up, elapsed time is
displayed for 15 seconds and
then changes to date/time
display.
NO. 203
5551374
NO. 203
00: 13: 23
3. When finished with
the call, hang up or
press 6SNU.
Making an Outside Call to an ISDN Trunk
1. Access an outside CO
line
2. Dial the number.
3. Press 6WDUW.
18
The dialed digits will not be sent until you press this
button or until the timer expires. See “ISDN Outgoing
Calling” on Page 56 for more information on ISDN
calls.
Strata DK Digital Telephone 6/00
Features
Quick Reference
On-Hook Dialing
1. Press 6SNU(if you
have Automatic line
selection).
2. Access an outside line
and dial a telephone
number.
3. Lift the handset when
the called party
answers.
Note
If you have a full speakerphone, you do not
have to lift the handset.
4. When finished with
the call, hang up or
press 6SNU.
Answering Calls
When you receive an incoming call, the LCD displays either
the CO line (10)
... or the station’s [PDN] (210).
➤ Lift the handset or
press 6SNU
...or if you do not
have Ringing Line
Preference, press the
flashing [DN], /LQH,
or 3RROHG/LQH*US
and lift the handset.
Strata DK Digital Telephone 6/00
NO. 203
LINE 10 RINGING
NO. 203
210 CALLING
The green LED changes from incoming call rate to the
in-use rate. Your LCD displays the answered line.
For information on Caller ID/ANI/DNIS LCD displays
for incoming calls, see Chapter 3 – LCD Operation.
19
Features
Account Code Calls
Incoming Call Notification
Muted ringing while you are on a call indicates an incoming call. If another call comes
in during the first call, release, transfer, or place the call on hold, then answer the
second call.
➤ Press 5HOHDVHDQG$QV
...or hold down the hookswitch for about one second.
Account Code Calls
Entered before or after a call, Account Codes (i.e., Forced, Voluntary) can be used for
a variety of reasons including billing, tracking, and line restriction applications.
Account Codes are recorded by the system and can, along with the details of the calls,
be printed on a Station Message Detail Recording (SMDR) report.
Forced Account Codes (Verified/Non-Verified)
Some applications require you enter an Account Code, called a Forced Account Code,
before dialing a telephone number.
If the system is set for Verified Account Codes, station users must enter specific codes
when entering the Forced Account Code(s) or the call does not execute. Verified
Account Codes are established in system programming or by designated stations.
➤ To dial using a Forced Account Code Emergency Override of Forced Account Codes
You can bypass Forced Account Code requirements with three emergency numbers,
including 911. See your System Administrator for these numbers:
1)
20
911
2)
_______
3)
_______
Strata DK Digital Telephone 6/00
Features
Account Code Calls
Voluntary Account Codes (Verified/Non-Verified)
Voluntary Account Codes are usually optional. They can be entered after accessing a
CO line or during a call, to keep track of the call for client billing purposes.
An exception is a Voluntary Account Code which is required to change the Toll
Restriction classification of your station. The code gives you access to telephone
numbers outside your usual dialing area and must be entered prior to dialing the
telephone number. As an example, if your station is restricted to local area calls, you
can make out-of-state calls by using a Voluntary Account Code set in system
programming.
If the system is set for Verified Account Codes, station users must enter specific codes
when entering the Voluntary Account Code(s) or the code is not validated for the
SMDR call report.
➤ To dial using a Voluntary Account Code
1. After accessing a CO
line, press $FFRXQW
Your conversation is not
interrupted.
NO. 204
ENTER ACCT CODE
&RGH
...or 6SHHG'LDO+
...or if your
telephone does not
have a speed dial
button.
2. Enter the Account
Code.
Note
If the Voluntary
Account Code is not
required to dial out,
the account code can
be entered during a
call.
When your station is set for
Verified Account Codes, you
hear a half second
confirmation tone if the code
is valid.
NO. 204
CODE VERIFIED
The outside party is not able to hear any tones (e.g.,
confirmation tones) when the Account Code digits are
being entered. If your station is programmed not to
verify Account Codes, you do not hear a confirmation
tone.
Strata DK Digital Telephone 6/00
21
Features
Alarm Reset
If the code is invalid, you hear
two short tones.
NO. 204
CODE NOT VALID
3. Dial another account
code by repeating
Steps 1 and 2.
The last code entered is recorded.
4. Dial a telephone
number.
Any digits dialed after the code is entered in Step 2 is
treated as part of a telephone number.
Alarm Reset
Your Strata DK system can be connected to a facility alarm system. All telephones
produce a startling tone whenever this alarm is activated.
➤ To reset the alarm
➤ Press $ODUP5HVHW.
Alert Signaling
Alert Signaling enables you to send an alert sound to a predesignated (partner) station
by pressing a single button. This feature is based on the “buzz” key, where, for
example, a manager might alert his/her administrative assistant to enter the office.
You can have as many as four $OHUW6LJQDO(s) to send or receive an Alert Signal to/
from other telephones. An Alert Signal is sent even if the alerted telephone is busy
(on/off-hook) or in the DND or Call Forward mode.
➤ To send an Alert Signal
➤ Press $OHUW6LJQDO. An alert tone sounds at the designated station.
22
Strata DK Digital Telephone 6/00
Features
Attendant Console Calling
Attendant Console Calling
Up to four Attendant Consoles can be installed per system. There can be up to three
ways to call the Attendant Console, depending upon system programming.
➤ To call any attendant console
➤ Press a [DN] + .
The call rings the Attendant Console’s button. Dial
calls rotate between the consoles if more than one
console is installed.
➤ To call a specific console
➤ Press a [DN] + the
console’s [DN].
The call rings the console’s ,Q'1 (incoming [DN]
button). Your System Administrator can provide the
Attendant Console(s) ,Q'1s.
➤ To call all consoles for an emergency
➤ Press a [DN] + the
emergency access
code .
The call rings the (PJU button on all attendant
consoles.
Automatic Busy Redial (ABR)
After reaching a busy outside number, you can activate ABR so that the Strata DK
system automatically redials the number at regular intervals. If the system redials an
outside number that is still busy, ABR resets and tries again. This feature may not be
allowed on some (or all) lines in your system—depending on the telephone line type
connected.
ABR is not attempted while your station is busy, but continues
to time-out. The system inserts a pause (P) on your LCD
before redialing the number.
Strata DK Digital Telephone 6/00
NO. 202
P555 3700
23
Features
Automatic Busy Redial (ABR)
➤ To activate ABR
1. When you reach a
busy number, press
The LED flashes red.
$XWR%XV\5HGLDO
...or &QI7UQ + .
You hear confirmation tone.
2. Hang up
NO. 202
ABR SET
...or press 6SNU.
3. The system redials,
up to 15 times, every
30 or 60 seconds
(depending on system
programming).
4. Your telephone
receives ring tone,
when ABR dials the
number and it is
available.
The [DN] or Line and Spkr LEDs flash green.
5. Lift the handset or
press 6SNU and wait
for the party to
answer.
If you do not pick up the handset or press 6SNU within
30 seconds after a connection is made, you hear a
muted ring for another 30 seconds, then the call
disconnects.
➤ To cancel ABR
➤ Press $XWR%XV\5HGLDO
...or [DN] + .
24
Strata DK Digital Telephone 6/00
Features
Automatic Callback (ACB)
Automatic Callback (ACB)
After reaching a busy/DND station, you can set ACB to have the system call you back
when the called station becomes available. You can also set ACB to place you in a
queue for an available CO line, if you reach a line group in which all lines are busy.
➤ To set ACB
1. After reaching either
a busy/DND station
or CO line, press
$XWR&DOOEDFN
...or .
You hear busy tone, followed
by dial tone (two secs.), then
busy tone.
When you set ACB at a busy
station, its number (210)
displays.
When you set ACB at a busy
line group, its access code
number (801) is displayed.
2. Hang up
...or press 6SNU.
3. Your telephone rings
at a fast rate when the
called station or CO
line becomes idle.
NO. 204
INT 801 ACB SET
You can make other calls while waiting for the called
station/line to become available.
For busy/DND station: the
[DN] LED flashes green
(incoming call). The station
number you called (210)
displays.
For busy CO line: the [DN]
LED from which you
attempted to first access the
line flashes red (incoming call
rate). The seized line’s
number (3) displays.
Strata DK Digital Telephone 6/00
NO. 204
INT 210 ACB SET
NO. 204
210 ACB
NO. 204
LINE 3 ACB
25
Features
Automatic Hold
4. Answer within three
rings to prevent the
callback from being
cancelled.
After you answer, you hear a single tone, and the LED
flashes green (in-use).
5. If you were
attempting to make an
outside call and did
not use LCR, you
must now redial the
telephone number.
If the original call was made using LCR, the telephone
number is automatically dialed.
If you hear a busy tone after answering a callback, the
called party is already on another call or the line has
already been seized or has received an incoming call.
Your request is not cancelled. You will be called again
the next time a line becomes idle.
➤ To cancel ACB (to busy or DND station)
➤ Press $XWR&DOOEDFN or [DN] + .
Automatic Hold
Automatic Hold enables you to automatically place a call on hold by pressing another
outside /LQH or a [DN] button—there is no need to press +ROG. You can also switch
between calls without having to press +ROG. Your telephone must be programmed for
this feature, otherwise existing calls drop if you do not press +ROG before answering
or making another call.
➤ To use Automatic Hold
➤ While on a call, press another /LQH or [DN] to receive/originate a new call. The
LED of the accessed line flashes (in-use). The first call is put on hold and the LED
flashes (on-hold).
➤ To switch between calls
➤ Press /LQH or [DN] of the held call. The LED of the line just accessed flashes (inuse). The LED of the Line or [DN] placed on hold flashes (on-hold).
26
Strata DK Digital Telephone 6/00
Features
BGM Over Telephone Speakers
BGM Over Telephone Speakers
BGM over external speakers is controlled by the System Administrator. If BGM is
enabled, you can turn it ON/OFF for your individual station speaker.
➤ To enable/cancel BGM on your telephone speaker
➤ Press 7HO6HW0XVLFto toggle BGM ON/OFF.
...or press a [DN] + + 6SNU to turn BGM ON and press a [DN] + +
6SNU to turn it OFF (ignore busy tone after dialing and ).
Call Forward
If your telephone has more than one [DN], you can assign Call Forward destinations
for each [DN] on your telephone (up to one [PDN] and eight [PhDNs]. Each [DN] can
be independently set for a different Call Forward feature. Call Forward must be set
before the call is received and has priority over the Station Hunt feature.
To set call forward from a [PDN] or [PhDN]:
♦
You must set the call forward from your telephone.
♦
Your telephone must be programmed as the owner of the [PDN] or [PhDN].
Note
If you hear a re-order tone when following any of the Call Forward steps, your
telephone is not the owner of the [PDN]/[PhDN].
If Call Forward is set, the following calls to your station forward (except in Call
Forward-External mode):
♦
Internal calls (Handsfree and OCA calls optionally may or may not)
♦
Auto Attendant calls
♦
CO lines calls that ring only your station
♦
Transferred CO line or station calls
CO lines that ring more than one station do not forward.
Strata DK Digital Telephone 6/00
27
Features
Call Forward
Call Forward Modes
You can set your telephone [PDNs] or [PhDNs] for a variety of Call Forward modes:
♦
Call Forward—All Calls forwards all calls immediately; your telephone does not
ring when called.
♦
Call Forward—Busy forwards calls immediately when your station, [PDN], or
[PhDN] is busy or in the DND mode.
♦
On “tone-first” systems, if your [PDN] appears on more than one button on
your telephone, Call Forward Busy forwards calls only when all [PDN]
buttons are in use; if there is an idle [PDN], it flashes or rings when called.
♦
On “voice-first” systems, Call Forward Busy forwards all calls any time your
telephone is in use.
Note
28
Call Forward-All Calls, Call Forward-Busy, Call Forward Busy-No Answer,
and Call Forward-No Answer can be set with the touch of one button. See
“Feature Access Codes” on Page 73.
♦
Call Forward—No Answer forwards all calls to your station if you fail to answer
within a designated time (set by you when you enable the feature). Your station
can be programmed to bypass Call Forward-No Answer when receiving Voice
First (handsfree) calls. Callers can activate voice first or OCA by dialing during
their voice announcement.
♦
Call Forward—Busy/No Answer forwards all calls to your station immediately
whenever you are busy, in the DND mode, or after ringing and you do not answer
the call within a designated time (set by you when you enable the feature). Your
station can be programmed to bypass Call Forward/No Answer when receiving
Voice First (handsfree) calls. Callers can activate ringing and Call Forward by
dialing during their voice announcement.
♦
On “tone-first” systems, if your [PDN] appears on more than one button on
your telephone, Call Forward Busy forwards calls only when all [PDN]
buttons are in use; if there is an idle [PDN], it flashes or rings when called.
♦
On “voice-first” systems, Call Forward Busy forwards all calls any time your
telephone is in use and/or any time all of your [PDNs] are in use by other
telephones.
Strata DK Digital Telephone 6/00
Features
Call Forward
♦
Call Forward—Fixed forwards immediately to a station or voice mail device set
in system programming all internal, private or DID CO line calls to your station.
Your station does not ring when called. Your station must be assigned with the
&DOO)RUZDUGWR button in system programming to activate this feature.
♦
Call Forward—External forwards new incoming calls directed to your [PDN] to
a destination outside of the system. [PhDNs] assigned to your telephone do not
call forward to external destinations. Internal calls and transferred calls to your
[PDN] also do not forward to external destinations.
Only incoming calls over CO lines dedicated to immediately ring your [PDN], the
private CO /LQH button, and/or DID line, call forward externally. Any of the other
Call Forward modes can be set for your [PDNs] or [PhDNs] simultaneously with
Call Forward-External.
Using Call Forward Buttons
If your telephone has been system programmed for a Call Forward button, you can use
one of the following Call Forward buttons to set the feature for a [PDN]: &DOO)UZG
$OO&DOOV, &DOO)UZG%XV\, &DOO)UZG1R$QVZHU, &DOO)UZG%XV\1$QV,
&DOO)RUZDUG([WHUQDO, and &DOO)RUZDUGWR(Call Forward–Fixed feature).
Using Access Codes
If your telephone has not been programmed for Call Forward buttons or you are
forwarding a [PhDN], you must use access codes to set the Call Forward feature.
LCD Telephones
The LCD on your telephone provides you with call forwarding information.
Make CF Call
When you call a [DN] that is forwarded [203], the [DN] you
called is shown first.
NO. 201
203
The display changes to the [DN] where your call forwarded
(210).
NO. 201
210
Strata DK Digital Telephone 6/00
29
Features
Call Forward
Receive CF Call
When a call is forwarded to your [DN] (210), the calling [DN]
(205) is displayed on the left and the [DN] called is displayed
on the right [203].
Note
NO. 201
205 CALL 203
The LCD examples shown in the following sections are identical to those on
your telephone’s LCD. At times, the entries on the display will scroll off the
LCD and only portions of the entries will remain.
Call Forward–All Calls
1. Press &DOO)UZG$OO
The LED flashes red.
NO. 201
CALL FORWARD TO
&DOOV
...or [PDN]/[PhDN] +
.
You hear confirmation tone
after is dialed.
2. Enter the destination
[DN].
3. Press &DOO)UZG$OO
&DOOV
...or 6SNU (if access
code used).
NO. 201
CALL FORWARD TO 203
The LED lights steady red
and calls forward to the stored
directory number [203].
CF-A 201-203
JAN 01 TUE 12: 19
➤ To cancel a Call Forward–All Calls
➤ Press &DOO)UZG$OO&DOOV + 6SNU
...or [PDN] + + 6SNU.
30
Strata DK Digital Telephone 6/00
Features
Call Forward
Call Forward–Busy
1. Press &DOO)UZG
%XV\
...or [PDN]/[PhDN] +
.
The LED flashes red.
You hear confirmation tone
after is dialed.
2. Enter the destination
[DN].
3. Press &DOO)UZG
%XV\
...or 6SNU (if access
code used).
NO. 201
CALL FORWARD TO
NO. 201
CALL FORWARD TO 203
The LED lights steady red
and calls forward to the stored
directory number [203].
CF-B 201-203
JAN 01 TUE 12: 19
➤ To cancel a Call Forward–Busy
➤ Press &DOO)UZG%XV\ + 6SNU
...or [PDN] + + 6SNU.
Call Forward–No Answer
1. Press &DOO)UZG1R The LED flashes red.
$QVZHU
...or [PDN]/[PhDN] +
.
2. Enter the destination
[DN].
Strata DK Digital Telephone 6/00
You hear confirmation tone
after is dialed.
NO. 201
CALL FORWARD TO
NO. 201
ALL FORWARD TO 203
31
Features
Call Forward
3. Press 6SHHG'LDO.
Note
Skip this step, if
you pressed &DOO
The pre-set time delay for
calls forwarding is 12
seconds.
NO. 201
ALL FORWARD TO 203*
The LCD displays the amount
of time entered (16).
NO. 201
L FORWARD TO 203*16
)UZG1R
$QVZHU in
Step 1.
4. Enter the time delay
(a) seconds.
Note
Skip this step if
you do not want
to change the
time.
5. Press &DOO)UZG1R The LED lights steady red
and calls forward to the stored
$QVZHU
directory number [203].
...or 5HGLDO, then
6SNU (if access code
was used in Step 1).
CF-NA 201-203
JAN 01 TUE 12: 19
➤ To cancel a Call Forward—No Answer
➤ Press &DOO)UZG1R$QVZHU + 6SNU
...or [PDN] + + 6SNU.
Call Forward–Busy/No Answer
1. Press &DOO)UZG
%XV\1$QV
...or [PDN]/[PhDN] +
.
2. Enter the destination
[DN].
32
The LED flashes red.
You hear confirmation tone
after is dialed.
NO. 201
CALL FORWARD TO
NO. 201
ALL FORWARD TO 203
Strata DK Digital Telephone 6/00
Features
Call Forward
3. Press 6SHHG'LDO.
Note
Skip this step, if
you pressed &DOO
The pre-set time delay for
calls to ring before
forwarding is 12 seconds.
NO. 201
ALL FORWARD TO 203*
The LCD displays the amount
of time entered (16).
NO. 201
L FORWARD TO 203*16
)UZG%XV\
1$QV in Step 1.
4. Enter the time delay
(a) seconds.
Note
Skip this step, if
you do not want
to change the
time.
5. Press &DOO)UZG1R The LED lights steady red
and calls forward to the stored
$QVZHU
directory number [203].
...or 5HGLDO, then
6SNU (if access code
used in Step 1).
CF-BN 201-203
JAN 01 TUE 12: 19
➤ To cancel a Call Forward–Busy/No Answer
➤ Press &DOO)UZG%XV\1$QV + 6SNU
...or [PDN] + + 6SNU.
Call Forward–Fixed
➤ Press &DOO)UZGWR. The LED lights steady red and all calls forward to a station
[PDN] or voice mail device set in system programming.
...or press &DOO)UZGWR a second time to cancel the feature.
Strata DK Digital Telephone 6/00
33
Features
Call Forward
Call Forward—External
1. Store the destination
number at Station
Speed Dial location
Code 49 (RCTUA, B,
C/D processors) or
location 139
(RCTUE/F
processors).
Only perform Step 1
the first time Call
Forward-External is
set or when you
change the
destination. It is not
necessary to store the
destination each time;
it remains in system
memory.
This feature enables you to forward new incoming
calls directed to your [PDN] to a destination outside of
the system. [PhDNs] assigned to your telephone do not
Call Forward to an external destination. Internal calls
and transferred calls to your [PDN] do not forward to
external destinations.
Only incoming calls over CO lines dedicated to
immediately ring on your [PDN], private CO /LQH
button, and/or Direct In Dial line calls forward. Any of
the other Call Forward modes can be set for your
[PDNs] or [PhDNs] simultaneously with Call
Forward-External.
Use the Speed Dial storage procedures detailed on
Page 70. When forwarding to an outside destination
include the CO Line (or CO Line group) access code
before the telephone number.
Example: 8015833700
801 = CO Line access code
5833700 = Telephone number
See Table 13 on Page 134 for CO Line/Line Group
access codes. The LCR access code “9” cannot be
used.
2. To set CF-External,
press &DOO)UZG
Incoming calls forward to the destination stored at
Station Speed Dial Location 49.
([WHUQDO
...or the [PDN] +
.
➤ To cancel a Call Forward–External
➤ Press &DOO)UZG([WHUQDO
...or [PDN] + + 6SNU.
34
Strata DK Digital Telephone 6/00
Features
Call Forward
Remote Destination Change
If Call Forward-External mode is set at your station, you can change the forwarding
destination from a telephone outside of the system.
➤ To change the destination number
1. Call into the DK
system over a CO line
programmed for the
DISA feature.
You hear ringback tone signal, then internal dial tone
for 10 seconds.
Try again if you hear busy tone.
Note
See the System Administrator for DISA
telephone numbers.
2. After you receive dial
tone, press then
dial your [PDN].
You hear a confirmation tone.
3. Enter the Remote Call
Forward-External
security code.
You hear a confirmation tone. See the System
Administrator for the security code which is assigned
to your telephone in system programming.
Strata DK Digital Telephone 6/00
If a number is not dialed, the system automatically
makes the DISA CO line ring as a normal incoming
call. Then, if the call is not answered within 15
seconds after the ringing starts, it disconnects.
35
Features
Call Park Orbits
4. Enter the new
destination number.
You can enter an
internal number,
Voice Mail number
or, a CO line access
code plus an external
telephone number.
With some systems,
you can dial a line
group code instead of
a CO line number
access code. (Table 13
on Page 134 for
access code
information.)
5. Press .
You hear a confirmation tone.
Call Park Orbits
The Call Park feature enables you to hold a call temporarily in an orbit (the area where
the call is held). Anyone can retriev6e the call from the orbit using the same or a
different station. There are 20 General Park Orbits for the system and 1 Personal Park
Orbit for each station.
Once you have parked a call in an orbit, you can:
♦
Hang up and retrieve the parked call at a later time
♦
Originate another call
♦
Access a voice paging device to announce the parked call for pickup from another
station
If you park a call and it is not retrieved the following occurs:
♦
36
If your station is idle when the system Call Park recall timer expires, the parked
call automatically recalls to your station.
Strata DK Digital Telephone 6/00
Features
Call Park Orbits
♦
If your station is busy, the parked call camps-on.
If you have an LCD telephone, you can let the system automatically select an
available orbit number which displays on your LCD. To monitor the calls parked at
your station, see “Call Park Orbit List Display” on Page 99.
➤ To park a call
1. While on a call, press
3DUNLQ2UELW
The LED flashes green
(consultation-hold).
ENTER ORBIT NO
RTRN
...or &QI7UQ +
.
2. Enter a General Orbit
Number (~)
or a valid [PDN]
...or if you have an
LCD, press .
3. Hang up.
The call is parked and the CO
line flashes (Hold), or the
[DN] LED turns OFF.
The system parks the call on the lowest vacant Orbit
Number.
The caller’s extension or Line
number and the orbit number
are shown.
If the parked call is not
retrieved within a specified
time, the call rings back to
your phone.
When a parked call recalls
your phone, the LCD shows
the line or [DN] that is
recalling and the orbit
number.
Strata DK Digital Telephone 6/00
6793 PK ORBIT 900
LN 2 ORBIT 900
L
2 PK ORBIT 900
37
Features
Call Park and Page
➤ To retrieve a parked call
1. Press 3DUNLQ2UELW
...or [DN] + .
2. Enter the Orbit
Number where the
call is parked.
[DN] can be [PDN], [SDN] or [PhDN].
The [DN] LED flashes at the in-use rate when the call
is retrieved.
Call Park and Page
You can use the Park feature in conjunction with the Page feature. This operation can
be programmed on a 6SHHG'LDO button for one-touch activation (See “Feature
Access Codes” on Page 73.)
➤ To park and page a call
1. While on a call, press
3DUNDQG3DJH
The LED flashes green
(consultation-hold).
HOLD LINE 2
ENTER ORBIT NO.
...or &QI7UQ +
.
2. Enter a General Orbit
Number (~)
or a valid [PDN]
...or if you have an
LCD, press .
38
The call is parked and the CO
line flashes (Hold), or the
[DN] LED turns OFF.
The system parks the call on the lowest vacant Orbit
Number.
Strata DK Digital Telephone 6/00
Features
Call Park and Page
3. Enter a [DN] or a
Page Group or Zone
access code (see
Tables 14 and 15 on
Page 135,
respectively).
After you enter an Orbit Number, a short burst of dial
tone prompts you to enter the Page access code.
The LCD shows the Auto Park entry.
The LCD shows the Line
being held and its orbit
number. Example: Line 2 is
held on orbit 900.
HOLD LINE 2
999
HOLD LINE 2
L 2 ORBIT 900
4. Make your
announcement
(include the Orbit
Number).
5. Hang up to free the
paging device.
If the parked call is not
retrieved within a specified
time, the call rings back to
your phone.
When a parked call recalls
your phone, the LCD shows
the line or [DN] that is
recalling and the orbit
number.
Strata DK Digital Telephone 6/00
PARK ORBIT 900
HOLD
L
2 PK ORBIT 900
39
Features
Call Pickup
Call Pickup
You can pick up a call that is ringing another station’s [PDN] or [PhDN], a call placed
on hold at another station and other types of calls.
When you pick up an internal call, the calling station [200]
displays on the left and the called station [201] displays on the
right.
NO. 204
200 CALL 201
If your call is picked up by another station, the LCD shows
that your call to station [200] was picked up by station [201].
NO. 204
200 PICKUP 201
[DN] Pickup
Picks up ringing or held Directory Numbers.
➤ Press [DN] + + [PDN] or [PhDN] that you want to pick up.
Directed Call Pickup
This feature enables you to pick up calls ringing in, or calls held at other stations.
➤ To use directed call pickup
1. Press 'LUHFWHG
3LFNXS
...or [DN] + .
2. Dial directed [PDN].
40
The directed [PDN] is the Primary Directory Number
of the station that has the ringing or held call that is to
be picked up.
If more than one call is on hold, the call on the
telephone’s lowest button number is picked up.
Ringing calls are picked up over held calls as a
priority.
Strata DK Digital Telephone 6/00
Features
Call Pickup
➤ To pick up a ringing CO line in a tenant system
➤ Press 'LUHFWHG
3LFNXSa
You are connected to a incoming CO line call for a
Tenant Group (1~4).
...or [DN] + .
Notes
●
●
In non-tenant systems, 'LUHFWHG3LFNXSpicks
up any ringing CO line.
This feature does not pickup held lines or
transferred CO lines that are ringing; use Directed
Call Pickup.
Group Pickup
Stations can be assigned in system programming to Pickup Groups. As many as 20
groups can be created to enable you to easily pick up incoming (new or transferred) or
internal calls that are ringing stations that are in your group or in other groups. This
feature does not pickup held calls. You may belong to more than one group. See your
System Administrator for group assignments.
Calls Ringing Within Your Group
➤ Press *URXS3LFNXSor a [DN] + . You are connected to the call.
Calls Ringing to Other Groups
1. Press [DN].
You hear dial tone.
2. Enter , then the
access code
(~) of the
group to which the
station belongs.
You are connected to the call. If the called station
belongs to more than one group, any of the Group
Pickup codes associated with those groups pickup the
call.
Strata DK Digital Telephone 6/00
41
Features
Call Transfer with Camp-on
Page/Internal Call Pickup
This feature picks up Internal (station to station), Group Page, and All Call Page calls.
If these types of calls occur at the same time, the pickup priority is station-to-station
and then Page calls in the order of occurrence. In some systems this feature can be
applied to pickup All Call Page exclusively.
➤ To pickup a page or internal call
1. Press [DN].
You hear dial tone.
2. Enter .
You are connected to the caller who originated the
internal or page call. The page circuit is released.
Call Transfer with Camp-on
You can transfer calls to idle or busy [DNs], Hunt Group Numbers, ACD Group
[DNs], etc. You cannot transfer (or camp-on) to a station’s [PDN] or [PhDn] if the
station is in the DND mode, unless the station’s [PDN] or [PhDN] appears on other
stations.
➤ To transfer a call
1. While on a call, press
&QI7UQ.
The Line or [DN] LED flashes green (conference rate).
You hear internal dial tone.
2. Dial the [DN] where
the call will be
transferred.
The CO line rings the called station. If you hear a
single tone, you can then announce the call over the
called telephone’s speaker. (If you hear ringing tone,
the call was made with Tone Signaling.)
3. If the station is idle,
announce the call and
hang up
42
Strata DK Digital Telephone 6/00
Features
Call Transfer with Camp-on
...or if the station is
busy or does not
answer, hang up
The Line LED flashes green (on-hold). If you
transferred the call from a [DN], the [DN]’s LED turns
off. The CO line or [DN] camps on to the called station
and the called station receives a warning tone. The
camped-on call rings when you hang up.
...or to reconnect to
the transferred line
before it is answered,
press the flashing
/LQH or [DN] + .
The Line LED is a steady red
when the called station
answers the transferred call.
If the call is not answered
after a specified Recall time
set in system programming,
camp-on is cancelled and the
transferred call rings back
(when your station or [DN] is
idle or sends two tone bursts
if your telephone is busy).
NO. 204
CAMP-ON 4
HOLD LINE 2
LN 2 RECALL 203
The LCD shows the CO line
number and the station
number [203] where it was
originally transferred.
Strata DK Digital Telephone 6/00
43
Features
Call Waiting
Call Waiting
You can answer a call that is transferred to your station, even when your station is
busy. When another call is camped onto your station, you hear two camp-on tone
beeps and the [DN] or Line LED flashes red (on-hold).
If a call is sent to your station when busy, and your station does not have a [DN] or
/LQH button available to receive the call, two camp-on tone beeps are sent to your
telephone. You must disconnect or transfer the existing call to answer the waiting call.
➤ To answer a waiting call by placing the current call on-hold
➤ Press +ROG
...or if your telephone
has the Auto Hold
feature, just press the
flashing [DN] or
/LQH.
The existing call is placed on-hold. The camped-on
line rings your station (the Line LED flashes green incoming call).
You are connected to the transferred call. The [DN] or
Line LED flashes green (in-use).
Note
See your System Administrator to find out if
you have Auto Hold.
➤ To answer a waiting call by disconnecting or transferring the current call
➤ Hang up or transfer
the existing call; the
camped-on call rings
your station
...or press the flashing
[DN] or /LQH.
44
The existing call disconnects or transfers. The campedon line rings your telephone and the Line LED flashes
green (incoming call).
This disconnects the current call and connects you to
the transferred call. The [DN] or Line LED flashes
green (in-use).
Strata DK Digital Telephone 6/00
Features
Conference Calls
Conference Calls
This feature enables you to add other parties to an existing call. (If you have an LCD
telephone, you can use Soft Keys to make a conference call.) The following
conferencing configurations are possible:
♦
up to two stations and two CO lines
♦
up to three stations and one CO line
♦
up to four stations
➤ To make a conference call
1. While on a call, press
&QI7UQ.
You hear dial tone and the [DN] or Line LED flashes
green (conference-rate).
2. Dial a [DN] or access
a CO line and dial the
telephone number.
3. When the called party
answers, press
&QI7UQ.
All parties are conferenced. If the second call was
placed on a [DN] or CO line that appears on your
telephone, the LED also flashes green at the in-use
rate.
4. Repeat the procedure
to add other CO lines
or [DNs],
remembering not to
try and exceed the
allowed number.
Notes
●
●
If you receive a busy tone or no answer, press &QI7UQ to return to the original
connection.
The new station is not conferenced unless its user lifts the handset or presses a
[DN] to answer.
Strata DK Digital Telephone 6/00
45
Features
Date/Time/Day Adjustment
Date/Time/Day Adjustment
This feature is performed from a designated station. See the System Administrator
Guide for instructions.
Direct Inward System Access (DISA)
Outside callers with telephones that send Dual-tone Multi-frequency (DTMF) tones
can call in on CO lines programmed for DISA and dial a [DN] or outgoing CO line
without going through an attendant or operator. See the System Administrator for this
number.
DISA Calls - Internal
1. From outside the
system, dial the DISA
CO line telephone
number.
You hear a ringback tone signal, then an internal dial
tone for 10 seconds.
2. When you hear dial
tone, dial a [DN].
You hear ring tone. When the station answers, you are
connected.
If you do not dial within 10 seconds, the system
automatically causes the DISA CO line to ring a
telephone or group of telephones designated in system
programming. Then, if the call is not answered within
15 seconds after the ringing starts, it disconnects.
If the call is not answered after 6 rings or 24 seconds,
(whichever comes first) you hear busy tone.
3. If you receive busy
tone or want to dial
another number while
the station is still
ringing, press .
Repeat Step 2.
46
To call another station after completing a DISA station
call, the internal party must transfer you. Station and
System Page cannot be accessed on DISA calls.
Strata DK Digital Telephone 6/00
Features
Direct Inward System Access (DISA)
DISA Calls - External
1. From outside the
system, call the DISA
CO line telephone
number.
You hear a ringback tone signal, then an internal dial
tone for 10 seconds.
2. When you hear dial
tone, dial a CO line or
CO line access code
You hear dial tone. If you do not hear dial tone, you
must also dial a DISA security code.
...or dial a CO line or
CO line access code
and then a DISA
security code. See
Table 13 on Page 134
access codes.
3. When you hear dial
tone, dial a telephone
number.
Strata DK Digital Telephone 6/00
If you do not dial within 10 seconds, the system
automatically rings the DISA CO line as a normal
incoming call. Then, if the call is not answered within
15 seconds after the ringing starts, it disconnects.
You hear dial tone.
Note
See the System Administrator for the DISA
security code number. If the correct code is not
entered, the call disconnects.
If set in system programming, both parties hear a
warning tone approximately 4, 10, or 20 minutes after
the call was made. Press to reset the timer each time
the tone sounds (for an additional 4, 10, or 20
minutes). If you do not press , the call disconnects
approximately one minute after the tone.
47
Features
Direct Station Selection (DSS) Buttons (Hotline)
Direct Station Selection (DSS) Buttons (Hotline)
This optional feature enables you to use a '66 button to connect directly to another
station’s [PDN]. The DSS LED shows the status (idle/busy) of the station and/or the
station’s [PDN]. For example, a station’s DSS button LED shows busy (light steady
red) when the station is:
♦
busy on a call on any button or is in the DND mode.
♦
idle but all appearances of the station’s [PDN] are in use by other stations.
➤ To connect directly to another station’s [PDN]
1. When connected to a
CO line or another
station, press '66.
The original party is put on-hold. You can call a station
even if the DSS LED shows busy (steady red).
2. Announce the call
...or transfer the call
by hanging up or
pressing 5HOHDVH
DQG$QV.
Note
You can transfer the call to an idle or busy
station.
Do Not Disturb (DND)
If your station is in the DND mode, internal, external and transferred calls do not ring
your station and OCA calls are denied. You can continue to make calls while in the
DND mode.
If your [PDN] or [PhDN] appears on other stations, calls to your [PDN] or [PhDN]
flash on your station and flash or ring the other stations. This enables your calls to be
answered at the other stations (or yours), even while your station is in the DND mode.
Your “alert partner” telephone can override DND and signal your telephone by
pressing $OHUW6LJQDO. Telephones with DND Override can also call and mute ring
your telephone.
48
Strata DK Digital Telephone 6/00
Features
Door Lock(s)
➤ To activate/deactivate DND
➤ Press 'R1RW'LVWXUE. The LED lights steady red and DND mode is activated.
...or press it again to toggle the feature off.
Notes
●
●
Calls forward from your station immediately while in the DND mode, if it is set
for Call Forward-Busy or Call Forward-Busy/No Answer.
If you press 'R1RW'LVWXUE while a call is ringing, the ringing stops. The LED
continues to flash.
Door Lock(s)
Your telephone may have up to five 8QORFN'RRU button(s), which enables you to
unlock a door.
Door Lock Button
Location
Unlock Door 0
Unlock Door 1
Unlock Door 2
Unlock Door 3
Unlock Door 4
➤ To unlock a door
➤ Press 8QORFN'RRU. The door unlocks for three or six seconds (set in system
programming). The Unlock Door LED is lit while the door is unlocked.
Strata DK Digital Telephone 6/00
49
Features
Door Phone(s)
Door Phone(s)
Door phones can be used to call digital/electronic telephones selected in system
programming. When a door phone calls, you hear a distinctive ringing tone, one or
five times (set in system programming). You can also call a door phone and monitor
the surrounding area.
The number of possible door phones vary by Strata DK system, with up to 12 as the
maximum for larger systems.
LCD telephones display the door phone ID when calls are
NO. 204
made to/from door phones (e.g., door phone 1A). The ID
DOOR PHONE 1A
enables you to know the door phone [DN]. For example, door
phone 1A corresponds to Door Phone [DN] , 1B to , etc. Door phone IDs
and the corresponding [DNs] are shown in Table 6.
Table 6
50
Door Phone Lock IDs/Locations
Door Phone
[DNs]
Door Phone
ID
Door Phone
[DNs]
Door Phone
ID
#151
1A
#157
3A
#152
1B
#158
3B
#153
1C
#159
3C
#154
2A
#161
4A
#155
2B
#162
4B
#156
2C
#163
4C
Location
Location
Strata DK Digital Telephone 6/00
Features
Door Phone(s)
➤ To answer a door phone call
1. Lift the handset.
If you lift the handset while the door phone is still
ringing, the [DN] LED flashes green (in-use) and you
are connected to the door phone.
2. If not connected yet,
dial the door phone
[DN].
If you have an LCD telephone, see Table 6 for the
[DN].
...or to pick up door
phone calls ringing
someone else’s
phone, press [DN] +
.
Note
access is a system option that may not
be turned on for your system.
➤ To call/monitor a door phone
1. With the handset offhook, press a [DN].
You hear dial tone and the LED flashes green (in-use).
2. Dial the [DN] for the
desired door location.
If you have an LCD telephone, see Table 6 for the
[DN].
A two-way talk-path exists between your telephone
and the called door phone. You can audibly monitor
the area around the door phone.
Note
Strata DK Digital Telephone 6/00
Door phone [DNs] can be stored on 6'
buttons. See “Feature Access Codes” on Page
72.
51
Features
DTMF Tone Dialing with * and #
➤ To call from a door phone
1. Press the door phone
button and then
release it.
You hear a distinctive ringing tone–one or five times
(set in system programming).
2. When answered,
speak at a normal
voice level in the
direction of the door
phone.
DTMF Tone Dialing with * and #
You may have to send and DTMF tones to some devices or services, such as a
voice mail device or computer output service. DTMF tones are automatically enabled
on stations with 6SHHG'LDO. If you do not have 6SHHG'LDO, you must first dial ,
to enable these tones.
This feature disables the Speed Dial feature during the call. Speed Dial is restored
when you complete the call or place it on hold.
➤ To output and DTMF tones on a telephone without a 6SHHG'LDObutton
➤ While on an outside call, press , then . You can now output and , DTMF
tones, and digits ~ for the duration of the call. This procedure must be repeated
on each call where you require such output.
52
Strata DK Digital Telephone 6/00
Features
Emergency Ringdown/Hotline Service
Emergency Ringdown/Hotline Service
The Emergency Ringdown or Hotline Service feature enables standard telephones to
automatically ring a designated extension by going off-hook. Digital telephones
cannot perform this feature, but they can receive Emergency Ringdown or Hotline
Service from standard telephones.
Emergency Ringdown is used in healthcare facilities, where it 205 CALLING
is used to assist callers who may not be able to complete a call RINGDOWN
by dialing. An example of an incoming Emergency Ringdown
call is shown on the right. The calling [DN] and “Ringdown” displays whether soft
keys are ON or OFF.
This same feature is also known as Hotline Service and is often used for telephones in
hotel/motel lobbies.
Group Listening
This feature enables you to set your telephone so that you and people near your
telephone can hear the called party over the speaker, but the called party can not hear
you. You can alternate between parties as long as the handset is off-hook.
➤ To activate group listening
➤ While off-hook on a call, hold down 6SNU. The Spkr LED lights red.
➤ To deactivate group listening
➤ Release 6SNU. The Spkr LED turns OFF. You can talk to the party through the
handset.
Strata DK Digital Telephone 6/00
53
Features
Handsfree Answerback
Handsfree Answerback
You can talk back to internal or incoming Tie Line calls without lifting the handset.
➤ To receive a handsfree internal call
1. You hear a single long
tone, followed by the
caller’s voice.
The LED flashes green (incoming call). The Mic LED
lights steady red, indicating your microphone is active.
The Spkr LED flashes red.
2. Do not lift the
handset; speak toward
the telephone in a
normal voice level.
If you have a speakerphone, you will have better
performance if you press the called [DN] button first.
Notes
●
●
54
A [DN] must be pressed (or the handset must be taken off-hook) to actually
answer the call. This is necessary before transferring or placing an internal call on
hold.
You can press 9RO ▲ or 9RO ▼ to control the volume of the Handsfree
Answerback caller’s voice and ring tone. See Chapter 1–The Grand Tour for more
information on volume control.
Strata DK Digital Telephone 6/00
Features
Handsfree Monitoring
Handsfree Monitoring
Calls placed on hold by an outside party may be monitored handsfree. This feature
frees you from having to hold the handset to your ear until the outside party returns to
the call, enabling you to take care of other tasks in the meantime.
➤ To use handsfree monitoring
1. While on an off-hook
call, press and hold
6SNU.
The Spkr LED lights red.
2. Place the handset onhook.
The Spkr LED stays on and you can hear the distant
party through your telephone speaker.
3. Release 6SNU.
For privacy, press 0LF to turn your telephone’s
microphone off. (Otherwise, your conversations may
be picked up.)
4. Lift the handset when
the party returns.
Note
Strata DK Digital Telephone 6/00
Each station’s 0LF can be set in system
programming to switch ON/OFF with one
touch, to switch OFF only while pressed and
held, or to be either ON/OFF at the start of
handsfree dialing. See your System
Administrator if you want the setting changed.
55
Features
ISDN Outgoing Calling
ISDN Outgoing Calling
This feature enables you to make outgoing call using an Integrated Services Digital
Network (ISDN) trunk, provided that you are connected to a Strata DK424i, DK424
with software Release 4.0 or higher, or DK40i, and that you subscribe to ISDN lines.
ISDN trunks offer faster call connection setup, and they also provide more connection
circuits.
Making an ISDN outgoing call will either be handled automatically with a timer or by
you initiating the ISDN “Start” sequence. The method depends on your system’s
programming. See your System Administrator to determine the method.
➤ To make an outgoing call to an ISDN trunk
1. Access an outside CO
line
2. Dial the number.
3. Press 6WDUW.
The dialed digits will not be sent until you press this
button or until the timer expires.
Subaddress
Subaddress digits may be required for dialing another department, or to send a call to
equipment, such as a printer. If you need to enter subaddress digits, follow these
instructions:
➤ To make an outgoing call with a subaddress to an ISDN trunk
1. Access an outside CO
line
2. Dial the number.
3. Press 6XE.
The 6XE button informs the system that the following
digits are the subaddress.
4. Enter the subaddress.
56
Strata DK Digital Telephone 6/00
Features
Message Waiting
5. Press 6WDUW.
The dialed digits will not be sent until you press this
button or until the timer expires.
Message Waiting
If you call a busy station [DN] or its user does not answer, you can leave a message
waiting indication at the station. The Msg LED at the called station flashes and the
user can call you back by pressing the 0VJ button with the flashing LED. (Voice mail
devices, as well as people, can leave message waiting indications.)
All telephones have a standard (fixed) 0VJ button/LED for receiving/retrieving
messages left by callers that called the station’s [PDN]. Telephones that own [PhDNs]
can also have up to four additional (flexible) message waiting [PhDN/MW] buttons/
LEDs for receiving/retrieving messages left by callers that called the respective
[PhDNs]. To use the [PhDN] message waiting feature, your telephone needs to have
[PhDN/MWs].
Up to four message waiting indications and LCD messages can be left at each [DN] or
[PhDN] at one time. The fourth message and one of the LEDs is reserved for the
Message Center.
Message Waiting Light on [PDN]
➤ To answer a Msg light
1. Press 0VJ, then lift
the handset.
Your phone rings the station or voice mail device that
set the indication. The LED continues to flash red.
If you reach a station
that is busy or does
not answer, go onhook and press 0VJ
again. The system
rotates to the next
message sender.
Strata DK Digital Telephone 6/00
57
Features
Message Waiting
The LCD can show
up to three stations
that have left
messages for the
[PDN] and three for
each of your
[PhDNs].
In the example (shown at
right), the display indicates
CALL
that station DN [203] received
a message signal from DN [201].
The “+” indicates additional messages.
NO. 204
203-201+
2. Press 6FUROO to
display them.
3. After receiving the
message(s), place the
handset on hook.
If the Msg LED continues to flash, you have more
messages–repeat the Steps to retrieve them. Voice mail
devices may cancel the indication after a short delay.
➤ To cancel the Msg light
➤ Press 0VJ and lift the
handset.
Your Msg LED turns OFF when the called party
answers.
Note
The called party must answer–by either going
off-hook or by pressing 6SNU–for the
indication to be cancelled automatically.
Your Msg LED turns OFF without calling the
telephone or VM device.
...or [DN] + to
cancel the light. This
must be done for each
message recorded.
58
Strata DK Digital Telephone 6/00
Features
Message Waiting
Message Waiting Light on [PhDN/MW]
➤ To respond to [PhDN/MW]
1. Press the flashing red
[PhDN/MW] LED.
Your phone rings the station or voice mail device that
left the message. If the called party or VM device
answers, the message waiting indication is cancelled
automatically. If there is no answer, hang up and try at
a later time. The red
[PhDN/MW] LED on your phone continues to flash.
2. After receiving the
message, press 6SNU
If you have more messages, the red [PhDN/MW] LED
continues to flash. To answer the next message, repeat
this procedure.
...or place the handset
on-hook.
➤ To cancel [PhDN/MW]
1. Press [PhDN].
You hear a steady dial tone.
2. Enter .
The dial tone stops.
3. Press 6SNU.
The [PhDN/MW] LED turns OFF, indicating that the
message has been canceled.
Message Waiting Light on Another Telephone
➤ To set a message waiting light on another telephone
1. Press [DN] and dial
an internal number.
You hear ringback or busy tone.
2. Press 0VJ or .
The Msg or PhDN/MW] LED
flashes red at the called
telephone. The Msg LED
lights steady red at your
telephone. The LCD displays
the station [203] where you
set a message waiting light.
Strata DK Digital Telephone 6/00
NO. 201
INT 203 MW SET
59
Features
Microphone Cut-Off
3. Press 6SNU.
The Msg LED on your
telephone turns OFF. The
Msg or [PhDN/MW] LED on
the called telephone flashes
until the called party presses
the flashing 0VJ or [PhDN/
MW].
SENT 203
JAN 01 SUN 12: 19
➤ To cancel a message light set on another station
➤ Press [DN] and dial plus the [PDN] or [PhDN] that has the message light set.
Microphone Cut-Off
This feature prevents callers from monitoring the sounds near your telephone when
your telephone receives a Handsfree Call or cuts-off the telephone microphone while
on a speakerphone call. When the feature is ON, the Microphn Cut-off LED lights
steady red and the Mic and Spkr LEDs do not light when your telephone is called.
When the feature is OFF, the Microphn Cut-off LED is not lit and your microphone
works. The 0LFURSKQ&XWRII functions on Handsfree Answerback and speaker
OCA calls for privacy.
➤ To turn the microphone ON/OFF
➤ Press 0LFURSKQ&XWRII to toggle between ON/OFF.
Off-hook Call Announce (OCA)
This feature enables you to call and speak through either the handset or the speaker of
an off-hook, busy digital telephone. The called station must be set in system
programming for this feature to work.
The calling station can be set in system programming for OCA to occur automatically
when calling a busy-off-hook station or by dialing an access code after receiving busy
tone. Automatic OCA only functions on Voice First Signaling systems. The following
procedure covers both calling options.
60
Strata DK Digital Telephone 6/00
Features
Off-hook Call Announce (OCA)
♦
Handset Off-hook Call Announce (HS-OCA) – lets callers make an
announcement through the handset (or headset). No special hardware is required.
♦
Speaker Off-hook Call Announce (SP-OCA) – lets callers make an
announcement through the speaker of an off-hook, busy digital phone. The called
telephone must be equipped with optional hardware.
When you receive an HS-OCA call while you are on another
NO. 204
call, you hear a short warning tone (optional), followed by an
210 BUSY OVRD
announcement. You are the only one who hears the tone/
announcement. The station [210] sending the HS-OCA is displayed on your LCD.
Stations in the DND mode cannot receive OCA calls unless the calling station is
programmed for DND Override.
While on a speaker OCA call, 0LF and 0LFURSKQ&XWRII can be used to prevent an
OCA caller from listening to your conversation with the original party (see
“Microphone Cut-Off” on Page 60).
➤ To make an OCA call (Voice First Signaling)
➤ Lift the handset and dial the [DN]. You hear a single tone (optional) or nothing
and can talk to the station (Automatic OCA).
Note
If you receive busy tone, press to OCA the station
and talk. An optional tone is heard at the busy station,
indicating that you are connected on an OCA call.
NO. 203
205 BUSY OVR
➤ To make an OCA call (Tone Signaling)
1. Lift the handset and
dial the [DN].
You may hear busy or ring tone.
2. If you hear busy tone,
press and speak to
the called station
If you hear busy or ring tone after dialing the first digit
(2 or 1), disregard the tone and dial the second digit to
OCA the called telephone.
...or if you hear a ring
tone, press and
speak to the called
station.
If you still hear a busy tone after dialing 21 or 12, the
called telephone is either busy on a speakerphone call
or does not have the OCA option set in system
programming. Either condition blocks OCA.
Strata DK Digital Telephone 6/00
61
Features
Off-hook Call Announce (OCA)
HS-OCA
➤ To answer an HS-OCA talkback call
➤ Press and hold 0LF
This puts the original party on hold and you are
connected to the HS-OCA call for as long as you press
0LF.
When you release 0LF, the HS-OCA party can not
hear you, but you can still hear the original and HSOCA parties.
...or +62&$
7DONEDFN.
Note
Press the same
button to toggle
between parties.
You are connected to the party that has sent the HSOCA call. The original party is on hold.
HS-OCA Talkback acts as an ON/OFF switch between
the two parties.
➤ To disconnect an HS-OCA call to your station
➤ Press 6SNU. The HS-OCA call disconnects.
SP-OCA
➤ To answer an SP-OCA call
➤ Speak toward the microphone of your phone. You may want to hold your hand
over the handset mouth piece to prevent the other party from hearing you.
➤ To disconnect an SP-OCA call to your station
➤ Press 6SNU. The SP-OCA call made to your station disconnects.
62
Strata DK Digital Telephone 6/00
Features
Override Calls
Override Calls
The available override features are:
♦
Busy Override (BOV) – enables you to send a muted ring tone to a busy station
to indicate that a call is waiting. The BOV muted ring can be programmed for
each station to be two muted rings only or continued muted rings until the call is
answered. This option applies to the station receiving the muted ring. The muted
ring can be sent to the telephone speaker or to the telephone handset/headset and
speaker.
♦
Do Not Disturb Override – lets you send a tone to an
NO. 204
idle or busy station in the DND mode to indicate that a
INT 210 DND
call is coming in. Your phone can also be programmed to
block Do Not Disturb Override from other phones. Your
station’s LCD shows the station you have called [210] is in the DND mode.
OCA is possible to DND stations from stations that are programmed for Do Not
Disturb Override.
♦
Executive Override – enables you to enter an established conversation. Your
phone can also be programmed to block Executive Override from other phones.
The 3ULYDF\RQ/LQH does not block this feature.
♦
Privacy Override – enables you to enter an established call on a private common
CO /LQH button; it will not operate on common [DNs] which are always private.
(See “Conference Calls” which allow up to four parties to talk on a [DN] button.)
Up to two station users can enter an existing CO line-to-station call (i.e., up to
three stations can be connected to a CO line). You can also use this feature if the
station that is already connected to the CO line is in the Privacy Release mode.
Station users with 3ULYDF\5HOHDVH can allow stations to enter their
conversations, even if the station entering the conversation is not programmed for
Privacy Override.
Privacy Override is blocked by DND.
♦
Toll Restriction Override – Stations can be individually restricted from making
toll calls. Each station can be allowed or denied specific area and office codes,
long distance information calls, international calls and/or operator-assisted calls.
You can completely override Toll Restriction at selected stations or you can
Strata DK Digital Telephone 6/00
63
Features
Override Calls
change the station’s Toll Restriction class. The station resumes its normal class at
the conclusion of the call.
Busy Override
➤ After reaching a busy
station, press .
A muted tone is heard at the
busy station, indicating that a
call is waiting. The station
number [210] displays.
NO. 203
210 BUSY OVR
Do Not Disturb Override
➤ After reaching a
station in DND mode,
press .
A tone signal is heard at the
DND station, indicating a call
is coming in. On your station,
the LCD shows the station
number [210] you have
overridden.
Your LCD displays DND OVR
DENY, if the station you
NO. 204
210 DND OVR
NO. 204
DND OVR DENY
called denies Do Not Disturb
Override.
Executive Override
➤ After reaching a busy
station, press .
...or if you have an
LCD phone, use the
OVRD Soft Key. (See
“How to Use Soft
Keys” on Page 92.)
64
You enter the conversation. The called parties may
hear an optional tone signal prior to your entering the
conversation.
The overridden station [210]
displays until the call is
ended.
NO. 204
210 EXEC OVRD
Your Station
Strata DK Digital Telephone 6/00
Features
Override Calls
The station initiating
executive override [204]
displays until the override is
disconnected.
NO. 210
204 EXEC OVRD
Called Station
Privacy Override
➤ After reaching a busy
station, press /LQH.
Connected parties may hear
an optional tone signal before
you are connected. Your
station’s LCD displays the
CO line identification, Line
03.
The overridden station’s LCD
displays the initiating
station’s number [204].
NO. 204
LINE 03 PRV OVRD
NO. 205
204 PRV OVRD
Toll Restriction Override
1. Access a CO line.
You hear dial tone and the LED flashes at the in-use
rate.
2. Press &QI7UQ +.
You no longer hear dial tone
and your LCD prompts you to
enter a code.
3. Enter the Toll
Restriction Override
Code (four digits).
You hear dial tone. For security reasons, the override
codes are only available on a selected basis. See your
System Administrator.
NO. 204
OVERRIDE CODE
4. Dial a telephone
number.
Strata DK Digital Telephone 6/00
65
Features
Page Announcements
Page Announcements
Station users can make page announcements to telephones and external speakers.
➤ To make a page announcement
1. Press [DN], lift the
handset, and enter a
paging access code.
Note
Each of the page access codes (including the
[PDN] button) can be stored on an 6' button.
See “Speed Dial–Advanced Features” on Page
72
2. Use a normal voice
level to make your
announcement, then
repeat it.
3. Hang up.
All Call Page
You can make an All Call Page to digital/electronic telephones assigned to the “All
Call Page Group.” Stations are assigned to the “All Call Page Group” in system
programming.
➤ To make an All Call Page
1. With the handset offhook, press $OO&DOO
The $OO&DOO3DJH button pages “All Call Page”
telephones but does not access external page speakers.
3DJH
...or [DN] + .
Note
may also Page external speakers as well
as “All Call Page” telephones, depending on
system programming.
2. Make your
announcement in a
normal voice level
and repeat it.
3. Hang up.
66
Strata DK Digital Telephone 6/00
Features
Privacy On-Line
Privacy On-Line
With this feature, you can block those with Privacy Override from entering your CO
line. The button does not block Busy or Executive Override.
➤ To set/cancel privacy
➤ Press 3ULYDF\RQ/LQH to set privacy. The LED lights steady red. Others are
blocked from entering your CO line calls when they press a common CO line
button.
...or press 3ULYDF\RQ/LQH again to cancel the feature. The LED turns OFF.
Privacy Release
This feature enables others to enter your call on a common CO line just by pressing
/LQH on their telephone. It only works on common CO lines (i.e., CO lines which
appear on more than one telephone). Privacy Release cannot be used on single
appearing CO lines or multiple [DN] buttons. Calls on common [DNs] are always
private and cannot be accessed by more than one telephone.
Similar to conference calls, up to three stations can be connected to a CO line.
➤ To use Privacy Release
➤ While on a CO line
call, press 3ULYDF\
5HOHDVH.
The LED lights red. The CO line flashes at all
appearances. When another station user enters the CO
call by pressing a common CO /LQH, the Privacy
Release LED turns OFF.
To add a third station, press 3ULYDF\5HOHDVH again
and the process is repeated.
Strata DK Digital Telephone 6/00
67
Features
Release and Answer
Release and Answer
This feature enables you to automatically disconnect or transfer an active call and
answer a new call using a button, instead of a hookswitch. When you receive the new
call, the LED flashes red and you hear a muted, Busy Override or Camp-on busy tone.
➤ To release an active call and answer an incoming call
➤ While on a call, you
receive an incoming
call. Press 5HOHDVH
Releases the original call and answers the new
incoming call.
DQG$QV
Note
...or &QI7UQ and dial
a “transfer to”
destination. Then
press 5HOHDVHDQG
Transfers the original call and answers the new call.
...or '66 of a
“transfer to”
destination, then
press 5HOHDVHDQG
$QV.
Transfers the original call and answers the new call.
You can press +ROG before 5HOHDVHDQG
$QV if you do not wish to release the original
call.
$QV
Saved Number Redial
This feature enables you to store a dialed telephone or station number, then redial that
number with the touch of a button.
➤ To save a telephone number
➤ While on a call that you dialed (busy, talking, or ringing), press 6DYH/DVW
1XPEHU.
68
Strata DK Digital Telephone 6/00
Features
Speakerphone
➤ To call a saved telephone number
➤ Access a [DN] or CO line, then press 6DYH/DVW1XPEHU. The system
automatically dials the “saved” number.
Speakerphone
All digital telephone users can answer internal calls handsfree (on-hook), but only
users with a speakerphone can make and receive calls without lifting the handset. Any
digital telephone model with an “S” in the model name is equipped with a
speakerphone.
➤ To change from speakerphone to handset
➤ Lift the handset.
➤ To change from handset to speakerphone
1. While on a call, press
and hold 6SNU.
2. Return the handset
on-hook.
3. Release 6SNU.
➤ To make a call (on-hook dialing)
1. With the handset onhook, access a CO
line or press a [DN].
You hear dial tone and the Line or [DN] LED flashes
green (in-use).
2. Dial a telephone
number.
You hear ringback tone (or busy tone, if busy).
Strata DK Digital Telephone 6/00
69
Features
Speed Dial
3. Speak in a normal
voice level toward the
telephone.
Note
Your 0LF button must be set to be ON at the
start of a call in system programming. If not,
you must press the 0LF button before talking.
4. Press 6SNU to
disconnect the call.
➤ To answer an incoming call using speakerphone
1. With the handset onhook, press the /LQH
or [DN] with the
flashing LED.
The Line or [DN] LED flashes green (in-use) and you
are connected to the call.
2. Speak at a normal
voice level toward the
telephone.
3. Press 6SNU to
disconnect the call.
Speed Dial
Speed Dial enables you to call a telephone number with a brief access code. There are
two types of Speed Dial numbers:
♦
Station – assigned by individual station users to their own station and can only be
dialed from the station that assigns it.
♦
System – only assigned from attendant consoles or a designated station (typically
the System Administrator’s station), and can be used by other stations. (See
System Administrator User Guide for storing instructions.)
Important!
70
If you do not perform the following procedures within a specified time
(set in system programming for either one or three minutes) when
storing speed dial numbers, the operation times out and your telephone
returns to idle mode.
Strata DK Digital Telephone 6/00
Features
Speed Dial
➤ To store/replace a telephone number on a Station Speed Dial button
1. With the handset onhook, press 5HGLDO.
2. Press the 6' you
wish to store the
telephone number on.
6' buttons are assigned in system programming.
...or 6SHHG'LDO and
enter the code that
you want to store the
telephone number in.
See Table 16 on Page
136 for codes.
3. Enter the telephone
number (max. 20
digits).
To store longer
dialing strings, see
“Speed Dial Number
Linking” on Page 75.
To insert a pause or
flash signal in the
number, see “Speed
Dial Pause and Flash
Storage” on Page 75.
4. Press 5HGLDO.
The number is stored.
➤ To clear a telephone number on a Station Speed Dial button
➤ Repeat the previous procedure on Page 71, skipping Step 3.
➤ To program one-touch telephone number dialing
➤ Repeat the previous procedure on Page 71, except for Step 3. For Step 3, press
[PDN] + CO line access code before the telephone number. See “CO Line Access
Codes” on Page 133.
Strata DK Digital Telephone 6/00
71
Features
Speed Dial–Advanced Features
➤ To make a call using a Speed Dial button or access code
1. Lift the handset.
2. Access a CO line (if
necessary).
If your 6' button has
been programmed to
automatically do this,
skip this step.
3. Press 6'
...or 6SHHG'LDO.
Then enter a Speed
Dial access code (see
Table 16 on Page
136).
The system dials the telephone number assigned to the
button/code. If your 6' button is “one-touch,” as
explained above, skip Step 1.
Speed Dial–Advanced Features
Feature Access Codes
You can program 6'(Speed Dial) buttons with feature access codes for a single
feature or a sequence of features as long as the keyed dial pad characters do not
exceed 20 digits. To determine how many digits you have, count 2 digits for &QI7UQ,
[PDN] and +ROG feature buttons and 1 digit for all other dial pad characters.
See Table 7 for a list of feature access codes.Your System Administrator can tell you
which features can be programmed on your telephone.
➤ To store a feature onto a 6' button
➤ 5HGLDO+ 6' + Feature Access Code + 5HGLDO.
72
♦
See Table 7 for Feature Access code sequences.
♦
6' = the speed dial button the feature is stored on.
Strata DK Digital Telephone 6/00
Features
Speed Dial–Advanced Features
➤ To store a feature onto a code
➤ 5HGLDO+ 6SHHG'LDO + Speed Dial Access Code + Feature Access Code +
5HGLDO.
Important!
●
●
●
●
Table 7
Do not lift the handset.
If you do not enter the entire sequence within a specified time (set in system
programming for either one or three minutes), the operation times out and your
telephone returns to idle mode.
If your telephone does not have a 6SHHG'LDO, press “” instead of Speed Dial,
and enter instead of in all feature sequences
[PDNs] can be stored in speed dial sequences but [PhDNs] and [SDNs] cannot.
Feature Access Codes
Features
1
Feature Access Code Sequence
Account Code (Frequently used codes)
&QI7UQ + + Account code digits
Automatic Callback
Background Music2 (Telephone Speaker ON)
[PDN] + 2
Background Music (Telephone Speakers OFF)
[PDN] + Call Forward–All Calls (To Station or VM)
[PDN] + + Directory Number
Call Forward–Busy (To Station or VM)
[PDN] + + Directory Number
Call Forward Cancel
[PDN] + Call Forward–No Answer
[PDN] + Call Forward External
[PDN] + Call Forward External Cancel
[PDN] + Door Phone Calling
[PDN] + door phone Directory Number
Hookflash Signal
1
&QI7UQ + ISDN Sub
467
ISDN Start
469
ISDN Tone
490
Off-hook Call Announce (Manual Mode)
Voice First: ; Tone First: , , or One-touch Voice Mail Access
[PDN] + Voice Mail Directory Number
Strata DK Digital Telephone 6/00
73
Features
Speed Dial–Advanced Features
Table 7
Feature Access Codes (continued)
Features
Feature Access Code Sequence
Outgoing Calls
[PDN] + CO line access code
(See Table 13 on Page 134.)
Overrides (Busy, DND)
Overrides (Executive)
+ROG+ [PDN] + #XXX
Page Access4
#XXX = Page Access code - “Paging Access
Codes” on Pages 135 and 135.
&QI7UQ + + [X X X] + [Y Y Y]
Park Call/Access Page
The existing call is parked and you are automatically
connected to the page.
[X X X]3= 9 0 0~9 1 9 or 999 park zone number;
[Y Y Y] = page group/zone (See Tables 14 and
15 on Page 135.)
Pickup4 (Directed to station, new, or transferred call) +ROG + [PDN] + + station number [PDN]
Pickup a held or ringing [PDN] or [PhDN]
(not available for all systems)
4
[X X X X] = [PDN] or [PhDN] to be picked up
Pickup any ringing CO line (new call only)
+ROG + [PDN] + Pickup Station Page or Ringing Door Phone4
+ROG + [PDN] + 4
+ROG + [PDN] + Pickup External Page
Pickup Line on Hold (lines 1~99)
5
Pickup Line on Hold (lines 100~200)
1.
2.
3.
4.
5.
6.
74
[PDN] + + [X X X X]
[PDN] + +(a)
6
[PDN] + +(a)
These codes can be used during a CO line call.
Background music speakers can only be turned ON/OFF from Station 200.
XXX = Auto Park Orbit 9 9 9 (access the next available park orbit), or General Park Zones 900~919,
or [PDN] on which the call should be parked. Only use 999 with LCD telephones.
This feature will hold an existing call when the button is pressed. If the button is pressed when not
on a call, pickup or page will still be accessed. These codes can be used during a CO line call.
After pressing the feature button, the user dials the line number (01~99) to pickup the line.
After pressing the feature number, the user dials the line number (100~200) to pickup the line.
Strata DK Digital Telephone 6/00
Features
Speed Dial–Advanced Features
Speed Dial Pause and Flash Storage
Some Speed Dial numbers may require a pause (long or regular) or hookflash be
included (e.g., tone delay requires a pause at the beginning of a Speed Dial number).
Hookflash
Regular Pause
The )ODVK button stores a flash
signal only if 6SG'LDO3DXVH
is programmed as a flexible
button on the telephone. The
flash signal is 0.5 or 2 seconds
long (set in system
programming) and is displayed
on the LCD as “F-”.
Press )ODVK
Long Pause
The pause is either 1.5 or 3
seconds (set in system
programming). The LCD
displays “P-”.
Ten-second pause, which can
be entered anywhere in the
Speed Dial number. The LCD
displays “L-”.
Press 6SG'LDO3DXVH
Press 6SG'LDO/QJ3DXVH.
...or if 6SG'LDO3DXVH is not
on the telephone, press )ODVK
to store a pause.
...or enter the hookflash dial
code (&QI7UQ + ).
Speed Dial Number Linking
You can link any of the Station Speed Dial numbers to System Speed Dial codes or to
any of the optional buttons associated with these codes. This enables up to 36 digits to
be stored under one Station Speed Dial button or code.
The number directly stored in the System Speed Dial number dials out first, then the
number linked to it. Typically, a company’s special carrier access telephone numbers
are stored as part of the digit string.
Note
A designated station can be used to link System Speed Dial codes. See the
System Administrator’s User Guide.
Important!
Before linking Speed Dial Numbers, make sure the System
Administrator has stored the desired number in the System Speed Dial
you plan on using.
Strata DK Digital Telephone 6/00
75
Features
Speed Dial–Advanced Features
➤ To link station/system speed dial numbers
1. Press 5HGLDO.
2. Press 6'
...or 6SHHG'LDO + a
Station Speed Dial Access
Code. (See Table 17 on
Page 136.)
3. Press 6SHHG'LDO.
4. Enter the System
Speed Dial Access
Code to which the
number will be
linked. (See Table 17
on Page 136.)
5. Enter the telephone
number to be stored
(max. 16 digits).
6. Press 5HGLDO.
The number is stored and is automatically dialed when
the optional linked station 6' button is pressed or the
linked Station Speed Dial access code is dialed.
Linked Speed Dial Example
The System Administrator can store a CO line access code plus international long
distance dialing codes in System Speed Dial locations (See Table 17 on Page 136).
You link the System Speed Dial code to a telephone number stored in any Station
Speed Dial location on your station.
System Administrator
Stores the CO line access code and the international dialing sequence (9011813) in the
System Speed Dial location *690 from the administrator station.
➤ Press 5HGLDO + 6SHHG'LDO + + [PDN] + + 5HGLDO.
76
Strata DK Digital Telephone 6/00
Features
Speed Dial–Advanced Features
Note
When you press [PDN], the letter “I” (Intercom) is displayed on your LCD. It
is the [PDN] that is used to automatically access internal dial tone before
dialing the remaining numbers in the Speed Dial sequence (in our example
that number is 9011813).
where:
– System Speed Dial Code that is linked.
– CO line access code.
– international area code.
– country code (example: Japan)
– city code (example: Tokyo)
Station User
Stores the System Speed Dial information on Speed Dial Code 10.
➤ Press 5HGLDO + 6SHHG'LDO + + 6SHHG'LDO + + 5HGLDO.
where:
– Station Speed Dial Code.
– System Speed Dial Code being linked to Speed Dial Code 10.
– local Tokyo telephone number.
➤ To use the new link
➤ From your station, press the 6'() button or 6SHHG'LDO+ . Your
telephone automatically dials to access a CO line, then the international dialing
sequence code plus the local telephone number.
Chain Dialing Speed Dial Numbers
You can call two or more Speed Dial numbers during one call. This enables you to add
additional parties (conference calls) to your conversation with Speed Dialing. It also
allows dialing of a stored code, such as a credit card number, to send to a far-end
computer.
Strata DK Digital Telephone 6/00
77
Features
Timed Reminders
➤ To chain dial Speed Dial numbers
1. Access a CO line. (See Table 13 on Page 134 for CO Line Access Codes.)
2. Press 6SHHG'LDOand dial the Speed Dial code for the telephone number to be
dialed. (See Table 16 on Page 136 for Speed Dial Codes.)
3. To dial another telephone number, press &QI and repeat Steps 1 and 2.
Timed Reminders
You can set five separate reminders at your station. At the time (hour and minute) set
by you, your telephone beeps. If your phone has an LCD, the message is also
displayed. You can set the reminder to occur once or on a daily basis.
➤ To set a timed reminder
1. Press a [DN] and dial
a timed reminder
number
(~).
2. Enter the time you
want to be reminded.
3. Press for the
reminder to be
repeated every day, or
for a one-time
reminder only.
78
#605 TIMER SET
Use a 24-hour clock format
(HHMM).
#605 TIMER SET 0800
#605 TIMER SET 08001
Strata DK Digital Telephone 6/00
Features
Timed Reminders
4. Enter desired LCD
message station
number (~) or
system number
(~)
#605 TIMER SET 0800110
...or enter if your
telephone does not
have an LCD or if you
do not want a
message to display
when the time
reminder tone sounds.
5. Press 5HGLDO.
The time is recorded in
memory and you should hear
a beeping tone (along with the
displayed message) for 30
seconds at the set time.
DATA PROGRAMED
6. To cancel the
beeping/message
prior to 30 seconds,
press 0RGH + or
take the phone offhook.
➤ To cancel a Timed Reminder
1. Press [DN], then the
number of the timed
reminder
(~) you
want to cancel.
You can only cancel one reminder at a time.
2. Press 5HGLDO.
The reminder is cancelled.
Strata DK Digital Telephone 6/00
79
Features
Tone/Pulse Dialing
Tone/Pulse Dialing
With some older Central Offices, you may have to make calls on CO lines that are
programmed for rotary dial pulses. This feature enables you, while on these lines, to
switch to tone dial in order to access remote equipment (such as an answering
machine) requiring DTMF tones.
With ISDN calls, when 7RQH'LDO6HOHFW is pressed, all of the digits entered after
that point will be sent with DTMF tones.
➤ To change Tone Dialing
1. Access a CO line.
Although the CO line is programmed for rotary dial
pulses, access the CO line and dial the telephone
number like any other call described in this user guide.
2. Dial a telephone
number.
3. While on the call,
press 7RQH'LDO
6HOHFW.
The Tone LED lights steady red and you are able to
send DTMF tones with your dial pad. The feature is
cancelled when the call is completed.
Two (Tandem) CO Line Connection
[DN] Button
This feature enables a station user to connect two CO lines, then drop out of the
conversation.
➤ To connect two outside lines (using a [DN] button)
1. While talking on an
outside call using a
[DN] button, press
&QI7UQ.
80
You hear dial tone. The [DN]
LED flashes (conference
rate).
Strata DK Digital Telephone 6/00
Features
Two (Tandem) CO Line Connection
2. Dial a CO line access
code and then the
outside telephone
number.
See Table 13 on Page
134 or ask your
System
Administrator.
3. After the party
answers, press &QI
7UQ.
The [DN] LED flashes (in-use rate) and all parties are
conferenced.
If you receive a busy tone/no answer, press [DN] to
return to the original connection.
4. Press &QI7UQ and
hang-up.
You hear dial tone before you
hang-up The [DN] LED
flashes (exclusive-hold rate)
and the two lines are
connected. N1 and N2 identify
the connected CO lines.
TRK-TRK N1 N2
JAN 10 THU 11: 57
The LED turns OFF when the parties hang-up.
If the public telephone company provides auto
disconnect, the connection may release automatically
when the parties hang up. If not, the lines must be
supervised to be disconnected (see “Supervision” on
Page 83).
CO Buttons
This feature allows a station user to connect two CO lines, then drop out of the
conversation. On some systems, both CO /LQH buttons (or 3RROHG/LQH*US
buttons) must appear on your telephone to allow Tandem connections to be
established from your telephone.
Strata DK Digital Telephone 6/00
81
Features
Two (Tandem) CO Line Connection
➤ To connect two outside lines (using a /LQH button)
1. Press CO /LQH
You hear dial tone.
...or 3RROHG/LQH
*US and dial a
telephone number.
2. After the party
answers, press &QI
7UQ.
You hear dial tone. The CO Line LED flashes
(conference rate). The new Line LED flashes (in-use
rate).
3. Press another CO
/LQH
...or 3RROHG/LQH
*US and dial a
telephone number.
...or on some systems,
you can press &QI
7UQ and dial a CO
line access code
followed by a
telephone number.
4. After the party
answers, press &QI
7UQ.
It is not necessary to have both CO /LQH buttons on
your telephone.
The Line LEDs both flash (in-use rate) and all parties
are conferenced.
If you receive a busy
tone or no answer,
return to the original
connection by
pressing the original
/LQH button.
82
Strata DK Digital Telephone 6/00
Features
Two (Tandem) CO Line Connection
5. Press &QI7UQ and
hang up.
You hear dial tone. Both Line
LEDs continue to flash
(exclusive-hold rate) and the
two lines are connected. N1
and N2 identify the connected
CO lines.
TRK-TRK N1 N2
JAN 10 THU 11: 57
The LED turns OFF when the parties hang-up.
If the public telephone company provides auto
disconnect, the connection may release automatically
when the parties hang up. If not, the lines must be
supervised to be disconnected (see “Supervision” on
Page 83).
Supervision
➤ To supervise a tandem call and release it
1. Press [DN]
...or /LQH
...or 3RROHG/LQH
*US.
2. If the parties have
hung up, go back onhook
You are connected to both CO
lines. Both Line LEDs flash
(in-use rate). N1 and N2
identify the connected CO
lines.
TRK-TRK N1 N2
JAN 10 THU 11: 57
Both Line LEDs turn OFF and the connection is
released.
...or if the parties are
still talking, press
&QI7UQ and hangup.
Strata DK Digital Telephone 6/00
83
Features
Voice Mail Integration
Voice Mail Integration
This section explains how to program your telephone for Call Forward and retrieve
messages when using a Toshiba Voice Mail System with your Strata DK system. Refer
to the appropriate Toshiba Voice Mail User Guide for more information:
♦
Stratagy Voice Processing User Guide
♦
Toshiba VP User Guide
Message Mailbox
To direct forwarded calls to your mailbox–your personal storage space for voice
messages–and to ensure that callers receive your personal greeting, you must store a
Voice Mail (VM) Identification (ID) code. You need to store the ID code only once.
Then whenever your station is call forwarded to voice mail, the VM ID code is
automatically sent to the voice mail unit to direct the call to your mailbox.
Your [PDN] and up to four [PhDNs] can be independently Call Forwarded from your
telephone to either a unique (or the same) mailbox number. Telephones must be
programmed as the owners of a [PhDN] to be able to call forward the [PhDN] to a
voice mailbox number.
➤ To assign a voice mail message mailbox number
Note
84
This procedure is required for the initial storage of VM ID code to the Toshiba
Voice Mail system. Once programmed, these digits remain in memory
until changed. To change the code, repeat this procedure.
1. Press [DN] + .
You hear confirmation tone.
2. Enter the voice mail
ID code and the voice
mailbox [DN], plus
any required pauses
(up to 16 characters).
Example: for Toshiba voice
mail systems, enter + the
mailbox number.
656 ID CODE SET
91203
203= mailbox number of the
[DN] you pressed in Step 1.
Strata DK Digital Telephone 6/00
Features
Voice Mail Integration
3. Press 5HGLDO.
You hear a confirmation tone.
The LCD confirms the data
storage.
DATA PROGRAMED
➤ To cancel the mailbox number
➤ Press [DN] + + 5HGLDO.
Message Retrieval
You can program a flashing 06* or [PhDN/MW] to automatically retrieve your
voice mail messages when it is pressed. Storing the message retrieval sequence in
Steps 1~4 below is required only once. It remains in memory unless cancelled or
changed.
➤ To assign the message retrieval sequence
1. Press [DN] + .
You hear a confirmation tone.
657 ID CODE SET
2. Enter the voice mail
system code and the
voice mailbox [DN],
plus any required
pauses (up to 16
characters).
Example: for Toshiba voice
mail systems, enter + the
mailbox number.
3. Enter your security
code.
By storing your security code, you avoid having to
enter your code every time you access your mailbox;
however, this will also allow anyone to retrieve your
messages from your phone. If a security code is not
desired, do not include it.
4. Press 5HGLDO.
You hear confirmation tone.
The LCD confirms the data
storage.
Strata DK Digital Telephone 6/00
92203
[203] = mailbox number.
DATA PROGRAMMED
85
Features
Voice Mail Integration
➤ To retrieve messages with 0VJ or [PhDN/MW] button
➤ Press 0VJ [PhDN/MW] button with flashing LED.
➤ To cancel automatic retrieval
➤ Press [DN] + + 5HGLDO.
Multiple Message Retrieval (LCD Telephones)
1. With the flashing
LED, press 0VJ or
[PhDN/MW].
The displayed station is
called.
When a message waiting
voice mail is displayed, a V
follows the station number. If
a + sign is displayed, you
have message waiting
indications from more than
one source (voice mail or
stations). Press 6FUROO to
rotate through more message
waiting sources.
86
NO. 203
CALL 200 216V+
Strata DK Digital Telephone 6/00
Features
Voice Mail Integration
Call Forward to Voice Systems
By setting Call Forward to the Toshiba Voice Mail System on your telephone, callers
are automatically connected to your voice mailbox.
Note
&DOO)RUZDUG buttons can only be used to Call Forward [PDNs]; access
codes can be used to Call Forward [PDNs] or [PhDNs].
➤ To forward calls to voice mail
1. Press the desired &DOO The LED flashes.
)RUZDUG button
...or a [PDN] or
[PhDN] + access
code.
You hear a confirmation tone after entering the access
code.
Call Forward access codes:
Call Forward-All Calls:
Call Forward-Busy:
Call Forward-No Answer:
Call Forward-Busy-No Answer:
2. Dial the Voice Mail
System Directory
number__________.
See your System Administrator for the correct voice
mail Directory Number. After dialing, you hear
confirmation tone.
3. Press the same Call
Forward button used
in Step 1
If your phone has a Call Forward button assigned, its
LED lights steady red.
...or if you used an
access code sequence,
press 6SHHG'LDO +
5HGLDO + 6SNU.
Strata DK Digital Telephone 6/00
87
Features
Voice Mail Integration
➤ To cancel Call Forward
➤ Press Call Forward
button
The Call Forward LED turns off.
Note
...or press a [PDN] or
[PhDN] + , then
hang up.
88
Call Forward buttons apply only to [PDNs]
and not to [PhDNs].
You hear a confirmation tone, and Call Forward is
cancelled.
Strata DK Digital Telephone 6/00
LCD Operation
3
This chapter covers the LCD, its buttons and displays. Special features available only
with the LCD are described in detail and step-by-step instructions on using them are
given. (For digital telephone standard features, see Chapter 2 – Features.)
Strata DK Digital Telephone 6/00
89
LCD Operation
Control Buttons
Control Buttons
The 0RGH, 3DJH and 6FUROO buttons are active when Soft Keys are turned off or
your telephone is idle. Table 8 lists button functions.
Table 8
Control Button Definitions
Button
Definitions
Cancels the beeping tone when using timed reminders and enables you to enter/
exit the following mode functions.
0RGH
90
Used to exit another mode and return to clock/calendar display
(see “To Exit from any Mode” on Page 91).
Busy Lamp Field (BLF) display
(see “Busy Lamp Field (BLF) Display” on Page 96).
Busy station messaging
(see “Silent Messaging (Busy Station)” on Page 110).
Called station messaging
(see “Notification Station Messaging” on Page 107).
Displays LCD message number NN, where NN can be personal
messages or system messages. 0RGH only displays the selected
message. It cannot be used to edit or create a new message.
Speed dial number check and memo dialing
(see “Retrieve and Auto Dial Lost Calls” on Page 99).
Caller ID/ANI/DNIS information mode OFF
(see “Caller ID/ANI/DNIS Information Mode” on Page 97).
Caller ID/ANI/DNIS information mode ON
(see “Caller ID/ANI/DNIS Information Mode” on Page 97).
Caller ID/ANI/Lost Call stored information display
(see “Retrieve and Auto Dial Lost Calls” on Page 99).
View Call Park Orbit list (see “Call Park Orbit List Display” on Page 99).
Soft Keys ON (see “Soft Keys” on Page 91).
Soft Keys OFF (see “Soft Keys” on Page 91).
Remote called station messaging
(see “Group Notification Station Messaging” on Page 108).
Remote calling station messaging (see “To set a advisory station
message for a remote station” on Page 106).
Strata DK Digital Telephone 6/00
LCD Operation
Soft Keys
Table 8
Control Button Definitions (continued)
Button
3DJH
6FUROO
Definitions
♦
Changes Busy Field groups.
♦
Changes displays (date/time, elapsed time,
message, call forward, dialed number).
♦
Scrolls through speed dial numbers when in Mode
8.
♦
Scrolls through message waiting numbers.
♦
Scrolls through the speed dial digits (if more than 16 digits) when in Mode 8.
NO. 204
MAY 24 MON 12: 05
➤ To Exit from any Mode
1. Press 0RGH.
MODE NO. ?
2. Press .
The LCD displays date/day/
time.
JUNE 03 TUE 03:54
Soft Keys
The Soft Key feature provides a quick-and-easy way to access frequently-used
features during a call. When Soft Keys are on, they replace the Mode, Page, and Scroll
functions. When your telephone is idle, Soft Keys do not display and the 0RGH,
3DJH, and 6FUROO keys operate as LCD control buttons.
If the Soft Key feature is activated at your station, you can still access features with
feature buttons (fixed or flexible) or with access codes. Your telephone may already
come with the Soft Keys activated.
Strata DK Digital Telephone 6/00
91
LCD Operation
Soft Keys
➤ To turn Soft Keys ON
1. Make sure that your
telephone is idle and
the handset on-hook.
2. Press 0RGH + .
Your LCD confirms that the
keys are on.
LINE OR STATION?
LINE STA.
RTRN
Your LCD confirms that the
keys are off.
NO. 204
SOFT KEY OFF
➤ To turn Soft Keys OFF
1. Make sure that your
telephone is idle and
the handset on-hook.
2. Press 0RGH + .
Soft Key Display
Abbreviated Soft Key feature prompts display on the LCD
above the Control buttons (0RGH, 3DJH, and 6FUROO). In the
following example, you would press 0RGH for the TRNS
function, 3DJH for CONF and 6FUROO for PGE.
TALK ON LINE 2
TRNS CONF PGE
If the Soft Key feature is activated at your station, incoming call information does not
display on your LCD while your station is busy. To display this information, you must
either disconnect the existing call or place it on hold.
How to Use Soft Keys
This section provides an example of how to use Soft Keys to make a Conference call
by adding a station to an outside call. See “Soft Key Prompts” on Page 95 for a list of
features that can be accessed with Soft Keys.
92
Strata DK Digital Telephone 6/00
LCD Operation
Soft Keys
Example: Using Soft Keys to Make a Conference Call
While on an outside call (LINE 3) you initiated, your LCD
displays the prompts ABR, CONF, and PGE during the first 30
seconds (if ABR does not appear, then this feature was not
assigned in system programming).
Thirty seconds after the first digit of the telephone number is
dialed, the display changes to TRNS, CONF, and PGE. If the
call is an incoming call, the TRNS prompt appears
immediately when you answer the call.
TALK ON LINE 3
ABR CONF PGE
TALK ON LINE 3
TRNS CONF PGE
➤ To Use Soft Keys to Make a Conference Call
1. While on an outside
call, press CONF
(3DJH) to initiate the
Conference.
The outside call is placed onhold.
LINE OR STATION?
LINE STA.
RTRN
(Optional) You can
press RTRN (6FUROO)
to terminate the
operation and return
to the outside call.
If you press RTRN,
you will have to
repeat the previous
step if you wish to
return to transfer,
conference, or page.
2. To transfer to a
station, press STA
(3DJH).
3. Dial a station number.
Strata DK Digital Telephone 6/00
DIAL STATION NO.
RTRN
The name and/or number
[203] displays for about three
seconds.
CALLING
JANE BROWN 203
93
LCD Operation
Soft Keys
If you have Voice First
Signaling, the display changes
to:
If you have Tone First
Signaling, the phone rings
station [203] and the display
changes to:
ANNOUNCE TO 203
TRNS CONF PGE
RINGING 203
TRNS TALK
RTRN
TALK WITH 203
TRNS JOIN
RTRN
4. (Optional) If you have
voice first signaling,
announce the call to
station 203.
The called station answers,
and you are connected to
station 203 and the outside
call remains on-hold.
5. Press JOIN (3DJH).
All parties are now joined in a
conference. Your LCD
indicates that you are in a
conference with CO line 3
and station 203 [LN3+203].
6. Press EXIT (0RGH)
to drop out of the
conference
The other parties remain connected in the conference
call.
LN3+203
EXIT CONF
...or CONF (3DJH) to
add another party to
the conference.
94
Strata DK Digital Telephone 6/00
LCD Operation
Soft Keys
Soft Key Prompts
Table 9 provides definitions of all of the Soft Key prompts that could appear on your
LCD.
Table 9
Soft Key Prompts
Soft Key
Definition
ABR
Activates Automatic Busy Redial after dialing a busy outside telephone number.
ACB
Activates Automatic Callback after reaching a busy station, CO line, or CO Line group.
BUSY
(Busy Override) Sends a call-waiting tone to a busy station.
CONF
Initiates or completes a conference.
EXEC
(Executive Override) Breaks into the conversation of a busy called station.
EXIT
Exits you from a conference; remaining parties are connected.
JOIN
Joins all parties to a conference while on a conference call.
LINE
Adds a CO line to an existing call while in the Conference mode. The LCD prompts you to
access a CO line after you press this key.
MESG
Sets a message waiting indication at a busy or unanswered station.
OVRD
Overrides options, busy mode, or overrides Do Not Disturb mode.
PGE
Parks an outside call and to gain access to a menu of options.
RING
Makes a called station ring when making a voice announce call to the station.
RLS
Disconnects a call and returns phone n to the idle state.
RTRN
Terminates a feature operation and to return to a previously displayed state.
STA.
Adds a station to an existing call while in the Conference mode. The LCD prompts you to
dial a station number after you press this key.
TALK
Makes a voice announcement to a called station that is ringing.
TRNS
Initiates or completes a Transfer while on an outside call. Press once for an immediate or
announced transfer, depending on system programming. Pressing TRNS again
completes the transfer.
Strata DK Digital Telephone 6/00
95
LCD Operation
Busy Lamp Field (BLF) Display
Busy Lamp Field (BLF) Display
This feature displays when a station is busy or ringing on any type of [DN] or CO line.
If all or a telephone’s [PDNs] are in use on another telephone(s), the telephone shows
busy on the BLF, even though it may be idle. If a telephone is in the DND mode, the
telephone BLF appearance displays busy.
Starting with the number entered, the BLF displays a group of 10 [PDNs] per line; a
total of 20 for the LCD. Pressing 3DJH scrolls the display. The BLF mode stops all
other displays from appearing on your telephone’s LCD.
➤ To display the BLF
1. Press 0RGH + .
BLF NO. ?
2. If [PDNs] are two
digits, press ...or enterthe first
digit of a three-digit
[PDN]
...or enterthe first two
digits of a four-digit
[PDN].
For example, if you enter 2
for 200, the list of telephone
[DNs] beginning with the 200
display.The sample LCD
(shown at right) indicates that
stations 200, 205, and 217 are
in use or DND mode.
200
210
0 . . . 5 . . . . .
. . . . . . 7 . . .
210
220
. . . . . . 7 . . .
. . 2 . 4 . . . . 9
3. Press .
4. Press 3DJH to rotate
BLF groups.
96
The 200/210 group changes to
210/220.
Strata DK Digital Telephone 6/00
LCD Operation
Caller ID/ANI/DNIS Information Mode
Caller ID/ANI/DNIS Information Mode
Automatic Number Identification (ANI) information cannot co-exist on the same
telephone LCD with Dialed Number Identification Service (DNIS) information. If
your system is programmed to receive both ANI and DNIS information on incoming
calls, press 3DJH while the call is ringing to alternate between DNIS and ANI/Caller
ID LCD displays. After you answer the call, you can not alternate between displays.
DNIS
Incoming DNIS telephone numbers can be correlated in the system database with
assigned DNIS names. These names, up to 16 alphanumeric characters, display on
your telephone’s LCD, enabling incoming calls to be instantly identified and
appropriately answered. Table 10 shows DNIS samples.
ANI/Caller ID
If your telephone is programmed to receive Caller ID names and numbers, the calling
party’s name displays. Table 10 shows ANI samples. If Caller ID was activated, then
the caller’s name and/or number would appear on the first line.
➤ To display the number while the call is ringing
➤ While the call is
ringing, press 3DJH.
MR. JONES
LINE 3 RINGING
➤ To activate the Caller ID/ANI or DNIS display mode
➤ Press 0RGH + . (The system default is ON.)
➤ To deactivate the Caller ID/ANI or DNIS display mode
➤ Press 0RGH + .
Strata DK Digital Telephone 6/00
97
LCD Operation
Caller ID/ANI/DNIS Information Mode
Table 10
DNIS/ANI Samples
Function
Incoming Call
ANI/Caller ID Number1
CN: 7145556782
LINE 3 RINGING
Answered incoming or transferred call.
Display changes to call duration.
CN: 7145556782
ANSWERED LINE 3
Call placed on-hold.
HOLD LINE 3
SEP 9 TUES 18:30
Held call recalls your station.
CN: 7145556782
LINE 3 RECALL
201
TOSHIBA TSD
ANSWERED LINE 3
TOSHIBA TSD
LINE 3 RECALL
NO. 200
CALLING
Transferred station (201) hangs up.
CN: 7145556782
LN 3 TRANS 201
TOSHIBA TSD
LINE 3 TRANS
Transferred call recalls your station (201).
CN: 7145556782
L 3 RECALL 201
TOSHIBA TSD
L 3 RECALL
201
TOSHIBA TSD
LINE 3 CALL
201
Call forwarded to your phone.
1.
98
TOSHIBA TSD
LINE 3 CALLING
TOSHIBA TSD
LINE 3 RINGING
Incoming ACD Call
Station 201 is transferring a call to you
(station 200).
DNIS/Caller ID Name
201
Caller ID numbers do not display CN: before the number, whereas ANI does.
Strata DK Digital Telephone 6/00
LCD Operation
Call Park Orbit List Display
Call Park Orbit List Display
This feature enables you to monitor (view) the calls that are parked at your station.
➤ While your phone is
idle, press 0RGH +
.
LCD shows the CO Line
number (003) and the orbit
number where the call is
parked (900).
LN 3 ORBIT 900+
...or 2UELW/LVW. To
scan the Orbit List,
press 6FUROO.
Retrieve and Auto Dial Lost Calls
The system automatically saves the numbers for all calls that ring at your telephone,
but are unanswered (lost calls). This feature enables you to view the stored
information, view the time and date, delete the information without returning the call,
and/or Auto Dial the saved numbers.
➤ To view lost calls
1. Press 0RGH + .
The phone number and caller
name are displayed on your
LCD. ANI/Caller ID numbers
always include area codes.
2. Press 6FUROO
The next lost call displays.
...or
Strata DK Digital Telephone 6/00
The previous lost call
displays.
MR. JONES
7145553700
MR. SMITH
7145568725
MS. DOE
7143723546
99
LCD Operation
Retrieve and Auto Dial Lost Calls
...or 3DJH.
Toggles between the phone
number/caller name screen
and the date and time screen.
06/02 17: 46
CN: 7145553700
MR. JONES
7145553700
Note
CN: Identifies ANI calls as opposed to Caller ID calls which do not display
CN:.
➤ To delete lost call
1. Press 0RGH + The next lost call is displayed.
2. Press 6FUROO
The next lost call displays.
MR. SMITH
7145568725
...or press The previous lost call
displays.
...or press .
The lost call information is deleted without auto
dialing the call.
MS. DOE
7143723546
➤ To Auto Dial the lost call
1. Press 0RGH + The phone number and caller
name are displayed on your
LCD. ANI/Caller ID numbers
always include area codes.
2. Press6FUROO
The next lost call displays.
...or 100
The previous lost call
displays.
MR. SMITH
7145568725
MS. DOE
7143723546
Strata DK Digital Telephone 6/00
LCD Operation
Messages, Memos, and Name Display
3. Press CO /LQH
You hear dial tone.
...or a [DN] + CO
/LQH access code.
4. Press /RVW&DOO
$XWR'LDO.
The DK System auto dials the digit “1” before dialing
the saved, outgoing telephone number.
Messages, Memos, and Name Display
The LCD on your telephone can be used to send or receive
BACK AT 2-PM-CALL
messages to/from other LCD telephone users (sample shown
MEETING FOR 3PM
at right). It can also display the names/numbers of the person
calling your telephone or the name of the person you are calling. Names and memos
can also be set
to display with speed dial numbers and timed reminders.
You can write or edit a station message (10~19), “fill in the blanks” of system
messages 62~64, enter a name/title that will display when other stations call your
station (see “Name/Number Display” on Page 113), or enter a Speed Dial (see “Speed
Dial Memos” on Page 111) or Timed Reminder memo (see “Timed Reminders” on
Page 78). System messages 65~99, if available, are written by the System
Administrator and cannot be edited by the user.
Strata DK Digital Telephone 6/00
101
LCD Operation
Messages, Memos, and Name Display
➤ To enter LCD characters
102
1. Access message/
memo/name display.
A cursor (—) appears at the first character in the
display.
2. Enter the message/
name/memo (up to 32
alphanumeric
characters), using the
following dial pad keys
(dial pad shown at
right):
– moves right
– moves left
²toggles between
alphanumeric
mode (dial pad
defaults to
numeric mode)
– scrolls the alpha/
special characters.
See Table 11 for dial pad key equivalents.
3. To blank out any
portion of a message,
press (in alpha mode)
and move the cursor to
the right.
Each character the cursor transverses is deleted.
2358
Move Right
(Alpha mode only)
Move Left
Scrolls alpha/
special characters
Toggles between
alphanumeric
characters
Strata DK Digital Telephone 6/00
LCD Operation
Messages
Table 11
Dial Pad Key Equivalents
Letter
Key
Equiv.
Letter
Key
Equiv.
Letter
Key
Equiv.
Symbol
Key Equiv.
A
J
S
:
B
K
T
–
C
L
U
+
D
M
V
/
E
N
W
F
O
X
G
P
Y
H
Q
Z
I
R
Note Symbols shown
above must be
made in alpha
character mode on
the dial pad.
Messages
There are three basic LCD message functions:
♦
Advisory messaging enables you to store an informative message for LCD
telephones that call your phone.
♦
Silent messaging enables you to write a message that you can send to busy LCD
telephones. Silent messaging lets you communicate visually to someone who is
occupied on the telephone.
♦
Notifications enable you to send your station number and message indication to
another LCD station. Responding to the message, the called station receives your
message.
Strata DK Digital Telephone 6/00
103
LCD Operation
Messages
System Messages 60~64
System messages 60~64 are standard messages. You can “fill in the blanks” of
messages 62~64 (see below). Example: Message 64 can be edited to read RETURN
ON JAN. 4. Callers with LCD phones will see that message when they call your
number.
System Message
Number
Preprogrammed message
(Max. 32 digits per message)
60
OUT TO LUNCH
61
IN A MEETING
62
CALL _____________
63
BACK AT __________
64
RETURN ON________
System Messages 65~99
System messages 65~99 can only be programmed or permanently changed at the
Administrator’s telephone. Any messages programmed at Administrator’s telephone
remain in memory until canceled from Administrator’s telephone or until the system is
reinitialized.
Station Messages
You can create up to 10 station messages (10~19). Once entered, a message can never
be deleted; only overwritten. This is a station option that is enabled in system
programming.
➤ To enter/store a station message
1. Press /&'0VJ
6HOHFW
The LCD Msg Select/[PDN]
LED flashes.
MSG NO. ?
...or [PDN] + .
2. Enter the two-digit
message number
(10~19) to be stored.
104
The current message, if any, is displayed.
Strata DK Digital Telephone 6/00
LCD Operation
Messages
3. Enter the message.
(See “To enter LCD
characters” on Page
102.)
The LCD Msg Select/[PDN] LED lights steadily, and
the LCD displays the message. The message is now
stored in system memory.
4. Repeat Steps 1~3 for
any additional
messages you want to
store.
5. Press /&'0VJ
6HOHFW
...or 6SNU.
The message displays on your LCD an Advisory
Message (see below). To cancel the message display,
press [PDN] and dial or press /&'0VJ
6HOHFW.
➤ To set an advisory message for incoming calls
1. Press /&'0VJ
6HOHFW
The LCD Msg Select/[PDN]
LED flashes.
MSG NO. ?
...or a [PDN] + .
2. Enter the desired
message number:
~ (station)
...or ~ (system)
3. Press /&'0VJ
6HOHFW
...or 6SNU.
The selected message
displays. (This assumes the
message has already been
stored in memory.)
MSG NO. 10
The message displays on your telephone’s LCD. The
LCD Msg Select/[PDN] LED lights continuously. The
selected message is sent to LCD phones when they call
your [PDN] or any [PhDN] owned by the telephone.
4. If you have Call
Forward set, press
3DJH to display the
message instead of
the CF display.
Strata DK Digital Telephone 6/00
105
LCD Operation
Messages
➤ To cancel an advisory message that has been set at your station
➤ Press /&'0VJ6HOHFW
...or [PDN] + + 6SNU.
The LED goes out. If a station message was sent, this procedure does not erase it.
➤ To set a advisory station message for a remote station
1. While your telephone
is idle, press 0RGH +
.
2. Dial the destination
[PDN].
MODE 95
DEST EKT NO.?
207 = the destination [PDN]
3. Press 3DJH.
MW TO ST123
MSG NO?
4. Enter the message
number (station
a; system,
a).
(This assumes the message is
already stored in memory.)
5. Press 3DJH.
Remote calling station
messaging allows you to set a
calling station message for
only one station at a time.
6. Press 0RGH.
207 = the [PDN] where
message will be set.
M
MW TO STXXX
MSG NO?10
CALL 207-010M
010 = the message number.
106
MODE 95 DEST EKT
EKT NO. 207
Called station
= message is set.
Strata DK Digital Telephone 6/00
LCD Operation
Messages
7. Press .
Your LCD shows the time and
date. The message is
displayed at station 207. LCD
telephones calling station 207
receives the message.
SENT 207
Your station
Message Notifications
With an LCD telephone, you can set short messages (up to 32 characters) that display
to callers with LCD telephones.
Any station can record a message; however, only stations with an LCD are able to see
the stored messages. Stations that do not use Soft Keys (Soft Keys Off: 0RGH+)
can send messages “live” to other LCD station users.
Notification Station Messaging
Your station number and a message indication can be sent to another LCD station.
When that station responds, it will receive the message. Soft Keys must be OFF at the
sending station for this feature to operate.
➤ To set a notification station message
1. Press [PDN] and dial
the station Directory
Number (station does
not answer or is
busy).
2. Press 0RGH + .
3. Enter the message
number.
MW TO STXXX
MSG NO.?
Station message (10~19), system message (60~99).
The LCD displays the message. (This assumes the
message has already been stored in memory.)
4. Press 0VJ.
Strata DK Digital Telephone 6/00
107
LCD Operation
Messages
5. Press 6SNU or hang
up to release.
Msg LED flashes on the
called station.
CALL 204-207M
204 = the called [DN]
207 = the [PDN] of the station
Called station
that sent the message
M = message has been sent.
SENT 204
Your station
➤ To receive a notification station message
➤ Press 0VJ when your telephone Msg LED is flashing.
➤ To cancel the message from the telephone that set the message
➤ Press [PDN] and dial
;;;.
XXX is the [PDN] of the telephone that has the
message set.
Group Notification Station Messaging
This feature enables a station to set a Called Station Message for a group of stations.
➤ To set a notification station message for another station or group of stations
1. Press 0RGH + .
2. Dial the destination
[DN]
...or press for all
call page stations,
...or enter a group
code (~).
MODE 94
DEST EKT NO.?
Station groups correspond to
the same stations that are in
respective Page groups
assigned in system
programming.
MODE 94
DEST EKT NO. 207
207=destination [DN] or
group number.
~ for Page Group
1~8 respectively.
108
Strata DK Digital Telephone 6/00
LCD Operation
Messages
3. Press 3DJH.
4. Dial the originating
[PDN].
MODE 94
ORG EKT NO.?
This can be your number or
another station number.
MODE 94
ORG EKT NO. XXX
5. Press 3DJH.
MSG NO.?
6. Enter the message
number (station
a; system,
a).
The LCD displays the
message. In this example,
system message 60 was
entered. (This assumes the
message is already stored in
memory.)
OUT TO LUNCH
7. Press 3DJH.
MSG NO.?
8. Press 0RGH.
MODE NO.?
9. Press .
At the destination station, the
LCD displays the originating
station number and the 0VJ
LED flashes.
SENT 207M
➤ To receive a notification message
➤ Press 0VJ.
Strata DK Digital Telephone 6/00
109
LCD Operation
Messages
➤ To cancel the message from the telephone that set the message
➤ Press [PDN] and dial ;;;, where XXX is the [PDN] of the telephone that
set the message.
Silent Messaging (Busy Station)
An audible tone and an LCD message can be sent to an LCD station that is busy. The
busy station can return a message to the calling station’s LCD. The two stations may
continue this procedure to carry on a “silent” conversation. Soft Keys must be OFF
(0RGH + ) at the sending and receiving stations for this feature to operate.
➤ To send a message to a busy station
1. When you receive a
busy tone, press
0RGH + .
210=[DN]
2. Enter the message
number.
Station message (10~19) and
system message (60~99). The
LCD displays the message.
(This assumes the message is
already stored in memory.)
3. Press 3DJH.
The destination station beeps
four times and the message
displays for 30 seconds, or
until you hang up.
Your LCD confirms the
message was sent.
110
OVER TO ST210
MSG NO?
MSG SEND
Strata DK Digital Telephone 6/00
LCD Operation
Memos
➤ To return to a busy station message after receiving a busy station message
1. Press 0RGH + .
OVR TO ST210
MSG NO?
2. Enter the message
number.
Station message (10~19) and system message (60~99).
The LCD displays the message. (This assumes the
message is already stored in memory.)
3. Press 3DJH.
Your LCD confirms the
message was sent.
MSG SEND
Memos
Speed Dial Memos
You can store names (12 characters max.) for each of 40 station speed dial numbers.
The memo pad of names can be scrolled to select the appropriate party. The station
must be enabled via system programming for LCD message memory.
➤ To program Speed Dial names and numbers
1. Press 5HGLDO, then
6SHHG'LDO.
2. Dial a station speed
dial code.
See Table 16 on Page 136 for
speed dial codes.
3. Press 0RGH.
If a name was previously
stored on this code, it appears
on the top line.
Strata DK Digital Telephone 6/00
# * 10 SPEED DIAL
*10 NAME
SPEED DIAL
111
LCD Operation
Memos
4. Enter the name or
memo (12 characters
maximum).
The name appears on the bottom line as you enter it.
(See “To enter LCD characters” on Page 102.)
5. Press 0RGH.
6. Enter a phone number
(16 characters
maximum).
The number displays on the top line as you enter it.
7. Press 5HGLDO to
record data in
memory.
➤ To display the Speed Dial number and memo
➤ Press 0RGH + ;a;, where X~X is the speed dial number to be displayed.
➤ To dial a Speed Dial number
1. When your phone is
idle, press 0RGH + .
2. Enter Station Speed
Dial Code
SPEED DIAL NO. 10
...or System Speed
Dial Code.
3. Press 3DJH to see
more of the directory
of numbers/memos.
4. Press an available
The number is dialed.
/LQH
...or [DN] and enter a
CO line access code.
112
Strata DK Digital Telephone 6/00
LCD Operation
Name/Number Display
➤ To check a speed dial number
1. When phone is idle,
press 0RGH + .
2. Dial a speed dial
number.
MODE NO.? 8
TOSHIBA is the memo (up to
12 characters).
*11 TOSHIBA
7145553700
714 583 3700 is the number
(up to 16 digits).
3. Press 3DJH to scan
the directory for the
appropriate number/
memo.
If the number is longer than 16 digits, a “+” appears in
the far right corner of the display.
4. Press 6FUROO to
display any remaining
digits.
Timed Reminders
See “Timed Reminders” on Page 78.
Name/Number Display
This feature enables you to enter a name/title, telephone number, location, etc. in
system memory. This name/title (e.g., LOBBY) displays on your station’s LCD while
it is idle, and on other stations’ LCDs when you call them or they call you.
Name display information for non-LCD telephones or voice mail/auto attendant
devices may be entered by the System Administrator for display on other stations’
LCDs when called.
When this feature is set, your Name/Number displays during direct, forwarded, and
hunted calls. On override or OCA calls, it does not display.
Strata DK Digital Telephone 6/00
113
LCD Operation
Name/Number Display
➤ To enter name/number information
1. Press [DN] + .
USER NAME ?
2. Enter the new
information (up to 16
characters, e.g., user
name and station
number). See “To
enter LCD
characters” on Page
102.
3. Press 6SNU.
The information is stored and
appears on the top line of your
station’s LCD.
When you call a station, the
name/title displays on the
bottom of the called station’s
LCD.
TOSHIBA EXT. 200
DATE DAY TIME
NO. 213
TOSHIBA EXT. 200
➤ To clear name/number display
1. Press [DN] +
.
You hear confirmation tone, then busy tone.
2. Press 6SNU.
During clear:
114
NO. 213
USER NAME RESET
Strata DK Digital Telephone 6/00
LCD Operation
Name/Number Display
After clear: A name is
displaced by message and call
forward settings if they are
set.
Note
NO. 213
DATE DAY TIME
This procedure does not erase the name/
number. To restore the display, press [DN] +
.
➤ To erase name/number display
1. Press [DN] +
.
Current information displays
on the lower line of the LCD.
2. Press in the alpha
mode to enter blanks.
Blank characters replace the information.
3. Press 6SNU.
The information is erased and the [PDN] of the
telephone is displayed.
Strata DK Digital Telephone 6/00
USER NAME ?
115
LCD Operation
Name/Number Display
116
Strata DK Digital Telephone 6/00
Full-duplex Speakerphone
4
This chapter explains how to use the Full-duplex Digital Speakerphone
(DKT2020-FDSP).
The DKT2020-FDSP is designed to allow both parties of a speakerphone call to speak
simultaneously. This eliminates “clipping” and enables true two-way conversation.
However, when two parties are talking simultaneously, the performance is not as good
as on a handset. The technology necessitates some volume loss in this situation.
An optional External Microphone can be connected for improved performance.
However, the External Microphone is extremely directional and should only be used
in certain applications. The telephone also provides half-duplex/full-duplex manual
selection.
The DKT2020-FDSP has three operational modes for enhanced microphone use
(Best, Good and Normal). These modes allow adjustments for different room
acoustical characteristics. Choosing either the Internal or External Microphone
(RFDM) and proper operational mode should be pre-selected by the system installer.
When the External Microphone option is installed, the telephone’s Internal
Microphone is disabled on all but Voice First Handsfree Answerback calls and OCA
calls. The External Microphone is powered by the phone (no batteries are required)
and does not need to be turned off when not in use.
Choosing either the Internal or External Microphone is performed on the DIP
switch 5, located under the keystrip (see Figure 4).
Strata DK Digital Telephone 6/00
117
Full-duplex Speakerphone
Dip Switches
Important!
The DKT2020-FDSP’s full-duplex operation depends on the speaker volume setting.
Raising or lowering speaker volume directly affects the performance of the full-duplex
operation.
♦
Depending on the room’s echo characteristics, raising the volume of the
speakerphone can cause the full-duplex operation to deteriorate. When set to
maximum volume, it may be necessary to switch to half-duplex operation.
♦
The speakerphone will automatically reduce volume in each direction when both
the FDSP user and the distant party are talking at the same time. The volume
reduction is required to control the echoes at high volume levels. It is possible for
surrounding conversations and other sounds to trigger this effect even when you
are not speaking.
♦
The performance of the DKT2020-FDSP can vary on calls that involve a delay,
such as wireless calls, Voice Over Internet Protocol calls, etc. With these types of
calls, the quality can diminish.
♦
When using the [PDN] or Intercom button, the performance for internal calls is
not as good as for external calls.
Dip Switches
The DKT2020-FDSP has DIP switches that enable use for the External Microphone
and the international market. The DIP switches are located underneath the flexible
button key strip (see Figure 4).
There are three different DIP switch settings for optimum operation in various types of
environments:
118
♦
Best – provides full-duplex operation with the Internal or External Microphone.
This is ideal for a large enclosed area, such as an office with little echo. Echo
varies according to the environment. For instance, a room that is relatively empty
has more echo than a room with furniture or items that can absorb sound waves.
♦
Good – provides full-duplex operation with the Internal or External Microphone.
This is ideal for a small office with high echo.
♦
Normal – provides full-duplex operation with the Internal or External
Microphone. This works well with an open office area, such as an office cubicle.
Strata DK Digital Telephone 6/00
Full-duplex Speakerphone
Dip Switches
LCD Display
Handset
DIP Switches
(some models)
ON
Red/Green
LED Indicators
1
2
3
4
Line 9
Do Not
Disturb
Line 8
Line 7
Dial Pad
Speed
Dial
Line 17
Line 6
Line 16
Line 5
Line 15
Line 4
Line 14
Line 3
Line 13
Line 2
Line 12
Line 1
Line 11
Flexible Buttons
Intercom Line 10
Fixed Buttons
3926
Figure 4
Microphone Location
Location of DIP Switches
Table 12 shows the switch positions for the three different settings.
Table 12
DKT2020-FDSP DIP Switch Settings
Dip Switch
Full Duplex Setting
1
2
3
4
5
ON
ON
ON
ON
ON
6
7
DIP Switch Position
ON
Best
OFF ON
1 2 3 4 5 6 7
ON
Good
ON
ON
ON
ON
ON
ON
OFF
1 2 3 4 5 6 7
Normal
(Default)
ON
ON
ON
ON
ON
ON
ON
ON
1 2 3 4 5 6 7
ON
Dip Switch 5 ON for Internal Microphone; OFF for External.
1 2 3 4 5 6 7
5206
Strata DK Digital Telephone 6/00
119
Full-duplex Speakerphone
Dip Switches
Note
The first four DIP switches are used to select the country, same as all other
DK2000-series telephones. The default DIP switch settings (1~4) are preset to
On for the USA and Canada. If you need to make adjustments for other
countries, see Table 19 on Page 146.
➤ To use the External Microphone
1. Plug in the RFDM External Microphone into the bottom of the telephone (see Figures
5 and 6).
2. Turn the microphone On by opening it (see Figure 7).
Note
The High/Low switch works independently from the telephone’s
speakerphone. This setting must be on High for proper operation.
Important!
●
●
●
The microphone has a narrow voice pick-up range so the front of the microphone
should always point toward the person speaking (see Figure 8).
Be sure to place the microphone at least one foot from the telephone speaker and
do not point the microphone toward the telephone speaker grille.
To use the external microphone in a conference room setting, place the
microphone away from all parties to eliminate some of the directionality effect.
Parties may have to speak up to be heard.
CAUTION! Avoid pulling the microphone cord excessively.
120
Strata DK Digital Telephone 6/00
Full-duplex Speakerphone
Dip Switches
EXT MIC
EXT MIC
5217
LOW
HIGH
5218
Figure 5
RFDM Plug on DKT2020-FDSP
RFDM Unit (OFF Position)
Figure 6
RFDM Unit
RFDM Unit (ON Position)
5352
Figure 7
External Microphone On/Off
Strata DK Digital Telephone 6/00
121
Full-duplex Speakerphone
Dip Switches
RFDM Super Directional Microphone
5353
Figure 8
External Microphone Voice Pick-up Path
Speech Training Mode
When the DKT2020-FDSP is used in speakerphone mode, it adjusts to both the
telephone line’s and room’s acoustic properties. At the beginning of each
speakerphone call, the echo canceller must perform Speech Training by evaluating
both the FDSP user and the far-end user’s voice, background noise and line quality.
➤ To train the speakerphone
➤ The parties at both the local telephone and on the far end should take turns
speaking for approximately 10 seconds.
➤ To improve speaker quality
➤ If the conversation becomes unstable during the call, or there is clipped speech,
feedback or short silences, first try adjusting the volume. This forces the FDSP
phone into speech training mode. The LED will go on.
➤ If conversation is still unstable, press button 10 to activate half-duplex mode. You
can turn off button 10 at any time to reactivate full-duplex mode.
122
Strata DK Digital Telephone 6/00
Full-duplex Speakerphone
Dip Switches
➤ To force the telephone into Speech Training mode
➤ During a call, momentarily press 9RO▲, 9RO▼, +ROG or 0,&.
During Speech Training mode, the speakerphone operates in half-duplex mode.
Tips for best results
♦
Avoid blocking the microphone or shuffling paper near the microphone.
♦
Avoid placing the speakerphone where it can detect excessive background noise,
especially during Speech Training mode.
♦
Avoid moving the telephone during a call—this changes the room’s acoustic
properties. If the telephone or microphone is moved, you may have to force the
Speech Training mode.
Special Button Operation (Button 10)
When using the external or Internal Microphone, button 10 works as a toggle from
full- to half-duplex on the DKT2020-FDSP.
Button 10
toggles
between fulland half-duplex.
5241
Figure 9
Button 10 on the Full-duplex Speakerphone
Strata DK Digital Telephone 6/00
123
Full-duplex Speakerphone
Dip Switches
➤ To toggle full/half-duplex mode
➤ Press button 10 (see
Figure 9) to turn fullduplex mode On or
Off.
Full-duplex mode: Button 10 LED Off.
Half-duplex mode: Button 10 LED On.
Notes
●
●
●
Button 10 functions the same for Internal and/or External Microphone.
If DIP switch 6 and 7, in Figure 12, are turned Off, the Full/half-duplex function
of Button 10 is disabled and Button 10 will function as programmed in Program
39 of system/station Programming.
The DKT2020-FDSP’s full-duplex operation depends on the speaker volume
setting. Raising or lowering the speaker volume directly affects the performance
of the full-duplex operation.
Important!
124
♦
If raising or lowering the volume does not improve performance, switch to halfduplex mode by pressing Key 10.
♦
If both you and the distant party are using full-duplex speakerphones, the
sensitivity to both echo paths may cause a reduction or instability of volume. If
this happens, it may be necessary to switch to half-duplex mode by pressing key
10.
Strata DK Digital Telephone 6/00
Add-on Module/DSS Console
5
This chapter provides an equipment overview of the following two optional units and
describes the features buttons and their associated LEDs.
♦
Digital Add-on Module (DADM) – add 20 feature buttons to 2000-series digital
telephones. Up to two DADMs can be connected to a telephone.
♦
Direct Station Selection (DSS) Consoles – available for system operators who do
not have an attendant console. (See “DSS Console” on Page 127.)
DADM
The DADM, model DADM2020, is shown in Figure 10 on Page 126. The buttons can
be programmed for [DSS], CO line access, and Station or System Speed Dial.
Directory Numbers or other functions cannot be assigned to DADMs.
Each [DSS] and /LQH button has an LED that provides a status of the CO line or
station assigned to it.
♦
The [DSS] LED flashes green when the station equipped with an DADM is
calling or transferring an outside call to a station. (If calling a station, the LED
turns steady red when the called station answers; if transferring to a station, the
LED turns steady red when you hang up to complete the transfer.) The DSS LED
is steady red whenever the station associated with the DSS is ringing, busy, or in
the DND mode.
Strata DK Digital Telephone 6/00
125
Add-on Module/DSS Console
DADM
♦
A Line (CO) LED is green when the CO line is in use by the DADM console user.
It is red if it is in use by another telephone user.
Notes
●
219
229
239
208
218
228
238
207
217
227
237
206
216
226
236
205
215
225
235
204
214
224
234
203
213
223
233
202
212
222
232
201
211
221
231
200
210
220
230
●
Not available on DK14 systems.
2038
209
The button numbers shown in this figure
are examples only and may not reflect the
numbers on your particular station
equipment.
First DADM
Figure 10
126
Second DADM
Example Button Assignments for the Strata DK DADMs
Strata DK Digital Telephone 6/00
Add-on Module/DSS Console
DSS Console
DSS Console
The DSS console operates alongside of a digital telephone to provide the telephone
with 60 additional feature buttons. The buttons can be programmed for [DSS], CO
line access, All Call Page, Night Transfer, and Station or System Speed Dial. This
guide applies to the DSS Console models DDSS2060 (see Figure 11), DDSS1060, and
HDSS6560.
LEDs on the DDSS2060 and DDSS1060 models light or flash red or green, and LEDs
on the HDSS6560 model light or flash red. For the DDSS2060 and DDSS1060
models, the Line (CO) and [DSS] LEDs act in the same manner as on the DADM;
other feature button LEDs on both of these models will be red when activated.
Notes
●
209
219
229
239
249
NT
208
218
228
238
248
AC
207
217
227
237
247
257
206
216
226
236
246
256
205
215
225
235
245
255
204
214
224
234
244
254
203
213
223
233
243
253
202
212
221
232
242
252
201
211
221
231
241
251
200
210
220
230
240
250
●
The button numbers shown in
this figure are examples only
and may not reflect the
numbers on your particular
station equipment.
Not available on DK14
systems.
2039
Figure 11
Example Button Assignments (DDSS2060 shown)
Strata DK Digital Telephone 6/00
127
Add-on Module/DSS Console
[DSS] Button
[DSS] Button
The Direct Station Select [DSS] button can appear on both the DADM and DSS
Console. Each DSS button is associated with a particular station in your telephone
system. It can be used to transfer an outside call to the associated station or to make a
direct call to the associated station. The [DSS] LED lights steady red when the station
associated with the [DSS] is ringing, busy on a call, or in the DND mode; or when the
associated station is idle, but all appearances of the station’s [PDN] are busy or in-use
by other stations. [DSS] buttons cannot call station [PhDNs], Distributed Hunt Group
[DNs], or ACD Groups.
Features
The LED color indications described in these feature descriptions apply specifically to
the DADM and DSS Console models DDSS2060 and DDSS1060. Flash conditions
described here apply to all DSS console models and the DADM.
Calling a Station
To call a station’s [PDN] from either a DSS console or a DADM, press the [DSS]
associated with the station. A station call with a [DSS] can be made on-hook or offhook, and with Voice First or Tone signaling. After pressing the button, treat the call
like any other station call made from a digital telephone.
[DSS] LEDs indicate whether the associated station is idle or busy. The LED is steady
red if the station is busy or ringing, and is not lit if idle. If all the station’s PDN buttons
are being used by other stations, the DSS LED of the station is lit steady red, but the
station may be idle. If the station is in the DND mode, its DSS LED lights steady red.
Transfer to an Idle Station
You can transfer internal or outside calls to an idle station from either a DSS console
or a DADM.
128
Strata DK Digital Telephone 6/00
➤ To transfer a call to an idle station
1. Press [DSS]
corresponding to the
station to be called.
The call is placed automatically on hold. The Line or
[DN] LED flashes green at double the on-hold rate,
and the [DSS] LED flashes green.
You hear a single-ring tone. (If using the Tone
signaling mode, you hear successive ring tones.)
2. Announce the call.
With Tone signaling, you would have to wait for the
called station to answer before announcing the call.
3. Hang up.
The call rings the called station when you hang up.
While the called station is ringing, the [DSS] LED is
steady red, and the Line LED flashes green at the onhold rate or if on a [DN] button, it goes idle.
When the called station answers the call, the [DSS]
LED stays steady red, and the Line LED becomes
steady red.
4. If the station does not
answer before a
period set in system
programming, the call
recalls your station.
Call Transfer with Camp-on
You can transfer a call to a busy station from either a DSS console or an DADM. Use
the [DSS] to transfer the call, even though the [DSS] LED associated with the station
you are “transferring to” is red.
➤ To transfer call to a busy station
1. Press [DSS]
corresponding to the
busy station to be
called.
Strata DK Digital Telephone 6/00
You may hear a busy tone. The original caller is placed
automatically on hold. The Line or [DN] LED flashes
green at double the on-hold rate, and the [DSS] LED
remains steady red.
129
Add-on Module/DSS Console
Features
2. Hang up.
The call rings the called station once with the camp-on
tone. While the called station is receiving this tone, the
Line LED flashes green (on-hold rate) or if you are on
a [DN] button, it goes idle. The [DSS] LED remains
steady red.
When the called station answers the transferred call,
the Line LED becomes steady red. The [DSS] LED
remains steady red.
Note
If the busy station is in the DND mode, the
call will not transfer, but will recall your
telephone immediately.
If the call is not answered after a specified Recall time
set in system programming, camp-on is cancelled and
the transferred call rings back.
Call Answering (CO Line)
If your DADM or DSS console is equipped with a /LQH button, you can answer CO
line calls from the DADM or DSS console as you would from a digital telephone. See
Chapter 2 – Features for detailed information.
➤ To answer an incoming CO Line call to a DADM or DSS Console
➤ Press the flashing /LQH.
Speed Dial
Your DADM or DSS console may be equipped with 6' (Speed Dial) buttons that can
be programmed to dial telephone numbers or to access features. 6' buttons on either
the DADM or DSS console function like 6' buttons on digital telephones. See
Chapter 2 – Features for information.
130
Strata DK Digital Telephone 6/00
Paging
You can make an announcement page to a group of station telephone speakers selected
in system programming with $OO&DOO3DJH on the DSS console. 6' (if
programmed) on either the DSS console or the DADM can be used for page
announcements. See “All Call Page” on Page 66.
Call Forward Override ([DSS] Override)
Either the DSS buttons on your DSS console or the associated telephone can be set in
system programming to ring stations that are in the Call Forward mode, instead of
being forwarded. Usually the console’s telephone is the unit activated to perform this
function. Among other applications, this feature can be used to notify a person who
forgets to deactivate the Call Forward feature after returning to the office.
Important!
DSS buttons on DADMs cannot override Call Forward.
➤ To override call forward with the console’s associated telephone
1. Press &QI7UQ or
[PDN].
2. Dial the station
number set for call
forward.
Make the call as you would from any other station.
This procedure assumes your station has a typical
program setting.
➤ To override call forward with your DSS Console
➤ Press the station [DSS] set for call forward.
Night Transfer
You can use the DSS console to make the system ring different telephones for
incoming calls during different times of the day. For further details, refer to the Strata
DK System Administrator’s User Guide.
➤ To enable/disable night transfer
➤ Press 1LJKW7UDQVIHU to toggle night transfer ON/OFF.
Strata DK Digital Telephone 6/00
131
Add-on Module/DSS Console
Features
132
Strata DK Digital Telephone 6/00
Access Codes
A
This appendix contains access codes for outside Speed Dial numbers, CO lines,
Paging Group and Paging Zone Codes.
CO Line Access Codes
CO lines are used when you dial an outside number. If your telephone does not have a
&2 or /LQH button, you can enter the appropriate code listed in Table 13 to access an
outside line.
You can also store the code on a Speed Dial (6') button for one-touch access. If you
are storing a CO line access code onto a Speed Dial code, enter before the CO
access code (e.g., to store code , enter ).
In some systems, is used as a general group code or to access Least Cost Routing
(LCR). System users are required to dial in order to access an outside line. If you
press in a system programmed with LCR, you may not hear internal dial tone,
depending on system programming.
See your System Administrator for the code which applies to your telephone.
➤ To access a line
➤ Press [PDN] + CO Line Access Code
Strata DK Digital Telephone 6/00
133
Add-on Module/DSS Console
Feature Access Codes
Table 13
CO Line Access Codes
System
CO Line Access Codes
DK14
or aor a
DK16e/DK16
or aor a
DK40i/DK40
or aor a
DK424 (RCTUA)
or ~or a
DK424 (RCTUBA/BB) and
DK424i (B1CU)
or ~or a
DK424 (RCTUC/D) and
DK424i (B2CAU/B2CBU)
(B3CAU/B3CBU)
oraora
DK424 (RCTUE/F) and
DK424i (B5CAU/B5CBU)
or aor a
Notes
♦
accesses LCR or a general line group.
♦
a accesses line groups 1~16, respectively.
♦
a accesses individual lines 1~200, respectively.
Feature Access Codes
See Table 7 on Page 73.
Paging Access Codes
Your telephone can be assigned to page group(s). Telephones can be a member of
more than one group and each group can have as many as 120 stations. Station users
can access each group separately by dialing an access code (Tables 14~15).
➤ To enter a paging group access code
➤ Press [PDN] + Access Code
134
Strata DK Digital Telephone 6/00
Add-on Module/DSS Console
Paging Access Codes
Table 14
Paging Groups
Paging Group
Access Code
Paging Group
Access Code
Station Group A
Station Group E
Station Group B
Station Group F
Station Group C
Station Group G
Station Group D
Station Group H
Table 15
External Paging Zones
External Paging Zone
Access Code
External Paging Zone
Access Code
Paging
All Call, External Page Zone
DK14/DK40/DK40i/DK424/DK424i (all processors)
Paging
All Call Page Zone
DK40i/DK40/DK424 (RCTUA, RCTUBA/BB, RCTUC/D) and
DK424i (B1CU, B2CAU/B2CBU, B3CAU/B3CBU)
Zone A
Zone C
Zone B
Zone D
DK424 (RCTUE/F) and DK424i (B5CAU/B5CBU)
Zone A
Zone E
Zone B
Zone F
Zone C
Zone G
Zone D
Zone H
Strata DK Digital Telephone 6/00
135
Add-on Module/DSS Console
Speed Dial Access Codes
Speed Dial Access Codes
The number of station and system speed dial numbers available to you depends on the
size of your company’s telephone system. Check with your System Administrator to
find out which codes apply to your system.
Once you store a telephone number on any of the codes listed below, you can dial the
number by entering the code, such as or 6SHHG'LDO + .
Table 16
Telephone System Size
Station
Speed Dial Codes
System
Speed Dial Codes
Small System
(DK14/DK16/DK16e/DK40/DK40i/DK424 RCTUA)
a
a
Medium System
(RCTUBA/BB, RCTUC/D, B1CU,
B2CAU/B2CBU and B3CAU/B3CBU)
a
a
Large System
(RCTUE/F and B5CAU/B5CBU)
a
a
Table 17
136
Speed Dial Access Codes
Speed Dial Number Linking
System
System Speed Dial Codes that can be Linked to
other Speed Dial Codes
DK14, DK16e, DK40i, RCTUA
a
RCTUBA/BB, RCTUC/D, B1CAU,
B2CAU/B2CBU and B3CAU/B3CBU
a
RCTUE/F and B5CAU/B5CBU
a
Strata DK Digital Telephone 6/00
Centrex Application
B
Your system may be equipped with the Centrex Application, which enhances its
feature capability when installed behind a Centrex or PBX system.Your telephone
may have access to one or more of the enhanced Centrex features listed below:
Flexible Directory Numbering
A station’s [PDN] can be three or four digits. It is, therefore, possible to match a
station’s [PDN] and Centrex line extension number. Dial the entire station number
when indicated.
Note
Some access code numbers may have been changed to avoid system
numbering plan conflicts.
Centrex Feature Buttons
You can access some Centrex features by pressing a preprogrammed flexible button
on your telephone, instead of dialing a Centrex access code. The Centrex access code,
including the necessary flash and/or pause sequence, is activated when the button is
pressed. See your Centrex or PBX operations manual for specific details.
Strata DK Digital Telephone 6/00
137
Add-on Module/DSS Console
Ringing Repeat
Ringing Repeat
The distinctive ring patterns available in your Centrex system are automatically
repeated with your digital telephone, enabling you to answer appropriately for either
outside, inside or callback calls.
Delayed Ringing
CO or Centrex line(s) can be programmed for a 12-second and/or 24-second ring
delay at stations to permit alternate answering conditions. Answer the line when your
telephone is ringing.
138
Strata DK Digital Telephone 6/00
C
Button Labels
All flexible buttons must be programmed for your telephone in system programming
and vary for individual telephones. If a button does not appear on your display or
telephone keystrip label, see your System Administrator for button assignments.
The button labels in Table 18 are for the 2000-series telephone mode.
Table 18
Feature Button Definitions
2000-series Telephone
$FFRXQW&RGH
$ODUP5HVHW
$OHUW6LJQDO
RU
$OO&DOO3DJH
$XWR%XV\5HGLDO
Definitions
Account Code Button
Press to enter a Voluntary Account Code anytime during a Central Office
(CO) line call without interrupting the conversation.
Alarm Reset Button
Press to turn off a telephone alarm connected to a facility alarm
mechanism.
Alert Signaling Buttons
Press to alert a predesignated station with a distinctive sound and to
indicate a pre-arranged meaning and visual indication to a predesignated
station. Up to four Alert Signal buttons can be assigned to a telephone.
All Call Voice Page Button
Press to page all of the digital and electronic telephones in the All Call Page
group.
Automatic Busy Redial Button
Press to set up Automatic Busy Redial after receiving a busy tone on a
dialed CO line call (not available when calling on tie or DID CO lines).
Strata DK Digital Telephone 6/00
139
Add-on Module/DSS Console
Delayed Ringing
Table 18
Feature Button Definitions (continued)
2000-series Telephone
Definitions
$XWR&DOOEDFN
Automatic Callback Button
Press to recall a busy station or station in the Do Not Disturb (DND) mode
as soon as that station becomes idle or deactivates DND. Also used for CO
line queuing when all lines are busy.
&DOO)UZG$OO&DOOV
&DOO)UZG%XV\
Call Forward-Busy Button
Press to forward calls immediately to another station or voice mail device
when your station is busy or in the DND mode.
&DOO)UZG%XV\
1$QV
Call Forward-Busy/No Answer Button
Press to forward calls immediately to another station or voice mail device
when your station is busy or in DND mode. Also forwards calls when your
station is not answered after 8~60 seconds (set at your station).
&DOO)UZG1R
$QVZHU
&DOO)UZG([WHUQDO
Call Forward-No Answer Button
Press to forward calls to another station or voice mail device when your
station is not answered after 8~60 seconds (set at your station).
Call Forward-External Button
Press to forward Private or DID line calls to an external or internal
telephone number.
&DOO)UZGWR
Call Forward-Fixed Button
Press to forward all calls to a station or voice mail device assigned in
system programming.
'DWD5HOHDVH
Data Release Button
Press to release data calls. See the Strata DK PC/Data Interface User
Guide.
'LUHFWHG3LFNXS
Call Pickup Button
Press to initiate a ringing Directed Call Pickup of CO line, [DN], and page
calls.
'LUHFWHG3LFNXS
RU
Tenant Call Pickup Buttons
If the system is shared by tenants, the Directed Pickup 1~4 buttons pick up
ringing CO line calls for Tenants 1~4 respectively.
'R1RW'LVWXUE
140
Call Forward-All Calls Button
Press to forward all calls to another station or voice mail device.
Do Not Disturb Button
Press to lock your station in or out of the DND mode.
Strata DK Digital Telephone 6/00
Add-on Module/DSS Console
Delayed Ringing
Table 18
Feature Button Definitions (continued)
2000-series Telephone
Definitions
'66
Direct Station Selection Button(s)
Press to ring a preselected station. The LED associated with each DSS
button provides the status (idle/busy) of the station assigned to the button.
)ODVK
Flash Button
Press to perform the following functions: Disconnect and recall dial tone on
a CO line; access Centrex or PBX features; enter a pause or flash signal
when programming speed dial numbers.
*URXS3LFNXS
+62&$7DONEDFN
/&'0VJ6HOHFW
/LQH
Group Pickup Button
Press to pick up a call that is ringing a station that belongs to a Pickup
Group that your station is a member of.
Handset Off-hook Call Announce Button
Press this key while off-hook busy with a call and while being called by an
internal caller who initiates off-hook call announce to switch the talk path
from the current call to the off-hook call announce internal caller.
Message Select Button
Press to enable system and personal messages to be displayed on the
optional 32-character LCD.
Line Button
Press to answer or access an outside Central Office (CO) line.
/RVW&DOO$XWR'LDO
Unanswered (Lost) Call Automatic Dial Button
Press to automatically dial the stored ANI (Automatic Number Identification)
or Caller ID number shown on the LCD. Unanswered calls will be stored on
this button and the LCD.
0LFURSKQ&XWRII
Microphone Cutoff Button
Press to turn the microphone off/on while idle, providing privacy when you
receive handsfree internal calls. Also functional when your station receives
calls—the Mic button controls the microphone when you originate calls.
0RGHP
Modem Button
Press to reserve a modem from a pool. The LED of the button indicates the
status of the modem pool. See the Strata DK PC/Data Interface User
Guide.
0VJ:DLW
Additional Message Waiting Buttons
Phantom Directory Numbers allow multiple Message Waiting buttons with
LEDs for up to four different Directory Numbers [DNs] other than your
Primary Directory Number [PDN]. It performs the same Message Waiting
functions as the MW/FL button.
Strata DK Digital Telephone 6/00
141
Add-on Module/DSS Console
Delayed Ringing
Table 18
Feature Button Definitions (continued)
2000-series Telephone
1LJKW7UDQVIHU
Night Transfer Button
Press to control the system’s CO line ringing pattern for after-hours
incoming calls.
1LJKW7UDQVIHU
a
Tenant Night Transfer Buttons
Press the appropriate button to control the system’s CO line ringing
patterns for after hours incoming calls for either of the tenants that share a
single Strata DK280 system.
17/RFN
a
Night Transfer Lock Buttons
Initiates entry of the NT Lock password. NT L LED will be on when the
system ring mode (Day/Day2/Night) is locked.
2UELW/LVW
Park Orbit Display Button - LCD Telephones Only
Press to display call(s) parked in orbit. If there are multiple parked calls, a +
sign appears on the LCD.
3DUNDQG3DJH
142
Definitions
Park/Page Button
Press to park internal or outside call in orbit and announce to other
telephones or paging speakers to retrieve the parked calls.
3DUNLQ2UELW
Park Button
Press to park internal or outside calls in an orbit. Call retrieval can be made
locally from the same parking telephone or remotely from a different
telephone.
3RROHG/LQH*US
Pooled Line Button
Press to access an available CO line from a group of lines appearing under
one button.
3ULYDF\RQ/LQH
Privacy Button
Press to block Privacy Override on common CO line buttons. This button
does not block Busy Override or Executive Override.
3ULYDF\5HOHDVH
Privacy Release Button
Press to release privacy on common CO line buttons, enabling other station
users to enter your conversations on those buttons. Privacy release does
not apply to common [DN] buttons which are always private.
5HOHDVHDQG$QV
Release and Answer Button
Press to disconnect or complete the transfer the current CO or [DN] call and
automatically answer the new incoming CO or [DN] call.
Strata DK Digital Telephone 6/00
Add-on Module/DSS Console
Delayed Ringing
Table 18
Feature Button Definitions (continued)
2000-series Telephone
Definitions
5HOHDVH&DOO
Release Button
Press to disconnect or complete the transfer of the current CO or [DN] call
and to place your station in the idle condition.
6DYH/DVW1XPEHU
Save Button
After dialing an outside or internal directory number, press to “save” the
number. Later, you can have the system automatically redial the number for
you when you press the button after accessing an internal or outside line.
6'RU&XVWRPL]HG
%XWWRQ
Speed Dial Button
Press to Speed Dial a telephone number or feature access codes. SD
buttons can be used as either System Speed Dial numbers or Station
Speed Dial numbers.
6SHHG'LDO
6SG'LDO/QJ3DXVH
6SG'LDO3DXVH
6WDUW
6XE
7HO6HW0XVLF
7RQH'LDO6HOHFW
8QORFN'RRU
Speed Dial Select Button
Press (in conjuncton with Redial) to store and access Speed Dial number.
Pause (Long) Button
Press to insert a 10-second pause when programming Speed Dial
numbers.
Pause Button
Press to set either a one-half or two-second pause when programming
Speed Dial numbers. (The pause time is set in system programming).
Start Button
Press to make an outgoing call using an ISDN trunk.
Subaddress Button
Press to enter a subaddress on an ISDN trunk outgoing call.
Background Music Button
Press to turn Background Music on or off over your station speaker.
Tone Button
Press to change the outgoing dialing of the CO line in use from dial pulse to
tone signaling.
Door Lock Buttons
Press to unlock a door lock mechanism.
Strata DK Digital Telephone 6/00
143
Add-on Module/DSS Console
Delayed Ringing
144
Strata DK Digital Telephone 6/00
International Settings
D
The DKT2000 V.4 series telephones have DIP switches that enable use for the
international market. The DIP switches are located underneath the flexible button key
strip on the DKT2000 V.4 series telephones (see Figure 4).
Table 19 shows the correct country settings for the DKT2010-S, DKT2020-S,
DKT2010-SD, DKT2020-SD, DKT2020-FDSP, DKT2001 V.4 telephones.
Note
The default DIP switch settings are preset for the USA and Canada.
Therefore, you do not need to adjust any of these from the default factory
settings for North America.
Strata DK Digital Telephone 6/00
145
Add-on Module/DSS Console
Delayed Ringing
Table 19
DKT International DIP Switch Settings
Dip Switch
Country
USA
Canada
(Default Setting)
DIP Switch Position
1
2
3
4
ON
ON
ON
ON
ON
1 2 3 4
ON
Mexico
ON
ON
ON
OFF
1 2 3 4
ON
Taiwan
OFF
ON
ON
ON
1 2 3 4
ON
Hong Kong
Thailand1
ON
Singapore
Malaysia
Indonesia
Sri Lanka
India
China
OFF OFF ON
OFF ON
ON
1 2 3 4
ON
OFF
1 2 3 4
3925
1. The DKT2000 V.4 is not compatible for Hong Kong and Thailand. Use the
V.4A or later versions in these two countries.
146
Strata DK Digital Telephone 6/00
Index
A
about this book
conventions, ix
how to use this guide, viii
organization, viii
related documents, x
ABR, 23
ACB, 25
access code
using, 29
access codes, 133
CO Line, 133
feature, 72
speed dial, 136
account code
calls, 20
emergency override of forced account
codes, 20
forced account codes (verified/nonverified), 20
add-on module⁄DSS console, 125
advisory messaging, 105
alert signaling, 22
all call page, 66
ANI/Caller ID, 97
attendant console calling, 23
auto dial lost calls, 99
Strata DK Digital Telephone 6/00
automatic busy redial, 23
automatic callback, 25
automatic hold, 26
B
before you begin, 15
BGM over telephone speakers, 27
BLF display, 96
busy override, 64
button labels, 139
buttons, 4
[DSS], 128
[PDN], 7
[PhDN], 7
[SDN], 7
Cnf/Trn, 4
directory number, 7
feature, 8
fixed, 4
flexible, 6
Hold, 4
LCD, 9
Mic, 5
Mode, 90
Msg, 5
Page, 91
Redial, 5
147
Index
C~F
Scroll, 91
Spkr, 6
volume control, 4, 6
C
call forward, 27
all calls, 30
busy⁄no answer, 32
external, 34
fixed, 33
modes, 28
no answer, 31
to voice systems, 87
using the buttons, 29
call park
orbit list display, 99
orbits, 36
call pickup, 40
directed, 40
call transfer, 42
with camp-on, 42
call waiting, 44
called station messaging, 107
Caller ID/ANI/DNIS information mode, 97
centrex application, 137
centrex feature buttons, 137
Cnf/Trn, 4
CO Line access codes, 133
conference calls, 45
control buttons, 90
D
DADM, 125
date⁄time/day adjustment, 46
delayed ringing, 138
digital add-on module (DADM), 125
digital telephone models
(see telephone models)
148
direct inward system access, 46
direct station selection buttons, 48
directed call pickup, 40
directory number, 7
DISA, 46
incoming calls, 46
outgoing calls, 47
DKT2010-H, 2
DKT2010-SD, 2
DKT2020-FDSP, 2, 117
DKT2020-S, 2
DKT2020-SD, 2
DNIS, 97
do not disturb (DND), 48
do not disturb override, 64
door lock, 49
door phone, 50
[DSS] button, 128
DSS, 48
console, 125, 127
E
emergency override of forced account
codes, 20
emergency ringdown, 53, 57
executive override, 64
exit from any mode, 91
F
feature access codes, 72
feature buttons, 8
features, 128
call answering (CO Line), 130
call forward override ([DSS]
Override), 131
call transfer with camp-on, 129
calling a station, 128
night transfer, 131
Strata DK Digital Telephone 6/00
Index
G~O
paging, 131
speed dial, 130
transfer to an idle station, 128
flash, 75
flexible buttons, 6
flexible directory numbering, 137
forced account codes (verified/nonverified), 20
full-duplex speakerphone, 117
operation, 89
telephones, 29
incoming calls, 30
outgoing call, 29
LED indicators, 10
liquid crystal display (LCD), 9
lost calls
retrieve and auto dial, 99
G
incoming DISA calls, 46
indicators
LED, 10
ISDN
buttons, 18, 56, 80, 143
feature codes, 73
memo, 111
speed dial, 111
timed reminders, 113
message, 103
advisory, 105
called station, 107
group called station, 108
notifications, 107
remote calling station, 106
silent (busy station), 110
station, 104
system, 104
message waiting light
on [PDN], 57
on [PhDN/MW], 59
on another telephone, 59
messages, memos, and name display, 101
Mic, 5
microphone cut-off, 60
mode button, 90
Msg, 5
L
N
LCD, 9
buttons, 9
how to enter characters, 101
messages, 103
O
group called station messaging, 108
group listening, 53
group pickup, 41, 42
calls to other groups, 41
calls within your group, 41
H
handsfree answerback, 54
handsfree monitoring, 55
Hold, 4
hotline service
emergency ringdown, 53, 57
I
Strata DK Digital Telephone 6/00
M
name⁄number display, 56, 113
OCA, 60
149
Index
P~V
off-hook, 11
off-hook call announce, 60
on-hook, 11
outgoing DISA calls, 47
override
busy, 64
do not disturb, 64
executive, 64
privacy, 65
toll restriction, 65
override calls, 63
page announcements, 66
page button, 91
paging group codes, 134
phantom directory number, 7
primary directory number, 7
privacy
on-line, 67
override, 65
silent messaging (busy station), 110
soft keys, 91
display, 92
how to use, 92
making a conference call (example), 93
prompts, 95
speakerphone, 69
speed dial, 70
access codes, 136
advanced features, 72
chain dialing, 77
linked speed dial example, 76
number linking, 75
pause and flash storage, 75
long pause, 75
memos, 111
pause, 75
Spkr, 6
SP-OCA, 62
start (ISDN button), 18, 56
sub (subaddress ISDN button), 56
Q
T
quick reference, 17
telephone models
timed reminders, 78
toll restriction override, 65
tone⁄pulse dialing, 80
two (tandem) CO line connection, 80
[DN], 80
CO buttons, 81
supervision, 83
P
R
redial, 5
release and answer, 68
remote calling station messaging, 106
remote destination change, 35
retrieve and auto dial lost calls, 99
ringing repeat, 138
U
S
using access codes, 29
saved number redial, 68
scroll button, 91
secondary directory number, 7
V
150
voice mail integration, 84
Strata DK Digital Telephone 6/00
Index
V~V
message mailbox, 84
message retrieval, 85
multiple message retrieval, 86
volume, 4, 6
volume controls, 12
voluntary account codes (verified/non-verified), 21
Strata DK Digital Telephone 6/00
151
Index
V~V
Strata DK Digital Telephone 6/00
152