1
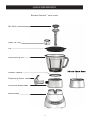
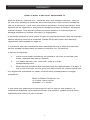
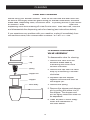
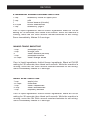
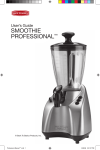
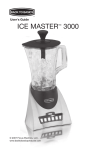
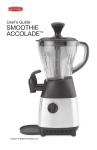
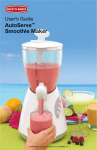
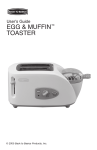
BACK TO BASICS
®
User's Guide
Blender Solution™ 4000
with Smoothie Attachments
achments
© Back To Basics Products, Inc.
QUICK REFERENCE
Blender Solution™ 4000 Parts
Stir Stick
Clear Lid Cap
Lid
Glass Mixing Jar
Blender Blade Base
Rubber Gasket
Dispensing Valve
Smoothie Blade Base
Motor Base
2
IMPORTANT SAFEGUARDS
!
WARNING
WARNING: This appliance is not a toy. Close adult supervision is
necessary when used by or near children. Please do not leave this
unit unattended with children.
When using electrical appliances, basic safety precautions should
always be followed:
•
Read all instructions.
•
To protect against risk of electrical shock do not put cord, plug
or motor in water or other liquid.
•
Close supervision is necessary when any appliance is used
by or near children.
•
Unplug appliance from outlet when not in use, before putting
on or taking off parts, and before cleaning.
•
Make sure appliance is OFF when not in use, before putting on
or taking of parts, and before cleaning.
•
Avoid contacting moving parts.
•
Do not operate any appliance with a damaged cord or plug or
after the appliance malfunctions, or is dropped or damaged
in any manner. Return appliance to Back to Basics for
examination, repair or electrical or mechanical adjustment.
•
The use of attachments, including canning jars, not
recommended by the manufacturer may cause a risk of injury
to persons.
•
Do not use outdoors.
•
Do not let cord hang over edge of table or counter.
•
Do not let cord contact hot surface, including the stove.
•
Do not use this appliance for other than it’s intended use.
•
Keep hands and utensils (other than included stir stick) out
of container while blending to reduce the risk of severe injury to
persons or damage to the appliance. A scraper may be used
but must be used only when the blender is not running.
•
Blades are sharp. Handle carefully.
•
To reduce the risk of injury, never place cutter-assembly blades
on base without jar properly attached.
3
IMPORTANT SAFEGUARDS
•
Always operate blender with lid in place.
•
•
When blending hot liquids, remove center piece of two-piece lid.
Keep hands and utensils out of container to reduce the risk of
injury to persons or damage to the mixer.
•
Be sure to turn switch to OFF position after each use.
•
Never add ingredients to container while appliance is operating.
•
Container must be properly in place before operating appliance.
•
The use of accessory attachments not recommended or sold by
Back to Basics may cause fire, electrical shock or injury.
•
Do not place on or near a hot gas or electrical burner or in a
heated oven.
•
Turn off machine before removing the mixing container from the
base and before placing the mixing container on the base.
•
Do not run motor without mixing container properly attached to
motor base or when mixing container is empty.
•
Do not blend excessively hot liquids. Never pour boiling water
into the mixing container.
•
Be sure to turn switch to OFF position after each use.
•
To disconnect, grip plug and pull from wall outlet. Never pull on
cord to disconnect.
•
Never leave the house while the appliance is on.
•
A short cord set is provided to reduce the hazards resulting from
becoming entangled in or tripping over a longer cord.
•
Extension cords may be used if care is exercised in their use.
The marked electrical rating of the extension cord should
be at least as great as the electrical rating of the appliance.
The extension cord should be arranged so that it will not drape
over the counter top where it can be tripped over or pulled
by children.
•
After running the motor continuously for three minutes, wait at
least five minutes before running the motor again.
4
IMPORTANT SAFEGUARDS
•
This appliance has a polarized plug (one blade is wider than
the other). To reduce risk of electric shock, this plug will fit
into a polarized outlet only one way. If the plug does not
fit fully into the outlet, reverse the plug. If it still does not fit,
contact a qualified electrician. Do not modify the appliance
plug in any way.
SAVE THESE INSTRUCTIONS.
INTENDED FOR HOUSEHOLD USE
ONLY.
5
INTRODUCTION
BLENDER SOLUTION ™ 4000
Congratulations! We hope you enjoy your new Back to Basics® Blender Solution™ 4000. The Blender Solution™ is designed for endless blending and chopping possibilities and easy clean-up capabilities. The Blender Solution™ has
been designed with three speeds (low, medium, high + pulse operation) that let
you purée, blend, mix, chop and liquefy your favorite fresh ingredients to make
gourmet soups, homemade salsas, icy cocktails, thick and delicious frozen
smoothies and shakes, baby food and more.
The Blender Solution™ is two appliances combined into one.
•
Use the Blender Attachment to make gourmet soups, to
smoothly blend creamy salad dressings, to puree baby food,
salsa or to mix batters for homemade multigrain pancakes and
waffles.
•
Use the Smoothie Maker Attachment to quickly and easily
blend and dispense perfect fruit smoothies, icy cocktails, frozen
coffee and thick shakes.
The powerful 430-watt/500-watt pulse power motor
motor, specially-designed stainless steel blades and 3-speed operation work together to precisely blend and
chop all types of ingredients for exact recipe specifications. The smoothie maker blade base has been specifically designed with heavy stainless steel blades
to easily crush ice and frozen fruit. The blender blade base also can be used to
make smoothies and other frozen drinks. Both are built to accommodate the
revolutionary stir stick, which when rotated counter-clockwise, increases blending efficiency. The 48-ounce glass mixing jar has a spill-proof pour spout and is
dishwasher-safe.
Enjoy!
6
WARRANTY
ONE-YEAR LIMITED WARRANTY
Back to Basics Products, Inc., warrants your new Blender Solution™ 4000 to
be free from defects in materials and workmanship under normal household
use for a period of 1 year from the date of purchase. During this period, such
defects will be repaired or the product replaced at Back to Basics' discretion
without charge. This warranty does not cover exterior or interior finish or
damage caused by misuse, accident, or negligence.
A purchase receipt or other proof of date of original purchase may be required
before warranty service is rendered. Please fill out and return the warranty
registration card located on page 20.
If a problem with this houseware item develops during or after the warranty
period, please contact Back to Basics Products, Inc. for service.
If service is required:
•
•
•
Send a brief letter explaining the problem. Be sure to include your
name, address and phone number.
For faster service, call 1.800.688.1989 or e-mail:
@btbproducts.com.
Most service problems are resolved with the replacement of a part. If
this is not the case, we will give you instructions for returning the unit.
Any appliance submitted for repair must be sent (transportation charges
prepaid) to:
Back to Basics Products, Inc.
675 West 14600 South
Bluffdale, UT 84065
If you have any questions concerning the use or care of this product, or
comments regarding your experience with the product, please write a letter
explaining the nature of your concern.
7
ASSEMLY
Use and Care (Assembly)
To use your Blender Solution™ 4000, begin by assembling the glass mixing jar.
Lid
Clear Lid Cap
Glass Mixing Jar
Rubber Gasket
Blender Blade Base
1. Position the rubber gasket down onto the circular flat surface in the
plastic blender or smoothie blade base.
2. Place the bottom threaded section of the glass mixing jar down into the
plastic blade base. Engage threads by twisting the blade base clockwise
until tightened onto the jar. Make sure that the blade base is tightly fastened
to the jar and that the rubber gasket is properly compressed between the jar
and the plastic blade base.
3. Push the lid onto the top of the mixing jar. Place the clear lid cap in the
center of the lid or place the stir stick through the center of the lid.
4. Place the mixing jar onto the motor base so that the bottom of the blade
base is sitting flat on the motor base.
5. Plug in the cord. Your Blender Solution™ 4000 is now ready to use!
8
OPERATION
BLENDER SOLUTION™ 4000 CONTROL BUTTONS
OFF shuts off the
machine.
MEDIUM runs the Blender
Solution™ at medium speed.
LOW runs the Blender
Solution™ at low speed.
This speed should be used
for the initial 30 seconds
of mixing as well as for
dispensing.
PULSE runs the
Blender Solution™
at high speed.
HIGH runs the Blender
Solution™ at high speed. This
speed should be used for the
final stages of mixing. Do not
use this speed for dispensing.
BLENDER OPERATION
1. Assemble the blender blade base onto the glass mixing jar.
2. Add ingredients to the mixing jar and replace the lid. You may add more
ingredients through the hole in the center of the lid. (Note: Add liquid
ingredients first, then add frozen or solid ingredients. This will prevent
excessive wear and stress on the motor). Cover the hole with the clear lid
cap or stir stick during operation.
3. TO START BLENDING: Choose a speed for blending the ingredients and
then press the appropriate button.
4. TO STOP BLENDING: To stop the blending process, push the OFF button.
5. PULSE MODE: The PULSE button allows you to create short bursts of
power. To use the PULSE function, repeatedly push and release the PULSE
button. The PULSE function should be used in the initial stage of blending
ice and frozen ingredients for smoothies and other frozen drinks. The
PULSE function should also be used to break apart larger pieces of food or
to control the texture of food when chunkier results are desired.
9
OPERATION
SPEED SELECTION GUIDE
INGREDIENTS:
SPEED:
RESULT:
Salsa
Pulse and then Low
Chunky
Nuts
Pulse and then Low
Coarse
Bread, Cookies, Crackers
Pulse and then Low
Coarse
Heavy Whipping Cream
Low
Thick
Mayonnaise
Medium
Creamy
Salad Dressing
Medium
Creamy
Cheese
Pulse and then Medium
Coarse
Grating / Chopping Citrus
Zest
Medium
Fine
Smoothies, Cocktails,
Shakes
Pulse and then High
Thick and Smooth
Baby Foods / Fruit & Vegetable purees
High
Smooth and Creamy
SMOOTHIE MAKER OPERATION
The Blender Solution™ 4000 mixing jar is conveniently marked to create perfect
smoothies for two or four servings. To make a frozen blend of your favorite
healthy foods, follow these simple steps:
1. Assemble the smoothie maker blade base (with dispensing valve) onto the
glass mixing jar and place the stir stick through the hole in the center of the
lid of the glass mixing jar.
2. Add Liquids: Add any combination of liquid ingredients up to the LIQUIDS
mark. Liquids include any soft ingredients such as fruit, milk, fruit juice,
herbal supplements or yogurt in any combination that you think would be
tasty.
We are, of course, partial to the Back to Basics® smoothie mixes, which
quickly and easily make three delicious 8-ounce smoothies.
3. Add Ice: Add ice or frozen ingredients until the total level reaches the
FROZEN INGREDIENTS line on the side of the mixing container
container. Frozen
ingredients include ice, frozen fruit, frozen yogurt, ice cream, etc.
10
OPERATION
4. Smooth It: With the lid on and the stir stick set in the hole in the center
of the lid, press and release the PULSE button 3 to 5 times to get things
started. Next, press the LOW button and run the machine at LOW for about
30 seconds. Finally, push the HIGH button. Continue until smooth. Turn
the stir stick counter-clockwise for best mixing results.
5. Serve It: To serve the smoothie, push the LOW button, hold a cup under
the valve, and with the motor running, press down on the dispensing valve.
Stir the smoothie with the stir stick while dispensing thick smoothies. As the
smoothie level reaches the bottom of the glass mixing jar, a thick mix may
stop dispensing. Add a few tablespoons of liquid to increase flow. When the
glass mixing jar is empty, shut off the machine. Enjoy!
6. You can continue making
aking smoothies one after another
another. When you are
finished, be sure to wash thoroughly the glass mixing jar, dispensing valve,
lid and stir stick. See care and cleaning on page 12.
11
OPERATION
TIPS FOR GENERAL OPERATION
•
Thicker Smoothies: To make a thicker smoothie, add more frozen
ingredients.
•
Thinner Smoothies: To make a thinner smoothie, add more liquid
ingredients.
•
Always add liquid ingredients to the glass mixing jar first and then add
remaining ingredients. This will prevent excessive wear on the motor and
ensure that the ingredients are properly blended.
•
Cut harder foods (e.g. cheese) into approximately 1 inch cubes to
achieve better chopping results.
•
The stir stick may be used to assist in making frozen drinks or for blending
any other types of ingredients. When the stir stick is not being used, be sure
to place the clear lid cover over the hole in the center of the lid.
•
When chopping dry ingredients such as bread crumbs, nuts, spices, etc.,
make sure that the glass mixing jar and blade base are completely dry.
•
The PULSE button should be operated in short bursts. As the PULSE
button is pressed and released, the blades should stop rotating between
pulses.
•
Do not attempt to mix or knead heavy dough, mash potatoes or beat egg
whites.
•
Do not over-blend foods. Most ingredients should be properly blended or
chopped in seconds. Do not operate motor base for longer than 3 minutes
at a time.
•
If the motor stalls, turn off and unplug the unit. Remove a portion of the
ingredients before attempting to continue.
•
Do not add boiling liquids to the glass mixing jar.
12
CLEANING
CARE AND CLEANING
Before using your Blender Solution™ 4000 for the first time and after each use,
be sure to thoroughly wash the glass mixing jar, blender blade base, smoothie
blade base, dispensing valve, lid and stir stick. To prolong the life of your Blender Solution™ 4000, do not wash plastic parts in the dishwasher
dishwasher. Open the
dispensing valve while washing to rinse out the valve. After each use, unscrew
and disassemble the dispensing valve for cleaning (see instructions below).
If you experience any problem with your machine, unplug it immediately from
the electrical outlet, then contact Back to Basics® at 1.801.571.7349.
CLEANING DISPENSING
VALVE ASSEMBLY
Lever
To disassemble valve for cleaning:
Cap
1. Remove the valve from the
smoothie blade base by
unscrewing the entire valve
counter-clockwise.
Spring
2. Remove the cap from the valve
body by unscrewing it counterclockwise.
Stopper Pin
Stopper
3. Squeeze cap and stopper
together and slide the lever off
the stopper pin.
Valve Body
4. Remove the spring.
5. Remove the stopper and stopper
pin by pulling the rubber rim of
the stopper. The stopper and
pin are tightly fitted and need not
be separated.
6. Clean all parts in warm soapy
water and reassemble in
the order shown.
13
RECIPES
STRAWBERRY BANANA SUPREME SMOOTHIE
1 cup
1 cup
1
2½ cups
1 cup
strawberry nectar or apple juice
milk
frozen banana (chunks)
frozen strawberries
strawberry yogurt
Pour in liquid ingredients. Add all frozen ingredients. Blend at PULSE
setting for 30 seconds; then blend until smooth. While the machine is
running, move the Stir Stick around counter-clockwise to aid mixing.
Serve immediately. Makes 3–5 servings.
MANGO TANGO SMOOTHIE
1 cup
1 cup
½
1 cup
1½ cups
pineapple juice
orange juice
frozen banana (chunks)
pineapple sherbet
frozen mango slices
Pour in liquid ingredients. Add all frozen ingredients. Blend at PULSE
setting for 30 seconds; then blend until smooth. While the machine is
running, move the Stir Stick around counter-clockwise to aid mixing.
Serve immediately. Makes 3–5 servings.
BERRY BLAST SMOOTHIE
1 cup
1½ cups
1 cup
½ cup
1 cup
apple juice
lemonade
frozen raspberries
frozen strawberries
raspberry sherbet
Pour in liquid ingredients. Add all frozen ingredients. Blend at PULSE
setting for 30 seconds; then blend until smooth. While the machine is
running, move the Stir Stick around counter-clockwise to aid mixing.
Serve immediately. Makes 3–5 servings.
14
RECIPES
RASPBERRY CREAM SMOOTHIE
1 cup
1 cup
1 cup
½
1½ cups
orange juice
raspberry yogurt
vanilla frozen yogurt
frozen banana (chunks)
frozen raspberries
Pour in liquid ingredients. Add all frozen ingredients. Blend at PULSE
setting for 30 seconds; then blend until smooth. While the machine is
running, move the Stir Stick around counter-clockwise to aid mixing.
Serve immediately. Makes 3–5 servings.
ORANGE BANANA CREAM SMOOTHIE
1 cup
1½ cups
½ tsp.
½
1 cup
½ cup
3 tbs.
milk
orange juice
vanilla
frozen banana (chunks)
vanilla frozen yogurt
orange yogurt
orange juice concentrate
Pour in liquid ingredients. Add all frozen ingredients. Blend at PULSE
setting for 30 seconds; then blend until smooth. While the machine is
running, move the Stir Stick around counter-clockwise to aid mixing.
Serve immediately. Makes 3–5 servings.
RASPBERRY SUNRISE SMOOTHIE
2½ cups
1½ cups
1 cup
1 cup
orange juice
frozen raspberries
raspberry sherbet
ice
Pour in liquid ingredients. Add all frozen ingredients. Blend at PULSE
setting for 30 seconds; then blend until smooth. While the machine is
running, move the Stir Stick around counter-clockwise to aid mixing.
Serve immediately. Makes 3–5 servings.
15
RECIPES
LEMON LOUIE SMOOTHIE
2 cups
1 cup
1½ cups
1 cup
1 cup
lemonade
lemon yogurt
frozen pineapple (chunks)
pineapple sherbet
ice
Pour in liquid ingredients. Add all frozen ingredients. Blend at PULSE
setting for 30 seconds; then blend until smooth. While the machine is
running, move the Stir Stick around counter-clockwise to aid mixing.
Serve immediately. Makes 3–5 servings.
PEACH REFRESHER SMOOTHIE
2 cups
1 cup
½
1 cup
1½ cups
peach nectar or apple juice
vanilla frozen yogurt
banana
peach yogurt
frozen peach slices
Pour in liquid ingredients. Add all frozen ingredients. Blend at PULSE
setting for 30 seconds; then blend until smooth. While the machine is
running, move the Stir Stick around counter-clockwise to aid mixing.
Serve immediately. Makes 3–5 servings.
BANANA LIME SUBLIME SMOOTHIE
2
1
1
3
1
cups
cup
tbs.
cup
limeade
banana
lime sherbet
coconut milk
ice
Pour in liquid ingredients. Add all frozen ingredients. Blend at PULSE
setting for 30 seconds; then blend until smooth. While the machine is
running, move the Stir Stick around counter-clockwise to aid mixing.
Serve immediately. Makes 3–5 servings.
16
RECIPES
PIÑA COLADA SMOOTHIE
5 tbs.
2½ cups
½ cup
½
1½ cups
coconut milk
pineapple juice
vanilla ice cream
frozen banana (chunks)
frozen pineapple (chunks)
Pour in liquid ingredients. Add all frozen ingredients. Blend at PULSE
setting for 30 seconds; then blend until smooth. While the machine is
running, move the Stir Stick around counter-clockwise to aid mixing.
Serve immediately. Makes 3–5 servings.
STRAWBERRY LEMON SURPRISE SMOOTHIE
2 cups
2 cups
1 cup
lemonade
frozen strawberries
strawberry yogurt
Pour in liquid ingredients. Add all frozen ingredients. Blend at PULSE
setting for 30 seconds; then blend until smooth. While the machine is
running, move the Stir Stick around counter-clockwise to aid mixing.
Serve immediately. Makes 3–5 servings.
HAWAIIAN HOLIDAY SMOOTHIE
1 cup
1 cup
1 cup
½ cup
½ cup
4 tbs.
1 cup
½ cup
passion fruit nectar
guava nectar
orange sherbet
frozen strawberries
frozen mango slices
coconut milk
strawberry yogurt
frozen banana in (chunks)
Pour in liquid ingredients. Add all frozen ingredients. Blend at PULSE
setting for 30 seconds; then blend until smooth. While the machine is
running, move the Stir Stick around counter-clockwise to aid mixing.
Serve immediately. Makes 3–5 servings.
17
RECIPES
LOW-FAT STRAWBERRY ORANGE SMOOTHIE
2 cups
1
⁄2 cup
1 cup
1 cup
1 cup
strawberries
orange juice
skim milk
plain nonfat yogurt
ice
Pour in liquid ingredients. Add all frozen ingredients. Blend at PULSE
setting for 30 seconds; then blend until smooth. While the machine is
running, move the Stir Stick around counter-clockwise to aid mixing.
Serve immediately. Makes 3–5 servings.
LEMONADE WATERMELON SOOTHER
2 cups
watermelon (pulp, not rind)
3 oz
frozen lemonade concentrate (1⁄2 of a 6 oz can)
1 cup
lemon/lime soda
1 tsp.
grenadine syrup
1-2 cups
ice, to desired consistency
*add water if necessary
Pour in liquid ingredients. Add all frozen ingredients. Blend at PULSE
setting for 30 seconds; then blend until smooth. While the machine is
running, move the Stir Stick around counter-clockwise to aid mixing.
Serve immediately. Makes 3–5 servings.
CHOCOLATE TREAT
3.5 oz
11⁄2 cups
11⁄2 cups
1
package of instant chocolate pudding mix
milk
ice
banana
Pour in liquid ingredients. Add all frozen ingredients. Blend at PULSE
setting for 30 seconds; then blend until smooth. While the machine is
running, move the Stir Stick around counter-clockwise to aid mixing.
Serve immediately. Makes 3–5 servings.
18
MY RECIPES AND NOTES
19
WARRANTY
Please complete and return this product warranty card or register your product online
at: backtobasicsproducts.com within 10 days of purchase.
THIS INFORMATION IS FOR INTERNAL USE ONLY
Mr.
Mrs.
Model: Blender Solution™ 4000
Ms.
1. Name __________________________________________________________________
2. Address _________________________________________________________________
City ______________________________________ State ______ Zip Code _____
3. E-Mail Address ____________________________________________________________
4. Age:
18-24
5. Marital Status:
25-34
Married
Below $25,000
50+
Single
6. Number of Children in the House :
7. Income:
35-49
12 yrs and under _________ 13-18 yrs _________
$25,001-$50,000
$50,001-$75,000
$75,001+
8. Where was this product purchased? ___________________________________________
9. How did you become aware of this product?
____ Gift
____ TV advertisement
____ Print ad
____ Magazine article
____ Recommendation from friend
____ Saw product in store
____ TV shopping program
____ Internet
____ Other ________________________
10. What were the two most important reasons influencing your purchase:
____ Gift
____ Special offer
____ Product appearance
____ Ease of operation
____ Quality/durability
____ Product features
____ Recommended by sales person
____ Recommended by friend
____ Prior experience with Back to Basics
____ Back to Basics brand reputation
____ Value for price
____ Product packaging
____ Other ________________________
11. Why did you purchase this Back to Basics® product?
____ To replacement/upgrade current product
____ Not satisfied with current product(s) already owned
____ First product(s) ever owned
____ Received as a gift
12. Would you be interested in being contacted via e-mail for promotions, recipes, new
product information, etc.?
YES
NO
COMMENTS _______________________________________________________________________
__________________________________________________________________
20
Fold here and mail registration card within 10 days of purchase to validate warranty.
Place
Stamp
Here
BACK TO BASICS PRODUCTS, INC.
675 West 14600 South
Bluffdale, UT 84065 USA