1
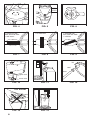
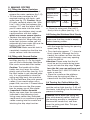
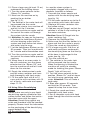
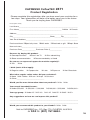
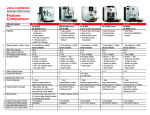
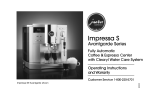
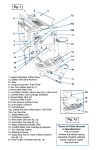
CoffeeTEC Model #471
• Operating Instructions
• Product Registration
• Warranty
IMPORTANT SAFEGUARDS
When using electrical appliances, basic safety precautions should always
be followed, including the following:
1. Read all instructions.
2. Do not touch hot surfaces. Use handles or knobs.
3. To protect against fire, electric shock and personal injury, do not
immerse cord, plugs, or appliance in water or other liquid.
4. Close supervision is necessary when any appliance is used by or near
children.
5. Unplug from outlet when not in use and before cleaning. Allow it to
cool before putting on or taking off parts, and before cleaning the
appliance.
6. Do not operate any appliance with a damaged cord or plug or after the
appliance malfunctions, or has been damaged in any manner. Return
appliance to the nearest authorized service facility for examination,
repair or adjustment.
7. The use of accessory attachments not recommended by the appliance
manufacturer may result in fire, electric shock, or personal injury.
8. Do not use outdoors.
9. Do not let the cord hang over the edge of a table or counter, or touch
hot surfaces.
10. Do not place on or near a hot gas or electric burner, or in a heated
oven.
11. Always attach plug to appliance first, then plug cord into wall outlet. To
disconnect, turn any control to “off” then remove plug from wall outlet.
12. Do not use appliance for other than intended use.
13. Use extreme caution when disposing hot steam.
14. For household use only.
SAVE THESE INSTRUCTIONS
SPECIAL CORD SET INSTRUCTIONS
Regarding your cord set:
A. A short power-supply cord (or detachable power-supply cord) is to be
provided to reduce risks resulting from becoming entangled in or
tripping over a longer cord.
B. Longer detachable power-supply or extension cords are available and
may be used if care is exercised in their use.
C. If a long detachable power-supply cord or extension cord is used,
1) The marked electrical rating of the detachable power-supply cord
or extension cord should be at least as great as the electrical rating
of the appliance,
2) If the appliance is of the grounded type, the extension cord should
be a rounding type 3-wire cord, and
3) The longer cord should be arranged so that it will not drape over
2
the counter top or table top where it can be pulled on by children or
tripped over.
D. This appliance has a polarized plug (one blade is wider than the other).
As a safety feature, this plug will fit in a polarized outlet only one way. If
the plug does not fit fully in the outlet, reverse the plug. If it still does
not fit, contact a qualified electrician. Do not attempt to defeat this
safety feature.
CAUTION
This appliance is for household use. Any servicing other than cleaning and
user maintenance should be performed by an authorized service representative.
• Do not immerse base in water or try to disassemble.
• To reduce the risk of fire or electric shock, do not remove the base.
No user serviceable parts inside. Repair should be done by authorized
service personnel only.
• Check voltage to be sure that the voltage indicated on the name plate
agrees with your voltage.
• Never use warm or hot water to fill the water container!
Use cold water only!
• Keep your hands and the cord away from hot parts of the appliance
during operation.
• Never clean with scouring powders or hard implements.
WHO IS CAPRESSO?
With more than 20 years experience in coffee equipment for consumers
I founded CAPRESSO in 1994. My goal is to provide coffee makers and
espresso/cappuccino machines for the customer who wants a better
product. Safety, reliability, performance and convenience are the cornerstones of the CAPRESSO quality. Our products are available through
selected retailers who can provide expert service and advice, are friendly,
and treat you as a valued customer. For a listing of Capresso dealers
near you please check our website at www.capresso.com. I hope you
will enjoy your new CAPRESSO product and will recommend it to your
friends.
Michael Kramm, President
3
CONTENTS
Page
IMPORTANT SAFEGUARDS
2
LINE DRAWINGS (FIGURES 1-14)...................................................... 5-6
WHO IS CAPRESSO? .............................................................................3
WELCOME TO THE CAPRESSO CoffeeTEC..........................................7
EQUIPMENT ............................................................................................7
FEATURES AND BENEFITS ....................................................................7
1. PREPARING THE CoffeeTEC ..............................................................8
1.1 Before First Use ............................................................................... 8
1.2 Setting the Clock and Timer ............................................................8
1.3 Priming the frothXpress system .......................................................8
2. MAKING COFFEE............................................................................... 9
2.1 Filling the Water Container ...............................................................9
2.2 Filling with Ground Coffee................................................................ 9
2.3 Placing the Stainless Steel Carafe ................................................... 9
2.4 Turning the Coffee Maker On ........................................................... 9
2.5 Serving Coffee ................................................................................10
2.6 Pouring Coffee While Brewing .......................................................10
2.7 Brewing Small Amounts of Coffee .................................................10
2.8 Making Multiple Carafes of Coffee .................................................10
2.9 Auto Shut-Off .................................................................................10
3. AUTOMATIC BREWING AT A PROGRAMMED TIME ......................10
4. KEEPING COFFEE HOT IN THERMAL CARAFES ...........................10
5. FROTHING MILK ..............................................................................11
5.1 Assembly of the frothXpress System .............................................11
5.2 Adding Milk ....................................................................................11
5.3 Brewing Coffee and Frothing Milk ..................................................11
5.4 Frothing Milk Only ..........................................................................11
5.5 Producing Frothed Milk ..................................................................11
5.6 Regulating Milk Froth and Temperature .........................................11
5.7 Green Steam Light Off ...................................................................12
5.8 Recommendations for Cappuccino and Latte ...............................12
5.9 Using the Flexible Hose ..................................................................12
6. MAKING HOT CHOCOLATE .............................................................12
7. CLEANING ........................................................................................12
7.1 The frothXpress System .................................................................12
7.2 The Milk Container .........................................................................13
7.3 The Coffee Maker ...........................................................................13
8. DECALCIFYING................................................................................ 13
8.1 Decalcifying With Durgol ................................................................13
8.2 Using Other Decalcifying Agents ...................................................14
8.3 Decalcifying Hose ..........................................................................14
9. TROUBLESHOOTING ...................................................................... 15
10. WARRANTY ....................................................................................15
11. PRODUCT REGISTRATION ............................................................16
4
A. Water Container Lid
B. Sticker: Capresso Plus Service
C. Water Container (removable)
K
J
D. Display and Operating Panel
(see figure 2)
E. Milk Container with Lid
F. Drip Grid
G. Drip Tray
I
H.
I.
J.
K.
H
Fig. 1
Platform
Stainless Steel Carafe with Lid
Swing-Out Filter
Push Button for Swing-Out Filter
FIG. 1
L
M
N
O
Program
On
Auto
3-5
3-5
AM
On/Off
Q
Steam
R
Program
Auto Hours
Minutes
S
P
L.
M.
N.
O.
P.
T.
LCD Display
On Light (red)
Auto Light (green)
3-5 cup Light (green)
On/Off Button with Knob for 3-5 cup Setting and
Auto Setting
Program Light (green)
Steam Ready Light (green)
Program Button with Knob for Hour and Minute
Setting
Steam Selector
U.
V.
W.
X.
Y.
Z.
Steam Nozzle
Connector
Frothing Sleeve
Knob (for regulating froth)
Joint
Milk Container Lid with Siphoning Straw
Steam Off
T
Steam On
Q.
R.
S.
FIG. 2
U
V
X
Y
"click"
W
Z
FIG. 3
5
to close
DRIP
STOP
FIG. 4
• maximum milk
flow and milk froth
• milk warm
FIG. 5
• no milk flow
FIG. 6
• reduced milk
flow and milk froth
• milk hot
F
FIG. 7
FIG. 8
FIG. 9
lid
seal
straw
upper valve
lower valve
FIG. 10
FIG. 11
HOT STEAM!
FIG. 13
6
FIG. 14
FIG. 12
WELCOME TO THE CAPRESSO CoffeeTEC
Thank you for choosing this unique CAPRESSO product. Your new CoffeeTEC has
two distinctly different functions which work completely independently of each
other: Brewing Coffee and Frothing Milk. Please study these operating instructions carefully before operating your new CoffeeTEC and keep them in a safe place
for easy reference in the future. Understanding and complying with these directions
is essential to ensure that the machine is utilized without risk and to ensure safety
during operation and maintenance. Should you require further information or if particular problems occur that are not covered in this manual, please contact your local
dealer or call our toll free HELP LINE: 1-800-767-3554 9AM to 9PM Eastern
Standard Time, Monday through Friday and 9AM to 5PM on Saturday.
If you call at any other time, please leave a message with your telephone number
and when we can call you back. You can also send us a fax at 1-201-767-9684,
or e-mail us at [email protected].
EQUIPMENT
The CoffeeTEC comes complete with:
• Stainless Steel Carafe with Lid
• GoldTone Filter (inserted in removable Filter Holder)
• Removable Water Container
• Measuring Scoop and Mail Order Form for Parts and Accessories
frothXpress System with:
• Milk Container with Lid and Siphoning Straw attached
• Steam Nozzle (figure 3; U) attached to machine
• 4-piece Frothing Assembly (figure 3; V, W, X, Y) packed in Milk Container
• Special Decalcifying Hose (see figure 14)
• Flexible Siphoning Hose (see figure 11)
• Drip Grid and Drip Tray (figure 1; F, G)
FEATURES AND BENEFITS OF THE CoffeeTEC
• 10-cup coffee maker with stainless steel vacuum carafe keeps coffee hot for up
to 4 hours without reheating. (A full pot of coffee is more than 180˚ F after brewing, and more than 160˚ F after 4 hours.)
• Carafe lid is closed during the brewing process, preventing aroma and heat loss.
Since lid is closed, carafe can remain on the platform after brewing has finished.
• Safety push button swing-out filter prevents accidental opening.
• Drip-stop allows you to pour a cup of coffee while brewing.
• Removable filter holder for easy cleaning.
• Fast brewing process allows you to brew 10 cups of coffee in under 8 minutes.
(Remember the shorter the brewing time, the less bitter your coffee tastes.)
• Illuminated digital programmable clock/timer displays the time and allows you to
program the coffee maker to make coffee anytime you want.
• Five signal lights indicate the status of your CoffeeTEC.
• Removable water container has cup markings and two water compartments for
coffee and steam. Automatically fill water for brewing coffee and frothing milk, or
just fill water for frothing milk.
• Patented frothXpress System instantly delivers hot milk or milk froth for up to
8 regular cappuccinos at a time, directly into your coffee mug or cappuccino cup.
No frothing pitcher needed, no waste of milk, simply the fastest way to produce
frothed milk.
• frothXpress System can also be used to produce hot chocolate.
• 2-hour safety auto shut-off.
7
1. PREPARING THE CoffeeTEC
1.1 Before First Use
a. After unpacking your CoffeeTEC
clean all the loose parts with warm
water and make yourself familar
with the different functions.
b. After reading these instructions, let
some water run through the coffee
maker to clean all internal parts.
1.2 Setting the Clock and Timer
When you plug in the CoffeeTEC the
green display will flash “AM 12:00”
and all indicator lights are off.
To set the current time:
Turn and hold the program knob to
the left (hours) to set the hours (see
fig. 2; S). While you are doing this,
watch the AM change to PM. Then
turn and hold the program knob to
the right (minutes) and set the minutes (see fig. 2; S).
To set the programmed time:
a. Push the program button (see fig.
2; S). The Program light (see fig. 2;
Q) will go on and the display will
show “AM 12:00.”
b. Turn and hold the program knob to
the left (hours) to set the hours.
While you are doing this, watch the
AM change to PM. Then turn and
hold the program knob to the right
(minutes) and set the minutes.
Within four seconds, the display will
revert to the current time and the
program light will turn off.
c. To change the programmed time,
push the program button (see fig. 2;
S). It will show the programmed
time. Then set the time as
described above in step b.
d. To check the programmed time,
push the program button. The
display will show the time you have
programmed to brew coffee. The
display will switch back by itself to
the current time after a few seconds.
8
Attention: Flashing LCD Display
(see fig. 2; L)
If you unplug the coffee maker for
more than 15 seconds or if you have
a power failure, you will lose the current time and program settings. The
display will flash “AM 12:00” indicating that you have to reset the current
and programmed time.
1.3 Priming the frothXpress system
Before using the CoffeeTEC for the
first time to make coffee or to froth
please proceed as follows:
1. Remove water tank.
2. Fill only the lower part of the water
tank about half full (see fig. 10)
3. Replace water tank and push down
so that it engages properly.
4. Turn machine on (button P, fig 2)
5. Within 60 seconds the green Steam
Ready Light will go on (R, fig. 2).
6. Place a large cup underneath the
steam nozzle.
7. Wait approx. 30 seconds. Turn the
Steam Selector Switch (T, fig. 2) all
the way to the right - to the "Steam
On" position – until you feel resistance.
8. Allow steam to release for 30 sec.*
9. Turn the Steam Selector Switch
back to the "Steam Off" position to
stop the steam action.
10. The frother is now primed and
ready for use on a regular basis.
11. Turn the machine off (push button
P, fig, 2; the red light M will go off).
*Attention: If steaming should stop
by itself before 30 seconds are up,
turn the Steam Selector Switch back
to "Steam Off" and wait until the
green Steam Ready Light turns on
again (this will take approx. 2 minutes).
Then repeat steps (6) through (11) one
more time. The frother should now
steam without interruption for 30
seconds or longer.
2. MAKING COFFEE
2.1 Filling the Water Container
• Open the water container lid and
remove the water container (fig.1; C).
• Fill the water container to the
required marking with fresh, cold
water (see fig. 10). Caution: Never
fill water container above the “Max
Line”—this is the line between the
number “10” and the letters MAX. If
you fill more water into the water
container the stainless steel carafe
could overflow with hot coffee
which can cause severe injuries.
• Replace the water tank and close
the water tank lid. When filling the
water tank to brew coffee you will
automatically have water left over for
frothing milk (see section 5).
ATTENTION: Make sure the tank is
completely inserted so that the two
valves connect with the machine.
2.2 Filling with Ground Coffee
a. Push the button to open the swingout filter (see fig. 4). On the inside
you will find a removable GoldTone
filter and a removable filter holder.
Caution: The handle of the filter
holder has to sit over the raised
plastic part of the filter (see fig. 5). If
the filter holder is not inserted properly, it is not possible to close the
swing-out filter back into machine.
b. Fill the GoldTone filter with ground
coffee. If you would rather use a
paper filter, use size 4. Please follow
the instructions on the filter paper
box for proper use of filter paper.
c. Important: Coffee Amounts
Never use more than the amounts
indicated in the following chart.
Using more coffee than indicated
could result in an overflow of ground
coffee running into the carafe and
blocking the drip stop function.
Maximum #
of Scoops
GoldTone
Size 4
Filter
Paper Filter
Regular Grind
(Supermarket
Version)
13
scoops
16
scoops
Fine Grind (finer
8-9
scoops
10-11
scoops
than regular)
d. Close the swing-out filter until it
firmly clicks in place (see fig. 1; J).
2.3 Placing the Stainless Steel Carafe
Caution: Remove the carafe lid and
make sure that the carafe is empty
before brewing coffee.
• Place the carafe lid on the carafe
with the large dot facing the pouring
spout (see fig. 6).
• Turn clockwise approx. 1 1/2 turns to
firmly close lid. Although the lid is
closed, the coffee can flow into the
carafe through a one-way opening
device on the lid.
Attention: Please note that the lid
must be on the carafe during brewing to activate the drip stop. If you
lose the lid, you can not brew coffee. Please call 1-800-767-3554 to
order a new lid.
• Place the carafe on the platform.
Make sure the swing-out filter is
closed with the filter holder in place.
2.4 Turning the Coffee Maker On
Push the on/off button (see fig. 2; P)
and the red on light (see fig. 2; M) will
illuminate, indicating that the brewing
process is starting.
Caution: Never open the swing-out
filter while brewing coffee. Wait until
the brewing process is completed.
Remove the carafe first, and then
open the swing-out filter. This prevents spilling.
9
After the coffee maker has finished
brewing, remove the carafe from the
platform. Turn the lid counterclockwise until the large round dot is over
the pouring spout. You can now serve
coffee. After serving make sure to
close the lid securely.
CAUTION: Do not store carafe on its
side or upside down. Hot coffee can
drip out of the air release valve.
2.5 Serving Coffee
Brewing time for a full pot of coffee is
under 8 minutes. When using a finer
grind, it can take an additional two to
four minutes until all the water has
processed through the ground coffee.
2.6 Pouring Coffee While Brewing
You can pull the carafe from the
platform during the brewing process
for approx. 20 seconds to pour a cup
of coffee. Make sure the lid is closed
before you replace the carafe on the
platform.
2.7 Brewing Small Amounts of Coffee
When brewing small amounts of coffee, we always recommend rinsing
the carafe with hot water and switching to the 3-5 cup brewing cycle
before you turn on the machine.
• Turn the on/off knob to the left,
towards “3-5 cup” marking (see fig.
2; P). The green 3-5 cup indicator
light (see fig. 2; O) will go on. This
setting will slow down the brewing
process and improve the temperature. When brewing 3 to 5 cups of
coffee, temperature in the carafe
after brewing will be between 174˚ F
and 177˚ F.
• To cancel the 3-5 cup brewing cycle
turn the on off knob to the 3-5 cup
marking again. The 3-5 cup indicator
light will turn off.
2.8 Making Multiple Carafes of
Coffee
If you want to make another carafe of
coffee immediately after the first
10
carafe is brewed, push the on/off button (see fig. 2; P) to turn the coffee
maker off (the red light will turn off)
and let the coffee maker cool down
for approx. 5 minutes before refilling
with fresh cold water and ground coffee. Important: Make sure the carafe
is empty before brewing.
2.9 Auto Shut-Off
After brewing is finished the CoffeeTEC
will go into stand-by mode for frothing.
If you do not operate the machine
within the next 2 hours, it will turn
itself off automatically (the red light
will turn off – fig. 2, M).
3. AUTOMATIC BREWING AT A
PROGRAMMED TIME
• Set the programmed time at which
you wish to brew coffee as
described in section 1.2.
• Prepare the coffee maker as
described in sections 2.1 - 2.3.
• Turn the on/off knob towards the
Auto marking and let go. The green
auto light (see fig. 2; N) will go on.
• At the pre-programmed time, the
red on button will go on and the
green auto light will go off, indicating
that brewing has started.
• Important: If you inadvertently
turned the on/off knob to the Auto
marking you can turn the Auto light
off by turning the knob towards the
Auto marking again.
4. KEEPING COFFEE HOT IN
THERMAL CARAFES
After brewing a full pot of coffee the
temperature in the carafe will be
above 180˚ F. If the carafe stays
closed the temperature will gradually
fall. After 4 hours the temperature will
remain between 160˚ F and 165˚ F.
The more often you open the carafe
and the less coffee remains, the faster
the temperature will decrease.
5. FROTHING MILK
The frothXpress System allows you to
heat and froth milk directly into your
cup. Like a pump espresso machine,
the CoffeeTEC is equipped with a
pump and a separate heating system
to create hot steam. The frothXpress
System works independently from the
coffee brewing system.
Caution: Steam Pressure Release
Through Top of Swing-Out Filter
(see fig. 13)
Any time you turn the steam selector
(see fig. 2; T) from “Steam On” to
“Steam Off,” the machine
automatically releases the remaining
pressure into the filter holder. As a
result, a short, hot burst of steam will
come out of the openings above the
swing-out filter (see fig. 13). Never
place your hand or arm on this part
of the machine. The hot steam can
cause serious injury.
5.1 Assembly of the frothXpress
• Important: In order to siphon milk
through the frothXpress System all
parts must be tightly connected. If
the parts are loose, outside air might
be entering the process, making it
impossible to siphon the milk.
Please refer to figure 3.
• Attach the connector to the steam
nozzle until the red seal of the steam
nozzle is no longer visible (see fig. 3;
U to V). Next, attach the large hole
of the frothing sleeve to the
connector (W to V).
Insert the knob into the joint and
make sure it clicks in place and sits
tight (X to Y), and then insert the joint
firmly into the connector (Y to V).
5.2 Adding Milk
Remove the lid of the milk container
and fill with milk. Replace the milk
container lid and connect with the
joint (see fig. 3; Z to Y). Make sure
that the knob sits parallel to the joint
(see fig. 7). (If it sits perpendicular to
the joint no milk can be siphoned
through the system; see fig. 8.)
5.3 Brewing Coffee and Frothing
Milk
Fill the water container with the
desired amount of water for coffee.
By doing so, you automatically add
the water necessary for frothing. The
CoffeeTEC will first brew the coffee.
After coffee brewing is finished, the
machine will switch to stand-by
position for frothing. The green steam
light will go on (see fig. 2; R), indicating that the machine is ready to froth.
5.4 Frothing Milk Only
Only fill water in the lower part of the
water tank (see fig. 10). Make sure
that no water covers the upper valve.
Push the on button (see fig. 2; P). The
red light will illuminate. After approx.
60 seconds the green “Steam Ready”
light will illuminate. Now you are ready
to froth.
5.5 Producing Frothed Milk
Place a cup underneath the frothing
sleeve (see positioning on cover of
instruction book), and then turn the
steam selector switch to the position
“Steam On.” Make sure the knob sits
parallel to the joint (see fig. 7). The
frothXpress System will automatically
dispense warm frothed milk into your
cup. When you have enough frothed
milk, turn the steam selector back to
the position “Steam Off” (see fig. 2;
T). As long as you have water in the
lower part of the water container, you
can continue frothing milk. When you
are finished, disconnect the milk
container and store with any unused
milk in the refrigerator.
5.6 Regulating Milk Froth and
Temperature
Maximum milk flow with maximum
froth is achieved when the knob sits
parallel to the joint (see fig. 7). By
11
slightly turning the knob towards the
front or the back (approx. 20 to 40
degrees; see fig. 9) the flow of milk
will be slowed down, increasing the
milk temperature and decreasing the
amount of froth. The temperature of
the milk can vary between 110˚ F and
175˚ F depending on the position of
the knob. Attention: If you turn the
knob too much the milk will splatter. If
the knob sits perpendicular to the
joint (see fig. 8), the flow of milk is
totally blocked. Only hot steam will
pass through the frothXpress System.
5.7 Green Steam Light Off
When the machine is turned on and
coffee brewing is finished, CoffeeTEC
will automatically go into stand-by for
frothing, indicated by the green steam
light. The steam light will cycle
between on and off. If the light is off
and you want to froth, place a cup
underneath the frothing sleeve and
turn the steam selector (see fig. 2; T)
to the position “Steam On.” Within 20
seconds, the steam heating system
will heat up, the green steam light will
come on, and frothing will start.
5.8 Recommendations for
Cappuccino and Latte
If you want to serve multiple cups of
cappuccino and latte at the same
time, we recommend frothing your
milk directly into your cups and then
pouring the coffee through the frothed
milk. This method keeps the froth
very white in color. If you pour coffee
into the cups first and then froth the
milk on top of it, the froth will change
to a brownish color. It’s up to you to
decide what method you like best.
5.9 Flexible Hose
Instead of using the milk container
you can use the flexible hose (see fig.
11). Attach the flexible hose to the
joint and insert the end of the hose
directly into a small milk carton.
Important: The hose has to point
12
downwards to function properly
(fig. 11). You can cut the hose to fit.
6. MAKING HOT CHOCOLATE
• Fill the milk container with cold milk,
add chocolate syrup and stir well.
Only fill water in the lower part of the
water container. Make sure that no
water covers the upper valve (fig. 10).
• Push the on button (see fig. 2; P)
and the red light will turn on. Within
60 seconds the green “Steam
Ready” light will illuminate (see fig. 2;
R) indicating that you are ready to
produce hot chocolate.
• Place a cup underneath the frothing
sleeve and then turn the steam
selector to the position “Steam On.”
Make sure the knob sits parallel to
the joint (see fig. 7). The frothXpress
System will automatically dispense
warm frothed chocolate into your cup.
• When you have enough hot
chocolate, turn the steam selector
back to the position “Steam Off.” By
slightly turning the knob towards the
front or the back (approx. 20 to 40
degrees; see fig. 9) the flow of
chocolate milk will be slowed down,
increasing the temperature and
decreasing the amount of froth.
Attention: Tiny chocolate particles
can delay the siphoning of cold
chocolate. Make sure that the knob
sits parallel to the joint (see fig. 7),
and let the frothing run for 10 to 15
seconds. The machine will automatically resume proper frothing. If this
does not give you the desired result,
turn the machine off, let it cool down
for two minutes, and then turn the
machine on and start frothing again.
7. CLEANING
7.1 The frothXpress System
If you do not clean the frothXpress
System, hardened milk will deposit in
the knob, joint, frothing sleeve, and
the connector. Hardened milk
deposits are very difficult to remove.
Therefore, we highly recommend
cleaning the frothXpress System after
each use as follows (it will take less
than a minute):
• Disconnect the milk container from
the joint (see fig. 3; Z from Y).
• Remove the four parts and immerse
in a cup with warm water (knob,
joint, connector, frothing sleeve) or
rinse all parts under warm running
water (see fig. 3; parts V, W, X, Y).
• Place a large cup underneath the
steam nozzle and turn the steam
selector to “Steam On” and let some
steam run through for a few seconds.
Turn the steam selector back to
“Steam Off.”
• Assemble the system.
7.2 The Milk Container
• Remove the lid of the milk container.
(The milk container is diswasher
safe; upper rack.)
• Hold the lid under warm running
water and allow some water to run
through the straw. For a more thorough cleaning take the lid assembly
apart (lid, seal, straw).
• Important: When replacing the
three parts, first insert the seal into
the receptacle on the underside of
the lid, and then push the straw
inside the seal to ensure a tight fit
(see fig. 12).
7.3 The Coffee Maker
• Always unplug the appliance from
the outlet before cleaning.
• Never use scouring agents
• Never immerse the appliance in
water or any other liquid, and never
clean under running water. To clean
the appliance, wipe off with a soft,
damp cloth.
• Dishwasher safe (upper rack)
parts: filter holder, GoldTone filter,
drip grid, drip tray, water container
and milk container (without lid).
• Make sure that the drip stop in the
filter holder is free of any coffee
particles, or else it might not close
properly when removing the carafe
(see fig. 5).
• Attention: The swing-out filter is not
removable.
• Not dishwasher safe: Stainless
steel carafe. Wipe outside with a
damp cloth. Rinse inside.
8. DECALCIFYING
For prolonged use of your CoffeeTEC
it is necessary to decalcify it regularly.
Calcium (limestone) found in drinking
water will leave deposits in the
machine. We highly recommend that
you decalcify your machine at least
every four months.
• Attention: Before decalcifying,
remove the GoldTone Filter from the
machine.
• When to decalcify: A slowdown in
brewing or insufficient steam output
indicates that it is time to decalcify.
8.1 Decalcifying with Durgol
Capresso and many European companies recommend “DURGOL” - a
liquid decalcifying agent that removes
calcium deposits up to 20 times
faster than vinegar.
1. Unscrew steam nozzle. Pour Durgol
in a small cup and insert steam
nozzle. Let it sit for five minutes.
Discard Durgol and rinse steam
nozzle thoroughly.
2. Replace steam nozzle.
3. Fill the water container up to the 5cup marking with fresh cold water.
4. Replace water container into the
coffee maker.
5. Add one cup of Durgol, so that the
solution is at the 6-cup water level.
Attention: Never fill Durgol into the
water container first.
6. Remove GoldTone filter.
7. Make sure that the filter holder is in
place and that the carafe is empty.
8. Place the carafe with its lid in place
on the platform.
9. Fill the milk container with approx.
10 oz. of fresh water (no Durgol!)
and attach to the system.
13
10. Place a large mug (at least 12 oz.)
underneath the frothing sleeve.
11. Turn the steam selector to the
“Steam On” position.
12. Now turn the machine on by
pushing the on button
(see fig. 2; P).
13. The solution in the water tank will
be pumped into the carafe.
14. After one minute, turn machine off
and let it sit for 5 minutes.
15. Turn the machine on again and let
the rest of the water run through
the system into the carafe.
16. Attention: As soon as the brewing
is finished the frothXpress System
will start drawing water into the
system and then deliver hot steam
and water into the mug.
17. Let the frothXpress System run for
30 seconds. Then turn machine off
for 1 minute and let the solution work.
18. Turn the machine on again and let
the rest of the steam/water process
continue.
19. When there is no more water in
the milk container, turn the steam
selector back to “Steam Off” and
turn the machine off and let it cool
down for five minutes.
20. Empty the stainless steel carafe
and the water container and rinse
both thoroughly with fresh water.
21. Fill the water tank with 8 to 10
cups and the milk container with 10
oz. of fresh, cold water and repeat
steps 11-19.
8.2 Using Other Decalcifying
Agents
Please make sure only to use liquid
decalcifying agents suitable for drip
coffee makers and follow the instructions that come with the agent.
Attention: Decalcifying agents are
acids and therefore must be handled
properly. Please check the information
on the packaging of the decalcifying
agents before using.
8.3 Decalcifying Hose
14
In case the steam system is
completely clogged with calcium
deposits, proceed as follows:
1. Unscrew the steam nozzle and
replace with the decalcifying hose
(see fig. 14).
2. Fill the water container up to the 5cup marking with fresh cold water.
3. Replace the water container into
the coffee maker.
4. Add one cup of Durgol, so that the
solution is at the 6-cup marking on
the water container.
Attention: Never fill Durgol into the
water container first.
5. Remove the GoldTone filter.
6. Make sure that the filter holder is in
place and that the carafe is empty.
7. Place the carafe on the platform.
8. Fill a large mug with 5 to 6 oz. of
cold water and place underneath
the decalcifying hose so that the tip
of the hose is submerged in the
water (see fig. 14).
9. Turn the machine on.
10. The solution in the water tank
will be pumped into the carafe.
When the brewing is finished the
machine will switch to standby
mode for frothing (the green “Steam
Ready” light will turn on).
12. Turn the steam selector to the
position “Steam On” and let steam
run into the mug containing cold
water. Attention: This will make a
loud noise.
13. Stop after approx. 30 seconds
and wait for 30 seconds. Then
repeat this step five to ten times.
14. Empty the carafe and rinse
thoroughly with fresh water.
15. Run a complete cycle with fresh
water through the machine and the
frother.
9. TROUBLESHOOTING
Call the CAPRESSO HELP LINE at
1-800-767-3554 or email us at
[email protected] for warranty
repair or replacement procedures.
• Coffee drips from the filter, when
the carafe is removed.
--> Ground coffee sits in the drip stop and
does not allow it to close properly.
--> Immediately replace the carafe and
remove the filter holder.
--> Clean filter holder under running
water and push the drip stop several
times to remove coffee particles.
--> Fill some water into the filter holder
and check if the drip stop closes properly.
• Ground coffee is flowing over the
GoldTone filter.
--> Coffee is ground too fine.
--> Use less coffee the next time.
(See section 2.2)
--> Use a paper filter (size 4).
• No steam.
--> Fill some water into the water
container. (See section 5.4)
--> Insert the water tank correctly.
--> Make sure the Steam Selector is
turned all the way to the Steam On
position.
• Steam is o.k. but there is no
frothed milk.
--> Make sure that all pieces of
the frothXpress System are tightly
connected. (See section 5.1)
--> The knob must sit parallel to
the joint. (See fig. 7.) and must be
totally inserted into the joint.
--> Check if the straw inside the
milk container lid sits tightly (fig. 12).
--> Check if there is enough milk
in the milk container.
• Volume of milk froth is too low or
frothing takes too long.
--> Make sure the knob sits
parallel to the joint. (See fig. 7)
--> Clean the steam nozzle, and
frothing sleeve. (See section 7.1).
--> Decalcify the coffee maker.
(See section 8 “Decalcifying.”)
--> Try a low fat or no fat milk.
Remember, the higher the fat
content in the milk, the lower
the amount of froth produced.
10. WARRANTY
This Limited One Year Warranty covers your
CAPRESSO CoffeeTEC machine, model
#471. This warranty is in effect for the period
described above from the date of the first
consumer purchase and is limited to the
United States of America. This warranty
covers all defects in materials or
workmanship (parts and labor) including
UPS ground transportation for both
ways, if necessary.
This warranty does not cover:
• Any machine not distributed by
CAPRESSO within the United States.
• Any machine not purchased from an
authorized CAPRESSO dealer.
• Damaged caused by accident, abuse,
negligence, misuse, improper operation
or failure to follow instructions contained
in this manual.
• Any service or alteration performed by
an unauthorized person, company or
association.
• Loss of any loose parts.
• Damage caused by neglecting or omitting cleaning and decalcifying.
Other limitations and exclusions:
Any implied warranties including
fitness for use and merchantability are limited in duration to the period of the
express warranty set forth above and no
person is authorized to assume for
Capresso any other liability in
connection with the sale of the machine.
Capresso expressly disclaims liability for
incidental and consequential damages
caused by the machine. The terms “incidental damages” refers to the loss of the
original purchasers time, loss of the use of
the machine or other costs relating to the
care and custody of the machine. The
terms “consequential damages” refers to
the cost of repairing or replacing other
property which is damaged when this
machine does not work properly. The
remedies provided under this warranty are
exclusive and in lieu of all others. This
warranty gives you specific legal rights,
and you may also have other rights which
vary from state to state.
15
CAPRESSO CoffeeTEC #471
Product Registration
Please complete this registration after you have used your machine for a
few days. Your information will help us to better serve you in the future.
Thank you for buying from CAPRESSO.
Please print clearly
Last Name_________________________________________________________________
First Name_______________________________________________ q Male q Female
Address___________________________________________________________________
City_________________________________________State_______Zip________________
Your Email Address_________________________________________________________
Purchased from: qSpecialty store qMail order
qReceived as gift qDept. Store
Name of store______________________________________________________________
Purchase Date_______________ Purchase Price $_____________
Reasons for buying this product:
q Concept/Features
q Saw it on TV
q Print advertising
q Store recommendation
q Recommended by a friend
Do you use an espresso/cappuccino machine regularly?:
q Yes
q No
I drink (mark all that apply):
q Regular coffee
q Cappuccino
q Latte
q Espresso
q Hot Chocolate
What other regular coffee maker did you use before?:
q None q Mr. Coffee q Braun q Krups q Cuisinart
q Other:______________________________
Would you like more information about our products?: q Yes q No
Your annual household income:
q Under $50,000 q $50,000 – $100,000
q $100,000 – $250,000
q $250,000 +
Your age group: q Under 25 q 25–40 q 41–45 q 46-55 q 56-65 q 65 +
Any suggestions on how we can improve this product?
___________________________________________________________________________
___________________________________________________________________________
Would you recommend this product to your friends?: q Yes q No
Mail to CAPRESSO Inc., P.O. Box 775, CLOSTER, NJ 07624
or FAX to: (201) 767-9684.
16