1
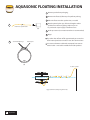
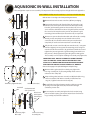
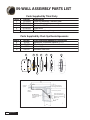
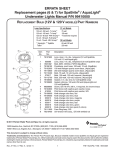
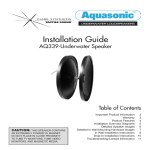
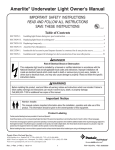
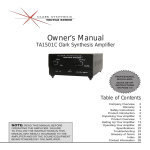
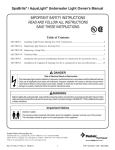
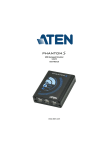
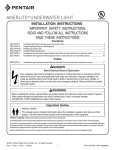
AQUASONIC
POOL SPEAKER
INSTALLATION GUIDE
Clark Synthesis, Inc. • 8020 Southpark Circle, Suite 600 • Littleton, CO 80120 • www.clarksynthesis.com • 800-898-1945
!
GENERAL SAFETY INSTRUCTIONS
Thank you for purchasing the Aquasonic® AC339 from Clark Synthesis Tactile Sound. Please read
the following instructions before assembling and using the product.
1. DO NOT DROP SPEAKER - If damage occurs due to high impact of speaker, it is not covered
under warranty.
2. Do not expose speaker to high distortion levels - Excess distortion may result in failure. If
speaker shuts down the built-in protection circuit is signaling that the volume level is too high.
Turn the amplifier off for approximately 45 - 90 seconds to allow the speaker to reset. Operate at
reduced volume. Continued use of high levels of distortion may cause speaker failure, which is
not covered under the warranty.
3. Use a ground fault interrupter - A GFI outlet or extension cable on the sound system will prevent
electrical shock in the event of a malfunction. These are available at hardware stores or home
improvement stores. They are easy to install and provide a safe operating environment for your
electronics and all pool users.
4. Place speaker in pool away from diving boards and high activity areas - Severe injury may
result if speaker is contacted while diving or jumping.
5. Cable placement - Do not place cable in high traffic areas where people may trip or cable may
tangle causing possible drowning or where pets may damage cable.
6. Do not hang speaker by speaker cable - Use a tether (nylon rope) tied to the eyelet on the
speaker, and tie other end to a stationary anchor.
7. Do not drag speaker on pool deck, bottom or side of pool - This may damage speaker. This
damage is not covered under the warranty.
8. Do not remove or alter the watertight fitting from the speaker wire - This fitting is set at the
factory to seal out water. Over tightening may destroy the water-tight seal. Any physical
alteration or damage will void the warranty.
9. Avoid Excessive heat - Do not leave the speaker in direct sunlight unless it is submerged in pool.
High temperatures, as in a closed car, may result in damage and will void the warranty.
10. The built-in protection circuit - If the speaker shuts down, turn the amplifier off for
approximately 45 - 90 seconds to allow the speaker to reset. Restart the amplifier at a lower
volume. The protection circuit is triggered by excessive heat, distortion, or being overpowered.
Continued overload of the protection circuit may cause speaker failure, which is not covered
under the warranty. If symptoms persist the system may need to be configured differently.
Contact Clark Synthesis or your local dealer for assistance.
1
Aquasonic
INDEX OF CONFIGURATIONS
Portable Floating Model
Page 2
In-Wall Model
(Shown with Third-Party Light Niche)
Page 3
Portable Drop-In Model
Page 5
SUPPLIED/REQUIRED ITEMS
Supplied Parts
Required Tools and Materials
A.
B.
C.
D.
E.
F.
G.
H.
•
•
• Third-Party Light Niche Part
• #2 Phillips Screwdriver
• (2 ea.) 9/16" Open-Ended Wrenches
(1 ea.) Aquasonic Transducer
(1 ea.) Acoustic Sound Lens
(3 ea.) Jam Nut
(1 ea.) Stainless Steel Stud
(2 ea.) Stainless Steel Washers
(1 ea.) Acoustic Radiator
(1 ea.) Float
(4 ea.) Wire Floats
100' Underwater Speaker Wire Cable
Installation Guide
Complete AC339 as packaged
A
G
B
F
Carefully unpack product. DO NOT discard any parts or packaging until installation is complete.
Some Parts Are Pre-Assembled
A
x3
B
C
x2
D
E
F
G
H
Required Audio Components
• Power: Receiver or amplifier for the TST. All AC339 configurations should be powerered with
between 100watts and 200watts. Make sure your amplifier is capable of driving a 4-ohm load.
Aquasonic
2
AQUASONIC FLOATING INSTALLATION
1 Remove speaker from packaging.
2 Remove wire floats (H) from top of styrofoam packing.
3 Slide wire floats onto the speaker wire, as needed.
3
Underwater Speaker Cable
(H)
4 Attach optional nylon rope of desired length to tether
eyelet hole in rubber ring flange. Nylon rope can
be purchased at pool supply or hardware store.
5 Hook up to stereo (135 watts into 4ohms is recommended).
6 Enjoy!
4
If speaker shuts off, turn off for approximately 45 seconds to
allow internal protection circuit to reset. Turn down volume.
Strain Relief Openings
Tether Eyelet
Use same underwater cable with waterproof connector to
extend cable—extra cable available from Clark Synthesis.
(A)
To Stereo System.
Suggested Final Assembly Using Wire Floats
3
Aquasonic
AQUASONIC IN-WALL INSTALLATION
This configuration requires some assembly. The Aquasonic® AC339 simply replaces the light bulb in the light niche.
TOOLS NEEDED: Phillips Head Screwdriver, 2-9/16" Open-Ended Wrenches.
Refer to Parts List on Page 2 For Corresponding Part Names.
1
1 Remove AC339 and acoustic sound lens (B) from packaging.
(A)
(F)
(G)
2 Seperate the transducer (A) from the float (G). Using the 9/16”
wrenches, loosen the jam nut to remove the float (G) assembly
from the gold mounting point on the transducer (A). Use one
9/16" wrench to hold the transducer’s (A) gold fastener, and with
the second 9/16" wrench turn the jam nut away from the gold
mounting point until float (G) and transducer (A) are seperated.
(B)
Jam Nut
2
(A)
3 Remove one jam nut from the threaded stud on float (G) assembly.
Thread jam nut completely onto stud attached to acoustic
sound lens (B). You should now have two jam nuts threaded
completely on to the stud connected to the sound lens (B).
(F)
(G)
4 Fully thread acoustic sound lens (B) onto transducer (A). Using two
wrenches tighten jam nut against the mounting point. Using one
wrench to hold the transducer’s (A) gold fastener, while the second
tightens the jam nut against the gold mounting point. Make sure
that jam nut is firmly tightened against the gold mounting point.
This assembly is now ready for installing into a third-party light niche.
3
4
Jam Nut
(A)
IMPORTANT NOTE: DO NOT ASSEMBLE BY USING THE DOME
ITSELF TO TIGHTEN—MAKE SURE TO TIGHTEN THE TSTs BY
USING A 9/16” WRENCH ON THE GOLD HEX MOUNTING POINT
AND TURN THE JAM NUT USING A SECOND 9/16” WRENCH.
(B)
8
Please refer to page 5 for exploded diagram and part listing.
6
6 Wrap rubber gasket (#3) onto acoustic lens’ (B) black rubber ring,
then re-install (#3) with AC339 assembly installed into face
ring (#1). Tighten unitension wire clamp (#2).
7
(A)
(B)
Third-Party Light Niche (#4)
Rubber Gasket (#3)
Pool Wall
Gasket Mounted
onto Sound Lens
Pilot Screw
with Captive
Gum Washer
(#5)
8
(A)
5 Remove rubber gasket (#3) from a third-party light niche
face ring assembly (#1) by loosening Phillips head screw on
unitension wire clamp (#2).
7 Insert finished end of underwater speaker cable into conduit
opening in back of light niche (#4). Thread wire through
conduit to junction box.
8 Insert complete assembly into light niche back can (#4) using
pilot screw with captive gum washer (#5) to fasten chrome face
ring assembly (#1) to finish installation.
(B)
Third-Party Light
Niche (#4)
Chrome Face Ring
Assembly (#1)
Aquasonic
4
IN-WALL ASSEMBLY PARTS LIST
Item #
1
2
3
4
5
Parts Supplied By Third Party
Part No.
79110600
79111000
79101600
00782105
79104800
Description
Face ring assembly, stainless steel
Unitension wire clamp assembly
Gasket for 8-3/8” lens
Light niche
Pilot screw with captive gum washer
Parts Supplied By Clark Synthesis/Aquasonic
Item #
A
B
C
D
Part No.
AC339
ASL339
LN002
SS-015
4
Clark Synthesis/Aquasonic Description
Aquasonic underwater speaker (TST)
Clark Synthesis acoustic sound lens
Lock nut (2)
Stainless steel stud
A
3
D
B
2
1
C
48"
min.
4" min.
To stereo
system.
8" min. Junction Box or
low Voltage Transformer.
Rigid
Conduit
18" min. to top of Lens.
Concrete must be cut
back around Niche to
allow for a compacted
plaster seal.
#8 AWG Ground
Connector bonding
is located at rear
of Niche.
11.50"
AC339
16"
5
Aquasonic
AQUASONIC DROP-IN INSTALLATION
This configuration requires some assembly. A tether is recommended to suspend speaker in water.
TOOLS NEEDED: Phillips Head Screwdriver, 2-9/16" Open-Ended Wrenches.
1 Remove AC339 and acoustic sound lens (B) from packaging.
1
(A)
(G)
(F)
2 Seperate the transducer (A) from the float (G). Using the 9/16”
wrenches, loosen the jam nut to remove the float (G) assembly
from the gold mounting point on the transducer (A). Use one
9/16" wrench to hold the transducer’s (A) gold fastener, and with
the second 9/16" wrench turn the jam nut away from the gold
mounting point until float (G) and transducer (A) are seperated.
(B)
3 Remove one jam nut from the threaded stud on float (G) assembly.
Thread jam nut completely onto stud attached to acoustic
sound lens (B). You should now have two jam nuts threaded
completely on to the stud connected to the sound lens (B).
Jam Nut
2
(A)
(G)
(F)
3
Floating Assembly
4
Jam Nut
(A)
(B)
4 Fully thread acoustic sound lens onto transducer (A). Using two
wrenches tighten jam nut against the mounting point. Using one
wrench to hold the transducer’s (A) gold fastener, while the second
tightens the jam nut against the gold mounting point. Make sure that
jam nut is firmly tightened against the gold mounting point. This
assembly is now ready to have a tether attached and be lowered into water.
IMPORTANT NOTE: DO NOT ASSEMBLE BY USING THE DOME
ITSELF TO TIGHTEN—MAKE SURE TO TIGHTEN THE TSTs BY
USING A 9/16” WRENCH ON THE GOLD HEX MOUNTING POINT
AND TURN THE JAM NUT USING A SECOND 9/16” WRENCH.
5 Attach nylon rope* (not supplied) to tether eyelet.
Tether Eyelet
6 Use wire floats (H) as needed.
7
* Recommended option: A tether (nylon rope) is recommeded
to use to raise, lower, and suspend speaker in water—this can
be purchased at your local hardware or pool supply store.
8
(H)
Aquasonic
6
United States Warranty and Return Policy
AC339-AQUASONIC POOL SPEAKER WARRANTY
Clark Synthesis, Inc. warranties the AC339-Aquasonice Pool Speaker to be free from defects and workmanship under normal use for a period
of one (1) year from date of original purchase. For industrial or commercial use, the warranty period is six (6) months.
Should warranty service be necessary, Clark Synthesis, Inc. will (at its discretion) repair or replace the defective merchandise with equivalent
merchandise at no charge.
This warranty is valid for the original purchaser and is not extended to subsequent owners. Any applicable implied warranties are limited in
duration to a period of the express warranty as provided herein beginning with the date of the original purchase at retail, and no warranties,
whether expressed or implied, shall apply to this product thereafter. Some states do not allow limitations on implied warranties; therefore these
exclusions may not apply to you. This warranty gives you specific legal rights; however, you may have other rights that vary state to state.
WHAT IS NOT COVERED
This warranty is valid only if the product is used for the purpose for which it was designed. It does not cover the following:
• Damage caused by excessive heat
• Damage through negligence, misuse, accident, or abuse
• Damage caused by incorrectly mounting the speaker
• Damage due to not using an appropriate amplifier
• Freight damage
• Items previously repaired by unauthorized repair facility
• Items damaged due to amplifier clipping and/or distortion
• Items returned from unauthorized individuals or dealers
• Cost of shipping product to Clark Synthesis, Inc.
• Return shipping on non-defective items
RETURN POLICY
New, unused items purchased from us may be returned within 7 days of the purchase date. Please note: Clark Synthesis will only accept
returns for items that are received in their original packaging, in undamaged and re-sellable (new) condition. Manuals, accessories, warranty
cards, and everything else that came with the unit must be included as well. If your return does not meet these conditions, you will be charged
a 15% restocking fee or have the merchandise returned to you at your expense. Non-defective merchandise can also be returned for a
15% restocking fee. Shipping charges for all non-defective returns or exchanges are not refundable.
WHAT TO DO IF YOU NEED WARRANTY OR SERVICE
If it becomes necessary for you to return defective merchandise call Clark Synthesis Customer Service at (303) 797-7500, and you will be given a
Return Authorization Number. Follow the instructions provided by our customer service staff, use suitable packing materials (preferably the
original shipping boxes), and make sure to write your Return Authorization Number on the outside of your box when sending your return to us.
Orders that are returned without an Return Authorization Number may be refused by our returns department!
Remember to include a dated proof of purchase from an authorized dealer. Freight must be prepaid: items received freight collect will be refused.
Make sure that the following is included in your package:
• Product to be returned
• Repacked in original shipping containers
• Return Authorization Number printed on the outside of the box
• Copy of original invoice with Return Authorization Number printed on it
Return to our Service Department:
RA#: _______________
Clark Synthesis, Inc.
8020 Southpark Circle, Suite 600
Littleton, Colorado 80120
INTERNATIONAL WARRANTY
Contact your International Clark Synthesis dealer or distributor concerning specific procedures for your country's warranty policies.