1
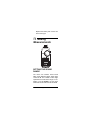
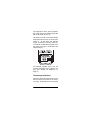
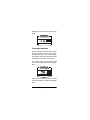
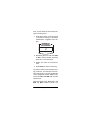
Please read before using this equipment.
Owner’s Manual
Digital Sound Level
Meter
ˆ Contents
Features ............................................... 3
Installing the Battery ........................... 5
Making Measurements ........................ 7
Setting the Sound Range ............... 7
Setting the Weighting ..................... 8
Setting the Response ..................... 9
Making Normal Measurements .... 10
Making Maximum Measurements 12
Level Indications .......................... 12
Underrange Indication .......... 13
Overrange Indication ............ 14
Using Data Hold ........................... 15
Making an Integrated Average
Measurement ............................... 16
Making Maximum and Minimum
Measurements During an
Undetermined Time Period .......... 19
Checking Stereo System
Acoustics ...................................... 20
Calibrating the Meter .................... 20
Care .................................................... 21
Specifications .................................... 22
© 2000 RadioShack Corporation. All Rights Reserved.
RadioShack and RadioShack.com are trademarks used
by RadioShack Corporation.
2
ˆ Features
Your new RadioShack Digital Sound Level Meter precisely measures area noise
and other sound levels. The meter’s digital
design and special measuring features,
such as the bargraph and date hold, ensure pinpoint accuracy for checking an
acoustic environment. The meter is lightweight and easy to operate.
Note: This meter should be used for
home/hobbyist use only. This meter
does not meet the requirements set
forth by the American National Standards Institute (ANSI), Standard S1.4.
Your meter also has these features:
3-Digit Liquid Crystal Display — makes
it easy to read sound measurements.
21- Dot Analog Bargraph — gives you a
visual representation of the measured
sound.
Mode/Condition Indicators — show you
the current mode and status of the meter.
Features
3
Wide Sound-Measuring Abilities —
measures from 50 dB to 126 dB SPL with
seven ranges.
Average or Maximum Sound Level Display — continuously shows the average
or maximum sound level: per second with
digits, per 0.2 or 0.5 seconds with the bargraph.
Tripod Ready — lets you attach the
meter to a tripod (1/4-inch) for more accurate sound measurements.
Date Hold — lets you freeze a measurement on the display.
Integrated Averaging — measures the
integrated average, and holds the maximum and minimum sound levels for a preset period.
Underrange and Overrange Indicators
— show you when the sound level reading
is under or over the selected range.
A and C Weighting — lets you select either type of weighting to suit the purpose
of the measurement.
Selectable Bargraph Response — lets
you select a slow (0.5 second) or fast (0.2
second) bargraph response.
4
Features
Peak Level Indication — shows you
when the meter registers the maximum
level measurement on the bargraph.
Reset Button — lets you clear the current
measurements from the meter’s memory
and begin a new measurement.
9-Volt Battery Operation — lets you
power the meter with a 9-volt battery.
Phono Output Jack — lets you connect
the meter to your stereo system or test
equipment.
Low-Battery Indicator — shows you
when the battery needs to be replaced.
ˆInstalling the
Battery
The meter requires one 9-volt battery for
operation. For the best operation and
longest life, we recommend RadioShack
alkaline batteries. Follow these steps to
install the battery.
Installing the Battery
5
1. Set RANGE to OFF.
2. Remove the battery compartment
cover by pressing
in both sides and lifting off the cover.
3. Install the battery as indicated by the
diagram marked in the compartment.
Place the battery over the red ribbon
to make it easy to remove the battery
later.
4. Replace the battery compartment
cover.
Notes:
• When you are not using the meter,
set RANGE to OFF.
• If you will not use the meter for a
week or more, remove the battery.
• When the battery becomes low,
BATT appears on the display.
6
Installing the Battery
Replace the battery with a fresh one
of the same type.
ˆ Making
Measurements
SETTING THE SOUND
RANGE
The meter can measure sound levels
within seven different ranges. Each range
covers 20 dB. The number of each range
represents the center of the range. For example, if you set RANGE to 70, the meter
measures sound levels from 60 to 80 dB.
Making Measurements
7
Set RANGE for the approximate sound level you want to measure. If you do not
know the sound level, start with the highest range setting (120) and gradually reduce the setting. When the measured
value is lower or higher than the set
range, an underrange or overrange indicator appears. See “Level Indications” on
Page 12.
Notes:
• If you set RANGE to 120, the meter
measures sound levels from 110 dB
to 126 dB.
• If you change the range setting during
a measurement, you clear all the current data and a normal continuous
measurement resumes.
SETTING THE WEIGHTING
WEIGHTING lets you set the meter’s
weighting characteristics, which determine the meter’s frequency response
curve. You can select A-weighting or Cweighting.
A-weighting has A-curve frequency characteristics. This setting causes the meter
to respond mainly to frequencies in the
8
Making Measurements
500-to-10,000 Hz range, which is the human ear’s most sensitive range. Select Aweighting to determine an area’s noiselevel. Take measurements at several different points in the area.
C-weighting has C-curve (flat) frequency
characteristics. This setting causes the
meter to respond mainly to frequencies in
the 32 to 10,000 Hz range. Select Cweighting to measure sound levels of musical material.
When you set RANGE to OFF, the meter
automatically selects C-weighting.
Press WEIGHTING to change the weighting between A and C.
The display shows the current setting
(WEIGHTING A or WEIGHTING C).
Note: You can change the weighting setting only during a continuous average or
maximum measurement.
SETTING THE RESPONSE
RESPONSE lets you set the interval at
which the meter revises the bargraph
sound level reading. There are two settings – fast and slow. When you set
Making Measurements
9
RANGE to OFF, the meter automatically
sets the response for fast.
At the fast setting, the meter revises the
bargraph reading after about every 0.2
seconds. At the slow setting, the meter revises the reading after about every 0.5
seconds.
Press RESPONSE to change the bargraph’s response between fast and slow.
The display shows the selected setting
SLOW or RESPONSE
(RESPONSE
FAST).
Note: You can change the response setting only during a continuous average or
maximum measurement.
MAKING NORMAL
MEASUREMENTS
Follow these steps to measure the average sound level.
1. Set RANGE for the desired sound
range. If you do not know the sound
level, start at the highest range setting (120) and reduce the setting until
you get a reading. (See “Setting the
10
Making Measurements
Sound Range” on Page 7 and “Level
Indications” on Page 12.)
2. Set the weighting and response. (See
“Setting the Weighting” on Page 8
and “Setting the Response” on
Page 9.)
3. Face the sound source. Then hold
the meter to one side and point its
microphone at the sound source.
The meter begins to display the continuous average sound level. This is
the average sound level during a 1second sampling period, which the
meter updates once per second. The
bargraph shows the continuous average for either a 0.2-second or 0.5second period, depending on the
response setting.
When you complete a measurement, set
RANGE to OFF.
Making Measurements
11
MAKING MAXIMUM
MEASUREMENTS
To measure the continuous maximum
sound level, follow the steps in “Making
Normal Measurements” on Page 10 and
press MAX so MAX appears on the display.
The meter displays only the loudest measured sound level during the 1-second
sampling period. The bargraph shows the
maximum level of every 0.2 or 0.5 seconds. The bargraph segment that corresponds to the peak reading stays on the
display for 2 seconds or until the meter
measures a higher maximum level.
Press MAX again to cancel the continuous maximum measurement and resume
a normal continuous average measurement.
LEVEL INDICATIONS
The meter displays the sound level using
numbers and a bar graph. The numbers
show the sound level in dB within ±10 dB
of the selected range and the meter updates the reading once per second.
12
Making Measurements
The bargraph’s center point represents
the center level of the selected range (60
dB, 70 dB, 80 dB, and so on).
The points to the left of the center indicate
measurements less than the center level
(down to –10 dB below the selected
range). The points to the right of the center indicate measurements greater than
the center level (up to +10 dB above the
selected range).
The bargraph updates every 0.2 or 0.5
seconds, depending on the response setting. (See “Setting the Response” on
Page 9.)
Underrange Indication
When the measured sound level is lower
than the lowest sound level of the selected range, LO appears and the bargraph
Making Measurements
13
disappears. If this happens, select a lower
range.
Overrange Indication
When the measured sound level is higher
than the highest sound level of the selected range (except for the 120 dB range),
the bargraph and digits that represent the
next higher range flash on the display.
For example, if the meter measures 91 dB
in the 80 dB range, 90 and the bargraph
flash.
If the meter measures more than 126 dB
in the 120 dB range, 126 and the bargaph
flash.
14
Making Measurements
If you get an overrange indication, change
the range setting until you get a reading in
the upper half of the range (0 to + 10 dB).
Notes:
• The underrange or overrange indication can also appear when you recall
a measurement using data hold and
the measurement is under or over the
selected range. See “Using Data
Hold.”
• The meter cannot measure sound
levels lower than 50 dB or higher than
126 dB.
USING DATA HOLD
The data-hold function lets you store the
current measurements in memory and
freeze a measurements on the display.
The meter stores the continuous average,
the maximum, and the minimum sound
levels for the last 1 second.
To store the current measurements, press
DH during a continuous average or maxi-
mum measurement. The last average
measurement or last maximum measurement (with MAX) appears on the display.
Making Measurements
15
Press MAX to freeze the current maximum
measurement if the last average measurement (without MAX) is on the display.
Press MAX again to return to the average
measurement.
Press MIN to freeze the current minimum
measurement. MIN also appears on the
display. Press MIN again to return to the
average measurement.
Press RESET to return to a continuous average or maximum measurement.
Notes:
• You cannot change the response and
weighting settings during data hold.
• When you set RANGE to a different
range during data hold, you cancel
the function and return to a continuous measurement.
MAKING AN INTEGRATED
AVERAGE MEASUREMENT
Follow these steps to monitor the sound
level and average the measurement over
a preset time period of 1 to 199 seconds.
The meter stores the average, the maxi-
16
Making Measurements
mum, and the minimum sound levels during the set time period.
1. Press DH for about 2 seconds during
a continuous average or maximum
measurement. 1 appears on the display.
2. Repeatedly press or hold down MAX
or MIN to set the desired measuring
period from 1 to 199 seconds.
3. Position the meter for the measurement.
4. Press RESET to start the monitoring.
The meter measures the integrated average, maximum, and minimum sound levels for the set time. The meter updates the
current integrated average display every
second and MIN and MAX flash until the
set time ends.
When the set time ends, DH appears, and
MIN and MAX continue to flash. The
Making Measurements
17
meter displays the total integrated average sound level.
Press MAX to display the maximum sound
level for the set time. Press MAX again to
return to the total integrated average
sound level.
Press MIN to display the minimum sound
level for the set time. Press MIN again to
return to the total integrated average
sound level.
Press RESET after you check the integrated average sound level and the maximum
or minimum sound level. The meter resumes a continuous average measurement.
Note: If you change the RANGE setting
during an integrated measurement, you
clear any stored data and a normal continuous average measurement resumes.
18
Making Measurements
You must repeat the procedure for making
an integrated average measurement.
MAKING MAXIMUM AND
MINIMUM MEASUREMENTS
DURING AN UNDETERMINED
TIME PERIOD
You can check the maximum and minimum sound level over any length of time.
To do so, press RESET during a continuous average or maximum average measurement.
At the end of the desired time period,
press DH. DH appears.
To display the maximum sound level during the time period, press MAX if both MIN
and MAX flash on the display and the last
average sound level appears. Press MAX
again to return to the average sound level.
Note: If only MIN flashes on the display,
the meter is already showing the maximum sound level during the time period.
Press MIN to display the minimum sound
level during the time period. Press MIN
again to return to the last average sound
level.
Making Measurements
19
Press RESET after you check the maximum or minimum sound level. The meter
resumes a normal continuous average or
maximum measurement.
CHECKING STEREO
SYSTEM ACOUSTICS
To check the sound of a stereo system,
use a test recording that produces pure
tones, one at a time, at intervals that span
the entire audio spectrum.
Use C-weighting with either slow or fast
response.
Make a graph or table that shows the
sound level each tone generates. This
gives you a clear idea of the frequency response of the total audio system – including the room. To smooth out the
response, adjust the tone control, vary the
speaker placement, and use a frequency
equalizer.
CALIBRATING THE METER
The recessed calibration control (labeled
CAL on the meter’s left side) is intended
for service technicians only.
20
Making Measurements
Attempting to calibrate the meter yourself
might result in inaccurate measurements.
ˆ Care
Your RadioShack Digital Sound Level
Meter is an example of superior design
and craftsmanship. The following suggestions will help you care for the meter so
you can enjoy it for years.
• Keep the meter dry. If it gets wet,
wipe it dry immediately. Liquids might
contain minerals that can corrode
electronic circuits.
• Use and store the meter only in normal temperature environments. Temperature extremes can shorten the
life of electronic devices and distort or
melt plastic parts.
• Handle the meter gently and carefully. Dropping it can damage the circuit boards and cause the meter to
work improperly.
• Keep the meter away from dust and
dirt, which can cause premature wear
of parts.
Care
21
• Wipe the meter with a damp cloth
occasionally to keep the meter looking new. Do not use harsh chemicals,
cleaning solvents, or strong detergents to clean the meter.
• Use a fresh battery of the recommended size and type. Always
remove an old or weak battery. It can
leak chemicals that destroy electronic
circuits.
ˆ Specifications
Battery .........................................9-volt Alkaline
Microphone......................... Electret Condenser
Range...................................... 50 dB to 126 dB
Accuracy ............................± 2 dB at 114 dB SPL
Reference................... 0 dB = 0.0002 Micro Bar
Weighting ............................................. A and C
Display Response ...................... Fast and Slow
Signal Output:
Voltage ...................1 Volt Peak-Peak Min.
(Open Circuit, Full Scale at 1 kHz)
Impedance.............. 10 Kilohms Min. Load
Distortion .............. Less than 2% at 1 kHz.
0.5 V p-p Output
(Input: Mic Out, Output: 10 Kohm)
22
Specifications
Operating Temperature..............32 °F to 122 °F
Storage Temperature............... -40 °F to 149 °F
Dimensions (HxWxD) .. 6 ¼ × 2 ½ × 1 ¾ Inches
(159 × 64 × 44 mm)
Weight ..................................................... 5.8 oz
(165 g Approx.)
Specifications
23
Limited Ninety-Day Warranty
This product is warranted by RadioShack against manufacturing defects
in material and workmanship under normal use for ninety (90) days from
the date of purchase from RadioShack company-owned stores and authorized RadioShack franchisees and dealers. EXCEPT AS PROVIDED
HEREIN, RadioShack MAKES NO EXPRESS WARRANTIES AND ANY
IMPLIED WARRANTIES, INCLUDING THOSE OF MERCHANTABILITY
AND FITNESS FOR A PARTICULAR PURPOSE, ARE LIMITED IN DURATION TO THE DURATION OF THE WRITTEN LIMITED WARRANTIES CONTAINED HEREIN. EXCEPT AS PROVIDED HEREIN,
RadioShack SHALL HAVE NO LIABILITY OR RESPONSIBILITY TO
CUSTOMER OR ANY OTHER PERSON OR ENTITY WITH RESPECT
TO ANY LIABILITY, LOSS OR DAMAGE CAUSED DIRECTLY OR INDIRECTLY BY USE OR PERFORMANCE OF THE PRODUCT OR ARISING OUT OF ANY BREACH OF THIS WARRANTY, INCLUDING, BUT
NOT LIMITED TO, ANY DAMAGES RESULTING FROM INCONVENIENCE, LOSS OF TIME, DATA, PROPERTY, REVENUE, OR PROFIT
OR ANY INDIRECT, SPECIAL, INCIDENTAL, OR CONSEQUENTIAL
DAMAGES, EVEN IF RadioShack HAS BEEN ADVISED OF THE POSSIBILITY OF SUCH DAMAGES.
Some states do not allow limitations on how long an implied warranty
lasts or the exclusion or limitation of incidental or consequential damages, so the above limitations or exclusions may not apply to you.
In the event of a product defect during the warranty period, take the product and the RadioShack sales receipt as proof of purchase date to any
RadioShack store. RadioShack will, at its option, unless otherwise provided by law: (a) correct the defect by product repair without charge for
parts and labor; (b) replace the product with one of the same or similar
design; or (c) refund the purchase price. All replaced parts and products,
and products on which a refund is made, become the property of RadioShack. New or reconditioned parts and products may be used in the
performance of warranty service. Repaired or replaced parts and products are warranted for the remainder of the original warranty period. You
will be charged for repair or replacement of the product made after the
expiration of the warranty period.
This warranty does not cover: (a) damage or failure caused by or attributable to acts of God, abuse, accident, misuse, improper or abnormal usage, failure to follow instructions, improper installation or maintenance,
alteration, lightning or other incidence of excess voltage or current; (b)
any repairs other than those provided by a RadioShack Authorized Service Facility; (c) consumables such as fuses or batteries; (d) cosmetic
damage; (e) transportation, shipping or insurance costs; or (f) costs of
product removal, installation, set-up service adjustment or reinstallation.
This warranty gives you specific legal rights, and you may also have
other rights which vary from state to state.
RadioShack Customer Relations, 200 Taylor Street, 6th Floor, Fort
Worth, TX 76102
We Service What We Sell
09A00
33-2055 A
12/99
811023970E
Printed in China