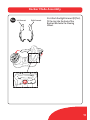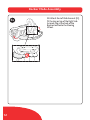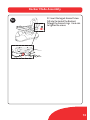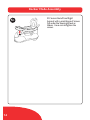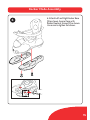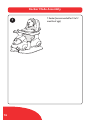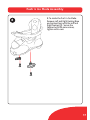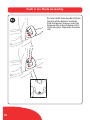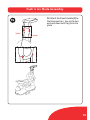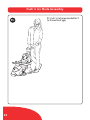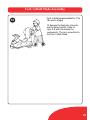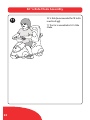
1
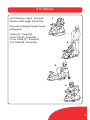
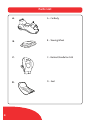
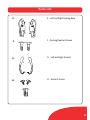
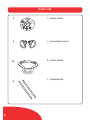
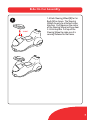
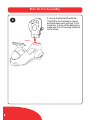
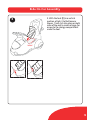
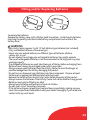
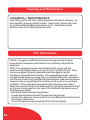
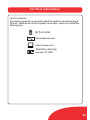
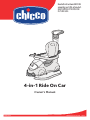
Read all instructions BEFORE
assembly and USE of product.
KEEP INSTRUCTIONS FOR
FUTURE USE.
4-in-1 Ride On Car
Owner's Manual
IS0062.3ESF
©2011 Artsana USA, INC. 01/12
WARNING
Failure to follow these warnings and the instructions could result in
serious injury or death
• PLEASE READ THESE INSTRUCTIONS • Before each use, check this product
CAREFULLY TO ENSURE THE SAFETY for damaged, loose fitting, or missing
OF YOUR CHILD.
parts. Make sure that all fasteners
• ALWAYS PROVIDE THE
are properly tightened and that the
SUPERVISION NECESSARY FOR
components are securely attached.
THE CONTINUED SAFETY OF
DO NOT use this product if any parts
YOUR CHILD. NEVER LEAVE CHILD
are missing, damaged, or broken.
UNATTENDED.
Contact Chicco for replacement parts
and instructional literature if needed.
• Adult assembly required.
DO NOT substitute parts.
• The un-assembled toy and shipping
• Only use this toy on flat surfaces
box may contain items with
without any obstacles. Never use
potentially hazardous sharp edges
this toy in roadways, near motor
or sharp points, and/or small parts
vehicles, on or near steep inclines
that are a choking hazard to young
or steps, swimming pools or other
children - Please keep them out of
bodies of water.
reach of children.
• Avoid serious injury from falling or
• Suffocation Hazard: Plastic bags
sliding out. Make sure the armrests
can be dangerous. To avoid danger
are securely fastened in the ROCKER
of suffocation, keep bag away from
and PUSH ‘N GO modes. To avoid
babies and children. Properly dispose tipping, Never use the toy in the Push
of any plastic bags or any other
and Walk and/or Sit ‘n’ Ride modes
packaging materials.
with the armrests assembled.
• ALWAYS keep child in view when
• Make sure the child wears properly
they are using this toy.
secured shoes.
• This product is intended for children • Never allow more than one child to
9 months of age, or able to sit up
use this toy at one time.
unassisted.
• Each of these modes requires a
different level of ability to be able to
avoid falls or collisions - Make sure
your child's development allows
them to safely use this toy.
2
4 in 1 Modes
4 in 1 Ride on toy – Ages 9 - 36 months.
Maximum child’s weight: 44 lbs/20 Kg
1.
This product is designed to adjust to your
child’s growth:
1. Rocker (9 – 12 months)
2. Push ‘N Go (9 – 18 months)
3. Push ‘N Walk (12 – 18 months)
4. Sit ‘N Ride (18 – 36 months)
2.
3.
4.
3
Parts List
4
A.
A. - Car Body
B.
B. - Steering Wheel
C.
C. - Backrest/handle for child
D.
D. - Seat
Parts List
E.
E. - Left and Right Rocking Base
F.
F. - Rocking/Footrest Screws
G.
G. - Left and Right Armrest
H.
H. - Armrest Screws
5
Parts List
I.
I. - Activity Center
J.
J. - Left and Right Footrest
K.
L.
6
K. - Parent Handle
L. - Extension Bars
Ride On Car Assembly
1
“CLICK!”
1. Attach Steering Wheel (B) to Car
Body (A) as shown. The Steering
Wheel can only be attached in one
direction. Push down on the center
of the Steering Wheel until you hear
it click into place. Pull up on the
Steering Wheel to make sure it is
securely fastened to the frame.
7
Ride On Car Assembly
2. Line up the Backrest/handle for
Child (C) to the Car Body as shown
and push down until you hear it click
into place. Pull up on the Backrest to
make sure that it is securely attached
to the frame.
2
“CLICK!”
8
Ride On Car Assembly
3. With the Seat (D) in a vertical
position, attach it to the frame as
shown. It will click into place on both
sides of the seat to create a hinge, for
access to the storage compartment
under the Seat.
3
“CLICK!”
9
Ride On Car Assembly
4
10
4. Insert Activity Center (I) into the
Steering Wheel and press down.
Rocker Mode Assembly
5A
Left Armrest
Right Armrest
5A. Attach the Right Armrest (G) first,
fit the ring into the back of the
Backrest and onto the Steering
Wheel.
11
Rocker Mode Assembly
5B
12
5B. Attach the Left Side Armrest (G),
fit the ring on top of the Right Side
Armrest ring at the back of the
Backrest and onto the Steering
Wheel.
Rocker Mode Assembly
5C
5C. Insert the largest Armrest Screw
(H) into the back of the Backrest,
through the Armrest rings. Use a coin
to tighten the screws.
13
Rocker Mode Assembly
5D
14
5D. Secure the Left and Right
Armrest with a small Armrest Screws
(H) under the Steering Wheel as
shown. Use a coin to tighten the
screws.
Rocker Mode Assembly
6
6. Attach Left and Right Rocker Base
(E) as shown. Secure them with
Rocker/Footrest Screws (F) as shown.
Use a coin to tighten the screws.
15
Rocker Mode Assembly
7
16
7. Rocker (recommended for 9 to 12
months of age)
Push 'n Go Mode Assembly
8
8. To create the Push 'n Go Mode:
Remove Left and Right Rocking Base
and replace them with the Left and
Right Footrest (J). Secure the
Footrest with the same screws,
tighten with a coin.
17
Push 'n Go Mode Assembly
9A. Insert both Extension Bars (L) into
the back of the Backrest as shown.
Slide the tab over to open, insert the
Extension Bar and push down until it
clicks into place. Repeat for the other
side.
9A
“CLICK!”
18
Push 'n Go Mode Assembly
9B. Attach the Parent Handle (K) to
the Extension bars. Line up the bars
and push down until they click into
place.
9B
“CLICK!”
“CLICK!”
19
Push 'n Go Mode Assembly
9C
20
9C. Push 'n Go (recommended for 9
to 18 months of age)
Push 'n Walk Mode Assembly
10
Push 'n Walk (recommended for 12 to
18 months of age)
10. Remove the Footrests, Armrests,
and the Parent handle. Refer to
steps 5, 8 and 9 to remove the
components. The car is assembled in
the Push 'n Walk Mode.
21
Sit 'n Ride Mode Assembly
11
Sit 'n Ride (recommended for 18 to 36
months of age)
11. The Car is assembled in Sit 'n Ride
Mode.
22
Fitting and/or Replacing Batteries
To replace the batteries:
Remove the battery cover with a Phillips head Screwdriver. Install two AA batteries
matching the polarity indicated inside battery compartment and re-attach the
battery cover.
WARNING
The Activity Center requires 2 x AA 1.5 Volt alkaline type batteries (not included).
•Only use alkaline batteries of the same type .
•Never mix new and old batteries, or different types of batteries, alkaline,
carbon-zinc, ni-cad.
•Do not attempt to recharge non-rechargeable batteries: they might explode.
•The use of rechargeable batteries is not recommended as the toy panel may stop working properly.
•If rechargeable batteries are used, take them out of the toy before recharging them. Batteries must always be recharged under adult supervision.
•Always remove spent batteries from the Activity Center to avoid the danger of possible leakage from the battery damaging the product.
•Do not burn or dispose of spent batteries into the environment. Dispose of spent batteries at an appropriate differentiated collection point.
•Remove the batteries from the Activity Center before disposing of the product.
•Always remove the batteries if the Activity Center will not be used for a long period.
•Batteries must only be fitted by an adult.
•Always keep batteries and tools out of reach of children.
•Do not short-circuit the battery terminals.
•If the batteries happen to leak liquid, replace them immediately, making sure you clean the compartment beforehand; wash your hands thoroughly if you come into contact with any such liquid.
23
Cleaning and Maintenance
CLEANING / MAINTENANCE
Clean the toy with a soft cloth, lightly dampened with water if necessary. Do
not completely submerge the toy in water. Clean Activity Center with a soft,
dry cloth to avoid damaging the electronic circuit. Protect the toy from
collisions, heat, dust, sand, humidity and water.
FCC Information
Caution: Changes or modifications not expressly approved by the party
responsible for compliance could void the user’s authority to operate the
equipment.
NOTE: This equipment has been tested and found to comply with the
limits for a Class B digital device, pursuant to Part 15 of the FCC Rules. These
limits are designed to provide reasonable protection against harmful
interference in a residential installation. This equipment generates, uses and
can radiate radio frequency energy and, if not installed and used in accordance
with the instructions, may cause harmful interference to radio communications.
However, there is no guarantee that interference will not occur in a particular
installation. If this equipment does cause harmful interference to radio or
television reception, which can be determined by turning the equipment off and
on, the user is encouraged to try to correct the interference by one or more of
the following measures:
- Reorient or relocate the receiving antenna.
- Increase the separation between the equipment and receiver.
- Connect the equipment into an outlet on a circuit different from that to which the receiver is connected.
- Consult the dealer or experienced radio/TV technician for help.
24
For More Information
For USA customers :
If you have any questions or comments about this product, or are missing any of
the parts. Please do not return this product to the store. Contact us in one of the
following ways:
(877)-424-4226
@
[email protected]
www.chiccousa.com
1826 William Penn Way
Lancaster, PA 17601
25
www.chiccousa.com