1
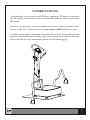
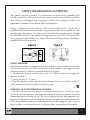
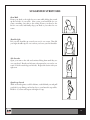
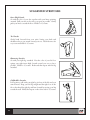
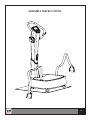
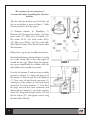
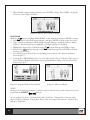
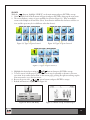
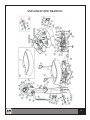
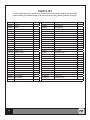
OWNER’S MANUAL
Important: Read all instructions carefully before using this product. Retain this owner’s manual for future reference.
BH North America | 20155 Ellipse, Foothill Ranch, California 92610 | p.949.206.0330 | f.949.206.0013 | www.BHFitnessUSA.com
TABLE OF CONTENTS
TitlePage
Introduction03
Safety Information04
Exercise Instruction06
Training Guidelines07
Workout and Stretching11
Assembly Instructions13
Console Operations17
Exploded View
Drawing23
Parts List24
Warranty25
CONGRATULATIONS
Congratulations on your purchase of BH Fitness equipment. We hope you appreciate
the style, quality, and value that exercisers around the world have come to expect from
BH Fitness.
If you have any questions, concerns or product issues, please call our Customer Service
Team at 1-866-325-2339 or email us at [email protected].
Carefully read through the instructions contained in this manual. They provide you with
important information about assembly, safety, fitness and use of the vibration machine.
Please read ALL the safety information contained in the following pages.
3
SAFETY INFORMATION
PRECAUTIONS
The vibration machine has been designed and constructed to provide maximum safety.
Nevertheless, certain precautions should be taken when using exercise equipment. Read
the whole manual before assembling and using the vibration machine. Please observe
the following safety precautions:
1. Keep children and pets away from this equipment at all times. DO NOT leave them unsupervised
in the room where the vibration machine is kept.
2. If you experience dizziness, nausea, chest pains or any other symptom while using this vibration
machine STOP the exercise. SEEK IMMEDIATE MEDICAL ATTENTION!
3. Use the vibration machine on a level and solid surface.
4. Do not place hand or objects in or near any openings.
5. Wear clothing suitable for doing exercise. Always wear athletic shoes when using the vibration
machine and tie the laces securely.
6. This vibration machine must only be used for the purposes described in this manual. DO NOT
use accessories that are not recommended by BH Fitness.
7. Do not place sharp objects near the vibration machine.
8. Do not use the vibration machine if it is not working correctly.
9. Before using the vibration machine, thoroughly inspect the equipment for proper assembly.
10.Keep a clear perimeter of 3 feet (1 meter) around the vibration machine before operating the
equipment.
11.This vibration machine is not suitable for commercial use.
12.Use only authorized and trained technicians if a repair is needed.
13.Please follow the advice for correct training, as detailed in the Training Guidelines.
14.Use only the tools provided to assemble this vibration machine.
15.This vibration machine was designed for a maximum user weight of 350 lbs (159 kgs).
16.The vibration machine can only be used by one person at a time.
17.To unplug the vibration machine, first put the switch to the off position and then unplug from the
electrical outlet.
18.Do not use this vibration machine outside.
19.Do not use the vibration machine if the main electrical cord becomes damaged or worn. Keep the
main electrical cord away from hot surfaces.
20.This machine has been designed for home use, not for commercial use.
21.
Caution: Consult your doctor before beginning to use the vibration machine or any
exercise program. Read all of the instructions before using any exercise equipment.
KEEP THESE INSTRUCTIONS SAFE FOR FUTURE USE.
4
SAFETY INFORMATION CONTINUED
This product must be grounded. If it malfunctions or breaks down, grounding will
provide a path of least resistance for electric current to reduce the risk of electric shock.
This cord must be plugged into an appropriate outlet that is properly installed and
grounded in accordance with all local codes and ordinances.
Danger – Improper use can result in a risk of electric shock or fire. Check with a
qualified electrician to ensure the product is properly grounded. Do not modify the cord
provided with the product – if it does not fit the outlet, have a proper outlet installed
by a qualified electrician. This product is designed for use with 110V-120V power. The
unit is equipped with a NEMA 5-15 plug as illustrated in the figure below. No adapter
should be used with the product.
Figure A
Figure B
Wall Socket
Plug
SAFETY BREAKER
This vibration machine is equipped with a circuit breaker to protect both the electronic
and electrical circuits. This safety device (fuse) will be automatically triggered if the
vibration machine is subjected to abnormal electrical activities.
1. Set switch (L), located on the casing, to the “0” (OFF) position, then unplug the
vibration machine.
2. Change the fuse (C) (7 Amp).
3. Plug the vibration machine into the electrical outlet. Next, set switch (L) to the “I”
(ON) position and the unit will be ready for use again.
DISPOSAL OF YOUR VIBRATION MACHINE
1. All electrical and electronic products should be disposed of at your local e-waste
facility. If you have questions, your local waste disposal service can connect you with
information about recycling e-waste. The correct disposal of your old equipment will
help prevent potential negative consequences for the environment and your community.
2. For more detailed information about disposal of your old equipment, please contact
your city office, waste disposal service, or the shop where you purchased the product.
5
EXERCISE INSTRUCTION
Use of the vibration machine offers various benefits; it can improve fitness, muscle tone,
flexibility and circulation. When used in conjunction with a calorie controlled diet, it can
help you lose weight.
1. Consult your doctor before starting any exercise program. It is advisable to undergo
a complete physical examination.
2. Exercise at recommended level. Do not over exert yourself.
3. If you feel any pain or discomfort, stop exercising immediately and consult your
doctor.
4. Wear appropriate clothing and footwear for the exercise; do not wear leather soled
shoes or high heels.
5. Step on to the equipment slowly and securely.
6. Select the program or workout option that is most closely aligned with your
workout interests.
Do not use this vibration machine if you are under any of the following conditions:
•
Pregnancy
•
Acute thrombosis conditions
•
Cardiovascular disease •
Hip or knee replacement
•
Recent surgery
•
Acute hernia, discopathy, spondylolysis
•
Epilepsy
•
Heavy migraines
•
Wearing a pacemaker
•
Wearing recently fitted i.u. coils, metal pins, bolts or plates
•
Tumors
•
Broken toe(s)
6
TRAINING GUIDELINES
Exercise is one of the most important factors in the overall health of an individual.
Listed among its benefits are:
• Increased capacity for physical work (strength endurance)
• Increased cardiovascular (heart and arteries/veins) and respiratory efficiency
• Decreased risk of coronary heart disease
• Changes in body metabolism, e.g. losing weight
• Delaying the physiological effects of age
• Reduction in stress, increase in self-confidence, etc.
There are several components of physical fitness and each is defined below.
STRENGTH
The capacity of a muscle to exert a force against resistance. Strength contributes to power and speed.
MUSCULAR ENDURANCE
The capacity to exert a force repeatedly over a period of time, e.g. it is the muscular endurance of
your legs to carry you 10 km without stopping.
FLEXIBILITY
The range of motion of your joints. Improving flexibility involves the stretching of muscles and
tendons to maintain or increase suppleness, and it provides increased resistance to muscle injury or
soreness.
CARDIO-RESPIRATORY ENDURANCE
The most essential component of physical fitness. It is the efficient functioning of the heart and
lungs.
AEROBIC FITNESS
Is an exercise of relatively low intensity and long duration, which depends primarily on the aerobic
energy system. Aerobic means "with oxygen", and refers to the use of oxygen in the body's metabolic
or energy-generating process. Many types of exercise are aerobic, and by definition are performed at
moderate levels of intensity for extended periods of time.
ANAEROBIC TRAINING
Is an exercise intense enough to trigger anaerobic metabolism. This means “without oxygen” and
is the output of energy when the oxygen supply is insufficient to meet the body’s long term energy
demands. (For example, a 100 meter sprint.)
7
OXYGEN UPTAKE
The effort that you can exert over a prolonged period of time is limited by your ability to deliver
oxygen to the working muscles. Regular vigorous exercise produces a training effect that can increase
your aerobic capacity by as much as 20 to 30%. An increased VO2 Max indicates an increased ability
of the heart to pump blood, of the lungs to ventilate oxygen, and of the muscles to take up oxygen.
THE TRAINING THRESHOLD
This is the minimum level of exercise which is required to produce significant improvements in any
physical fitness parameter.
OVERLOAD
This is where you exercise above your comfort level. The intensity, duration and frequency of exercise
should be above the training threshold and should be gradually increased as the body adapts to the
increasing demands. As your fitness level improves, the training threshold should rise. Working
through your program and gradually increasing the overload factor is important.
PROGRESSION
As you become more fit, a higher intensity of exercise is required to create an overload and therefore
provide continued improvement.
SPECIFICS
Different forms of exercise produce different results. The type of exercise that is carried out is specific
to the muscle groups being used and to the energy source involved. There is little transfer of the
effects of exercise, i.e. from strength training to cardiovascular fitness. That is why it is important to
have an exercise program tailored to your specific needs.
REVERSIBILITY
If you stop exercising or do not do your program often enough, you will lose the benefits you have
gained. Regular workouts are the key to success.
WARM-UP
Every exercise program should start with a warm-up where the body is prepared for the effort to
come. It should be gentle and preferably use the muscles group to be involved later. Stretching
should be included in both your warm-up and cool down, and should be performed after 3-5
minutes of low intensity aerobic activity or calisthenic type exercise.
WARM DOWN OR COOL DOWN
This involves a gradual decrease in the intensity of the exercise session. Following exercise, a large
supply of blood remains in the working muscles. If it is not returned promptly to the central
circulation, pooling of blood may occur in the muscles.
8
HEART RATE
As you exercise, your heart beat increases. This is often used as a measure of the required intensity of
an exercise. You need to exercise hard enough to condition your circulatory system, and increase your
pulse rate, but not enough to strain your heart.
Your initial level of fitness is important when developing an exercise program for you. When starting,
you can get a good training effect with a heart rate of 110-120 beats per minute (BPM). If you are
more fit, you will need a higher threshold of stimulation.
To begin with, you should exercise at a level that elevates your heart rate to about 65 to 70% of your
maximum. If you find this is too easy, you may want to increase it, but it is better to lean on the
conservative side.
As a rule of thumb, the maximum heart rate is 220 minus your age. As you increase in age, your
heart, like other muscles, loses some of its efficiency. Some of its natural loss is won back as fitness
improves. The following table is a guide to those who are “starting fitness.”
Age Target Heart Rate 25 3035404550556065
10 Second Count 23 2222212019191818
Beats per Minute
138 132 132 126 120 114 114 108 108
PULSE COUNT
The pulse count (on your wrist or carotid artery in the neck, taken with two index fingers) is done
for ten seconds, taken a few seconds after you stop exercising. This is for two reasons: (a) 10 seconds
is long enough for accuracy, (b) the pulse count is to approximate your BPM rate at the time you are
exercising. Since heart rate slows as you recover, a longer count isn’t as accurate.
The target is not a magic number, but a general guide. If you’re above average with your fitness, you
may work comfortably a little above that suggested for your age group. The following table is a guide.
Age Target Heart Rate 25 3035404550556065
10 Second Count 262625242322222120
Beats per Minute 156156150144138132132126120
Don’t push yourself too hard to reach the figures on this table. It can be very uncomfortable if you
over exercise. Let it happen naturally as you work through your program. Remember, the target is a
guide, not a rule, a little above or below is just fine.
Two final comments: (1) don’t be concerned with day to day variations in your pulse rate, being
under pressure or not enough sleep can affect it; (2) your pulse rate is a guide, don’t become a slave
to it.
9
MUSCLE SORENESS
For the first week or so, muscle soreness may be the only indication you have that you are on an
exercise program. This, of course, does depend on your overall fitness level. A confirmation that you
are on the correct program is a very slight soreness in most major muscle groups. This is quite normal
and will disappear in a matter of days.
If you experience major discomfort, you may be on a program that is too advanced, or you have
increased your program too rapidly.
If you experience PAIN during or after exercise, your body is telling you something. Stop exercising
and consult your doctor.
WHAT TO WEAR
Wear clothing that will not restrict your movement in any way while exercising. Clothes should be
light enough to allow the body to cool. Excessive clothing that causes you to perspire more than you
normally would gives you no advantage. The extra weight you lose is body fluid and will be replaced
with the next glass of water you drink. It is advisable to wear a pair athletic shoes.
BREATHING DURING EXERCISE
Do not hold your breath while exercising. Breathe normally as much as possible. Remember,
breathing involves the intake and distribution of oxygen, which feeds the working muscles.
REST PERIODS
Once you start your exercise program, you should continue through to the end. Do not break off
halfway through and then restart at the same place later on without going through the warm-up stage
again. The rest period required between exercises may vary from person to person.
10
SUGGESTED STRETCHES
Head Rolls
Rotate your head to the right for one count while feeling the stretch
up the left side of your neck. Next, rotate your head back for one
count, stretching your chin to the ceiling. Rotate your head to the
left for one count, and finally, drop your head to your chest for one
count.
Shoulder Lifts
Lift your left shoulder up toward your ear for one count. Then lift
your right shoulder up for one count as you lower your left shoulder.
Side Stretches
Open your arms to the side and continue lifting them until they are
over your head. Reach your left arm as far upward as you can for one
count. Feel the stretch up your left side. Repeat this action with your
right arm.
Quadriceps Stretch
With one hand against a wall for balance, reach behind you and pull
your left foot up. Bring your heel as close to your buttocks as possible.
Hold for 15 counts and repeat with right foot up.
11
SUGGESTED STRETCHES
Inner Thigh Stretch
Sit with the soles of your feet together with your knees pointing
outward. Pull your feet as close into your groin as possible. Gently
push your knees towards the floor. Hold for 15 counts.
Toe Touches
Slowly bend forward from your waist, letting your back and
shoulders relax as you stretch toward your toes. Reach down as far
as you can and hold for 15 counts.
Hamstring Stretches
Sit with your right leg extended. Rest the soles of your left foot
against your right inner thigh. Stretch toward your toes as far as
possible. Hold for 15 counts. Relax and then repeat with left leg
extended.
Calf/Achilles Stretches
Lean against a wall with your right leg in front of the left and your
arms forward. Keep your left leg straight and the right foot on the
floor; then bend the right leg and lean forward by moving your hip
toward the wall. Hold, then repeat on the other side for 15 counts.
12
ASSEMBLY INSTRUCTIONS
13
The assistance of a second person is
recommended when assembling this vibration
machine.
Take the vibration machine out of the box and
place it on the floor as shown in Figure 1. Make
sure that you have all of the pieces.
(1) Platform column; (4) Handlebar; (7)
Platform; (40) Transportation wheels; (35) Main
power cord; (27) Allen screw M-10x40; (25)
Flat washer M-10; (26) Lock washer M-10;
(29) Allen screw M8x25; (16) Flat washer M8;
Allen Wrench 4mm; Allen Wrench 6mm; Allen
Wrench 8mm.
16
Follow these step-by-step assembly instructions.
Position the platform as shown in Figure 2, resting
on a stable, sturdy table (at least two people are
needed for this step). When fitting the column,
one person should hold the column while the
other follows the assembly instructions.
First take the column (1) and put it into assembly
position (see Figure 2). Connect the plug (A) of
the column (1) with the jack (B) of the platform
(7). Next, mate all male keyed connectors (C)
sticking out of the column to the female keyed
connectors (D) of the platform (7). Once all of
the plugs and jacks have been connected, tuck
them inside the column (1). Attach the transport
wheel (40) along with the lock washers (26) and
the flat washers (25), and tighten securely using
the 8mm Allen Wrench.
14
FIGURE 1
FIGURE 2
For the next stage of the assembly, it is recommended
to lower the platform back on the floor, with the
help of a second person. Take the handlebar (4) as
shown in Figure 3, and line up the holes. Fit the
screws (29) and flat washers (16) and use the 6mm
Allen Wrench to tighten securely. It is possible that
the hand straps (17) may have come loose during
shipment. Fit them back into place (as shown in
Figure 4).
START-UP
Plug the power cord (35) into the vibration machine
on the column, see Figure 5, and then the other
end of the cord into an electrical outlet (110V). Set
switch (L) to the on position (I), Figure 5. Note:
A mechanical knocking noise is normal when the
vibration motors first begins to run, this will stop as
soon as the motor reaches working speed. Similarly,
when the motor is switched off, you will also hear this
knocking noise as the motor slows down, but it will
stop as soon as the motor is at a standstill.
TRANSPORT & STORAGE
The vibration machine is equipped with wheels
(see #40 in Figure 6), to make it easier to move.
Make sure that the power cord is unplugged from
the electrical outlet before moving the vibration
machine. To prevent accidents DO NOT move the
platform across uneven floors.
16
Auxiliary
Column
Keypad
FIGURE 3
Auxiliary
Column
Keypad
FIGURE 4
INSPECTION & MAINTENANCE
Switch the vibration machine off and unplug the
power cord. Use a damp cloth or towel to clean the
dust off the platform, especially the handrails and
the electronic console. Do not use solvents.
15
ATTENTION:
Periodically check that all of the fastening elements
are tightened and connected correctly. Check
and tighten all the parts on your unit every three
months. If you have any questions about any part
of the vibration machine, please contact BH North
America (see last page in manual). Only use original
spare parts to replace any worn components. The
use of other spare parts may affect the performance
of the vibration machine or cause injury.
BH NORTH AMERICA RESERVES THE
RIGHT TO MODIFY THE PRODUCT
SPECIFICATIONS WITHOUT
PRIOR NOTICE.
110V
FIGURE 5
FIGURE 6
16
CONSOLE OPERATIONS
Main Console
A
Auxiliary Column
Keypad
B
30
30
45
35
60
40
45
90
start
stop
menu
reset
C
F
J
H
D
G
seconds
hertz
enter
E
start
F
C
I
stop
menu
A: This display shows information about the current exercise.
B: Time Settings - buttons for specific time settings (30-45-60-90 seconds).
C: START - This starts the program.
D: Forward/Backward - buttons to move between screens.
E: H/L - by pressing this button you will toggle between the high "H" and low "L"
vertical displacement settings.
F: STOP/MENU - Button to stop the vibration machine if it is operating or to return
to the main menu if it is stopped.
G: Frequency Settings - buttons for selecting specific frequency settings (30Hz.-35Hz.40Hz.-45Hz).
H: ENTER, HORIZONTAL and VERTICAL buttons.
I: +/- buttons to increase or decrease the frequency/time.
J: Reset - to reset the machine
17
Workouts:
Turn the vibration machine on. The LCD display will show the default main menu items: Quick
Start, Manual, Programs, and Sports.
30
30
Figure 2:
Console
45
35
60
40
45
90
seconds
hertz
enter
start
Figure 1: Main Menu
stop
menu
QUICK START
Use
buttons to highlight the selection. After pressing ENTER at the red highlighted
QUICK START on the main menu (fig. 1), the next workout screen offers parameters (Duration,
Vibrating height, Vibrating frequency).
1. Press H/L button to change vertical displacement to High or Low. 2. Time can be set using the SECONDS buttons on the left side of the LCD display for 30S,
45S, 60S, or 90S. Alternately, Press the Duration +/- buttons to change the Time by 1 second
increments.
3. Vibrating frequency can be set using the HERTZ buttons on the right side of the LCD display
for 30Hz, 40Hz, 40Hz, or 45Hz.
Press START to begin the workout. Once the START button is pressed, the timer starts counting
down and the user cannot change the time setting. During the workout the vibrating frequency can
be increased or decreased with the Duration +/- buttons by 1hz with each button press.
As seen in Figure 3, the header displays the set parameters
of 30 seconds for Time, Low (L) for Vibration Height,
and 30 Hertz for Vibration frequency. The left
column under the header shows the values of seconds
corresponding to the quick access time choices on the
console. The right column shows the values of Hertz
corresponding to the quick access frequency choices.
Figure 3: Quick Start default parameters
18
MANUAL
1. With the
buttons, highlight ‘MANUAL’ on the workout menu and press ENTER to
accept. Select a suitable level from the menu in figure 4 and press ENTER to bring up the next
screen.
2. The types of Workout screen will appear and includes: Strength, Massage, Stretching, and Low
Impact (figure 5). The following steps are applicable to Strength, Massage & Stretching.
3. Highlight the desired type of Workout using
buttons then press ENTER to accept.
Figure 4: Workout Level Figure 5: Types of Workouts
4. Browse with buttons through a collection of muscle groups. Press ENTER at a desired
muscle group. Figure 6: Muscle Group
Figure 7: Exercise Posture
5. As a muscle group is selected, the corresponding posture related to the vibration machine is
shown in Figure 7. Figure 8: Time Settings
Figure 9: Intensity Settings (frequency)
6. By following the directions on the screen, the user can set Workout Time, Level (Vibration
Height), and Intensity in the subsequent screens as shown in Figures 8 & 9.
19
7. When finished setting relevant parameters, press ENTER to accept. Press START to begin the
workout as seen in Figure 10 below.
Figure 10. All Set - Press START to Begin
PROGRAMS
With the
buttons, highlight ‘PROGRAMS’ on the main menu and press ENTER to accept.
1. Select a suitable level from the menu in figure 4 and press ENTER to bring up the next screen.
2. Types of Workout will appear which include: Strength, Massage, Stretching, and Low Impact
(figure 5). The following steps are applicable to Strength, Massage & Stretching.
3. Highlight the desired Type of Workout using
buttons then press ENTER to accept.
4. Browse with
buttons through a collection of muscle groups. Press ENTER at a desired muscle group to accept.
5. As a muscle group is selected, the corresponding posture related to the vibration machine is
shown (Figure 7).
6. At this point in PROGRAMS, there is no more input asked of the user: Workout Time is preset,
Level (Vibration Height) and Intensity are pre-programmed according to the Level chosen by
user in step 1 above.
Figure 11: Program Workout Preset Details Figure 12: All Set and Ready
NOTE:
At any point of setting up parameters or selection options, the user can go back to the previous screen
by pressing the SCREEN
buttons. As seen in figure 11, there is a Training Time and a Total Time. Training Time is the time when
there are bursts of vibration. During these bursts, there are rest periods in between. Together, they
add up to Total Time.
20
SPORTS
With the
buttons, highlight ‘SPORTS’ on the main menu and press ENTER to accept.
1. Select a suitable level from the menu in Figure 4 and press ENTER to bring up the next screen.
2. The screen displays a variety of sports available for selection (Figure 13). There are multiple
screens with example as shown below (Note: Your vibration machine has the latest software version, and the sports may be in a different order than shown).
Figure 13: Types of Sports Screen 1
Figure 14: Types of Sports Screen 2
Figure 15: Types of Sports Screen 3
2. Highlight the desired sport using
buttons then press ENTER to accept.
3. To access screen 2 from screen 1, press the arrows in step 2 repeatedly to advance to the next
sport item. As it reaches the last item on the current page, pressing the right arrow brings up the
next screen and so on to the next screen.
4. Browse the sports with
arrows buttons and press ENTER to accept.
5. Related information is displayed as in Figure 16.
Figure 16: All Set and Ready
Figure 17: Muscle Group of Related Sport
21
6. As a sport is selected (Figure 15), the program displays the corresponding muscle group involved
for user information (Figure 17).
7. At this point in SPORTS, there is no more input asked of the user: Workout Time is preset,
Level (Vibration Height) and Intensity are pre-programmed according to Level chosen by user in
step 1 above and muscle group is also preset according to the selected sport.
8. Press START to begin the workout.
GENERAL RULES:
• No training is recommended to consist of more than 12 series in a single session.
• 48 hours must elapse between two training sessions.
• VERY IMPORTANT: if you have never trained on a vibration platform, before you
start using any of the 3 default programs, you should use the platform in manual mode
until your body gets used to the vibrations. Perform 8 sets of 30 seconds, 30 seconds
of recovery between sets, with four minutes of rest in the middle of the entire training
session, until you feel that your body is accustomed to the vibration and do not feel
discomfort or dizziness.
• In addition, it is essential that before you start to train, you read the "Exercise Guide"
where you will find more information on how to use the platform of other frequently
asked questions, tips for use, etc.
BH RESERVES THE RIGHT TO MODIFY THE SPECIFICATIONS ALONG
WITH OTHER PRODUCTS WITHOUT PRIOR NOTICE.
22
EXPLODED VIEW DRAWING
23
PARTS LIST
To order replacement parts: provide your customer service representative with the product model
number and the part number located on the Parts List below, along with the quantity you require.
NO
VS5001
VS5002
VS5003
VS5004
VS5005
VS5006
VS5007
VS5008
VS5009
VS5010
VS5011
VS5012
VS5013
VS5014
VS5015
VS5016
VS5017
VS5018
VS5019
VS5020
VS5021
VS5022
VS5023
VS5024
VS5025
VS5026
VS5027
24
English Description
Column
Plate
Motor
Handle bar
Console
Cover of handle bar
Non-slip map
Transducer
Filter
Reactor
Hard steel plate
Evase rubber
Rubber bush
Rubber cushion
Spring cushion
Washer
Strap
Eva mat
Power socket
Power switch
Fuse
Plug socket
Spring
M10 nut
M10 washer
M10 washer
Bolt(M10x60)
Q’TY
1
1
2
1
1
2
1
1
1
1
1
5
5
4
4
4
2
1
1
1
1
1
5
31
17
12
4
NO
VS5028
VS5029
VS5030
VS5031
VS5032
VS5033
VS5034
VS5035
VS5036
VS5037
VS5038
VS5039
VS5040
VS5041
VS5042, 043, 044
VS5045
VS5046
VS5047
VS5048
YV20RG01
YV20RG02
YV20RG03
YV20R300
YV20R301
YV20R303
YV20R304
English Description
Bolt (M5x10)
Bolt (M8x25)
Bolt (ST3,5x10)
Bolt (M5x15)
Washer (M5)
M5 nut
Bolt (M5x40)
Power wire
Lower console
Bolt
Bolt wheel
Washer
Pu wheel
Reinforce shelf
Hook assembly for handlebar
Eva mat
Floor mat
Main power cable
Lower console cable
Base assembled with stickers
Reinforce shelf set
Power set
User manual
Monitor manual
Carton box
Hardware pack
Q’TY
4
4
2
8
12
4
4
1
1
1
2
2
2
1
2
1
1
1
1
1
1
1
1
1
1
1
WARRANTY
RESIDENTIAL WARRANTY
BH North America will repair or replace, free of charge, at its option, parts that are
defective as a result of material or workmanship. Lifetime replacement warranty coverage
on frame and Two (2) year on other parts. Labor warranty coverage is Two (2) year.
Warranty covers the original consumer purchaser only.
COMMERCIAL OR RENTAL USE
If this equipment is used for commercial or rental purposes the warranty is void.
THIS WARRANTY DOES NOT COVER
• Pre-delivery set-up.
• Components that require replacement due to dirt or lack of regular maintenance.
• Expendable items which become worn during normal use.
• Repairs necessary because of operator abuse or negligence or the failure to operate
and maintain the equipment according to the instructions contained in the Owner’s
Manual.
For more detailed warranty information or to register your product warranty easily
online, visit our website at: www.BHFitnessUSA.com
FOR WARRANTY REPAIRS, PLEASE DO NOT TAKE YOUR MACHINE
BACK TO THE RETAIL STORE. CONTACT BH FITNESS FIRST.
BH North America Corporation
20155 Ellipse
Foothill Ranch, CA 92610
Phone: 949.206.0330; Toll Free: 866.325.2339; Fax: 949.206.0013
Web: www.BHFitnessUSA.com
Mon - Fri 8am - 5pm PST
25