1
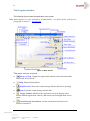
This publication contains proprietary information of the Acuant Company, provided for customer use only. No other use is authorized without the express written permission of Acuant. 2 Disclaimer Warranty Acuant provides this publication “as is” without warranty of any kind, either express or implied, including, but not limited to, the implied warranties of merchantability or suitability for any particular purpose. Acuant reserves the right to revise this publication, and to make changes in the content hereof from time to time without notification. Some countries or states in the USA do not allow a disclaimer of express or implied warranties in certain transactions; if you are a resident of such country or state, this statement may not apply to you. This publication may include technical inaccuracies or typographical errors. Changes are made periodically to the information herein; these changes will be incorporated in new editions of the publication. Acuant may make improvements and/or changes in the products and/or the software described in this publication at any time. Notice to User This manual should not be construed as a representation or warranty with respect to the software named herein. Occasionally, changes or variations exist in the software that are not reflected in the manual. Generally, if such changes or variations are known to exist and to affect the product significantly, a release note or “read me” file accompanies the manual and/or the distributed software. In that event, be sure to read the release note or “read me” file before using the product. Publication The descriptions, specifications, design and procedures contained in this manual were effective at the time of publication of this manual. Acuant reserves the right to modify any of the above at any time without notice and without incurring obligations. 3 Table of Content Disclaimer .............................................................................................................. 2 Warranty ............................................................................................................ 2 Notice to User .................................................................................................... 2 Publication ......................................................................................................... 2 Table of Content .................................................................................................... 3 Table of Figures ..................................................................................................... 4 1. Getting Started .................................................................................................. 5 Before using the scanner ....................................................................................... 5 Minimum system requirements .............................................................................. 5 Connecting the scanner ......................................................................................... 5 Installation ............................................................................................................. 7 Starting the Program .............................................................................................. 7 Uninstall ................................................................................................................. 7 2. Introduction........................................................................................................ 8 The Program Interface ........................................................................................... 9 The main screen controls....................................................................................... 9 3. Configuring the Program.................................................................................. 13 Automation tab .................................................................................................... 13 Data Source......................................................................................................... 14 Scanner button assignment .............................................................................. 15 Saving options ..................................................................................................... 16 Image manual save .......................................................................................... 16 Image auto save............................................................................................... 16 File Naming ......................................................................................................... 17 Driver License images tab ................................................................................ 17 General documents images.............................................................................. 18 Data extraction tab (*ScanShellOCR Only) .......................................................... 19 Extract full image.............................................................................................. 19 Extract face image to file .................................................................................. 20 Extract signature image to file .......................................................................... 20 Export id data to web........................................................................................ 20 Extract ID data to a file ..................................................................................... 20 Document type export strings ....................................................................... 21 Append records: ............................................................................................... 21 OCR text export tab (*ScanShell OCR Only) ....................................................... 22 Image tab ............................................................................................................ 23 Scanner Calibration .......................................................................................... 25 Cleaning the Scanner ....................................................................................... 25 Printing – Print tab ............................................................................................... 26 Image Print Size ............................................................................................... 26 Live Update ......................................................................................................... 28 4. Program Operation .......................................................................................... 30 Overview ............................................................................................................. 30 Scanning a new document................................................................................... 31 ID Data (*ScanShellOCR Only)............................................................................ 32 Custom fields - User defined fields ................................................................... 33 Editing and deleting custom fields................................................................. 33 ID data saving .................................................................................................. 33 4 ID Card authentication (*ScanShellOCR Only) .................................................... 34 To authenticate a card:..................................................................................... 34 Understanding the authentication status light ................................................... 35 What to do when verification fails? ................................................................... 35 Reading Passports (*ScanShellOCR Only) .......................................................... 36 5. Appendix A – Supported States for Detection .................................................. 37 6. Appendix B – Supported Scanners .................................................................. 40 7. Appendix C - Maintaining the scanner ............................................................. 41 Calibrating the scanner ........................................................................................ 41 Cleaning the scanner ........................................................................................... 41 8. Appendix D - Minimized Interface Mode & Command-Line Switches ............... 42 Using the command line switches ........................................................................ 42 Running in Minimized Interface mode .................................................................. 42 9. Appendix E – Full Export Fields List ................................................................ 45 Table of Figures Figure 1: Main Screen ............................................................................................. 9 Figure 2: status bar document type indication ................................................... 10 Figure 3: Scanner configuration panel ................................................................ 13 Figure 4: Scanshell 1000 button configuration ................................................... 15 Figure 5: File naming configuration – Driver license .......................................... 17 Figure 6: File naming configuration – General documents ................................ 18 Figure 7: Scanner configuration panel - License data processing tab .............. 19 Figure 8: Scanner configuration panel – Image tab ............................................ 22 Figure 9: Scanner configuration panel – Image tab ............................................ 23 Figure 10: Document Measurements ................................................................... 24 Figure 11: Scanner configuration panel – Print tab ............................................ 26 Figure 12: Print custom fields dialog ................................................................... 27 Figure 13: Live Update tab.................................................................................... 28 Figure 14: Live Update user details ..................................................................... 29 Figure 15: ID Data (detailed mode) ....................................................................... 32 Figure 16: Cusotm fields creation window .......................................................... 33 Figure 17: ScanShell 1000, ID placing ................................................................. 36 Figure 18: The placing of a passport ................................................................... 36 Figure 19: Main screen in minimized mode ......................................................... 43 5 Getting Started Before using the scanner The application has been carefully packaged to avoid damage during transportation. Before operating the scanner, please remove the packaging materials. After removing the packaging materials, you will find the following: ScanShell scanner CD of the application USB interface cable User license card Calibration card (only with ScanShell 800) This manual Minimum system requirements The minimum system requirements are: Pentium III with 128MB Win 98 Second Edition or higher USB port 15 MB free storage space Connecting the scanner The scanner is connected to the computer via the USB port. To connect the reader, do the following: Place the scanner on a flat, firm, solid surface with easy access. Plug the USB interface cable into the USB port of the computer After the Add new hardware wizard dialog box appears, click Next until you are asked to set the driver for the reader. You’ll find the driver on the Installation CD at: <CD ROM drive>:\Scanner Driver\ScanShell800 (for scanner model ScanShel800) <CD ROM drive>:\Scanner Driver\ScanShell800N (for scanner model ScanShel800N) <CD ROM drive>:\Scanner Driver\ScanShell1000 (for scanner model ScanShel1000) 6 <CD ROM drive>:\Scanner Driver\MagShell900 (for magnetic reader model MagShel900) After you specify the driver, click Next until the installation is complete. 7 Installation To install the software on the computer, do the following: 1. Close all programs. 2. Insert the CD into the CD ROM drive. 3. Wait until the install program begins and follow the instructions on the screen. 4. If the install program does not automatically start, click the My Computer icon on the desktop and then select the CD ROM drive. 5. Double click on the Setup program. Once the Setup program starts, select the application name from the left list and click on the Setup icon. Enter your license key number when prompt, and follow the instructions. Starting the Program The very first time you start the program after installation, you will be prompted to enter your registration key. You'll find your registration key sticker on the box of your ScanShell scanner. On the first time you start the program, you will also be prompted to check for new updates. Click Yes to let the program check for updates (make sure you are connected to the Internet at that time), or No to skip the update check and proceed to the program's main screen. If you click yes, the program will check for updates. If updates are found, you will be prompted to confirm download and installation. If you confirm, the program will download the most recent updates and install them automatically. Uninstall To uninstall the software, open the Add-Remove Program control panel. Select the Application icon and click on Add/Remove. Follow the uninstall instructions until the operation is completed. 8 Introduction Important! This manual refers to two versions of ScanShell: ScanShell and ScanShellOCR. Please note that if you purchased ScanShell only, some of ScanShellOCR advanced features (namely text recognition, extraction and manipulation) are not available in your version. Whenever this manual refers to options that are only included in ScanShellOCR, they will be marked as “*OCR Only”. ScanShell scans medical insurance cards, and saves their image in a variety of ways. When using the automatic page-feed detection, ScanShell launches the scan job immediately upon the insertion of a document into the ScanShell 800 scanner. In the ScanShell 1000, the scan job is initiated by pressing any of the scanner buttons. The image is scanned and saved to the hard disk in a predefined color scheme, resolution, and scanning area, in a user-defined format (BMP, JPG, PCX, PNG, TIFF, TGA, PSD). The scanned image can also be rotated automatically, using predefined angles to obtain the proper orientation. ScanShell offers three naming conventions to the saved images: fixed name, ascending numerator name, and naming according to the customer name as extracted from the card. Full automation of the scan process allows the user to chain-feed the media to the Scanshell 800 scanner while image processing takes place in the background. The ScanShell 800 scanner is capable of scanning any photo media due to its powerful scanning engine – including paper photos, ID cards, and even rigid plastic credit cards. The ScanShell 1000 scanner is designed for Passport reading but can also scan any 3" x 5" or smaller document including ID cards. ScanShellOCR adds important functionality, namely extensive OCR capabilities. It extracts the textual information from the medical insurance card image into appropriate text fields, and saves them to external file, clipboard or third party software. With an outstanding card scanning and processing speed of up to 4 seconds per card, combined with a powerful OCR engine ScanShell and ScanShellOCR are ideal for customer service offices, tnevnoevog agencies, various businesses, and third party kiosk applications. 9 The Program Interface The following figure shows the application main screen: Note: Some features are only available in ScanShellOCR – see details below, and the first paragraph in chapter 2 - Introduction. Figure 1: Main Screen The main screen controls Always on Top: Toggles the application window between normal mode and always-on-top mode. Help: Shows this document. Print Preview: Shows the scanned image and the data before printing. Print: Prints the scanned image and the data. Toggle Toolbar: Minimizes the application screen to display only a toolbar with the application controls, and restores the full application screen again. Card Insertion Auto-Detect: Set the automatic detection of card insertion on and off. 10 Live Update: Updates your software with the most recent version, using the Internet. Category: Toggles between the available document types, according to the scanner used, and sets the source for data detection accordingly. ScanShell800N: Support barcode, business card and general non-OCR reading. ScanShell800\1000: Support all document reading as follows: Driver License Business card Barcode Passport General document (in MAG mode): Extracts data from magnetic strips of general document (e.g., credit cards) and shows the data as-is. Special categories Driver license/Business card: In this mode, ScanShell scans a document assuming that the document is a driver license. If it is indeed a driver license, the process shows the license details (and exports the data). If the document is not a driver license, ScanShell switches automatically to business card mode and attempts to process the scanned card as a business card. The progress of this process can be followed in the status bar at the bottom of the screen, which also indicates whether the card is being processed as a driver license or a business card. Clicking the OCR button will open an appropriate window according to the document type detected; driver license details for scanned driver licenses and business card details if the document scanned was a business card. Note: This option is only available if the United State (auto detection) option is selected in the 'State' field! Figure 2: status bar document type indication Driver license (in Magnetic Reader mode): Extract data from driver license by reading the magnetic strip. Driver’s license country: Sets the country and state to be used for the OCR recognition template. In the case of the US only, you can select ‘Auto Detect’ (top of the list), which will enable the Driver license/business card option in the 'Category' field, or select a state manually from the state list. 11 Rotate Image: Rotates the image 90 degrees clockwise. This allows you to control the image orientation prior to saving. Zoom Image: Click to enlarge the image for better reading. Scan Image: Starts the image scan if using manual scan and the image source is set to scanner. Otherwise, activates the FILE OPEN dialog. Note: ‘Toggle to file’ is possible only if a scanner is physically connected to the PC, or if the license key used is a temporary key. Toggle Image Source: Sets the input image source to Scanner (ScanShell 800 or ScanShell 1000), Magnetic Strip, or an image file on the hard disk. Scanner Connection: A green light indicates that the scanner is connected to the PC. A red light indicates that no scanner was found. Delete Image: Deletes the scanned image. This gives you a way to control the image prior to saving. Save to File: Active only in manual save mode: Opens the SAVE AS dialog if file saving is enabled, or saves the file to the clipboard. Toggle Image Output: Active only in manual save mode: Sets the output destination to file or clipboard. Card Verification: Activates the verification function. Toggle reference (*ScanShellOCR Only): Sets the reference source for card verification purposes. Open OCR View (*ScanShellOCR Only): Opens extracted text view. Open Configuration Dialog: Opens the configuration dialog screen in which all the application behavior can be set. Exit / End of Scan: Used to close the application or to save the current image (used in automatic save mode only). 12 Background Save Progress: Shows the background saving progress (used in automatic save mode only). FTP Progress (Status bar): Shows the progress of FTP Export Detected State (Status bar): Displays the detected state when State Auto Detect is selected. Device connection indicator Red – device is not connected Green – device is connected 13 Configuring the Program Before you start scanning, it would be a good idea to configure the program’s scanning and file saving parameters. Click on the ‘Open configuration screen’ button in the main screen (see figure 1 page 9). The following configuration panel will be displayed: Image source section Manual file - save section Auto file save section Figure 3: Scanner configuration panel Automation tab The configuration panel first tab is the Automation tab. Here you can set various parameters of scanning and saving data and images. The Automation tab consists of three main sections: Data Source Manual file save Auto file save 14 Data Source The Data Source section determines the data input source: Scanners, magnetic strip or image file. Checking the ‘Scanner’ option does the following: Sets the scanner as the input image device. Sets the Scan button icon to a scanner image in the main screen. Enables the lower checkbox, titled ‘Paper auto detection’. Checking the ‘Image File’ option does the following: Sets the image source as a local image file from the hard disk. Sets the Scan button icon to an ‘Open file’ image in the main screen. Disables the lower checkbox, titled ‘Paper auto detection’. Checking the ‘Magnetic Strip’ option does the following: (*ScanShellOCR Only)? Sets the Magnetic Strip Reader as the input device. Sets the Scan button icon to a magnetic strip card image in the main screen. Disables the lower checkbox, titled ‘Paper auto detection’. Checking the 'Automatic scan size' option does the following: (This feature is available only if the ScanShell800\N scanner is connected!) It allows for scanning undefined document sizes and continuous scan of the full length of the document. Once the scan is complete, the image is cropped automatically to its proper size. This feature is useful for scanning different documents of different sizes. Paper auto detection - Checking this option will cause the scanner (ScanShell 800) to auto-detect document insertion and start the scanning and saving process automatically. When using the ScanShell 1000 scanner, any of the scanner buttons can be pressed to start the scan. If the ‘Paper auto detection’ is unchecked, the scanner starts scanning when you click on the Scan button in the main screen. 15 Scanner button assignment If you use the ScanShell 1000 scanner, clicking the 'Scanner button assignment' will open the following window, allowing you to assign specific document category to each of the scanner buttons. Figure 4: Scanshell 1000 button configuration To configure the scanshell 1000 buttons: Select the a document type from the dropdown list of the desired scanner button. Note that an arrow is marking the appropriate button. Click OK. Repeat the selection for the other buttons. Note: The scanner button assignment option is available only if auto-detection is enabled. 16 Saving options Once an image is imported, it can be saved to a file or to the clipboard. Images can be saved in two ways: Manual save: The image is saved to the hard disk or to the clipboard as soon as the user clicks on the Save button or immediately after the scanning, depending on user settings. Automatic save: The image is saved to the hard disk in a predefined directory. Saving can be performed as soon as scanning is complete, or when the next card scanning starts. Image manual save The scanned image can be saved manually either to a file on the hard disk, or to the clipboard. You select the file destination as follows: Save to clipboard: To save the scanned image to the clipboard, check the ‘Save to clipboard’ checkbox (See Figure 2 page 13). Note that the Save button in the main screen now displays a clipboard icon. Save to file: To save the scanned image to a file, check the ‘Save to file’ checkbox (See Figure 2 page 13). Note that the Save button in the main screen now displays a diskette icon. Once this option is selected, you can set the default file format that will appear in the Save As dialog box. ScanShell supports seven image file formats: BMP, JPG, PCX, PNG, TIFF, TGA, PSD. Scan scheme: This function is set to single-sided document in ScanShell. Image auto save Image auto save is particularly useful for large batch scanning jobs. This option enables chain-feeding the scanner while image saving is done automatically without user interference. Scan scheme: Select the desired saving scheme (single side, double side or two sides on the same imege. If the later is selected, you can specify the image layout by clicking on the orientation button (Side A above B or B above A). Save immediately after scan - Checking the checkbox titled ‘Save immediately after scan’ (See Figure 2 page 13), will save the image and data immediately after the scan is done. If the ‘Save immediately after scan’ checkbox is unchecked, the saving will occur on the next scan job (in the automatic saving option) or when the user clicks on the Save button (in the manual saving option). Once the ‘Auto save’ checkbox is checked, the ‘File naming and type’ button is enabled, and clicking on it opens the ‘AutoSave file naming’ configuration dialog: 17 File Naming Clicking on the ‘File naming and type’ button will take you to the following configuration screen: Figure 5: File naming configuration – Driver license This dialog sets the naming properties of the automatically saved image files. The file destination folder can be typed into the ‘File Path’, or selected by clicking the File Path button. In the window that opens you can navigate to the directory in which you want to save the files. The file format may be one of seven supported formats (BMP, JPG, PCX, PNG, TIFF, TGA, PSD). You determine the file format in which the images will be saved by selecting the format extension in the ‘File Extension’ combo box. The file name is determined by the ‘Saving Types’ radio buttons as follows: Driver License images tab Use this tab to specify driver license saving options. Save to ascending file name: The software will create a new file name for each saved file, based on a combination of the ‘Base File Name’ and the ‘Name Index’ that determines the value by which the index is increased for each file. For example, if the ‘Base Name’ is set to IMAGE and the ‘Name Index’ is set to 1, the first saved file name will be IMAGE1.BMP, the second saved file name will be IMAGE2.BMP, etc. Save to a fixed file name: This method saves the image to a fixed file name based on the value in ‘Base Name’. Each new scan saves a new image file that is written over the previous scanned image file. Save to a file name using extracted data from ID: The image file name is based on the value of a selected field. Currently, the only option is to use the 18 NAME field from the ID card. Accordingly, if the ID card belongs to JOHN SMITH, the saved file name will be JOHN SMITH.BMP. File name: Type in a name select the start number with which the files are automatically numbered, and select the graphic file type to use .Click on brows button left of the path field, to specify a path for the saved files. General documents images Use this tab to specify general documents saving options. Figure 6: File naming configuration – General documents 19 Data extraction tab (*ScanShellOCR Only) Figure 7: Scanner configuration panel - License data processing tab Extract full image: extracts the complete ID card image and saves it as a separate file. Extract face image: Isolates the face image rectangle from the ID card image and saves it as a separate file. Extract signature image to file: Isolates the signature image rectangle from the ID card image and saves it as a separate file. Export id data to web: Export the scanned card data to a predefined web address according to the settings in the data.txt file. Extract ID data to a file: Extracts the textual information from the ID card image and saves it to a text file. To activate these features, select the ‘License text export’ tab in the configuration panel, and check the appropriate checkboxes. Extract full image The full card image is extracted from the ID image and saved to a file. The face image is saved under the ID image name (e.g. c:/images/ID-1.bm). To find out more 20 about file naming methods, see the Image manual save and Image auto-save sections on page 16. Extract face image to file The face image rectangle is extracted from the ID image and saved to a file. The face image is saved under the ID image name with the .Face extension (e.g. if the card image name is c:/images/ID-1.bmp, the face image is saved as c:/images/ID-1Face.bmp). To find out more about file naming methods, see the Image manual save and Image auto-save sections on page 16. The saved face image has the same properties as the ID card image (color scheme, resolution and file type). To activate this feature, check the checkbox titled Extract face image to file. Extract signature image to file The signature image rectangle is extracted from the ID image and saved to a file. The signature image is saved under the ID image name with the Sig extension, e.g. if the card image name is c:/images/ID-1.bmp, the signature image is saved as c:/images/ID-1-Sig.bmp). The saved signature image has the same properties as the ID card image (color scheme, resolution and file type). To activate this feature, check the checkbox titled Extract signature image to file. Note: The signature extraction feature is currently not supported by all the states. Appendix A shows the states that support signature extraction. Using the signature extraction feature in documents of states that do not support it yields no result. Export id data to web If you select this option, the scanned card data is exported automatically to a predefined web address, according to the settings in the data.txt file, located in the application (.exe file) directory. Extract ID data to a file The textual data is extracted from the ID image and saved to a user-selected text file. The data is organized in fields in a constant order separated by a unique character. The field separating character can be any of the following: Comma character “,” (default). Tab character. Custom-defined character: any single character from the keyboard. Each ID scan (record) is organized in a single line. Each record has the following organizational order: ID number, License number, Name, Address, City, State, Zip, Issue date, Expiry date, Birth date, Sex, License class, Social security, ID image file name, First name, Middle name, Last name, Name suffix, Scan time, Scan date, Text line1, Text line2, Text line3. Note: For a full list of exported fields please see Appendix E – Full Export Fields List, page 45. 21 Document type export strings The document type is specified in the exported text file with the following (exact) strings: When scanning driver licenses using OCR, the last fields will contain the string: "Driver license (ocr)" When scanning driver licenses using barcode, the last fields will contain the string: "Driver license (barcode)" When scanning driver licenses using a magnetic reader, the last fields will contain the string: "Driver license (mag)" When scanning passports using OCR, the last fields will contain the string: "Passport (ocr)" When scanning business cards using OCR, the last fields will contain the string: "Business card (ocr)" Notes: 1. If a specific field is not supported in the current state, its corresponding value is empty. 2. ID number and License number have the same value in the US. 3. ID image file name holds the full path and name of the ID card image file. 4. First name, Middle name, Last name, Name suffix fields are generated by parsing the Name field and not directly from the cards. 5. Text lines 1-3 are extracted only for Chile driver licenses. These data fields are not extracted for other states or countries. 6. Address2-Address5 are extracted for United Kingdom driver licenses. Important! This order is guaranteed to remain in this format in future versions of ScanShell. However, this list may expand in the future to include additional fields, as more states are supported. These new fields will be added to the end of the list. Append records: The records can be written to the text file in two ways: Appending mode: In this mode, each new record is appended to the end of the text as a new text line. To activate this mode, check the checkbox titled ‘Append Records’. Single record mode: In this mode, each new record overwrites the previous record; thus the text file always contains a single record. To activate this mode, uncheck the box titled ‘Append Records’. 22 OCR text export tab (*ScanShell OCR Only) Figure 8: Scanner configuration panel – Image tab By checking the checkbox, text extracted from the scanned card will be saved to a text file, which will have the same name as the image file (ending with the .txt extension), and which will be placed in the directory where the image files are saved. 23 Image tab The following scanned image parameters can be controlled from the Image tab: Document size: The scanned area size in the document, Passport or Driver License. Color scheme: The number of colors used by the image. Resolution: Number of dots-per-inch used for scanning the image (dpi). JPG Quality: Set the image compression factor when saving the image in JPG format. The compression ratio (11-100) influences the image quality and file size when the lowest value (11) yields the smallest image size (with the lowest image quality) and the highest value (100) yields a large image file (with the highest image quality). To set these values, select the Image tab in the configuration panel. Figure 9: Scanner configuration panel – Image tab Document size: The document size determines the size of the scanned area. This area is defined by the width and height values, as shown in Figure 11 below using the ScanShell800 scanner: Height 24 Width Figure 10: Document Measurements The document Passport size drop-down list offers the following options: Full size (3"x5") Data section only The document Driver License size drop-down list offers the following options: ID card (landscape) ID card (portrait) Photo size (3” x 5”) Large Photo size (4” x 6”) Custom size: offers variable scan size from (1.85” x 2”) to (4.1” x 9”) (W x H) Note: If the scan size is smaller than the actual document, the image will be cropped to the size defined by the scan size. Color Scheme: Color scheme defines the number of colors used to display the image. In general, the higher the number of colors, the better and clearer is the image. However, please bear in mind that more colors result in a larger file size. ScanShell offers the following color schemes: True color: 24-bit color image 256 colors: 8-bit color image 256 shades of gray: 8-bit gray image Black and white: 1-bit image As mentioned above, more colors mean larger image file size. The relation between color scheme and file size can be defined approximated as follows: File size = 2 number of bits 25 Accordingly, if a certain document scanned in black and white format produces a file of 50KB, the same document produces an image file of 400KB when scanned in 256 colors (or gray scale), and 1.2 MB for true color. Resolution: The resolution parameter defines how vividly the image will be displayed. In general, an image that is scanned in higher resolution shows more details of the original document image. However, as with the color scheme – higher resolution means larger image file size. ScanShell supports scanning resolutions in the range of 50 dpi to 600 dpi, in increments of 10 dpi. ScanShell calculates the approximate file size for bitmap format based on the current document size, color scheme and resolution. The result is displayed under ‘Image dimensions and size’. JPEG Quality: Sets the image quality when saving in JPEG format. This value range can be between 11 and 100. 100 represents the best image quality, but would also result in the biggest file size. Scanner Calibration With time, the scanner colors detection tends to change to incorrect values. This phenomenon affects the text detection accuracy as well as the resulted image quality. To reset the scanner to the proper colors, the scanner needs to be calibrated. To calibrate the scanner, click on the Calibrate button (located in the configuration panel’s Image tab) and use the calibration paper card that was part of the scanner package, to calibrate the ScanShell 800 scanner. The ScanShell 1000 does not require a calibration paper. Cleaning the Scanner Cleaning the scanner improves the scan quality. How to clean: Scanner model ScanShell 800: Place the cleaning sheet (that come with the scanner package) in the scanner tray, and click on the Clean Scanner button. The sheet is fed back and forth through the scanner and cleans the scanner lens. Add a few drops of alcohol for better results. Scanner model ScanShell 800: Use a soft cloth to clean the scanner glass surface. Scanner model ScanShell 600: Unscrew the scanner cover (the screw is located on the bottom of the device). Use a soft cloth to clean the scanner lens. 26 Printing – Print tab Image Print Size Surprisingly, the printed image size depends very much on the graphic program used. In some low-end graphic applications (such as Microsoft Paint that comes with Windows), the printed image size depends on the image resolution. The more dpi – the larger the image size that will be printed. To get a properly printed image size, use a more professional graphic package (such as Adobe Photoshop) that prints the image in the correct dimensions regardless of the image dpi. The Print tab has the following options: Figure 11: Scanner configuration panel – Print tab Image size as percent of actual size: Reduces / enlarges the image size from 50% to 200% of the actual document size. Selecting the default (100%) prints the image the same size as the document. Show Print dialog before printing – If enabled, opens the printing dialog when printing and allows you to select a printer. If unselected, prints directly to the default printer. 27 Print data from driver’s license card: Places the data from the card under the card image. The printed image and data fields can be selected using the appropriate check boxes. Printing Font: Select the desired printing font parameters. Printing custom fields: Allows you to print custom, user defined fields. This is useful for creating badges and other purposes. Custom fields can be added in the OCR window, see Custom fields - User defined fields, page 33. This is useful to print badges. Click on the 'Print custom fields' button. Figure 12: Print custom fields dialog Select the fields you want to print. Select Print label and data or Print data only. If you check the 'Clear custom fields' your custom fields will be deleted after printing (useful for a one-time extra marking of records). Click OK. 28 Live Update Live Update checks for updates whenever you are connected to the Internet, and updates your program automatically with the most recent version of your program available. Note: If you don’t configure your software for automatic Live Update, you can still update it manually using the Live Update button in the main screen. To use the automatic Live Update feature, go to the Live Update tab in the configuration screen: Figure 13: Live Update tab 1. Check the Live Update checkbox. 2. Choose the updating frequency: a. Every time the program is started (providing you are connected to the Internet) b. At preset times; Use the combo boxes to specify the updating frequency. 3. Click on the ‘Set User Data’ button. 29 ABC12345 jfk80DD Figure 14: Live Update user details 4. Fill in your details. Note: License, Email and Company are obligatory and must be filled in. 5. Click ‘OK’. 30 Program Operation Overview ScanShell operation can be divided into six main operation categories: 1. Scanning and Image import 2. Saving and exporting data and images 3. Magnetic Strip reading (*ScanShellOCR Only) 4. Extracted text manipulation and export (*ScanShellOCR Only) 5. ID card Verification (*ScanShellOCR Only)? 6. Setting Image formats and other parameters Image scanning and import – Images can be imported from two sources: from a scanner (ScanShell 1000 or ScanShell 800) or from an existing image file. When using the ScanShell 800 scanner as input source, you can choose between two operating modes: manual scan, i.e. each scan starts when the user places the card in the scanner and clicks on the Scan button, or auto-scan, i.e. the scan starts automatically when the user inserts the card into the scanner. When using the ScanShell 1000 scanner, the scan starts as soon as one of the silver buttons on the scanner is pressed. The text information in the imported image is extracted using one of two methods: Optical Character Recognition (OCR), in which the text is extracted directly from the scanned image, and Barcode reading, which extracts the data from a Barcode image. In both cases images are either scanned by the scanner or opened from a file. Image export – Images can be exported to one of two destinations: An image file and the clipboard. When saving to an image file, the application offers two operating modes: manual save, i.e. the user clicks on the Save button to save the image using the Save As dialog box, and auto-save, i.e. the image is automatically saved to a predefined destination folder. Magnetic Strip Detection (*ScanShellOCR Only) - Available when a magnetic strip reader is connected to the computer, and indicated in the ScanShell application as the data source. Extracted text export (*ScanShellOCR Only) - Saves the detected text from the card / passport (name, ID number, address, etc.) to a user-defined text file. The text is saved in records format of one record per line. The fields are separated by user defined separator characters. ID Verification (*ScanShellOCR Only) – Verification of the ID card authenticity by comparing two data sources, such as OCR and Barcode, OCR and magnetic strip information, etc. Image format - Defines the way the input image is scanned (color scheme, resolutions, scan size) and saving format (BMP, JPG, PCX, PNG, TIFF, TGA, PSD). 31 Scanning a new document To scan a new document, just feed the driver’s license into the scanner. If the scanner is set to automatic scan mode, the scanner will start scanning the card automatically. In manual scan mode, the scanner starts scanning when you click on the Scan button in the main screen. See Paper auto detection page 14. Once the scan is complete, the program will process the image. The scanned image and data will be saved according to the settings you specified in the configuration panel. 32 ID Data (*ScanShellOCR Only) After scanning and processing the ID card, you can review the acquired text information by opening the ID Data window. To open the ID Data window, press the button titled ‘OCR’ on the main screen. The ID Data window shows the data retrieved either from the scanned image by OCR (Optical Character Recognition), or from the scanned image Barcode, depending on the option selected. Irrelevant fields are disabled (depending the state). The data shown in the ID Data window can be reviewed and edited. Once a new ID card is scanned, this data is transferred to a text file (if this option is enabled). Figure 15: ID Data (detailed mode) The ID Data window can be viewed in two modes: Basic mode: Only the most important data is shown. Detailed mode: Shows all the data on the card, and contains a button for creating user defined custom fields. You can toggle between the two modes using the Basic / Detailed button at the bottom of the ID Data window. State: You can select the state manually from the dropdown list, or, in the case of the US, let the program detect the state automatically (By selecting 'United state (auto detect) at the top of the countries list. 33 Custom fields - User defined fields Custom fields can be useful for creating badges and other purposes. Click on the 'OCR' button at the bottom left of the main screen. Click on the 'Details' button at the bottom left of the window that opens. Click on the 'Custom' button at the bottom left of the window that opens. Click on the 'Labels' button at the bottom of the window that opens to create a label for the field, Figure 16: Cusotm fields creation window Click 'Add' and type in a name for the field. Repeat the process to create additional fields. Click OK. You will find new fields in the Custom fields' window. You can now type values or data into the field. Editing and deleting custom fields Repeat the process above. After the 'Add' window opens, select a label and click 'Edit' to change the field's name, or 'Remove' to remove it. When you are done, click OK. ID data saving Text data saving options are controlled from the configuration panel ‘Data Extraction’ tab. See ‘Data extraction tab (*ScanShellOCR Only)’ page 19. 34 ID Card authentication (*ScanShellOCR Only) Use this option to check if the card you scan is genuine. ScanShell will scan the data on the card using OCR, and then compare it to data from a second source on the card, either the barcode or the magnetic strip (if available). If the data from the two sources match, the card is genuine. Else, the card is either faked, or one of the data sources on the card is corrupted. To authenticate a card: 1. Select Record -> New Record from the menu bar or click on the New Record button from tool bar. 2. The New Record Screen will appear. 3. Select a state from the State dropdown list or use the State Detect option (for OCR). You are advised to select the state manually, because if the state is not recognized for some reason, you’ll have to repeat the process. You can also select a state from the quick state selection buttons, if you have predefined them. (To set a button for the desired state, right-click on the button. Select the desired state from the list. After you release the mouse button, you’ll notice that the button name has been changed to the state you selected). 4. Use the popup menu of the card authentication button to select a second card data source (barcode or magnetic strip), which will be used for comparison with the OCR results. 5. Click on the Card Authentication button to start the authentication (When the authentication process is active, the icon on the button will flash, if it’s not active it will be black) 6. Place the ID card in scanner. If you are not using the Auto detect card insertion option: Click on the Scan button to scan the data source (This scan will be saved to the database if you will save the record). If you are using the AutoDetect card insertion mode, just insert the card into the scanner 35 7. ScanShell will scan the card, and than prompt you to scan the card a second time. Insert the card again in the scanner/reader and repeat the steps above. 8. If the data from the two sources on the card matched, the icon on the authentication button will be green. If it did not match, the icon will be red, which means the card is not in order, (either faked, or one of the data sources on the card is corrupted. 9. Press OK to save the record to database. Understanding the authentication status light The status light provides indications for the authentication process, as follows: Solid black color, the authentication function is not activated. Solid brown color, the authentication function is activated and waits for the reference scan or swipe. Flashing brown light, the reference scan or swipe has been successful, waits for the scan of the source. Solid green color - the source was scanned successfully and the authentication is successful (the data of the two sources match). Solid red color - the source was scanned badly or the authentication is failed (the data of the two sources don’t match). What to do when verification fails? If the status light remains solid red after the reference scan or swipe, it means that the data from the two sources don’t match. He reason can be one of the following: 10. The card could be faked 11. Bad reading of either one of the source 12. Corruption of one of the data sources. If verification fails, you can try the following: Make sure the current (US) State box is set to the correct state of the driver license. Try authenticating the card again 36 Reading Passports (*ScanShellOCR Only) Passports scanning can only be done with the ScanShell 1000 scanner. This scanner was designed specifically for reading / scanning of passports; however, it can be used also for ID / Driver License reading / scanning. With the ScanShell software the ScanShell 1000 has full functionality for Passport and ID / Driver Licenses. Both Passport and ID cards should be placed on the glass of the scanner with the side to be scanned facing the glass. When scanning ID cards, they should be placed on the top right corner as shown in the figure below. Figure 17: ScanShell 1000, ID placing When scanning a passport, the entire glass surface (3" X 5") is being scanned unless the ScanShell software is configured to scan only the data lines of the passport. The proper way to scan a passport is to put the information page (the page that includes the person picture) facing down on the glass, and the data lines (the lines at the bottom of the page) against the plastic frame closer to the ScanShell 1000 logo as shown below. Figure 18: The placing of a passport 37 Appendix A – Supported States for Detection The following table shows the countries and states supported by ScanShell. This list will be updated in each new version release of ScanShell. Region Name USA Region ID 0 Country Name USA Country ID 0 Document Name Alabama Alaska Arizona Arkansas California Colorado Connecticut Delaware Washington D.C. Florida Georgia Idaho Illinois Indiana Iowa Kansas Kentucky Louisiana Maine Maryland Massachusetts Michigan Minnesota Mississippi Missouri Montana Nebraska Nevada New Hampshire New Jersey New Mexico New York North Carolina North Dakota Ohio Oklahoma Oregon Pennsylvania Rhode Island Document ID 0 1 2 3 4 5 6 7 8 9 10 11 12 13 14 15 16 17 18 19 20 21 22 23 24 25 26 27 28 29 30 31 32 33 34 35 36 37 38 38 Region Name Region ID Country Name Country ID Canada 1 Canada 3 America 2 Chile Mexico Brazil Bermuda 4 6 8 13 Bahamas 21 France United Kingdom and Ireland Israel Germany 5 7 9 10 Spain Romania Norway Holland Luxemburg Lithuania 11 12 15 17 18 19 Europe 3 Document Name Document ID South Carolina South Dakota Tennessee Texas Utah Vermont Virginia Washington West Virginia Wisconsin Wyoming Hawaii Permanent Resident (Green Card) USA Army Social Security Card Ontario Alberta British Columbia Manitoba New Brunswick New Foundland New Territories Nova Scotia Saskatchewan Canadian Citizen ID Quebec Chile Mexico Brazil Bermuda driver license Bahamas driver license France United Kingdom and Ireland Israel German driver license German ID Spain Romania Norway Holland Luxemburg Lithuania 39 40 41 42 43 44 45 46 47 48 49 54 81 82 83 70 71 72 73 74 75 76 77 78 79 1079 80 100 130 170 250 90 110 120 140 141 150 160 190 210 220 230 39 Region Name Australia Asia Region ID 4 5 Country Name Swiss Sweden Italy Australia Malaysia New Zealand Singapore Country ID Document Name Document ID 20 22 23 1 Swiss Sweden driver license Italian driver license New South Wales Australian Capital Territory Queensland Victoria Tasmania Western Australia South Australia Northern Territory Malaysia New Zealand Singapore 240 260 270 50 51 2 16 14 52 53 55 56 57 58 60 200 180 40 Appendix B – Supported Scanners Before using ScanShell, the scanner driver must be installed. ScanShell can work with the following scanner types: Scanshell 800: Driver for the scanner can be found at http://www.id-scan.com/FTP/Scanner_Drivers/scanshell800 ScanShell 900: Driver for the scanner can be found at http://www.id-scan.com/FTP/Scanner_Drivers/MagShell900 ScanShell 1000: Driver for the scanner can be found at http://www.id-scan.com/FTP/Scanner_Drivers/ScanShell1000 Scanshell 600, USB 201: Driver for the scanner can be found at http://www.ID-scan.com/FTP/Scanner Drivers/USB 201 41 Appendix C - Maintaining the scanner Calibrating the scanner With time, the scanner colors detection tends to change to incorrect values. This phenomenon affects the text detection accuracy as well as the resulted image quality. To reset the scanner to the proper colors, the scanner needs to be calibrated. How to calibrate? To calibrate the ScanShell 800scanner, insert the calibration paper card that was part of the scanner package into the scanner, and click on the Calibrate button (located in the configuration panel’s Image tab). The ScanShell 1000 does not require a calibration paper, just click on the Calibrate button. Cleaning the scanner Cleaning the scanner improves the scan quality. To clean the scanner click on the “Clean Scanner” button. Follow the Cleaning Wizard instructions. This operation requires a cleaning sheet (supplied with the scanner) and alcohol solution. How to clean? Scanner model ScanShell 800: Place the cleaning sheet (that come with the scanner package) in the scanner tray, and click on the Clean Scanner button. The sheet is fed back and forth through the scanner and cleans the scanner lens. Add a few drops of alcohol for better results. Scanner model ScanShell 800: Use a soft cloth to clean the scanner glass surface. Scanner model ScanShell 600: Unscrew the scanner cover (the screw is located on the bottom of the device). Use a soft cloth to clean the scanner lens. 42 Appendix D - Minimized Interface Mode & CommandLine Switches The ScanShell application behavior can be modified to best suit your needs. This is done by running the program while using command lines switches. ScanShell offers the following switches: MI – Runs the application with minimum amount of control buttons on the main screen and eliminate access to the configuration dialog screens. ShowGUI – When using the system tray icon, this switch adds the option to show/hide the application main screen from the system tray. NOMAG – Eliminates the use of the magnetic strip engine. Using this option speeds up the application start-up. Using the command line switches To use the command line switch, add the switch to the application shortcut as follows; Assuming that you have a shortcut to ScanShell on your desktop and you want to add to the program the MI switch that will cause it to run in minimized mode: 1. Right click on the shortcut and select properties. 2. Modify the TARGET field from "F:\Program Files\Card Scanning Solutions\ScanShellOCR Ver. 6.3.0\ScanShellOCR.exe" to: "F:\Program Files\Card Scanning Solutions\ScanShellOCR Ver. 6.3.0\ScanShellOCR.exe" /MI 3. Click OK to close the properties dialog. Important: Make sure you type the switch value after the double quote character! You can add several switched one after the other as follows: "F:\Program Files\Card Scanning Solutions\ScanShellOCR Ver. 6.3.0\ScanShellOCR.exe" /MI /NOMAG /ShowGUI Running in Minimized Interface mode Running in Minimized Interface mode displays the program with a minimum set of controls, thus preventing the user from altering the program configuration. Nevertheless, this operating mode allows the user to take full advantage of all the features embedded in the program. To run in Minimized Interface mode, the program needs to be started with the /MI switch. To do so, change the program shortcut used to start the program from "C:\Program Files\Card Scanning Solutions\…\ScanShellOCR.exe" to: "C:\Program Files\Card Scanning Solutions\…\ScanShellOCR.exe" /MI 43 This alters the program main screen as follows: Calibrate Scanner Clean Scanner Select country & State Help Barcode Scanner connection status Figure 19: Main screen in minimized mode Main screen function controls: Help: Opens this help document. Calibrate Scanner: Activates the scanner’s Calibration Wizard. Clean: Activates the scanner Cleaning Wizard. Country list: Selects the current country. If the current country contains several states, the state list is loaded to the State List control. Select Country and State: Sets the current state detection mode. Exit: Closes the application. Scanner connection status: Indicates if the scanner is connected to the PC. 44 Note: All the settings described in previous sections of this documents apply when running in Minimized Interface mode. 45 Appendix E – Full Export Fields List The following table shows the full list of exported fields from idScan (in this order). Field name and index 1. ID number 2. License number 3. Name 4. Address 5. City 6. State 7. Zip 8. Issue date 9. Expiry date 10. Birth date 11. Sex 12. License class 13. Social security 14. ID image file name 15. First name 16. Middle name 17. Last name 18. Name suffix 19. Scan time 20. Scan date 21. Text line1 22. Text line2 23. Eyes color 24. Hair color 25. Height 26. Weight 27. Restrictions 28. Type 29. Endorsements 30. Audit Document type 46 31. Issuing Country passport field 32. Nationality passport field 33. County. 34. mAddress2; 35. mAddress3; 36. mAddress4; 37. mAddress5; 38. CustomData0 39. CustomData1 40. CustomData2 41. CustomData3 42. CustomData4 43. CustomData5 44. CustomData6 45. CustomData7 46. CustomData8 47. CustomData9 48. mDuplicate 49. Title Business card field 50. Company Business card field 51. Country Business card field 52. City2 Business card field 53. State2 Business card field 54. Zip2 Business card field 55. Country2 Business card field 56. City3 Business card field 57. State3 Business card field 58. Zip3 Business card field 59. Country3 Business card field 60. City4 Business card field 61. State4 Business card field 62. Zip4 Business card field 63. Country4 Business card field 64. PhoneLabel0 Business card field 47 65. Phone0 Business card field 66. PhoneLabel1 Business card field 67. Phone1 Business card field 68. PhoneLabel2 Business card field 69. Phone2 Business card field 70. PhoneLabel3 Business card field 71. Phone3 Business card field 72. PhoneLabel4 Business card field 73. Phone4 Business card field 74. FaxLabel0 Business card field 75. Fax0 Business card field 76. FaxLabel1 Business card field 77. Fax1 Business card field 78. FaxLabel2 Business card field 79. Fax2 Business card field 80. FaxLabel3 Business card field 81. Fax3 Business card field 82. EmailLabel0 Business card field 83. Email0 Business card field 84. EmailLabel1 Business card field 85. Email1 Business card field 86. EmailLabel2 Business card field 87. Email2 Business card field 88. EmailLabel3 Business card field 89. Email3 Business card field 90. WebLabel0 Business card field 91. Web0 Business card field 92. WebLabel1 Business card field 93. Web1 Business card field 94. WebLabel2 Business card field 95. Web2 Business card field 96. WebLabel3 Business card field 97. Web3 Business card field 98. DocumentType; 48 99. Text line3 100. Country name (for driver license document only) 101. Ammount 102. Date Bank Cheque field 103. Issuer Bank Cheque field 104. Issuing bank Bank Cheque field 105. MICR line Bank Cheque field