1
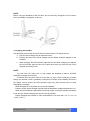
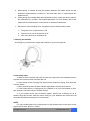
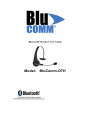
Model:
BluComm-OTH
All rights reserved.
www.blucomm.com
1
Index
1. Notice Before Using
2. Specifications
3. Product Introduction
4. Charging the Headset
5. Power On/Off
6. Pairing the Headset with a Bluetooth Device
7. Wearing the Headset
8. Answering Calls
9. Refusing Calls
10. Ending Calls
11. Voice Dialing
12. Redialing
13. Mute
14. Transferring Calls
15. Adjusting the Volume
16. Safety Instructions
17. Package Contents List
18. Diagnosing Problems
19. Headset Storage
20. Travel Charger
21. Battery
All rights reserved.
www.blucomm.com
2
1. Notice Before Using
Thank you for purchasing the BluComm® Bluetooth® Headset Model # BluComm-OTH.
Please check the contents of this package to verify the items listed in the Package
Contents List below to has been included in your package. Be sure and read this User
Guide before you use the Headset. The BluComm has been developed using Bluetooth
wireless technology and is capable of connecting with Bluetooth devices designed with
Audio Gateway and PDAs. Desktop and notebook computers can be connected and
paired with the Headset using a USB Bluetooth Dongle. Before using the Headset please
verify your Bluetooth device complies with Bluetooth V2.1 and supports the Bluetooth
Headset or Handsfree profile.
2. Specifications
Product Model NO.
Standard Convention/Signal Output
Frequency Band
Talk/ Stand by Time
Supporting Profile
Connection
Data Encryption
Power Capacity
Power Supply
Operation Temperature
Facility Saving Temperature
Operation Moisture
Weight
Size
Safety Regulation
Bluetooth V2.0, Class II
2.4GHz~2.4835GHz,ISM Band
Up to 8 hours/ Up to 200 hours
Headset & Handsfree
Peer to Peer
128 bits encrypted
Rechargeable Li-Polymer
5V DC, 100~240V AC adapter
-10 ~ 55℃
-20 ~ 60℃
10% ~ 90%(non-concrete status)
41g (battery included)
150*140*47 mm
CE, FCC, BQB
3. Product Introduction
Functions (Answering / Ending / On / Off ) Button #3
LED Indicator Light
Receiver / Speaker
Microphone
Power Interface / Adapter for Charging the Unit
Ear Hook
Decrease Volume Key (-) 1
Increase volume key (+) 2
All rights reserved.
www.blucomm.com
3
NOTE:
Before using the Headset for the first time, be sure and fully charge the unit at least 4
hours, preferably overnight (8-10 hours).
4. Charging the Headset
The BluComm comes with a built in Lithium Polymer battery. To charge the unit:
a. Plug the travel charger into an electrical outlet.
b. Plug the unit end of the Travel Charger into the Power Interface Adapter on the
Headset.
c. While charging, the LED Indicator Light will turn red. When charging is complete,
the red Indicator light will shut off or flash red to alert you that the unit is fully
charged and ready to use.
NOTE:
· For first time use, make sure to fully charge the Headset at least 4 HOURS,
preferably overnight (8-10 hours).
· If Headset has not been used for more than 21 days, when recharging it please
charge unit at least 4 hours, preferably overnight (8-10 hours) as the battery will need a
full charge and be aware the LED Indicator Light may take several hours to show
recharging is complete.
·While charging the unit, please do not use the Headset.
·Please use the original charger included with the Headset to charge/recharge the unit.
·When the LED Indicator Light flashes red during usage or while on standby, the battery
is low and you should recharge the unit as soon as possible.
。
·Please recharge the Headset in room temperatures of no less than +14 F (-10℃) to
。
+113 F (+45℃).
All rights reserved.
www.blucomm.com
4
5. Power On / Off
a. To TURN THE UNIT ON, PRESS AND HOLD THE Function button for 5 seconds.
The power will turn on after the LED Indicator Light flashes the blue light 3 times.
b. To turn the unit off, press and hold the Function button for 5 SECONDS UNTIL THE
RED Indicator Light flashes 3 times.
NOTE:
·While turning the Headset on, you will hear a “Du Du” sound from the receiver. The
blue Indicator Light will flash 5 times, then 2 times, and after repeating this for 5 cycles,
the Indicator Light will flash the blue light every 3 seconds until the unit adjusts into
Standby mode.
·While the Headset is turned on, it will automatically search for the paired device. Under
the “ON” mode and within the effective range of 30 feet from the Headset, the Indicator
will flash the blue light to indicate that it entered the connecting mode.
·When turning the headset off, you will hear one “Bi” sound followed by two “Du” sounds,
then the Indicator will shut off after flashing the red light a few times.
6. Pairing the Headset with a Bluetooth Device
Before you use the Headset the first time, you must pair the unit with a Bluetooth device
i.e. cellular phone. To set up the pairing:
a. Insure your mobile phone is Bluetooth capable
b. Make sure the Headset is turned off.
c. Press and hold the Function button for 10 seconds until the Indicator Light flashes
alternating “Red – Blue – Red – Blue” to enter the pairing mode.
d. On your mobile device start the Bluetooth search function. Refer to the mobile
device manufacturer’s instructions regarding pairing the device to the BluComm
Bluetooth Headset.
e. When your mobile device is in the stage of searching for a new Bluetooth device, it
should locate and pair with the BluComm
On your mobile device, please choose and confirm the BluComm as your
Bluetooth paired device.
g. Key in the Headset Passcode-“0000” and press “YES”. If the pairing is successful,
the Indicator light on the Headset will flash the blue light only. For some mobile
f.
phones, after pairing you may have to select and reconfirm BluComm PAIRING
EACH TIME YOU TURN ON THE PHONE. Please read you phone manufacturer’s
instructions regarding Bluetooth devices.
h. The Headset should now be in standby mod – ready to send and receive calls.
NOTE:
If the pairing is not successful the first time, the Headset will return to standby mode.
Please repeat the pairing process and refer to the mobile device’s manufacturer’s
instructions for additional information.
All rights reserved.
www.blucomm.com
5
a. While pairing, it is better to keep the distance between the mobile device and the
Headset to approximately 3 inches to 1 foot and make sure no metal objects are
between them.
b. While pairing the Headset with other Bluetooth devices, when the device asks for
the Passcode, key in “0000”- the Headset passcode. For more details, refer to the
mobile device’s manufacturer’s instructions for additional information.
c. Should one of the following occur, the paired devices should remain paired:
1. The power for or of the devices is off.
2. The service or one of the devices is off.
3. One of the devices is re-switched on.
7. Wearing the Headset
According to your preference, adjust the headset on your left or right ear.
8. Answering Calls
a. When a call is received, wait until you hear the ringing from your Headset receiver
to press the Function button to answer the call.
b. If the mobile device is ringing first, wait until the Headset is ringing, then press the
Function button.
c. While answering calls, the blue Indicator light flashes 4 times each second.
d. If the mobile device is ringing and your Headset is off, turn the Headset on first,
then press the Function button to answer the call.
e. If your mobile device has “automatic answer” feature and it already set up to
answer using this function, while the call is coming in, your Headset can receive the call
automatically without pressing the Function button.
NOTE:
· For some mobile phones, the ringing sound of the Headset may be the same as the
ringing sound of the phone i.e. Nokia.
All rights reserved.
www.blucomm.com
6
· For some mobile phones, the ringing sound of the Headset is different than the phone
i.e. Motorola.
9. Refusing Calls
To refuse a call, wait to hear from our receiver, then press and hold the Function button
2-3 seconds until you hear the “Du” sound to refuse the call. If you have the mobile device
set to automatically answer calls, refusing call as described here will not apply.
10. Ending Calls
a. When the call is complete, press the Function button to end the call.
b. You can also wait until your caller hangs up and the call will be disconnected
automatically.
11. Voice Dialing
a. If your mobile phone supports Voice Dialing, you can use this Function with your
Headset also.
b. Under the standby or connecting mode, press the Function button on the Headset
and follow the mobile devices’ manufacturer’s instructions to proceed with Voice Dialing.
NOTE:
· The activation of Voice Dialing will depend on the design of your mobile device.
· The working range of the Bluetooth Headset is approximately 15 feet indoors and 15
-30 feet outdoors.
12. Redialing
a. If your mobile device supports the Redialing feature, you can also use this function
with your Headset.
b. Under the Standby or Connecting mode, press the Decrease Volume Key (-) of the
Headset for 2-3 seconds until you hear the “Du” sound to redial the last call.
13. Mute
a. During a phone conversation, press the Decrease Volume Key (-) and Increase
Volume Key (+) at the same time until you hear the “Du” sound to begin the Mute function
of the Headset.
b. While in Mute mode, you will hear an intermittent “Du” sound
c. To cancel the Mute mode, press either Decrease Volume Key (-) or the Increase
Volume Key (+) to end this function.
14. Transferring Calls
a. Transfer a call from the headset to the mobile device. While a call is in progress,
press the Increase Volume Key (+) for 2-3 seconds until you hear one “Du” sound.
All rights reserved.
www.blucomm.com
7
b. Transfer a call from the mobile device to the headset. While a call is in progress,
press the Increase Volume Key (+) for 2-3 seconds until you hear one “Du” sound. Note
that some phones may require a 2-3 seconds press of the Function button instead of the
Increase Volume Key (+) to perform this function.
NOTE:
To activate this function, your mobile device must support the Handsfree mode. For
more details, please check your mobile device’s manufacturer’s instructions for additional
information.
15. Adjusting the Volume
During a call, you may adjust the Headset’s volume.
a. To increase the volume, press the Increase Volume Key (+).
b. To decrease the volume, press the Decrease Volume Key (-).
NOTE:
You will hear the “Du Du” sound while adjusting the volume to the highest and lowest
settings.
16. Safety Instructions
a. Read this Headset manual carefully and use the Headset correctly at all times by
following the instructions.
b. THIS IS NOT A TOY. Keep the Headset away from children and avoid children
chewing on the Headset or it’s components or accidentally swallowing any pieces.
c. To clean the Headset, wipe it with a soft, dry static-free cleaning cloth.
d. NEVER use cleaning liquids, solvents, or sprays to clean the Headset.
e. Do not clean the Headset while charging.
f. Do not dissemble the Headset. If you encounter any problems, contact the retailer
immediately.
HANDLING
· If you encounter a problem, turn the Headset off immediately.
· If the inside component(s) break, please contact the retailer for a repair center and
instructions for immediate service and support.
17. Package Contents List
Please inspect this package and refer to the package contents list below to verify all
items were included in this package.
All rights reserved.
www.blucomm.com
8
Item Name
Quantity
BluComm Bluetooth Headset………… 1
User Guide ………………………………1
Travel Charger ………………………… 1
INPUT: AC 100-240V, 50/60Hz
OUTPUT: DC5.1V, 120Ma
If you find any items were not included please contact your retailer where you purchased
this product.
18. Diagnosing Problems
a. If the Headset LED Indicator Light is flashing red -the battery is low so recharge the
unit immediately.
b. If, after recharging for 20 minutes, the Headset does not turn on: For initial use, the
power will be on after charging the Headset at least 40 minutes. The manufacturer’s
recommended initial charging time is no less than 4 hours, preferably overnight
(8-10hours).
c. If the Headset does not show the recharging sign: The battery is completely
depleted or the Headset has not been used for 21 days, when charging the red Indicator
Light will be lit after a few minutes.
d. You hear no sound coming from the Headset:
★ Make sure the Headset is turned on.
★ Make sure the headset has been paired with a Bluetooth enabled device.
★ Make sure the distance between the Headset AND THE PAIRED Bluetooth device
is no more than 30 feet.
★ some Bluetooth mobile phones support only one Headset. In this case, if you pair
the BluComm Headset with the device, the other Bluetooth Headsets may be deactivated.
Likewise, if you pair other Bluetooth headsets with this type of mobile device, the
BluComm Headset may become deactivated.
19. Headset Storage
﹥ Use of accessories other than the manufacturer’s originally supplied accessories
may cause the Headset to malfunction or fail. In addition, product damage, electrical
conflicts with non-manufacturer chargers may occur resulting in the cancellation of the
product warranty.
﹥ Do not disassemble the headset for any reason. This may damage the Headset
accidentally and void the manufacturer’s warranty.
All rights reserved.
www.blucomm.com
9
﹥ Please store the Headset away from dust, heat and areas where it might
accidentally fall or other damage may occur.
﹥ Use a clean, soft static-free cloth to clean the Headset’s surfaces.
﹥ You can put the Headset in a pocket while not in use.
﹥ Do not let children play with the Headset as it may cause damage to the unit and
avoid any danger to young children.
﹥ Avoid storing the Headset and chargers in extreme temperatures.
Travel Charger
1. The Travel Charger is designed for indoor use and not to be used outdoors.
2. Connect the Travel Charger with the appropriate power supply.
3. Do not unplug the Travel Charger from the electrical outlet by the cord. Use the
wall plug to pull the charger from the electrical outlet.
BATTERY
1. New battery: For first time use, charge the battery at least 4 hours, preferably
overnight (8-10 hours).
2. Only manufacturer authorized personnel can perform battery replacement.
3. Under normal usage, the built in battery should be viable for up to 24 months or
longer depending on usage.
。
4. The battery must be recharged in room temperatures of no less than +14 F (-10℃)
。
to + 113 F (+45℃) to remain under warranty and to maximize the life of the battery.
5. Using the Headset in normal room temperatures enables the battery to maximize its
life.
6. When used in colder weather, the Headset’s battery life may decrease.
7. Recharge the Headset at least every two months whether it is used or not.
All rights reserved.
www.blucomm.com
10