1
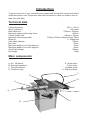
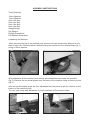
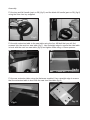
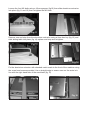
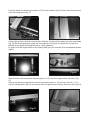
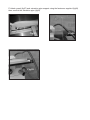
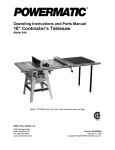
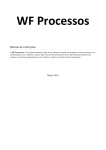
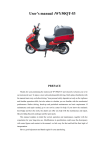
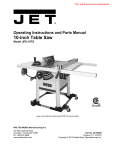
10” CAST IRON SAWBENCH
WITH SLIDING CARRIAGE
OPERATING INSTRUCTIONS
MODEL: W650
Charnwood, Cedar Court, Walker Road, Bardon Hill, Leicestershire,
LE67 1TU
Tel. 01530 516926 Fax. 01530 516929
email; [email protected] website; www.charnwood.net
Introduction
To get the most out of your new table saw, please read through this manual and safety
instructions before use. Please also save the instructions in case you need to refer to
them at a later date.
Technical data
Voltage/frequency
Motor (Induction)
Main table size
Maximum ripping width using fence
Crosscut table size
Maximum crosscutting width
Blade tilt
Saw blade diameter
Bore size
Maximum depth of cut at 90 degrees
Maximum depth of cut at 45 degrees
Work Table Height
Net weight
230 V ~ 50 Hz
1700 watts
750mm x 1000mm
605mm
400mm x 180mm
550mm (700mm Using Reverse Table)
0 - 45degrees
254mm
30mm
75mm
45mm
830mm
125kg
Main components
A. On / Off Switch
B. Raising Handwheel
C. Tilting handwheel
D. Production stop
E. Guide fence
F. Dust Hose
G. Blade guard
H. Sliding carriage
F
G
D
H
D
C
B
A
Safety Rules
As with all machines, there is a certain amount of hazard involved with the use of this circular sawbench. Use the machine with the respect and caution demanded where safety precautions are concerned. When normal safety precautions are overlooked or ignored, personal injury to the operator can
result.
Read, understand and follow the safety and operating instructions found in this manual. Know the
limitations and hazards associated with this circular sawbench.
Electrical grounding. Make certain that the machine frame is electrically grounded and that a ground
lead is included in the incoming electrical service. In cases where a cord and plug are used, make certain that the grounding plug connects to a suitable ground. Follow the grounding procedure indicated in
the local electrical code.
Eye safety. Wear an approved safety shield, goggles, or glasses to protect eyes. (NOTE: Common eye
glasses are not safety glasses.)
Personal protection. Before operating the machine, remove tie, rings, watch and other jewelry and roll
up sleeves above the elbows. Remove all loose outer clothing and confine long hair. Protective type
footwear should be used. Do not wear gloves.
Guards. Keep the machine guards in place for every operation for which they can be used. If any
guards are removed for maintenance, DO NOT OPERATE the machine until the guards are re-installed.
Work area. Keep the floor around the machine clean and free of scrap material, saw dust, oil and other
liquids to minimize the danger of tripping or slipping. Be sure the table is free of all scrap, foreign material and tools before starting to cut. Make certain the work area is well lighted and that a proper exhaust
system is used to minimize dust. We recommend the use of anti-skid floor strips on the floor area where
the operatornormally stands and that each machine’s work area is marked off. Provide adequate work
space around the machine.
Operator position. Maintain a balanced stance and keep your body under control at all times. Do not
stand in line with the saw blade or work piece and do not allow anyone else to do so. Never climb on or
near the saw.
Do not overreach. Use a support table or have a helper or “tailman” take stock away from the back
side of the blade.
Housekeeping. Before turning on machine, remove all extra equipment such as keys, wrenches, scrap,
and cleaning rags away from the saw.
Careless acts. Give the work you are doing your undivided attention. Looking around, carrying on a
conversation, and “horseplay” are careless acts that can result in serious injury.
Disconnect machine before performing any service or maintenance or when changing blades. A
machine under repair should be RED TAGGED to show it should not be used until the maintenance is
complete.
Alignment. Check the alignment of the splitter, fence and miter slot to the blade. A caution decal is
installed on each guard and splitter to remind the operator of the dangers of mis-alignment.
Maintain tools in top condition. Check the saw blade for cracks or missing teeth. Do not use a
cracked or dull blade or one with missing teeth or improper set. Make sure the blade is securely locked
on the arbor.
Hand safety. Keep hands clear of the blade area. Do not reach past the blade to clear parts or scrap
with the saw blade running. Never saw free hand. Avoid awkward operations and hand positions where
a sudden slip could cause your hand to contact the blade.
Safety devices. Always use the splitter, blade guard, push stick and other safety devices for all operations where they can be used. On operations such as dadoing or molding where the blade guard cannot
be used, use feather boards, fixtures and other safety devices and use extreme caution. Reinstall the
splitter and blade guard immediately after completing the operation that required their removal.
Saw blade rotation. Be sure the saw blade rotates clockwise when viewed from the motor side (left
side) of the machine.
Adjustments. Make all adjustments to the machine and operational setup with the power off. Never
remove the insert with the blade running.
Material condition. Do not attempt to saw boards with loose knots or with nails or other foreign material, on its surface. Do not attempt to saw twisted, warped, bowed or “in wind” stock unless one edge has
been jointed for guiding purposes prior to sawing.
Large stock. Do not attempt to saw long or wide boards unsupported where spring or weight could
cause the board to shift position.
Job completion. If the operator leaves the machine area for any reason, he should turn “off” the power
to the table saw motor and wait until the saw blade comes to a complete stop before his departure. In
addition, if the operation is complete, he should clean the table saw and the work area. NEVER clean off
the table saw with power “on” and NEVER use the hands to clear sawdust and debris; use a brush.
If you are not thoroughly familiar with the operation of this circular sawbench, obtain advice from your
supervisor, instructor or other qualified person.
Drugs, alcohol, medication. Do not operate this machine while under the influence of drugs, alcohol,
or any medication.
Health hazards. Some dust created by power sanding, sawing, grinding, drilling and other construction
activities contains chemicals known to cause cancer, birth defects or other reproductive harm. Some
examples of these chemicals are:
* Lead from lead-based paint.
* Crystalline silica from bricks and cement and other masonry products.
* Arsenic and chromium from chemically-treated lumber.
Your risk from these exposures varies, depending on how often you do this type of work. To reduce your
exposure to these chemicals, work in a well-ventilated area, and work with approved safety equipment,
such as those dust masks that are specifically designed to filter out microscopic particles.
Use proper extension cord: Make sure your extension cord is in good condition. When using an extension cord, be sure to use one heavy enough to carry the current your product will draw. An undersized
cord will cause a drop in line voltage resulting in loss of power and overheating. If in doubt, use the next
heavier gauge the smaller the gauge number, the heavier the cord.
General Safety Procedures for Table Saw
This machine has been built exclusively for woodworking. Do not alter the design of the machine or use
it for purposes not intended by the manufacturer. The manufacturer is not liable for damage or injury,
which results from incorrect assembly, operation or electrical connections. This machine must be operated under strict safety regulations. This is the only way to reduce the risk of accidents.
Location
Certain types of woods. press boards, etc. produce hazardous dust emissions when being processed.
For this reason, processing procedures must be performed with an exhaust unit (air speed at the connection points: 20m/s) Be sure to switch on the machine and the exhaust unit simultaneously. The main
cable plug must be connected as appropriate for the electrical installation and must have an earth lead
(or a directly earth conductor for 380 V). It is advisable to have a qualified electrical connection.
Appropriate lighting must be provided in the work area.
The Operator
Read the operating manual carefully to prevent machine accidents. Never work while under the influence of drugs, alcohol or medications. Wear tight-fitting work clothes, safety goggles and safety shoes
and tie back long hair. Remove rings, wrist watches and bracelets before working.
Ear protection is recommended. Never climb onto the machine table: the machine may fall and cause
injuries.
Keep children and visitors out of the work area.
Before working
Check that the sawing tool type is suited for the intended work. Immediately replace damaged or dull
sawing tools. Only work with the appropriate standard accessories. Always work with well-sharpened
sawing tools increase the risk of wood kick back. Note the correct rotational direction. As a general rule,
check that sawing tool wrenches and other items have been removed. Check that the sawing tool can
rotate freely and does not contact the limit stop, the safety equipment, the work piece or other objects.
Keep out of the kick-back zone.
While working
Wood must be hand fed uniformly and without jerking into the sawing tool, slightly more slowly when
processing hard wood or work pieces, which produce large amounts of dust. Never move the work piece
during a processing operation. Avoid uncomfortable working stances to reduce the risk of contacting the
rotating sawing tool. Do not bend over the rotating sawing tool. Remove debris from the machine table
only when the machine is off. Never use the machine table as a worktable while the sawing tool is rotating.
After working
Never leave the machine operating without supervision. Remain at the machine until the sawing tool has
come to a complete stop. Remove debris and clean the machine and surrounding area so that the
machine is ready to use the next time.
Machine maintenance
Unplug the mains cable before any mechanical or electrical work is per-formed or when the sawing tool
is changed. Regularly lubricate mechanical parts: threaded rods, gears, driving chains, hinges, sliding
parts,etc.
Grounding Instructions
Caution: This tool must be grounded while in use to protect the operator from electric shock.
In the event of a malfunction or breakdown, grounding provides a path of least resistance for electric
current to reduce the risk of electric shock. This tool is equipped with an electric cord having an
equipment-grounding conductor and a grounding plug. The plug must be plugged into a matching outlet
that is properly installed and grounded in accordance with all local codes and ordinances.
Do not modify the plug provided. If it will not fit the outlet, have the proper outlet installed by a qualified
electrician.
Improper connection of the equipment-grounding conductor can result in a risk of electric shock. The
conductor, with insulation having an outer surface that is green with or without yellow stripes, is the
equipment-grounding conductor. If repair or replacement of the electric cord or plug is necessary, do not
connect the equipment-grounding conductor to a live terminal.
Check with a qualified electrician or service personnel if the grounding instructions are not completely
understood, or if in doubt as to whether the tool is properly grounded. Use only three wire extension
cords that have three-prong grounding plugs and three-pole receptacles that accept the tool’s plug.
Repair or replace a damaged or worn cord immediately.
ASSEMBLY INSTRUCTIONS
Tools Required.
10mm Spanner.
13mm Spanner.
4mm Hex Key.
5mm Hex Key.
6mm Hex Key.
8mm Hex Key.
Straight Edge.
Set Square.
Phillips Screwdriver.
Flat Bladed Screwdriver.
Unpacking the Machine.
After removing the top of the packing case remove all loose accessories and put to one
side for later use. Remove the two bolts securing the machine to the wooden base (fig 1)
using a 13mm spanner.
Fig.1
Fig.2
With assistance tilt the machine and remove all accessories from inside the machine
(fig 2). Remove the two metal plates from the base of the machine using an 8mm hex key
(fig 3)
With the machine tilted screw the four adjustable feet into place on all four corners on the
bottom of the machine (fig 4)
You are now ready with assistance to lift the machine off the wooden base.
Fig.3
Fig.3
Fig.4
Assembly
Fit the rise and fall handle (part no 58) (fig 5) and the blade tilt handle (part no 58) (fig 6)
using the 5mm hex key supplied.
Fig.5
Fig.6
Fit the side extension table to the saw table using the four M8 bolt that you will find
screwed into the cast iron saw table (fig 7). Use a straight edge to ensure the side table
is level with the cast iron saw table (fig 8) and tighten bolts using a 13mm spanner.
Fig.7
Fig.8
Fit the rear extension table using the fasteners supplied. Use a straight edge to ensure
that the extension table is level with the cast iron saw table (fig 9)
Fig.10
Fig.9
Fig.12
Loosen the four M6 bolts using a 10mm spanner (fig10) then slide aluminium extrusion
into place (fig 11 and 12) then re-tighten the M6 bolts.
Fig.11
Fig.12
Remove one end stop from the aluminium extrusion using a 6mm hex key (fig 13) and
slide sliding table into place (fig 14) replace end stop and re-tighten.
Fig.13
Fig.14
Fix the aluminium extrusion with attached metric scale to the front of the machine using
the cross head screws provided. Use a straight edge to ensure zero on the scale is in
line with the right hand side of the saw blade (fig 15)
Fig.15
Fig.16
Loosely attach the leader pole (part no 35) to the machine (fig 16) then slide the rip fence
onto the leader pole (fig 17)
Fig.17
Fig.18
Clamp the rip fence onto the leader pole with the rip fence 5mm away from the saw blade
(fig 18) Set the leader pole using the five adjuster nut (fig19) to ensure the rip fence is
parallel to the blade then tighten with a 13mm spanner.
In order to fit the angle fence to the sliding table you will need the five components shown
(fig20)
Fig.19
Fig.20
Slide the two short aluminium sections (part no 15) onto the angle fence extrusion (Fig
21)
Drop work clamp through Short aluminium section (part no 15) and into the holeFig.24
drilled
into the sliding table (fig 22) and secure with the grub screw using a 4mm hex key (fig 23)
Fig.21
Fig.22
Fig.25
Fig.23
Using
a set square (fig24) adjust the back stop forFig.28
the angle fence with a flat bladed
Fig.26
screwdriver (fig25) so that the angle fence is at 90 degrees to the blade when the back of
the angle fence is against the stop, tighten the back stop up with a 4mm hex key.
Fig.24
Fig.25
Fix the end stop onto the angle fence (fig 26)
Fig.31
Fig.26
Fig.32
Fig.33
Fit blade guard (fig27) and extraction pipe support using the fasteners supplied (fig28)
then connect the extraction pipe (fig29)
Fig.27
Fig.29
Fig.28
Malfunctions
Machine vibrates
Clamping levers for height and diagonal adjustment are not locked.
Sawing tool is not tightly screwed.
Cuts are not clean/wood is burned
Sawblade is dull or incorrectly mounted.
Rip fence is not parallel to the sawblade.
Rapid sawing tool wear
Sawing tool is incorrectly sharpened.
Contaminated wood (cement, sand, nails etc...).
Motor becomes too warm (It is too hot to touch with bare hands, it continuously shuts itself off.)
By all means have a qualified electrician inspect the motor.
Machine comes to a stop
Drive belt is slipping and needs replacing.
Motor Overloading (feeding too rapid, sawblade is dull).
Wood is raised by the rear side of the saw blade
Rip fence not parallel.
Riving knife is not aligned.
The saw height is difficult to adjust
Thoroughly clean and lubricate the threaded rod, gears and slide tracks.
Check the operation of the clamping lever.
Miscellaneous
Bearings make unusual noises. Inspect the bearings and replace if necessary.
Check the tension of the poly-v belt (poly-v belts are
accessible when the exhaust cover is removed).
Please dispose of packaging for the
product in a responsible manner. It is
suitable for recycling. Help to protect the
environment, take the packaging to the
local amenity tip and place into the
appropriate recycling bin.
Only for EU countries
Do not dispose of electric tools together
with household waste material!
In observance of European Directive
2002/96/EC on waste electrical and
electronic equipment (EEE) and its
implementation in accordance with
national law, electric tools that have
reached the end of their life must be
collected separately and returned to an
environmentally compatible recycling
facility.
Your local refuse amenity will have a
separate collection area for EEE goods.