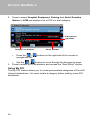
1
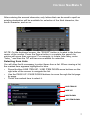
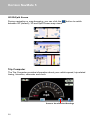
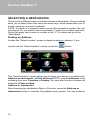
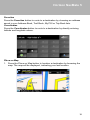
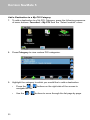
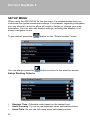
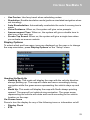
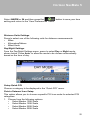
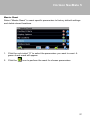
ADVUV630
NavMate 5
Navigation Instructions
DEST
NAV
PWR-VOL
A/V
INPUT
Horizon NavMate 5
NAVMATE 5 INTRODUCTION
We hope that you enjoy using your new ADVUV630 navigation system. This
manual is designed to help you get the most out of your system. This
navigation system leads you straight to your destination. You can navigate
and plan your route with an easy-to-use and intuitive interface, plan your trip
to suit your personal preferences and interests, and find and save (bookmark)
interesting destinations before you begin your trip.
Key Features
•
•
•
•
•
•
•
•
Powered by Horizon NavMate 5
Tele Atlas Map Data
11 million POI (Point Of Interest)
Speed Sensitive Zoom
3D Landmarks
Female/Male TTS Voice Guidance
Female/Male Recorded Voice Guidance
Turn by Turn Voice Guidance
Specifications
•
•
•
•
SiRF Prima 600 MHz processor
SDRAM - 256MB
WIN CE 6.0
Storage Internal SD Card 4 Gigabytes
About GPS and GNSS
The ADVUV630 uses a vehicle GPS (Global Positioning System)-based
navigation device which utilizes digital map data to guide you from your
selected location A to location B, using location information obtained from a
Global Navigation Satellite System (GNSS).
A GNSS consists of a set of satellites that transmit high-frequency radio
signals containing time, direction, and distance data that can be picked up by
a receiver, allowing users to pinpoint their precise locations anywhere around
the globe. Navigation Satellite Receivers (GPS devices) use this transmitted
information to calculate an exact location on the earth. Every point on Earth
can be identified by latitude and longitude. The receiver uses the information
sent by at least three satellites and determines the coordinates of the
receiving device.
By comparing the time the signals were transmitted from the satellites and the
time they were recorded, the receiver calculates how far away each satellite
is. The distance of the receiver from three or more satellites reflects its
1
Horizon NavMate 5
position on the surface of the planet. Using these distance measurements, the
receiver might also be able to calculate speed, bearing, trip time, distance to
destination, altitude, etc. The GPS position may be displayed as a point on a
digital map (at least three satellites' signals must be received) and as the GPS
device moves the corresponding trace is displayed as well.
Please keep in mind that although the radio signals of navigation satellites will
pass through clouds, glass, plastic, and other lightweight materials, satellitenavigation receivers will not work underground or in some enclosed spaces.
Horizon NavMate Navigation / Tele Atlas Map Data
The ADVUV630 is pre-loaded with Horizon NavMate 5 and Tele Atlas map
data. The map data covers the continental US.
The initial GPS location lock is best established when your vehicle is parked.
If the device is in motion, the signal can take longer to initially connect. Once
the initial coordinates are established, the software will follow you as you
move and navigate.
NOTE: It may take up to 5 minutes to establish the first connection.
Subsequent connections will be faster (30 seconds to 1 minute), but if you
have not used the unit for several days or are very far away from the last
location you used it, it may take up to 5 minutes again to find a strong signal.
2
Horizon NavMate 5
SAFETY INFORMATION
User Agreement
When the navigation system is first access, you will see the following
message, warning you to operate your navigation system appropriately:
You must agree to the above notice before operating the ADVUV630
navigation system. Touch the bar labeled “Press to accept.” to proceed to the
Main Menu.
Driver Safety Rules
The following safety rules must be followed to prevent accidents that can
result in injury or death to yourself or others:
• The driver should operate the device only when the vehicle is stopped.
Only a vehicle passenger should operate the device while the vehicle is
moving. When driving, the need to view the display is minimal. Voice
prompts will guide you to your destinations.
• It is your responsibility to comply with all traffic laws.
• The ADVUV630 is designed to assist you in the process of reaching your
destination. It is not a substitute for attentiveness and good judgement. It
is your responsibility to disregard any unsafe, hazardous, or illegal route
suggestions.
• The device does not include, analyze, process, consider, or reflect any of
the following:
a. Legal restrictions (such as vehicular type, weight, height, width, load
and speed restrictions);
b. Road slope or grade, bridge height, width, weight, or other limits;
c. Population density;
d. Neighborhood quality or safety;
3
Horizon NavMate 5
•
•
•
4
e. Availability or proximity of law enforcement, emergency rescue,
medical, or other assistance;
f. Construction work zones or hazards;
g. Road or lane closures;
h. Road, traffic, or traffic facilities' safety or condition;
i. Weather conditions;
j. Pavement characteristics or conditions;
k. Special events;
l. Traffic congestion.
While every attempt is made to ensure that the database is accurate,
roadways, points of interest, and business and service locations may
change over time.
Do not use the ADVUV630 to navigate to a police station, hospital, etc. in
an emergency. Call 911 for assistance.
Laws in some states prohibit wearing stereo headphones or may prohibit
use or placement of a navigation device while operating a motor vehicle.
Please contact your state's Department of Motor Vehicles for information.
Horizon NavMate 5
BASIC OPERATION
Head Unit Button Functions
Accessing the Navigation Software
Press the SRC button and select the NAV icon to access navigation mode.
Selecting / Listening to a Source while Navigating
While navigating, other sources may be selected and listened to such as AMFM Tuner, CD, etc. To listen to another source while navigating, press the
SRC button and then select a source from the Source Menu. Navigation voice
prompts will be heard automatically, although the navigation map cannot be
seen. To view the navigation screen, but continue to listen to the selected
source, press the NAV button or choose the navigation source from the
SOURCE menu.
Acquiring a Satellite Signal
Drive your vehicle to an open area where the GPS signal can be clearly
received and park the vehicle. If the device is in motion, the signal can take
longer to initially connect.
With the ignition on, verify that the "GPS" indicator is green. It may take up to
5 minutes to establish the first connection. Subsequent connections will be
faster (30 seconds to 1 minute), but if you have not used the unit for several
days or are very far away from the last location you used it, it may take up to 5
minutes again to find a strong signal. If you cannot acquire the signal, drive to
another location. If the signal is still unobtainable, check your antenna
installation.
Once a GPS signal has been established, verify that the information display
clock time (time displayed on the radio) matches the navigation system clock.
With an established GPS signal, the software will follow you as you move and
navigate.
The GPS symbol (
)may change colors indicating the strength of the
signal. The GPS symbol colors mean:
• Green - GPS signal is free from obstruction and is being received
regularly - at least four satellites are being received.
• Yellow - GPS signal is partially obstructed which means only three
satellites are being received.
• Red - GPS signal is unavailable, meaning two or fewer satellites are
being received.
5
Horizon NavMate 5
Using the Keyboard
Keyboard Command Buttons
Table 1: Keyboard Command Buttons
Press to backspace.
Press to switch to City Name entry.
Press to switch to Street Name entry.
Press to switch to Postal Code entry.
Press to add a space when entering a multi-word location.
When applicable, the specials characters button appears to the right
of the space button, allowing to complete your entry of a business
name. Press to view the special characters keyboard.
Press to confirm current entry and begin navigation.
Press to return to the previous screen.
Look Ahead Feature
Your navigation system offers a convenient interactive look-ahead search
function to prevent misspelling. Only keys that lead to a search result can be
pressed – all others are greyed out.
6
Horizon NavMate 5
After entering the second character, only letters that can be used to spell an
existing destination will be available for selection of the third character, the
fourth character, and so on.
SPACE
NOTE: On the keyboard screen, the “SPACE" button is located in the bottom
center of the screen. Press the Space button to complete the search for
entries with more than one word. For example, to locate Lake Mary, enter
"Lake_" and then the "M" will become available for selection.
Selecting from Lists
You will often find it necessary to select items from a list. When viewing a list,
the marked item appears highlighted in blue.
• Press the blue LINE ITEM UP / LINE ITEM DOWN arrow buttons on the
right side of the screen to navigate the list.
• Use the PAGE UP / PAGE DOWN buttons to move through the list page
by page.
• Touch the marked item to select it.
LINE ITEM UP
PAGE UP
PAGE DOWN
LINE ITEM DOWN
7
Horizon NavMate 5
NOTE: Some lists keep track of the five most recently used selections, which
are placed at the top of the screen. This feature allows you to quickly select
popular choices.
8
Horizon NavMate 5
Function Buttons
Table 2: Common Command Buttons
Press the map icon to view your current location on the map or to return to
map mode.
Zoom in the map to show a smaller area.
Zoom out the map to show a larger area.
Press the return icon on any screen to return to the previous screen.
Press the Menu icon to access the Main Menu.
After panning map, press to view a list of locations near the selected position.
Press to repeat voice prompt.
Press to go up one line item while viewing a list.
Press to go down one line item while viewing a list.
Press to view the keyboard for direct entry.
Press to go up one page while viewing a list.
Press to go down one page while viewing a list.
Press to mute voice commands.
Press to begin search based on the selected parameters.
9
Horizon NavMate 5
Main Menu
The main menu, titled “Select location” is your central point of access to all
functions of your navigation system. It allows you to set your destination,
manage your favorites and control all settings of your device.
The “Select location” menu consists of the following options:
• Address or Intersection: Travel to address entered using on-screen
keypad.
• Point of Interest: Browse or search for Point of Interest.
• History: Return to previous destination.
• Favorites: Travel to favorite location.
• Coordinates: Travel to destination specified by coordinates.
• Place on Map: Browse map to choose destination.
•
•
•
•
10
(Home Address): Return to Home Address.
(Setup): Configure your navigation to suit your needs. Define
general settings (e.g. time, language, or system of measurement),
configure your map (e.g. 2D or 3D mode, day or night mode, map
complexity) or load a map of a different region, set the route options (e.g.
choose to avoid or allow toll roads or ferries, or change the volume (see
“Setup Menu” on page 112).
(Office Address): Route to Office Address.
(Trip Computer): Display Speed, Trip, Odometer and Clock
readings.
Horizon NavMate 5
Navigation Screen
The map is the core component of your ADVUV630 navigation system.
During navigation, it is centered on your current location by default, provided
you have a GPS connection.
In Tracking mode, the map follows your actual position (GPS position),
displaying information about your geographic position, distance to your
destination, etc. The GPS position is indicated by a red/blue arrow.
You can also browse the map, view businesses and other Points of Interest
(POI, and then choose them for routing and navigating. The map knows two
basic states: Tracking and Browsing.
Map Tracking Screen
During navigation, the screen displays your route (in yellow) and your
surroundings. A red/blue arrow identifies your current position. The upcoming
maneuver is visualized in the upper left corner, along with the distance and
approximate time before that turn. When you come up to a turn, you will hear
a voice command at the appropriate time.
Next Turn/Junction/Exit Number
Distance to
Destination
Repeat
Voice Prompt
Next Maneuver
Distance to Next Maneuver Time Before Next Maneuver
Zoom Out
Estimated
Arrival Time
Zoom In
Press for 2D/3D/Split Screen View
11
Horizon NavMate 5
Adjust Horizon Angle
Miles Per Hour
Current Position
Adjust Horizon Angle
Mute Voice Prompts
Map Scale
Compass Heading
Menu Button
GPS Signal Strength
Current Location
Map Location
On the left, additional information, including the map scale and compass
orientation (N, S, E, W) is displayed.
• To zoom in or out, press the + or – icons (Map Scale indicates zoom
value).
•
To return to the Main Menu, press the
•
•
•
To add a POI destination to your route, press the
button.
For one-way streets, the transit direction is indicated with a red arrow.
For more information about navigation, see “Navigating” on page 94.
12
button.
Horizon NavMate 5
Map Browsing Screen
Touch (and hold) the screen to access Map Browsing Mode. Use a stylus or
your finger to browse the map. Your position is identified as the center of the
crosshair.
Business
Icons
Crosshair
Crosshair Location
•
To zoom in or out, press the + or – icons.
•
To return to the map tracking mode, press the
button.
13
Horizon NavMate 5
2D/3D/Split Screen
During navigation or map browsing, you can click the
between 2D (default), 3D and Split Screen map views.
button to switch
2D
3D
SPLIT
Trip Computer
The Trip Computer provides information about your vehicle speed, trip related
timing, elevation, odometer and clock.
Press to View Detailed Readings
14
Horizon NavMate 5
•
Press the “i” icon to view detailed readings for each field.
•
Press the Press the
navigate the list.
•
•
Use the
/
buttons to move through the list page by page.
Touch the marked item to select it.
•
Press the
/
buttons on the right side of the screen to
button to reset the current reading.
15
Horizon NavMate 5
SELECTING A DESTINATION
There are five different ways to find and choose a destination. Some methods
allow you to select from a list using the arrow keys, while others allow you to
search using an on-screen keyboard.
NOTE: If a route is in progress when you exit the navigation system, the unit
will prompt “Do you want to resume guidance?” when you resume operation.
Press the green check mark to resume or the “X” to cancel and go to the
“Main Menu.”
Finding an Address
Access the “Select location” screen to begin locating an address. If you
cannot see the “Select location” screen, press the
button.
The “Select location” screen allows you to begin your search by entering the
Address or Intersection, a Point of Interest (POI), map Coordinates, or by
choosing from your Favorites or History. You may also choose a location by
selecting a Place on Map.
Address or Intersection
After choosing the destination State or Province, press the Address or
Intersection button to view the City address entry screen. You can locate an
16
Horizon NavMate 5
address or intersection in the previously selected state beginning with the
City, Street Name, or Postal Code.
To toggle between City, Street Name and Postal Code entry, press the
/
/
button.
1. Begin entering the city by typing the City, Street Name or Postal Code.
The navigation software will utilize it’s look-ahead feature and only offer
characters for existing cities as you type. Once the city is recognized as
the only possible option based on the characters you entered, you will
automatically be prompted for the street.
2. Enter the Street name using the same method described above. Once the
street name is recognized, you will automatically be prompted for the
street number.
3. Enter the street number using the same method described above.
4. Press the
button to select the street number and access the
“Start Route” screen.
Point of Interest
The POI finder allows you to quickly find points of interest, like gas stations
and restaurants, in a database of millions of POI’s. These places can be near
your current position or near a selected State or Province. See “Selecting a
Point Of Interest” on page 84 for information about locating a Point of Interest.
History
Previous destinations are automatically saved to memory as “History”. This
feature helps you quickly locate the address of and return to a previous
destination. The origin of the last calculated route is also stored for easy
return to your starting point.
17
Horizon NavMate 5
1.
From the “Select location” menu, choose History.
2. A list of recent locations will appear on the screen.
•
Press the
/
navigate the list.
buttons on the right side of the screen to
• Use the
/
buttons to move through the list page by page.
• Press the Garbage Can icon to delete the highlighted item.
3. Press to select a recent destination from the “History” list and view the
“Start Route” screen.
4. Continue navigation as instructed in the previous sections.
NOTE: The “History” list stores the last 15 addresses or destinations. After 15
entries, the oldest destination will be deleted and the newest entry added to
the top of the list. Recent addresses cannot be deleted manually.
18
Horizon NavMate 5
Favorites
Press the Favorites button to route to a destination by choosing an address
saved in your Address Book, Trail Book, My POI or Trip Book lists.
Coordinates
Press the Coordinates button to route to a destination by directly entering
latitude and longitude values.
Place on Map
1. Press the Place on Map button to location a destination by browsing the
map. The map will be displayed, indicating your last location:
19
Horizon NavMate 5
2. Touch any part of the map area to enter browsing (panning) mode and
navigate the map. Use the +/– buttons to zoom in/out.
3. Press the
button to view and select the address nearest the
crosshair, or press Quick POI to locate a POI in the visible map area.
20
Horizon NavMate 5
4. Select an address from the “Select” list to view the “Start Route” screen,
where you can begin navigation, save the address for later, select a
different POI or modify routing criteria.
Navigating to your Home or Office Address
Located on the “Select location” screen, the Home Address and Office
Address buttons allow you to quickly navigate to your home or office address
from your current location.
•
Touch the
address.
(Home Address) icon to navigate to a saved home
•
Touch the
address.
(Office Address) icon to navigate to a saved office
21
Horizon NavMate 5
If the home or office address is not already saved, a screen like the following
will appear:
Press the check mark to access the “Save location” screen. From here you
can enter your preferred home or office address and save it for future use.
Choosing a Location from your Address Book
1. On the “Select location” menu, press Favorites.
2. Press Address Book to view a list of Address Book entries.
3. Select an Address Book entry.
• Press to highlight an Address Book entry.
22
•
Press the
/
navigate the list.
•
Use the
/
buttons on the right side of the screen to
buttons to move through the list page by page.
Horizon NavMate 5
4. Press Start Route to begin navigating to the chosen Address Book
destination.
Following a Trail
The Trail Book feature allows you to create a path using map points when
navigation data is not available. To navigate to a saved Trail, perform the
following steps:
1. Press the
button to view the “Select location” screen.
2. Press Favorites.
3. Press Trail Book to view a list of existing trails.
23
Horizon NavMate 5
4. Press the Trail you would like to follow and a list of trail points will be
displayed.
5. Press to choose any Waypoint as the stating point.
6. Choose Start Route from the “Start Route” screen.
7. The system will display a dotted line from your current location to the
starting point. Follow the dotted line to begin traveling along the trail.
You can press the
cancel the route.
24
button and then press Stop Trail at any time to
Horizon NavMate 5
SELECTING A POINT OF INTEREST
From the main menu, press the Go To... button and then press the Point of
Interest button. The “POI Search Criteria” window will be displayed:
The previously selected State or Province is automatically selected for the
POI search. Press the State or Province button to select a different State or
Province. See “Address or Intersection” on page 75.
Searching for a Specific POI
To narrow your list of POI search results, you can enter a POI Category, City
and/or Name. Entering a Category, City, or POI Name is optional.
Select POI Category
1. On the “Point of Interest” screen, press the Category button to view a list
of possible categories.
•
Press the
/
navigate the list.
buttons on the right side of the screen to
25
Horizon NavMate 5
•
Use the
/
buttons to move through the list page by page.
2. Click an item on the list to select that category OR press the
button to access the keyboard and enter a category directly.
Select POI City
1. Press the City button to enter the city in which you would like to find a
point of interest.
2. Begin typing the City name. The navigation software will utilize it’s lookahead feature and only offer characters for existing cities as you type.
Once the city is recognized as the only possible option based on the
characters you entered, the city name will appear at the top of the screen.
3. Press the
Interest” menu.
button to select the City and return to the “Point of
Select POI Name
To retrieve a very specific list of POI destinations, you can enter part or all of
the POI name directly. Please note that the Name screen will allow you to
enter any possible POI, but the system will return the message “No POI
Found” if the selected name does not fall within the selected category or city.
NOTE: Since business information changes regularly, not all POI categories
are available in all areas and some POI’s may not be listed for all categories.
In addition, the search radius may be restricted to minimize the search time.
26
Horizon NavMate 5
TO BEGIN NAVIGATION:
After entering the desired POI search parameters, perform the following steps
to navigate to the chosen POI.
1. Press the
button.
2. Press Sort by Distance or Sort by Name to retrieve a list of POI’s within
the parameters you entered.
•
Press the
/
navigate the list.
buttons on the right side of the screen to
• Use the
/
buttons to move through the list page by page.
3. Press to select a POI destination and access the “Start Route” screen.
Browsing POI Destinations
1. Press the
button without entering Category, City or Name criteria to
display a menu of six common POI categories from which you can
choose.
27
Horizon NavMate 5
2. Press to select Hospital, Restaurant, Parking Lot, Hotel, Gasoline
Station or ATM and display a list of POI’s in that category.
POI Address
POI Name
Straight Line Distance
•
Press the
/
navigate the list.
Phone Number
buttons on the right side of the screen to
• Use the
/
buttons to move through the list page by page.
3. Press to select a POI destination and access the “Start Route” screen.
Using My POI
The My POI feature allows you to create personalized categories of Point Of
Interest destinations. You must create a category before adding a new POI
destination.
28
Horizon NavMate 5
Add a New POI Category
1. To access the My POI function, press the My POI button on the “Favorites” menu.
If no custom POI categories exist, the system will display “No POI Found.
Add?”. Press the green check mark button to go directly to the “Add Category” screen and continue with Step 4. If personal POI’s exist, continue to
step 2.
2. Press the
button to create a new POI or the
highlighted POI.
button to edit the
29
Horizon NavMate 5
3. Press the
•
•
button to enter a name for the new Category.
Press the
button to clear the default entry, if desired.
Use the keyboard to enter the name of your new Category. (See
“Using the Keyboard” on page 66.)
4. Press the
button to save the Category name and go to the
“Setup Display” screen.
5. Determine map indicators and settings for your new Category.
• Name: Press to edit the POI category name.
• Marker: Press to select the marker that will represent POI
destinations in your new Category.
• Sound: Press to select a sound to be heard when you are nearing the
destination (based on Distance).
• Distance: Press to choose the distance from the destination at which
you would like the chosen sound to be played.
30
Horizon NavMate 5
•
Scale: Choose the scales (zoom levels) at which the POI will be
visible.
6. Press the green check mark to confirm and add your new POI Category
to the directory.
Edit/Delete at My POI Category or Destination
The following options are available using the buttons at the bottom of the
“Category” and “My POI” screen:
•
: Rename the highlighted POI category or destination.
•
: Add a new POI category or destination.
•
: Return to the “Select location” menu.
•
: Delete the highlighted POI category or destination.
•
: View the “Setup” menu.
•
: Return to the previous screen.
31
Horizon NavMate 5
Add a Destination to a My POI Category
7. To add a destination to a My POI Category, press the following sequence
of menu buttons: Favorites > My POI from the “Select location” menu.
8. Press Category to view custom POI categories.
9. Highlight the category to which you would like to add a destination.
32
•
Press the
/
navigate the list.
•
Use the
/
buttons on the right side of the screen to
buttons to move through the list page by page.
Horizon NavMate 5
10. Press the category name to view POI destinations stored for that
category.
If no POI destinations are stored for the chosen category, the system will
display “No POI Found. Add?”.
11. Add a POI destination using the “Save location” screen
• If you are adding the first POI destination for the selected category,
press the green check mark button after the “No POI Found. Add?”
message to view the “Save location” screen.
• If at least one POI destination exists for the selected category, the
“My POI” screen lists those destinations. Press the
view the “Save location” screen.
button to
12. Refer to information in the section titled “Selecting a Destination” on
page 75 to locate the home or work address on the map.
33
Horizon NavMate 5
13. After locating the address, the “Select MyPOI parameters” screen
appears.
Use this screen to add additional information about your POI:
• Press the name/address icon to edit the name of your POI.
• Press the category box to select a custom category for your new POI.
• Press the phone number icon to use the on-screen keypad to enter
the phone number for the new POI.
14. Press the
main menu.
34
button to save the new POI destination and return to the
Horizon NavMate 5
NAVIGATING
The powerful navigation capabilities of your ADVUV630 will guide you along
the shortest or quickest route from A to B – with voice commands and in 3D
(optional).
To begin navigation, select a location beginning with the “Select location”
main menu (see “Selecting a Destination” on page 75).
Route Calculation and Guidance
After choosing a destination, the system will determine a route based on your
preferences in the “Setup” menu. (See “Setup Menu” on page 112.)
The status bar at the top of the screen indicates the route calculation
progress.
Once route calculation is complete, you will be instructed to “Please proceed
to the highlighted route” (if you are not already on the route). Once on the
highlighted route, guidance information is delivered on-screen and via voice
prompts. The guidance information is continuously undated to indicate your
progress.
35
Horizon NavMate 5
Intersection Zoom
As you approach an intersection, the map will automatically zoom in to show a
close-up view of the roads near the intersection point on the right side of the
screen.
Route Interruptions
If you intentionally or accidentally leave the current route, the NavMate
software will automatically recalculate the route and prompt you to get back
on track to your destination.
You can disable this feature by checking the “Auto Recalculation” option off
(X) in the Setup menu, under “Setup Routing Criteria.”
If you leave the route to make a stop, the NavMate software remembers your
destination and asks you if you want to continue your route.
Turn by Turn
While navigating, press the next maneuver arrow on the top left corner of the
map screen screen to view a turn-by-turn list of upcoming maneuvers.
36
Horizon NavMate 5
Press the
button to return to the map screen.
Browsing the Map During Navigation
You can browse the map while navigating without interrupting the current
route – you will still be guided through voice commands.
• To browse during navigation, touch (and hold) the screen to activate the
Map Browsing feature.
•
Press the
button to return to on-screen navigation.
Adding a Detour
If you are unable to complete the route as calculated, you can add a Detour to
the route that will allow you to stay on track to your destination.
1. To add a Detour while navigating, press the
Route” screen and then press Detour.
button to view the “Edit
37
Horizon NavMate 5
2. Press Detour to view the “Detour” screen.
3. Choose a parameter for the Detour from the on-screen list.
4. The NavMate software will recalculate the route based on your chosen
Detour information.
Arriving at your Destination
When you are near your destination, the destination is indicated by a
checkered flag symbol. A voice prompt will announce that you are
approaching your destination.
38
Horizon NavMate 5
MANAGING FAVORITES
The “Edit Favorites” menu allows you to save your home and work locations,
as well as other frequent destinations for easy recall. After entering an
address or searching for a POI, you can choose the Save option to bookmark
your selection, eliminating the need to perform repeated searches.
Edit Address Book
The “Address Book” feature allows you to store and edit address book entries.
To edit your address book, perform the following steps:
1. Press the
button to access the “Select location” screen.
39
Horizon NavMate 5
2. Press the Address Book icon.
3. The “Address Book” screen appears.
40
•
Press the
/
navigate the list.
•
Use the
•
Press the
icon to rename the highlighted address book entry.
•
Press the
icon to delete the highlighted address book entry.
/
buttons on the right side of the screen to
buttons to move through the list page by page.
Horizon NavMate 5
Edit Home/Office Address
1. On the “Select location” menu, press the
(Home Address) or
(Office Address) icon to add or replace the home or office
address. The “Save location” screen appears.
2. Refer to information in the section titled “Selecting a Destination” on
page 75 to locate the home or work address on the map.
Using the Trip Book
The “Trip Book” is a collection of trips with each trip representing a set of
multiple destinations.
Add a New Trip
1. To access the Trip Book function, press the Trip Book button on the
“Favorites” menu.
41
Horizon NavMate 5
If no trip exist, the system will display “There are no saved trips. Add?”.
Press the green check mark button to go directly to the “Enter Name of
Trip” screen and continue with Step 4. If trips exist, continue to step 2.
2. Press the
existing Trip.
button to create a new Trip or the
button to edit an
3. After pressing the
button to create a new trip, you will see the “Enter
Name of Trip” screen, shown below:
4. Use the on-screen keyboard to enter a name for your trip.
•
•
42
Press the
button to clear the default entry, if desired.
Use the keyboard to enter the name for your Trip. (See “Using the
Keyboard” on page 66.)
Horizon NavMate 5
5. The system will display “Trip is Empty. Add?”. Press the green check
mark button to access the “Save location” screen.
6. Refer to information in the section titled “Selecting a Destination” on
page 75 to add a destination to your trip. Instead of the navigation screen,
the “Select Trip to add destination” screen appears. Press the name of
the trip to which you would like to add this new destination.
7. Add additional destinations to your trip.
a. Choose Trip Book from the “Favorites” menu.
b. Press the
/
buttons on the right side of the screen to select
the trip name and view Trip Book destinations for that trip.
c. Press the
icon to add an additional destination to your trip.
d. Repeat Step 6.
43
Horizon NavMate 5
Edit Trip
1. To edit an existing Trail, choose Favorites > Trip Book from the “Select
location” menu.
2. Press the
/
buttons on the right side of the screen to select the
trip name and view Trip Book destinations for that trip.
3. Use the buttons at the bottom of the screen to make changes to your trip
destinations or to add a new destination.
44
•
Press the
/
navigate the list.
•
Use the
•
Press the
/
buttons on the right side of the screen to
buttons to move through the list page by page.
icon to rename the highlighted destination.
Horizon NavMate 5
•
Press the
trip.
icon to delete the highlighted destination from your
• Press the
icon to add an additional destination to your trip.
Delete Trip
1. To delete an existing trail. choose Favorites > Trail Book from the
“Select location” menu.
2. Highlight the trip you want to delete.
•
Press the
/
navigate the list.
•
Use the
/
buttons on the right side of the screen to
buttons to move through the list page by page.
3. Press the
icon to delete the highlighted trip.
4. Press the green check mark to confirm deletion.
Using the Trail Book
The “Trail Book” option allows adding, editing and Setup display for trail book
entries. The “Trail Book” allows you to track off-road navigation in areas
where the digital map coverage is not sufficient or missing. A trail represents a
path taken by a vehicle while the trail is being recorded. Each trail is shown on
the map as a series of dots that can be color-coded for each trail.
You can also assign names, called waypoints, to some of the dots on the trail.
These waypoints will be shown on the map. All other dots representing the
trail are recorded automatically by the NavMate application. Once the trail is
45
Horizon NavMate 5
recorded and saved, you can choose the named waypoints as future
destinations.
Add a New Trail
1. To access the Trail Book function, press the Trail Book button on the
“Favorites” menu.
If no trails exist, the system will display “There are no trails. Add?”. Press
the green check mark button to go directly to the “Name Trail Book Entry”
screen and continue with Step 4. If trails exist, continue to step 2.
2. Press the
existing Trail.
46
button to create a new Trail or the
button to edit an
Horizon NavMate 5
3. After pressing the
button to create a new trail, you will see the
“Name Trail Book Entry” screen, shown below:
4. Use the keyboard to enter the name for your Trail. (See “Using the
Keyboard” on page 66.)
5. Press the
Display” screen.
button to save the Trail name and go to the “Setup
6. If you’d like to modify the trail name, press the pencil button with the trail
name listed below to return to the “Name Trail Book Entry” screen.
Press the
button to backspace and clear the previous entry.
47
Horizon NavMate 5
7. Press Color to choose from ten colors for your dotted line guidance.
8. Press the desired color to apply that color and return to the “Setup
Display” menu.
9. Press Scale to set the map scale display preference for this trail.
10. Press the green check mark next to each scale setting to make your trail
visible at that scale.
11. Press the
button to confirm and return to the “Setup Display” screen.
12. Press the
button again to save display settings and view the map.
48
Horizon NavMate 5
13. Continue along your desired trail path and the stop the vehicle at the first
waypoint destination. Press the
button to add your current position
as a waypoint. The “Name Waypoint Entry” screen appears:
14. Use the keyboard to enter a name for your waypoint and then press
to save and return to the navigation map.
15. Continue adding waypoints along the way until your trail is complete.
16. If desired, press Waypoints to edit waypoints on your trail.
•
Press the
/
navigate the list.
buttons on the right side of the screen to
•
•
•
Use the
/
buttons to move through the list page by page.
Press the pencil icon to edit the name of the waypoint.
Press the trash can icon to delete the waypoint (you will be asked to
confirm deletion).
49
Horizon NavMate 5
17. When finished, press the
button and then choose Stop Trail.
Edit Trail
1. To edit an existing Trail, choose Favorites > Trail Book from the “Select
location” menu.
2. Highlight the trail you want to edit.
•
Press the
/
navigate the list.
•
Use the
/
buttons on the right side of the screen to
buttons to move through the list page by page.
3. Press to
button to edit the name of the highlighted trail.
4. Press the Trail name to view and edit individual waypoints.
50
Horizon NavMate 5
Delete Trail
1. To delete an existing trail. choose Favorites > Trail Book from the
“Select location” menu.
2. Highlight the trail you want to delete.
•
Press the
/
navigate the list.
•
Use the
/
buttons on the right side of the screen to
buttons to move through the list page by page.
3. Press the
icon to delete the highlighted trail.
4. Press the green check mark to confirm deletion.
Using My POI
Refer to “Using My POI” on page 87.
51
Horizon NavMate 5
SETUP MENU
When using the ADVUV630 for the first time, it is recommended that you
customize the system parameter settings. For example, regarding navigation,
you can choose to avoid or allow toll roads or ferries or change your map
orientation. You can also edit display settings, including the display of onscreen navigation icons.
To get started, press the
button on the “Select location” menu.
You can always press the
button to return to the previous screen.
Setup Routing Criteria
•
•
•
52
Shortest Time: Calculate route based on the fastest time.
Avoid Freeway: Try not to use highways when calculating routes.
Avoid Tolls: Do not use toll roads when calculating routes.
Horizon NavMate 5
•
•
•
•
•
•
Use Ferries: Use ferry travel when calculating routes.
Simulation: Enable simulation mode (perform simulated navigation when
not traveling).
Auto Recalculation: Automatically recalculate the route if a wrong turn is
made.
Voice Guidance: When on, the system will give voice prompts.
Announcement Tone: When on, the system will give a double tone to
alert you of the next turn.
Screen Tap Sound: When on, the system will give a single tone when
you activate on-screen controls.
Display Options
To select which and how many icons are displayed on the map or to change
the map orientation, press Display Options on the “Setup” menu.
Heading Up/North Up
• Heading Up: This mode will display the map with the vehicle direction
always pointing up. The map will rotate and move accordingly during
navigation while the green arrow representing the vehicle stays up and
still.
• North Up: This mode will display the map with North always pointing
upward. The map will not rotate during navigation. The green arrow
representing the vehicle will rotate and move according to the vehicle
location on the map.
On-Screen Icons
Press to turn the display for any of the following icons or information on/off:
• Display Clock
• ETA
53
Horizon NavMate 5
•
•
•
•
•
•
•
Display Status Bar
Display GPS Icon
Display Scale Icon
Display Compass Icon
Display Next Maneuver
Enlarged Intersection
Line to Destination
User Preferences
Language Settings
Press to choose from a list of available languages for on-screen text. Once a
new language is selected, you will return the initial screen and be required to
review safety information in the chosen language.
Voice Guidance
Press to choose from the following available languages for voice guidance:
• English USA (TTS) Callie
• English USA (TTS) David
• English USA Rebecca
• Espanol Mexicana (TTS) Marta
• Espanol Mexicana (TTS) Miguel
• Espanol Mexicana Maria
• Francais Canadien (TTS) Isabelle
• Francais Candien (TTS) Jean-Pierre
• Francais Canadien Josette
Set Time
The “Set Time” screen allows you to choose between AM/PM or 24 hour
(military time) clock display mode.
54
Horizon NavMate 5
Select AM/PM or 24 and then press the
button to save your time
setting and return to the “User Preferences” menu.
Distance Units Settings
Press to select one of the following units for distance measurements:
• Miles
• Kilometers/Meters
• Miles/Yards
Day/Night Settings
From the Day/Night Settings menu, press to select Day or Night mode,
shown below. Press Auto. to allow the mode to be chosen automatically
based on the time of day.
NIGHT MODE
Setup Quick POI
Choose a category to be displayed in the “Quick POI” menu.
Point of Interest Icon Setup
This option allows you to choose a specific POI icon scale for selected POI
categories.
1. Choose from the following options:
• Select Marker 100ft Scale
• Select Marker 150ft Scale
• Select Marker 250ft Scale
• Select Marker 350ft Scale
55
Horizon NavMate 5
• Select Marker 600ft Scale
2. Press to turn the setting on/off for various categories.
Location Reset
Press to reset the location of your vehicle. You will be returned to the “Select
location” screen when completed.
System
Volume
From the “System” menu, select Volume to modify the volume of voice
commands.
•
•
•
Press the + button to increase the volume.
Press the – button to decrease the volume.
Press the Sound Mute button to silence or resume the voice command
volume.
GPS Diagnostics
View satellite information for diagnostic use, including the number of satellites
currently in view and how many are being used. You can also view the GPS
time along with the current latitude and longitude.
System Information
View software version, map version and copyright information.
56
Horizon NavMate 5
Master Reset
Select “Master Reset” to reset specific parameters to factory default settings
and delete stored locations.
1. Click the red circled “X” to select the parameters you want to reset. A
green check mark will appear.
2. Click the
icon to perform the reset for chosen parameters.
57
Horizon NavMate 5
TROUBLESHOOTING
Table 3: Troubleshooting
Problem
Cause
Corrective Action
I can’t find an address Address spelled
incorrectly
Please make sure you have correctly spelled your entry. If you do
not know how an address is spelled,
simply enter the parts of the address
about which you are certain - e.g.
"Brook" for Brooklyn in New York.
Then browse the results list and look
for the address. Also make sure that
the city in which you are looking for
an address is correct. Sometimes
the official postal address differs
from the address you are looking for.
In that case, search for a known
address nearby and browse the
map.
I cannot get a good
signal
Poor antenna placement
If you have problems getting a satellite fix with GPS (you can see how
many satellites are being received
on the main menu at the bottom left),
please make sure you are outside
and the GPS antenna has good 'visibility' to the open sky. Some models
also support an additional external
active antenna. Please consult the
hardware manual of your device to
get further information on how to
obtain a GPS fix.
The ADVUV630 stops
responding
Unknown
Turn the unit off and back on. If this
does not help, reset the unit by using
a small metal object to press the
RESET button located on the front
panel of ADVUV630 (see front panel
illustration for exact location).
58
Horizon NavMate 5
59
®
Audiovox Electronics Corporation
Hauppauge, NY 11788
Technical Assistance: 1-800-323-4815
www.audiovox.com
© 2011 Audiovox
Ver. 011911
Printed in China