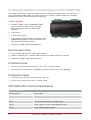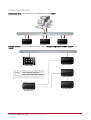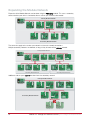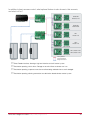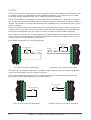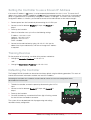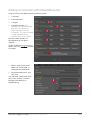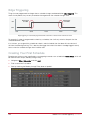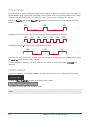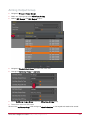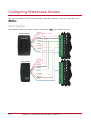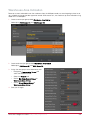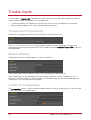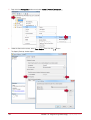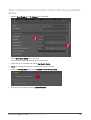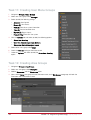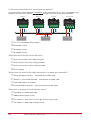
1
Study Guide Level One: Protege GX Installer Study Guide Copyright © Integrated Control Technology Limited 2003-2012. All rights reserved. No part of this document may be reproduced, photocopied, or transmitted in any form or by any means (electronic or mechanical), for any purpose, without the express written permission of Integrated Control Technology Limited. The specifications and descriptions of products and services contained in this document were correct at the time of printing. Integrated Control Technology Limited reserves the right to change specifications or withdraw products without notice. Protege® and the Protege® Logo are registered trademarks of Integrated Control Technology Limited. All other brand or product names are trademarks or registered trademarks of their respective holders. Publication Date: August 2013 2 Level One: Protege GX Installer Study Guide | August 2013 Contents Module 101: ICT Company Profile ______________________________________________ 7 About ICT ____________________________________________________________________________ 8 Review Questions ____________________________________________________________________ 12 Module 121: Protege GX Platform Introduction __________________________________ 13 Platform Focus _______________________________________________________________________ 14 Installer Certification __________________________________________________________________ 16 Review Questions ____________________________________________________________________ 19 Module 122: Protege GX Licensing ____________________________________________ 21 Licensing Structure ___________________________________________________________________ 22 Base License ________________________________________________________________________ 23 Licensed Items and Features___________________________________________________________ 24 Server License _______________________________________________________________________ 27 Software Maintenance Agreements (SMAs) ______________________________________________ 29 Review Questions ____________________________________________________________________ 31 Module 123: Protege GX System Architecture ___________________________________ 35 The Protege GX Server ________________________________________________________________ 36 Protege GX Client Software ____________________________________________________________ 37 Network Architecture _________________________________________________________________ 38 Advantages of a Server Based System __________________________________________________ 41 Protege GX and Small Sites____________________________________________________________ 42 Review Questions ____________________________________________________________________ 43 Module 124: Protege GX Hardware Overview ___________________________________ 47 The Protege DIN Rail Range ___________________________________________________________ 48 The Protege PCB Range ______________________________________________________________ 54 The Protege GX Module Network _______________________________________________________ 73 Proximity Readers ____________________________________________________________________ 82 Keypads ____________________________________________________________________________ 85 Temperature and Humidity Sensors _____________________________________________________ 89 Enclosures __________________________________________________________________________ 90 Elevator Control ______________________________________________________________________ 91 Review Questions ____________________________________________________________________ 94 Level One: Protege GX Installer Study Guide | August 2013 3 Module 126: Limitations of SE Hardware in Protege GX _________________________ 101 System Controller Compatibility _______________________________________________________ 102 Review Questions ___________________________________________________________________ 106 Module 127: Protege DIN Rail Hardware Configuration __________________________ 107 DIN Rail Hardware Setup _____________________________________________________________ 108 LED Indicators ______________________________________________________________________ 123 Review Questions ___________________________________________________________________ 129 Module 130: Protege GX Hardware Setup _____________________________________ 133 DIN Rail Controller Setup _____________________________________________________________ 134 PCB Controller Setup ________________________________________________________________ 137 Keypad Configuration ________________________________________________________________ 141 Review Questions ___________________________________________________________________ 143 Module 125: Protege GX System Design ______________________________________ 145 Identifying Requirements _____________________________________________________________ 146 Understanding Physical Design _______________________________________________________ 148 Planning the Training System _________________________________________________________ 159 Review Questions ___________________________________________________________________ 162 Module 128: Protege GX Software Installation __________________________________ 165 Protege GX System Requirements _____________________________________________________ 166 Installation Procedure ________________________________________________________________ 169 Review Questions ___________________________________________________________________ 181 Module 129: Protege GX Software Introduction_________________________________ 183 The Protege GX Services _____________________________________________________________ 184 The Protege GX User Interface ________________________________________________________ 190 Global Settings ______________________________________________________________________ 201 Review Questions ___________________________________________________________________ 203 Module 131: Hardware Programming _________________________________________ 205 Programming a Controller ____________________________________________________________ 206 Status Pages _______________________________________________________________________ 214 Troubleshooting Hardware____________________________________________________________ 219 Review Questions ___________________________________________________________________ 233 Module 132: User Management ______________________________________________ 235 Managing Users _____________________________________________________________________ 236 4 Level One: Protege GX Installer Study Guide | August 2013 Schedules __________________________________________________________________________ 245 Review Questions ___________________________________________________________________ 258 Module 133: Basic Intruder Detection _________________________________________ 261 Programming Areas__________________________________________________________________ 262 Programming Inputs _________________________________________________________________ 270 Review Questions ___________________________________________________________________ 281 Module 134: Basic Access Control ____________________________________________ 283 Programming Doors _________________________________________________________________ 284 Configuring Access Levels ____________________________________________________________ 292 Door Configuration __________________________________________________________________ 305 Review Questions ___________________________________________________________________ 314 Module 135: Configuring Intruder and Access Integration ________________________ 317 Configuring Office Access ____________________________________________________________ 318 Configuring Warehouse Access _______________________________________________________ 328 Testing the System __________________________________________________________________ 334 Review Questions ___________________________________________________________________ 336 Module 136: System Monitoring ______________________________________________ 337 Trouble Inputs ______________________________________________________________________ 338 Contact ID Monitoring ________________________________________________________________ 346 IP Monitoring _______________________________________________________________________ 353 Review Questions ___________________________________________________________________ 359 Module 137: System Commissioning __________________________________________ 361 System Commissioning Tools _________________________________________________________ 362 Keypad Testing _____________________________________________________________________ 368 Backing up and Restoring a Database _________________________________________________ 372 Review Questions ___________________________________________________________________ 381 Module 138: Programming Walkthrough _______________________________________ 383 Programming a System from Start to Finish _____________________________________________ 384 Testing the System __________________________________________________________________ 391 Step by Step Tasks __________________________________________________________________ 393 Review Questions and Answers ________________________________________________ 415 Module 101: ICT Company Profile _____________________________________________________ 417 Module 121: Protege GX Platform Introduction __________________________________________ 419 Level One: Protege GX Installer Study Guide | August 2013 5 Module 122: Protege GX Licensing ____________________________________________________ 421 Module 123: Protege GX System Architecture ___________________________________________ 425 Module 124: Protege Hardware Overview_______________________________________________ 429 Module 126: Limitations of SE Hardware in Protege GX __________________________________ 435 Module 127: Protege DIN Rail Hardware Configuration ___________________________________ 437 Module 130: Protege GX Hardware Setup ______________________________________________ 441 Module 125: Protege GX System Design _______________________________________________ 443 Module 128: Protege GX Software Installation ___________________________________________ 445 Module 129: Protege GX Software Introduction _________________________________________ 447 Module 131: Hardware Programming __________________________________________________ 449 Module 132: User Management _______________________________________________________ 451 Module 133: Basic Intruder Detection __________________________________________________ 453 Module 134: Basic Access Control ____________________________________________________ 455 Module 135: Integrating Intruder Detection and Access Control ___________________________ 457 Module 136: System Monitoring _______________________________________________________ 459 Module 137: System Commissioning___________________________________________________ 461 6 Level One: Protege GX Installer Study Guide | August 2013 Module 101: ICT Company Profile ICT is a world leading manufacturer of innovative and superior integrated electronic access control and security solutions. This module provides an overview of the company and its focus. In This Module About ICT ........................................................................................................................................ 8 Review Questions .......................................................................................................................... 12 Level One: Protege GX Installer Study Guide | August 2013 7 About ICT ICT is a world leading manufacturer of innovative and superior integrated electronic access control and security solutions that enable organizations to protect their people, operations and information. Our flagship platform Protege provides electronic access control, ID credential issuance and management; alarm monitoring, apartment management, digital video surveillance and management, real-time digital video content analysis, integration of biometric technologies, intrusion detection and smart card functionality, plus integration with a multitude of third party systems. ICT also provides a range of Proximity Card Readers, IP Reporting, Apartment Management, and Wireless solutions Locations ICT operates 4 offices worldwide: New Zealand, Canada, USA, and UAE. 8 Module 101: ICT Company Profile | About ICT Distribution Customers With thousands of system installations in over 20 countries worldwide, ICT boasts a prestigious customer base with a large number of high profile customers and a strong presence in a broad range of vertical markets. Capabilities 100% production level testing to IS9000 IPC602 L3 Board Level Manufacture Risk Mitigation and Disaster Recovery Strategy implementation in all locations Research and Development ICT operates an extensive research and development program with approximately 35% of staff dedicated to the research and development team. Dedicated Computer Aided Design and Computer Aided Manufacturing teams Embedded software engineering with expertize in a wide variety of architectures and operating systems Specialist VoIP and intercom development Windows Development Architects and Engineers Radio Frequency Identification team ICT Research and Development centers are located in New Zealand and Canada. Level One: Protege GX Installer Study Guide | August 2013 9 Production ICT produce ALL products in our state of the art production facility located in Auckland, New Zealand. Full surface mount production facility capable of over 80,000 part placements per hour 100% testing for ALL products - no batch testing Boards are manufactured to IPC610 Level 3 standard with an automatic end-to-end production process Products ICT produces more than 260 different products. Protege GX comprises of 23 software modules featuring DVR integration to Automated Transaction exports with over 60 different hardware components. Protege SE comprises of 4 software modules and over 80 products. All SE products can be used with GX. We produce over 120 different card formats on to 20 different card technologies. Certifications UL Certification (UL294, UL1610, UL1635) ULC Certification (S304, S319, S559) CE Compliance C-Tick EN50133 Level 3 Specification NIST AES256 Bit Encryption Certification We are currently the only certified security vendor that can transmit and decode in AES256 encryption according to UL. Solution Providers ICT has over 4000 trained solution providers throughout the world. Our exam based training courses and certification ensures a high level of service and support with certified professionals being required to refresh certification every 12 months. This strict certification policy ensures that if you are using an accredited factory trained professional you have a solid level of service and a competent engineer. 10 Module 101: ICT Company Profile | About ICT Integration Partners: DVR/NVR Systems Protege integrates with a number of third party DVR / NVR systems providing a full featured event based DVR and NVR solution. Operators can control Digital Video and Network Video Recorders and cameras within Protege, including the ability to view live and historical video feeds directly from event association. Video is triggered from events for pin point accuracy. Simply right click and view the video in a separate window with full screen and keyboard shortcut control. Link cameras to objects on floor plans and view video directly from the live floor plan view. Exacq OnSSI Milestone Avigilon IVT Pelco Hikvision March Networks Panasonic Geutebrück Honeywell Dedicated Micros Mobotix OpenEye DVTel Integral Integration Partners: Intercom Systems Protege enables integration with a range of third party Intercom systems to provide a complete access management solution. The Intercom service provides a direct link to the intercom solution, allowing automatic token generation for elevators, doors and control functions. SES (Select Engineered Systems) Sentex Viscount Siedle Integration Partners: ERP/MRP Systems Enterprise resource planning (ERP) is an enterprise-wide information system designed to coordinate all the resources, information, and activities needed to complete business processes. An ERP system supports most of the business system that maintains in a single database the data needed for a variety of business functions such as Manufacturing, Supply Chain Management, Financials, Projects, Human Resources and Customer Relationship Management. ICT and the Protege System provide integration with ERP systems to allow the exchange of data between the ERP system and the electronic access control system. ICT also provides a solution for ERP systems to take advantage of tag and card issuance for use in productivity management; canteen and staff allowance systems and 'At Register Deductions' for employees. SAP : ICT provides integration with SAP® to perform tasks such as automatic allocation of card holder data, personnel management, card issuance, allocation of access credentials based on freight and logistics data as well as many other advanced solutions infor: Flow: Customers who already implement the Flow B2B® Software Solution can take advantage of some significant integration that allows not only HR related duties but full management of access and security functions based on process flow in your business Level One: Protege GX Installer Study Guide | August 2013 11 Review Questions Where is ICT hardware produced? China New Zealand Canada Canada and New Zealand Which certification applies to ICT products? UL Certification CE Compliance NIST AES256 Bit Encryption Certification All of the above Where is research and development carried out? China Canada New Zealand New Zealand and Canada 12 Module 101: ICT Company Profile | Review Questions Module 121: Protege GX Platform Introduction This module describes the focus of Protege GX, who it's been designed for, and what's involved in gaining Protege GX certification. In This Module Platform Focus ............................................................................................................................... 14 Installer Certification ....................................................................................................................... 16 Review Questions .......................................................................................................................... 19 Level One: Protege GX Installer Study Guide | August 2013 13 Platform Focus Before you begin your journey in to ICT Protege GX training, it is important that you have a good understanding of what GX is all about, why we made it, and - more importantly - where and how you should be using it. Who is an electronic security system for? This may sound like a stupid question but all too often integrators are losing sight of their end user and what it is that they need. It is too easy for an integrator to try and fit the end user into a box and sell them a system off the shelf. System Ownership On average, the installed solution will be the responsibility of: The Integrator for 3 Weeks The Operator for 4 Years The Owner for 12-15 Years Focus Protege GX was created with the end user in mind. The system gets designed around the end user's needs, providing a truly scalable system from a single door to an enterprise class system. Everything is open - the end user owns the system and their data. Unified Interface GX is big on integration, incorporating all of your requirements into one simple-to-use unified interface for all security requirements. Control multiple DVR and NVR platforms from a single platform Intercom integration provides a complete access management solution Single-point solution for monitoring and control of Building Control and Automation systems Transport events between multiple systems through integration with Building Management systems Custom Operator Interface Protege GX presents the system to the end user in a way that makes sense to them. Build an interface specific to your facilities needs Embed event lists, status lists, cameras, floor plans Breakout and detach any window for support of multiple monitor control rooms Supports up to 4 monitors per user interface 14 Module 121: Protege GX Platform Introduction | Platform Focus Intelligent Event Reporting One of the simplest and most important requirements of a security system is its ability to produce useful event reports. In many systems this is often overlooked or even licensed as an additional feature. GX makes event reporting both intelligent and easy, with a new grid view WYSIWYG reporting tool that allows you to quickly and easily find the data you are looking for. Results can be filtered, sorted, and grouped, to show only relevant information. Reports can be automatically generated at scheduled times and sent via e-mail to any operator, and data exported to a range of formats including PDF, HTML, XLS, and CSV. Use the built-in reports, or create your own for the ultimate flexibility. All of this is included in the base license. System Capacity What good is an enterprise class system if it has limits? Users: unlimited Access Levels: unlimited Door Groups: unlimited Doors: unlimited Floor Plans: unlimited The software has no limits and you can add servers as the demands change. Approximately 1200 controllers are supported per server, and Microsoft clustering is supported to perform hot standby and regional failover. Protege GX DIN Rail Controller Capacity The physical hardware limitations of the Controller are as follows: Users: 5 Million Access Levels: Unlimited Inputs: 1000 Outputs: 1000 Doors: 64 Areas: 128 Level One: Protege GX Installer Study Guide | August 2013 15 Installer Certification It is important to ICT to protect the image of GX. As such only certified Protege GX partners will have access to the product. Becoming a Protege GX Partner To become a Protege GX Partner, you must submit an application to join the ICT Dealer Network (IDN) and purchase a Protege GX Level 1 Partner Training Pack. Training and certification of at least one technician must be successfully completed before IDN membership will be issued. The IDN focuses on quality and not revenue targets. Partner Training Packs The Protege GX Partner Training Pack includes the following hardware and software: 1 PRT-GX-SVR Base Server License 1 PRT-CTRL-DIN Protege GX DIN Rail System Controller 1 PRT-PSU-DIN Protege DIN Rail Power Supply 1 PRT-RDM2-DIN Protege DIN Rail 2 Door Expander And all required accessories for a two-door system It also includes two Protege GX Technician Training Packs. Technician Training Packs Technician Training Packs provide 24/7 access to the ICT Online Classroom for the registered user and include: A folder containing full course notes A demonstration version of the software ICT Connect Card providing prioritized technical support and access to exclusive member-only deals 1 exam voucher allowing one attempt at the certification exam 16 Vouchers are valid for 6 months from the date of purchase and a new voucher required each time an exam is sat If a technician fails an exam 3 times, a facilitated course must be completed Additional training packs and/or exam vouchers can be purchased as required Module 121: Protege GX Platform Introduction | Installer Certification Certification Levels There are three levels of Certification: Protege GX Installer (Level 1): Aimed at installers responsible for small to medium projects, this certification focuses on planning, installing, and configuring Protege systems to ensure successful implementation of an intruder detection and access control solution. Protege GX Integrator (Level 2): Aimed at integrators responsible for installing medium to large projects, this certification has a focus on system integration. Protege GX System Administrator (Level 3): Aimed at integrators responsible for installing enterprise level projects, this certification has a focus on high-level system programming. Installer Certification Process The prerequisite components are all delivered as web-based training modules. The actual course content may be completed either online or in a facilitated training course. A Bootcamp option is also available to fast track certification with a one-day accelerated workshop to drive home the theoretical and practical elements before sitting the final certification exam. Web Based Training Web based training is made up of a number of short modules allowing you to study at your own pace, in your own time. Each module is made up of one or more objectives, with objectives containing a mix of slides, videos, exercises and review questions. Once all objectives have been studied, an online module exam must be completed. These exams are timed and have a minimum pass rate of 90%. If a module exam is failed 3 times, you must undertake facilitated training to gain certification. Certification Exam Once all certificate modules are complete (either all online or a mixture of online and facilitated), a supervised certification exam must be taken (and passed) to gain certification. Supervised exams must be carried out at an ICT approved facility with one practice exam available online. You must achieve a score of 80% or above to pass and if a certification exam is failed 3 times, you will have a 3 month stand-down period and must then complete a facilitated course. Each attempt at a supervised exam incurs a charge. Training Cost Pricing varies according to location but included in the training pack is a range of Protege GX hardware, software, and accessories. The hardware and software may be resold to recover the cost of training, however alternative hardware must be available for any further technicians to use in conjunction with the training program. Level One: Protege GX Installer Study Guide | August 2013 17 Maintaining Certification The Protege GX Installer certificate is valid for one year from the date of completion. Refresher training can be carried out online and a supervised recertification examination must be undertaken at an ICT approved facility prior to the expiration of the certificate to remain current. Alternatively, you can opt to advance to the next certification level by completing the relevant course and corresponding exam. 18 Module 121: Protege GX Platform Introduction | Installer Certification Review Questions Who was the GX platform built for? The Integrator The Consultant The End User The Distributor What type of system is the GX platform best suited to? Single door systems Systems up to 50 doors Enterprise class systems All of the above Complete this statement: WYSIWYG Event reports are... A) Exportable to multiple formats B) A licensable feature C) An intuitive way of finding the data you want D) A and C How many users are supported by the system / controller? Unlimited / Unlimited Unlimited / 2000 2000 / 2000 Unlimited / 5 Million Who can purchase Protege GX hardware / software? Integrators who have at least one Certified Protege GX Installer Integrators who maintain a predefined level of sales Integrators who are paid members of the Protege GX Installers Group All of the above Level One: Protege GX Installer Study Guide | August 2013 19 Where do certification exams take place? Web based, self paced Only at the ICT factory Supervised at the Integrators office Supervised at an ICT approved facility 20 Module 121: Protege GX Platform Introduction | Review Questions Module 122: Protege GX Licensing This module outlines the Protege GX licensing structure, describes which items and features are included in the base license (and which must be licensed separately), and explains the importance of an SMA and how it is charged. In This Module Licensing Structure ........................................................................................................................ 22 Base License ................................................................................................................................. 23 Licensed Items and Features ......................................................................................................... 24 Server License ............................................................................................................................... 27 Software Maintenance Agreements (SMAs) .................................................................................... 29 Review Questions .......................................................................................................................... 31 Level One: Protege GX Installer Study Guide | August 2013 21 Licensing Structure Protege GX uses a modular licensing model which is both flexible and scalable. This enables you to purchase only the features you need, yet easily extend your system by adding additional features as you need them. The larger the system the higher the premium, however a ceiling (or license cap) prevents runaway license costs. Once this cap is reached, the total number of that item becomes unlimited. Total number of licensed doors capped at 1000 Total number of licensed cameras capped at 250 Total number of licensed IP doors capped at 1000 Users and Controllers are unlimited meaning unrestricted growth in an enterprise License Facts Not a revenue grabbing exercise Enables small solutions to be more cost effective Enterprise class solutions must grow with an enterprise The larger the system the higher the premium. However a ceiling (cap) prevents runaway license costs License Duration Purchased licenses are valid for 20 years Training or Demo licenses are valid for 3 months 22 Module 122: Protege GX Licensing | Licensing Structure Base License The base Protege GX Server License (PRT-GX-SRVR) is required for all installations and includes 1 concurrent Protege GX Client connection 50 Doors 10 Cameras Unlimited DVRs Unlimited sites Unlimited controllers Unlimited areas Unlimited operators Unlimited users Additional client, door, and camera licenses can be purchased to extend the base configuration. These are only required when exceeding the base license quantity. For example, a site requiring 5 concurrent operator logins, 75 doors, and 30 cameras would need a base license, 4 additional client connection licenses, 25 additional door licenses, and 20 additional camera licenses. Included Features The base license includes the following features: Floor plans Event reports Grid view reports Email reports Bulk user import Level One: Protege GX Installer Study Guide | August 2013 23 Licensed Items and Features Additional licensable components are available based on your needs. Doors The base license includes 50 doors. If additional doors are required, further door licenses can be purchased in blocks of 50, 10 or as a single item, with bulk purchases being more cost effective. Doors have a cap or "top out" limit of 1000. Once this limit has been reached, the number of doors allowed becomes unlimited. This means that the maximum number of additional door licenses ever required (in addition to a base license) would be 950. The number of licensed doors applies to the server, not the site or controller. So if you have 8 sites with 10 doors each, the system determines this as 80 doors, and would require an additional 30 doors in addition to the base license. IP doors are purchased separately. Cameras The base license includes 10 cameras. If additional cameras are required, further camera licenses can be purchased in blocks of 10. Cameras have a cap or "top out" limit of 250. Once this limit has been reached, the number of cameras allowed becomes unlimited. This means that the maximum number of additional camera licenses ever required (in addition to a base license) would be 240. The number of licensed cameras applies to the server, not the site or controller. So if you have 8 sites with 5 cameras each, the system determines this as 40 cameras, and would require an additional 30 cameras in addition to the base license. The camera license covers the video to Protege GX component. HLI is licensed separately and covers the exchange of events between Protege GX and the DVR. The number of DVRs is not restricted. Concurrent Operator Connections Protege GX uses a concurrent usage license model enabling you to install the Protege GX Client on any number of workstations, with the restriction being on the number of operators that can connect at any one time. The base server includes one Protege GX Client (operator). Use additional client licenses to increase the number of concurrent operator connections that can be made. IP Doors IP Doors (Salto, Sargent, and Kaba) are purchased separately in blocks of 10 or as a single item, and allow the connection of IP software doors to the system. The number of licensed IP doors applies to the server, not the site or controller. This means if have 8 sites with 10 IP doors each, you require 80 IP doors. 24 Module 122: Protege GX Licensing | Licensed Items and Features SIP An SIP license enables the GX client to communicate directly with IP intercoms. This feature is licensed per connection point. DVR HLI A DVR HLI (High Level Interface) license enables bi-directional communication between Protege GX and an NVR or DVR platform. Note that this is separate to the live and archived video display which is covered with a camera license. Inserts events in to the Protege GX event log Actions are sent to the DVR or NVR platform in response to events in Protege GX Operates with only GOLD level integrations This feature is licensed once and enables HLI for an unlimited number of DVRs. Active Directory (LDAP) Users This feature enables you to import Active Directory users into a site based on the Active Directory group that has been selected, and to synchronize them every 10 minutes. This feature is licensed once and allows an unlimited number of Active Directory users. Active Directory (LDAP) Operators This feature enables you to use Active Directory for operator management allowing operators to login automatically using their Windows credentials. Active Directory details are configured under the operator record. Once defined, the operator can select the option to use Windows Authentication. This feature is licensed once. The number of operators that can connect at one time is limited by the Concurrent Operator Connection license. Muster Reports This feature provides the ability to create lists of people currently in a defined area. It is ideal for creating an evacuation list of who is on site when a fire alarm is triggered. You can have multiple lists for different areas. This feature is licensed once. Photo ID A Photo ID license provides the ability to create and manage users Photo ID badges from within Protege GX. This feature is licensed once. Level One: Protege GX Installer Study Guide | August 2013 25 Protege GX SDK An SDK license allows programmers to interface with Protege GX: Receive status updates Control devices Add users and assign access levels This feature is licensed once. Time and Attendance This feature provides the ability to report on employee attendance, including early or late arrivals, early or late departures, exceeded break times, and total hours worked. This feature is licensed once. You can use a single or multiple readers for logging staff movement. Video Verification This feature displays a popup window showing live video footage when a user badges at a door to request access. The operator can compare video footage with stored image for verification, and grant or deny access. This feature is licensed once. CSV Schedule Import The ability to import users from a CSV file is included in the base license, however it is a manual process so best suited to the initial setup of users The licensed feature allows you to import on a schedule (every hour, day, week, etc) enabling you to create a low level integration to a third party system. For example, a storage facility may use software that lists all the people that are permitted access. This feature allows you to import that list on a defined schedule, automatically creating new users in the Protege GX system This feature is licensed once. Email on Event This feature enables the Protege GX Server to send an email to a pre defined user on a pre defined event. For example, emailing a muster report to the fire marshall automatically when a fire alarm is activated, or notifying a building manager when access is granted (or denied) to a secure door. This feature is licensed once. 26 Module 122: Protege GX Licensing | Licensed Items and Features Server License The Protege GX license is bound to the server. Each time a license request is generated, it takes a complete hardware profile of the server. Any significant change in the hardware profile requires a new license activation. System specifications must be met, and may be checked when your server is licensed. If using Protege GX in a virtual environment (such as VMWare), the MAC address of the virtual machine must be fixed otherwise your hardware profile will keep changing. When to license your server Your server license must be updated after: The server software installation is complete An additional licensed feature is purchased A software upgrade requires the Protege GX software to be uninstalled The server hardware profile changes When the server hardware profile changes, ICT must be contacted to request an additional license activation. The reason for the hardware change will be logged, as will the change in hardware profile. Licensing Process: Automatic Licensing your server is a simple task if you have internet access 1. Open the Protege GX application 2. If your server has not been licensed yet, you will be prompted to update your license. 3. Go to the License Update tab (About > License > License Update) 4. Click Download License 5. If your server internet access is via a proxy server, you will need to set this up in the Proxy Setup tab 6. Enter your SSN, Site details and Installer details and click OK Once your License has been successfully installed, you then need to close and restart the user interface Level One: Protege GX Installer Study Guide | August 2013 27 Licensing Process: Manual If you do not have internet access you will need to manually license your server. 1. Open the Protege GX application and go to the License Update tab (About > License > License Update) 2. Click Generate License. You will be prompted to save a license request file 3. Take this license request file to a PC with internet access 4. Open a web browser to http://www.incontrol.co.nz/license/ or browse to Support > Software Registration > GX Registration Form from the ICT website 5. Enter your Site details, Installer details and SSN, then browse to the license request file 6. You will now be prompted to save a license file 7. Take this license file back to your server and click the browse button on the License Update page 8. Select the new license file and click OK Once your License has been successfully installed, you will need to close and restart the user interface 28 Module 122: Protege GX Licensing | Server License Software Maintenance Agreements (SMAs) At ICT, we take improving and maintaining our software very seriously. A Software Maintenance Agreement (SMA) is designed to provide the best support possible on all our products. Why Maintaining an SMA is Important A Software Maintenance Agreement is an agreement between ICT and the end user and must be purchased through an ICT approved integrator. It provides the end user with access to new features, updates, enhancements and fixes, and priority access to technical support. This protects the investment the end user has made in the software, and funds ICT's continuing Research and Development program. Cost and Duration of an SMA All licenses are sold including an annual SMA. This is renewable 12 months following the initial software registration and is calculated at 25% the current cost of the licensed software. Renewing an SMA is not mandatory, however you will not receive important updates or be able to upgrade or add client licenses once the SMA has expired. The SMA can be renewed at any time, however you will be charged for the annual agreements going back to the initial date of expiry. For example, if your SMA expired in November 2008, you would need to pay the annual charges from this date forward and at the current SMA rate. You can also choose to purchase an SMA in advance to take advantage of current price structures and avoid any potential price increases. Example SMA Calculation For a system of 111 doors, the following calculation would be made each year: Base License $1000 50 Door License $1000 10 Door License $500 1 Door License $100 Total $2600 Annual SMA (25 % of Total) $650 Note: These are not the true license costs, and have only been used to show a simple calculation. Level One: Protege GX Installer Study Guide | August 2013 29 Example SMA Calculation After Expiry Scenario: Software was purchased in January of 2010, including SMA which expired in February of 2011. It is now July 2012. One years SMA would take the system to February 2012, therefore two years is required to get a current SMA expiring in February 2013 Base License $1000 50 Door License $1000 10 Door License $500 1 Door License $100 Total $2600 Annual SMA (25 % of Total) $650 Total SMA Cost (2 Years) $1300 Note: These are not the true license costs, and have only been used to show a simple calculation. 30 Module 122: Protege GX Licensing | Software Maintenance Agreements (SMAs) Review Questions What is the license cap for doors? 250 500 1000 Doors are unlimited What is the maximum number of Controller licenses you will ever pay for? 250 500 1000 Controllers are unlimited What happens when the number of cameras reach 250? No more cameras can be added, the cap has been reached Cameras are now unlimited Nothing, the camera cap is 500 No difference, cameras are not limited anyway How many camera licenses are included in the base license? None 5 10 Cameras are unlimited Which of the following features are NOT included in the base license? Floor plans DVR HLI (High Level Interface) Grid View reports CSV bulk user import Level One: Protege GX Installer Study Guide | August 2013 31 How many operators can log in at the same time with a base license? As many as you like, operators are unlimited 1 As many as you like, users are unlimited 10 To connect 20 PTZ cameras and have them respond to events automatically, what would be required? 10 camera licenses and a DVR HLI license 10 camera licenses, DVRs are unlimited A base license, 10 camera licenses and a DVR HLI license A base license, 20 camera licenses and a DVR HLI license Which licensed feature(s) are required in order to enable operators to login to the Protege GX Client using their Windows credentials? An Active Directory (LDAP) Users License An Active Directory (LDAP) Operators License A Concurrent Operator Connection License All of the above Which license would I require for a system with 100 IP Doors? A base license and 50 Door licenses A base license and 100 Door licenses A base license and 100 IP Door licenses A base license, 100 IP Door licenses and 50 Door licenses To what is the Protege GX license bound? The Integrator The Site The Server The Protege GX database 32 Module 122: Protege GX Licensing | Review Questions Which of the following circumstances would NOT require a license update? Restoring an old Protege GX database Adding 150 door licenses Replacing the server motherboard Upgrading Windows on the server Do you need to have Internet access to update your license? No, you can do a manual license update Yes, the automatic license update connects to the ICT licensing server via the internet Yes, even with a manual license update, you will need internet access somewhere to upload the license request and download the license file No, the proxy server can provide your license update Which of these statements is NOT correct? An SMA provides access to new features, updates, enhancements and fixes An SMA is an agreement between ICT and the Integrator The end user must purchase their SMA from an ICT approved Integrator An SMA provides priority access to technical support If an SMA expired 30 months ago, how much would it cost to renew? It will be 25% of the current cost of the entire license x 1 year It will be 25% of the current cost of the entire license x 2 years It will be 25% of the current cost of the entire license x 3 years It will be the same cost as a new license Calculate the following: If you had a system with a base license and a total of 1050 doors, how much would an SMA cost if the base license was $1000, and door licenses were $1000 for 50? $5500.00 $5250.00 $5000.00 $4500.00 Level One: Protege GX Installer Study Guide | August 2013 33 Module 123: Protege GX System Architecture Before looking at the hardware or software, it is important to have a good understanding of how the overall system fits together. This module provides an overview of the Protege GX system and its architecture. In This Module The Protege GX Server .................................................................................................................. 36 Protege GX Client Software............................................................................................................ 37 Network Architecture ..................................................................................................................... 38 Advantages of a Server Based System .......................................................................................... 41 Protege GX and Small Sites ........................................................................................................... 42 Review Questions .......................................................................................................................... 43 Level One: Protege GX Installer Study Guide | August 2013 35 The Protege GX Server Protege GX is built around a central server and one or more Protege GX Controllers. The Server is responsible for maintaining the system configuration and monitoring, while Controllers are responsible for the physical control and operation of the system. Network Connectivity While the controllers are designed to run standalone, network connectivity is required between the central server and the controller(s) to enable configuration and monitoring of the system. Databases The Protege GX Server contains two databases: 1. The Protege GX database which contains the configuration for the entire system including global settings, operators, workstations, right down to the physical configuration of the Controllers and associated doors, readers, inputs and outputs. 2. The Protege GX Events database which stores the events from all Controllers and the server. These events are used for live monitoring of the system, triggering system alarms and reporting. Both databases run on Microsoft SQL Server. 36 Module 123: Protege GX System Architecture | The Protege GX Server Protege GX Client Software The client software is used for the configuration and monitoring of the Protege GX system. The client communicates with the Server using TCP/IP. The client software only ever communicates with the Server, never directly with the Controller(s). Configuration Changes For configuration changes, the client software makes changes to the Protege GX database. System Monitoring For system monitoring, the client software requests information from the server, which in turn retrieves events from the Protege GX Events database and directly from the Controller(s) as required. Client Setup Client software is usually installed on the same machine as the Protege GX Server. This allows the entire system (including configuration and monitoring) to run on a single PC. Client software can also be installed on as many other workstations as you like. Licensing only limits the number of concurrent connections to the server, not the number of PCs with the software installed. Level One: Protege GX Installer Study Guide | August 2013 37 Network Architecture The Protege GX Server uses TCP/IP on an Ethernet network to communicate with Protege GX Controllers. The Server sends configuration changes, control commands, status requests and firmware updates to the Controllers LAN The Server receives events and status updates from the Controllers. Scalability The Protege GX system was built with scalability in mind and is suitable for single controller sites right through to enterprise scale systems that span large geographical areas. Small Sites / Single Controllers For smaller sites, consider installing the software on a PC that is also used for other functions, or on a laptop that is permanently housed in the same cabinet as the controller. LAN The example above shows a small system with a single controller and a client and server installation all on a single PC. 38 Module 123: Protege GX System Architecture | Network Architecture Large Sites / Multiple Controllers For larger sites with multiple controllers, a more powerful server is required. In this example, the server resides on a high spec PC, and the client software is installed on separate desktop PCs. LAN Always consult the system requirements in your installation guide prior to specifying your system. Enterprise Level Solutions The Protege GX system is also designed to cater for the needs of corporate clients and scales well to enterprise class solutions. Head Office LAN Branch Office WAN LAN This example shows a larger system running on existing corporate network infrastructure. The head office contains the central Server, a client PC and several controllers. There is also a branch office which has its own client PC and Controller. Level One: Protege GX Installer Study Guide | August 2013 39 Remote Environments With IP technology constantly improving and internet coverage spreading further and further every day, thinking outside the box cannot only solve some tricky problems, but can open up a multitude of business opportunities. ADSL LAN LAN WWW WiFi GPRS Consider the example above showing Controllers connecting to a central server using an ADSL internet connection, WiFi access points and GPRS across a cellular network. Remote Opportunities Now imagine the possibilities of access control, intruder detection, and automation control in remote locations where these technologies are now available – buses, trains, boats and other vehicles, mobile plant, remote pumping stations, plant rooms or equipment sheds... Wherever monitoring or control is required and a network connection is available, there is potential for a Protege GX system. 40 Module 123: Protege GX System Architecture | Network Architecture Advantages of a Server Based System Protege GX was designed to be easy to operate, simple to integrate, and effortless to extend. It is a server based system, and as such, is not designed to be run on a technician's laptop. The following outlines the reasons why... Simplicity To keep the system simple and manageable for the end user, much of the hardware is hidden. When making configuration changes, you are making changes to the system rather than to a specific Controller. The system then manages which controllers need updating, and does this all behind the scenes. Security Any access control system contains valuable and often sensitive information. This information belongs to the end user, not to the technician that happens to be maintaining or installing their system. It is dangerous, irresponsible, and in most cases completely unacceptable for a company's private data to be sitting on a technician's laptop, floating around in the back of a station wagon. Synchronization Setups that allow multiple copies of the system configuration are open to synchronization problems. If one technician makes changes using his laptop on one day, then another technician attends on another day and forgets to upload all of the controllers first, changes the first technician made are overwritten. A server based system avoids this problem, as the changes are made immediately. Level One: Protege GX Installer Study Guide | August 2013 41 Protege GX and Small Sites For some smaller sites, budget restricts the practicality of having a dedicated server on site. In this situation it is easy to jump to the conclusion that Protege GX is not suitable. This is not the case. It just needs a shift in thinking, and can actually present a new business opportunity. Central Configuration The majority of businesses these days have an internet connection. Where there is an internet connection, there is the ability to connect controllers to a server. ACME Ltd LAN LAN WWW aBank PTY Corporate Park The example above shows a server with multiple client PCs at a central location controlling, configuring and monitoring multiple Controllers at individual client sites. The Opportunities Rather than having a laptop lying around in the back of your vehicle, install a server at your office and charge a monthly fee for configuring and monitoring the system. Package this into a preventative maintenance package with a Software Maintenance Agreement and not only do you reduce the upfront capital expenditure, you turn a one off sale into a regular client. 42 Module 123: Protege GX System Architecture | Protege GX and Small Sites Review Questions Which database are events stored in? On the Controller only. The server interrogates the Controller for reports. The Protege GX database located on the Server. The Protege GX Events database located on the Server The reports database What does the Protege GX database contain? Controller configuration only Global system configuration only The configuration for the entire system The configuration and events for the entire system Can the GX Controller run in standalone mode? Yes, Protege GX is a controller based system. The Server is only used to program the Controller. Yes, Protege GX is a Server based system but Controllers will run stand-alone once configured. No, Protege GX is a Server based system and must have a network connection between the Controller and Server at all times. No, the Protege GX Controller stores its configuration database on the server. The Protege GX Client Software... can be installed on only one PC if you only have a base licence is only installed on the Server if you only have a base licence can be installed on any number of workstations is never installed on the server When making configuration changes... The GX Client makes changes to the Controller directly The GX Client makes changes to the Protege GX Database The GX Client makes changes to the Protege GX Database and Controller The GX Client is not used Level One: Protege GX Installer Study Guide | August 2013 43 What does the GX Client software communicate with? The server only The server for system configuration and reports, and the controller for status updates The controller for configuration and reports, and the server for status updates None of the above Which of the following statements is correct? Controllers can communicate with the GX Server using the Internet Controllers must be on the same local area network as the GX Server Controllers must be on the same corporate network as the GX Server Controllers cannot communicate with the GX Server using the Internet How does the Controller communicate with the server? Using the RS-485 module network Using TCP/IP on an Ethernet network Using the RS-232 serial interface Using Point to Point Protocol over Ethernet (PPPoE) What type of site/system was Protege GX built for? High end residential sites Single controller commercial sites Enterprise scale systems All of the above Which of the following is NOT a reason for making GX a server-based system? Storing system configuration on a server allows more data to be stored Configuration changes can be easily made to the system, then the system manages which Controllers need to be updated It helps to keep system information confidential It means there is a single point for all configuration changes 44 Module 123: Protege GX System Architecture | Review Questions Complete this statement... Where budget constraints on a small single Controller site mean an onsite server can't be justified... ...Protege GX is not a suitable solution ...the GX Controller should be programmed using a technicians laptop ...connect the Controller to a shared server using the Internet ...use any old existing PC as the server Level One: Protege GX Installer Study Guide | August 2013 45 Module 124: Protege GX Hardware Overview Protege GX is an enterprise level product with leading edge hardware and software to provide a solution for security, access control, and building automation. This module provides an overview of the hardware available and the features included. In This Module The Protege DIN Rail Range........................................................................................................... 48 The Protege PCB Range ................................................................................................................ 54 The Protege GX Module Network ................................................................................................... 73 Proximity Readers .......................................................................................................................... 82 Keypads ........................................................................................................................................ 85 Temperature and Humidity Sensors ............................................................................................... 89 Enclosures ..................................................................................................................................... 90 Elevator Control ............................................................................................................................. 91 Review Questions .......................................................................................................................... 94 Level One: Protege GX Installer Study Guide | August 2013 47 The Protege DIN Rail Range The Protege DIN Rail range provides extensive hardware advancements and flexible access control, area control and alarm monitoring. Designed with an industry standard DIN Rail mount enclosure, the modules allow for seamless integration into large scale installations alongside high end HVAC and electrical switchboard components. The DIN enclosures also provide more durability and protect the circuitry from damage. Exposed PCBs can be easily damaged physically or by electrostatic discharge. Protege GX DIN Rail System Controller (PRT-CTRL-DIN) ICT's latest central processing device, built to match the unparalleled scalability of the Protege GX Integrated System in a DIN Rail format. Responsible for the control of security, access control and automation in the Protege GX Integrated System. Feature Highlights: 2 doors (4 readers) onboard Unlimited records 2 high current Form-A lock outputs 4 low current outputs for LED / buzzer control 8 zone inputs Expandable module network Capability 32 Bit advanced RISC processor 2 Gb total memory onboard Communications 10/100 Ethernet port (Supports IPV6) IP Reporting built in Onboard alarm dialer (Contact ID or SIA) Expandable RS-485 Module Network Door Access Control Two standard wiegand reader interface ports onboard Reader multiplexing allows 4 readers to be connected, for reader in and out on two doors Standalone – fully intelligent door control Control more doors by adding reader expanders (64+ doors supported) 48 Module 124: Protege GX Hardware Overview | The Protege DIN Rail Range 8 Onboard Inputs Use for access control, detection devices such as PIRs, or a mixture of both Most common EOL combinations supported (no need to change resistors when upgrading) Monitor more inputs by adding input expanders (500+ inputs supported) 7 Onboard Outputs One 12VDC 1.1A Bell output Two high current (7A) relays for control of locks, lights, etc Four low current (50mA) outputs for LED / buzzer control Control more outputs by adding output expanders (500+ outputs supported) PRT-CTRL-DIN: Technical Specifications Technical Specifications Operating Voltage 12V DC +- 10% Operating Current 120mA (Typical) DC Output (Aux) 0.7A (Typical) Electronic Shutdown at 1.1A Bell DC Output (Continuous) 8 Ohm 30W Siren or 1.1A (Typical) Bell DC Output (Inrush) 1500mA Communication 1 10/100Mbps Ethernet Communication Link 1 RS-485 Communication Interface Port Readers (Standard) 2 Wiegand or clock data readers providing one Entry/Exit Door or two Entry/Exit only Doors Readers (Multiplex) 4 Wiegand Readers (connected in Multiplex Reader mode) providing any combination of Entry or Exit for two Doors Inputs (System Inputs) 8 High Security Monitored Inputs Outputs 4 50mA (Max) Open Collector Output for reader LED and beeper or general functions Relay Outputs 2 FORM C Relays - 7A max Level One: Protege GX Installer Study Guide | August 2013 49 Protege DIN Rail 16 Zone Input Expander (PRT-ZX16-DIN) The Protege DIN Rail 16 Zone Input Expander extends the number of inputs on a system by 16, enabling monitoring of a wide range of EOL capable or open contact sensors for security and building automation purposes Feature Highlights: 16 inputs, each can be assigned to up to 4 areas in the system and processed using different options or features Connect any combination of normally closed or normally open zones, configurable per zone input Utilizes analog to digital processing with 5x over sampling 4 input states to provide short, alarm, closed and tamper conditions High performance 32 Bit processor PRT-ZX16-DIN: Technical Specifications Technical Specifications Operating Current 80mA (Typical) DC Input Voltage 12VDC (+/-10%) Inputs 16 (10ms to 1hr Input Speed Programmable) Comms RS-485 Isolated Module Network 50 Module 124: Protege GX Hardware Overview | The Protege DIN Rail Range Protege DIN Rail 8 PGM Output Expander (PRT-PX8-DIN) The Protege DIN Rail 8 PGM Output Expander extends the number of outputs on a system by 8, featuring high current Form-C relays providing flexible and structured control of lighting and automation systems. Feature Highlights: 8 Form-C relay outputs capable of switching resistive loads up to 7 Amps Ideal for connection in an electrical switch room to control signage, lighting and building automation. LED indicators to show state of all onboard relays High performance 32 Bit processor PRT-PX8-DIN: Technical Specifications Technical Specifications Operating Current 80mA (Typical) DC Input Voltage 12VDC (+/-10%) Outputs 8 FORM C Relays, 7A 250V Max Comms RS-485 Isolated Module Network Level One: Protege GX Installer Study Guide | August 2013 51 Protege DIN Rail Mini 2 Reader Expander (PRT-RDM2-DIN) The Protege DIN Rail Mini 2 Reader Expander extends the number of card reader inputs on a system by 2 (4 when using Multiple Reader mode), the number of inputs by 6, and the number of outputs by 8, providing flexible access control, area control and alarm monitoring. Feature Highlights: Connect 2 readers using the independent reader inputs or connect 4 readers using the 2 reader operation to provide dual entry and exit door connection 6 zone inputs 2 FORM C lock outputs 6 open collector outputs (Reader Control outputs) with predefined configurations for instant connection (red LED, green LED and buzzer control) Support for intelligent reader tamper operation Door Access Control Two standard wiegand reader interface ports onboard Reader multiplexing allows 4 readers to be connected, for reader in and out on two doors Support for intelligent reader tamper operation 8 Onboard Inputs Use for access control, detection devices such as PIRs, or a mixture of both Most common EOL combinations supported (no need to change resistors when upgrading) 8 Onboard Outputs Two high current (7A) relays for control of locks, lights, etc Six low current (50mA) outputs for LED / buzzer control PRT-RDM2-DIN: Technical Specifications Technical Specifications Operating Current 80mA (Typical) DC Input Voltage 12VDC (+/-10%) Doors 2 doors, up to 4 readers in multiplex mode Inputs 6 4 state, EOL configurable, 1 module tamper Outputs 2 Form C relays (7A max), 6 Open Collector (50mA) Comms RS-485 Isolated Module Network 52 Module 124: Protege GX Hardware Overview | The Protege DIN Rail Range Protege DIN Rail Intelligent Power Supply (PRT-PSU-DIN) The Protege DIN Rail Intelligent Power Supply provides 12VDC power, ideal for running security, access control or automation devices, along with large numbers of Protege network powered modules within the same installation. Feature Highlights: Mains input ideal for reducing complexity in set up and easy deployment 12VDC output voltage and up to 4.0 Amps continuous output current Battery backup connection for continued power delivery Intelligent charging algorithm monitors battery and AC supply Processor controlled battery level testing and indication Monitored signals for battery low/disconnect and AC failure PRT-PSU-DIN: Technical Specifications Technical Specifications Operating Current 110VAC 220VAC 1500mA (Full Load) 800mA (Full Load) Mains Input 90 to 264VAC DC Output 4.0A Max (V1Out + V2Out Total) PSU Battery backup Inputs 1 module tamper Outputs 2 FORM B Relay Outputs, 50mA 12V Max Comms RS-485 Isolated Module Network 47 to 63Hz Level One: Protege GX Installer Study Guide | August 2013 53 The Protege PCB Range The Controller ...is the central processing unit responsible for the control of security, access control and automation in the Protege integrated system. Ethernet 10 / 100 Connection Controllers provide onboard Ethernet communication allowing direct connection from a local PC or interconnection to an existing LAN/WAN: Directly connect the Protege System Management Suite across a LAN or WAN interface for instant connection and upload download IP reporting functionality using the Protege IP Reporting protocol, Contact ID over IP, SIA over IP and full text reporting methods. The Protege IP Reporting protocol requires the Protege IP Reporting Bridge application operating on the remote machine or device with a suitable communications driver for the automation software being used. Full 10/100 compliant network interface allows the Protege Controller to connect to all networks at the maximum capable signaling rate. Indication of link status, signaling rate and data transmission/reception shown on LED status indicators. Local Monitored Power Supply The Controller operates from a 16VAC input, utilizing a low cost transformer and providing a fully monitored 12VDC power solution using: Deep discharge prevention of the battery with automatic electronic cut-off Manual or processor controlled battery charge selection of 350mA or 700mA Intelligent charging algorithm monitors battery and AC supply allowing optimum performance to be achieved using standard lead acid batteries Monitored signals for Battery Low/Disconnect and AC Failure using local trouble zones Integrated Arming/Disarming Controllers feature advanced integration of arming and disarming solutions for control of up to 250 alarm areas: Deny access to a user based on the status of the area and the ability for the user to control the area they are entering in turn reducing false alarms Implement bank vault areas to control and manage time delayed access and unlocking in banking facilities without the need for extra hardware control devices Prevent access to a keypad using a card and PIN function or allow card presentation to automatically login the user at the associated keypad Disarm an area associated with an elevator floor on access when using the destination reporting option or prevent the user from gaining access to the floor based on the area status associated with the floor Arm large numbers of areas using area groups 54 Module 124: Protege GX Hardware Overview | The Protege PCB Range Integrated Access Control The Controller provides a highly sophisticated access control solution with large user capacity and extensive features: Utilize primary and secondary access levels to manage users over simple scheduled periods and time zones Assign Door groups, Menu groups, Area groups, Floor groups and Elevator groups to an access level for flexible user management. Each group can optionally access a secondary group to provide multiple levels of user access. System wide global anti-pass back, the Protege Controller can maintain and control users area status throughout the entire system with hard and soft anti-pass back configuration options Multiple card presentation options allows the use of access control cards, tags or other credentials to arm and disarm areas associated with doors Count users entering an area and arm the area when the count reaches a terminal number or deny access to users based on a maximum user count Automation Points Automation points can be controlled from the Protege Alphanumeric LCD Keypad for the management of any controllable device such as lighting, air conditioning and signage. Accessible directly from the keypad, the automation points provide a user interface to the specific programmable outputs that a user can control. Link automation points to programmable functions to provide sophisticated control logic at the selection of an automation point. Text names can be defined for the automation points, allowing a scrollable list of controllable items in the system such as Office A/C or Outside Lights. Programmable Functions Programmable Functions allow for the use of special applications that are configured in the Controller for Logic, Area, Door, and many other controllable devices: Process logic functions to allow complex equations to be evaluated using the special internal memory registers and PGM Output status Output of programmable functions can be directed to an action, memory region for storage and later use, or a programmable output Applications to reduce installation time for the control and automation of garden lighting, external lighting and electronic movement sensors with auto manual operation Control of Doors, Areas, Elevators and PGMs can be easily programmed and managed Starting and stopping of functions can be managed remotely including special run once options to allow manual control of a function that is controlled by an operator Level One: Protege GX Installer Study Guide | August 2013 55 Connectivity and System Expansion Onboard local zone (input) and PGM (output) allows convenient cost effective expansion without the increased cost of modules for simple system functions: 16 onboard zone inputs can each be programmed to require EOL (End Of Line), Dual EOL or direct contact 2 Bell/Siren Outputs with fully monitored operation Use the Protege Alphanumeric LCD Keypad to expand the number of LCD keypads within an installation Zone expansion is provided on nearly all modules as part of the Protege Systems integrated structure and provides a dual function for many of the zone input configurations. Use the Protege 16 Zone Input Expander to expand the number of zone inputs on the Protege System. Output expansion is provided directly on the module network by the Protege 16 PGM Output Expander and incorporates 16 high current FORM C relays and fire control functions Expand the access control reader connections with the Protege Mini, Standard, Intelligent, or Ethernet Reader Expander. All provide 2 additional readers (or 4 Wiegand) and various options with local autonomous operation, power supply and Ethernet options. Integration Link the Protege System with intelligent locking solutions through Integrated Control Technologies comprehensive world class solution partners Hi-O Technology, Aperio and TZ. Communication RS-485 communication interface for module communication, onboard 2400bps modem with dual line input, and a 10/100 Ethernet communications port gives a complete solution: Network RS-485 port used for all network communication functions and interconnects to other modules with full galvanic isolation Onboard 2400bps modem interface to allow all popular alarm reporting formats and the ability for remote connection from the Protege System Management Suite 10/100Mbps Ethernet interface for communication with the Protege System Management Suite and other applications and functions Multifunction Reporting Services Utilizing the latest functionality in communication services the Controller incorporates a host of communication options: Monitor telephone line inputs using the monitor phone service and answer incoming calls on local modem interface using answer machine override and high security remote call back options Report alarms using Contact ID, SIA Level 2 Communicate with terminal programs using the Telnet Terminal option and output the data in ASCII, HEX with custom format options and acknowledgement settings to allow connection of third party applications directly to the Protege Controller Send IP based reporting protocols using the onboard Ethernet communication interface and Protege IP Reporting ArmorIP formats 56 Module 124: Protege GX Hardware Overview | The Protege PCB Range Upgradable Firmware Utilizing the latest flash technology and high performance communication interface the firmware can be updated using industry standard applications. Electronic Bell/Siren Outputs High current electronic monitored Bell/Siren control outputs: Indication of Bell/Siren outputs activation using LED. Bell/Siren failure monitoring or lock disconnected (tamper) displayed as indicator and reported using trouble zone Automatic shutdown on bell over current when activated or shorted. Automatic restore on next deactivation/activation cycle. Shutdown reported using trouble zone. Protege GX Integrated System Controller (PRT-CTRL-GX) The Protege Integrated System Controller is the central processing unit responsible for the control of security, access control and automation in the Protege integrated system, an advanced technology security product providing seamless and powerful integration of access, security and building automation. Feature Highlights: Control two doors onboard Internal industry standard 10/100 Ethernet Communicate with Ethernet modules that are interconnected using a LAN or corporate network In-built offsite dual line communications dialer (ContactID, SIA) 32 Bit advanced RISC processor with 2MB RAM and 4MB flash 16 high security monitored zone inputs 2 high current outputs Firmware upgradable using standard IT technology Enhanced technology power supply with battery charging and monitoring Encrypted module network using RS-485 communication Level One: Protege GX Installer Study Guide | August 2013 57 PRT-CTRL-GX: System Capacities System Capacities Fixed Profile Users 5000 Events 2000 Schedules 128 Doors 64 Inputs 912 Outputs 676 Zone (Input) Expanders 32 PGM (Output) Expanders 8 Analog Expanders 8 Keypad Modules 32 Reader Expanders 32 Maximum Controllers per Enclosure Medium Large Fatboy Jumbo - 1 2 4 Requires 1 16VAC, 40VA 16 Transformer (TFR-40-16) 58 Module 124: Protege GX Hardware Overview | The Protege PCB Range Input (Zone) Expanders Protege 16 Zone Input Expander (PRT-ZX16) The Protege 16 Zone Input Expander provides the interface of up to 16 zone inputs, 2 bell/siren device outputs and 2 programmable outputs to the Protege system Technical Specifications Operating Current: 97mA (143mA max) AC Input: 16VAC, 40VA DC Output (AUX): 1.2A Fused & Monitored PSU: Local monitored PSU with battery backup Inputs: 16 4 state, EOL configurable. Outputs: 2 High current (1.0A), 2 Open Collector (50mA) Comms: 1x Galvanic isolated RS-485 port 1 module tamper Maximum Number per Enclosure Medium Large Fatboy Jumbo - 1 2 4 Requires 1 16VAC, 40VA 16 Transformer (TFR-40-16) Level One: Protege GX Installer Study Guide | August 2013 59 Protege Standard 16 Zone Input Expander (PRT-ZXS16) The Protege Standard 16 Zone Input Expander provides the interface of up to 16 zone inputs and 1 programmable output to the Protege system. Technical Specifications Operating Current: 47mA Inputs: 16 4 state, EOL configurable. 1 module tamper Outputs: 1 Open Collector (50mA) Comms: 1 non isolated RS-485 port Maximum Number per Enclosure Medium Large Fatboy Jumbo 1 1 4 8 Requires 1 16VAC, 40VA 16 Transformer (TFR-40-16) Zone Input Expander Comparison Feature PRT-ZXS16 PRT-ZX16 Onboard PSU No Yes Zone Inputs 16 16 PGM Outputs (Total) 1 4 High Current Bell PGM Outputs None 2 Low Current Open Collector 1 2 Isolated Module Network No Yes Module Powered Device Yes No Multiple AUX Supply Points No Yes 60 Module 124: Protege GX Hardware Overview | The Protege PCB Range Output (PGM) Expanders Protege 16 PGM Output Expander (PRT-PX16) The Protege 16 PGM Output Expander provides the control of 16 high current FORM C relay outputs or 16 elevator floors (connected with a Protege Intelligent 2 Reader Expander) from the Protege system. Technical Specifications: Operating Current: 119mA (1145mA max all relays activated) AC Input: 16VAC, 40VA DC Output (AUX): 150mA Fused and Monitored PSU: Local monitored PSU with battery backup Inputs: 1 x Fire Control (12-24VDC 6.5mA). Outputs: 16 x Form C Relays (5A max) with LED status indication Comms: 1 x Galvanic isolated RS-485 port Expansion: Optional 16 galvanic isolated inputs for elevator destination reporting (PRT-PX16-DRI) 1 x module tamper Maximum Number per Enclosure Medium Large Fatboy Jumbo - 1 2 4 Requires 1 16VAC, 40VA 16 Transformer (TFR-40-16) Level One: Protege GX Installer Study Guide | August 2013 61 Protege Standard 16 PGM Output Expander (PRT-PXS16) The Protege Standard 16 PGM Output Expander provides the control of 16 low current open collector outputs from the Protege system. Technical Specifications: Operating Current: 129mA (148mA max all relays activated) Inputs: 1x module tamper Outputs: 16 x Open Collector (50mA) Comms: 1 x non- isolated RS-485 port Maximum Number per Enclosure Medium Large Fatboy Jumbo 1 1 4 8 Requires 1 16VAC, 40VA 16 Transformer (TFR-40-16) Output Expander Comparison Feature PRT-PXS16 PRT-PX16 Onboard PSU No Yes Zone Inputs None None PGM Outputs (Total) 16 16 Form C Relay None 16 Low Current Open Collector 16 None Isolated Module Network No Yes Module Powered Device Yes No Elevator Floor Controller No Yes Fire Control Unit No Yes 62 Module 124: Protege GX Hardware Overview | The Protege PCB Range Reader Expanders Feature Highlights Connect 2 readers using the independent reader inputs or use the 2 reader operation to connect 4 readers providing dual entry and exit door connection. Provision to control up to 3 Outputs per reader input with predefined configurations for instant connection (red LED, green LED and buzzer control). Support for intelligent reader tamper operation the system will monitor the reader for reader keep-alive transmissions using the programmed protocol. Data received LED indicates a valid decode of the format on the Reader. Individually fused and monitored reader power supply protected with auto reset electronic polythermal fuse and monitored reader supply voltage. Power Output indicator shows power is available on the reader voltage Outputs. Over 45 formats predefined for simple configuration, additional formats added using the format builder or implemented directly using the firmware update function. Level One: Protege GX Installer Study Guide | August 2013 63 Multiplex Reader Mode Pushing the boundaries of functionality, ICT have taken another step in providing the capability to connect up to 4 readers on to ANY of the reader expanders with the multiplex reader mode: Allows the addition of an EXIT reader on to any existing entry with REX egress configuration Identifies the entity with the associated EXIT and ENTRY events No limitations are made on the operation allowing user counting, car park counting, loiter operation, credential anti-pass back and area control to take place on the readers used in multiplex mode Increased saving to customer while giving retrofit and installation flexibility ENTRY READER SHIELD +AUX- RED BLACK DO GREEN D1 WHITE L1 ORANGE L2 BROWN EXIT READER BZ BLUE SHIELD +AUX- RED BLACK DO GREEN DATA D1 WHITE ORANGE L1 BROWN L2 BLUE BZ This functionality is also available on the SE controller. 64 Module 124: Protege GX Hardware Overview | The Protege PCB Range Arming/Disarming The Reader Expander allows a user to arm and disarm an area from a reader input when associated with a door: Deny access to a user based on the status of the area reducing false alarms Dual presentation of the card can arm an area associated with the entry or exit direction of the door being accessed Fail to arm programmable output can be programmed to provide feedback in the event areas fail to arm when using card reading functions Prevent access to a keypad using a card and PIN function or allow card presentation to automatically login the user at the associated keypad Disarm an area associated with an elevator floor on access when using the Protege 16 Input Destination Reporting Interface in elevator mode Connectivity and System Expansion Expanding the Protege System with local zone (input) and PGM (Output) from Protege Reader Expanders allows convenient cost effective expansion and added benefit of dual functionality on door monitoring zones: 6 or 8 zones (depending on the module) can be used to perform any system alarm and automation functions with a dedicated enclosure tamper switch. Configurable EOL resistor combinations All zones are assigned functions that are processed by the Reader Expander for door control. Each function can be enabled or disabled individually, as required. Network RS-485 port used for all network communication functions and interconnects to other modules. Upgradable Firmware Utilizing the latest flash technology and high performance communication interface the firmware can be updated using industry standard applications. Local Monitored Power Supply (RDS2, RDI2, RDE2) The RDS2, RDI2, and RDE2, operate from a 16VAC input, utilizing a low cost transformer and providing a fully monitored 12VDC power solution using: Deep discharge prevention of the battery with automatic electronic cut-off Manual or processor controlled battery charge selection of 350mA or 700mA Intelligent charging algorithm monitors battery and AC supply allowing optimum performance to be achieved using standard lead acid batteries Monitored signals for Battery Low/Disconnect and AC Failure using local trouble zones Level One: Protege GX Installer Study Guide | August 2013 65 Electronic Lock Outputs (RDS2, RDI2, RDE2) High current electronic monitored electric lock control Outputs: Indication of lock output activation using LED Lock failure monitoring or lock disconnected (tamper) displayed as indicator and reported using trouble zone Automatic shutdown on lock over current when activated or shorted with automatic restore on next deactivation/activation cycle. Shutdown reported using trouble zone. Drive electric strikes directly from the lock outputs Elevator Control (RDI2, RDE2) The RDI2 and RDE2 allow the control of two independent elevator cars capable of servicing 128 openings (floors): Utilize button feedback for floor selection monitoring and single badge, single floor control prevents user tailgating with full floor selection audit. Deny access to a user based on the status of the area on a specific floor that they are attempting to access (button feedback required). Floor can use the Late Open option forcing the floor to remain locked on a schedule until valid access to the floor is granted. Interface to the Protege 16 PGM Output Expander using the slave RS-485 communication port for intelligent elevator control (controls 16 floors per Protege 16 PGM Output Expander per elevator car). Optional high level RS-485 communication to elevator control system (requires protocol documentation to be provided). 66 Module 124: Protege GX Hardware Overview | The Protege PCB Range Protege Mini 2 Reader Expander (PRT-RDM2) The RDM2 is a small and cost effective module for controlling up to 2 doors. Mounted in a medium cabinet, this module has a very small footprint, or mount up to 8 modules in a jumbo cabinet to control up to 16 doors. Technical Specifications: Operating Current: 83mA (109mA max) Doors: 2 doors, up to 4 readers in multiplex mode Inputs: 6 4 state, EOL configurable. Outputs: 2 Form C relays (5A max), 6 Open Collector (50mA) Offline Operation: Stores first 10 users + 50 cached users. No offline schedules. No offline event storage Comms: 1 non-isolated RS-485 port 1 module tamper The RDM2 (and any readers connected to it) draw their power from the RS-485 Module Network. Maximum Number per Enclosure Medium Large Fatboy Jumbo 1 1 4 8 Level One: Protege GX Installer Study Guide | August 2013 67 Protege Standard 2 Reader Expander (PRT-RDS2) The RDS2 has all the same functionality as the RDM2, but including a local power supply and battery backup, 2 additional zone inputs and 2 fixed voltage, high current monitored lock outputs. Power locks directly from the module, or use the onboard Form C relays to switch an external power supply. Technical Specifications: Operating Current: 119mA (207mA max all relays activated) AC Input: 16VAC, 40VA DC Output (Aux): 1.2A Fused & Monitored PSU: Local monitored PSU with battery backup Doors: 2 doors, up to 4 readers in multiplex mode Inputs: 8 4 state, EOL configurable. 1 module tamper Outputs: 2 12VDC monitored lock outputs (1A continuous, 1.2A max) or 2 Form C relays outputs for lock control (no lock monitoring), 6 open collector outputs (50mA) Offline Operation: Stores first 10 users + 50 cached users. No offline schedules. No offline event storage Comms: 1 Galvanic isolated RS-485 port Maximum Number per Enclosure Medium Large Fatboy Jumbo - 1 2 4 Requires 1 16VAC, 40VA 16 Transformer (TFR-40-16) 68 Module 124: Protege GX Hardware Overview | The Protege PCB Range Protege Intelligent 2 Reader Expander (PRT-RDI2) In addition to the features of the RDS2, the RDI2 also has the ability to run standalone in offline mode with 2000 users, 2000 events, and schedules stored locally, enabling the RDI2 to continue to operate seamlessly should there be a loss of RS-485 communications. Technical Specifications: Operating Current: 119mA (207mA max all relays activated) AC Input: 16VAC, 40VA DC Output (Aux): 1.2A Fused & Monitored PSU: Local monitored PSU with battery backup Doors: 2 doors, up to 4 readers in multiplex mode Inputs: 8 4 state, EOL configurable. Outputs: 2 12VDC monitored lock outputs (1A continuous, 1.2A max) or 2x Form C relays outputs for lock control (no lock monitoring), 6 open collector outputs (50mA) Offline Operation: 2000 users, schedules, 2000 events Comms: 2 Galvanic isolated RS-485 ports 1 module tamper The RDI2 has a second RS-485 port onboard which can be used as a Module Network repeater to provide extended distance, two more spurs, or allow repowering of the network. It can also be used to interface with a number of 3rd party devices, including high and low level elevator control and locking systems such as Aperio. Maximum Number per Enclosure Medium Large Fatboy Jumbo - 1 2 4 Requires 1 16VAC, 40VA 16 Transformer (TFR-40-16) Level One: Protege GX Installer Study Guide | August 2013 69 Protege Ethernet 2 Reader Expander (PRT-RDE2) The RDE2 has all of the intelligence of the RDI2, but with an onboard Ethernet interface. It can be plugged virtually anywhere on the network allowing the use of existing network infrastructure. The RS-485 ports can then be used to extend the network in four directions for elevator control or 3rd party system integrations. Technical Specifications: Operating Current: 119mA (207mA max all relays activated) AC Input: 16VAC, 40VA DC Output (Aux): 1.2A Fused & Monitored PSU: Local monitored PSU with battery backup Doors: 2 doors, up to 4 readers in multiplex mode Inputs: 8 4 state, EOL configurable. Outputs: 2 12VDC monitored lock outputs (1A continuous, 1.2A max) or 2x Form C relays outputs for lock control (no lock monitoring), 6 open collector outputs (50mA) Offline Operation: 2000 users, schedules, 2000 events Comms: 2 Galvanic isolated RS-485 ports, 1 10/100 Ethernet port 1 module tamper Maximum Number per Enclosure Medium Large Fatboy Jumbo - 1 2 4 Requires 1 16VAC, 40VA 16 Transformer (TFR-40-16) 70 Module 124: Protege GX Hardware Overview | The Protege PCB Range Reader Expander Comparison Feature PRT-RDM2 PRT-RDS2 12VDC 16VAC 16VAC 16VAC Battery Backup - Yes Yes Yes AUX PSU - 1A 1A 1A 2 Relay 2 Electronic 2 Electronic 2 Electronic - Yes Yes Yes Offline Users 10 10 2000 2000 Reader Ports 2 2 2 2 Yes Yes Yes Yes Isolated RS485 Ports - 1 2 2 Non-Isolated RS485 Ports 1 - - - Ethernet - - - Yes Power Supply Lock Outputs Lock Monitoring Multiplexed (4) Readers PRT-RDI2 PRT-RDE2 Power Supply Protege Intelligent 5 Amp Power Supply (PRT-PSU-5I) The Protege Intelligent 5 Amp Power Supply provides 12VDC power ideal for running security, access control or automation devices along with large numbers of Protege network powered modules in the same installation. Technical Specifications: Operating Current: 100mA (typical, no load) AC Input: 16VAC, 100VA DC Output: 5A (max) PSU: Battery backup Inputs: 1 module tamper Outputs: 1 mains fail open collector output, 1 battery low open collector output, 2 programmable open collector outputs (50mA) Comms: 1 Galvanic isolated RS-485 port Reliable Power The Protege Intelligent 5 Amp Power Supply is capable of supplying power to a large number of smaller devices or multiple high current devices up to a maximum of 5 Amps. A continuous source of power is maintained with the inclusion of intelligent battery backup charging, optimal level maintenance and seamless switch on AC failure. The battery backup and AC status are constantly monitored, and failure conditions are communicated to the Protege System and simultaneously output to open collector drivers suited to connection to third party warning systems. Level One: Protege GX Installer Study Guide | August 2013 71 Intelligent Power Monitoring The Protege Intelligent 5 Amp Power Supply is able to relay information about critical system voltages and currents to the Protege Integrated System Controller by registering as an analog expander module on the Protege network. The Protege Controller can then store these values in system registers that can be viewed live from the Protege software. This allows live viewing of the system voltages and currents along with logging for review at any time. Maximum Number per Enclosure 72 Medium Large Fatboy Jumbo 1 1 4 8 Module 124: Protege GX Hardware Overview | The Protege PCB Range The Protege GX Module Network The Protege system utilizes a RS-485 four-wire powered module network in a multi-drop daisy-chain configuration Level One: Protege GX Installer Study Guide | August 2013 73 System Architecture Systems can be made up of a single Controller with multiple expanders connected by the RS-485 Module Network LAN PRT-CTRL-DIN PRT-RDM2-DIN PRT-RDM2-DIN PRT-RDM2-DIN PRT-RDM2-DIN PRT-RDM2-DIN PRT-PSU-DIN PRT-PSU-DIN PRT-PSU-DIN PRT-PSU-DIN PRT-PSU-DIN PRT-PSU-DIN Cabinet 1 Cabinet 2 Cabinet 3 Systems can also be made up of multiple Controllers with multiple expanders, with the Controllers connecting to the Server via Ethernet (Ethernet standards apply) LAN PRT-CTRL-DIN PRT-RDM2-DIN PRT-CTRL-DIN PRT-RDM2-DIN PRT-CTRL-DIN PRT-RDM2-DIN PRT-PSU-DIN PRT-PSU-DIN PRT-PSU-DIN PRT-PSU-DIN PRT-PSU-DIN PRT-PSU-DIN Cabinet 1 74 Cabinet 2 Cabinet 3 Module 124: Protege GX Hardware Overview | The Protege GX Module Network Communications System controllers communicate with the Protege Server using TCP/IP LAN Protege modules communicate to the controller using an encrypted high speed module network or via TCP/IP PRT-TLCD PRT-CTRL-DIN TCP/IP Ethernet Connection Encrypted RS485 Module Network PRT-ZX16-DIN PRT-PX8-DIN PRT-ZX16-DIN Level One: Protege GX Installer Study Guide | August 2013 75 Module Wiring The RS-485 module network must be wired in a daisy chain configuration Star or Spur wiring is not an acceptable method for new installations PRT-CTRL-DIN PRT-C -CT -C CT C TRLLD DIN IN N PRT-RDM2-DIN PRT-RDM2-DIN PRT-ZX16-DIN PRT-ZX16-DIN Cabling The RS-485 module network must be wired in a daisy chain configuration. Belden 9842 RS-485 cable is recommended Total length of the module network should not exceed 900 metres (2952 feet). Cat5E cable can be used, but is limited to 100 metres (328 feet) Warning: Unused wires in the cable must not be used to carry power to other devices. 76 Module 124: Protege GX Hardware Overview | The Protege GX Module Network Module Network Power The DIN Rail range is supplied by a 12V DC power supply connected to the Module Network. We recommend using an ICT PRT-PSU-DIN however any clean 12V DC supply is suitable. In a small installation this can be powered by a single PSU, as long as the maximum load of the power supply is not exceeded PRT-CTRL-DIN PRT-PSU-DIN PRT-RDM2-DIN PRT-ZX16-DIN PRT-PX8-DIN It is recommended that the power supply used to power the module network is dedicated to this task, and is not used to power other devices, especially electrically noisy devices such as locks. Where possible, use a separate supply for your locks. PRT-CTRL-DIN PRT-RDM2-DIN PRT-PSU-DIN PRT-PSU-DIN In larger installations, the Module Network power supply may need to be split to allow for load sharing between several supplies. This is done by removing the N+ connection from between split sections. PRT-PSU-DIN #1 PRT-CTRL-DIN Cabinet 1 PRT-PSU-DIN #2 PRT-RDM2-DIN Cabinet 2 Powered RS-485 Unpowered RS-485 Level One: Protege GX Installer Study Guide | August 2013 77 All ancillary devices connected to a module network powered device, such as keypads, readers or PIRs also draw their power from the module network. You must include all connected devices when considering power supply loading calculations. PRT-CTRL-DIN PRT-PSU-DIN Module Network Isolated Devices The Protege suite of hardware is made up of a number of devices where the Module Network is optically isolated from the rest of the device. This provides additional system integrity and allows modules to be powered by other supplies. The following modules typically have an onboard power supply, requiring a 16VAC feed: PRT-CTRL Protege System Controller PRT-RDS2 Protege Standard Reader Expander PRT-RDI2 Protege Intelligent Reader Expander PRT-RDE2 Protege Intelligent Ethernet Reader Expander PRT-PX16 Protege 16 PGM Output Expander PRT-ZX16 Protege 16 Zone Input Expander PRT-ADC4 / PRT-DAC4 Protege Analog Expanders Even if the module has an onboard power supply, the module network must still be powered from one location. PRT-PSU-5I PRT-CTRL-SE PRT-RDS2-PCB PRT-KLCD 78 PRT-RDI2-PCB PRT-PX16-PCB PRT-RDM2-PCB PRT-PXS16-PCB PRT-ZX16-PCB PRT-ZXS16-PCB Module 124: Protege GX Hardware Overview | The Protege GX Module Network This is usually from a dedicated power supply, but in small installations can be powered by a module with an onboard supply, such as the Controller. Note: In this scenario, 12VDC must be wired from the module's 12V Auxiliary supply to the module network 12V terminals. This must only be done on one module on the network. Module Network Powered Devices Module network powered devices are not optically isolated from the RS-485 Module Network and draw all of their power directly from the Module Network PRT-KLCD LCD Keypad Module. PRT-RDM2 Mini Two Reader Module. PRT-ZXS16 Standard 16 Zone Input Expander PRT-PXS16 Standard 16 Output Expander And all of the DIN Rail range... The device and any devices connected to it ALL draw their power from the module network. PRT-PSU-5I PRT-CTRL-SE PRT-RDS2-PCB PRT-RDI2-PCB PRT-KLCD PRT-RDM2-PCB PRT-PX16-PCB PRT-PXS16-PCB PRT-ZX16-PCB PRT-ZXS16-PCB Relay PIR PRX-NPROX Relay PIR PRX-NPROX Relay You must include all connected devices when considering power supply loading and voltage drop Level One: Protege GX Installer Study Guide | August 2013 79 Expanding the Module Network Expansion of the Module Network can be done using the PRT-RDI2 module. This uses a secondary communications port which is isolated to allow a stub or spur network to be created. Primary Module Network PRT-PSU-5I PRT-CTRL-SE PRT-RDS2-PCB PRT-RDS2-PCB PRT-RDI2-PCB PRT-PX16-PCB PRT-PX16-PCB PRT-RDS2-PCB PRT-ZX16-PCB PRT-ZX16-PCB Secondary Module Network The same rules apply to the stub or spur network as the main network connections. Multiple secondary networks are allowed, as long as they all come off the primary network. Primary Module Network PRT-PSU-5I PRT-CTRL-SE PRT-RDS2-PCB PRT-PX16-PCB PRT-RDI2-PCB PRT-RDS2-PCB PRT-RDS2-PCB PRT-RDS2-PCB PRT-ZX16-PCB PRT-RDI2-PCB PRT-PX16-PCB Secondary Module Network PRT-RDS2-PCB PRT-ZX16-PCB PRT-ZX16-PCB Secondary Module Network Additional stubs or spurs cannot be taken from the secondary network Primary Module Network PRT-PSU-5I PRT-CTRL-SE PRT-RDS2-PCB PRT-RDI2-PCB PRT-PX16-PCB PRT-ZX16-PCB Secondary Module Network PRT-RDS2-PCB PRT-RDI2-PCB PRT-RDS2-PCB 80 PRT-ZX16-PCB PRT-RDS2-PCB Module 124: Protege GX Hardware Overview | The Protege GX Module Network Use secondary module networks where daisy chain wiring is not practical Primary Module Network PRT-PSU-5I PRT-CTRL-SE PRT-RDS2-PCB PRT-RDI2-PCB PRT-RDS2-PCB PRT-RDI2-PCB PRT-RDS2-PCB PRT-RDS2-PCB PRT-RDS2-PCB RDE2 expanders use Ethernet to communicate with the controller providing another way to expand the Module Network PRT-PSU-5I PRT-RDE2-PCB PRT-PSU-5I PRT-PX16-PCB PRT-PX16-PCB PRT-CTRL-SE PRT-RDE2-PCB PRT-PSU-5I PRT-ZX16-PCB PRT-ZX16-PCB PRT-ZX16-PCB A biasing adapter must be installed when using the primary 485 interface as a network repeater Level One: Protege GX Installer Study Guide | August 2013 81 Proximity Readers Wiegand Interface ICT offers a range of Proximity Readers and Reader Expander modules. A standard Wiegand interface means that ICT Readers can be used on any system that supports standard Wiegand readers. It also means that we support 3rd party standard Wiegand readers. Maximum cable run from Reader to Expander = 150m Approved cable types = 22Awg alpha 5196, 5198, 18Awg alpha 5386, 5388 The Wiegand interface and communications protocol are not an ICT or Protege proprietary standard. http://en.wikipedia.org/wiki/Wiegand_interface for more information. See 125Khz Card Readers ICT 125KHz Card Readers offer superior functionality by being programmed to read all popular 125KHz cards including Position Technology, HID, Paradox and ICT cards. The card reading technology is selected via the reader programming. LED Operation Dual LED Outputs and independently operated beeper connections allow card readers to integrate with all existing and new installations. The units are programmable using a programming card. In single LED operation the unused spare LED input can be programmed to function as a command button for Wiegand control messages (REX, REN, arm button). Feature Highlights Bi color LED (red and green) with independent or single LED control Programmable Wiegand data formats from 26 to 128 Bit with card configured Output Keep alive transmission every 30 seconds for intelligent tamper management Fully encapsulated design for outdoor and indoor operation Beeper activation does not prevent card read operation LEDs and Beepers can be used for other functions such as displaying area arming status Extensive programmable features using programming card 82 Module 124: Protege GX Hardware Overview | Proximity Readers Comparison The Nano Prox reader is small, unobtrusive and cost effective The Vario boasts an extended read range of up to 150mm with clamshell cards The Multi Prox includes a PIN pad allowing multiple authentication combinations using card and/or PIN 13.56 Mifare Desfire Readers The ICT Mifare DESfire range of readers provide a complete open standard DESfire smart card RFID solution compatible with DESfire EV1 Cards, Mifare Classic MAD (Mifare Application Directory), Mifare S and X, specific managed sector and ESN/CSN decoding. Compatible with ALL Wiegand data capable control systems and incorporating RS-485 communication they allow rapid deployment of secure DESfire RFID technology in any environment. The DESfire range offers superior functionality and independent operation using open DESfire technology and is capable of decoding and sending up to 128 Bits of information in the Wiegand format or full sector information in the EIA485 protocol. Migration Migration from legacy and insecure low frequency technology (125KHz) is easily achieved using dual technology DESfire Proximity ISO Cards that incorporate both high and low frequency card inlays. Program the card using ICT's universal programmer with the specific site and card number required. Support for a number of low frequency products is possible. Compatibility Compatible with a large number of integration solutions. ICTs DESfire series of products has been successfully deployed in many integration solutions from cost recovery for printing and services to vending and cashless solutions. Encryption ICT's DESfire technology also integrates 256 Bit AES encryption with user selectable keys, reinforcing our support for open technology and standards. Level One: Protege GX Installer Study Guide | August 2013 83 Reader Technology Comparison Mifare Desfire EV1 Secure card format ON card data storage Open architecture platform Cost effective Extended read range Reads common cards 84 125KHz Module 124: Protege GX Hardware Overview | Proximity Readers Keypads Protege Alphanumeric LCD Keypad (PRT-KLCD) The Protege Alphanumeric LCD Keypad provides a user friendly human interface to the Protege integrated access control, security and building automation system. Feature Highlights: Securely login with user codes from 1 to 8 digits with support for card reader and PIN code operation Intuitive menu function allows scrollable options according to user security level with quick access shortcut keys for the power user Dual code and master code provider functions for secure ATM and banking vault area access with automatic time-out and delayed opening functions Unique reportable duress code for each Protege Alphanumeric LCD Keypad Activation of 3 x reportable panic events (Panic, Medical and Fire) Smoke detector reset provided on clear and enter keys selectable for a PGM or PGM group Arming/Disarming Allows a user to arm and disarm an area or group of areas: Area progress is shown on the LCD display with user friendly plain text messages displayed to the user as it guides them through the arming or disarming procedure. Easily view open system zones during the pre-arming phase Local display of user area for quick arming and disarming confirmation. Direct zone bypass option System Object Control and Monitoring Monitoring of all objects within the system can be achieved from the Protege Alphanumeric LCD Keypad: Monitor the status of any Door, User (anti-pass back), Zone (Input), PGM (Output) or schedule directly at the keypad Offline functions allow Quick Key menu functions to be performed on objects used for automation (lights, HVAC, electric gates and doors) Single automation quick key for REX (Door Request To Exit) or PGM Output activation Level One: Protege GX Installer Study Guide | August 2013 85 Auto Logout Confirmation The Protege Alphanumeric LCD Keypad can be programmed for a custom auto logout time specific to each station. Connectivity and System Expansion Expanding the Protege System with local zone (input and PGM Output) from the Protege Alphanumeric LCD Keypad allows convenient cost effective expansion: 2 zones (4 using zone duplex) can be used to perform any system alarm and automation functions with a dedicated enclosure tamper switch 1 low current PGM Output for driving any signaling device Two controllable LEDs on the display Controllable buzzer Intelligent backlight to minimize power consumption Configuration and addressing of the keypad is achieved by a simple easy to follow configuration menu available during initialization Protege Eclipse LED Keypad (PRT-KLES) The Protege Eclipse LED Keypad offers a sleek, user friendly interface to the Protege system, providing area control and security zone status at a glance. Feature Highlights: Sleek and stylish to fit in with modern decor, providing a user friendly interface to the Protege alarm functions 4 onboard zones 1 PGM output Capacitive touch keypad Fire, Panic and Medical alarm options Up to 20 zones per Area can be used for Delay, Instant, Follow, Fire, Fire Delay and 24 Hour Operation Conforms to the UL/ULC fire control specifications Simple single Area control Door unlock operation Integrated tamper switch 86 Module 124: Protege GX Hardware Overview | Keypads Protege Control Operating in the Protege Control mode the Protege Eclipse LED Keypad provides a complete standalone 4 zone, 8 user local alarm system: Operates autonomously when communication fails without the need for a Protege Integrated System Controller Locally program siren, entry and exit delay timers and configure the operation of up to 8 users with arming and disarming options 4 zones (zone duplex) for delay, instant, follow, fire, fire delay and 24 hour operation Configuration and addressing of the Keypad is achieved by a simple easy to follow configuration menu available during initialization Communicate with up to 3 slave Protege Eclipse LED Keypads for expansion to 18 zones and operation of multi-floor penthouse apartments Protege Touchscreen Keypad (PRT-TLCD) The Protege Touchscreen Keypad eliminates the need for a myriad of keypads, control panels and switches for each part of a system, offering true integration in any building environment. Feature Highlights: 12VDC power supply input with intelligent power saving mode Communication with the Protege Integrated System Controller via Ethernet 2 monitored zone inputs or 4 with duplex zone operation 1 programmable open collector Output, suitable for digital or relay control 10/100 Ethernet with link/data status indicator 128MB onboard RAM, 256MB flash storage space Mounting Options With a thickness of only 22mm, the Protege Touchscreen Keypad complements any building interior. The keypad can be mounted over a traditional flush box mount requiring only 15mm depth inside the wall cavity. The widescreen unit complements and enhances any building interior, with custom frame inserts available on special order to truly synchronize interior designs. Installation Wiring Power is provided via a 12VDC power supply. Ethernet connection allows installation using a dedicated Protege Network (recommended for multiple touchscreen installations) or by simply connecting the Protege Touchscreen Keypad and Protege Integrated System Controller into the buildings existing network. Level One: Protege GX Installer Study Guide | August 2013 87 Networking Capabilities The 10/100 Ethernet network connection is completely configurable via the onboard setup menu or the touchscreen builder software. Protege Control Use the Protege Touchscreen Keypad to create custom menus and displays that allow control and viewing of any inputs and outputs in the Protege System. Create floor plans to display this information in a concise and powerful way Graphics and Video Capabilities Create a unique user experience with a blend of high quality graphics and customizable images which can be displayed up to 640 x 480 resolution. Audio Capabilities Play high definition audio from WAV, MP3 or WMA files to announce events, warn and inform users of alarm or other input status. Voice notification of network status is built in for ease of installation Touchscreen Builder Software Build a menu system completely customized for each installation. Create pages for access control, security, and automation for any building or combine all key functions into a floor plan or main page 88 Module 124: Protege GX Hardware Overview | Keypads Temperature and Humidity Sensors Protege Temperature and Humidity Sensor (PRT-ATH1) The Protege Temperature and Humidity Sensor is designed to measure temperature and humidity. It can operate in standalone mode or can be connected to the Protege system. Technical Specifications: Operating Current: 20mA (typical) Inputs: 1 module tamper Outputs: 2 relay outputs (100mA max), 2 programmable LEDs Comms: 1 non-isolated RS-485 port Note: The ATH1 draws its power from the RS-485 Module Network. Features The ATH1 has an internal temperature and humidity sensor as well as the circuitry for an external k-type thermocouple temperature sensor: Temperature sensor -40˚C to 60˚C (±1˚C) -40˚F to 140.0˚F (±2˚F) Humidity sensor 0% to 100% (±3%) Secure encrypted RS-485 module communications Channel deviation trigger level 2 low current PGM Outputs 2 display LED PGM Outputs 2 0 to 10V or 4 to 20mA analog Outputs (ACC-ATH1 only) 8 to 30VDC input power supply Online and remote upgradable firmware Level One: Protege GX Installer Study Guide | August 2013 89 Enclosures Throughout the training so far, you will have seen how many of each module fits into our cabinets. Now we will have a look at the cabinets and see how they fit together. Enclosure Specifications Medium EN-ST-2828 Dimensions Large EN-ST-4133 Fatboy EN-GPT_3850 Jumbo EN-GPT-6150 280 x 280 x 85 410 x 335 x 95 388 x 508 x 170 610 x 508 x 170 Half Modules 1 1 2 4 Quarter Modules - 1 4 8 Transformers 1 1 2 4 Batteries 1 2 2 4 Gear Plates - - Gear Plates The medium and large enclosures are not able to take gear plates. These are standard enclosures which have PCB installed in them using plastic push through stand-offs. Transformers are screwed in to the chassis. The Fatboy and Jumbo enclosures use a system of gear plates for mounting. PCBs are mounted to the gear plates, and cabling is hidden and fastened behind the gear plates. This creates a much tidier way to wire your enclosures, and by layering gear plates allows more equipment to fit in an enclosure. Gear plates come in top and bottom versions of half and quarter sizes. Bottom plates sit at the back of en enclosure, top plates fit on top of bottom plates creating a second layer. Transformers are mounted at the left and have a metal cover to keep them isolated from low voltage components. Cable management fingers allow incoming cables to be bunched together neatly. 90 Module 124: Protege GX Hardware Overview | Enclosures Elevator Control Interfacing with elevator controllers to achieve access control to floors can be done either high level or low level. Configuration of elevator control is not covered in this module which simply aims to advise what equipment is required to achieve low level elevator floor control. Low level elevator control is achieved by controlling the user's ability to select floors in the elevator car. This is done by supplying a set of clean contacts to the elevator control system for every floor that needs to be locked off. The access control system then enables and disables floors by changing the state of the contacts. Typically, when a user badges their card at the reader located in the elevator car, the access control system turns the relays on for the floors that the user is allowed access to. After the lock timeout, the relays are turned off again, locking the floor select buttons off again. There are two main problems with this: 1. Security: For the period that the relays are on, multiple floors can be selected. Two people could enter an elevator, one could badge their card and select a floor. The other could then press buttons until another floor is selected. 2. Reporting: There is no way for the security system to report on where the user went, or if indeed access was taken. All we get is an access request. Destination Reporting Destination Reporting can be implemented to improve security. This involves providing a set of isolated inputs to the elevator control system, which receive feedback on which floor buttons are pressed. With Destination Reporting enabled, the user badges their card, the floor relays energize for the floors they are permitted access to, but now when they select a floor the system sees the button press. In response, the system turns the floor relays off to prevent any other buttons being pressed and logs an event showing which floor the user selected. Hardware Requirements At this stage, there is not yet a full DIN Rail solution so implementing elevator control in Protege GX requires PCB hardware. An intelligent reader expander (RDI2 or RDE2) is required for every two lifts you need to control. Each expander provides two reader ports, one per lift car. The secondary RS-485 port is used to interface with PX16 output modules which become dedicated for low level elevator control. PX16 expanders are added based on number of floors that require controlling. The last PX16 added can be split in half if required with the first 8 relays controlling one lift car and the second 8 relays controlling the second lift car. For Destination Reporting, Protege Destination Reporting Interfaces (PRT-PX16-DRI) are interconnected to the PX16 modules. Level One: Protege GX Installer Study Guide | August 2013 91 Example: Single Car System To control a single elevator with 1 to 16 controlled floors and no Destination Reporting, you would need: 1 System Controller 1 PRT-RDI2 or PRT-RDE2 1 PRT-PX16 1 Card Reader PRT-PX16-PCB PRT-CTRL-DIN PRT-RDI2-PCB Primary RS-485 Network Secondary RD-485 Network Wiegand Connection 92 Module 124: Protege GX Hardware Overview | Elevator Control Example: Three Cars with Different Floor Ranges Now let's look at an example where there are two lifts covering from Ground to Level 24, and a goods lift covering the Basement to Level 24. The end user would also like Destination Reporting. You would need: 1 System Controller 2 PRT-RDI2 or PRT-RDE2 modules 5 PRT-PX16 modules 5 PRT-PX16-DRI modules 3 Card Readers The PRT-PX16 modules would be configured to control the following: #1: Goods Lift, Floors B-15 (16 total) #2: Goods Lift, Floors 16-24 (9 total) #3: Lift 1, Floors 1-16 (16 total) - the ground Floor does not need to be controlled #4: Lift 2, Floors 1-16 (16 total) #5: Lifts 1 & 2, Floors 17-24 (16 total) Goods Lift Floors B, 1-15 PRT-PX16-PCB PRT-CTRL-DIN PRT-PX16-DRI PRT-RDI2-PCB Goods Lift Floors 16-24 PRT-PX16-PCB PRT-PX16-DRI Lift 1 Floors 1-16 PRT-PX16-PCB PRT-PX16-DRI PRT-RDI2-PCB Lift 2 Floors 1-16 PRT-PX16-PCB PRT-PX16-DRI Lift 1, Floors 17-24 Lift 2, Floors 17-24 PRT-PX16-PCB Goods Lift Lift 1 Lift 2 Level One: Protege GX Installer Study Guide | August 2013 PRT-PX16-DRI Primary Network Secondary Network Wiegand Connection 93 Review Questions How many access controlled doors can be directly connected to the DIN Rail Controller? 0 1 2 4 How many onboard high current relay outputs does the DIN Controller have? 2 4 7 500+ How many onboard inputs does the RDM2-DIN Reader Expander have? 7 6 8 4 If installing a system with two doors (both with readers for entry and exit), how many Reader Expanders are required? Two. Each Reader Expander has two reader ports onboard. One. With reader multiplexing, a single Reader Expander can support two doors with entry and exit readers. None. The Controller supports reader multiplexing, which allows two doors with entry and exit readers to be controlled onboard. One. The Controller has two reader ports onboard so a reader expander is required for the other two readers. Which of the following offsite reporting paths are supported by the DIN Rail Controller? IP Reporting via the Ethernet port Contact ID via the built in dialer SIA via the built in dialer All of the above 94 Module 124: Protege GX Hardware Overview | Review Questions How many onboard reader ports does the PCB Controller have? 0 1 2 4 How many onboard readers does the PCB Controller support? 0 1 2 4 What's the most RDM2-PCBs you can fit in a Jumbo Cabinet? 1 2 4 8 What is the maximum distance that the Protege Module Network may be run? 100m 900m 1200m 1500m A project requires a run of 300m (1000ft) between the Controller and the nearest Ethernet switch. Which cable type should I use? You can't - the maximum cable run between a Controller and a switch is 100m (328ft) Belden 9842 or 24AWG security cable Belden 9842 or CAT5e Belden 9842 Level One: Protege GX Installer Study Guide | August 2013 95 In a new installation, how many spurs can come off a Controller on the RS-485 module network? 3 4 250 None - star or spur wiring is not an acceptable method for new installations Can multiple power supplies be connected to the Protege Module Network? No, the Module Network must only be powered at one location Yes, as long as the N+ connection is removed between the split sections Yes, as long as they are all in the same cabinet Yes, as long as they are all in different cabinets If a door needs to operate in card and PIN mode, which reader should be used? The Nano Prox reader The Multi Prox reader The Vario reader The Vario PIN reader If an ICT reader is connected to an ICT reader expander, is tamper monitoring possible? Yes, ICT readers and expanders can be programmed for intelligent tamper recognition. Yes, ICT readers include a tamper switch. Yes, ICT reader expanders include a tamper input. No, there is no tamper monitoring on ICT readers. What is the maximum cable run for an ICT reader connected to an RDM2-DIN Reader Expander? 75m 100m 125m 150m 96 Module 124: Protege GX Hardware Overview | Review Questions How many onboard controllable outputs does the PRT-KLCD have? None 1 low current output 1 low current output and two controllable LEDs 1 low current output, two controllable LEDs and a controllable buzzer How many inputs does a PRT-KLCD keypad have onboard? None 1 input (2 using zone duplex) 2 inputs (4 using zone duplex) 4 inputs (8 using zone duplex) What is the ATH1 module used for? Arming and disarming areas To measure temperature and humidity Reading smart cards Programming smart cards Complete this statement Gear plates must be used in... Large and Jumbo cabinets Fatboy and Jumbo cabinets Medium and Large cabinets Fatboy and Large cabinets Level One: Protege GX Installer Study Guide | August 2013 97 With a single car elevator system configured as shown, what is the maximum number of floors that could be controlled? PRT-PX16-PCB PRT-CTRL-DIN PRT-RDI2-PCB Primary RS-485 Network Secondary RD-485 Network Wiegand Connection 8 16 128 Unlimited 98 Module 124: Protege GX Hardware Overview | Review Questions In addition to basic access control, what optional feature is also shown in this scenario, and what is it for? Goods Lift Floors B, 1-15 PRT-PX16-PCB PRT-CTRL-DIN PRT-PX16-DRI PRT-RDI2-PCB Goods Lift Floors 16-24 PRT-PX16-PCB PRT-PX16-DRI Lift 1 Floors 1-16 PRT-PX16-PCB PRT-PX16-DRI PRT-RDI2-PCB Lift 2 Floors 1-16 PRT-PX16-PCB PRT-PX16-DRI Lift 1, Floors 17-24 Lift 2, Floors 17-24 PRT-PX16-PCB Goods Lift Lift 1 Lift 2 PRT-PX16-DRI Primary Network Secondary Network Wiegand Connection Direct Reader Interface, allowing a high level interface to the lift control system Destination reporting, which allows Protege to see which floor an elevator car is on Destination reporting, to prevent more than one floor being selected when a card is badged Destination reporting, allowing connection to a destination based elevator control system Level One: Protege GX Installer Study Guide | August 2013 99 Module 126: Limitations of SE Hardware in Protege GX ICT strive to maintain backwards compatibility on software and hardware wherever possible to enable clients to access the latest features and technology without having to upgrade their entire system. With the exception of Controllers, all ICT hardware (both DIN-Rail and PCB) is compatible on both Protege SE and GX systems. This module outlines the limitations that apply. In This Module System Controller Compatibility ................................................................................................... 102 Review Questions ........................................................................................................................ 106 Level One: Protege GX Installer Study Guide | August 2013 101 System Controller Compatibility To take full advantage of the Protege GX capabilities, the PRT-CTRL-DIN is required. All System Controllers apart from the PRT-CTRL-LE are compatible with Protege GX however there are some restrictions. The PRT-CTRL-SE and PRT-SE-RACK both require a firmware upgrade in order to work with GX systems. The PRT-CTRL-GX, PRT-CTRL-SE and PRT-SE-RACK are all subject to certain limitations when running on the GX system. Compatible with SE Software? Compatible with GX Software? PRT-CTRL-DIN No Yes PRT-CTRL-GX No With Restrictions PRT-CTRL-SE Yes With Restrictions & Firmware Upgrade PRT-CTRL-LE Yes No PRT-SE-RACK Yes With Restrictions & Firmware Upgrade 102 Module 126: Limitations of SE Hardware in Protege GX | System Controller Compatibility Memory Limitations The newer DIN Rail controller has a much larger storage capacity and a more powerful processor, enabling us to change the way we store and look up information. Because of the smaller storage and lower processing power, the PCB Controllers (PRT-CTRL-GX, PRT-CTRL-SE, and PRT-SE-RACK) have certain limitations imposed when running on a GX system. PCB Controllers require a fixed structure in the database to ensure efficiency. As DIN Rail Controllers have more power, the fixed structure is no longer required, allowing a dynamic database (meaning more flexibility and no limitations on particular records). These limitations are implemented by restricting the number of records each Controller can store: Description Number Description Number Access Levels 248 Input Expanders 32 Analog Expanders 8 Keypad Groups 16 Area Groups 32 Keypads 32 Areas 32 Menu Groups 16 Automation Points 32 Output Expanders 8 Data Values 248 Output Groups 128 Door Groups 248 Programmable Functions 64 Doors 64 Reader Expanders 32 Elevator Car Groups 8 Schedules 128 Elevator Cars 8 Services 8 Elevator Floor Groups 32 Users 5000 Elevator Floors 128 Access Levels (per user) 4 Events 2000 Access Cards (per user) 2 Holiday Groups 16 Variables 248 For a complete list, refer to the PRT-GX-SRVR Installation Guide. Level One: Protege GX Installer Study Guide | August 2013 103 Controller Comparison Records PCB Controller running GX Firmware Protege GX DIN Rail Controller Cards per user 2 8 Access Levels per user 4 32 Doors in Access Levels Not supported 16 Door Groups in Access Levels 1 per controller 8 Floors in Access Levels Not supported 16 Elevator Groups in Access Levels 1 per controller 8 Floor Groups in Access Levels 1 per controller 8 PGM Groups in Access Levels 1 per controller 1 Menu Groups in Access Levels 1 per controller 1 Arming Area Groups in Access Levels 1 per controller 8 Disarming Area Groups in Access Levels 1 per controller 8 Outputs in Access Levels 1 per controller 16 Output Groups in Access Levels 1 per controller 1 Doors in a Door Group 64 64 Areas in an Area Group 128 128 Keypads in an Area Group 16 16 Outputs in an Output Group 24 24 Holidays in a Holiday Group 16 16 Elevators in an Elevator Group 128 8 Floors in a Floor Group 128 128 Storage Allocation To assist in saving memory on the PCB Controllers, the Controller memory profile has a number of record types that have restricted or no storage space allocated for the names assigned to records. For example, the Controller can store up to 5000 users but there is only storage space allocated for the names of the first 2000 users. This means that users 2001 – 5000 will not see their name displayed when logging in at an LCD keypad, but will instead get a welcome message such as "Good Morning User 2001". This only affects the display of devices connected to the controller (such as keypads) and does not mean that events or reports created at the server have no names. 104 Module 126: Limitations of SE Hardware in Protege GX | System Controller Compatibility Feature Limitations The other issue affecting compatibility relates to physical hardware restrictions. New features sometimes require a physical change to the hardware as well as changes to software and firmware. You should always check the hardware release notes to ensure that the hardware version you have will support the feature. An example of this is where Access Levels allow you to add individual Doors or Floors. This feature is not supported by PCB Controllers, and requires specific firmware to run on the DIN Rail Controller. Exceeding Limitations The Protege GX Server has no restrictions on the number of records that can be programmed. If you create too many records for the Controller, the Server still attempts to download the data to the Controller. When the Controller receives a record that it does not have room to store, it sends a System Assertion event back to the Server. These events are seen by the Server and added to the Health Status of the Controller, so the technician on site is made aware of the problem. Level One: Protege GX Installer Study Guide | August 2013 105 Review Questions Can an RDM2-PCB Reader Expander be connected to a DIN Controller on a GX System? Yes, it is fully supported No, it is only compatible with a PCB Controller Yes, but it requires a firmware upgrade No, it is only compatible with SE systems When running GX with a PCB Controller, what greeting would 'Gordon Groves' see at a keypad if he was user number 4999? Good Morning User 4999 Good Morning Gordon Groves Nothing, only 2000 users are supported by the PCB Controller on GX Protege GX By ICT When running GX with a PCB Controller, what is the maximum number of users it can store? 5 million 5000 2000 10000 How many doors can be assigned to an access level on a GX system running on a PCB Controller? None, this is not supported by the PCB Controller 2 4 8 If a Controller limitation is exceeded, what happens? Nothing, the Controller ignores anything it can't fit or doesn't know about. The server displays an error. The Controller fault light comes on solid and the status light flashes three pulses. The Controller sends a System Assertion event to the Server. The server displays a message in the Controllers Health Status 106 Module 126: Limitations of SE Hardware in Protege GX | Review Questions Module 127: Protege DIN Rail Hardware Configuration This module outlines the requirements for setting up and configuring DIN Rail hardware. In This Module DIN Rail Hardware Setup ............................................................................................................. 108 LED Indicators ............................................................................................................................. 123 Review Questions ........................................................................................................................ 129 Level One: Protege GX Installer Study Guide | August 2013 107 DIN Rail Hardware Setup The Protege System is an advanced technology security system designed to provide integration with building automation, apartment complex control and HVAC in one flexible package. Communication is over a proprietary high speed protocol across an AES encrypted local area network and an encrypted proprietary RS-485 module network. Using modular-based hardware design, system installers have the flexibility to accommodate any installation whether it's small, large, residential or commercial. Flexible module network architecture allows large numbers of modules to be connected to the RS-485 Module Network. Up to 250 modules can be connected to the Protege System in any combination to the network up to a distance of 900M (3000ft). Communication beyond this distance requires the use of a RS-485 Network Extender Mounting The Protege DIN Rail range is supplied as DIN Rail mount modules and are designed to mount on standard DIN Rail either in dedicated DIN cabinets, Protege Jumbo Cabinet Enclosure with DIN Rail Gear Plates, or generic DIN Rail mounting strip. A section of this DIN Rail strip is provided as a mounting option. When installing the DIN Rail module ensure that there is adequate clearance around all sides of the enclosure and air flow to the vents of the unit is not restricted. It is recommended to install the unit in a location that will facilitate easy access for wiring. It is also recommended that the unit is installed in electrical rooms, communication equipment rooms, closets or in an accessible area of the ceiling. 1. Hook the lower tabs under the bottom edge of the DIN Rail. 2. Push the unit against the DIN Rail mount and press firmly on the top center of the Controller until the upper tab clips over the upper rail. To reduce the risk of damage caused by debris during the installation, install the cabinet enclosure when the unit is not installed on the rails. Removal The unit can be removed from the DIN Rail mount using the following steps: 1. Insert a flat blade screwdriver into the hole in the white tab at the top center of the Controller. 2. Lever the tab up and rotate the unit off the DIN Rail mount. 108 Module 127: Protege DIN Rail Hardware Configuration | DIN Rail Hardware Setup Cabinet Tamper Switch The PSU-DIN includes an onboard enclosure tamper input. This tamper input signals to the monitoring station or remote computer that the enclosure has been opened. The tamper input switch should be mounted into the steel bracket provided and connected to the tamper connection terminal and the V- terminal as shown below. V1+ V1+ V1+ V1+ V1+ V1+ V- V- V- V- V- V- Tamper Switch NO C NC C TP Bracket Connections Power Requirements Protege DIN Rail hardware is supplied by a 12V DC power supply connected to the N+ and N- terminals. It does not contain internal regulation or isolation. It is recommended that an ICT PRT-PSU-DIN is used for this purpose, although any clean 12V DC supply would be suitable. PRT-CTRL-DIN N+ N- NA PRT-PSU-DIN NB V1+ V1+ V1+ V1+ V1+ V1+ V- V- V- V- V- V- To other modules on network N+ N- NA NB Gel Cell Backup Battery L B- B+ N Mains Input + In the configuration shown above, a maximum module network load of 3A can be supplied. This includes all expanders and connected ancillary devices such as readers and PIRs. Level One: Protege GX Installer Study Guide | August 2013 109 When a PSU-DIN is dedicated to module network power, both outputs can be wired in parallel. In this configuration, a maximum module network load of 4A can be supplied. This includes all expanders and connected ancillary devices such as readers and PIRs. PRT-CTRL-DIN N+ N- NA PRT-PSU-DIN NB V2+ V2+ V2+ V2+ V2+ V2+ N+ To other modules on network N- NA NB V- V- V- V- V- V- V1+ V1+ V1+ V1+ V1+ V1+ V- V- V- B- B+ V- V- L Gel Cell Backup Battery V- N Mains Input + The total average PSU loading should be kept below 75% of its rated output. This leaves adequate available supply for fluctuations caused by peak loading or if a field device should become faulty. It will also extend the service life of the power supply. It is recommended that that the power supply used to power the module network is dedicated to this task, and is not used to power other devices, especially noisy devices such as locks. In a small installation this can be achieved by a single PSU, so long as the maximum load of the power supply is not exceeded. PRT-CTRL-DIN Network Module N+ N+ N- NA NB N- NA NB Network Module N+ N- NA NB PRT-PSU-DIN or equivalent 12V DC supply 110 Module 127: Protege DIN Rail Hardware Configuration | DIN Rail Hardware Setup Each section of the Module Network must be supplied from only one point. Connections from more than one 12V supply may cause failure or damage to the units supplying power. PRT-CTRL-DIN Network Module N+ N+ N- NA NB N- NA Network Module NB N+ PRT-PSU-DIN or equivalent 12V DC supply N- NA NB PRT-PSU-DIN or equivalent 12V DC supply In larger installations, the Module Network power supply may need to be split to allow for load sharing between several supplies. This is done by removing the N+ connection from between split sections. Module #2 Module #3 N+ N- NA Power Supply #3 NB N+ N- NA Module #1 NB N+ Power Supply #2 N- NA PRT-CTRL-DIN NB N+ N- NA NB Power Supply #1 Warning: When using multiple power supplies it is important to ensure that all ground connections (V-) are connected between all power supplies and that no power connections (V+) are connected between any power supplies. Level One: Protege GX Installer Study Guide | August 2013 111 Encrypted Module Network The Protege system incorporates encrypted RS-485 communications technology. Always connect the NA and NB terminals of the controller to the NA and NB terminals of the expansion devices and keypads. The N+ and N- must connect to a 12V power supply source capable of supplying the peak current drawn by all modules. If a shielded cable is used, the shield must be connected at only one end of the cable. DO NOT connect a shield at both ends. PRT-CTRL-DIN Network Module N+ N+ N- NA NB N- NA NB N+ N- NA NB Shielded Cable Shielded Cable Shield is frame grounded at one point Network Module Shield not connected Shields are connected together and Isolated PRT-PSU-DIN or equivalent 12V DC supply Warning: The 12V N+ and N- communication input must be supplied from only one point. Connections from more than one 12V supply may cause failure or damage to the units supplying power. Make sure that the power supply can supply enough current for the peak load drawn by all modules connected to the 12V supply, including the Controller itself. The recommended module network wiring specifications are: Belden 9842 or equivalent 24AWG twisted pair with characteristic impedance of 120ohm Maximum total length of cable is max 900m (3000ft) CAT5e / CAT6 are also supported for data transmission when using ground in the same cable (to a maximum length 100m / 328ft) Unused wires in the cable must not be used to carry power to other devices. The 330 Ohm EOL (End of Line) resistor provided must be inserted between the NA and NB terminals of the first and last modules on the RS-485 network. These are the modules physically located at the ends of the RS-485 network cabling. First Module on RS-485 Network N+ N- NA Last Module on RS-485 Network NB N+ 330R To Next Module 112 N- NA NB 330R From Previous Module Module 127: Protege DIN Rail Hardware Configuration | DIN Rail Hardware Setup Card Reader Connection Both the Protege DIN Rail Controller and RDM2 provide access control functionality allowing the connection of 2 Wiegand devices to control 2 doors (entry or exit only) or they can be configured in multiplex mode to allow 4 Wiegand devices controlling 2 doors giving the flexibility of entry and exit readers without the need for additional hardware. The card reader must be connected to the Controller port using a shielded cable Always refer to the card reader manufacturer for detailed installation guidelines The shield connection must only be connected at one end of the cable in the metallic enclosure (frame grounded) Do not connect the shield to a V- connection on the Controller Do not join the shield and black wires at the reading device Do not connect the shield to any shield used for isolated communication All Protege Readers are now shipped with single LED mode set as default. The following diagram shows the connection of a standard Wiegand reader with the controller or RDM2 controlling an access door in entry or exit mode (2 doors, 2 readers). RED BLACK Shielded Cable GREEN WHITE N/R ORANGE BROWN BLUE N/R Shield not connected Shield is frame grounded at one point YELLOW SHIELD Level One: Protege GX Installer Study Guide | August 2013 BZ L1 D1 DO Z4 V- Z3 Z2 V- Z1 V- V+ 113 When operating in multiple reader mode, the Controller or RDM2 allows the connection of 4 Wiegand reading devices controlling two doors each with entry/exit readers. The secondary reader will have all connections wired to the same port as the primary card reader with the DATA 1 connection wired to the opposite reader connection DATA 1 input. SHIELD RED BLACK Shielded Cable GREEN WHITE N/R ORANGE BROWN Shield is frame grounded at one point BLUE N/R YELLOW SHIELD RED BLACK Shielded Cable GREEN WHITE N/R ORANGE BROWN Shield not connected BLUE N/R YELLOW BZ 114 L1 D1 DO BZ L1 D1 DO Z4 V- Z3 Z2 V- Z1 V- V+ Module 127: Protege DIN Rail Hardware Configuration | DIN Rail Hardware Setup Input Connection The Protege DIN Rail Controller and RDM2 both allow the connection of up to 4 contacts for monitoring and controlling access control doors. Each input on the Controller can be used for the door function that is automatically assigned and as a normal input on the system. The following example shows the connection of a normally closed door position monitoring contact to monitor the Open, Closed, Forced and Alarm conditions of the door. N.C. Input Contact 1K 1K REN Input Bond Sense 1K 1K Z4 V- N.O. Input Contact Z3 N.C. Input Contact Z2 1K 1K VZ1 REX Input V- V+ Door Contact 1K 1K N.O. Input Contact Inputs 1-4 and 5-8 can operate as either general purpose inputs or as onboard reader inputs. If used as general purpose inputs, make sure that these inputs are not defined in the onboard reader set up. Input Access Control Function Default Setting Input 1 Door Contact, Port 1 Door Contact, Port 1 Input 2 REX Input, Port 1 REX Input, Port 1 Input 3 Bond Sense, Port 1 General Purpose Input Input 4 REN Input, Port 1 General Purpose Input Input 5 Door Contact, Port 2 Door Contact, Port 2 Input 6 REX Input, Port 2 REX Input, Port 2 Input 7 Bond Sense, Port 2 General Purpose Input Input 8 REN Input, Port 2 General Purpose Input When connected, the REX Input can be programmed to operate regardless of the door contact state. The REX input can also be programmed to recycle the door alarm time to prevent nuisance alarms when the door is held open to permit longer entry. Level One: Protege GX Installer Study Guide | August 2013 115 Lock Connection The DIN Rail Controller provides a connection for an electric strike lock with full monitoring of the lock circuit for tamper and over current/fuse blown conditions. The door lock monitoring can be disabled if it is not required. + B+ 1N4007 Diode BCOM NO COM NO 12VDC Electric Locking Device The lock output is shared with the bell/siren function. You can select another output for the lock control if the bell/siren function is required. To use the lock outputs in conjunction with the onboard reader module, the Lock output for the door associated with the reader port must be configured to be the desired lock output on the controller. This is not configured by default. When using a door with an Entry and Exit Reader, the lock output should be connected to the Bell (CP001:01), and the swap lock option for the second reader input should be enabled to allow the reader LEDs to display the correct status. Note: The Bell output current must not exceed 1.1A or electronic shutdown will be engaged. The DIN Rail Controller and RDM2 provide 2 lock output relays that can be used to switch electric locks V+ V- + NO 1N4007 Diode C NC - NO C 12VDC Electric Locking Device NC + - Power Supply for Locking Devices Max 30VDC When using a door with an entry and exit reader, the LOCK output should be connected to LOCK 1, and enable the swap lock option for the second reader input to allow the reader LED's to display the correct status The 1N4007 diode is supplied with the product and must be installed at the electric strike terminals 116 Module 127: Protege DIN Rail Hardware Configuration | DIN Rail Hardware Setup Electromagnetic spikes can affect normal system operation and in some cases, damage hardware. You must use a diode every time a coil, lock, or relay, is controlled. Waveform with a diode Waveform without a diode When the lock is de-energized from 24VDC, the diode absorbs the "Inductive-Kick". All the energy that the locks coil has to "free" is absorbed by the diode. When the lock is de-energized from 24VDC, there is no diode to absorb all the energy that the coil has accumulated. This energy has to go somewhere, in this case, there is no diode to absorb the energy, so it goes in the cable. Note that voltage goes as low -300VDC. These high spikes can cause electromagnetic disruptions and may affect the normal operation of the system. Even worse, it may damage equipment that is not protected by a diode. Level One: Protege GX Installer Study Guide | August 2013 117 Inputs The PRT-ZX16-DIN has 16 inputs that it monitors the state of using EOL monitored or dry contact devices such as magnetic switches, PIR motion detectors and temperature thermostats. It also monitors up to 16 trouble inputs used to report trouble conditions such as module communication problems. The DIN Rail Controller has 8 onboard inputs and monitors up to 64 trouble inputs. Trouble inputs will open or go in to alarm when the trouble condition is present, and close or return to normal when the trouble condition is restored. The Controller can monitor and control thousands of additional inputs and trouble inputs by using the expansion modules. Devices connected to these inputs can be installed to a maximum distance of 300m (1000ft) from the ZX16 or Controller when using 22 AWG wire. Each zone input may be individually configured for normally opened and normally closed configurations with or without EOL resistors for tamper and short condition monitoring. When using an input with the EOL resistor configuration, the controller generates an alarm condition when the state of a zone changes between open and closed and generates a tamper alarm condition when a wire fault (short circuit) or a cut wire (tampered) in the line occurs. Inputs default to require the EOL resistor configuration. 1K 1K 1K N.C Tamper Z4 C V- Z1 Z3 Z2 Z2 Z3 C V- 1K N.C Tamper Z1 Z5 Z6 N.C Input Contact V- Z7 V+ N.C Input Contact ZX16 with EOL Resistor Configuration Controller with EOL Resistor Configuration Each input can use a different configuration. To program a large number of inputs with a certain configuration, use the multi-select feature within the Protege GX software. Z2 Z3 Z3 V- Z2 Z4 Z1 C ZX16 with No EOL Resistor Configuration 118 VV- N.C Input Contact Z1 N.C Input Contact C Z5 Z6 Z7 V+ When using the No Resistor configuration, the controller only monitors the opened and closed state of the connected input device generating the alarm and seal conditions. Controller with No EOL Resistor Configuration Module 127: Protege DIN Rail Hardware Configuration | DIN Rail Hardware Setup When using the EOL resistor configuration, the EOL resistor option must be configured based on the site requirements. Note these resistor options are supported on the PRT-CTRL-DIN Controller but not all resistor options are supported on all Protege field modules. Value 1 Value 2 Monitored Status 1k 1k Open, Closed, Tamper, Short 1k - Open, Closed <5K7 - Open, Closed No Resistors - Open, Closed 2k2 6k8 Open, Closed, Tamper, Short 10k 10k Open, Closed, Tamper, Short 2k2 2k2 Open, Closed, Tamper, Short 4k7 2k2 Open, Closed, Tamper, Short 4k7 4k7 Open, Closed, Tamper, Short Both the Controller and RDM2 have 8 inputs onboard. These inputs are assigned default functionality if used for access control. The default settings are shown in the following table: Input Access Control Function Default Setting Input 1 Door Contact, Port 1 Door Contact, Port 1 Input 2 REX Input, Port 1 REX Input, Port 1 Input 3 Bond Sense, Port 1 General Purpose Input Input 4 REN Input, Port 1 General Purpose Input Input 5 Door Contact, Port 2 Door Contact, Port 2 Input 6 REX Input, Port 2 REX Input, Port 2 Input 7 Bond Sense, Port 2 General Purpose Input Input 8 REN Input, Port 2 General Purpose Input Any of these inputs that are not configured for use with the onboard reader may be used as general purpose inputs. If the onboard reader is enabled and you wish to use some of these as general inputs, you will need to disable the associated function input in the Reader Expander programming section of the Protege GX software. Level One: Protege GX Installer Study Guide | August 2013 119 Outputs The Controller has 7 onboard outputs. Outputs are used to activate sirens, bells, warning devices, control lighting and doors. The first output on the Controller has a special hardware design that allows it to monitor for fault conditions and is ideally suited to driving sirens or warning devices. The + and - terminals of the Bell output (CP001:01) are used to power bells, sirens or any devices that require a steady voltage output. The bell output supplies 12VDC upon alarm and supports one 30-watt siren. The bell output uses an electronically fused circuit and automatically shuts down under fault conditions. + B+ 1k Resistors BNO COM NC 12VDC siren warning device NO COM NC If the load on the bell terminals returns to normal, the controller reinstates power to the bell terminals on the next transition of the output. When the bell output is not used, the appropriate trouble input will be activated. This can be avoided by connecting a 1K resistor (provided in the accessory bag) across the bell output. If the bell is not being used for another function, and the trouble input is not programmed in the system, a resistor is not required. Connecting a Piezo siren may result in a dull noise being emitted. This is caused by residual current from the monitoring circuit. To prevent this occurring, connect 2 1K resistors in parallel. The Relay Outputs (CP001:03 and CP001:04) on the controller are normally open relay outputs. These outputs can be used to activate larger relays, sounders and lights, etc. B+ Z4 B- VZ2 NO COM NC Z3 1K5 OHM VV- V+ NO COM NC Z1 LED Warning: The Relay outputs can switch to a maximum capacity of 7A. Exceeding this amount will damage the output. 120 Module 127: Protege DIN Rail Hardware Configuration | DIN Rail Hardware Setup If readers are not attached to the reader ports then the Reader 1 L1 and BZ, and the Reader 2 L1 and BZ outputs can be used as general purpose outputs. These can be controlled by assigning the RDxxxGreen R1, RDxxx Beeper R1, RDxxxGreen R2 and RDxxx Beeper R2 outputs of whichever reader module has been configured as the onboard reader module. These are open drain outputs which switch to the V- reference. DO Z4 Z3 Z2 BZ L1 D1 V1K5 OHM VZ1 LED V- V+ Warning: The reader outputs can switch to a maximum capacity of 50mA. Exceeding this amount will damage the output. Ethernet 10/100 Network Interface The communication between the Protege System and the Protege Controller uses a 10/100 Ethernet network operating the TCP/IP protocol suite. The IP address of the Controller can be configured using the LCD Keypad terminal or via the built in web interface. The default IP address is set to a static IP address of 192.168.1.2 with a subnet mask of 255.255.255.0. These IP address settings are commonly used for internal networks. Installing the Controller on an active network requires knowledge of the configuration and structure for the network. Always consult the network or system administrator and ask them to provide you with a fixed IP address that can be assigned to the Controller. When installing an Ethernet connection the Controller should be interfaced using a standard segment (<100m in length) and should be connected to a suitable Ethernet hub or switch. Temporary direct connections can be used for onsite programming by connecting directly to the computer Ethernet port. Level One: Protege GX Installer Study Guide | August 2013 121 Telephone Dialer The Protege DIN Rail Controller provides the ability to communicate alarms and upload information to remote systems using the onboard 2400bps modem. The telephone line can be connected directly to the Controller using the onboard telephone connection terminals. T1i Telco line tip and ring input R1i T1o R1o Telco line out 122 Module 127: Protege DIN Rail Hardware Configuration | DIN Rail Hardware Setup LED Indicators All Protege DIN Rail hardware includes comprehensive front panel diagnostic indicators that can aid the installer in diagnosing faults and conditions. In some cases an indicator may have multiple meanings depending on the status indicator display at the time. Status Indicator The Status indicator displays module status of the module. State Description Continuous fast flash Module attempting registration with controller Continuous slow Module successfully registered with controller flash Single flash i Module communications activity When the fault and status indicators are flashing alternately, the module is in the identification mode, enabling the installer to easily identify the module in question. Upon either a module update or the identification time period set expiring, the module will return to normal operation. Fault Indicator The Fault indicator is lit any time the module is operating in a non-standard mode. State i Description Continuous slow flash (red) Module is in boot mode awaiting firmware update Constantly on (red) Module is in error state and will flash an error code with the status indicator. Refer to the Error Code Display section to determine the error. When the fault indicator is on, the status indicator will show an error code. Refer to the Error Code Display section for more information. Level One: Protege GX Installer Study Guide | August 2013 123 Error Code Display The following table is only valid if the FAULT indicator is CONSTANTLY ON and the STATUS indicator is FLASHING RED. If the fault indicator is FLASHING the module requires a firmware update or is currently in firmware update mode. The status indicator will FLASH RED with the error code number. The error code number is shown with a 250ms ON and OFF period (duty cycle) with a delay of 1.5 seconds between each display cycle. Flash Error Description 1 Unknown Error Code The error code returned by the system controller could not be understood by the module. Contact Integrated Control Technology. 2 Firmware Version The firmware version on the module is not compatible with the system controller. To clear this error, update the module using the module update application. 3 Address Too High The module address is above the maximum number available on the system controller. To clear this error change the address to one within the range set on the system controller, restart the module by disconnecting the power. 4 Address In Use The Address is already in use by another module. To clear this error set the address to one that is not currently occupied. Use the view network status command to list the attached devices, or the network update command to refresh the registered device list. 5 Controller Secured Registration Not Allowed Controller is not accepting any module registrations. To allow module registrations use the network secure command to change the secure setting to not secured. 6 Serial Number Fault The serial number in the device is not valid. Return the unit to the distributor for replacement. 7 Locked Device The module or system controller is a locked device and cannot communicate on the network. Return the unit to the distributor for replacement. Power Indicator The Power indicator is lit whenever the correct module input voltage is applied. State 124 Description On Correct module input voltage applied Off Incorrect module input voltage applied Module 127: Protege DIN Rail Hardware Configuration | LED Indicators Relay Indicators The Relay 1 and Relay 2 indicators show the status of the lock output relay. State Description On (red) Relay output is ON Off Relay output is OFF Zone (Input) Indicators Whenever an input on the Controller is programmed with an input type and area, the input status is displayed on the front panel (indicators 1-8) corresponding to the physical input number (Z1-Z8). This allows easy walk test verification of inputs without the need to view the inputs from the keypad or Protege interface. State Description 1 Off Input is not programmed 1 On (red) Input is in an OPEN state 1 On (green) Input is in a CLOSED state 1 1 1 Flashing (red) Input is in a TAMPER state 1 1 1 Flashing (green) Input is in a SHORT state Reader Data Indicators The R1 and R2 indicators display the status of the data being received by the onboard readers. State Description Short (red) flash A SHORT flash (<250 Milliseconds) will show that data was received but was not in the correct format. Long (red) flash A LONG flash (>1 Second) indicates that the unit has read the data and the format was correct. PSU Indicators V1 Output/V2 Output Indicators The V1 Output and V2 Output indicators will show the status of the 12VDC output. State Description Constantly on (green) 12VDC output operating OK Continuous flash 12VDC output failure Level One: Protege GX Installer Study Guide | August 2013 125 Battery Indicator The Battery indicator will show the status of the backup battery. State Description Continuous flash (red) Backup battery is disconnected Constantly on (red) Backup battery failed its dynamic battery test Constantly on (green) Last backup battery dynamic test successful Temp Indicator The Temp indicator will show the status of the unit's core temperature. State Description Constantly on (red) Core temperature exceeded. Over Temp Shutdown Activated Continuous flash (red) Core temperature within 10˚C of Over Temp Shutdown Constantly on (green) Core temperature OK Core Temperature on Output Load Operation In addition to the comprehensive front panel diagnostic indicators, the following table illustrates how the core temperature of the Power Supply will influence the operation of the V1 and V2 Outputs. Core Temperature Output Load Operation Status < 70˚C 70˚C ~ 80˚C Outputs Enabled (Mains Power) Outputs Supplied by Battery Output Over-Current Failure Trouble Input Activated Over-Current Output Shutdown Activated 126 > 80˚C Module 127: Protege DIN Rail Hardware Configuration | LED Indicators Output Current Indicator The Output Current indicator will show the status of the output current for both V1+ and V2+. State Description Constantly on Output current exceeded. Over Current Shutdown Activated Continuous flash Output current exceeded maximum, approaching Over Current Shutdown Constantly on (all indicators) Maximum output current level reached Constantly on (partial) Indicated output current level reached Output Current Influence on Output Load Operation In addition to the comprehensive front panel diagnostic indicators, the following table illustrates how the total output current drawn from the Power Supply will influence the operation of the V1 and V2 Outputs. Output Load Current Output Load Operation Status 0 ~ 4.0A 4.0 ~ 5A Outputs Enabled (Mains Power) Outputs Supplied by Battery 5A ~ Short Circuit Output Over-Current Failure Trouble Input Activated Over-Current Output Shutdown Activated Controller Indicators Ethernet Link Indicator The Ethernet indicator shows the status of the Ethernet connection. State Description On (green) Valid link with a hub, switch or direct connection to a personal computer detected Flashing (green) Data is being received or transmitted Off Ethernet cable not connected, no link detected Level One: Protege GX Installer Study Guide | August 2013 127 Modem Indicator The Modem indicator shows the status of the onboard modem. State Description On (green) Modem has control of telephone line Off Modem is not active Bell Indicator The Bell indicator shows the status of the bell output and the over current or circuit fault conditions. State 128 Description Off Bell is connected, output is OFF On (green) Bell is ON Single (green) flash Bell is ON, the circuit is in over current protection Two (green) flashes Bell is OFF, the circuit to the siren/bell is cut, damaged or tampered Module 127: Protege DIN Rail Hardware Configuration | LED Indicators Review Questions In the configuration shown, what is the maximum continuous load that can be drawn by the module network? PRT-CTRL-DIN N+ N- NA PRT-PSU-DIN NB V2+ V2+ V2+ V2+ V2+ V2+ To other modules on network N+ N- NA NB V- V- V- V- V- V- V1+ V1+ V1+ V1+ V1+ V1+ V- V- B- B+ V- V- L Gel Cell Backup Battery V- V- N Mains Input + 4 Amps 10 Amps 3.3 Amps 3 Amps To monitor a cabinet tamper switch using a dedicated tamper input, which module is required? PRT-PSU-DIN Power Supply PRT-CTRL-DIN Controller PRT-ZX16-DIN Zone Expander PRT-RDM2-DIN Reader Expander Where and when should a diode be fitted? Across the coil when a coil is being controlled Across the lock when a lock is being controlled Across the relay when a relay is being controlled All of the above Level One: Protege GX Installer Study Guide | August 2013 129 Where does the shield of the cable connected to a reader get connected? Frame grounded at one point. Connected to the reader shield. Wired to V- at the Reader Expander. Connected to the reader shield. Card reader cable is not shielded. Frame grounded at one point. Not connected to the reader shield. Is the wiring method shown in this diagram acceptable? Assume the power supplies indicated in the diagram shown are DIN Rail PSU's. Is this an acceptable wiring method? If so, what is the maximum recommended average current that the Controller could draw? Module #2 Module #3 N+ N- NA NB N+ N- Power Supply #3 NA Module #1 NB N+ N- NA PRT-CTRL-DIN NB Power Supply #2 N+ N- NA NB Power Supply #1 This is an unacceptable wiring method Acceptable, 3 Amps Acceptable, 9 Amps Acceptable, 4 Amps What does a constant red fault indicator mean? The Module is in identification mode Module communications activity The module is in error state. The status light will flash an error code. The module is in boot mode awaiting firmware What does a continuous fast green flash of the status indicator mean? The Module is in identification mode There is Module communications activity The Module is online The Module is attempting to register with a Controller 130 Module 127: Protege DIN Rail Hardware Configuration | Review Questions The Bell indicator on a DIN Controller is flashing two green flashes. What does this mean? The Bell output is off. The circuit to the bell is ok. The Bell output is off. The circuit to the siren / bell is cut, damaged or tampered. The Bell output is on. The circuit to the bell is ok. The Bell output is on. The circuit is in over current protection. What does a flashing green indicator on an input mean? The input is in an open state The input is in a closed state The input is in a tamper state The input is in a short state Level One: Protege GX Installer Study Guide | August 2013 131 Module 130: Protege GX Hardware Setup This module outlines the requirements for setting up and bringing a Controller online. In This Module DIN Rail Controller Setup ............................................................................................................. 134 PCB Controller Setup ................................................................................................................... 137 Keypad Configuration .................................................................................................................. 141 Review Questions ........................................................................................................................ 143 Level One: Protege GX Installer Study Guide | August 2013 133 DIN Rail Controller Setup To bring a DIN Rail Controller online with your Protege GX Server, the appropriate IP address, subnet mask and gateway (if applicable) must be assigned. The DIN Rail Controller has a factory default IP address of 192.168.1.2 and this should be changed to suit the IP addressing scheme of your site. The IP address can be changed using the built in web interface, or from a keypad. Assigning the IP Address via the Web Interface If the current IP is known, the recommended method is to connect to the built in web interface to edit the settings. 1. With the Controller connected to your network, type the current IP address into the address bar of your web browser. The default IP address is 192.168.1.2. 2. A login screen appears. Enter the user name and password: The default user name is admin. The default password is admin. 3. The Controller Configuration screen is displayed: 4. Enter the required settings, and click Save. 5. Restart the Controller. 134 Module 130: Protege GX Hardware Setup | DIN Rail Controller Setup Assigning the IP Address from a Keypad If the current IP address of the Controller is not known, it can be viewed and/or changed using a PRT-KLCD keypad. 1. Connect the keypad to the module network. 2. Log in to the keypad using any valid Installer code. The default Installer code is 000000. If the default code has been overridden and you do not know the new codes, you will need to force the Controller into its default state. This is achieved by connecting Reader 2 D0 to Reader 2 L and power cycling the unit. Note that this will erase all existing programming as well as setting up the default Installer code. 3. Once logged in press [Menu] [4] [2] [1] to display the current IP address *Main Menu* 4. Install *Install Menu* 2. IP config *IP Menu* 1. View/Edit IP 4. Edit the address using the numeric and [LEFT] [RIGHT] keys IP Address 192.168.001.002 IP Address 192.168.001.003 5. Press the [ARM] key to save your changes Press [ENTER] to acknowledge 6. You'll be prompted to confirm your changes. Press the [ENTER] key to acknowledge. If you press any other key, your changes will be discarded. 7. Go back to the View/Edit IP menu by pressing [ENTER] or [1]. Press the [UP] key to change the subnet mask (if required). Net Mask 255.255.255.000 By default, the PCB Controller comes with a 24 bit class C subnet mask already set. 8. Press the [UP] key again, to display the Gateway address. Gateway 192.168.001.001 This should be changed if your server is not on the same subnet, or if you are using an NTP server on another subnet, and should be set to the IP address of your network's router. Once finished, you must restart the Controller for the changes to take effect. Restarting the Controller There are three methods to restart the Controller: 1. Cycling the power 2. Using the web interface and clicking the Restart link 3. Using the keypad and selecting [Menu] [4] [2] [2] Level One: Protege GX Installer Study Guide | August 2013 135 Setting the Controller to use a Known IP Address If the current IP address is not known, it can be temporarily defaulted to 192.168.111.222. This resets the IP address for as long as power is applied but will not save the change permanently. Once the link is removed and power is cycled to the unit, the previously configured IP address is used again. This means that if the currently configured IP address is unknown, you are able to connect to the web interface to view and/or change it. 1. Remove power from the Controller by disconnecting the 12V DC input. 2. Connect a wire link between Reader 1 D0 input and Reader 1 L1 output. 3. Power up the Controller. 4. When the Controller starts up it will use the following settings: BZ L1 D1 DO READER 1 IP address : 192.168.111.222 Gateway : 192.168.111.254 Net Mask : 255.255.255.0 DHCP : disabled 5. Connect to the web interface by typing 192.168.111.222 into the address bar of your web browser, and view or change the IP address as required. Training Exercise For the purposes of this training, use either of the previous methods to: 1. Change the Controller IP address to 192.168.1.3 -and2. Change the Event Server IP address to 192.168.1.100 Defaulting the Controller The Protege DIN Rail Controller can be set back to factory default using the following procedure. This resets all internal data and event information, but does not reset the IP address. Defaulting the Controller sets the default installer code to 000000 until the new configuration data is downloaded to the Controller 1. To default a controller, remove the power by disconnecting the 12V DC input. 2. Connect a wire link between Reader 2 D0 input and Reader 2 L1 output. 3. Power up the Controller. BZ 4. Once the Controller has started and the Status light is flashing, remove the wire link from the Reader 2 connector. L1 D1 DO READER 2 The system will now be defaulted with all programming and settings returned to factory configuration. 136 Module 130: Protege GX Hardware Setup | DIN Rail Controller Setup PCB Controller Setup To get a PCB Controller online with your Protege GX Server, there are a number of things that need to be set up. Firstly, the Controller needs to have an appropriate IP address, subnet mask and gateway (if applicable) assigned. The PCB Controller has a factory default IP address of 192.168.1.2 and this should be changed to suit the IP addressing scheme of your site. The IP address can be changed using the keypad, or using Telnet. Assigning an IP Address via the Web Interface If the current IP address is known, use the built in web interface to enter the details. This method can only be used if the IP address is known. 1. With the Controller connected to your network, type the IP address into the address bar of your browser. The default IP address is 192.168.1.2 2. A login screen appears. Enter a valid Installer Code. The default is 000000. 3. Click the Network link. The Network Configuration screen is displayed 4. Enter the required settings, and click save. 5. Click the System link. The Controller serial number is shown here. Note this down, as you will need it to connect later. Once finished, you must restart the Controller for the changes to take effect. This can be done by cycling power to the Controller, using Telnet, or via the keypad. Assigning an IP Address via the Keypad 1. The Protege GX PCB Controller comes programmed with a default installer PIN of 000000. Login to the system by entering this code into the keypad. ProtegeGX By ICT Enter user code: ****** Good Morning Installer 2. Press [Menu] [4] [2] [1] to display the current IP address *Main Menu* 4. Install *Install Menu* 2. IP config *IP Menu* 1. View/Edit IP 3. Edit the address using the numeric and [LEFT] [RIGHT] keys IP Address 192.168.001.002 IP Address 192.168.001.003 4. Press the [ARM] key to save your changes Press [ENTER] to acknowledge 5. You'll be prompted to confirm your changes. Press the [ENTER] key to acknowledge. If you press any other key, your changes will be discarded. Level One: Protege GX Installer Study Guide | August 2013 137 6. Go back to the View/Edit IP menu by pressing [ENTER] or [1]. Press the [UP] key to change the subnet mask (if required). Net Mask 255.255.255.000 By default, the PCB Controller comes with a 24 bit class C subnet mask already set. 7. Press the [UP] key again, to display the Gateway address. Gateway 192.168.001.001 This should be changed if your server is not on the same subnet, or if you are using an NTP server on another subnet,and should be set to the IP address of your network's router. Once finished, you must restart the Controller for the changes to take effect. This can be done by cycling power to the Controller, or using Telnet. Assigning an IP Address via Telnet 1. Open a command prompt (hold down the Windows key and press [R], then type cmd and hit [Enter]) 2. Type telnet 192.168.1.2 10001 then press [Enter] followed by the [Esc] key. The telnet console displays version information and the serial number of the Controller. Keep a note of the serial number as you will need it later. 3. Enter the default password admin and press [Enter] to display the full Controller menu. 4. Type A and press [Enter] to amend the IP address. 5. Enter the new IP address then press [Enter] 6. Select B if you need to change the subnet mask and C if you need to change the gateway. 7. Save the changes by typing J and pressing [Enter]. 8. You must restart the Controller to apply the changes. Type K and press [Enter], type restart when prompted, then press [Enter] again. Alternatively, you can restart by cycling power to the Controller. 138 Module 130: Protege GX Hardware Setup | PCB Controller Setup If Telnet is Not Recognized Telnet is included as a standard feature with Windows Vista and Windows 7, however the feature is not installed by default and must be enabled. If Telnet has not been enabled, you will receive an error: 'telnet' is not recognized as an internal or external command, operable program or batch file To Enable Telnet: 1. From the Windows Start Menu, select Control Panel >Programs > Turn Windows Features On or Off 2. This opens the Windows Features dialog. Scroll down until you see the Telnet Client, select the option then click OK. Once enabled, you will be able to continue with the IP Address Change process. If prompted, restart your computer before continuing. Setting the Controller to a Temporary IP Address This method of changing the IP address is used when you do not know the current IP address of the Controller. 1. Turn on DIP switch 3 then cycle the power. The Controller will start up with a temporary IP address of 192.168.111.222 2. Change your PC IP address to something on the same subnet (such as 192.168.111.100), then follow the Telnet instructions to change the IP address permanently. When you have finished, remember to switch DIP switch 3 off again. Level One: Protege GX Installer Study Guide | August 2013 139 Setting the Event Server IP Once the Controller IP address is set, the Event Server IP address must be set to tell the Controller which IP address to use to send messages to the Event Server. 1. Telnet back into your controller using your new IP address 2. Type D and press [Enter] 3. Type 1 to select the first address and press [Enter]. Type in the IP address of your GX Server and press [Enter] In most cases, you will only need to set the first IP address. The other two are used only when there are multiple paths to your server. Setup of multiple paths is not covered in this training module. 4. Save the changes by typing J and pressing [Enter]. 5. You must restart the Controller to apply the changes. Type K and press [Enter], type restart when prompted, then press [Enter] again. Alternatively, you can restart by cycling power to the Controller. Defaulting the Controller It is also good practice to default your Controller when you first install it. This clears out any configuration data, but leaves all IP configuration intact. 1. To default a Controller, turn DIP switch 4 on, then cycle power to the Controller. 2. Once the Controller is running (the fault light is off and status light is flashing once per second), turn DIP switch 4 off again. Your PCB Controller is now ready to connect to the Protege GX Server. 140 Module 130: Protege GX Hardware Setup | PCB Controller Setup Keypad Configuration Accessing the Configuration Menu Before the Protege LCD Keypad module can communicate, it must be assigned an address. This, and other settings, are configured using the device configuration menu: 1. Apply power to the device and when the keypad version information is displayed, press the key followed by the X key 2. The configuration menu is displayed 3. Scroll the available options by pressing the item. and keys and use the key to select the menu The configuration menu can only be accessed when the device powers up. It cannot be accessed when the system is operational. Setting the Keypad Device Address The address selection sets the address of the LCD Keypad. This address must be a unique address in the system below address 250. Enter keypad address: 001 Use the numerical keys 0 to 9 to program the address and press the To exit without making changes press the key to save the setting. key. Adjusting the Display Contrast The display contrast setting adjusts the LCD display contrast settings. Contrast [******* ] Use the To exit without making changes press the and keys to adjust the contrast and press to save the setting. key. Resetting a Keypad to Factory Defaults The default setting resets the keypad to the factory default settings. Press [ENTER] to default keypad. Press To exit without defaulting the keypad press the to default the keypad. key. Level One: Protege GX Installer Study Guide | August 2013 141 Displaying Keypad Version Information The version menu option displays the version and build information of the keypad. ICT Protege LCD Keypad Ver 1.44 142 Press the key to exit. Module 130: Protege GX Hardware Setup | Keypad Configuration Review Questions How do you default a DIN Rail Controller? Use the web interface to connect to the Controller, then click on Restart Wire a link between D0 and L1 of reader port 2, then cycle power Turn on DIP switch 4, then cycle the power Log in at a keypad, then select [Menu] [4] [2] [2] [Enter] If the IP address of a DIN Rail Controller is unknown, how can you find it? Turn DIP switch 3 on, then cycle power to the Controller to temporarily set the IP address to 192.168.111.222 Connect a keypad, press [Menu] [4] [Arm], then scroll down three times Use the web interface to browse to the default IP address of 192.168.1.2 Connect a link from L1 to D0 on reader port 2, then cycle power to the Controller to temporarily set the IP address to 192.168.111.222 What is the default IP address of a DIN Rail Controller 192.168.1.2 192.168.1.3 192.168.111.222 255.255.255.0 When the IP address of a Controller is changed, what additional step(s) must be taken? Perform a module update Save the settings Cycle power to the Controller Save the settings, then restart the Controller If the IP address of a PCB Controller is unknown how can you find it? Turn DIP switch 3 on, then cycle power to the Controller to temporarily set the IP address to 192.168.111.222 Connect a keypad, press [Menu] [4] [Arm], then scroll down three times Either of the above Connect a link from L1 to D0 on reader port 2, then cycle power to the Controller to temporarily set the IP address to 192.168.111.222 Level One: Protege GX Installer Study Guide | August 2013 143 How do you access Telnet for the first time on a Windows 7 PC? Start > Run, type CMD and press [Enter], then type telnet [Controller IP] 10001 Control Panel > Programs > Turn Windows Features On or Off then check (enable) Telnet Client Control Panel > Programs > Turn Windows Features On or Off then check (enable) Telnet Server Control Panel > Programs > Turn Windows Features On or Off then check (enable) Telnet Server and Telnet Client What is the default IP address of a PCB Controller? 192.168.1.2 192.168.1.3 192.168.1.100 192.168.111.222 How is the module address set on a Protege LCD keypad? Using DIP switches From the Keypad Configuration Menu: [X] at version info during power up From the Keypad Configuration Menu: [Menu], [4], [Arm] once the system is operational Using the Module Address tool from within the GX software 144 Module 130: Protege GX Hardware Setup | Review Questions Module 125: Protege GX System Design A detailed system design put together up front will result in a much smoother and efficient installation and configuration process. This module outlines the requirements for designing a Protege GX system. In This Module Identifying Requirements .............................................................................................................. 146 Understanding Physical Design .................................................................................................... 148 Planning the Training System ....................................................................................................... 159 Review Questions ........................................................................................................................ 162 Level One: Protege GX Installer Study Guide | August 2013 145 Identifying Requirements A well planned system design will result in a much smoother and efficient installation and configuration process. It is important to get as much information about what the end user is trying to achieve early on. Sit down with your end user or consultant and run through their requirements. Try to keep the design as simple as possible. Ask the questions that will give you all the information you need for your system design. The Five W's of System Design When designing an access control system, the five W’s need to be asked: Who are the people we are managing? What are the people allowed to do? Where are the people allowed to go? When are they allowed to do these things or go these places? Why did someone do something or go somewhere? The first 4 questions relate to system design, the last is about monitoring and reporting from the system once it is up and running. All are important to think about before you install or program your system. Determine Areas to be Managed First, look at the key areas that need to be managed. Where are the entry points to the areas? How are we going to control access to these areas? Do we need to know when people are exiting these areas as well as entering them? Do we need intruder detection in these areas? From this information, we can list our physical hardware and areas required. Determine Schedule Requirements Secondly, find out what times the Users come and go. Are there people that need to access the building 24/7? Are there standard office hours? Are there multiple shift times? Should managers be given extended access times? Answers to these questions will allow us to create our schedules. 146 Module 125: Protege GX System Design | Identifying Requirements Determine User Requirements Next, we need to look at the people we are trying to manage. We need a list of these people, and we need to group them by function. For example, Managers, Office staff, Cleaners. This, along with the information we already have will allow us to create our Users and Access Levels. Determine Information Requirements Finally, the why part of the questioning relates to how the end user intends to extract information from the system once it is up and running. Are they going to have operators actively monitoring the system, or are they only intending to generate reports as required? Once you have all this information, collate it into a design document which all parties agree on. This document will be used throughout your installation and programming. Level One: Protege GX Installer Study Guide | August 2013 147 Understanding Physical Design Cable Selection Perhaps one of the most important yet most commonly overlooked design considerations is the selection of the right cable types. While cost savings in materials can be made by selecting lower cost cables, the cost of troubleshooting and resolving issues that often arise from using such cable usually outweigh the benefits. CCA Cables While Copper Clad Aluminium cables are attractive from a cost point of view, there are a number of negative side effects. Higher attenuation (signal strength lost over shorter distance) Lower tensile strength (subject to damage if pulled too tightly during installation) Poor flexibility Higher temperature rises when carrying higher currents Exhibit oxidation of exposed aluminium at points of connection ICT recommends against the use of CCA cables, especially for Module Network and Reader connection. RS-485 Module Network While RS-485 is quite a robust network solution, any data transmission can be affected by noise. Cat5e and Cat6 data cables were not designed to be used in RS-485 networks. While it can be used, it is recommended that a cable specifically designed for RS-485 networks, such as Belden 9842 is used. This is a Shielded, twisted pair, multicore cable. This is especially important for longer network runs, and in electrically noisy environments. Belden 9842 or equivalent Controller 900m / 3000ft max 148 Module 125: Protege GX System Design | Understanding Physical Design Reader Cable Type Wiegand readers also rely on data transmission, and can therefore be affected by noise. Cat5e and Cat6 data cables were not designed to be used for wiegand readers. It is recommended that a cable specifically designed for Wiegand readers, such as Alpha 5388c is used. This is a Shielded, non twisted multicore cable. Reader Cable Distance The maximum distance between the reader and expander is 150m / 500ft if using an 0.8mm or 18AWG cable such as Alpha 5386c or 5388c. If using a 0.6mm or 22AWG cable such as Alpha 5196c or 5198c, the maximum recommended distance is 80m / 260ft. Expander Reader Max 150m/500ft 18AWG reader cable Reader Max 80m/260ft 22AWG reader cable Voltage Drop An important consideration for cable selection, especially for devices with a high power demand, such as locks is Voltage Drop. As the distance of a cable increases, so too does its internal resistance. This leads to voltage drop. Take an average Maglock for instance. Running at 12 volts, it will draw around 500mA. If this was connected to a PSU-DIN via a 0.5mm security cable, the voltage drop across the cable would bring the voltage at the lock to below 12 volts after just 26m (85ft). Level One: Protege GX Installer Study Guide | August 2013 149 Voltage Drop Calculation While it is recommended that voltage drop calculations are made with every system design, the following table offers a general guide. 0.2mm 0.5mm 0.6mm 0.8mm 1mm 2mm PIR 150m 225m 300m X X X Keypad 100m Reader X X 80m 150m X X Strike / Drop Bolt X 30m 40m 100m 160m 250m Mortice / Single Mag X 15m 20m 50m 80m 130m Double Maglock X X 10m 25m 40m 65m 24AWG 23AWG 22AWG 18AWG 16AWG 14AWG PIR 500ft 750ft 985ft X X X Keypad 330ft Reader X X 260ft 500ft X X Strike / Drop Bolt X 100ft 130ft 330ft 525ft 820ft Mortice / Single Mag X 50ft 65ft 165ft 260ft 425ft Double Maglock X X 30ft 80ft 130ft 210ft For more reading on calculating Voltage Drop, see http://en.wikipedia.org/wiki/Voltage_drop PIR Cable Distance The maximum distance between an expander and any security detection device is 300m or 985ft. Power consumption should also be considered. The diagram below sets general guidelines for ICT PIRs. Expander PIR 300m/985ft 0.6mm/22AWG cable PIR 150m/500ft 0.2mm/24AWG cable 150 Module 125: Protege GX System Design | Understanding Physical Design Lock Cable Distance Incorrect conductor sizing for lock power can lead to: Cable degradation Lock malfunction Decreased bond strength PSU overload PSU Expander 250m/820ft 2mm/14AWG Strike/dropbolt 30m/100ft 0.5mm/23AWG 130m/425ft 2mm/14AWG Mortice/single mag 15m/50ft 0.5mm/23AWG 65m/210ft 2mm/14AWG Double mag 10m/30ft 0.6mm/.23AWG Output Wiring If a Controller or expander loses power for any reason, all relays will return to their un-powered state. When designing a system it is a good idea to consider what would happen in failed condition to any devices you may be controlling with these relays. Output terminals are labeled in their un-powered state. Where a terminal is labeled NC or Normally Closed this set of contacts will be closed when the output is off. If your system was specified to control some lighting, it would be a good idea to use the NC or Normally Closed terminals to do this. If for some unexpected reason, the module fails and the output turns off, then the lights being controlled would be turned on. Ultimately, in a failed state it would be better for the lights to be stuck on than stuck off. This can however lead to programming confusion, but as long as smart naming conventions are used, this can be avoided. For instance, the above example could be labeled Lighting Control (ON to de-energize). Level One: Protege GX Installer Study Guide | August 2013 151 Power Supply Design Any system is only as good as the power supply behind it. Wherever possible, the following should be adhered to: Module network power should be from a dedicated feed. Lock power should be separated from other devices. PSU average load should be kept below 75% of rated capacity. Batteries should always be connected to the PSU. Power supply loading calculations should always be carried out to ensure you have enough power to keep your system running under all conditions. Device Intelligence Device intelligence refers to a devices ability (or lack of) to continue functioning if connection to the rest of the system is lost. A fully intelligent solution is one that appears to behave in the same manner regardless of whether it is connected to the rest of the system or not. Controller Intelligence The Protege GX Controller is a fully intelligent device. If communications are lost to the server the Controller will continue to function stand-alone as per the last received configuration. Areas can still be armed and disarmed Access will still be granted or denied Schedules will be followed Events will be stored locally Off site monitoring will continue to function if a path to the monitoring station is still available Non-Intelligent Devices Devices that are designed to expand the Controllers functionality are often non-intelligent. These devices rely on the Controller for instructions on how to operate. They include: Input expanders Output expanders Keypads RDM2 and RDS2 reader expanders Analog expanders These devices will have limited or no functionality if they lose their RS-485 Module Network connection to the Controller. 152 Module 125: Protege GX System Design | Understanding Physical Design Offline Behavior Input Expanders When RS-485 communications are lost, input expanders continue to process the states of inputs, however it is the Controller that is responsible for carrying out any actions required such as triggering sirens or off site monitoring. Input expanders do not store events, so if an input opens and closes while the expander is offline, it will never be logged or actioned. If an input changes state while offline and remains in the new state, it will be logged and actioned when the expander comes back online. Because the input state is still processed, LED operation will continue to follow the state of the input while it is offline. Output Expanders When RS-485 communications are lost, output expanders will keep all outputs in the same state they were last in. If an output was supposed to change state for any reason, it will not happen while the module is offline. When the module comes back online, the Controller updates the expected states of all the outputs. Reader Expanders All Protege reader expanders have three programmable modes of operation which they will follow if communications to the Controller are lost. 1. No Users (Entry is denied for everyone) 2. Any card (Entry is granted for any card that can be read) 3. First 10 users + Cache (The first 10 programmed users and a number of stored users will be allowed access) Offline Operation No Users The No Users mode of offline operation should only be used for perimeter and high security doors. In this mode of operation, all card and / or PIN access attempts will be denied. REX or request to exit will be granted, and an offline warning of four short beeps will be emitted from any readers attached to the door. If this mode is selected, it is critical that another means of entry to the area is provided. This could be through an alternative door, via a key override switch or an emergency break glass switch. Level One: Protege GX Installer Study Guide | August 2013 153 Any Card The Any card mode of offline operation should only be used for high volume internal low security doors. In this mode of operation, all card and / or PIN access attempts will be granted. All granted events, including REX events will generate the offline warning of four short beeps from any readers attached to the door. There are two important points to remember with this mode: 1. Any card that can be read by the reader will be granted access 2. Any PIN entered at a reader in Card or PIN or PIN only mode will be granted access First 10 Users + Cache The First 10 users + Cache mode of offline operation is recommended for most doors. In this mode of operation, access will be granted for the first 10 programmed users (usually the most important people on the system, such as the installer and master). Access will also be granted for a number of cached offline users. All granted events, including REX events will generate the offline warning of four short beeps from any readers attached to the door. RDM2 & RDS2 The RDM2 and RDS2 reader expanders are non-intelligent reader expanders, and will function as follows in offline mode. In the cached mode of offline operation, the RDM2 and RDS2 will currently grant access for any card that has a facility code matching one of the last 50 facility codes to be presented. This is currently being reviewed and is likely to change in the near future. Events will not be stored while in offline mode. Schedules will not be followed while in offline mode. Doors that are unlocked will lock while in offline mode. Door alarms such as DOTL and Forced will not be processed while in offline mode. If an input used for intruder detection opens and closes while the expander is offline, it will never be logged or actioned. If an input used for intruder detection changes state while offline and remains in the new state, it will be logged and actioned when the expander comes back online. Because the input state is still processed, LED operation will continue to follow the state of the input while offline. 154 Module 125: Protege GX System Design | Understanding Physical Design RDI2 & RDE2 The RDI2 and RDE2 reader expanders are intelligent reader expanders, and will continue to function as follows in offline mode: The first 2000 users in the controllers database are stored in the reader expander's offline database and will be granted access based on the their configured access levels. The last 2000 events will be stored while in offline mode and uploaded to the controller once online. Schedules will be followed while in offline mode. Doors that are unlocked by schedule will remain unlocked while in offline mode, until they are scheduled to be locked again. The reader expander's offline database can be configured to be updated once per day at a specified time. When updated a copy of the currently programmed settings in the controller is sent to all connected intelligent reader expanders. Robust RS-485 Engineering When engineering your system, a good system design will attempt to avoid situations where expanders are forced into their offline mode. PSU Controller ZX16 PX8 RDM2 RDM2 * RS-485 Protected by Cabinet If RS-485 standards are followed, the correct cable used and the cable is protected, the RS-485 module network has an extremely low failure rate. Expanders that are located in the same cabinet as the Controller are very unlikely to fail, and are therefore considered to be a robust solution. Level One: Protege GX Installer Study Guide | August 2013 155 Centrally Located Equipment Where cabinets are located together, and the RS-485 cable is well protected between them, this solution is also considered robust. PSU Controller ZX16 PX8 RDM2 RDM2 ZX16 PX8 Cable protected by conduit Centrally locating equipment and running cable out to field devices can often be a cost effective way of providing a robust solution. External RS-485 Cabling However, when the RS-485 Module Network leaves the cabinet, it is at risk of being damaged. PSU Controller RDM2 RDM2 ZX16 Cabinet 1 PX8 Cabinet 2 Cable is at risk of being damaged If the cable is completely cut here, the ZX16 and PX8 in Cabinet 2 will cease to function. If the RS-485 Module Network cable is well run, and protected by cable tray or conduit where applicable, it is unlikely to be damaged, and therefore unlikely to present a problem, however this is a risk that must be considered during the designing and planning of a new system. Sometimes the RS-485 Module network must leave the cabinet. For instance, when a keypad is required on the system. 156 Module 125: Protege GX System Design | Understanding Physical Design If the integrity of the RS-485 Module Network is critical, then an intelligent reader expander with an isolated secondary module network can be used. Cabinet PSU Controller ZX16 RDI2 Primary RS-485 Keypad Secondary RS-485 Now if the cable outside the cabinet gets cut, it will only affect the keypad. *Alternatively, a 3rd party RS-485 LAN isolator can be used. Utilizing Ethernet Another option for a robust system design is to use Ethernet. Although an ethernet cable can still be cut or damaged, it is much less likely to affect the rest of the network. LAN PSU Controller TLCD ZX16 RDM2 Cabinet The Controller connects to the network using ethernet. The RS-485 Module Network and expanders are protected inside the cabinet, and a TLCD touchscreen is used for arming and disarming the system. Not only does the TLCD offer more functionality for the end user, it also protects the RS-485 module network by being completely isolated. Level One: Protege GX Installer Study Guide | August 2013 157 Multiple Controllers Protege GX not only supports the connection of multiple Controllers, it was built around this scalability. Level 5 Level 4 Controller 2 LAN Level 3 Level 2 Level 1 Controller 1 Ground This provides even more options for designing a large, but robust solution. Robust Design Summary LAN Ethernet TLCD Primary RS485 Keypad Secondary RS485 PSU Controller PSU Controller ZX16 PX8 ZX16 PX8 RDM2 RDM2 RDI2 RDI2 Cabinet 1 Cabinet 2 PSU RDE2 Cabinet 3 PSU RDI2 Cabinet 4 As you can see, there are many ways of creating a robust solution. With the flexibility of the Protege system, a robust solution for most budgets should be achievable. 158 Module 125: Protege GX System Design | Understanding Physical Design Planning the Training System Our training scenarios are based on our fictitious client - ACME International. We will be installing an access control system in their Texas office. Training Scenario Acme have provided us with a basic building plan: Office Warehouse Manager Equipment room From this plan, we can easily identify 3 areas: 1. Office 2. Managers Office 3. Warehouse Looking at the entry points on our plan, and our discussions with Acme, we can determine that the two external entry points should require a card and PIN for entry after hours. The internal doors will only require a card, and the Office Entry Door should automatically unlock and lock based on office hours. The Warehouse should remain secure at all times and require access control on both sides of the doors. Door Type Internal Area Schedule Office Entry Door Card/PIN entry, REX exit Office Office Hours Managers Office Door Card entry, REX exit Managers Office None Warehouse Roller Door Card/PIN entry, Card exit Warehouse None Office to Warehouse Door Card entry, Card exit Warehouse None To provide intruder detection, we will need the following detectors: Office PIR Managers Office PIR Warehouse PIR To provide system control, we will install a keypad in the Office. Level One: Protege GX Installer Study Guide | August 2013 159 We have established that the manager will be allowed access to the entire building 24/7. The office staff will be allowed access to the Office from 9am to 5pm, Monday to Friday, and the Warehouse only when warehouse staff are present. There will be two shifts in the warehouse, one from 6am to 2pm and one from 10am to 6pm. There will also be a Warehouse Supervisor who will be allowed access to the warehouse through both shifts. All warehouse staff will be allowed to access the office if there are office staff present. After discussing the above, we have defined five Access Levels. 1. Manager 2. Office 3. Warehouse Supervisor 4. Warehouse Shift 1 5. Warehouse Shift 2 We have asked Acme to supply a list of employees, their corresponding Access Levels, and PINs. Hardware Design From our system design, we specify the following hardware: 1 Controller (2 doors) 1 RDM2 Reader Expander (2 Doors) 1 Power Supply (4.0A) 2 Multi Prox Readers 4 Nano Readers 1 Keypad 3 PIR's We need to confirm that our power supply is sufficient to drive our system: Device Current mA (avg) Quantity Total Module Network Load Load A (avg) 2.70 Protege DIN Rail Controller 150 1 150 Protege Mini 2 Reader Expander 83 1 83 Protege Alphanumeric LCD Keypad 38 1 38 Protege Readers 130 6 780 Protege PIRs 15 3 45 Relays 15 1 15 Locks 500 3 1500 Siren 85 1 85 160 Module 125: Protege GX System Design | Planning the Training System We also need to check that we have enough inputs for our system: Input Description CP1:1 Office Entry Door (Reed) CP1:2 Office Entry Door (REX) CP1:3 Office Entry Door (Bond) CP1:4 Office (PIR) CP1:5 Managers Office Door (Door) CP1:6 Managers Office Door (REX) CP1:7 Managers Office Door (Bond) CP1:8 Managers Office (PIR) RD1:1 Warehouse Roller Door (Reed) RD1:2 Warehouse (PIR) RD1:3 - RD1:4 - RD1:5 Office to Warehouse Door (Reed) RD1:6 - RD1:7 Office to Warehouse Door (Bond) RD1:8 - Level One: Protege GX Installer Study Guide | August 2013 161 Review Questions Where should copper clad aluminium cables be used? For Reader connection For RS-485 Module Network connection CCA cables should be used wherever possible due to its higher attenuation The use of CCA cables should be avoided If the keypad cable was damaged, causing a short across all conductors, what would happen? Cabinet PSU Controller ZX16 RDI2 Primary RS-485 Keypad Secondary RS-485 The Keypad would stop functioning. The RDI2 would stop functioning. Everything else would continue to function properly. The Keypad would stop functioning. Everything else would continue to function properly. Everything would continue to function properly. The Keypad would stop functioning. The RDI2 would go into offline mode. Everything else would continue to function properly. In Offline Operation... A front door of a retail shop is connected to an RDI2-DIN intelligent reader expander which is programmed for 'First 10 Users + Cache' mode. The door is programmed to unlock at 9am and lock at 5 pm. Jane, one of the shop staff, is programmed as User 202. If the expander was to go offline at 5am, what would happen? The door would not unlock at 9am. Jane would be granted access. The door would not unlock at 9am. Jane would not be granted access. The door would unlock at 9am. Jane would be granted access. The door would unlock at 9am. Jane would not be granted access. 162 Module 125: Protege GX System Design | Review Questions What happens to...? A lighting circuit is connected to an output on a PX8-DIN module that is programmed to turn on at 8pm and off at 5am. The expander goes offline at 4am, then comes back online at 10am. What happens to the lights after the expander goes offline? The lights turn off at 5am. The lights turn off at 10am. The lights turn off at 4am. The lights turn off at 5am the following day. What happens when...? If a door is connected to an RDM2 that has been programmed for 'No Users' offline operation, and the module has gone offline, what happens when a user requests exit using a REX button? The door is unlocked. The reader does not beep. The door is not unlocked. Four short beeps are given at the reader. The door is not unlocked. The reader does not beep. The door is unlocked. Four short beeps are given at the reader. Level One: Protege GX Installer Study Guide | August 2013 163 Module 128: Protege GX Software Installation This module outlines the requirements and procedure to install Protege GX. In This Module Protege GX System Requirements ............................................................................................... 166 Installation Procedure ................................................................................................................... 169 Review Questions ........................................................................................................................ 181 Level One: Protege GX Installer Study Guide | August 2013 165 Protege GX System Requirements Client/Server Architecture Protege GX uses a client/server architecture. Every installation includes a server which holds the main system database and the Protege services. In most cases it will also have the client software installed. The client application is then installed on additional (remote) workstations enabling multiple operators to access the system. These workstations connect to the database and services on the Protege GX Server. Workstation A Workstation C Protege GX Server Workstation B Workstation D Server Requirements: Standard Installation A standard installation consists of up to 10 system controllers connected over Ethernet, each communicating with up to 16 modules: Intel® Dual Core Machine 2.8GHz 4 GB RAM 40 GB free disk space Mouse / Keyboard Ethernet 10/100MBs 166 Module 128: Protege GX Software Installation | Protege GX System Requirements Server Requirements: Multiple Controller Site A multiple controller installation consists of over 100 controllers operating as multiple sites, or a single site running multiple Controllers. Each controller may have any number of modules connected. The connection to the controllers may be over any variety of communication mediums and can communicate independently or on demand. For best performance, connect using an Ethernet 10/100Mbs connection or similar over a local LAN or WAN network. Intel® Quad Core, 2.8GHz or Higher 8 GB RAM 100 GB free disk space Mouse / Keyboard Dual Ethernet 10/100MBs Client Workstation Requirements Intel® Dual Core Machine 3GHz 4 GB RAM 40 GB free disk space DirectX 10 Compatible Video Card Mouse / Keyboard Ethernet 10/100/1000MBs DVR Integration When integrating with a DVR system, the DVR system will have its own minimum system requirements. It is important that you check with the manufacturer prior to installation to ensure that your machine meets these specifications. Supported Operating Systems Protege GX is supported on the following operating systems: Microsoft Windows Server 2008 R2 (Recommended for Server) Microsoft Windows Server 2008 SP2 Microsoft Windows Server 2003 SP2 Microsoft Windows 7 Professional (Recommended for Client) Microsoft Windows Vista SP2 Level One: Protege GX Installer Study Guide | August 2013 167 SQL Server Editions Protege GX uses a non-proprietary open SQL database engine to store and share information. Protege GX is compatible with the following versions of Microsoft SQL Server in either Standard, Enterprise, or Express editions: SQL Server 2008 R2 (recommended) SQL Server 2008 SQL Server 2005 SQL Server Express is a scaled down, free edition of SQL Server that includes the core database engine and functionality. It provides an alternative to the Standard or Enterprise edition which requires additional Microsoft licenses. For your convenience, the setup files for SQL Server Express 2008 R2 are included as part of the full distribution package. Prerequisites Before installing Protege GX, you must have installed: Microsoft .NET Framework v4.0 Microsoft SQL Server 2008 R2, 2008, or 2005 (required on server machine only) Microsoft SQL Server also has its own set of prerequisites: Microsoft Windows Installer v4.5 Microsoft .NET Framework v3.5 SP1 Microsoft Windows PowerShell v1.0 Administration Permissions To successfully complete installation, you must have local administrative privileges on the workstation(s) you are performing the installation on. This ensures you have the necessary permissions to create and modify any of the files or folders on the computer, as well as change any settings. 168 Module 128: Protege GX Software Installation | Protege GX System Requirements Installation Procedure There are several steps required to install Protege GX: 1. Install Microsoft SQL Server the database system used to store all Protege GX configuration information and events. 2. Install the Protege GX Server Components on the server. This installs the database, services, and the client (unless deselected). 3. Install the Protege GX Client on the remote workstations. This installs the user interface that will be used by operators. Installing Microsoft SQL Server 1. Run the supplied GXSQLSetup.exe file to launch the Protege GX SQL Server Installation wizard. 2. Select the option to Install SQL Server 2008 R2. Progress is shown as the setup files are extracted to a temporary location. During setup, checks are performed to ensure that you have the necessary prerequisites required to successfully install SQL Server 2008 R2 Express. If you are missing required components, you will be prompted to install these before continuing. 3. Read and accept the license terms then click Next. 4. Ensure the following features are selected then click Next: Database Engine Services SQL Server Replication Management Tools – Basic Level One: Protege GX Installer Study Guide | August 2013 169 5. Ensure the Named instance and Instance ID are set to PROTEGEGX then click Next to continue. 6. The Server Configuration details are shown. Click Next to continue. 7. The Database Engine Configuration details are shown. Select the Authentication Mode to define how database permissions are created. We recommend Windows authentication wherever possible as it provides a single sign-on experience for users and simplifies security management. If choosing Mixed Mode you will need to define a password for the system administrator (sa) account. Click Next to continue. 8. If you wish to, enable the error reporting option to automatically send error reports to Microsoft. Click Next to continue. 9. Progress is shown as the installation completes. Once finished, click Close to exit the setup wizard. 170 Module 128: Protege GX Software Installation | Installation Procedure Installing the Protege GX Server 1. Run the supplied setup.exe to launch the Protege GX Install Wizard. Click Next to start the installation process. 2. Read and accept the License Agreement then click Next to continue. 3. Enter your registration information including your name, company, and product serial number then click Next to continue. Level One: Protege GX Installer Study Guide | August 2013 171 4. Click Next to install to the default folder or click Change to choose another location. We recommend accepting the default folder. 5. Select the Complete setup type then click Next. This installs all components including the Protege database, services, and the client application on the server. 172 Module 128: Protege GX Software Installation | Installation Procedure 6. Click Next to start the Protege services automatically during installation. By default, services are installed using the local account. If you are performing a remote installation you will need to customize the logon and passwords so should disable this option and configure the services manually after installation. 7. Enter the details of the database server where the Protege GX database will be created. Provided you selected the defaults when installing SQL Server, this will be the server name and ProtegeGX (where ProtegeGX is the SQL instance). Click Next to continue. Level One: Protege GX Installer Study Guide | August 2013 173 8. To customize the database names and/or paths, clear the setting to Hide advanced database configuration options and enter the relevant details. It is recommended these settings are only modified by advanced users. Click Next to continue. 9. Click Next to use the default WCF TCP/IP port, or clear the option and enter a different port. This option should only be changed where another application on the target machine uses the default port as this would otherwise cause the services to fail to start. 174 Module 128: Protege GX Software Installation | Installation Procedure 10. Click Install to begin installation. 11. Progress is shown as the installation completes. Once complete, click Finish to exit the setup wizard. 12. You will be prompted to ensure that the Microsoft DirectX Runtime is installed (required if you are integrating with an OnSSI or Avigilon DVR system). This can be installed by running the DXSETUP located in the Microsoft DirectX Runtime for November 2008 folder Level One: Protege GX Installer Study Guide | August 2013 175 Installing the Protege GX Client on Remaining Operator Workstations Once the Server installation is complete, the Protege GX client can be installed on the remaining operator workstations. 1. Run the supplied setup.exe to launch the Protege GX Install Wizard. Click Next to start the installation process. 2. Read and accept the License Agreement then click Next to continue. 3. Enter your registration information including your name, company, and product serial number then click Next to continue. 176 Module 128: Protege GX Software Installation | Installation Procedure 4. Click Next to install to the default folder or click Change to choose another location. We recommend accepting the default folder. 5. Select the Custom setup type and click Next. This enables you to select the program features that will be installed. Level One: Protege GX Installer Study Guide | August 2013 177 6. Click the Server item and choose This feature will not be available from the options displayed. This removes the server components from the list of features to be installed. Click Next to continue. 7. Click Next to use the default WCF TCP/IP port, or clear the option and enter a different port. This option should only be changed where another application on the target machine uses the default port as this would otherwise cause the services to fail to start. 8. Click Install to begin installation. 9. Progress is shown as the installation completes. Once complete, click Finish to exit the setup wizard. 178 Module 128: Protege GX Software Installation | Installation Procedure Initial Site Configuration Once the server and client components are installed, there's a few basic steps you need to take to get things setup. 1. Log In 2. Activate your license, and 3. Add a Site You also need to add (and program) a Controller but we'll cover that later in the course. Step 1: Log In Start Protege GX and login as a user with full access to the system. For new installations, this is admin with a blank password. For security reasons, this password should always be changed after the initial setup. Step 2: Activate Your License Before you can begin using Protege GX, you must register and activate your license. This procedure must be carried out from the server and not from a remote client workstation. You must also have local administrative privileges on the server in order to activate the license correctly. 1. From the main menu, select About > License 2. Select the License Update tab 3. Select the Automatic or Manual option to download and activate your Protege GX license. Important: The activation process requires an Internet connection. If this is not available on the server, you will need to use the manual activation option, copy the license request to another machine or portable drive, and connect to the ICT website from a remote machine to download the license file. The downloaded license file must then be taken back to the server, and used to complete the activation process. The steps of generating the license and then adding it to Protege GX must be carried out from the server and not from a remote client workstation or the system profile will not match and license activation will fail. Level One: Protege GX Installer Study Guide | August 2013 179 To Automatically Activate Your License: 1. Click Download License, enter the required information and select OK. 2. The Protege application passes your details to the ICT web registration service, then activates your software automatically. To Manually Activate Your License: 1. Click Generate to create a license request file. When prompted, save the ICT_LicenceRequest.req file to a folder on your network or a portable drive. 2. Click the link to Select your licensing options. This opens a webpage where you will be prompted to enter your Site, Installer, and SSN details. 3. Browse to the saved ICT_LicenceRequest.req file and click Submit. 4. Your details are passed to the ICT web registration service. Once registration is complete you will be prompted to download your license (*.lic) file. 5. Click Browse to select the license file and activate your Protege GX license. Note: Steps 2 to 4 can be performed on any workstation with Internet access. Steps 1 and 5 must be performed on the server. Step 3: Add a Site When you login after activating your license and restarting the UI, you will be prompted to add a site: Simply enter a name for your site - we suggest something meaningful - and click OK. 180 Module 128: Protege GX Software Installation | Installation Procedure Review Questions Which of the following operating systems are NOT supported for server installations? Microsoft Windows XP SP3 Microsoft Windows Vista SP2 Microsoft Windows Server 2008 R2 All of the above systems are supported Which database version is recommended? SQL Server 2008 R2 MySQL Server Enterprise Edition MySQL Server Express Edition SQL Server 2005 What are the minimum CPU and RAM requirements for a Protege GX Server? Intel Atom 1.66GHz, 2GB RAM Intel Dual Core 2.8GHz, 4GB RAM Intel Dual Quad 2.8GHz, 8GB RAM Intel Xeon E5620, 2GB RAM Level One: Protege GX Installer Study Guide | August 2013 181 Module 129: Protege GX Software Introduction This module describes the various services that make up the Protege GX Server and the functions they perform, provides an introduction to the user interface, and outlines the global settings that apply to the entire Protege system including all sites and all controllers. In This Module The Protege GX Services ............................................................................................................. 184 The Protege GX User Interface ..................................................................................................... 190 Global Settings ............................................................................................................................ 201 Review Questions ........................................................................................................................ 203 Level One: Protege GX Installer Study Guide | August 2013 183 The Protege GX Services The Protege GX Server is made up of six different services: Protege GX Update Service Protege GX Data Service Protege GX Download Service Protege GX DVR Service A Protege GX DVR Service B Protege GX Event Service Each service performs a different function within the system. It is important that you have a good understanding of what these services do, and more importantly, when to start or stop them. Protege GX Update Service The Update Service acts like the supervisor of all the other Protege GX services. It is also responsible for ensuring that the server license is valid. Update Service Download Service Event Service Data Service DVR Services es Stopping the Update Service will stop all other Protege GX services The Update Service should only ever be turned off during software upgrades or while the configuration database is being restored. If you need to stop all services, stop the Update Service. The system will then ask if you would like to stop the other critical Protege GX services. 184 Module 129: Protege GX Software Introduction | The Protege GX Services Protege GX Data Service The Data Service is responsible for: Communications between the Protege GX services Communications between the Protege GX server and the MS SQL databases Communications between the Protege GX client and Protege GX server Download Service Event Service Data Service DVR Services GX Client(s) Event Database GX Database Stopping the Data Service The Data Service is the central point for all communication, and cannot be stopped without adversely affecting the system. It must be running for the Protege GX server to function. Stopping the Data Service will take all GX clients offline, and prevent configuration changes and operator monitoring of the system. Before stopping the Data Service, all clients should be shutdown. This ensures that all operators know that the system is about to be stopped, and that the client is logged in correctly once the Data Service is restarted. Starting the Data Service When starting all services, such as after restoring a database or installing a software upgrade, start the Data Service first. The system will then automatically start the other critical Protege GX services, excluding the Download Service. The Download Service must be started manually once you are sure of the integrity of your system configuration database. If the Protege GX Data Service fails to start, it is most likely due to a corrupt database or where a database that has been restored is a different version to that of the Protege GX server. Any errors encountered by the service are logged to the Windows Event Viewer. Level One: Protege GX Installer Study Guide | August 2013 185 Protege GX Download Service The Download Service is responsible for all outgoing messages and sends system configuration data, firmware updates, status requests and control commands from the server to the controllers. Controller(s) Download Service Data Service GX Client(s) Firmware updates Status requests Control commands Configuration data GX Database The Download Service can be stopped without adversely affecting the system. Stopping the Download Service will stop all outgoing messages to the controllers. The Download Service periodically checks the configuration known to be stored in the controller and compares this with the current configuration in the GX database. If the two don't match, a new configuration is downloaded to the controller. Controller(s) Download Service Event Service DVR/NVR(s)) Data Service DVR Services DAT file(s) Eventt GX Database Database 186 Module 129: Protege GX Software Introduction | The Protege GX Services The Download Service is advised of a successful download by the controller. The controller sends this message to the Download Service via the Event Service and Data Service. Controller(s) Download Service Data Service Event Service DVR Services DVR/NVR(s)) When the server successfully sends a new configuration to the controller, it writes a file to its local hard disk. This file contains only the current configuration of the controller. Download Service Data Service Event Service DVR Services DAT file(s) Eventt GX Database Database If the Event Service is not working, the Download Service will never receive the message from the controller to say the download was successful and the DAT file will not be saved. This will result in the Download Service continuing to attempt a download to the controller. The period that the Download Service compares the configurations is defined by the Download Retry Delay setting found under the Configuration tab of the Controller properties. By default, this is set to 60 seconds and means that when you make a change to the GX database using the client, it may take up to 60 seconds before the server starts to download the configuration. Depending on the type of controller you have, it can take another 5-60 seconds before the changes take effect. The Download Retry Delay should only be shortened while configuring a new controller. This allows configuration changes to be pushed out more frequently. Once the configuration is complete, the delay should be set back to the default of 60 seconds. This is especially important on systems with a large number of controllers, or on systems using higher cost data links to communicate with controllers. Using a larger delay and manually triggering a download when configuration changes are complete will mean less data is used. The Download Service should be stopped when restoring a database and only restarted once you have checked that the configuration of the newly restored database is correct. The Download Service will then push out any configuration changes to the controllers. By default the Download Service uses an outgoing port of 21000 for configuration and firmware downloads, and outgoing port of 21001 for status requests and control messages. Level One: Protege GX Installer Study Guide | August 2013 187 Protege GX DVR Services There are two DVR services that are responsible for the interaction between Protege GX and integrated DVR/NVR systems. Controller(s) Download Service Data Service Event Service DVR Services DVR/NVR(s)) The DVR services can be stopped without adversely affecting the system. Stopping these services will stop events and control messages going from the Protege GX server to the DVR, and prevent the viewing of video within the Protege GX client. Ports used by the DVR Services vary depending on the make and model of DVR. This is covered in more depth in a level 2 module. Protege GX Event Service The Event Service is responsible for all incoming messages from controllers. It receives events, status updates and other messages from controllers. Controller(s) Download Service Data Service Event Service DVR/NVR(s)) Status Updates DVR Services GX Client(s) Events DAT file(s) Event GX Database Database As the Event Service receives events, it passes them to the Data Service for processing, which in turn writes them into the Event database, and updates any clients requiring real-time information. 188 Module 129: Protege GX Software Introduction | The Protege GX Services Stopping the Event Service The Event Service can be stopped without adversely affecting the system. Stopping this service will prevent the server from receiving all messages from controllers. If your site has operators actively monitoring the system, then they should be advised prior to stopping the service, as they will not receive any events, alarms or status updates while the service is offline. Stopping the Event Service has no impact on the monitoring station reporting services already running on the controller, such as Contact ID or ArmorIP. These will continue to report offsite as long as their phone line or network connection remains intact. While the Event Service is offline, controllers will store events locally. When the service comes back online, the events are transmitted along with the time they actually occurred (field time). As GX Controllers can store a minimum of 2000 events onboard, the Event Service can be offline for a reasonably long time before any events are lost. The Event Service uses a default incoming port of 22000. Protege GX Client Communication The GX Client communicates with the Data Service using the Windows Communication Foundation (WCF) default TCP port of 808 or HTTP port of 8000. This can be set at the time of installation, but should only be changed if there is another program already installed on the Server which is also utilizing WCF communications on the default port. TCP 808 Data Service HTTP 8000 GX Client(s) Level One: Protege GX Installer Study Guide | August 2013 189 The Protege GX User Interface The Protege GX user interface (or GX client) is used by operators to: Program the configuration database Receive live events and alarms from the server Receive video from DVR/NVR systems Send control commands to devices, such as opening doors remotely or controlling cameras Run reports Programming changes made using the GX client are entered into the GX database by the Protege GX Data Service. The Download Service then pushes these changes out to the applicable controllers on the next download cycle. The Protege GX interface is divided into five main areas: 1. Main Toolbar 2. Toolbar 3. Record List 4. Programming Window 5. Status Bar 190 Module 129: Protege GX Software Introduction | The Protege GX User Interface Main Menu The Main Menu provides complete access to all program functions and is designed to help you quickly find the commands that you need by organizing commands in logical groups. The Global menu contains settings that apply to the entire system, such as server and database configuration, operators and roles and system wide display options The Sites menu contains items that are applicable across a whole site, such as schedules and holidays, controllers, and other site-wide configuration The Users menu contains functions related directly to users, such as user configuration, access levels and card templates The Events menu contains functions used to create event filters, define alarms, and configure how events and alarms are handled The Reports menu takes the events and turns them into something useful for operators, such as event reports and user reports The Monitoring menu contains configuration of the items used by operators monitoring the system, including status pages, floor plans and cameras The Programming menu includes functions for configuring items at the edge of the system, such as doors, inputs and output, areas, and elevators Groups provide an effective way of grouping functions together and assigning them to an access level. Functions for creating and editing groups are all found under the Groups menu. The Expanders menu contains the settings required to configure the physical hardware connected to your system The Automation menu contains functions relating to automation and intelligent control. This is covered in a level 2 module The About menu is used to view version information, licensing and online help Level One: Protege GX Installer Study Guide | August 2013 191 Toolbar The Toolbar remains consistent throughout the Protege GX User Interface. Once you know what a button does, it has the same functionality throughout the software: Add: Adds a new record to the database. The new record isn't added until you save it. Delete: Removes the selected record(s) from the database. Where a record has links to other records (such as an Expander with links to Inputs), you'll be prompted to remove these records too Save: Saves the selected record to the database. Any changes made are sent by the Download Server to the applicable controllers on the next download cycle. Find: Opens a Find dialog to search for a particular record or records. Refresh: Refreshes the Record List by reloading the records from the database. Export: Provides a quick and easy way of taking data out of your system and using it elsewhere. Import: Takes the configuration from another record and copies it to the currently selected record. This can be used to clone the configuration of an existing item. Site: Used to quickly switch between multiple sites. Controller: Allows the operator to change the controller currently selected. 192 Module 129: Protege GX Software Introduction | The Protege GX User Interface Find Use the Find button to search for particular record(s) 1. Choose the Field to search across 2. Enter the text string (label) to look for and click OK The Record List is filtered to display only the records that match the text entered. The Find tool can also be used to filter records of a specific type. For example, to find all inputs in a particular Area: 1. Select the Area from the field options 2. Choose the specific Area(s) you want to search from the records shown and click OK The Record List is filtered to display only the inputs from the selected Area. The Find tool works on the records that are currently displayed. This means that if you filter your records using the find tool then run the Find a second time, the action is only performed on the results from the first Find action. To perform a new search, click the Refresh button to reset the list first Level One: Protege GX Installer Study Guide | August 2013 193 Refresh Clicking the Refresh button will reload the records that are displayed in the Record List Use the Refresh button in the following circumstances: To clear the filtered results when using the Find tool To update data when a second client window has been used to configure something For example, if you are configuring something that requires an Area to be selected and you use the ellipsis button to open another window to create a new Area, you will need to click the Refresh button in the original window for the new Area to be displayed To update data when another operator may have made changes to the same record Export The Export tool provides a quick and easy way of taking data out of your system and using it elsewhere. For example, you can use this to create a list of Doors to include in your routine maintenance check sheets, or to create a list of users to be emailed to someone. 1. Select the Export Type. If you haven't selected any records, the Export Type is set to All Records and the entire Record List will be exported. If you selected specific records in the Record List, the Export Type is set to Selected Records and only those items will be exported. 2. Choose the Destination. Use Clipboard if you intend to paste the results into an email or document, or File if you want to create a CSV file to use the data in an Excel spreadsheet or similar. 3. Select the columns you want to export and click OK. To export everything, select one column then use CTRL+A to select the rest. 194 Module 129: Protege GX Software Introduction | The Protege GX User Interface Import The Import tool takes the configuration values from one record and copies it to another. This can be used to clone the configuration of an existing item. 1. Select the item that you wish to copy the configuration values to and click Import 2. Choose the existing item to copy data from and click OK 3. The settings are updated to match those of the existing record Breakout Button Use the Breakout button to open the current page in another window. You can then navigate to a different page in the primary window. This is particularly useful when you have two monitors. Level One: Protege GX Installer Study Guide | August 2013 195 The Record List The Record list is the panel shown on the left of the screen and is used to display a list of records within the current database. For example, when programming Inputs, the Record List displays a list of all Inputs that are currently programmed. The Record list contains one or more of the following columns: Column Description Name The primary language name given to the record. Controller The name of the Controller that the record belongs to. Database ID This is the Database ID. It is a unique ID across the whole system and is used to identify the record in the event log. For example, the event log below shows an input identified as (ZN23). This means it has a database address of 23 and has no relation to the physical input number on the Input Expander. Module Type Identifies the type of module this record belongs to. For example, if the module type is shown as Controller, the record is physically connected to a Controller. Module Address Identifies the hardware address of the module the record belongs to. For example, if the record has a Module Address of 1, it refers to the hardware expander that is physically addressed as Module 1. Module Input/Output Identifies the hardware position of the device this record is configuring. For example, if the record has a Module Input of 1, it refers to input number 1 on the physical hardware device. Created Date The date and time that this record was first created. Last Modified The date and time that this record was last modified. Last Modified By The operator that made the last modification to this record. 196 Module 129: Protege GX Software Introduction | The Protege GX User Interface The Record List can be sorted, resized and reordered to suit. Sort the record list by clicking on a column header. For example, to sort alphabetically by record name, click the Name column. Click the column header again to sort in reverse order. Resize columns by hovering your mouse over the edge of the column header until it forms a double-headed then dragging the column to the required size. Alternatively, you can double click between the arrow column headers to automatically resize the column to its optimum width. Reorder columns by dragging and dropping a column header to a new position in the list. If you want to quickly see the differences between records, click and hold on a record, then drag up or down the record list. As your mouse moves over a new record, the details are updated in the programming window. Selecting Multiple Records Use the standard Windows shortcuts for selecting multiple records at once. This is useful if you want to delete or export a large number of records, or if you want to configure a number of records to have the same settings. To select a group of consecutive records, click the first record, and then hold down SHIFT and click the last record To select a group of non-consecutive records, click the first record, then hold down CTRL and click the additional records you want You can also use CTRL + A to select all records at once You can also use a combination of these methods to speed up your selection process. For example, use CTRL + A to select all records, then hold the CTRL key and click on the records you don't want. Once you have a group of records selected, you can perform a group operation, such as assigning an Area and Input Type to a group of Inputs. The Programming Window The Programming Window is where the system configuration is programmed. Selecting a record from the Record List will populate the Programming Window with the configuration details for that record. Level One: Protege GX Installer Study Guide | August 2013 197 1. The Programming Window typically contains a number tabs, with similar configuration items grouped together. The General tab always contains the name of the record as well as the most common or important items to be configured. 2. Use the up and down arrows to collapse/expand the groups. This is particularly useful when using a low screen resolution. 3. Items that require you to select other configurable records have an ellipsis button that opens a second window. This allows you to configure the appropriate record without navigating away from the current programming window. Viewing History The History tab contains a list of every modification that has occurred to a record. This includes the date and time it was modified, and which operator made the modification. 1. Click the Details button to show the fields that have been modified and the old/new values. 2. This provides a full audit trail so previous settings can easily be restored if a programming error is made. 198 Module 129: Protege GX Software Introduction | The Protege GX User Interface Viewing Usage The Usage tab shows other records that rely on the record currently displayed. Viewing Events The Events tab provides an easy way to find information about a record. Click Load Events to display all events for the current record Click Run as Report to generate a report of these events that can be printed, exported in multiple formats or emailed directly from the application Use Copy to Clipboard if you want to quickly paste the events into an email or other document Level One: Protege GX Installer Study Guide | August 2013 199 The Status Bar The status bar provides general information about the system, regardless of where you are in the software. Item Description Current Operator The name of the operator that is currently logged in Controller Status The current status of the controller. Shown as OK when all controllers are online and there are no health warnings. Displays a number (in red) to indicate a configuration problem (such as a component requiring a module update). Use the Health Status to check for issues. Network Status The current network status Alarms The total number of alarms present in the system requiring acknowledgement View Alarms A quick link button that opens the Alarm Status Page defined for the site 200 Module 129: Protege GX Software Introduction | The Protege GX User Interface Global Settings Global settings apply to the entire Protege system - including all sites and all controllers. They define such things as: The user name format How long event records are stored The backup settings They also define email, display, and sound settings which we will cover in a later module. Setting the Display Name Format of Users The User Display Name Auto Format property allows you to automatically populate the Name field of a user based on the information entered in to the First Name and Last Name fields. This name is used throughout the system to identify users - in event logs, reports, at keypads, etc. Choose from: Short Format: to use the first character of the first name and the full last name (eg J Smith) Long Format: to use the full first and last names (eg John Jacob Smith) Set it to Long Format now. Event Database Capacity The maximum capacity of your event database varies according to the version of SQL Server you are using. SQL Server Express 2008 R2 (the version that is included in the Protege GX setup package), has a database limit of 10GB. Earlier version of SQL Server Express (including SQL Server 2005 Express and SQL Server 2008 Express), have a maximum database size is 4GB. The full Standard or Enterprise editions of SQL Server have no such size limitation however in reality you will still have limitations based on the physical storage capacity of your server and your ability to manage and backup/restore the database. Level One: Protege GX Installer Study Guide | August 2013 201 Deleting Events from the Event Database If your event database reaches its capacity, you will have problems. To help control the database size, we can set the frequency at which events are deleted (or purged) from the database. The frequency you choose will vary according to the size and the nature of the site but in most cases 1 year would be sufficient. The Importance of Backups It should probably go without saying, that regular backups are vital in ensuring the data protection of a site. Failure to enable backups can result in irrecoverable data loss. Many companies will already have an automated backup procedure in place, so talk to the IT department to discuss the options with them. Protege GX also provides its own built in backup functionality so there is no excuse to not have backups. Your backup plan should always account for hardware failure, fire or theft of any computer equipment. This means it's important to get the backup offsite for the purpose of risk mitigation. Configuring Protege GX Backup Settings Ensure the option to Backup Main Database Every Night is enabled. Provided the option to Append Day of Week to Backup File Name is also selected, a new file is created for each day and only overwritten the following week. If this option is disabled, the backup is overwritten each night with the latest copy. Enter the Backup Path to define where the backup files will be created. It's a good idea to use an external drive or network location, so the backup is protected in the event of a disk failure. You can also use the Backup Now at any time to perform an instant backup. We recommend you do this before performing an upgrade to protect against damage caused by an installation failure or database upgrade malfunction. 202 Module 129: Protege GX Software Introduction | Global Settings Review Questions After a configuration change, how long must you wait before the changes take effect? Protege GX is a server based system so changes take effect immediately 60 Seconds The changes won't take effect until you connect to the Controller and download to it Up to the time that is set in 'Download Retry Delay' under the Controller Configuration tab After restoring a database and starting the Data Service what additional step(s) must be taken? Confirm your configuration is correct. Confirm your configuration is correct. Start the Download Service. Confirm your configuration is correct. Start the Download Service. Default your Controller. No additional steps are required as the Database would not restore if the configuration was incorrect. Which service is responsible for incoming messages? The Update Service The Data Service The Download Service The Event Service What does the Details button on the History tab do? It shows the date/time and operator that modified the record Runs a detailed event report on the record It shows the old and new values of fields that were modified None of the above What does the Breakout button do? Opens the current page in another window Switches to the Alarms page Exits the software Closes the current window Level One: Protege GX Installer Study Guide | August 2013 203 What is the Refresh button used for? To clear the filtered results when using the Find tool To update data when a second client window has been used to configure something To update data when another operator may have made changes to the same record All of the above What is the Events tab in the Programming window used for? To load events for the selected record To load events for the selected record and run a report on these events To show which fields were modified and their old and new values To load events for the selected record, run a report on these events or copy the events to the Windows Clipboard What is the maximum capacity of SQL Server 2005 Express or SQL Server 2008 Express Database? 32 Million events 4GB Unlimited 10GB What must you do to prevent the SQL Express event database from reaching its capacity? Periodically delete some events from SQL Purchase a larger hard drive Enter a timeframe in the 'Purge Events' field in Global settings Create an event filter that limits the number of events saved Where should your database backup be stored? Offsite if possible In the default location of C:\Program Files\Microsoft SQL Server\MSSQL10_50.PROTEGEGX\MSSQL\Backup On a second internal hard drive On a USB thumb drive 204 Module 129: Protege GX Software Introduction | Review Questions Module 131: Hardware Programming This module outlines the requirements for programming a Controller, configuring a status page to show what is happening on the system, and the steps to take for troubleshooting hardware connections. In This Module Programming a Controller ............................................................................................................ 206 Status Pages ............................................................................................................................... 214 Troubleshooting Hardware ........................................................................................................... 219 Review Questions ........................................................................................................................ 233 Level One: Protege GX Installer Study Guide | August 2013 205 Programming a Controller Adding a Controller To add a controller, select Sites | Controllers from the menu then click Add. You'll be given 3 options: 1. Use the controller wizard 2. Add an individual controller record 3. Add a new controller based on an existing controller. This option effectively clones an existing controller, including all its records (doors, outputs, etc) For the purpose of this exercise, we are going to use the first option which adds the controller and the required hardware records. Use the wizard to add and link all the hardware you might possibly use. It is much easier to delete unwanted items than it is to add and link them later. Acme Hardware Requirements Let's go back to our scenario where we are installing an access control system in the Acme Texas office. We have determined we need the following hardware: 1 Controller (2 doors) 1 RDM2 Reader Expander (2 Doors) 1 Power Supply (4.0A) 2 Multi Prox Readers 4 Nano Readers 1 Keypad 3 PIR's 206 Module 131: Hardware Programming | Programming a Controller Adding a Controller with Default Records Using the wizard, we'll add the following hardware records: 1. 1 Controller 2. 8 Controller Inputs 3. 1 Keypad 4. 2 Reader Expanders. The Controller has 2 onboard reader ports but must register as a reader expander to use this functionality. This means we need 1 reader expander for our Controller and 1 for our RDM2. Note the number of doors has adjusted based on the options selected. Accept the defaults for the remaining options, then click Add Now to create the records. 1. Add the serial number and IP address of the Controller, as configured and noted earlier. 2. Set the download server, then click Save. Your Controller should come online within a few seconds. If it doesn't, proceed to the objective on troubleshooting. Level One: Protege GX Installer Study Guide | August 2013 207 Setting the Controller Date/Time By default, the Date/Time is set to the current time of the PC. Right click the Controller to adjust the Date/Time then click Set Controller Date Time to save the changes. This can be very useful for testing your system as you can enter any date and time. Viewing and Addressing Health Status Issues The Get Health Status function provides details of the overall status of the system and can be useful in identifying any problem areas that need to be addressed. To view health status, right-click on the Controller and choose Get Health Status. The Controller Health Status window appears listing any problems that the Controller has with its current configuration. This includes: Controller restarts If encryption is disabled Modules that require an update Modules that are offline Services that have been programmed, but not started Programmable functions that have been programmed, but not started Inputs that have been assigned to an area, but not assigned a type Items that can't fit in the Controller database Essentially, anything that has been configured but that is not operating according to that configuration, is shown in this list. 208 Module 131: Hardware Programming | Programming a Controller The health status is generated by the Controller as follows: 1. The Download Server sends configuration data to the Controller 2. The Controller checks the new configuration 3. Any problems are reported back to the Data Server via the Event Server This can all take time, so it is important to note that a health status problem will not necessarily show up immediately after it has been programmed. The health status will also show up issues related to compatibility. For example, if you are using a PCB Controller and attempt to use a feature that is unique to the DIN Controller (such as adding a single door to an access level, or programing too many items such as adding more than 5000 Users), the Controller reports this back as a health status issue. The total health status items are shown on the status bar. This doesn't update immediately, as it looks across every Controller on the system, and is only checked periodically. It is designed as a diagnostic tool and as a last minute check of the system health before leaving site. Once our Controller is online, our health status should indicate 6 issues: The first message tells us the Controller has been restarted. This shouldn't happen with a battery backed PSU which is why it's reported as a health status item. The second message is telling us that both of our Reader expanders are offline. The number in brackets is the database ID of the item, not the physical address of the hardware. This applies across the system, including the event log. The health status is also advising that both reader expanders require a module update. To do this, we will first need to get them online. Finally, the health status is advising us that the encryption between the Controller and the Server is currently disabled. We can clear the first message, as it is only an advisory notice Highlight the message and press Clear Level One: Protege GX Installer Study Guide | August 2013 209 This sends a message to the Controller to tell it to take this message off its Health Status list The next time we open the Health Status window, the message will have been cleared. Note also that the number under Health has now reduced. Enabling the Onboard Reader Expander Our Reader expanders are currently showing as offline for two reasons. Firstly, the Controller by default does not have its onboard reader expander enabled. Secondly, our RDM2 doesn't have a valid address configured yet. To enable the Controller onboard reader expander, select the Configuration tab of the Controller and set the following two options: This instructs the Controller to set the address of its onboard reader expander to address 1. It also tells it to use Outputs 3 and 4 as lock outputs. When using a PCB Controller, you may wish to use outputs 1 and 2 (the powered bell outputs) instead. Downloading Programming Changes We've just made some programming changes that need to be downloaded to the Controller. The Download Server will discover these changes next time it checks, which may not be for another 60 seconds. While we are doing our initial programming and testing, we can tell the Download Server to check this more often. This is done by setting the Download Retry Delay in the Configuration tab of the Controller. Set this now to 1 second. This tells the download server to check the Controllers configuration every second. We will reduce this while we are doing our initial programming, but set this back when we have finished. We can also force the Download Server to download the configuration at any time, by right clicking the Controller and selecting Force Download. Try this now. 210 Module 131: Hardware Programming | Programming a Controller Addressing Modules Right click the Controller and select Auto Address. The auto addressing window displays a list of expanders that are (or have been) connected to the Controller. Listed here are all expanders that have reported to the Controller since the last Controller module update or power cycle. Listed for each module is: The module type The serial number Current firmware version Whether the module address can be changed by Auto-addressing Whether the module is registered with the Controller Whether the module is currently online If the module is from the DIN Rail range, you can use the Auto-addressing function to address it. By default, modules are shipped from the ICT factory with an address of 254. This is outside the range that the Controller will accept, and must therefore be set by the installer. You'll note that the Controller and one of the reader expanders are showing the same serial number. This is because your Controller has now been configured to register as Reader Expander 1. Set the address of your RDM2 to 2 and your PSU (shown as an Analog Expander) to 1. The addresses are shown in red because they have not been updated. You can do this either by clicking the Update button beside each module, or by clicking the Update All button. Wait for your modules to come back online, then click Refresh. Level One: Protege GX Installer Study Guide | August 2013 211 Module Update If you check your Health Status now, you should have everything online: We'll deal with the service encryption in just a moment. The other messages are all in relation to items requiring module updates. This can be resolved by right clicking on the Controller and selecting Update Modules. This updates all modules connected to the Controller. A module update is required whenever a programming change is made that requires the hardware to function in a different manner. The Controller will advise you whenever this is required by generating a health status message. Enabling Encryption To enable encryption click the Configuration tab of the controller and select Initialize Controller Encryption: Disabling Encryption To disable encryption, select the option to Disable Controller Encryption: This disables encryption at the server end only. The result is that the controller will now ignore all messages from the server as they are not encrypted. Similarly, the server will not understand any of the messages sent back from the controller as they are encrypted with a key that the server no longer understands. To disable encryption on the controller, the controller must be defaulted. This is a security feature and ensures that the only way to remove encryption is physically on site. 212 Module 131: Hardware Programming | Programming a Controller Firmware Updates You should always check the ICT website to ensure you are running the latest software and firmware versions. If your controller is running older firmware, update it by right clicking on the controller and clicking Update Firmware. Enter the file name or click the [...] button to browse to the new firmware file. You can select multiple controllers to update. The software updates them sequentially, and reports the results when complete. The new DIN Rail Controller has enough storage space and CPU power that it can download the new firmware while continuing to run the system. When the firmware has been downloaded and the integrity verified, the controller does a quick restart and boots up with the new firmware running. Level One: Protege GX Installer Study Guide | August 2013 213 Status Pages Now that we have our hardware up and running and we want to begin the rest of our system programming and testing, it would be good to have a way of seeing what is happening on the system. The best way to do this is with a Status Page. Status pages are usually designed by the integrator, and are a quick and efficient way to get an overview of your Protege system in one easy place. They are used to display information from the Protege system as well as external systems, such as DVRs / NVRs, websites and documents. Creating a Technician Status Page 1. Open the Status Page Editor: Monitoring | Setup | Status Page Editor 2. Name the page Technician, then scroll down and select the layout as shown: 3. Click OK. This creates an empty page with a preset layout. The layout can be changed later, so this is just a starting point. 214 Module 131: Hardware Programming | Status Pages Status Page Layout The layout we've chosen creates a 3 x 3 grid. Items can be set to span multiple rows and/or columns giving us control over the layout. Item 1 spans the first two rows of the first column Item 2 spans the first two rows of the second column Item 3 spans the first two rows of the third column Item 4 has been set to appear in the third row and span all three columns Adding Content to a Status Page Now that we have the layout, we want to add content to each of the panels. 1. In the bottom left panel, set the Type to Event Windows and choose the All Events Record. 2. Click Save. This will add the event window to the bottom panel of our status page, displaying a live view of events as they occur. Level One: Protege GX Installer Study Guide | August 2013 215 Status Lists The next option we are going to look at is status lists. A status list is a list of system items usually created by the integrator, and is used to provide a real time display of the defined devices. Status lists can contain any number of items, and can contain items of different types (eg inputs and outputs). Creating Status Lists Navigate to Monitoring | Setup | Status Lists 1. Change the name of the default status list to All Doors and Areas. 2. Click Add to open the Select Devices window 3. Set the Device Type to Door and choose your Controller 4. To quickly select all devices, click an item and press CTRL+A then check any of the boxes 5. Click OK then select Save 6. Add a new status list by clicking the Add button on the main toolbar 7. Call this one All Inputs 8. Change the device type to Input, select the Controller, then choose all of the inputs 9. Repeat to create additional status lists for All Outputs and All Trouble Inputs 10. You should now have 4 status lists: 216 Module 131: Hardware Programming | Status Pages Editing a Status Page Go back to the Status Page Editor (Monitoring | Setup | Status Page Editor) 1. Click Cancel to exit the wizard then choose your Technician page from the dropdown 2. Set the Columns to 4 3. Now, in each of the top panels, set the Type to Status List and choose a different list for each 4. Make sure you set the Rows to 2 in the right most panel 5. Finally, adjust the Event Window so it spans all 4 columns 6. Save your changes Level One: Protege GX Installer Study Guide | August 2013 217 View the Finished Status Page Navigate to Monitoring | Status Page View and select your Technician page Click the button to open the page in a secondary window. This enables you to keep the status page open while you continue programming in the main window. Note that for the rest of this course, it is assumed that you will have this status page displayed in a second window. 218 Module 131: Hardware Programming | Status Pages Troubleshooting Hardware If your controller is not coming online, you need to follow some basic troubleshooting steps. Controller Connectivity The first step is to establish what is between the server and controller Controller Server Depending on whether the controller and server are on the same sub network or not will affect how you go about troubleshooting Simple Networks If the server and controller are on the same sub network, troubleshooting the network path is somewhat easier Server Switch 192.168.10.100 Controller 192.168.10.201 Devices on the same sub network only have switches or hubs connecting them together This means the server and controller should be able to communicate directly if they are both physically connected to the network Complex Networks If your network has routers between the controller and server, then troubleshooting can be more difficult Server Router Router Controller 10.10.1.100 203.86.25.12 203.96.14.26 10.12.1.201 Troubleshooting networks such as these are beyond the scope of this qualification Level One: Protege GX Installer Study Guide | August 2013 219 Requirements For the server and controller to communicate, the following things are required: 1. The server must have the correct IP address of the controller 2. The controller must be contactable on ports 21000 and 21001 3. The controller must have the Event Server IP address set correctly 4. The Event Server must be contactable on port 22000 5. The server must have the correct controller serial number to properly identify incoming messages from it 6. Encryption must either be disabled at both ends or enabled at both ends with the correct encryption key Confirm the Controller IP Address For the Server to be able to contact the Controller, it must have the correct IP address programmed and be able to reach that IP address From the Controller general tab, highlight and copy (CTRL + C) the IP address: Paste (CTRL +V) this into the address bar of a web browser on the Server If the Controller is reachable, you should be presented with a login screen like either shown below: If you are unable to web browse to the Controller, then it is likely that you have a network problem. If this is the case, skip to the Network troubleshooting section. Otherwise, log in to the Controller using the default admin login of admin for a DIN Controller or 000000 for a PCB Controller. 220 Module 131: Hardware Programming | Troubleshooting Hardware Confirm the Controller Serial Number Incoming messages from the controller to the server are identified by the controller serial number Highlight and copy (CTRL + C) the serial number from the controller web page: Paste (CTRL + V) the copied serial number to the controller configuration: Confirm the Event Server is Functioning To confirm that the Event Server is functioning and listening on the correct port for incoming events, open the Event Server diagnostic window Navigate to Sites | Controllers. Expand the Diagnostic Windows group Select Open Event Server Diagnostic Window Level One: Protege GX Installer Study Guide | August 2013 221 Confirm that the server is listening on the correct port. The default event server port is 22000. This shows that the event server is accepting events on port 22000 Confirm that the Event Server port is correctly set at the Controller For the DIN Controller this is done via the web interface, but for the PCB Controller this is done via Telnet If the Event Server diagnostic window shows messages about an unknown serial number, then events are being received from a Controller with the serial number listed This also means that the event server is accepting incoming events 222 Module 131: Hardware Programming | Troubleshooting Hardware If the Event Server diagnostic window contains no text, then you have a problem with the configuration of the Event Server: This means that the event server is not accepting incoming events Check the Computer Name On the Server, open Control Panel | All Control Panel Items | System Copy the Computer name Within Protege GX, navigate to Global | Event Server and ensure that the Computer Name matches the server PC Name This usually only changes when you have restored a database from a different PC If the name doesn't match, change it. You will also need to update the name of the Download Server (Global | Download Server). Level One: Protege GX Installer Study Guide | August 2013 223 Confirm the Event Server IP Address For messages to get from the Controller to the Server, the Event Server IP address must be programmed correctly Open a command prompt at the Server and type ipconfig then press [Enter] If the Server has more than one IP address, select the one that is on the same sub network as the Controller. In this case, 192.168.10.100 The Event Server will accept events on any IP network interface as long as the appropriate port is open (22000 by default) Now check that the Event Server IP is set correctly at the Controller This is configured in the web interface for the DIN Controller or via Telnet for the PCB Controller: 224 Module 131: Hardware Programming | Troubleshooting Hardware There are three spaces for entering the Event Server IP: This is for situations where Controllers have multiple paths to the Server. In most cases, the second and third Event Server IP addresses should be left as all zeros or all 255s. Windows Firewall When the Controller and Server are on the same local network, the only place that a firewall can be blocking messages is on the Server PC itself. This is called the Windows Firewall: Server Firewall Download Server Switch Controller Event Server Events on port 22000 Open the Windows Firewall settings: Control Panel | All Control Panel Items | Windows Firewall Level One: Protege GX Installer Study Guide | August 2013 225 If the firewall is on, it will be shown in green To eliminate the Windows Firewall as a cause of communication problems, turn it off temporarily by clicking the Turn Windows Firewall on or off link at the left of the screen: Then turn off the firewall for all network locations. If this fixes the issue, you may choose to leave the firewall off. Alternatively you can allow the services through the firewall by clicking the Allow a program or feature through Windows Firewall link. 226 Select Allow another program to add the program as an exception. Module 131: Hardware Programming | Troubleshooting Hardware Click Browse then navigate to the Protege GX installation directory. By default, this is C:\Program Files\Integrated Control Technology\Protege GX. Add the following executables one by one: GXSV.exe GXSV2.exe GXSV3.exe GXEvtSvr.exe GXDVR1.exe GXDVR2.exe This allows access through the Windows Firewall to all Protege GX services. Multiple Firewalls On corporate networks, there can be multiple firewalls. Status, control + downloads on ports 21000 +21001 Download Server Controller Event Server Events E t on port 22000 To ensure these are configured correctly, pass the Protege GX Network Administrators Guide to the appropriate IT staff member. This document is included with the software installation pack. Level One: Protege GX Installer Study Guide | August 2013 227 Encryption Encryption relies on a shared key that both the sender and receiver of a message know. The message is encrypted using the key, then decrypted by the receiver using the same key. Server LAN Message encrypted Encrypted data Controller Message decrypted If the message is intercepted it will make no sense to anyone without the key. If for some reason the receiver loses the key, then it will be unable to decrypt incoming messages. In this case the message is rejected: Server LAN Message encrypted Encrypted data Controller Message rejected If the sender loses the key then the message will be sent in plain text. The receiver - expecting to receive encrypted events - will also reject these messages as they may be of a malicious nature: Server LAN Message sent as plain text 228 Controller Message rejected Module 131: Hardware Programming | Troubleshooting Hardware If the sender and receiver have different keys then the message will still not be able to be decrypted by the receiver. This also results in the receiver rejecting the incoming messages: Server LAN Message encrypted Encrypted data Controller Message rejected Every time encryption is enabled at the server, it generates a new encryption key: Each controller will have a unique key, independent from all other controllers If encryption for a controller is disabled, then enabled again, the key is changed If encryption for a controller is disabled at the server, the controller must be defaulted It is not possible to re-enable encryption without first defaulting the controller If encryption is disabled at both the sender and receiver then messages received will be accepted. Server LAN Message sent as plain text Controller Message received as plain text The downside of this scenario is that anyone 'listening' between the sender and receiver can also receive the messages. Level One: Protege GX Installer Study Guide | August 2013 229 Encryption Summary The server issues a different key each time it negotiates encryption with a controller Encryption can be enabled for one controller and disabled for another If both the server and controller have encryption disabled, communications are possible If both the server and controller have encryption enabled and the keys match, communications are possible If the server has encryption enabled but the controller does not, communications are not possible If the server does not have encryption enabled but the controller does, communications are not possible If the server and controller both have encryption enabled but the keys do not match, communications are not possible Disabling Encryption Defaulting the controller is the only way to remove the encryption key. This is by design and intended as a security feature. It means that physical access to the controller must be gained before encryption can be disabled. If the controller is defaulted, encryption must be disabled at the server before communications can be established. This is done in the controller configuration tab. The software will warn you prior to disabling encryption. Once this has been done, the Controller must be defaulted to clear the encryption key. If you are unsure of the state of encryption of either the Server or Controller, disable it at the Server then default the Controller. This will ensure that neither are currently encrypted and will rule this out as a cause of communications problems. Encryption should then be enabled once communications are established. 230 Module 131: Hardware Programming | Troubleshooting Hardware Duplicate IP or Serial Number Although the software will warn you, it is possible to save two controllers with the same IP or serial number. In this case, the controller that was created first will take priority. Confirm that you haven't created a controller with a duplicate IP or serial number. Check all of your sites. If you have created a site for templates, these should be left with zero IP addresses and serial numbers. If you have two controllers with the same IP address or serial number anywhere on your server, there will be communication problems with at least one of them. Confirm Ports Ensure that the ports that have been set on your controller match those configured at the server. The event server port is set under Global | Event Server. This is the only place it is configured. The download and control ports are set for each controller on the general tab. Compare these with what is set at your controller. Use the web interface for the DIN Controller or Telnet for the PCB Controller. If you have changed any settings on the controller, you will need to save your changes and restart the controller for the changes to take effect. To confirm that a network path exists from the Server to the Controller and that the correct port are open, Telnet to the Controller (regardless of whether it is DIN or PCB) on port 21000. For example: telnet 192.168.1.2 21000 If the Controller is able to accept the connection, you will get a clear screen with a cursor blinking in the top left corner. If you do not get a connection, you will see a message similar to that shown here: If this is the case, there is still a problem between the server and controller. If you are able to web browse to the controller then it is very likely that a firewall is blocking the connection somewhere. Level One: Protege GX Installer Study Guide | August 2013 231 Finally, to confirm that the event server is able to accept connections, configure a laptop with the same IP settings as the controller. Remove the Ethernet plug from the controller and plug in your laptop Try to telnet to the server IP address on the event server port (22000 by default): telnet 192.168.1.100 22000 If the server is able to accept connections, you will get the clear screen and blinking cursor. If the server is not reachable, you will see a similar message to that shown on the previous slide. Once again, this would indicate that a firewall is blocking port 22000 to the server. Requesting Technical Support If all of the above options have been exhausted, contact ICT Technical Support. Make sure you have the results of all of your tests at hand. If it is possible to get internet access on the Server, a remote support session can be initiated. 232 Module 131: Hardware Programming | Troubleshooting Hardware Review Questions A module update is required when... You change any settings on the expander You change any programming The Controller advises it is required via the health status All of the above What does the Controller Wizard do? Adds a Controller Adds expanders, inputs, outputs, trouble inputs Links all of the associated records All of the above What steps are required to use the Controller onboard reader ports? None. Door processing is enabled by default Assign a Reader Expander address in the Controller Configuration tab and select the lock outputs to use Assign a Controller address in the Reader Expander Configuration tab and select the lock outputs to use Turn DIP switch 4 on What does it mean if an address is shown in red in the Auto- Addressing window? The address has been changed but not updated The address can't be changed using Auto-Addressing The address is outside the Controllers address space The address is at factory default of 254 Which of the following will generate a Controller Health Status message? A low battery on a power supply Failure to communicate When encryption is disabled All of the above Level One: Protege GX Installer Study Guide | August 2013 233 If Controller encryption is accidentally disabled, what additional step must be carried out to get the Controller back online? The Controller must be defaulted to clear the encryption key Controller encryption should be enabled again Controller encryption should be initialized again Nothing. If encryption is disabled at the Server, the Controller will continue to communicate Answer the following... On a site where encryption between the Controller and Server is normally enabled, a Controller is defaulted. The Controller does not come back online. What additional step must be carried out to get the Controller back online? Encryption must be disabled for the Site Encryption must be re-initialized on the Controller Encryption must be disabled for the Controller A force download is required to push the existing encryption key out to the Controller What is the correct Event Server IP address? Assuming the screenshot shown is from the Protege GX Server. What should a Controller with the IP address 192.168.10.2 have set as its Event Server IP address? 192.168.10.1 192.168.10.100 192.168.1.1 192.168.1.100 234 Module 131: Hardware Programming | Review Questions Module 132: User Management This module takes you through creating users and access levels, and using schedules to control how and when users gain access. In This Module Managing Users ........................................................................................................................... 236 Schedules .................................................................................................................................... 245 Review Questions ........................................................................................................................ 258 Level One: Protege GX Installer Study Guide | August 2013 235 Managing Users A User is a person that requires access to the facility being controlled by the access control system. They identify themselves to the system using credentials such as access cards, PIN and biometric profiles. Once a user has been added, they can then be assigned access to doors, areas, elevator floors and menu groups via Access Levels. Training Exercise Throughout the rest of the programming modules, you will be guided through setting up a basic system. Follow the instructions in this workbook to create your Acme Engineering site. Review questions will be based on what you have set up on your system. Access Levels Access Levels are used to control what users can do, where they can go, and when they can do these things. They determine the doors, areas, elevator floors and menu groups a user has access to. The tidiest way to define this access is using groups Creating an Access Level We'll spend more time on access levels later, but for now we are going to create a new access level for our installers, with full access to the system: 1. Navigate to Users | Access Levels and click Add 2. Enter a name for the access level - we'll use Installers - and click Save 236 Module 132: User Management | Managing Users Door Groups Doors and Door Groups define which doors a user has access to. By default, Protege GX has a door group called All Doors that allows access to all doors, all of the time. When a new door is created, it is automatically assigned to this All Doors group. Adding a Door Group to an Access Level 1. Select the Door Groups tab and click Add 2. Select the All Doors group and click OK Menu Groups Menu groups control access to keypads. They define what a user can do at a keypad, but not which areas the user has access to. When we used the Add Controller Wizard, we created an Installer menu group for our new controller. This provides access to all keypad menus. Menu groups must be created for every controller. Level One: Protege GX Installer Study Guide | August 2013 237 Adding a Menu Group to an Access Level 1. Select the Menu Groups tab and click Add 2. Select the Installer group and click OK. Arming and Disarming Area Groups Arming Area Groups and Disarming Area Groups control which areas a user is allowed to arm or disarm. Protege GX has a default Area Group called All Areas. This allows access to all areas, all of the time. When a new area is created, it is automatically assigned to the All Areas group. If an Access Level contains an Area Group in the Disarming Area Groups tab, it will also allow arming of that Area Group. It is assumed that a user that is allowed to disarm an area should also be allowed to arm that area. Adding a Disarming Area Group to an Access Level 1. Select the Disarming Area Groups tab and click Add 2. Select the All Areas group and click OK. 3. Click Save to finish creating the access level 238 Module 132: User Management | Managing Users Creating a User Now that we have our installer access level, we need to create a user: 1. Navigate to Users | Users and click Add 2. Enter a First Name and Last Name for the user. Because we have set our global options to use the long format, the Name is populated automatically 3. Enter a PIN or use the [4] [5] or [6] button to automatically generate a random pin number between 4 and 6 digits in length. For now, we'll set the PIN to 000000 so we can remember it easily. This should be changed once we have finished programming the site. Adding Cards Each user can have up to 8 cards in Protege GX: Cards can be entered manually by typing in the facility code and card number into one of the available fields. There are alternative methods of adding cards which we will look at a little later. Level One: Protege GX Installer Study Guide | August 2013 239 User Expiry Users can be set to expire by checking the Start and/or End options and setting a date and time: This allows cards to be issued and sent out prior to access being enabled, and allows for a users access to be stopped on a certain date. Adding an Access Level to a User 1. Select the Access Levels tab and click Add 2. Select the Installers access level and click OK 3. Click Save to finish configuring the new user. Users can have multiple access levels. If using a PCB controller, remember there is a limit of 4 access levels per user. 240 Module 132: User Management | Managing Users Batch Adding Users The Batch Add Users feature enables you to automatically create a number of user records with an assigned facility and range of card numbers. Use this feature when you have a large number of cards to add to the system. 1. Navigate to Sites | Batch Add Users 2. Enter the Facility Number, the Card Number range (first and last card number to be entered), and the Access Level to be assigned to the users 3. Click OK. The user records are created, ready to enter names and additional user details. Deleting Users You can easily delete user records that are no longer required. Simply select the record(s) to be deleted, then click the Delete button on the toolbar Use multi select to delete multiple users in one action. Select the first user and hold down the CTRL key while selecting specific records, or hold the SHIFT key while selecting a block of users. Once the required users are selected, click Delete. We'll delete all the users we created using the batch add function now: 1. Click on any user then use CTRL + A to select the entire list of users. 2. Hold down the CTRL key and click once on the first user to deselect the Installer record. You should have all other users apart from the Installer selected. 3. Click the Delete button on the main toolbar. This should leave you with only the Installer user. Level One: Protege GX Installer Study Guide | August 2013 241 Importing Users from a CSV File It's not unusual to have hundreds of users that need to be loaded into the system. Entering the data manually can be tedious and time consuming, and data entry is often prone to human error. Many organizations already have some form of data source - such as an HR system or a student enrolment database - containing user information. Most of these systems enable you to easily export this data as a CSV file or even an Excel spreadsheet. The Import Users wizard enables you to transfer that user data into Protege GX, mapping the user information to the corresponding fields in Protege GX. 1. Navigate to Sites | Import Users to launch the Import Users wizard 2. Browse to and select the CSV File you wish to import the users from, then click Next For our Acme training system, use the CSV file provided on your USB training card. 3. Select the line to start importing data from. If your CSV file contains a header row, start the import at line 2 so the header row is not imported 4. Select the text delimiter to use, then click Next 5. Select a column in the panel on the left then click the associated field on the right that the data should be mapped to. 6. Repeat for the remaining columns, selecting Skip where you want to ignore a column. This allows you to import from a CSV containing additional data without having to edit the file first. The data in the top panel is updated as you make your selections enabling you to preview how fields will be imported. 242 Module 132: User Management | Managing Users For our Acme training system, we'll map the columns as follows: Column 1 = First Name Column 2 = Last Name Column 3 = Skip (we'll use the Auto Format function instead) Column 4 = PIN Number Column 5 = Facility Number Column 6 = Card Number Column 7 = Access Level When mapping to an access level that does not yet exist, it will be created during the import 7. Set the User Display Name option to Long Format: 8. Click Next to continue. 9. If you have not mapped a Facility, Card Number, or Access Level, you can assign these now. You can also choose to generate PIN numbers automatically if these have not been mapped. 10. Click Next to continue. 11. Click Finish to start the import process. Level One: Protege GX Installer Study Guide | August 2013 243 12. If the imported users are not showing up, navigate away from the Users page, then back again. You should now have a list of users something like that shown above. 13. Navigate to Users | Access Levels. The Import function has created all of the access levels from our CSV file. We will still need to configure these, but time has been saved in creating, naming and assigning them to users. During the CSV import, access levels that don't already exist will be created, but any existing access levels will remain intact. 244 Module 132: User Management | Managing Users Schedules Schedules are definitions of timeframes. They can be programmed to: Have multiple start and stop times Work on some days, but not others Span multiple days Operate differently on holidays Be qualified by an output state Uses Schedules are used to: Control when a user can gain access to things Unlock doors automatically Arm or disarm Areas at certain times or days Turn things on and off at particular times or days Change how things behave at certain times or days States Once a schedule is programmed and active, it will always be in one of two states: valid or invalid. When a schedule becomes valid, items that are programmed to depend on that schedule will become active. For instance: An Access Level will only grant access when its operating schedule is valid A door will unlock when its unlock schedule becomes valid An output will turn on when its activation schedule becomes valid Validation When a user tries to gain access to something, the schedule is checked at that time. If the schedule is valid, access will be granted If the schedule is invalid, access will be denied Level One: Protege GX Installer Study Guide | August 2013 245 Edge Triggering Things that are programmed to change when a schedule changes are deemed to be edge triggered. This means that by default, they are only checked and changed when the schedule changes state. Edge trigger for valid ON Edge trigger for invalid OFF 0:00 06:00 12:00 18:00 0:00 Edge triggering for a schedule programmed with a start time of 06:00 and an end time of 18:00 For example, if a door is programmed to unlock by a schedule, then it will only unlock at the point that the schedule becomes valid. If at 10:00am, you assigned this schedule to a door's unlock schedule, then that door will not unlock until 06:00am the following morning. This is because the trigger that unlocks the door is the edge trigger that only occurs when the schedule changes from invalid to valid. Creating Your First Schedule Based on our training system specifications, we are going to create a new schedule for Office Hours, which will be valid from 9am to 5pm, Monday through Friday Navigate to Sites | Schedules and click Add Enter a name for the schedule Start by checking the Monday through Friday boxes of period 1 246 Module 132: User Management | Schedules Notice how the Graphics View updates to show green bars for these days. These green bars show when the schedule will be valid. Now, double click the hours of the Start Time and enter 9:00 Notice how the Graphics View updates immediately Try using the up and down arrow keys and observe how the hours change in response Enter the End Time of 17:00 Note the effect on the Graphics View Save the schedule You should see some operator events coming up in your All Events window: At this point, your controller has not been made aware of this schedule. The download server will only send this schedule to the controller once a device or access level on the controller needs to know about it. Level One: Protege GX Installer Study Guide | August 2013 247 Adding an Unlock Schedule to a Door Navigate to Programming | Doors and select DR 1 Set the Unlock Schedule to the newly created Office Hours schedule Once the download server has pushed out the new configuration, you should see something like this in your All Events window Because the schedule hasn't gone through a state change, there should be no effect on the state of the door yet. Notice that DR 1 is locked, and the lock output is off. 248 Module 132: User Management | Schedules Navigate to Sites | Controllers, then right click on your controller Set the controller time to 08:59 on a weekday Looking at your event window, you should see the schedule go invalid, then after a minute it should go valid Straight after this, you should hear a relay click and see in the event window that the door has been unlocked Looking at your status page now, you should see that DR 1 is now unlocked, and that the lock output is on. Level One: Protege GX Installer Study Guide | August 2013 249 Manually Locking a Door Unlocked by a Schedule Right click on DR 1 and select Lock Notice that the door locks and stays locked The schedule unlocked the door when it was edge triggered at 09:00am, but we still have full manual control and are able to override the door back to locked Always Check Unlock Schedule Navigate to Programming | Doors and select DR 1. Click the Options tab and enable the option labeled Always Check Unlock Schedule. Save your changes and observe what happens. Once the download server sends the new configuration to the controller, the door unlocks again. Now try to manually lock the door again... You'll see that the controller almost immediately unlocks the door again. This is because we have told the controller to always check the schedule state. 250 Clear (disable) the Always Check Unlock Schedule option and save the changes. Module 132: User Management | Schedules Schedule Triggering Summary Devices that are controlled by a schedule will be edge triggered by default Edge triggering allows full manual control of the devices in between times Edge triggering only gets processed at the start and end of a period If you program a device to follow a schedule, control will not take place until the next 'start' time passes If you configure the device to always follow the schedule, the device state will immediately start following the schedule When a device is configured to always follow the schedule, manual control of the device is no longer possible. Holiday Groups As schedules are commonly used to control access or secure areas, it is a common requirement for a schedule to behave differently on a holiday. Holidays are defined in Protege GX using Holiday Groups. You can create multiple groups, providing lots of flexibility in how holidays are applied to schedules. Adding a Holiday Group Navigate to Sites | Holiday Groups and click Add Enter a name for the holiday group - we'll use National Holidays for our example Switch to the Holidays tab and click Add Enter the name Christmas and enable the Repeat option as Christmas occurs on the same day every year. Set the start and finish date to December 25th Level One: Protege GX Installer Study Guide | August 2013 251 Holidays That Change Dates Each Year Let's look at a holiday that changes date every year. A good example of this is Easter. These holidays need to be programmed for every occurrence, but being able to put multiple entries in a group means we can program many years in advance. Holidays That Span Multiple Days Holidays can also span multiple days. For instance, Christmas Day and Boxing Day usually go hand in hand, so this can be configured as a single holiday. Just set the start date (the first day that will be classed as a holiday), and the end date (the last day that will be classed as a holiday). 252 Module 132: User Management | Schedules Applying a Holiday Group to a Schedule Once you have programmed a holiday group or groups, these can be applied to your schedules. Navigate to Sites | Schedules Select the Holiday Groups tab and click Add Select the group or groups of holidays that you wish to apply to this schedule. This tells the schedule which days are holidays, but it does not tell the schedule what to do if it is a holiday. For that, you must configure a Holiday Mode. Schedules and Holiday Mode Each period in a schedule can be assigned a different Holiday Mode. The three modes to select from: Disabled on Holiday: When selected, the period will not make the schedule valid on a holiday. In other words, if a door is programmed to unlock by this schedule, it will not unlock on a holiday if Disabled on Holiday is selected. This is the default mode of operation for schedules. Enabled on Holiday: When selected, the period will only ever make the schedule valid on a holiday. Ignore Holiday: When selected, the period will make the schedule valid regardless of whether the day is a holiday or not. Default Operation If you program times and days in to a schedule, but don't do anything else, then the schedule will always operate. For a holiday to stop a schedule from becoming valid, the following must have been programmed: 1. The holiday must be programmed in a holiday group 2. That holiday group must be applied to the schedule 3. The holiday mode must be programmed as Disabled on Holiday Level One: Protege GX Installer Study Guide | August 2013 253 Multiple Time Spans Schedules sometimes need to turn on and off more than once, or at different times on different days. Protege GX has 8 periods for each schedule to allow for these scenarios. Different Hours for Weekends Sometimes, premises will need to open for shorter hours on a weekend. To set this up, we simply add the second period of shorter hours and select the relevant day (in our example Saturday): Shorter Hours on a Holiday In some installations, especially retail, a schedule must still operate on a holiday, but may do so for shorter hours: In this example, the schedule will be valid from 9am to 5pm, Monday to Friday on normal days. If the day is a holiday, the schedule will only be valid from 10am to 4pm. Multiple Periods in a Single Day Another example would be where there are multiple periods required in a single day. Consider a movie theatre where there are multiple session times and the doors are to be unlocked during these times. 254 Module 132: User Management | Schedules Overnight Schedules Where a schedule is required to operate overnight, enter a start time, but leave the end time as 00:00. This results in the period being valid from 3pm until midnight: Now program a second period to start at midnight and continue until 3am. The schedule will become valid at 3pm on Monday, and stay valid until 3am the following morning. By extending the days the period is valid, we can create an overnight Monday to Friday shift: This schedule will now be valid from 3pm to 3am Monday to Friday: Overlapping Periods Where overlapping periods are present, the schedule will take the sum of all periods Level One: Protege GX Installer Study Guide | August 2013 255 In this example, Wednesday has two periods that overlap. The two periods are combined, and as a result, the schedule will be valid from 9am to 3pm on Wednesday. Because they have been combined, the edges are at 9am and 3pm, and these are the only times that the schedule will change state. Qualify Output The final bit of schedule flexibility comes from the ability to qualify a schedule with the state of an output. In this example, this schedule will only ever become valid if all the other conditions of the schedule are met, and the Alarm Set output is off. Consider a schedule that has been programmed to unlock the front door of a retail shop. By configuring the above, the front door would unlock at opening time only if the alarm has been unset. If nobody shows up for work, the door doesn't unlock. 256 Module 132: User Management | Schedules Adding the Managers Schedule Referring back to our system design, we require some additional schedules. The manager is going to require access to the building 24/7. Add a new schedule called Managers Hours Check every day in Period 1 and set the holiday mode to Ignore Holiday This schedule is effectively the same as the built in schedule called Always, but we now have an easy way to reconfigure the managers access at a later date if requirements change. Adding the Warehouse Schedules The Warehouse requires two schedules to cover the two shifts: Add a new schedule called Warehouse Shift 1 Set the schedule up to be valid from 06:00 to 14:00 Monday through Friday and disabled on holidays Add another schedule called Warehouse Shift 2 Set the schedule up to be valid from 10:00 to 18:00 Monday through Friday and disabled on holidays Level One: Protege GX Installer Study Guide | August 2013 257 Review Questions What are Access Levels used for? To control which elevator levels they have access to To control what users can do, where they can go and when they can do these things To control how a door responds to a user To provide a way to rank users In an Access Level, what are Door Groups used for? They define which doors a user has access to They allow a number of doors to be unlocked with a single card read They are used for scheduling multiple doors to unlock They define which Area a door belongs to What happens if the Import Users Wizard has an Access Level mapped that doesn't exist in the Protege GX database? The wizard will crash The wizard will skip the user The wizard will import the user but leave the Access Level unset The wizard will import the user and create a new Access Level to match What must you do to ensure a schedule does not operate on a holiday? Nothing. By default, the schedule will not operate on a holiday. Program the holiday into a holiday group. Apply that holiday group to the schedule. Program the holiday mode of the applicable periods to 'Disabled on Holiday'. Program the holiday into a holiday group. Apply that holiday group to the schedule. Program the holiday mode of the applicable periods to 'Enabled on Holiday'. Program the holiday into a holiday group. Apply that holiday group to the schedule. Program the holiday mode of the applicable periods to 'Ignore Holiday'. 258 Module 132: User Management | Review Questions How do you program a schedule to run from 11pm on Monday through to 2am on Tuesday? Program period 1 from 23:00 to 00:00 and check Monday. Program period 2 from 00:00 to 02:00 and check Monday and Tuesday. Program period 1 from 23:00 to 23:59 and check Monday. Program period 2 from 00:01 to 02:00 and check Tuesday. Program period 1 from 23:00 to 00:00 and check Monday. Program period 2 from 00:00 to 02:00 and check Tuesday. Program period 1 from 23:00 to 23:59 and check Monday. Program period 2 from 00:01 to 02:00 and check Monday and Tuesday. How do you program a schedule to be valid from 09:00 to 17:00 Monday to Friday if the day is not a holiday? Program period 1 from 09:00 to 17:00 and check Monday-Friday. Select 'Disabled on Holiday'. Program period 1 from 09:00 to 17:00 and check Monday-Friday. Select 'Enabled on Holiday'. Program period 1 from 09:00 to 17:00 and check Monday-Friday. Select 'Ignore Holiday'. Program period 1 from 09:00 to 17:00 and check Monday-Friday. Program a qualify output for holidays. How do you program a schedule to be valid from 09:00 to 17:00 on normal days and 10:00 to 16:00 on holidays? Program two periods. Set the holiday mode of the 09:00-17:00 period to 'Enabled on Holiday' and the 10:00-16:00 period to 'Disabled on Holiday'. Program two periods. Set the holiday mode of the 09:00-17:00 period to 'Ignore Holiday' and the 10:00-16:00 period to 'Enabled on Holiday'. Program two periods. Set the holiday mode of the 09:00-17:00 period to 'Ignore Holiday' and the 10:00-16:00 period to 'Disabled on Holiday'. Program two periods. Set the holiday mode of the 09:00-17:00 period to 'Disabled on Holiday' and the 10:00-16:00 period to 'Enabled on Holiday'. Level One: Protege GX Installer Study Guide | August 2013 259 Module 133: Basic Intruder Detection There are several items that need to be configured to set up a system for intruder detection: Areas: A location - often with a group of devices - that will be monitored for intrusion or other purposes. Inputs: Used to connect motion detectors, door contacts, and other protection devices to the system. Outputs: Used to control devices from the Protege system, outputs can be used to activate sirens, bells, warning devices, control lighting, and doors. This module outlines how to program areas and inputs to provide effective intruder detection. In This Module Programming Areas ..................................................................................................................... 262 Programming Inputs .................................................................................................................... 270 Review Questions ........................................................................................................................ 281 Level One: Protege GX Installer Study Guide | August 2013 261 Programming Areas Naming Conventions Before you start programming the system, it's important that you decide on the naming conventions that will be used. This step is too commonly forgotten, resulting in systems that are inconsistent and therefore hard to understand and maintain. Consider that the first 16 characters are what a user sees from a keypad, so these characters should be as descriptive as possible to ensure items are easily identifiable. Additional information can help us later when we want to search for similar devices (for example all PIRs or all doors, etc) to quickly configure common properties. Based on this, we are going to adopt the following naming convention for our ACME site: Office Entry Dr (Door) TXS CP1:1 1. The first 16 characters will describe the item - Office Area DR, Managers Door, etc. We'll add spaces where necessary before adding the additional information so the keypad only shows our description 2. We'll then include the connected device type in brackets - such as (PIR) and (REX) etc - so we can find and grab the same type of devices to quickly configure the common properties 3. We'll follow this with TXS as a site reference so we can easily identify items belonging to the Texas office 4. Finally, we'll use the hardware address to identify where the device physically connects to the Protege system Programming the Office Area 1. Navigate to Programming | Areas and click Add 2. Using our naming convention, we'll name the Area Office TXS We've added 10 spaces to ensure our description uses the full 16 characters and so the site identifier does not appear at a keypad. And because an Area is not physically connected, there is no device type or hardware address to include. 262 Module 133: Basic Intruder Detection | Programming Areas 3. Select the Configuration tab: Set the Entry Time to 10 seconds. This will allow any users that enter the area 10 seconds to disarm it before the area generates an alarm Set the Exit Time to 10 seconds. This will allow our users 10 seconds to exit the area once the arming of the area has begun before an alarm is triggered Set the Alarm 1 Time to 1 minute. This determines how long the bell/siren output for the area will remain activated before timing out. Normally we would use longer Entry and Exit times, but we will keep these short for our training system. 4. Select the Outputs tab: Set the Bell Output to CP001: Bell 0 This determines the output that will be triggered when the area alarm is activated. In most cases, this will be used to connect a siren. The Exit Delay and Entry Delay Outputs are activated whenever the area starts the exit or entry delay cycle. Using an audible output like the keypad beeper provides a distinctive warning to users to let them know the area has begun arming and they need to get out, or that the entry delay period has been triggered and they need to disarm the area before it generates an alarm. Set the Exit Delay Output to KP1 Beeper Set the Exit Delay Pulse On Time to 1 Set the Exit Delay Pulse Off Time to 9 Set the Entry Delay Output to KP1 Beeper The Disarmed and Armed Outputs are activated whenever the area completes the disarming or the arming cycle. Using an output such as a keypad LED provides a visual indication of the status of an area. Set the Disarmed Output to KP1 Green LED The Disarmed Indicator on the keypad will be green when the area is disarmed Set the Armed Output to KP1 Red LED The Armed Indicator on the keypad will be red when the area is armed 5. Click Save to finish configuring the Area Level One: Protege GX Installer Study Guide | August 2013 263 Pulse Times Pulse times allow an output or group of outputs to be pulsed for the duration of an area state. For example, the keypad beeper can be used to make short beeps for an exit delay, then a long continuous beep for entry delay. Pulse times are measured in tenths of a second or 100ms. A pulse time of 10 equates to 1 second. Setting the Pulse On to 1 and the Pulse Off to 9 provides a short pulse (such as a short beep or flash) every second. ON ON ON OFF OFF Setting both the Pulse On and Pulse Off values to 1 will provide a rapid pulse on/pulse off: ON ON OFF ON OFF ON OFF ON OFF ON OFF ON OFF Setting both values to 5 provides a slow steady pulse on/pulse off: ON ON OFF ON OFF If the Pulse On and Pulse off values are both set to zero (the default setting) the pulse is disabled and the output will remain on for the duration of the cycle time. If Pulse On is given a value but Pulse Off is set to zero, the output will pulse (flash or beep) once only then remain off. Health Status Once the configuration has been downloaded, you'll notice a health status count showing on the status bar. Navigate to Sites | Controllers and pull up the Health Status window. You should see a message similar to the one above. Remember, the number in brackets is a reference to the server database ID - this may be different on your server. 264 Module 133: Basic Intruder Detection | Programming Areas 24 Hour Tamper Area Every Area in Protege is actually made up of two areas. The main area that monitors devices (such as PIRs) only when it is armed The 24 hour (or Tamper) area that monitors for a tamper or short condition on devices (such as PIRs) 24/7 Whenever a 24 hour area is disarmed, it will be displayed under the controller's Health Status. The 24 hour tamper area is armed automatically when the main area is armed. Testing the Office Area Test the Area now by logging in with the Installer code of 000000, then pressing [Enter]. You should get a user greeting, then a display of the Office area status. Office is DISARMED Note that the green disarmed LED has not turned on yet. This is because the Area Disarmed function is edge triggered and hasn't been activated yet. The next time that the Area Disarmed function is triggered, the Keypad Green LED will be turned on. Arming the Office Area Press the [Arm] key. Once testing is complete, the Area should go into exit delay. The exit delay function will now be triggered and any output(s) associated with it will be turned on or pulsed. In our case, the keypad beeper should start making short beeps. Note: Whenever a key is pressed on the keypad, the system grabs control of the beeper output so that a key press results in a beep. This will take priority over anything else trying to turn the beeper output on. After approximately 5 seconds the system will release control of the beeper output and anything trying to turn it on will then be allowed control. Disarming the Office Area Once arming has finished, the exit delay function will stop, turning off any output(s) associated with it. The display on the keypad will change and the red Armed LED should light up. Office is ARMED The Controller Health Status should also return to OK. This is because the 24hr portion of the Office Area is now armed. Note that the user remains logged in. This is because we are using the Installer menu group which allows the user to stay logged in permanently. Press the [Disarm] key and observe the red LED turn off and the green LED turn on. Press [X] to log out. Level One: Protege GX Installer Study Guide | August 2013 265 Disarming the 24 Hour Area The 24 hour or tamper portion of an area can be armed and disarmed at the keypad by any user that has an appropriate menu group. Log in using the Installer code of 000000. Once the area status is displayed, press the left arrow key. Office 24HR Enabled You can now use the [Arm] and [Disarm] keys to control just the 24 hour portion of the area. Programming Additional Areas Based on ACME's requirements, we need to create additional areas as follows: Warehouse Managers Office Office Configure the Timings and Bell Output the same as the Office area, but leave the exit/entry delay and disarmed/armed outputs at the default values (not set). These areas don't have a keypad, so these settings are not required. Warehouse Manager Don't forget to use our consistent naming convention. 266 Module 133: Basic Intruder Detection | Programming Areas Updating the Technician Status Page Now we need to add the new areas to our Technician status page. Navigate to Monitoring | Setup | Status Lists. 1. Select the All Doors and Areas Status List 2. Click Add to open the Select Devices window 3. Set the Device Type to Area and choose your Controller 4. Check the new Areas and click OK. If your status page is already open, you will need to close it and open it again for the changes to take place. You should now have three areas in your status list. Level One: Protege GX Installer Study Guide | August 2013 267 Controlling Areas from the Software Devices shown in status lists can be controlled directly from the software: Right clicking the Office area will present a control menu. Try clicking the Arm option. You will be presented with an Arm Area control window: The area status should change to Exit Delay then you should hear the keypad beeper pulsing. 268 Module 133: Basic Intruder Detection | Programming Areas Once armed, close the window. Note that the statuses are updated live on the status page. The Office area is now shown as armed, and the output states have changed to match the keypad. Navigate to Programming | Areas and right click on the Office Area. You'll see that the control menu is accessible from here too. Right clicking most devices within the Protege GX interface will provide some level of control or functionality. Disarm the Office area again. Level One: Protege GX Installer Study Guide | August 2013 269 Programming Inputs Input Testing Next, we will need to program some Inputs into the areas. So that we can test the functionality, wire buttons or switches as follows: On the Controller, wire inputs 1 - 8 On the RMD2, wire inputs 1, 2, 5 and 7 N.C. Input Contact 1K 1K REN Input Bond Sense 1K 1K Z4 V- N.O. Input Contact Z3 N.C. Input Contact Z2 1K 1K VZ1 REX Input V- V+ Door Contact 1K 1K N.O. Input Contact You should have green LED's now for each of the inputs you have wired switches to: 270 Module 133: Basic Intruder Detection | Programming Inputs Programming Inputs 1. Navigate to Programming | Inputs 2. Select Input CP1:1 from the Record List 3. Using our naming convention, set the Name to Office Entry Dr (Door) TXS CP1:1 We'll leave the rest of the settings on the General tab as they are: The Module Address identifies where the device physically connects to the system and allows us to shift inputs around at a later date if we need to. The Reporting ID (if defined) will override the report map for Contact ID and offsite monitoring. If left at 0, it will follow the default report map. Only change this value if you want to give the input a specific number. The Alarm Input Speed determines how long an input must be open for before an alarm event will be generated. The Restore Input Speed determines how long an input must be closed for before a restore event will be generated. 4. Select the Areas and Input Types tab Set the Area to the Office TXS area Set the Input Type to Delay Inputs can be assigned to as many as four areas and they can perform a different function in each area independently of the other area's status. For now, we'll just use the first area. Level One: Protege GX Installer Study Guide | August 2013 271 Input Types Input Types define how an input will operate in an area. For example, Delay will go into entry delay when triggered, whereas Instant will activate immediately. There are a range of predefined input types included by default. These can be modified to suit your requirements or new input types created. The four most commonly used input types are: Instant: Activates an armed area immediately when input opens Delay: Activates entry delay when input opens Trouble Silent: Used for system trouble inputs. Generates an alarm without the Bell 24 Hour Alarm: Used for panic inputs. Generates an alarm even when area is disarmed Programming Additional Inputs Based on Acme's requirements, program the names of the additional inputs as follows: Input Description Input Description CP1:1 Office Entry Dr (Door) TXS RD2:1 Warehouse Roller Door (Reed) TXS CP1:2 Office Entry Dr (REX) TXS RD2:2 Warehouse (PIR) TXS CP1:3 Office Entry Dr (Bond) TXS RD2:3 Spare TXS CP1:4 Office (PIR) TXS RD2:4 Spare TXS CP1:5 Managers Dr (Door) TXS RD2:5 Office to Warehouse Door (Door) TXS CP1:6 Managers Dr (REX) TXS RD2:6 Spare TXS CP1:7 Managers Dr (Bond) TXS RD2:7 Office to Warehouse Door CP1:8 Managers (PIR) TXS RD2:8 Spare TXS (Bond) TXS Remember to use our consistent naming convention - for example CP1:2 will be Office Entry Dr (REX) TXS CP1:2 Label all unused inputs as Spare. For easy searching later, use the site name and input address too - for example Spare TXS RD2:3 272 Module 133: Basic Intruder Detection | Programming Inputs Onboard Reader Expander If you look at the Technician status page, you will note that we have inputs 1-8 for the Controller and for Reader Expander 1. The Controller has been configured to register as Reader Expander 1, so what happens to the inputs assigned to Reader Expander 1? If you now open Inputs 1 and 3 on the Controller, you will see that both the Controller and Reader Expander inputs change state. This means that as far as programming goes, you can configure either set of inputs, or even both When programming both sets of inputs: Physical characteristics obey Controller input configuration Response speed will follow Controller input settings EOL resistance will follow Controller input settings Input inverted state will follow Controller input settings Non-physical characteristics are processed for both sets of inputs Events will be logged for both sets of inputs (if configured) Alarms in areas will be processed for both sets of inputs Level One: Protege GX Installer Study Guide | August 2013 273 Programming Efficiently Now that you have programmed a number of inputs, we will look at how naming conventions will help us to program a system efficiently. This is particularly important on a large system. Program the Office Area Inputs 1. Click the Find button and type office into the Label field. 2. Click Ok. You should get a list of six inputs. 3. Click on one of the inputs then press CTRL + A to select all 4. Now hold down the CTRL key and click on Office Entry Dr (REX) to deselect it. You should end up with five inputs selected as shown. Note that the Door and Bond inputs are being used to trigger an intruder alarm. Inputs on Reader Expanders can be used for alarm inputs as well as for access control. Both functions are processed separately. 5. Click the Areas and Input Types tab: Set the Area to Office TXS Set the Input Type to Delay Click Save You have now programmed all of the required Office area inputs. Program the Managers Area Inputs 1. Now use the find tool again with the word manager. Select all but the REX input: 2. Set the Area to Managers Office and the Input Type to Instant 3. Click Save 274 Module 133: Basic Intruder Detection | Programming Inputs Program the Warehouse Area Inputs 1. Use the find tool again with the word warehouse. Select the first two inputs. 2. Set the Area to Warehouse and the Input Type to Instant 3. Click Save 4. Now select the other two inputs. Note that they already have the Office area assigned 5. Assign the second Area of Warehouse 6. Assign the second Input Type of Instant 7. Click Save Inputs can be assigned to multiple areas and with different input types. They are processed independently by each area. Level One: Protege GX Installer Study Guide | August 2013 275 Set the Input Speeds Now that we have configured our areas, let's look at other ways to use the Find tool. 1. Click Find and type (REX) into the label field. 2. Click Ok. You should get a list of two inputs: 3. Click on one of the inputs, then press CTRL + A to select all. 4. On the General tab, set the input speeds to 50 msec and click Save. The default Input Speed is 500 msec. This means the input needs to be activated for half a second before it will trigger. This can be too slow for a Request to Exit button Common Searches Using the Find Tool There are some other common searches we can use: TXS : This will list all inputs belonging to the Texas site TXS RD1 : This will list all inputs on Reader Expander 1 at the Texas site These can be useful where EOL resistance needs to be set for a whole site or an entire expander. To quickly find an available input when adding a new device, the find tool can be used with the word Spare. 276 Module 133: Basic Intruder Detection | Programming Inputs Monitor the Health Status You will find that your Controller health status is now showing 7. 1. Open the health status window. The first two messages are in relation to the new areas that have been added but not yet armed. The next five messages are appearing because the inputs have had changes made that affect the operation on an area that is currently armed. In this case, it is because the 24 hour portion of the Office area is armed. This is a security feature that ensures programming cannot be changed to an armed Area without someone being notified. 2. From the Technician status page, disarm the Office 24 hour area. Note that after the 24 hour area is disarmed, a report event is generated. This means that if offsite monitoring is configured, the monitoring station will be notified. The Controller health status should now drop to 3. 3. From the Technician status page arm the 24 Hour areas for the Office, Warehouse and Managers Office. The Controller health status should now be OK. Level One: Protege GX Installer Study Guide | August 2013 277 Testing Areas 1. Navigate to the Technician status page 2. Right click the Office area and select Arm 3. Click Close 4. Right click the Warehouse area and select Arm 5. Click Close 6. Right click the Managers Office area and select Arm 7. Click Close All areas should go through the 10 second exit delay then change to armed. Testing the Office Area 1. Open the Office (PIR) TXS CP1:4 input This has been programmed as a Delay input type so should trigger the entry delay. In the All Events panel you should see the event for the input opening, followed by the Keypad Beeper being turned on by the Entry function of the Office area. 2. Once the entry delay has timed out, you should see the following: The keypad beeper is turned off by the entry function A report is generated (this will send a zone alarm signal to offsite monitoring once configured) The area alarm is activated The siren/bell function is activated The Bell 0 output is turned on by the bell function 3. Leave the system in alarm for now. After the Alarm 1 Time (1 minute as programmed in the area configuration) has expired, the siren/bell function will deactivate and the Bell 0 output will be turned off. 278 Module 133: Basic Intruder Detection | Programming Inputs 4. Close the Office (PIR) TXS CP1:4 input An input closed event will be generated, then another report will be generated. This is the Zone Restore signal to offsite monitoring. 5. Open and close the Office PIR input again, but this time, log in at the keypad and disarm the area: Press: 000000 [Enter] [Enter] [Disarm] As you can see, the event logging in Protege GX is very comprehensive and can be a great source for troubleshooting. Testing the Managers Area Open the Managers (PIR) TXS CP1:8 input. Note the area goes straight in to alarm: This is because the inputs have been configured as Instant input types. Note also that the Controller Bell 0 has activated, but the keypad beeper has not: Testing the Warehouse Area Open the Warehouse (PIR) TXS RD2:2 input The Warehouse area should go straight in to alarm and the Bell 0 output should activate again. You will also see that the RD2 Lock 1 output activates for 5 seconds when you close the Warehouse (PIR) TXS RD2:2 input This is because Input 2 on a reader expander is configured by default for REX (Request to Exit). We will address this in a later module. Level One: Protege GX Installer Study Guide | August 2013 279 Testing Inputs Assigned to Multiple Areas 1. Arm the Office area again 2. Wait for the exit delay to expire 3. Open the Office to Warehouse Door (Door) TXS RD2:5 input This input is programmed for both the Office and Warehouse areas. You can see that after the input opens, the Warehouse area goes into alarm instantly, whereas the Office area goes through entry delay first. Testing Complete We have now finished testing the configuration of our Areas. Disarm the Office area Disarm the Warehouse area Disarm the Managers Office area 280 Module 133: Basic Intruder Detection | Programming Inputs Review Questions A short time after creating a new area, a health status message appears on the controller. What is this likely to be? The area is missing an Input Type The Controller requires a module update The new area has its Tamper or 24 hour area disarmed The area has no inputs programmed yet Which characters from the area name programming will be shown on the keypad? The last 16 characters of the programmed name The first 20 characters of the programmed name The last 20 characters of the programmed name The first 16 characters of the programmed name Explain the result of the setting shown in this image The output will never be activated as the pulse times are both set to 0 The output will be activated constantly when an entry delay input is triggered The output will be activated constantly while the area is arming The output will pulse rapidly while the area is arming How many areas can an input be programmed to? One Two Four It depends on whether it is on a Reader Expander Level One: Protege GX Installer Study Guide | August 2013 281 What does the Input Type setting do? It sets how the input operates in the specified area It sets how the input operates in all areas It sets the Input name displayed in the keypad It sets whether input to use for an on-board expander Which of the default input types should be used for a PIR that is covering the keypad at the main entry? Instant Delay Trouble Silent 24 Hour Alarm 282 Module 133: Basic Intruder Detection | Review Questions Module 134: Basic Access Control There are two main elements to access control: Doors: Used to control access by users or to monitor/control the flow of people into an area Access Levels: Used to control what users can do, where they can go, and when they can do these things This module outlines how to configure these items to provide basic access control. In This Module Programming Doors ..................................................................................................................... 284 Configuring Access Levels ........................................................................................................... 292 Door Configuration ....................................................................................................................... 305 Review Questions ........................................................................................................................ 314 Level One: Protege GX Installer Study Guide | August 2013 283 Programming Doors Navigate to Programming | Doors. You'll see that there are four doors already programmed: DR 1 DR 2 DR 3 DR 4 This is because the Add Controller Wizard added the doors automatically. Naming Doors Using our naming conventions, name the four doors as follows: DR1 = Office Entry TXS DR2 = Managers Office TXS DR3 = Warehouse Roller TXS DR4 = Office to Warehouse TXS We have chosen to put the Office Entry and Managers Office on the controller so that if there is a failure of the RS-485 or of the Reader Expander, we will still be able to gain access to the control equipment (located in the Managers Office) Door Testing Wire a MultiProx reader into Port 1 of the Controller and a NanoProx or Vario reader into Port 2 of the Controller RED BLACK Shielded Cable GREEN WHITE N/R ORANGE BROWN BLUE N/R Shield is frame grounded at one point YELLOW SHIELD 284 Shield not connected BZ L1 D1 DO Z4 V- Z3 Z2 V- Z1 V- V+ Module 134: Basic Access Control | Programming Doors Adding Cards from the Event Log Badge the first training tag at the MultiProx reader. You should see an event come through, telling us that an unknown card has been read on Port 1 The numbers in the brackets at the end of the event - in this example (99:1) - represent the Facility Code Card Number and 1. Right click on the event 2. Select Add Card Number to Existing User 3. Select the user you wish to add the card to then click OK 4. Once the download is complete, badge the card again. You should be granted entry to the door. Note that Lock 1 output is turned on, then off again 5 seconds later 5. Try badging again, and observe the LED indicators 1. The R1 LED should pulse for 1 second during card read (correct format data read) 2. The RELAY 1 LED should pulse for 5 seconds Level One: Protege GX Installer Study Guide | August 2013 285 Door Processing Door Sense Badge your card at the reader, then open the Office Entry Dr (Door) TXS CP1:1 input (using the switch you wired earlier) for a second or two This time you will see Door Opened and Closed events. Inputs 1 and 5 are configured by default as the Door Sense (Reed switch) inputs for the doors associated with a Reader Expander Door Processing occurs independently of any areas the inputs may be associated with as alarm inputs REX 1. Open the Office Entry Dr (REX) TXS CP1:2 input Note that the LED input on the Controller changes to red and the status changes to open, but the lock output does not change state 2. Close the Office Entry Dr (REX) TXS CP1:2 input You will see an Unlocked Request To Exit event, followed by the lock output cycling for 5 seconds: REX inputs are inverted by default. This is because many push buttons only have NO (normally open) contacts which close when the button is pressed. Inputs 2 and 6 are configured by default as the REX (Request to Exit) inputs for the doors associated with a Reader Expander. Bond Sense and REN Inputs 3 and 7 are configured as lock Bond Sense inputs for the doors associated with a Reader Expander By default, Bond Sense processing is not enabled Inputs 4 and 8 are configured as REN (Request to Enter) inputs for the doors associated with a Reader Expander By default, REN processing is not enabled Bond Sense and REN processing must be enabled if required 286 Module 134: Basic Access Control | Programming Doors Beeper The beeper on an ICT reader can be controlled internally by the reader itself or externally by grounding the beeper wire. Beep generated internally. Data sent to expander for processing. The first beep that is emitted when a card is read is generated internally by the reader to acknowledge that the card has been read. The second beep (or beeps) are generated by the access control system to advise whether access has been granted or denied. Beeps generated by Reader Expander supplying 12VDC to the beeper wire. This is achieved by the reader expander grounding the beeper via the BZ output. Level One: Protege GX Installer Study Guide | August 2013 287 Reader Beepers 1. From the Technician status page, right click the RD1 Beeper R1 output 2. Set a time of 5 seconds 3. Select Activate Timed The Reader Expander BZ output can be controlled by Protege GX just like any other system output. 288 Module 134: Basic Access Control | Programming Doors LEDs 1. From the Technician status page, right click the RD1 Green R1 output 2. Set a time of 5 seconds 3. Select Activate Timed Reader LED's can also be controlled by Protege GX Reader Single LED Mode ICT Readers can be configured to operate in either single or dual LED mode. In single LED mode the green LED control wire (orange) is not connected to the Reader Expander. The blue LED control wire (brown) is connected to the L1 output of the Reader Expander. Blue control line grounded The reader LED strip is GREEN Blue control line not grounded The reader LED strip is BLUE ICT Readers are now shipped with single LED mode set Level One: Protege GX Installer Study Guide | August 2013 289 Reader Dual LED Mode In dual LED mode the green LED control wire (orange) is connected to the L1 output of the Reader Expander. The blue LED control wire (brown) is connected to the L2 output of the Reader Expander. Green control line grounded The reader LED strip is GREEN Blue control line grounded The reader LED strip is BLUE Dual LED mode allows two extra states of LED display: No LED's and Both LED's. Neither LED wire grounded The reader LED strip is OFF Both control lines grounded The reader LED strip is CYAN 290 Module 134: Basic Access Control | Programming Doors Door Monitoring 1. Open the Office Entry Dr (Door) TXS CP1:1 input (using the switch you wired earlier) You should see a Door Forced Open event, and see the status update on the Technician status page 2. Close the Office Entry Dr (Door) TXS CP1:1 input 3. Badge the Installer card 4. Open the Office Entry Dr (Door) TXS CP1:1 input (to simulate the door opening) Leave the input open this time and observe what happens: 1. The door opens 2. After 30 seconds an alert is generated 3. After 45 seconds a DOTL (Door Open too Long) alarm is generated Managers Door The Office Entry door is now mostly configured according to our system design. 1. Badge your card at the Managers Office reader 2. Open the Managers Dr (Door) TXS CP1:5 input 3. Close the Managers Dr (Door) TXS CP1:5 input 4. Open the Managers Dr (REX) TXS CP1:6 input 5. Close the Managers Dr (REX) TXS CP1:6 input You should find that the Managers Office door functions correctly, and needs no further configuration. Configuring Doors As you can see, basic configuration is completed by the Add Controller Wizard. All that is required now is configuring any additional options required. We'll come back to this later. Next, we'll take a look at controlling access with Access Levels and Groups. Level One: Protege GX Installer Study Guide | August 2013 291 Configuring Access Levels Access Levels are used to control what users can do, where they can go, and when they can do these things. They determine the doors, areas, elevator floors and menu groups a user has access to. The tidiest way to define this access is using groups. Door Groups Navigate to Groups | Door Groups. You will see a default door group called All Doors. This is created by the system and cannot be deleted or changed. Whenever a new door is created, it will be added to the All Doors door group automatically. Because of this, use of the All Doors door group should be used with caution. An example of where this would be a problem would be at a research institute dealing with dangerous substances. If a new door was created in the system that controls access to a biohazard area, anyone with the All Doors door group would automatically have access to this door. In the case of our Acme scenario, it is acceptable for our Installer to have this group assigned. 292 Module 134: Basic Access Control | Configuring Access Levels Adding Door Groups Add the Managers Door Group We could also assign the All Doors door group to our Manager access level, however to follow good practice, we'll create a new door group for the Manager. 1. Click the Add button on the main toolbar 2. Name the door group Managers TXS 3. Click Save to create the group 4. Click Add to open the Doors selection window... This display all doors in the system that are not already in the group 5. Select all four doors. This can be done by dragging each door from the list and dropping them on to the main window, or by selecting the doors (use CTRL+A to select all) and clicking OK The doors now appear in the list with a schedule beside them... By default, Protege GX assigns the system-created Always schedule to the group 6. Change the schedule to the Managers Hours schedule This will provide the same functionality as the Always schedule, but means that if the requirements change at a later date and the Manager should no longer have 24/7 access, we would simply need to update the Managers Hours schedule rather than having to find everything that was using the Always schedule. 7. Click Save. Level One: Protege GX Installer Study Guide | August 2013 293 Add the Office Staff Door Group 1. Create a new door group called Office Staff TXS 2. Add the two office doors 3. Assign the Office Hours schedule In our system design, it was specified that the office staff will have access to the Warehouse only when warehouse staff are present. We still need to give them access to the door, but we will configure the rest later. 294 Module 134: Basic Access Control | Configuring Access Levels Add the Warehouse Staff Door Group 1. Create 2 further door groups for: Warehouse Shift 1 TXS and Warehouse Shift 2 TXS 2. Add the doors required by the warehouse staff: Office Entry Office to Warehouse, and Warehouse Roller 3. Assign the appropriate schedules (shift 1 or shift 2) Again, we will configure the office restriction later... Level One: Protege GX Installer Study Guide | August 2013 295 Adding Area Groups Add the Managers Area Group 1. Navigate to Groups | Area Groups You will see a default area group called All Areas. This is created by the system and cannot be deleted or changed. Whenever a new area is created, it is added to the All Areas group automatically. Use of the All Areas area group should be made with caution. 2. In the same way we created the Managers door group, add a new area group called Managers 3. Add all three areas 4. Click Save Add Additional Area Groups Now create an Office area group with only the Office area, and a Warehouse area group with only the Warehouse area: 296 Module 134: Basic Access Control | Configuring Access Levels Adding Menu Groups Add the Managers Menu Group The final thing we need to configure is Menu Groups. Menu groups control access to keypads. They define what a user can do at a keypad, but not which areas the user has access to. 1. Navigate to Groups | Menu Groups 2. Add a new menu group called Manager 3. Select (enable) the following settings: Areas (1): Area Control Events (3): View Events View (5): View other system information Time (6): Set the Controller time Bypass (7): Bypass Inputs Force Arming: Force arm the system Set Menu Group Options 1. Click the Options tab and select (enable) the following options: This will allow the manager to see any alarm activations when they log in 2. Click Save Level One: Protege GX Installer Study Guide | August 2013 297 Add an Additional Menu Group 1. Add another menu group called Staff 2. Check the Area (1) setting to allow area control 3. Under the Options tab select (enable) the Show User Greeting option 4. Click Save We have now created all of the groups we need... Configure Access Levels Navigate to Users | Access Levels. You should have six access levels programmed: Installers Manager Office Warehouse Shift 1 Warehouse Shift 2 Warehouse Supervisor The Installers access level was created manually. The others were created by the Import Users Wizard, but have not yet been configured. Configure the Managers Access Level 1. Select the Managers access level 2. Select the Door Groups tab and click Add to open the Door Groups selection window 3. Select the door group Managers TXS and click Ok 4. Click Save 5. Select the Menu Groups tab and click Add 298 Module 134: Basic Access Control | Configuring Access Levels 6. Select the Manager menu group and click OK 7. Click Save 8. Select the Disarming Area Groups tab and click Add 9. Select the Managers area group and click OK 10. Click Save Remember that if we allow a user to Disarm an area, the system will automatically allow them to Arm the area. Level One: Protege GX Installer Study Guide | August 2013 299 Testing the Managers Access Level 1. Badge Card Number 2 at a reader Right click the event and assign the card to our Manager Brett Lamb 2. Wait 5 seconds, then badge the card again. Access should now be granted: 3. Log in at the keypad using Brett's code of 9998 Note the areas he has access to 4. Press the [Menu] key and scroll up to see the menus he has access to 5. Navigate to Sites | Controllers and right click on the Controller 6. Set the time to 2:00AM 7. Try badging the Managers card again Notice how Brett is allowed access at 2am. This is because the door group assigned to the access level is set to use the Managers Hours schedule, providing 24/7 access. 300 Module 134: Basic Access Control | Configuring Access Levels Configure the Office Access Level 1. Navigate to Users | Access Levels and select the Office access level 2. Add the Office Staff door group 3. Add the Staff menu group 4. Add the Office area group to the Disarming Area Groups tab 5. Add the Warehouse area group to the Arming Area Groups tab 6. Click Save Testing the Office Access Level 1. Badge Card Number 3 at a reader Right click the event and assign the card to one of our office staff Calvin Diaz 2. Wait a few seconds, then badge the card again You should be denied entry as the Office staff are not allowed access outside of office hours. Level One: Protege GX Installer Study Guide | August 2013 301 3. Navigate to Sites | Controllers and right click on the Controller 4. Set the time to 9:30AM 5. Try badging Calvin's card again You will see the Office and Warehouse Shift 1 schedules go valid, and then Calvin is granted access. 6. Log in at the keypad using Calvin's code of 9779 Note the areas he has access to 7. Press the [Menu] key and scroll up to see the menus he has access to 8. Press [Enter] 9. Select the Warehouse area and press [Arm] Note how the Warehouse area now drops off Calvin's list of areas. This is because he is only allowed to Arm the Warehouse area. You'll also see that Calvin is automatically logged out. This is because the menu group assigned to him does not have the Installer Menu Group option checked. Configure the Warehouse Shift 1 Access Level 1. Select the Warehouse Shift 1 access level 2. Add the Warehouse Shift 1 door group 302 Module 134: Basic Access Control | Configuring Access Levels Configure the Warehouse Shift 2 Access Level 1. Select the Warehouse Shift 2 access level 2. Add the Warehouse Shift 2 door group Configure the Warehouse Supervisor Access Level 1. Select the Warehouse Supervisor access level 2. Add the Warehouse Shift 1 and Warehouse Shift 2 door groups 3. Add the Staff menu group 4. Add the Warehouse area to the Disarming Area Groups tab 5. Add the Office area to the Arming Area Groups tab Level One: Protege GX Installer Study Guide | August 2013 303 Assign the Remaining Cards Assign card number 4 to Lois Joseph Assign card number 5 to Douglas Ross Assign card number 6 to Gretchen Holmes 304 Module 134: Basic Access Control | Configuring Access Levels Door Configuration Door Types Door Types define how a door will operate. This includes the passback mode, the reading mode used to gain access (such as Card, PIN, Card or PIN, Card and PIN, etc), and if operator verification is required to grant access. Setting a Door Type 1. Navigate to Programming | Doors 2. Set the Door Type of the Office Entry door to PIN Only 3. Wait for the configuration to download, then try badging Card 1 You should see a Denied Entry by Entry Mode Error event This tells us that the user was trying to gain access to the door using a different credential to what is set in the door type Testing the Door Type 1. Type in the installer PIN 000000, then press [Enter] on the MultiProx Reader This time you should be granted access, with the mode logged as Keypad Input 2. Now set the Door Type of the Office Entry door to Card and PIN Wait for the configuration to download, then try badging the card. Level One: Protege GX Installer Study Guide | August 2013 Do not enter a PIN. 305 After approximately 10 seconds, you will see a PIN Entry Timed Out event. 3. Badge the card then type 000000 and press [Enter] at the MultiProx reader This time you should be granted access. Setting Additional Door Types Set the Door Type of the Warehouse Roller door to Card and PIN: We'll leave the Managers Office and Office to Warehouse doors as Card Only door types DOTL Times We configure the Pre-Alarm Delay and Door Left Open Alarm (DOTL) times under the Door's General tab: The Door Pre-Alarm Delay Time defines how long a door can be propped open before a warning is triggered The Door Left Open Alarm Time defines how long a door can be propped open before an alarm is generated Both times are measured from the time the door is opened 306 Module 134: Basic Access Control | Door Configuration Door Outputs We configure the outputs under the Door's Outputs tab: The Lock Output and Lock Output Group determine which output or output group to activate when the door unlocks The Lock Activation Time defines how long the door unlocks for (in seconds) Note that the Add Controller Wizard has configured this automatically. The Outputs tab is also where we configure outputs or output groups for: Door Pre-Alarm Door Left Open Alarm Door Forced Open These can be set to pulse in the same way we configured our area outputs. By default, the Pre-Alarm and Left Open Alarm are configured to pulse the local reader beeper at different rates. The Door Forced Open is not configured by default. Level One: Protege GX Installer Study Guide | August 2013 307 Relock on Door Close 1. Badge Card 2 at the Managers Door reader 2. Open the Managers Dr (Door) TXS CP1:5 input 3. Close the Managers Dr (Door) TXS CP1:5 input Notice that the lock output remains on for 5 seconds regardless of how long the door opens for 4. Select the Managers Office door and go to the Options tab 5. Enable the Relock on Door Close option and save your changes 6. Wait a few seconds then try simulating entering the Managers Office again Notice that the door now locks as soon as it closes. Door Options There are many more door options that can be configured however these are outside of the scope of this certification. Reader Expander Configuration While some functionality is configured at the door, many options around door processing is carried out at the Reader Expander. 1. Navigate to Expanders | Reader Expanders You'll see that the Add Controller Wizard has automatically created both Reader Expanders 2. Name the Reader Expanders using our naming conventions: RD1 = Office Entry | Managers Office RD1 TXS RD2 = Warehouse Roller | Office to Warehouse RD2 TXS This way, we can use the find tool to find a particular door, module, or site. 308 Module 134: Basic Access Control | Door Configuration Offline Operation Offline Operation defines how a reader expander will behave if it loses communications with the controller RD1 has been configured as the controller onboard reader expander, so offline operation is not relevant for RD1 RD2 controls access to the warehouse, so let's set the offline operation to First 10 Users plus Cache For offline operation to work, we also need to configure some options at the controller... 1. Navigate to Sites | Controllers and select the Configuration tab The Automatic Offline Time defines the time of day that the Controller will download offline users to the expanders and is set to midnight by default 2. Go to the Options tab and select (enable) the Enable Automatic Offline Download option: 3. Save your changes Level One: Protege GX Installer Study Guide | August 2013 309 Reader Multiplexing A unique feature of Protege GX is the ability to configure both an entry and an exit reader while only using a single reader port SHIELD RED BLACK Shielded Cable GREEN WHITE N/R ORANGE BROWN Shield is frame grounded at one point BLUE N/R YELLOW SHIELD RED BLACK Shielded Cable GREEN WHITE N/R ORANGE BROWN Shield not connected BLUE N/R YELLOW BZ L1 D1 BZ DO L1 D1 DO Z4 V- Z3 Z2 V- Z1 V- V+ Our system design is using this feature for the Warehouse Roller and Office to Warehouse doors. 1. Navigate to Expanders | Reader Expanders and select RD2 2. Select (enable) Multiple Reader Input Port 1 This will enable multiplexing for the Warehouse Roller door 3. Select (enable) Multiple Reader Input Port 2 This will enable multiplexing for the Office to Warehouse door 4. Save the changes. 310 Module 134: Basic Access Control | Door Configuration Reader Configuration Select the Reader One tab. The Configuration options here define the behavior of the reader port 1. By default, readers are configured for: 26 bit reading mode As entry readers for access control ARK-501 keypad (supports the ICT Multi Prox PIN input) The Add Controller Wizard has automatically assigned each reader port to a door: RD1 to doors 1 and 2, RD2 to doors 3 and 4, and so on. Reader Options The Reader Options are where we configure which of the Reader Expander inputs will be associated with door processing. We have used door sense (reed switches) for all of our doors, so will leave the Door sense enabled option selected. 1. Select (enable) the Bond Sense Input Enabled for both Reader One and Reader Two on RD1, and for Reader Two on RD2 This will enable bond sense on all doors except the Warehouse Roller 2. Clear (disable) the REX Enabled option for Reader One and Reader Two on RD2 Both the Warehouse Roller and Office to Warehouse door have entry and exit readers and will not be using a REX input. Level One: Protege GX Installer Study Guide | August 2013 311 Review the Health Status The Status Bar should now be showing 2 health status warnings. 1. Navigate to Sites | Controllers and open the Controller Health Status window. Remember, the numbers inside the brackets refer to the Database ID, not the physical expander number. 2. Both reader expanders require a module update as we have made changes to the physical properties of the hardware (disabled and enabled inputs for door processing). Performing a Module Update 1. Navigate to Expanders | Reader Expanders Note the Database ID's match the health status warning. Your Database IDs will probably be different from the IDs shown here. 2. Right click on RD1 and select Update Module 3. Repeat to perform a module update on RD2. Once complete, the health status should return to ok. 312 Module 134: Basic Access Control | Door Configuration Module Updates During a module update, there is a short period (a few seconds) where the expander temporarily stops processing Performing an update from the Controller will update all modules connected to the system Performing an update from the selected module only updates that single module causing less disruption Additionally, a single module update provides a confirmation that the update succeeded and the new configuration is now running Downloading Changes Before Updating It is important that any configuration changes are downloaded to the Controller before a module update is performed. If you attempt to update a module that has a download pending, the software will prompt you to initiate the download first. Click OK to force the download. Once the download is complete, the module update is actioned. Level One: Protege GX Installer Study Guide | August 2013 313 Review Questions If a door has been created by the Add Controller Wizard with no additional configuration and it is the Forced Open state, which input must be open? The REN (Request to Enter) Input The REX (Request to Exit) Input The Bond Sense (Lock State) Input The Door Sense (Reed) Input Which inputs are configured by default as bond sense (lock state) inputs on a Reader Expander? 1 and 5 2 and 6 3 and 7 4 and 8 What does this event mean? A card has been read that was programmed incorrectly at the factory The Reader Expander has the wrong format programmed A new card has been assigned to a user An unknown card has been read on Port 1 If a new area is created but is not added to any area groups, who will be able to disarm it? Nobody The Installer The Manager Anyone with the 'All Areas' disarming area group If a new door is created but is not added to any door groups or access levels, who will have access to it? The Installer Anyone with the 'All Doors' door group Nobody The Manager 314 Module 134: Basic Access Control | Review Questions If a user is automatically logged out of a keypad after a period of time, which option do they NOT have checked in their menu group? Installer (4) Advanced Installer (4, 8) Installer Menu Group Time (6) What do Door Types do? They define which lock outputs to use They set double badge arming They define the reading mode used to gain access All of the above For Offline Operation on a Reader Expander to allow a cached user through a door in offline mode, what items must be configured? The Controller must have the Enable Automatic Offline Download option checked and the Reader Expander offline operation mode must be set to First 10 Users + Cache The Reader must be programmed for Intelligent offline mode and the user must have the Super Rights option checked The Reader must be programmed for Intelligent offline mode and the Reader Expander offline operation mode must be set to First 10 Users + Cache The Controller must have the Enable Automatic Offline Download option checked and the user must have the Super Rights option checked Two Readers are going to be wired to Port 1 of a Reader Expander. To configure multiplexing, what must be done? The exit reader must have D0 wired to reader port 2 and Multiple Reader Input Port 1 must be checked The exit reader must have D0 wired to reader port 2 and Multiple Reader Input Port 2 must be checked The exit reader must have D1 wired to reader port 2 and Multiple Reader Input Port 1 must be checked The exit reader must have D1 wired to reader port 2 and Multiple Reader Input Port 2 must be checked Level One: Protege GX Installer Study Guide | August 2013 315 Module 135: Configuring Intruder and Access Integration In this module we'll finish configuring intruder detection and access control according to the system requirements we defined earlier. In This Module Configuring Office Access ............................................................................................................ 318 Configuring Warehouse Access ................................................................................................... 328 Testing the System ...................................................................................................................... 334 Review Questions ........................................................................................................................ 336 Level One: Protege GX Installer Study Guide | August 2013 317 Configuring Office Access From the Protege GX user interface: Set the Controller time to 7am on a weekday Arm the Office area (if it isn't already armed) Lock the Office Entry door (if it isn't already locked) Now we're going to simulate the manager arriving in the morning: Badge Card 2 at the Office Entry reader and enter the PIN 9998 Open the Office Entry Dr (Door) TXS CP1:1 input to simulate opening the door Note the keypad starts entry delay Door Areas It makes sense that if a staff member is allowed access, the area should be turned off automatically for them. We'll do this now... The first step to configure this is to assign the area to the door: Navigate to Programming | Doors Select the Office Entry door and go to the General tab Set the Area Inside Door to the Office area Disarm On Entry Navigate to Expanders | Reader Expanders and select RD1 Go to the Reader 1 tab and select (enable) the Disarm Area For Door On Access option Save the changes 318 Module 135: Configuring Intruder and Access Integration | Configuring Office Access Wait a few seconds then badge Card 2 again. Enter the PIN 9998. This time the Office area will automatically disarm. Arm the Office area again Badge Card 4 at the Office Entry reader and enter PIN 2758 Our user Lois Joseph has the Warehouse Shift 1 access level. This has the Office Entry door in a door group and the schedule is valid, however because Lois doesn't have access to the Office area, she is denied access. Badge Card 2 at the Office Entry reader and enter PIN 9998. Badge Card 4 at the Office Entry reader and enter PIN 2758 You'll see that Lois Joseph is now granted access as the Office area is no longer armed. This fulfills our system design requirement that the warehouse staff will only have access to the office area when the office staff are present. We want to set this functionality up for all of our doors. Select (enable) the Disarm Area For Door On Access option on: the Reader 2 tab of RD1 the Reader 1 tab of RD2 the Reader 2 tab of RD2 Disarm on Entry: Manager's Office Set the Area Inside Door of the Managers Office door to Managers Office Level One: Protege GX Installer Study Guide | August 2013 319 Disarm on Entry: Warehouse Roller Set the Area Inside Door of the Warehouse Roller door to Warehouse Disarm on Entry: Office to Warehouse Door Set the Area Inside Door of the Office to Warehouse door to Warehouse Set the Area Outside Door of the Office to Warehouse door to Office Arming an Area on 2 Reads Badge Card 2 at the Managers Office door The Area is disarmed Now badge Card 2 at the Managers Office door twice in a row You should get a 3 beep acknowledgment, and the Managers Office starts to arm again This is because the Reader Expander is configured by default to Arm Area on 2 Reads 320 Module 135: Configuring Intruder and Access Integration | Configuring Office Access Configure the Managers Office Outputs We don't have a keypad to show the status of the managers office, but we do have a reader, so let's set some outputs for the Managers area: Navigate to Programming | Areas Select the Managers Office area and go to the Outputs tab Set the Exit Delay Output to RD1 Beeper R2 Set Pulse Times of 1 and 9 Set the Armed Output to RD1 Green R2 Set the Pulse Times to 5 and 5 Save your changes The outputs we have used are the second reader port (R2) on reader expander 1 (RD1) Wait a few seconds, then try double badge arming at the Managers Office reader. The reader should now beep during exit delay, then flash the LED while armed. Configure the Office Entry Door Badge Card 2 at the Office Entry door twice. Because the door is set for Card and PIN mode, we would have to badge our card and enter our PIN twice to get the Arm on 2 Reads function to work A better approach is to set the door mode to Card and PIN if the alarm is armed, and to Card Only if the alarm is disarmed. To achieve this, we are going to need to create a new schedule that is valid when the Office area is set, then change the door mode when the schedule is invalid... Level One: Protege GX Installer Study Guide | August 2013 321 Create an Area Armed Schedule Navigate to Sites | Schedules Add a new schedule called Office Area Armed Select all days in period 1 and set the holiday mode to Ignore Holiday Go to the Options tab and select (enable) the Validate Schedule if Qualify Output On option Set the Qualify Output to KP1 Red LED We have created a schedule that will be valid 24/7 regardless of holidays, but requires the keypad's red LED to be ON before the schedule becomes valid. The keypad red LED is turned on when the area is armed. Create a New Door Type Now we will need to create a new door type that changes based on the state of the new schedule. Navigate to Programming | Door Types: 1. Add a new door type called Office Entry 2. Set the Operating Schedule to Office Area Armed 3. Set the Secondary Type to Card 4. Set the Entry Reading Mode to Card and PIN 322 Module 135: Configuring Intruder and Access Integration | Configuring Office Access Assign the New Door Type Navigate to Programming | Doors Select the Office Entry door, and choose the new Door Type Testing the New Door Type Arm the Office area: You will see that as the area is armed, the keypad Red LED turns on This in turn makes the Office Area Armed schedule valid The door is now in Card and PIN mode Badge Card 2 and enter the PIN 9998 at the Office Entry door: Brett is granted access which disarms the area The keypad Red LED turns off which makes the schedule invalid This puts the door type into its secondary type, which is Card only Level One: Protege GX Installer Study Guide | August 2013 323 Door Type Integration Summary 1. We've created a new 24/7 Office Area Armed schedule that is qualified by the Keypad Red LED This Schedule becomes valid whenever the Office area is Armed 2. We've created a new Door Type that has the new schedule as its Operating Schedule 3. We've set the Entry Mode to Card and PIN 4. We've set the Secondary Door Type to Card 5. We've assigned the new door type to the Office Entry door This means that now: When the Office area is armed, the door type follows its primary settings (Card and PIN) When the Office area is disarmed, the door type switches to its secondary type (Card only) Door Unlocking by Schedule Earlier, we set the Office Entry door to unlock via the Office Hours schedule. Let's test this functionality: Set the Controller time to 4:59pm - at 5:00pm, the door locks. Arm the Office area by double badging at the Office Entry reader - the building is locked and secure. But what happens if nobody turns up for work in the morning? Set the Controller time to 8:59am At 9:00am, the door unlocks! We need a way to prevent the Office Entry door from unlocking if the Office Area is armed. There are several ways to achieve this, but we'll use the easiest approach: Navigate to Programming | Doors Select the Office Entry door and go to the Options tab Enable the following options: 324 Door Lock Follows Inside Area Area Disarmed AND Schedule Valid Unlock Door Module 135: Configuring Intruder and Access Integration | Configuring Office Access Let's try that test again: Disarm the Office Area Set the Controller time to 4:59pm - at 5:00pm, the door locks Arm the Office area by double badging at the Office Entry reader - the building is locked and secure Set the Controller time to 8:59am At 9:00am, the Office Hours schedule goes valid but this time the door stays locked Badge Card 2 and enter the PIN 9998 The door is unlocked and the Office area disarmed Note the door stays unlocked Double badge Card 2 at the Office Entry reader The Area arms and the door locks Set the Controller time to 8:58am Badge Card 2 and enter the PIN 9998 Brett is granted access and the area is disarmed, but the door locks again At 9:00am the door unlocks Door Unlocking Integration Summary 1. We've assigned the Office Hours schedule to the Office Entry door as the Operating Schedule This means that the door will normally unlock when the Office Hours Schedule is valid 2. We assigned the Office Area to the Office Entry door as the Area Inside Door 3. We've enabled the Door Lock Follows Inside Area option This means that the door will normally unlock when the Office area is disarmed 4. We've enabled the Area Disarmed AND Schedule Valid Unlock Door option This ties the two together to ensure that the door only unlocks when both the Office Hours schedule is valid and the Office area is disarmed Output Groups Now that we have integrated the access control and intruder functions, it would be good to have some feedback at the reader as well as at the keypad. This can be achieved using Output Groups. Level One: Protege GX Installer Study Guide | August 2013 325 Armed Output Group Navigate to Groups | Output Groups Add a new output group called Office Area Armed Add the KP1 Red LED and RD1 Green R1 outputs Navigate to Programming | Areas and select the Office area Change the Armed Output to <not set> Set the Armed Output Group to the new Office Area Armed group Set pulse times of 5 and 5 Rearm the Office area Note that even though the outputs are pulsed, the schedule that is following the keypad Red LED only follows the edge triggers. 326 Module 135: Configuring Intruder and Access Integration | Configuring Office Access Arming Output Group Navigate to Groups | Output Groups Add a new output group called Office Area Arming Add the KP1 Beeper and RD1 Beeper outputs Navigate to Programming | Areas and select the Office area Change the Exit Delay Output to <not set> Set the Exit Delay Output Group to the new Office Area Arming group Disarm then re-arm the Office area We now have audible warnings while arming and visual indications at the keypad and reader when armed. Level One: Protege GX Installer Study Guide | August 2013 327 Configuring Warehouse Access We've fully configured the Office Entry and Managers Office doors and areas, so now let's take a look at the Warehouse... Door Testing Wire a Multiprox and a Nano reader in multiplex configuration to Port 1 of the RDM2 expander ENTRY READER SHIELD V+ RED V- BLACK D1 DO GREEN WHITE L1 ORANGE L2 BROWN C BZ BLUE SHIELD EXIT READER V+ RED BROWN C BLUE L1 ORANGE DATA L2 WHITE BZ GREEN D1 DO V- BLACK 328 Module 135: Configuring Intruder and Access Integration | Configuring Warehouse Access Wire two Nano readers in multiplex configuration to Port 2 of the RDM2 expander SHIELD V+ RED ORANGE BROWN C BLUE DATA L1 WHITE L2 GREEN D1 DO V- BLACK BZ EXIT READER SHIELD ORANGE BROWN VC BLUE D1 DO WHITE L1 GREEN L2 BLACK BZ RED V+ ENTRY READER Reader Multiplex Configuration We set up reader multiplexing in an earlier module, but let's recap: Navigate to Expanders | Reader Expanders and select RD2 Select Multiple Reader Input Port 1 to enable multiplexing for the Warehouse Roller Select Multiple Reader Input Port 2 to enable multiplexing for the Office to Warehouse Door Save your changes Reader multiplexing makes Protege GX extremely cost effective for doors with more than one reader Level One: Protege GX Installer Study Guide | August 2013 329 Testing the Doors Badge Card 2 at the Warehouse Roller entry reader You will see that an Entry event is generated. Badge Card 2 at the Warehouse Roller exit reader You will see that an Exit event is generated. Badge Card 2 at the Office to Warehouse entry reader Badge Card 2 at the Office to Warehouse exit reader Basic door configuration has already been completed... Double badge Card 2 at the Office to Warehouse exit reader - the Office area should begin to arm Double badge Card 2 at the Office to Warehouse entry reader - the Warehouse area should begin to arm Basic area integration is also working... With both areas now armed, you should see that warehouse users are not allowed in the office and that office users are not allowed in the warehouse. Warehouse Door Type We have not set the Warehouse Roller door type correctly yet as it needs to be configured for Card and PIN access on the outside... Navigate to Programming | Doors Select the Warehouse Roller door Set the Door Type to Card and PIN Save your changes Wait a few seconds and try badging Card 2 at the Multiprox reader Card and PIN mode should now be set. Badge Card 2 at the Warehouse Roller exit reader. You'll see a denied waiting for PIN event: This is because our door type has applied Card and PIN to both the entry and exit doors. What we actually need is a door type that has Card and PIN on entry, and Card on exit. It is good practice to leave the default door and input types unchanged and to create new types if different functionality is required. This means that you have a known reference you can return to if you need to troubleshoot any problems. 330 Module 135: Configuring Intruder and Access Integration | Configuring Warehouse Access Warehouse Area Indication Because we want to be able to arm the warehouse from the Multiprox reader, we are also going to have to set up a schedule to change the door type when armed. While we are at it, we should set up some indication using reader LED's and beepers. 1. Create a new output group called Warehouse Area Arming Add outputs RD2 Beeper R1 and RD2 Beeper R2 2. Create another output group called Warehouse Area Armed Add outputs RD2 Green R1 and RD2 Green R2 3. Assign the new groups to the Warehouse area: Navigate to Programming | Areas and select the Warehouse area Select the Outputs tab Set the Exit Delay Output Group to Warehouse Area Arming Set the Armed Output Group to Warehouse Area Armed 4. Save your changes Level One: Protege GX Installer Study Guide | August 2013 331 Office Area Indication Let's also add the Office to Warehouse door beeper and LED's to the Office output groups: Navigate to Groups | Output Groups Select the Office Area Arming output group and add the RD2 Beeper R2 output Select the Office Area Armed output group and add the RD2 Green R2 output The Office to Warehouse readers will now indicate if either area is armed. This makes sense as users in the unarmed portion will now have indication as to why they can't enter the other area. Warehouse Armed Schedule Now we need to create the schedule that will change the Warehouse Roller door type between Card and Card and PIN modes: 1. Create a new schedule called Warehouse Area Armed 2. Enable every day for Period 1 3. Set the holiday mode to Ignore Holiday 4. Go to the Options tab and enable the Validate Schedule is Qualify Output On option 5. Set the Qualify Output to RD2 Green R1 RD2 Green R1 is the Green LED on the Multiprox reader. This is only used to show when the Warehouse area is armed. 332 Module 135: Configuring Intruder and Access Integration | Configuring Warehouse Access Create the Warehouse Door Type 1. Create a new door type called Warehouse Entry 2. Set the Operating Schedule to Warehouse Area Armed 3. Set the Secondary Door Type to Card This means that when the Warehouse is disarmed the schedule is invalid and the door type will change to Card only. 4. Set the Entry Reading Mode to Card and PIN 5. Set the Exit Reading Mode to Card Only Now, when the area is armed, the entry reader will require a PIN. The exit reader will not ever require a PIN. 6. Navigate to Programming | Doors and select the Warehouse Roller door 7. Set the Door Type to Warehouse Entry Level One: Protege GX Installer Study Guide | August 2013 333 Testing the System Now, we are going to test everything... Before we do this, disarm all areas. Testing the Office Area Arm the office area. The beepers on the Keypad, Office Entry door and Office to Warehouse door should start beeping This gives anyone still in the warehouse an audible warning that the Office area is arming Once armed, the Keypad red LED, and the LED's on the Office Entry door and the Office to Warehouse door should be flashing From outside the office, there is now visual indication that the Office area is armed. Badge Card 6 (our warehouse supervisor) at the Office to Warehouse exit reader (this is the reader that would be on the warehouse side of the door) You should be denied access as the Office Area is armed Badge Card 6 at the Office to Warehouse entry reader (this is the reader that would be on the office side of the door) Access is granted. If our warehouse supervisor happened to be trapped in the office when it was armed, she can still get out. Notice that the Office area stays armed. Badge Card 3 (our office worker) at the Warehouse to Office reader Access is granted and the area is disarmed. The Office Entry door also unlocks. Badge Card 6 (our warehouse supervisor) at the Warehouse to Office reader This time it is granted. There are now office staff present so access is allowed. 334 Module 135: Configuring Intruder and Access Integration | Testing the System Testing the Warehouse Area Badge Card 6 (our warehouse supervisor) at the Warehouse Roller entry reader. Access should be granted without requiring a PIN. Double badge Card 6 (our warehouse supervisor) at the Warehouse to Office reader. The beepers on the Warehouse Roller and Office to Warehouse door should start beeping. Now anyone in the office will get an audible warning that the warehouse area is arming. Once armed, the LED's on the Warehouse Roller door and the Office to Warehouse door should be flashing From outside the warehouse there is now visual indication that the Warehouse area is armed. Badge Card 3 (our office worker) at the Office to Warehouse reader Access is denied as the Warehouse is armed. Badge Card 3 (our office worker) at the Warehouse to Office reader Access is granted, allowing our office worker to escape from the Warehouse if they get trapped. Badge Card 6 (our warehouse supervisor) at the Warehouse Roller entry reader This time a PIN is required Type 8837 and press Enter Access is granted and the area is disarmed Badge Card 3 (our office worker) at the Office to Warehouse reader Access is granted as there are now warehouse staff present. Badge Card 3 (our office worker) at the Warehouse Roller reader Access is denied as the Office door group does not include the Warehouse Roller door. Level One: Protege GX Installer Study Guide | August 2013 335 Review Questions Which of the following is a good example of where a Qualify Output should be used to validate a schedule? To change a Doors entry reading mode when an area is armed To keep a door locked on a holiday To turn on the keypad red LED when an area is armed To unlock a door when an area is disarmed To enable automatic disarming of an area when access to a door is granted, which of the following must be configured? Area Inside Door (Set in door programming) and Disarm Users Area On Valid Card (Set in reader expander programming) Reader One Arming Mode (Set in reader expander programming) and Disarm Users Area On Valid Card (Set in reader expander programming) Area Inside Door (Set in door programming) and Disarm Area For Door On Access (Set in reader expander programming) Reader One Arming Mode (Set in reader expander programming) and Disarm Area For Door On Access (Set in reader expander programming) If the first door on a reader expander has in and out readers, which of the following statements are correct? D0 of the entry reader must be wired into D0 of reader port 2 D1 of the entry reader must be wired into D1 of reader port 2 D0 of the exit reader must be wired into D0 of reader port 2 D1 of the exit reader must be wired into D1 of reader port 2 336 Module 135: Configuring Intruder and Access Integration | Review Questions Module 136: System Monitoring This modules explains how trouble inputs can be used to monitor the status and condition of the system, and describes how offsite monitoring can be achieved over a PSTN phone line and / or via any of the supported IP protocols across the internet. In This Module Trouble Inputs .............................................................................................................................. 338 Contact ID Monitoring .................................................................................................................. 346 IP Monitoring................................................................................................................................ 353 Review Questions ........................................................................................................................ 359 Level One: Protege GX Installer Study Guide | August 2013 337 Trouble Inputs A Trouble Input is a logical entity that behaves like a physical input, but changes state based on the state of a system trouble condition. For example, AC Fail or Battery Low. In a normal condition, the Trouble Input is closed, much like a PIR that is not detecting any movement. When a trouble conditions occurs, the associated Trouble Input opens. Trouble Input Programming Trouble Inputs are programmed much like a physical input, starting with the name. The Add Controller and Add Expander wizards provide the option to create Trouble Inputs for you, but we recommend you format these to include at least the site code (for example Controller Tamper TXS) to allow for easy identification. Module Address Trouble Inputs also have a module address, just like physical inputs: These are described for each hardware module in the corresponding installation manual. Some Trouble Inputs are not applicable to a particular type of module. For instance, Trouble Input 1 on a Controller is Controller Tamper. The PCB Controller has an onboard tamper, but the DIN Controller does not. Trouble Input 1 on a DIN Controller will never open. Contact ID Configuration The Configuration section is used to override the default Contact ID settings. Leave these as is unless you have a specific requirement for reporting codes. 338 Module 136: System Monitoring | Trouble Inputs Areas Trouble Inputs, just like physical inputs, must be programmed to an Area and assigned an Input Type before they will generate an alarm. Trouble Inputs can be assigned up to four areas, and will be processed individually by each area based on the Input Type assigned. Create a Trouble Area To monitor Trouble Inputs, we will need a new area: Navigate to Programming | Areas Create a new area called System TXS Switch to the Configuration tab and set the Entry and Exit delay times to 0 We want to be able to arm instantly Trouble Input Pruning Navigate to Programming | Trouble Inputs. The Add Controller Wizard automatically added all possible trouble inputs for all the modules it created. To keep the system tidy we will now go through and delete the irrelevant Trouble Inputs. It is much quicker to use the Wizard to create everything, then delete the items that are not required. Level One: Protege GX Installer Study Guide | August 2013 339 Controller Trouble Inputs 1. Use the Find tool to select only the Trouble Inputs on the Controller. 2. Using the CTRL key, select the following records: Controller Tamper Battery Low / Missing Bell Siren 2 Tamper / Cut Expansion Interface Fault Communication Port 1 Fault / Missing Communication Port 2 Fault / Missing Communication Port 3 Fault / Missing Communication Port 4 Fault / Missing DVAC Communication Polling Lost Service 1 State Stopped Service 2 State Stopped Service 3 State Stopped Service 4 State Stopped Click Delete Rename the AC Failure trouble input to 12VDC Supply Failure 340 Module 136: System Monitoring | Trouble Inputs Keypad Trouble Inputs Use the Find tool to select the Keypad trouble inputs Select and delete the Door Left Open and Door Forced Open records Reader Expander Trouble Inputs Find the Reader Expander trouble inputs Delete the following records from both Reader Expanders: Module Tamper AC Failure Battery Low / Missing Auxillary Fuse / Supply Fault Lock 1/2 Output Problem Reader 1 Fuse / Supply Fault Reader 2 Fuse / Supply Fault Add the Power Supply Module The Add Controller Wizard does not currently add Power Supply modules so we'll add this now: Navigate to Expanders | Analog Expanders Add a new Analog Expander named TXS PSU1 Ensure the Physical Address is set at 1 Level One: Protege GX Installer Study Guide | August 2013 341 Add a Trouble Input Navigate to Programming | Trouble Inputs Add a new trouble input named TXS PSU Tamper Set the Module Type to Analog (AE) Set the Module Address to 1 Set the Module Input to 1 Add Additional Trouble Inputs Add the remaining Trouble Inputs from the table as shown (excluding 7) Input Number Description AExxx:01 Module Tamper AExxx:02 Mains Failure AExxx:03 Low Battery / Battery Failure AExxx:04 Output Voltage Low AExxx:05 Output Over Current Failure AExxx:06 Core Temperature Over Temp Failure AExxx:07 Reserved AExxx:08 Module Offline Adjust the name and set the Module Input number accordingly. For instance TXS PSU Mains Failure should be Module Input 2 You should end up with a list like this: 342 Module 136: System Monitoring | Trouble Inputs Adding Trouble Inputs to the System Area We're now left with a list of active trouble inputs Select all the trouble inputs (CTRL+A) then click the Areas and Input Types tab Set the first Area to our new System area Set the first Input Type to Trouble Silent Click Save to update the records We've now added all the Trouble Inputs to the System Area. View the Status Page You'll notice that the Status Page now has links to missing Trouble Inputs: It also doesn't include the new System area. Level One: Protege GX Installer Study Guide | August 2013 343 Updating Status Lists We'll start by removing all of the old Trouble Inputs: 1. Navigate to Monitoring | Setup | Status Lists 2. Select the All Trouble Inputs status list 3. Highlight all the Trouble Inputs (CTRL+A) under the Devices window 4. Click Delete Then we will re-add our current Trouble Inputs: 1. Click Add to open the Select Devices window 2. Set the Device Type to Trouble Zone and choose your Controller 3. To quickly select all devices, click an item and press CTRL+A then check any of the boxes to select them all 4. Click OK then select Save 344 Module 136: System Monitoring | Trouble Inputs And finally, we'll add the new System area to our status page: 1. Select the All Doors and Areas Status List 2. Click Add to open the Select Devices window 3. Set the Device Type to Area and choose your Controller 4. Check the new System area and click OK 5. Save your changes If your status page is already open, you will need to close it and open it again for the changes to take place. Arm the System Area From the Technician status page, arm the 24hr portion of the System area. You should see some Trouble Inputs create alarms: Level One: Protege GX Installer Study Guide | August 2013 345 Contact ID Monitoring Offsite monitoring can be achieved using either ContactID or SIA over a PSTN phone line and / or via any of the supported IP protocols across the internet. PSTN Monitoring Station Internet Both options are built in to all Protege controllers and do not require any additional hardware or licenses. Traditional Analog CID Monitoring When alarm systems first started reporting to a central monitoring station they often used a third party alarm dialler. This device had one or more inputs onboard, which would initiate a phone call to a central monitoring station. The dialler would use either a series of pulses or beeps, or DTMF tones to communicate a message to an alarm receiver at the monitoring station, much like morse code. Contact ID Alarm Transmission Alarm Transmitted Alarm Panel Phone Line (PSTN) Telecom Exchange Phone Line Alarm Receiver Kiss off sent As alarm monitoring became more popular, more and more alarm panels came out with onboard diallers, and the industry started to settle on a number of standards or protocols for the communication of alarms. Contact ID seems to have become one of the most popular of these protocols, and is supported be most modern alarm systems. 346 Module 136: System Monitoring | Contact ID Monitoring Contact ID uses DTMF tones to communicate alarms in the following format: 1234 18 1131 01 015 8 Account Type Event Area Zone Chksum where: 1234 = The account number (1234) 18 = The message type used to identify the message as Contact ID 1131 = The event qualifier (1) for a new event, followed by the event code for perimeter burglary 01 = The partition or area number (1) 015 = The zone number (015) 8 = The checksum The entire message can be looked at like this: 0800 123 456 123 18 1131 01 015 8 Phone Number Contact ID String The panel dials the pre-programmed phone number then waits for the handshake tone. When it receives the handshake tone, it transmits the CID string then waits for the kiss-off tone from the receiver. The software running at the central monitoring station then picks these alarm messages up from the receiver, looks up the account and zone names on its database and displays the alarm to the operator. Contact ID Alarm Processing Alarm Monitoring Software Server Phone Line Workstation Receiver Monitoring Operator Database As Contact ID only sends a bunch of numbers representing account, area and zone, the monitoring operator relies on the database inside the monitoring software being accurate. The information they receive is only ever as good as that provided by the technician during installation. Level One: Protege GX Installer Study Guide | August 2013 347 Adding a Phone Number For any PSTN based monitoring service, at least one phone number is required for communication. Navigate to Programming | Phone Numbers and click Add Enter the Name and primary Phone Number of your monitoring station Save your changes Adding a Secondary (Backup) Phone Number Most monitoring stations have a secondary number to be used as a backup in case the first fails. Click Add to create another record Enter the Name and secondary/backup Phone Number of your monitoring station Save your changes 348 Module 136: System Monitoring | Contact ID Monitoring Services Services provide interaction between Protege GX and external systems. Services include: ContactID SIA Report IP and many other options for automation and control Services run on Protege GX Controllers, so are not reliant on the Protege GX Server. Configure the Contact ID Service 1. Navigate to Programming | Services 2. Select your Controller then click Add to create a new service 3. Set the Service Type to ContactID 4. Set the Service Mode to Start with Controller. This ensures that the service is started automatically whenever power is cycled to the controller. If left at Manual Mode, the service will need to be manually starting each time the controller is reset or restarted. 5. Select the General tab: Enter the Client Code (or account number) as supplied by the monitoring station. If the Controller must dial a number to gain an outside line (for instance, 1 or 9), create a separate phone number, then select it as the PABX Number. Level One: Protege GX Installer Study Guide | August 2013 349 Set Phone Number 1 to the primary phone number of the monitoring station Set Phone Backup to the second number we defined earlier. This number will be dialed if a connection to the monitoring station cannot be made on the Phone 1 number. This can be an alternative monitoring station. Phone Number 2 is only programmed when you require monitoring signals to be sent to two different phone numbers simultaneously. This is not a backup phone number. 6. Select the Options tab and enable the reporting options for the signals that you wish to be sent by this service: Open and Close: Reports all area arming and disarming signals. This is usually only enabled for commercial premises. Alarms, Tampers and Restore: Reports the corresponding input state changes. Bypass: Reports if a user bypasses an input. This is usually only enabled for commercial premises. 7. Select the Settings tab 350 Module 136: System Monitoring | Contact ID Monitoring The Area Group defines which group of areas the service is responsible for monitoring. By default, it is set to All Areas which means that signals generated by any area will be reported offsite by the service. This is particularly useful when dealing with a multi tenanted building where ContactID services can be set up for each tenant and Area Groups configured for each. The CID Mapping sets a standard predefined monitoring template. The two templates (Standard or Large) automatically map zone numbers to Protege GX inputs. We'll use Standard Mapping. CID Mapping is covered in greater detail in the Level 2 qualification. Definitions of the two reporting maps are available on the ICT website along with a report map generator which produces a report to provide to the monitoring station. Overriding CID Mapping To override the settings of the report maps, individual Contact ID codes can be programmed at each input: If left as 0, it will follow the report map. To override the account code for each area, program the Client Code setting in the area: If left as FFFF, it will follow the client code programmed in the service. The Reporting ID is used to identify the area to the monitoring company when a report is generated. Level One: Protege GX Installer Study Guide | August 2013 351 Start the Service Once a service has been configured, it must be started. Right click the service from the Record List and choose Start Service: 352 Module 136: System Monitoring | Contact ID Monitoring IP Monitoring As technology improves and more and more services and functions are being performed on computer networks or the internet, traditional analog systems are being forced into the digital world. Why IP Monitoring? Analog technologies such as copper phone lines are becoming more costly to maintain, and are therefore more expensive for the end user. In some cases, they are simply non-existent. Analog alarm dialers are no exception. Many businesses and now even new residential subdivisions are moving to fibre to the door. This means no analog phone lines, and VoIP for communications. The problem with VoIP for alarm dialers is that due to many of the compression techniques used, the handshake, DTMF, and kiss-off tones are often completely lost on transmission. Sometimes it is the cost of a traditional phone line that is prompting the move to digital. Every business call costs money If your site only sends open and close messages every day, you are looking at an added cost just for the calls alone If your average site has 2 alarm activations per month, add more money to this cost If your analog phone line is only being used for the alarm, add another charge for the line rental These costs add up! Moving your alarm system to a fully IP solution utilizing an existing internet connection can save a significant amount per site, per year. This alone can justify the cost of installing an IP alarm panel. Another key feature is that IP monitoring is essentially always online to the monitoring station with a regular default polling time of 90 seconds. Many alarm dialers only test once every 24 hours, or sometimes only once every 5 days. Message transmission is almost instant and a lost connection can be detected in 90 seconds or less. IP Monitoring can utilize existing IT infrastructure, and certainly won't 'tie up' the internet connection the way an alarm dialer does with a phone line. It uses such a small amount of bandwidth that it can sit on your existing network without any noticeable effect on other network traffic. Level One: Protege GX Installer Study Guide | August 2013 353 IP Alarm Monitoring IP alarm monitoring has been developed to achieve the same thing as Contact ID alarm monitoring (to transmit an alarm message to a central monitoring station), only it does this via a network connection across the internet. IP Alarm Transmission ArmorIP Server Alarm Transmitted -or- Alarm Panel Router Router www Acknowledgement sent Alarm Receiver The ArmorIP protocol takes the Contact ID message and encapsulates it inside a TCP/IP message. Along with this is the ability to add additional information if it is available, such as panel name, event time, panel type, serial number, zone or user name, and much more. This data is all transmitted across the internet to the monitoring station. 0800 123 456 1234 18 1131 01 015 8 Monitoring Phone Number Contact ID String Contact ID Format 203.97.49.55 Monitoring IP Address 1234 18 1131 01 015 8 Additional Data Contact ID String ArmorIP Format The message can be received at the monitoring station either by the existing receiver (if it is IP capable), or by the ArmorIP software running on a server. The ArmorIP software has the added advantage of being able to display all of the additional data that comes with the ArmorIP protocol. This means that changes to names of users, areas and zones on site will be transmitted to the monitoring station as they are seen on site, so there are no more mismatches between what the monitoring station and the people on site are looking at. 354 Module 136: System Monitoring | IP Monitoring IP Alarm Processing Workstation (optional) IP ArmorIP Server -or- Router Ademco 685 Alarm Monitoring Software Server IP Receiver Workstation Monitoring Operator Database The ArmorIP server receives the IP message from the alarm panel, sends an acknowledgement to the panel, then passes the data to the alarm receiver via RS232 using the Ademco 685 protocol. This allows the monitoring station to utilize their existing software for processing and tracking the alarm, and optionally displaying the alarm direct from ArmorIP as well, to ensure the additional information received from site is seen. i IP Alarm Monitoring Key Points No copper phone line required = $$$ saved Always online Instant transmission of alarms Uses existing network infrastructure = no additional cost Can display additional accurate information from sites Level One: Protege GX Installer Study Guide | August 2013 355 Configure the Report IP Service 1. Navigate to Programming | Services 2. Select your Controller then click Add to create a new service 3. Set the Service Type to Report IP 4. Set the Service Mode to Start with Controller. This ensures that the service is started automatically whenever power is cycled to the controller. If left at Manual Mode, the service will need to be manually starting each time the controller is reset or restarted. 5. Select the General tab: Enter the Client Code (or account number). This is the code used to identify the system at the monitoring station and will usually be issued by the monitoring company. Enter the connection details as supplied by your monitoring station: IP Address: The IP address of monitoring station. IP Port Number: The appropriate port number (in conjunction with IP address) of the monitoring station. If the monitoring station has a backup path, enter the Secondary IP Address and the Secondary IP Port Number to be used if the first IP address fails. Note: Either the IP address, port, or both, should be different. If a backup path is not used, leave these set at 0. Select the Reporting Protocol. This will usually be supplied by your monitoring station. ArmorIP is an ICT proprietary format and the only IP reporting protocol to be UL certified. Wherever possible, use ArmorIP (TCP) Encrypted for the most robust and secure monitoring format. 356 Module 136: System Monitoring | IP Monitoring If encryption is used, the monitoring station will supply an Encryption Level and Encryption Key that must also be entered in the service settings. If required, select a Backup Service: If a backup service is selected you must also enable the Service Operates as Backup option in the Contact ID service, otherwise both services will report each new event. The Area Group defines which group of areas the service is responsible for monitoring. By default, it is set to All Areas which means that signals generated by any area will be reported offsite by the service. One of the advantages of IP reporting is that essentially it is always 'on'. This is achieved by sending regular poll messages. In most cases the frequency should be set to 90 seconds, however your monitoring station may request a different setting. IP Polling should not be confused with the 24 Hour Test Signal. The 24 Hour Test signal is still required and is a Contact ID message generated by the system once every 24 hours. The polling messages are handled by the IP protocol, and don't appear as a test signal at the monitoring station. The IP receiver software handles the regular polling internally and generates a monitoring poll fail signal locally if a regular poll is not received within a predefined period. Level One: Protege GX Installer Study Guide | August 2013 357 6. Select the Options tab and enable the reporting options for the signals that you wish to be sent by this service: Open and Close: Reports all area arming and disarming signals. This is usually only enabled for commercial premises. Alarms, Tampers and Restore: Reports the corresponding input state changes. Bypass: Reports if a user bypasses an input. This is usually only enabled for commercial premises. Start the Service Once a service has been configured, it must be started. Right click the service from the Record List and choose Start Service: 358 Module 136: System Monitoring | IP Monitoring Review Questions How many areas can a trouble input be assigned to? 1 4 None - Trouble inputs are automatically assigned to the System area None- Trouble inputs are automatically assigned to the Trouble area When do you need to set a Reporting ID for a Trouble Input? Only if you want to use a different Reporting ID from the default reporting map Only if you need offsite monitoring for that trouble input Always Never When manually adding a trouble input, where can you find the Module Address to use for a particular trouble input on an expander? You can assign any address as long as it is within the memory profile In the installation manual for the expander module Trouble inputs don't have a module address The server automatically assigns the next free module address Which of the following statements about offsite monitoring are true? Contact ID is supported on all ICT Controllers with onboard dialer All ICT Controllers support IP monitoring onboard SIA is supported on all ICT Controllers with onboard dialer All of the above Which of the following things can Contact ID transmit? The account number that identifies the site The type of event that has occurred The area that the event occurred in All of the above Level One: Protege GX Installer Study Guide | August 2013 359 Which of these configuration examples are valid for IP Monitoring? They are all valid A is not valid B is not valid D is not valid Which of the following statements are true for ALL IP Monitoring Protocols? No copper phone lines required No copper phone lines required, displays additional, accurate information from site No copper phone lines required, displays additional, accurate information from site, they are essentially 'always online' No copper phone lines required, they are essentially 'always online', alarms are transmitted instantly 360 Module 136: System Monitoring | Review Questions Module 137: System Commissioning This module introduces you to the tools available within Protege GX for commissioning a system, how the keypad can be used when carrying out commissioning on site, and outlines the procedure for backing up and restoring a database. In This Module System Commissioning Tools ...................................................................................................... 362 Keypad Testing ............................................................................................................................ 368 Backing up and Restoring a Database ......................................................................................... 372 Review Questions ........................................................................................................................ 381 Level One: Protege GX Installer Study Guide | August 2013 361 System Commissioning Tools Protege GX has a number of built in features that can be used when commissioning a system. Item History All programmable items in Protege GX have a History tab. This tab shows the audit trail for the currently selected item, including who made a change to the programming and when. This can be very useful in tracking down why something that was working has stopped working. The History tab also shows details of what was changed. Highlight the change and click Details. Both the old and new values are logged. Where multiple changes were made in a single operation, these will be logged as one change. The history tab currently only logs the changed values where the field contains a single value. Where there are multiple values, such as doors in a door group, the values are not logged only the fact that something was modified is logged. 362 Module 137: System Commissioning | System Commissioning Tools Item Usage Another useful feature for troubleshooting and commissioning is the Usage tab. This tab shows how a particular item links to other items. For example, the usage tab on a door will show which reader expander the door is linked to, and which door groups the door currently belongs to. Use the usage tab on an area to show Which inputs are in an area Which doors are associated with an area Which area groups an area belongs to Use the usage tab on a schedule to show which items follow that particular schedule. Use the usage tab on an access level to show which users are currently assigned that access Level. Use the usage tab on an output to show items that can potentially control the output. Loading Events When testing or troubleshooting a particular item, it is quite common to want to see what it has been doing recently. Every device that can generate an Event has an Events tab. Clicking on the Load Events button will load the most recent events that were generated by the selected item. Use this on a user to quickly see what that user has been doing recently. Use this on a door to quickly see what caused that door to open. Use this on an input to see when and how often it opened. Use this on an area to find out when and who armed or disarmed it. Use this on an output to find out what and when it was turned on or off. Level One: Protege GX Installer Study Guide | August 2013 363 1. The loaded events can then be copied to the Windows clipboard to quickly paste into an email, or to save to a text document to include in commissioning reports. 2. Click the Run as Report button to run this list of events as a report. Reports are covered in more detail shortly... The Export Tool Another useful tool for commission documents is the Export tool. The Export tool enables you to extract selected information to the Windows clipboard or to a file in CSV format. The CSV format can be opened in Microsoft Excel, allowing this information to be easily included in commissioning documents. 1. Highlight the item(s) you wish to export 2. Click Export 3. Choose the Export Type and Destination The Export Type allows you to choose whether to export all the items in the current list, or only the ones you have highlighted. The Destination allows you to choose between the Clipboard or a file. 4. Select the information (columns) you want to export and click OK. If you've chosen file, you will be prompted for a filename and location to save the file to. This file can now be opened in Excel where the data can be formatted and added to the project documentation. 364 Module 137: System Commissioning | System Commissioning Tools Reports: Event Search An important function of any access control system is the ability to produce a report on what has happened. There are several ways to achieve this, but in this qualification we will just be looking at the Event Search function. 1. Navigate to Events | Event Search 2. Select the Time Period you wish to include events from Choose from the available list of common timeframes or enter a specific start and end date 3. Click Find A report is generated showing all events for the selected period Use the Next and Previous buttons to navigate through the pages of the report Use the Print button to open the Print Preview window where you can print, export, or - if an SMTP Server has been configured - email the results Export format options include: PDF, HTML, MHT, RTF, XLS, XLSX, CSV, Text, Image, or XPS. Most often though, you are looking for a particular event or sequence of events. This is where the WYSIWYG Grid View reporting tool comes in... Level One: Protege GX Installer Study Guide | August 2013 365 Using Grid View The Grid View enables you to easily sort and filter the report results. Click in any of the empty fields at the top of the list and start typing what you are looking for. For instance, type gran into the description field and the event list will be filtered to show only Granted events: The results can be even further refined by adding additional filters. For example, if we now type the letters br into the User field we will only see Granted events for Brett Lamb: If the report is printed now, it will only include the filtered results as shown on screen. 366 Module 137: System Commissioning | System Commissioning Tools CID Reporting Tool You'll often need to supply the offsite monitoring station with a Contact ID Report Map. The Report Map Generator enables you to easily produce this report from a Protege GX system. This is included on the Training USB Card or can be downloaded from the ICT website. 1. Double click the Report Map.exe to launch the Report Map Generator: 2. Enter the Database connection details. Provided you selected the defaults during installation, this will be the name of your server and ProtegeGX (where ProtegeGX is the SQL instance). 3. Click Connect. If connection is successful, a green folder appears and the version of the database is shown below. 4. Select the Output Directory where the report will to be saved to. 5. Select the Site Name and Controller to produce the report for, then click Generate. 6. Browse to the output folder and open the resulting HTML or CSV files. Print and send this to the monitoring station. Level One: Protege GX Installer Study Guide | August 2013 367 Keypad Testing Protege GX is a server based system, and as such, very little programming can be carried out at the keypad. Essentially, the Controller's IP settings are the only things that can be programmed at the keypad. The keypad is still however, a valuable tool when carrying out commissioning on site. We are going to look more in depth at the Events Menu (3) and Installer Menu (4). Events Menu Log in with the installer code. Press [3] [1] This takes you to the Events Review menu which displays all events stored on the Controller, starting with the most recent event. To move backwards through the event review, push the To move forwards through the event review, push the key. key. When you reach the most recent event, the keypad will show Start of events reached. Pressing the key at this point takes you back to the last event that you viewed. Pressing the key will then show any new events that have occurred. The maximum text length of an event is 64 characters, but as the keypad can only display 16 characters per line, events may be split over 4 lines. By default, lines one and two are displayed on the keypad. Press the key to display lines 2 and 3. Press the key again to scroll to lines 3 and 4. Moving up and down through the events will continue to display the same lines, so if you are currently key, lines 2 and 3 of the next event are displayed. viewing lines 2 and 3 of an event and press the Use the key to move back up through the lines being displayed. Input View Menu Log in with the installer code. Press input. [4] [1] [1]. This takes you to the Input View menu allowing you to view the current state of an Select zone to view: 000000‐‐ You will be prompted to enter an input number. This number refers to the order the input is stored at the Controller and doesn't relate to the server database. You can either type in a number, or use the 368 and keys to scroll through the available inputs. Module 137: System Commissioning | Keypad Testing Press to select an input. Pressing while the display shows all 0s will display the first input on the Controller (usually Input 1 on the Controller). The first line displays the first 16 characters of the input name as recorded at the server. The second line shows the current state. Office Entry Dr is CLOSED Note: This display is dynamic and updates in real time as the input changes state. Press the Press the and keys to cycle through the inputs. key to switch between Input name and Input address CP001:01 Zone is CLOSED Press the key to return to the input number selection screen. Trouble Input View Menu Press [4] [1] [2]. The Trouble Input View menu allows you to view the current state of a trouble input. Trouble zone to view: 000000‐ As with the Input View menu, you'll be prompted to enter a trouble input number. This number refers to the order the trouble input is stored at the Controller and doesn't relate to the server database. Navigation is carried out in the same way as with inputs. Output View Menu Press output. [4] [1] [3]. This takes you to the Output View menu allowing you to view the current state of an Select PGM to view: 000000 As with the previous menus, you'll be prompted to enter an output number. Navigation is carried out in the same manner. Outputs can also be controlled from this menu. You'll notice that the [1] key has the word ON next to it and the [2] key has OFF next to it. Pressing the [1] key will turn the output ON. CP001: Bell 0 is ON Pressing the [2] key will turn the output OFF. CP001: Bell 0 is OFF Level One: Protege GX Installer Study Guide | August 2013 369 Door View Menu Press [4] [1] [4]. This takes you to the Door View menu allowing you to view the current state of a door. Select Door to view: DR000000 As with the previous menus, you'll be prompted to enter a door number. Navigation is carried out in the same manner. Doors can also be controlled from this menu. Pressing the [1] key will send an unlock by menu command to the door. This will unlock the door for the same period as a card badge or REX input would (5 seconds by default). Office Entry TXS (Closed)(Menu ) After the time expires, the door locks again. Office Entry TXS (Closed)(Locked) You'll notice that the [3] key has the word LAT next to it. This is short for LATCH. Pressing the [3] key will latch unlock the door. Office Entry TXS (Closed)(Latch ) The door will now stay unlocked until another lock command is issued, such as when a schedule changes. Press the [2] key (OFF) to lock the door again. Office Entry TXS (Closed)(Locked) Bypassing Inputs Press BYPASS to access the Bypass Input menu. Navigate and select inputs in the same manner as other menus. The display will show the current bypass state of the input. Office Entry Dr is not BYPASSED If an input is not bypassed, it will function as normal if the area is armed. To bypass an input, press the [1] key (ON). Office Entry Dr is BYPASSED The next time an area arms, this input will be ignored and will be able to open and close without activating an alarm. Note: When the area is next disarmed, the bypass will clear automatically. 370 Module 137: System Commissioning | Keypad Testing Pressing the [3] key (Latch) will latch bypass the input. This means the input will be ignored and will be able to open and close without activating an alarm. Office Entry Dr is BYPASS LATCH When the area is next disarmed, a latched bypass will not clear automatically. Press the [2] key (OFF) to clear a bypass from an input. Office Entry Dr is not BYPASSED Level One: Protege GX Installer Study Guide | August 2013 371 Backing up and Restoring a Database The Configuration and Event databases are both Microsoft SQL Server databases. The databases are completely independent from the Protege GX server and user interface. This means the services and software can be completely removed without affecting the configuration or events databases. Similarly, the Protege GX databases can be backed up and restored as required. It is even possible to backup a database from one server and restore it to another server. This is very useful when running a test environment, or for pre-programming a system at your office prior to deployment to the client site. MS SQL Server Protege GX Server Protege GX Client Configuration Database (Protege GX) Protege GX Controller(s) Event D Database t b (ProtegeGXEvents) Backing up a Database i 372 The ProtegeGX Configuration database can be backed up automatically and manually from within the Protege GX software. It can also be backed up using Microsoft SQL Server Management Studio. The Event database can only be backed up using the Management Studio. Module 137: System Commissioning | Backing up and Restoring a Database To Backup a Database: 1. Open Microsoft SQL Server Management Studio. The first time you connect, you will need to specify the server name. If you accepted the defaults during installation, this will be COMPUTERNAME\PROTEGEGX where COMPUTERNAME is the name of the PC that GX is installed on. Click Connect to continue. By default, only the Windows user who performed the original installation (using the SQLSetup.exe file from the Protege GX installation package) will have access to the database. 2. Click to expand the Databases node in the Object Explorer Level One: Protege GX Installer Study Guide | August 2013 373 3. Right click the ProtegeGX database and select Tasks | Backup… If a backup has already been performed, the path is displayed under the destination. If you don't want to overwrite this file, select it and click Remove. By default, if you select a backup file that already exists, the new backup is added to this file. It can still be restored, but care needs to be taken to select the correct backup when restoring. 4. Click Add... to enter the name and location of the backup file. Make sure to include the extension .bak in the file name then click OK. 5. Click OK to close the Select Backup Destination screen then click OK again to start the backup. Progress is shown as the backup completes, and once finished a confirmation message is shown. 6. Backing up the events database can be achieved by following the same process, but selecting the ProtegeGXEvents database instead: 374 Module 137: System Commissioning | Backing up and Restoring a Database Restoring a Database While backups can be performed automatically or manually, and from within the software or from within MSSQL, restoring a database must always be carried out in MSSQL. Before attempting to restore a database: You should always backup your current database first so that you can return to a known point if something goes wrong. You must stop the Protege GX Services. This terminates the connection between the database and the Protege GX Services When stopping the Protege GX Data Service, the software should also be closed. To Restore a Database: 1. Open Microsoft SQL Server Management Studio. The first time you connect, you will need to specify the server name. If you accepted the defaults during installation, this will be COMPUTERNAME\PROTEGEGX where COMPUTERNAME is the name of the PC that GX is installed on. Click Connect to continue. By default, only the Windows user who performed the original installation (using the SQLSetup.exe file from the Protege GX installation package) will have access to the database. Level One: Protege GX Installer Study Guide | August 2013 375 2. Click to expand the Databases node in the Object Explorer 3. Right click the ProtegeGX database and select Tasks | Restore | Database… 4. Under the Source for restore, select From Device, then click the [...] button. The Specify Backup window opens. 376 Module 137: System Commissioning | Backing up and Restoring a Database 5. Click Add to browse to the backup file to be restored. By default, only file with the extension .bak or .tm will be displayed. 6. Browse to the backup file. For this exercise, we are going to restore an empty database which can be found on your USB training card. Take note of the version number which is shown in the file name then click OK. 7. You'll see that the file has been added as a backup path. Click OK. Level One: Protege GX Installer Study Guide | August 2013 377 8. You should now have the backup file listed under the backup sets to restore. Select (enable) the Restore check box beside the backup set. When performing a backup, if the file already exists, SQL appends the backup to the same file as an additional backup set. If multiple backup sets are shown, select the set with the most recent date. 9. Click the Options page and ensure the Restore options are set to Overwrite the existing database. If you don't select this, you will just add the backup set to the end of the existing database which will result in corruption of the database. 378 Module 137: System Commissioning | Backing up and Restoring a Database 10. Click OK to start the restore process. Progress is shown as the database is restored. If the progress wheel doesn't increase, an error message will eventually be displayed. This is usually caused by an open connection to the database, which most occurs when the Protege GX Services haven't been stopped. If the database restored successfully and the database version is the same as the software installed, then the services can now be restarted. If the ProtegeGX Data service fails to start, there is either a database / software version mismatch, or the restored database is corrupt. If the database is corrupt, then your only option is to restore the backup set taken at the beginning of this exercise. Database Versions The software version number is broken into 4 sections: 3 Major Release 1 Minor Release 48 14 Database Version Software Build The Database version section of this number is extremely important. When this number changes, the structure of the database has changed. If this number doesn't match the version of the database set currently installed, the Protege GX Data Service cannot start. Database Software 49 > 48 48 = 48 48 < 49 * It is not possible to restore a newer database to an older software version. If the version numbers match, the restore should be successful and the Data Service should start. If the database being restored is older than the software version, then the installation setup file must be re-run. This will upgrade the structure of the restored database to match the software. This is why it is good practice to record the database version in the backup file name. Level One: Protege GX Installer Study Guide | August 2013 379 Upgrading a Database If the database needs upgrading, this can be done by running the Setup.exe file of the currently installed Protege GX software. The software does not need to be uninstalled first, as it will only be used to upgrade the database structure. Select the Repair option when prompted then follow the onscreen instructions. The installer will cycle through versions one by one until the database is upgraded to the current version of the software. If you have made any changes to configuration files (such as Windows security settings) these may be overwritten by the installer and will need to be updated again at the server. Operator Credentials The SQL database contains all system configuration, including operator credentials. This means that after a database has been restored, the only valid operator login will be those that were valid at the time of backup. Having restored the empty database for this exercise, the only valid operator is now admin with no password. Server Details Also stored in the configuration database are the details of the Event and Download Server. If you have restored a database from a different server, the Server names will need to be updated. Open Protege GX and navigate to Global | Event Server. Ensure that the Computer Name matches the name of the PC it is installed on. Navigate to Global | Download Server. Ensure that the Computer Name matches the name of the PC it is installed on. After updating the Event and Download Server details, you must restart the Protege GX Data Service. 380 Module 137: System Commissioning | Backing up and Restoring a Database Review Questions What is the Usage tab used for? It shows which items are linked to the current item It shows when a change was made to the current item It shows the events associated with the current item It shows which operator made a change to the current item If an Output was on and I needed to know what turned it on, what would be the best way to figure this out? Go to the Usage tab of the output Use the find tool Run a usage report Use the 'Load Events' function for the output What is the best way to take information such as a list of inputs from the Protege GX databases for use in project documentation? Run a report Take a screenshot Use the Export Tool to create a CSV file Take a database backup The Protege Keypad can be used for which of the following things? Viewing events Viewing events and changing the Controller IP address Viewing events, changing the Controller IP address and changing PIN codes Viewing events, changing PIN codes and programming users Which of the following statments are true for the Protege GX Keypad? The states of inputs, outputs and doors can be viewed The states of inputs, outputs and doors can be viewed and doors can be controlled The states of inputs, outputs and doors can be viewed and outputs can be controlled All of the above Level One: Protege GX Installer Study Guide | August 2013 381 Can a database that has been backed up from one server be restored to another? Yes, any Protege GX database will work with any Protege GX Server No, it can only be restored to the Server it was taken from Yes, as long as the Server is running the same or newer version Yes, as long as the Server is running the same or older version How do you upgrade a database after it is restored to a newer Server version? By running the software installer and choosing the repair option It is not possible to restore an older database to a newer Server The upgrade process must be completed using SQL Server Management Studio The software will upgrade the database next time it is run If a database has been restored from a different server, what additional step or steps must be taken to get the Server running? Restart the PC Change the name of the Event Server and Download Server to match the PC name Run the software installer to upgrade the database Relicense the Server 382 Module 137: System Commissioning | Review Questions Module 138: Programming Walkthrough This module takes you through the practical steps of setting up and testing a system. In This Module Programming a System from Start to Finish ................................................................................. 384 Testing the System ...................................................................................................................... 391 Step by Step Tasks ...................................................................................................................... 393 Level One: Protege GX Installer Study Guide | August 2013 383 Programming a System from Start to Finish We'll now set up a new scenario to practice what we've learned so far. This will give you an idea of what to expect during the practical element of the certification exam. Scenario In this scenario, we are installing an access control system in Acme's Melbourne branch. Acme have provided us with a basic building plan from which we can see we have two areas: 1. Showroom, and 2. Warehouse For the purpose of this exercise, we are only implementing access control for the Showroom and Showroom to Warehouse doors. The Showroom will have a MultiProx card reader (set to card and PIN) for entry and a REX button for exit Valid access through the Showroom door should disarm the Showroom area The Showroom door should unlock during the hours of 8:00am and 5:00pm Monday to Friday and from 10:00am to 4:00pm on Saturday. This should only happen if the Showroom area is disarmed. The Showroom to Warehouse door will have a NanoProx reader for entry to the Warehouse and a REX button for exit Valid access through the Showroom to Warehouse door should disarm the Warehouse area 384 Module 138: Programming Walkthrough | Programming a System from Start to Finish Door Type Internal Area Schedule Showroom Entry Door Card/PIN entry, REX exit Showroom Opening Hours Showroom to Warehouse Card entry, REX exit Warehouse None The Showroom area will have the Showroom PIR, the Showroom Entry Door Reed, and the Showroom to Warehouse Door Reed assigned to it The Warehouse area will have one PIR in each corner, the Showroom to Warehouse Door Reed, and the Warehouse Roller Door Reed assigned to it We will also install a keypad in the Showroom that will be used to arm and disarm both areas We will have 5 users as follows: User Role PIN Card Manny Jah Manager 1111 Card 1 Stu Roman Storeman 2222 Card 2 Whare Hausmann Storeman 3333 Card 3 Sel Ettuyu Sales Rep 4444 Card 4 Ike Cansalla Sales Rep 5555 Card 5 Our manager requires 24/7 access to all areas. Our warehouse staff should have access to both the Warehouse and the Showroom, but only during opening hours. Our sales reps require access to both the Warehouse and the Showroom during opening hours. In addition, they should only be able to gain access to the Warehouse once the area has been disarmed by warehouse staff. Tasks The following tasks outline the basic steps for setting things up according to the scenario requirements. Detailed Step by Step instructions for each task are provided at the end of this module (see page 393) should you need them. 1. Restore a Blank Database and Default the Controller Before you begin, you will need to restore a blank database so you can start with a new site and with nothing programmed. If you have not done this already in the previous module, do this now using the backup (.bak) file supplied on your USB training card. You will also need to default your Controller. 2. Add a Controller Using the Add Controller Wizard, add a new Controller with: 8 Inputs 1 Keypad 1 Reader Expander (we only need one as we are only access controlling two doors) Level One: Protege GX Installer Study Guide | August 2013 385 3. Bring the Controller Online and Address Health Status Issues Enter the serial number and IP address of the controller Set the Download Server Clear the health status message advising that the controller has been restarted Enable encryption Update all modules 4. Create Schedules Create an Opening Hours schedule Create a Showroom Armed schedule The Showroom Armed schedule will control the reader mode for the door. Set it to operate 24/7 and to ignore holidays. Program the qualify output to the RD1 Green LED output. 5. Create Areas Create Showroom, Warehouse and System areas Set the exit delays to 10 seconds Set the bell output for both intruder areas to CP1:Bell 0 Set the armed outputs to flash appropriate reader LEDs Set the exit and entry delay of the Showroom area to use the reader buzzer 6. Create a Technician Status Page Create a Technician Status Page to show: 1. All Door and Areas 2. All Inputs 3. All Outputs 4. All Trouble Inputs 5. All Events 386 Module 138: Programming Walkthrough | Programming a System from Start to Finish 7. Configure Inputs Name the inputs and set them up as required: Input Description Input Description CP1:1 Showroom (PIR) RD1:1 Showroom Door (Reed) CP1:2 Warehouse NW (PIR) RD1:2 Showroom Door (REX) CP1:3 Warehouse NE (PIR) RD1:3 Showroom Door (Bond) CP1:4 Warehouse SW (PIR) RD1:4 - CP1:5 Warehouse SE (PIR) RD1:5 Showroom to Warehouse Door (Reed) CP1:6 Warehouse Roller (Reed) RD1:6 Showroom to Warehouse Door (REX) CP1:7 - RD1:7 Showroom to Warehouse Door (Bond) CP1:8 - RD1:8 - Wire them so they are closed. Ensure the EOL values are set to match the wiring. Set the response time of the REX inputs to 50ms. Set the PIR and Reed inputs to use the Instant type. Assign the inputs to the appropriate areas. 8. Create a Door Type for the Showroom Create a new Showroom door type Set the operating schedule to the Showroom Door schedule Set the secondary mode to Card Only Set the primary mode to Card and PIN 9. Configure the Doors Name both doors for easy identification. Set the Showroom door to use the new Showroom door type. Set the unlock schedule to opening hours. Set the area inside for both doors. Set the Door Lock follows... and Area disarmed AND… options for the Showroom door. 10. Setup Auto Disarming Configure the Reader Expander so that both doors automatically disarm their area on valid access. Level One: Protege GX Installer Study Guide | August 2013 387 11. Create User Menu Groups Create a menu group that allows Managers access to control areas, view events and other system information, set the controller time, bypass inputs, and force arm the system. The menu group should also be configured so that managers are shown a greeting when logging in at the keypad, so that any alarms that are in the memory are shown on log in, and that managers can acknowledge these alarms from a keypad. Add a further menu group that allows Staff access to control areas, and configured so that they are shown a greeting when logging in at the keypad. 12. Create Area Groups Create Area Groups containing the relevant areas for: Managers Sales Warehouse 13. Create Door Groups Create Door Groups containing the relevant doors and assigning schedules based on the user access requirements: Managers: Our manager requires 24/7 access to both doors. Sales: Our sales reps require access to both doors, but only during opening hours. They can only gain access to the Warehouse once warehouse staff have disarmed the area. Warehouse: Our warehouse staff should have access to both doors, and only during opening hours. 14. Create Access Levels Create Access Levels for each of the following: Managers Sales Warehouse Include the relevant Door Groups, Menu Groups, and Arming/Disarming Area Groups for each access level according to our user requirements. Remember that sales staff can only gain access to the Warehouse once warehouse staff have disarmed the area. This means that our sales reps should not be able to disarm the Warehouse, however they need to be able to arm it when they leave. 388 Module 138: Programming Walkthrough | Programming a System from Start to Finish 15. Create Users, Assign Access Levels, and Add Cards Create the following users, adding PINs and assigning the relevant access levels based on their role: User Role PIN Card Manny Jah Manager 1111 Card 1 Stu Roman Storeman 2222 Card 2 Whare Hausmann Storeman 3333 Card 3 Sel Ettuyu Sales Rep 4444 Card 4 Ike Cansalla Sales Rep 5555 Card 5 Add each of the training cards to the corresponding user 16. Add Power Supply Module and Trouble Inputs Add the Power Supply module. Add the relevant trouble inputs: Input Number Description AExxx:01 Module Tamper AExxx:02 Mains Failure AExxx:03 Low Battery / Battery Failure AExxx:04 Output Voltage Low AExxx:05 Output Over Current Failure AExxx:06 Core Temperature Over Temp Failure AExxx:08 Module Offline Add the new trouble inputs to the All Trouble Inputs status list. Wire the tamper input closed. 17. Add Trouble Inputs to the System Area Add the Trouble Inputs to the System area, setting the input type to silent 18. Create a Report IP Service Add a Report IP Service. For the purpose of this exercise, use the following details: Client Code: 1234 IP Address: 123.45.67.89 IP Port: 9467 Reporting Protocol: ArmorIP (TCP) Encrypted Level One: Protege GX Installer Study Guide | August 2013 389 19. Address Health Status Issues View and address any health status issues 20. Set the Controller Time 390 Ensure the Controller Date Time is set to the current date/time Module 138: Programming Walkthrough | Programming a System from Start to Finish Testing the System Our last - and perhaps most important - task is testing the system. The following steps provide a good indication of how your final practical assessment will be marked. Each item represents one mark. Using the software, arm the Showroom area. Did the area arm? Did the MultiProx Reader on Reader Expander 1 Port 1 (the Showroom Entry door) start beeping? Was the exit delay 10 seconds? Was the beeping made up of a short beep every second? Did the Reader LED start flashing once the area armed? Badge Card 1 (Manny Jah) at the Showroom Entry door (the MultiProx Reader on Reader Expander 1 Port 1). Enter the PIN 1111 if required. Was a PIN required? Was the PIN 1111 accepted and access granted? Did the Showroom area disarm? If the showroom area failed to disarm, manually disarm it now using the software. Badge Card 1 (Manny Jah) at the Showroom Entry door again. Was access granted without requiring a PIN? Badge Card 1 at the Showroom Entry door twice. Did the Showroom area begin to arm? If the showroom area failed to arm, manually arm it now using the software. Set the Controller time to 7:50am on a Monday. Badge Card 3 (Whare Hausmann) at the Showroom Entry door. Was access denied? Badge Card 5 (Ike Cansalla) at the Showroom Entry door. Was access denied? Set the Controller time to 7:59am on a Monday. After 60 seconds or less, did the Office Hours Schedule become valid? Did the Showroom door remain locked? Level One: Protege GX Installer Study Guide | August 2013 391 Badge Card 5 (Ike Cansalla) at the Showroom Entry door and enter PIN 5555. Was access granted? Did the Showroom door unlock and remain unlocked? Badge Card 5 at the Showroom to Warehouse door. Was access denied? Badge Card 3 (Whare Hausmann) at the Showroom to Warehouse door. Was access granted? Badge Card 5 (Ike Cansalla) at the Showroom to Warehouse door again. Was access now granted? Set the Controller time to 4:59pm on a Monday. After 60 seconds or less, did the Showroom door lock again? Using the software, arm the Warehouse area. Did the area arm? Did the Nano Reader on Reader Expander 1 Port 2 (the Showroom to Warehouse door) start beeping? Did the Reader LED start flashing once the area armed? Set the Controller time to 3:59pm on a Saturday. After 60 seconds or less, did the Showroom door lock? Badge Card 5 (Ike Cansalla) at the Showroom to Warehouse door. Was access denied? Badge Card 1 (Manny Jah) at the Showroom to Warehouse door. Was access granted? Using the software, ensure that the Showroom, Warehouse and System areas are armed. Open input CP1:1. Did a Report in Showroom … event get produced? Did the Bell output activate? Open the tamper input on the PSU. Did a Report in System … event get produced? Next Steps If you've answered yes to 90% or more of these items, you're probably ready to sit the final assessment. If not, continue practicing until you can. 392 Module 138: Programming Walkthrough | Testing the System Step by Step Tasks Task 1: Restoring a Blank Database and Defaulting the Controller 1. Ensure the Protege GX Services are stopped. From the Windows Start menu, choose Control Panel | Administrative Tools | Services. Scroll down to locate the services Right click and choose Stop 2. Open Microsoft SQL Server Management Studio. The first time you connect, you will need to specify the server name. If you accepted the defaults during installation, this will be COMPUTERNAME\PROTEGEGX where COMPUTERNAME is the name of the PC that GX is installed on. 3. Click Connect to continue. 4. Click to expand the Databases node in the Object Explorer Level One: Protege GX Installer Study Guide | August 2013 393 5. Right click the ProtegeGX database and select Tasks | Restore | Database… 6. Under the Source for restore, select From Device, then click the [...] button. The Specify Backup window opens. 394 Module 138: Programming Walkthrough | Step by Step Tasks 7. Click Add to browse to the backup file to be restored. 8. Browse to the backup file on your USB training card and click OK. 9. You'll see that the file has been added as a backup path. Click OK. Level One: Protege GX Installer Study Guide | August 2013 395 10. Select (enable) the Restore check box beside the backup set. 11. Click the Options page and ensure the Restore options are set to Overwrite the existing database. 396 Module 138: Programming Walkthrough | Step by Step Tasks 12. Click OK to start the restore process. 13. Restart the Protege GX Services. 14. Remove the power to the controller by disconnecting the 12V DC input. 15. Connect a wire link between Reader 2 D0 input and Reader 2 L1 output. BZ L1 D1 DO READER 2 16. Power up the Controller. Once the Controller has started and the Status light is flashing, you can remove the wire link from the Reader 2 connector. Level One: Protege GX Installer Study Guide | August 2013 397 Task 2: Adding a Controller Navigate to Sites | Controllers and click Add Choose the option to Add a controller with default records Include the following hardware records: 1. 2. 3. 4. 398 1 Controller 8 Controller Inputs 1 Keypad 1 Reader Expander Click Add Now Module 138: Programming Walkthrough | Step by Step Tasks Task 3: Bringing the Controller Online and Viewing Health Status 1. Add the Serial Number and IP Address of the Controller 2. Set the Download Server, then click Save. Your Controller should come online within a few seconds. 3. Right-click on the Controller and choose Get Health Status 4. Clear the message advising that the Controller has been restarted 5. Select the Configuration tab and click Initialize Controller Encryption: 6. Right click the Controller and select Update Modules Level One: Protege GX Installer Study Guide | August 2013 399 Task 4: Creating Schedules 1. Navigate to Sites | Schedules and click Add 2. Create the Opening Hours schedule and define the period the schedule applies to (8:00am and 5:00pm Monday to Friday and from 10:00am to 4:00pm on Saturday). 3. Create the Managers Hours schedule setting the time period to 24/7 and the holiday mode to Ignore Holiday 4. Create an additional schedule Showroom Armed setting the time period to 24/7 and the holiday mode to Ignore Holiday 5. Go to the Options tab and select (enable) the Validate Schedule if Qualify Output On option 6. Set the Qualify Output to RD1 Green R1 400 Module 138: Programming Walkthrough | Step by Step Tasks Task 5: Creating Areas 1. Navigate to Programming | Areas and click Add to create the Showroom area 2. Select the Configuration tab: Set the Entry Time to 10 seconds. Set the Exit Time to 10 seconds. Set the Alarm 1 Time to 1 minute. 3. Select the Outputs tab: Set the Bell Output to CP001: Bell 0 Set the Exit Delay Output to RD1 Beeper R1 Set the Exit Delay Pulse On Time to 1 Set the Exit Delay Pulse Off Time to 9 Set the Entry Delay Output to RD1 Beeper R1 Set the Disarmed Output to <not set> Set the Armed Output to RD1 Red R1 Set the Armed Pulse On and Armed Pulse Off Times to 5 4. Repeat these steps to create the Warehouse area, but using RD1 Beeper R2 and RD1 Red R2 5. Create a System area, setting the Entry and Exit delay times to 0. Level One: Protege GX Installer Study Guide | August 2013 401 Task 6: Creating a Technician Status Page 1. Navigate to Monitoring | Setup | Status Lists 2. Change the name of the default status list to All Doors and Areas. 3. Click Add to open the Select Devices window 4. Set the Device Type to Door and choose your Controller 5. Select all doors, then click OK 6. Repeat steps 3 to 5 to add all areas to the status list 7. Add a new status list by clicking the Add button on the main toolbar 8. Call this one All Inputs 9. Change the device type to Input, select the Controller, then choose all of the inputs 10. Repeat to create additional status lists for All Outputs and All Trouble Inputs You should now have 4 status lists: 11. Open the Status Page Editor: Monitoring | Setup | Status Page Editor 12. Name the page Technician, then scroll down and select the layout as shown 13. Click OK. This creates an empty page with a preset layout. The layout can be changed later, so this is just a starting point. 14. Set the Columns to 4 402 Module 138: Programming Walkthrough | Step by Step Tasks 15. In each of the top panels, set the Type to Status List and choose a different list for each Make sure you set the Rows to 2 in the right most panel 16. In the bottom left panel, set the Type to Event Windows and choose the All Events Record. 17. Adjust the Columns so it spans all 4 columns 18. Save the page Task 7: Configuring Inputs 1. Rename the inputs as required based on their function: Input Description Input Description CP1:1 Showroom (PIR) RD1:1 Showroom Door (Reed) CP1:2 Warehouse NW (PIR) RD1:2 Showroom Door (REX) CP1:3 Warehouse NE (PIR) RD1:3 Showroom Door (Bond) CP1:4 Warehouse SW (PIR) RD1:4 - CP1:5 Warehouse SE (PIR) RD1:5 Showroom to Warehouse Door (Reed) CP1:6 Warehouse Roller (Reed) RD1:6 Showroom to Warehouse Door (REX) CP1:7 - RD1:7 Showroom to Warehouse Door (Bond) CP1:8 - RD1:8 - Remember to use our consistent naming convention. So CP1:1, should become Showroom (PIR) MEL CP1:1 2. Wire the inputs so they are closed. 3. Select all inputs (CTRL + A) and set the Input End of Line (EOL) values on the Options tab to match how you have wired your inputs 4. Use the Find tool to locate the REX inputs 5. Set the Alarm Input Speed and Restore Input Speed to 50 msec Level One: Protege GX Installer Study Guide | August 2013 403 6. Use the Find tool to locate the PIR inputs 7. Set the Input Type to Instant 8. Use the Find tool to locate the Reed inputs 9. Set the Input Type to Instant 10. Use the Find tool to locate the Showroom inputs 11. Select the Showroom PIR and Showroom Door Reed, then click the Areas and Input Types tab. 12. Set the First Assigned Area to Showroom 13. Use the Find tool again to locate inputs with the word Warehouse 14. Select the first five inputs (the 4 Warehouse PIRs and the Warehouse Roller Reed) and set the First Assigned Area to Warehouse 15. Select the Showroom to Warehouse Door Reed input 16. Set the First Assigned Area to Showroom 17. Set the Second Assigned Area to Warehouse and the Input Type to Instant Task 8: Creating a New Door Type 1. Navigate to Programming | Door Types: 2. Add a new door type called Showroom 3. Set the Operating Schedule to Showroom Armed 4. Set the Secondary Type to Card 5. Set the Entry Reading Mode to Card and PIN 404 Module 138: Programming Walkthrough | Step by Step Tasks Task 9: Configuring Doors 1. Navigate to Programming | Doors 2. Using our naming conventions, rename DR1 to Showroom Entry MEL 3. Set the Door Type to Showroom 4. Set the Area Inside Door to Showroom 5. Set the Unlock Schedule to Opening Hours 6. Select the Options tab and enable the following options: Door Lock Follows Inside Area Area Disarmed AND Schedule Valid Unlock Door 7. Rename DR2 to Showroom to Warehouse MEL 8. Set the Area Inside Door to Warehouse Task 10: Setting up Auto Disarming 1. Navigate to Expanders | Reader Expanders and select RD1 2. Go to the Reader One tab and select (enable) the Disarm Area For Door On Access option 3. Repeat for the Reader Two tab. 4. Save the changes Level One: Protege GX Installer Study Guide | August 2013 405 Task 11: Creating User Menu Groups 1. Navigate to Groups | Menu Groups 2. Add a new menu group called Manager 3. Select (enable) the following settings: Areas (1): Area Control Events (3): View Events View (5): View other system information Time (6): Set the Controller time Bypass (7): Bypass Inputs Force Arming: Force arm the system 4. Click the Options tab and select (enable) the following options: Show User Greeting User Can Acknowledge Alarm Memory Show User Alarm Memory on Logon 5. Add another menu group called Staff 6. Check the Area (1) setting to allow area control 7. Under the Options tab select (enable) the Show User Greeting option Task 12: Creating Area Groups 1. Navigate to Groups | Area Groups 2. Add a new area group called Managers 3. Add the Showroom and the Warehouse areas 4. Now create a Sales area group with the Showroom area, and a Warehouse area group with both the Showroom and the Warehouse area: 406 Module 138: Programming Walkthrough | Step by Step Tasks Task 13: Creating Door Groups 1. Navigate to Groups | Door Groups 2. Click Add button and create a new door group Managers MEL 3. Click Add to open the Doors selection window 4. Select both doors and click OK 5. Change the schedule to the Managers Hours 6. Create a new door group called Sales Staff MEL 7. Add the Showroom and Showroom to Warehouse doors 8. Assign the Opening Hours schedule 9. Create another door group for Warehouse Staff MEL 10. Add the Showroom and Showroom to Warehouse doors 11. Assign the Opening Hours schedule Level One: Protege GX Installer Study Guide | August 2013 407 Task 14: Creating Access Levels 1. Navigate to Users | Access Levels 2. Create a Managers access level Select the Door Groups tab and add the Managers door group with the schedule set to Managers Hours Select the Menu Groups tab and add the Managers menu group Select the Disarming Area Groups tab and add the Managers area group with the schedule set to Managers Hours Select the Arming Area Groups tab and add the Managers area group 3. Create a Sales access level Select the Door Groups tab and add the Sales Staff door group with the schedule set to Opening Hours Select the Menu Groups tab and add the Staff menu group Select the Disarming Area Groups tab and add the Sales area group with the schedule set to Opening Hours Select the Arming Area Groups tab and add the Sales and Warehouse area groups 4. Create a Warehouse access level 408 Select the Door Groups tab and add the Warehouse Staff door group with the schedule set to Opening Hours Select the Menu Groups tab and add the Staff menu group Select the Disarming Area Groups tab and add the Warehouse area group with the schedule set to Opening Hours Select the Arming Area Groups tab and add the Warehouse area group Module 138: Programming Walkthrough | Step by Step Tasks Task 15: Creating Users, Assigning Access Levels, and Adding Cards 1. Navigate to Users | Users 2. Create a new user named Manny Jah with the PIN 1111 3. Select the Access Levels tab. Add the Managers access level and click OK 4. Create additional users, adding PINs and assigning access levels as follows: User Role PIN Card Access Level Manny Jah Manager 1111 Card 1 Managers Stu Roman Storeman 2222 Card 2 Warehouse Whare Hausmann Storeman 3333 Card 3 Warehouse Sel Ettuyu Sales Rep 4444 Card 4 Sales Ike Cansalla Sales Rep 5555 Card 5 Sales 5. Badge the first training tag at the MultiProx reader. You should see an event come through in the event window similar to that shown here: 6. Right click the event and select Add Card Number to Existing User 7. Select the user you wish to add the card to (Manny Jah) then click OK. 8. Repeat to add the remaining cards to the other users. Task 16: Adding the Power Supply Module and Trouble Inputs 1. Navigate to Expanders | Analog Expanders 2. Add a new Analog Expander named MEL PSU1 3. Ensure the Physical Address is set at 1 4. Navigate to Programming | Trouble Inputs Level One: Protege GX Installer Study Guide | August 2013 409 5. Add a new trouble input named MEL PSU Tamper Set the Module Type to Analog (AE) Set the Module Address to 1 Set the Module Input to 1 6. Add the remaining Trouble Inputs from the table as shown (excluding 7), adjusting the name and setting the Module Input number accordingly. For instance MEL PSU Mains Failure should be Module Input 2. Input Number Description AExxx:01 Module Tamper AExxx:02 Mains Failure AExxx:03 Low Battery / Battery Failure AExxx:04 Output Voltage Low AExxx:05 Output Over Current Failure AExxx:06 Core Temperature Over Temp Failure AExxx:07 Reserved AExxx:08 Module Offline 7. Add the new trouble inputs to the All Trouble Inputs Status List: Navigate to Monitoring | Setup | Status Lists and select All Trouble Inputs Click Add to open the Select Devices window Set the Device Type to Trouble Zone and choose your Controller Select the PSU Trouble Inputs and click OK. 8. Wire the tamper input closed. Task 17: Adding Trouble Inputs to the System Area 1. Select all the trouble inputs (CTRL+A) then click the Areas and Input Types tab 2. Set the first Area to the System area 3. Set the first Input Type to Trouble Silent 4. Click Save to update the records 410 Module 138: Programming Walkthrough | Step by Step Tasks Task 18: Creating a Report IP Service 1. Navigate to Programming | Services 2. Select your Controller then click Add to create a new service 3. Set the Service Type to Report IP 4. Set the Service Mode to Start with Controller 5. Select the General tab: Enter the Client Code (or account number). This is the code used to identify the system at the monitoring station and will usually be issued by the monitoring company. For the purpose of this exercise, we'll just use 1234. Enter the IP Address and IP Port Number of the monitoring station. As we don't have "real" connection details, we'll use the IP address of 123.45.67.89 and port 9467 for this exercise. Set the Reporting Protocol to ArmorIP (TCP) Encrypted. 6. Select the Options tab and enable the reporting options for the signals to be sent by the service. For the purpose of this exercise, select Alarms, Tampers and Restore to report the corresponding input state changes. 7. Right click the service from the Record List and choose Start Service. Level One: Protege GX Installer Study Guide | August 2013 411 Task 19: Addressing Health Status 1. Navigate to Sites | Controllers 2. Right-click on the Controller and choose Get Health Status. The Controller Health Status window appears indicating any areas that need addressing. 3. Right-click the Showroom area from your Technician status page and choose Arm 24 4. Repeat with the Warehouse and System areas. 5. Navigate to Expanders | Reader Expanders 6. Right-click RD1 and choose Update Module 7. Once the module has finished updating, view the health status again. You should receive a message advising that there are no known issues with the Controller. 412 Module 138: Programming Walkthrough | Step by Step Tasks Task 20: Setting the Controller Time 1. Navigate to Sites | Controllers 2. Right click the Controller and choose Set Controller Date Time. Level One: Protege GX Installer Study Guide | August 2013 413 Review Questions and Answers In This Section Module 101: ICT Company Profile................................................................................................ 417 Module 121: Protege GX Platform Introduction ............................................................................ 419 Module 122: Protege GX Licensing .............................................................................................. 421 Module 123: Protege GX System Architecture ............................................................................. 425 Module 124: Protege Hardware Overview .................................................................................... 429 Module 126: Limitations of SE Hardware in Protege GX ............................................................... 435 Module 127: Protege DIN Rail Hardware Configuration ................................................................ 437 Module 130: Protege GX Hardware Setup ................................................................................... 441 Module 125: Protege GX System Design ..................................................................................... 443 Module 128: Protege GX Software Installation.............................................................................. 445 Module 129: Protege GX Software Introduction ........................................................................... 447 Module 131: Hardware Programming .......................................................................................... 449 Module 132: User Management ................................................................................................... 451 Module 133: Basic Intruder Detection .......................................................................................... 453 Module 134: Basic Access Control .............................................................................................. 455 Module 135: Integrating Intruder Detection and Access Control ................................................... 457 Module 136: System Monitoring................................................................................................... 459 Module 137: System Commissioning ........................................................................................... 461 Level One: Protege GX Installer Study Guide | August 2013 415 Module 101: ICT Company Profile Where is ICT hardware produced? China New Zealand Canada Canada and New Zealand Which certification applies to ICT products? UL Certification CE Compliance NIST AES256 Bit Encryption Certification All of the above Where is research and development carried out? China Canada New Zealand New Zealand and Canada Level One: Protege GX Installer Study Guide | August 2013 417 Module 121: Protege GX Platform Introduction Who was the GX platform built for? The Integrator The Consultant The End User The Distributor What type of system is the GX platform best suited to? Single door systems Systems up to 50 doors Enterprise class systems All of the above Complete this statement: WYSIWYG Event reports are... A) Exportable to multiple formats B) A licensable feature C) An intuitive way of finding the data you want D) A and C How many users are supported by the system / controller? Unlimited / Unlimited Unlimited / 2000 2000 / 2000 Unlimited / 5 Million Who can purchase Protege GX hardware / software? Integrators who have at least one Certified Protege GX Installer Integrators who maintain a predefined level of sales Integrators who are paid members of the Protege GX Installers Group All of the above Level One: Protege GX Installer Study Guide | August 2013 419 Where do certification exams take place? Web based, self paced Only at the ICT factory Supervised at the Integrators office Supervised at an ICT approved facility 420 Review Questions and Answers | Module 121: Protege GX Platform Introduction Module 122: Protege GX Licensing What is the license cap for doors? 250 500 1000 Doors are unlimited What is the maximum number of Controller licenses you will ever pay for? 250 500 1000 Controllers are unlimited What happens when the number of cameras reach 250? No more cameras can be added, the cap has been reached Cameras are now unlimited Nothing, the camera cap is 500 No difference, cameras are not limited anyway How many camera licenses are included in the base license? None 5 10 Cameras are unlimited Which of the following features are NOT included in the base license? Floor plans DVR HLI (High Level Interface) Grid View reports CSV bulk user import Level One: Protege GX Installer Study Guide | August 2013 421 How many operators can log in at the same time with a base license? As many as you like, operators are unlimited 1 As many as you like, users are unlimited 10 To connect 20 PTZ cameras and have them respond to events automatically, what would be required? 10 camera licenses and a DVR HLI license 10 camera licenses, DVRs are unlimited A base license, 10 camera licenses and a DVR HLI license A base license, 20 camera licenses and a DVR HLI license Which licensed feature(s) are required in order to enable operators to login to the Protege GX Client using their Windows credentials? An Active Directory (LDAP) Users License An Active Directory (LDAP) Operators License A Concurrent Operator Connection License All of the above Which license would I require for a system with 100 IP Doors? A base license and 50 Door licenses A base license and 100 Door licenses A base license and 100 IP Door licenses A base license, 100 IP Door licenses and 50 Door licenses To what is the Protege GX license bound? The Integrator The Site The Server The Protege GX database 422 Review Questions and Answers | Module 122: Protege GX Licensing Which of the following circumstances would NOT require a license update? Restoring an old Protege GX database Adding 150 door licenses Replacing the server motherboard Upgrading Windows on the server Do you need to have Internet access to update your license? No, you can do a manual license update Yes, the automatic license update connects to the ICT licensing server via the internet Yes, even with a manual license update, you will need internet access somewhere to upload the license request and download the license file No, the proxy server can provide your license update Which of these statements is NOT correct? An SMA provides access to new features, updates, enhancements and fixes An SMA is an agreement between ICT and the Integrator The end user must purchase their SMA from an ICT approved Integrator An SMA provides priority access to technical support If an SMA expired 30 months ago, how much would it cost to renew? It will be 25% of the current cost of the entire license x 1 year It will be 25% of the current cost of the entire license x 2 years It will be 25% of the current cost of the entire license x 3 years It will be the same cost as a new license Calculate the following: If you had a system with a base license and a total of 1050 doors, how much would an SMA cost if the base license was $1000, and door licenses were $1000 for 50? $5500.00 $5250.00 $5000.00 $4500.00 Level One: Protege GX Installer Study Guide | August 2013 423 Module 123: Protege GX System Architecture Which database are events stored in? On the Controller only. The server interrogates the Controller for reports. The Protege GX database located on the Server. The Protege GX Events database located on the Server The reports database What does the Protege GX database contain? Controller configuration only Global system configuration only The configuration for the entire system The configuration and events for the entire system Can the GX Controller run in standalone mode? Yes, Protege GX is a controller based system. The Server is only used to program the Controller. Yes, Protege GX is a Server based system but Controllers will run stand-alone once configured. No, Protege GX is a Server based system and must have a network connection between the Controller and Server at all times. No, the Protege GX Controller stores its configuration database on the server. The Protege GX Client Software... can be installed on only one PC if you only have a base licence is only installed on the Server if you only have a base licence can be installed on any number of workstations is never installed on the server When making configuration changes... The GX Client makes changes to the Controller directly The GX Client makes changes to the Protege GX Database The GX Client makes changes to the Protege GX Database and Controller The GX Client is not used Level One: Protege GX Installer Study Guide | August 2013 425 What does the GX Client software communicate with? The server only The server for system configuration and reports, and the controller for status updates The controller for configuration and reports, and the server for status updates None of the above Which of the following statements is correct? Controllers can communicate with the GX Server using the Internet Controllers must be on the same local area network as the GX Server Controllers must be on the same corporate network as the GX Server Controllers cannot communicate with the GX Server using the Internet How does the Controller communicate with the server? Using the RS-485 module network Using TCP/IP on an Ethernet network Using the RS-232 serial interface Using Point to Point Protocol over Ethernet (PPPoE) What type of site/system was Protege GX built for? High end residential sites Single controller commercial sites Enterprise scale systems All of the above Which of the following is NOT a reason for making GX a server-based system? Storing system configuration on a server allows more data to be stored Configuration changes can be easily made to the system, then the system manages which Controllers need to be updated It helps to keep system information confidential It means there is a single point for all configuration changes 426 Review Questions and Answers | Module 123: Protege GX System Architecture Complete this statement... Where budget constraints on a small single Controller site mean an onsite server can't be justified... ...Protege GX is not a suitable solution ...the GX Controller should be programmed using a technicians laptop ...connect the Controller to a shared server using the Internet ...use any old existing PC as the server Level One: Protege GX Installer Study Guide | August 2013 427 Module 124: Protege Hardware Overview How many access controlled doors can be directly connected to the DIN Rail Controller? 0 1 2 4 How many onboard high current relay outputs does the DIN Controller have? 2 4 7 500+ How many onboard inputs does the RDM2-DIN Reader Expander have? 7 6 8 4 If installing a system with two doors (both with readers for entry and exit), how many Reader Expanders are required? Two. Each Reader Expander has two reader ports onboard. One. With reader multiplexing, a single Reader Expander can support two doors with entry and exit readers. None. The Controller supports reader multiplexing, which allows two doors with entry and exit readers to be controlled onboard. One. The Controller has two reader ports onboard so a reader expander is required for the other two readers. Which of the following offsite reporting paths are supported by the DIN Rail Controller? IP Reporting via the Ethernet port Contact ID via the built in dialer SIA via the built in dialer All of the above Level One: Protege GX Installer Study Guide | August 2013 429 How many onboard reader ports does the PCB Controller have? 0 1 2 4 How many onboard readers does the PCB Controller support? 0 1 2 4 What's the most RDM2-PCBs you can fit in a Jumbo Cabinet? 1 2 4 8 What is the maximum distance that the Protege Module Network may be run? 100m 900m 1200m 1500m A project requires a run of 300m (1000ft) between the Controller and the nearest Ethernet switch. Which cable type should I use? You can't - the maximum cable run between a Controller and a switch is 100m (328ft) Belden 9842 or 24AWG security cable Belden 9842 or CAT5e Belden 9842 430 Review Questions and Answers | Module 124: Protege Hardware Overview In a new installation, how many spurs can come off a Controller on the RS-485 module network? 3 4 250 None - star or spur wiring is not an acceptable method for new installations Can multiple power supplies be connected to the Protege Module Network? No, the Module Network must only be powered at one location Yes, as long as the N+ connection is removed between the split sections Yes, as long as they are all in the same cabinet Yes, as long as they are all in different cabinets If a door needs to operate in card and PIN mode, which reader should be used? The Nano Prox reader The Multi Prox reader The Vario reader The Vario PIN reader If an ICT reader is connected to an ICT reader expander, is tamper monitoring possible? Yes, ICT readers and expanders can be programmed for intelligent tamper recognition. Yes, ICT readers include a tamper switch. Yes, ICT reader expanders include a tamper input. No, there is no tamper monitoring on ICT readers. What is the maximum cable run for an ICT reader connected to an RDM2-DIN Reader Expander? 75m 100m 125m 150m Level One: Protege GX Installer Study Guide | August 2013 431 How many onboard controllable outputs does the PRT-KLCD have? None 1 low current output 1 low current output and two controllable LEDs 1 low current output, two controllable LEDs and a controllable buzzer How many inputs does a PRT-KLCD keypad have onboard? None 1 input (2 using zone duplex) 2 inputs (4 using zone duplex) 4 inputs (8 using zone duplex) What is the ATH1 module used for? Arming and disarming areas To measure temperature and humidity Reading smart cards Programming smart cards Complete this statement Gear plates must be used in... Large and Jumbo cabinets Fatboy and Jumbo cabinets Medium and Large cabinets Fatboy and Large cabinets 432 Review Questions and Answers | Module 124: Protege Hardware Overview With a single car elevator system configured as shown, what is the maximum number of floors that could be controlled? PRT-PX16-PCB PRT-CTRL-DIN PRT-RDI2-PCB Primary RS-485 Network Secondary RD-485 Network Wiegand Connection 8 16 128 Unlimited Level One: Protege GX Installer Study Guide | August 2013 433 In addition to basic access control, what optional feature is also shown in this scenario, and what is it for? Goods Lift Floors B, 1-15 PRT-PX16-PCB PRT-CTRL-DIN PRT-PX16-DRI PRT-RDI2-PCB Goods Lift Floors 16-24 PRT-PX16-PCB PRT-PX16-DRI Lift 1 Floors 1-16 PRT-PX16-PCB PRT-PX16-DRI PRT-RDI2-PCB Lift 2 Floors 1-16 PRT-PX16-PCB PRT-PX16-DRI Lift 1, Floors 17-24 Lift 2, Floors 17-24 PRT-PX16-PCB Goods Lift Lift 1 Lift 2 PRT-PX16-DRI Primary Network Secondary Network Wiegand Connection Direct Reader Interface, allowing a high level interface to the lift control system Destination reporting, which allows Protege to see which floor an elevator car is on Destination reporting, to prevent more than one floor being selected when a card is badged Destination reporting, allowing connection to a destination based elevator control system 434 Review Questions and Answers | Module 124: Protege Hardware Overview Module 126: Limitations of SE Hardware in Protege GX Can an RDM2-PCB Reader Expander be connected to a DIN Controller on a GX System? Yes, it is fully supported No, it is only compatible with a PCB Controller Yes, but it requires a firmware upgrade No, it is only compatible with SE systems When running GX with a PCB Controller, what greeting would 'Gordon Groves' see at a keypad if he was user number 4999? Good Morning User 4999 Good Morning Gordon Groves Nothing, only 2000 users are supported by the PCB Controller on GX Protege GX By ICT When running GX with a PCB Controller, what is the maximum number of users it can store? 5 million 5000 2000 10000 How many doors can be assigned to an access level on a GX system running on a PCB Controller? None, this is not supported by the PCB Controller 2 4 8 Level One: Protege GX Installer Study Guide | August 2013 435 If a Controller limitation is exceeded, what happens? Nothing, the Controller ignores anything it can't fit or doesn't know about. The server displays an error. The Controller fault light comes on solid and the status light flashes three pulses. The Controller sends a System Assertion event to the Server. The server displays a message in the Controllers Health Status 436 Review Questions and Answers | Module 126: Limitations of SE Hardware in Protege GX Module 127: Protege DIN Rail Hardware Configuration In the configuration shown, what is the maximum continuous load that can be drawn by the module network? PRT-CTRL-DIN N+ N- NA PRT-PSU-DIN NB V2+ V2+ V2+ V2+ V2+ V2+ To other modules on network N+ N- NA NB V- V- V- V- V- V- V1+ V1+ V1+ V1+ V1+ V1+ V- V- B- B+ V- V- L Gel Cell Backup Battery V- V- N Mains Input + 4 Amps 10 Amps 3.3 Amps 3 Amps To monitor a cabinet tamper switch using a dedicated tamper input, which module is required? PRT-PSU-DIN Power Supply PRT-CTRL-DIN Controller PRT-ZX16-DIN Zone Expander PRT-RDM2-DIN Reader Expander Level One: Protege GX Installer Study Guide | August 2013 437 Is the wiring method shown in this diagram acceptable? Assume the power supplies indicated in the diagram shown are DIN Rail PSU's. Is this an acceptable wiring method? If so, what is the maximum recommended average current that the Controller could draw? Module #2 Module #3 N+ N- NA NB N+ N- NA Module #1 NB Power Supply #3 N+ N- NA PRT-CTRL-DIN NB Power Supply #2 N+ N- NA NB Power Supply #1 This is an unacceptable wiring method Acceptable, 3 Amps Acceptable, 9 Amps Acceptable, 4 Amps Where and when should a diode be fitted? Across the coil when a coil is being controlled Across the lock when a lock is being controlled Across the relay when a relay is being controlled All of the above Where does the shield of the cable connected to a reader get connected? Frame grounded at one point. Connected to the reader shield. Wired to V- at the Reader Expander. Connected to the reader shield. Card reader cable is not shielded. Frame grounded at one point. Not connected to the reader shield. What does a constant red fault indicator mean? The Module is in identification mode Module communications activity The module is in error state. The status light will flash an error code. The module is in boot mode awaiting firmware 438 Review Questions and Answers | Module 127: Protege DIN Rail Hardware Configuration What does a continuous fast green flash of the status indicator mean? The Module is in identification mode There is Module communications activity The Module is online The Module is attempting to register with a Controller The Bell indicator on a DIN Controller is flashing two green flashes. What does this mean? The Bell output is off. The circuit to the bell is ok. The Bell output is off. The circuit to the siren / bell is cut, damaged or tampered. The Bell output is on. The circuit to the bell is ok. The Bell output is on. The circuit is in over current protection. What does a flashing green indicator on an input mean? The input is in an open state The input is in a closed state The input is in a tamper state The input is in a short state Level One: Protege GX Installer Study Guide | August 2013 439 Module 130: Protege GX Hardware Setup How do you default a DIN Rail Controller? Use the web interface to connect to the Controller, then click on Restart Wire a link between D0 and L1 of reader port 2, then cycle power Turn on DIP switch 4, then cycle the power Log in at a keypad, then select [Menu] [4] [2] [2] [Enter] If the IP address of a DIN Rail Controller is unknown, how can you find it? Turn DIP switch 3 on, then cycle power to the Controller to temporarily set the IP address to 192.168.111.222 Connect a keypad, press [Menu] [4] [Arm], then scroll down three times Use the web interface to browse to the default IP address of 192.168.1.2 Connect a link from L1 to D0 on reader port 2, then cycle power to the Controller to temporarily set the IP address to 192.168.111.222 What is the default IP address of a DIN Rail Controller 192.168.1.2 192.168.1.3 192.168.111.222 255.255.255.0 When the IP address of a Controller is changed, what additional step(s) must be taken? Perform a module update Save the settings Cycle power to the Controller Save the settings, then restart the Controller If the IP address of a PCB Controller is unknown how can you find it? Turn DIP switch 3 on, then cycle power to the Controller to temporarily set the IP address to 192.168.111.222 Connect a keypad, press [Menu] [4] [Arm], then scroll down three times Either of the above Connect a link from L1 to D0 on reader port 2, then cycle power to the Controller to temporarily set the IP address to 192.168.111.222 Level One: Protege GX Installer Study Guide | August 2013 441 How do you access Telnet for the first time on a Windows 7 PC? Start > Run, type CMD and press [Enter], then type telnet [Controller IP] 10001 Control Panel > Programs > Turn Windows Features On or Off then check (enable) Telnet Client Control Panel > Programs > Turn Windows Features On or Off then check (enable) Telnet Server Control Panel > Programs > Turn Windows Features On or Off then check (enable) Telnet Server and Telnet Client What is the default IP address of a PCB Controller? 192.168.1.2 192.168.1.3 192.168.1.100 192.168.111.222 How is the module address set on a Protege LCD keypad? Using DIP switches From the Keypad Configuration Menu: [X] at version info during power up From the Keypad Configuration Menu: [Menu], [4], [Arm] once the system is operational Using the Module Address tool from within the GX software 442 Review Questions and Answers | Module 130: Protege GX Hardware Setup Module 125: Protege GX System Design Where should copper clad aluminium cables be used? For Reader connection For RS-485 Module Network connection CCA cables should be used wherever possible due to its higher attenuation The use of CCA cables should be avoided If the keypad cable was damaged, causing a short across all conductors, what would happen? Cabinet PSU Controller ZX16 RDI2 Primary RS-485 Keypad Secondary RS-485 The Keypad would stop functioning. The RDI2 would stop functioning. Everything else would continue to function properly. The Keypad would stop functioning. Everything else would continue to function properly. Everything would continue to function properly. The Keypad would stop functioning. The RDI2 would go into offline mode. Everything else would continue to function properly. In Offline Operation... A front door of a retail shop is connected to an RDI2-DIN intelligent reader expander which is programmed for 'First 10 Users + Cache' mode. The door is programmed to unlock at 9am and lock at 5 pm. Jane, one of the shop staff, is programmed as User 202. If the expander was to go offline at 5am, what would happen? The door would not unlock at 9am. Jane would be granted access. The door would not unlock at 9am. Jane would not be granted access. The door would unlock at 9am. Jane would be granted access. The door would unlock at 9am. Jane would not be granted access. Level One: Protege GX Installer Study Guide | August 2013 443 What happens to...? A lighting circuit is connected to an output on a PX8-DIN module that is programmed to turn on at 8pm and off at 5am. The expander goes offline at 4am, then comes back online at 10am. What happens to the lights after the expander goes offline? The lights turn off at 5am. The lights turn off at 10am. The lights turn off at 4am. The lights turn off at 5am the following day. What happens when...? If a door is connected to an RDM2 that has been programmed for 'No Users' offline operation, and the module has gone offline, what happens when a user requests exit using a REX button? The door is unlocked. The reader does not beep. The door is not unlocked. Four short beeps are given at the reader. The door is not unlocked. The reader does not beep. The door is unlocked. Four short beeps are given at the reader. 444 Review Questions and Answers | Module 125: Protege GX System Design Module 128: Protege GX Software Installation Which of the following operating systems are NOT supported for server installations? Microsoft Windows XP SP3 Microsoft Windows Vista SP2 Microsoft Windows Server 2008 R2 All of the above systems are supported Which database version is recommended? SQL Server 2008 R2 MySQL Server Enterprise Edition MySQL Server Express Edition SQL Server 2005 What are the minimum CPU and RAM requirements for a Protege GX Server? Intel Atom 1.66GHz, 2GB RAM Intel Dual Core 2.8GHz, 4GB RAM Intel Dual Quad 2.8GHz, 8GB RAM Intel Xeon E5620, 2GB RAM Level One: Protege GX Installer Study Guide | August 2013 445 Module 129: Protege GX Software Introduction After a configuration change, how long must you wait before the changes take effect? Protege GX is a server based system so changes take effect immediately 60 Seconds The changes won't take effect until you connect to the Controller and download to it Up to the time that is set in 'Download Retry Delay' under the Controller Configuration tab After restoring a database and starting the Data Service what additional step(s) must be taken? Confirm your configuration is correct. Confirm your configuration is correct. Start the Download Service. Confirm your configuration is correct. Start the Download Service. Default your Controller. No additional steps are required as the Database would not restore if the configuration was incorrect. Which service is responsible for incoming messages? The Update Service The Data Service The Download Service The Event Service What does the Details button on the History tab do? It shows the date/time and operator that modified the record Runs a detailed event report on the record It shows the old and new values of fields that were modified None of the above What does the Breakout button do? Opens the current page in another window Switches to the Alarms page Exits the software Closes the current window Level One: Protege GX Installer Study Guide | August 2013 447 What is the Refresh button used for? To clear the filtered results when using the Find tool To update data when a second client window has been used to configure something To update data when another operator may have made changes to the same record All of the above What is the Events tab in the Programming window used for? To load events for the selected record To load events for the selected record and run a report on these events To show which fields were modified and their old and new values To load events for the selected record, run a report on these events or copy the events to the Windows Clipboard What is the maximum capacity of SQL Server 2005 Express or SQL Server 2008 Express Database? 32 Million events 4GB Unlimited 10GB What must you do to prevent the SQL Express event database from reaching its capacity? Periodically delete some events from SQL Purchase a larger hard drive Enter a timeframe in the 'Purge Events' field in Global settings Create an event filter that limits the number of events saved Where should your database backup be stored? Offsite if possible In the default location of C:\Program Files\Microsoft SQL Server\MSSQL10_50.PROTEGEGX\MSSQL\Backup On a second internal hard drive On a USB thumb drive 448 Review Questions and Answers | Module 129: Protege GX Software Introduction Module 131: Hardware Programming A module update is required when... You change any settings on the expander You change any programming The Controller advises it is required via the health status All of the above What does the Controller Wizard do? Adds a Controller Adds expanders, inputs, outputs, trouble inputs Links all of the associated records All of the above What steps are required to use the Controller onboard reader ports? None. Door processing is enabled by default Assign a Reader Expander address in the Controller Configuration tab and select the lock outputs to use Assign a Controller address in the Reader Expander Configuration tab and select the lock outputs to use Turn DIP switch 4 on What does it mean if an address is shown in red in the Auto- Addressing window? The address has been changed but not updated The address can't be changed using Auto-Addressing The address is outside the Controllers address space The address is at factory default of 254 Which of the following will generate a Controller Health Status message? A low battery on a power supply Failure to communicate When encryption is disabled All of the above Level One: Protege GX Installer Study Guide | August 2013 449 If Controller encryption is accidentally disabled, what additional step must be carried out to get the Controller back online? The Controller must be defaulted to clear the encryption key Controller encryption should be enabled again Controller encryption should be initialized again Nothing. If encryption is disabled at the Server, the Controller will continue to communicate Answer the following... On a site where encryption between the Controller and Server is normally enabled, a Controller is defaulted. The Controller does not come back online. What additional step must be carried out to get the Controller back online? Encryption must be disabled for the Site Encryption must be re-initialized on the Controller Encryption must be disabled for the Controller A force download is required to push the existing encryption key out to the Controller What is the correct Event Server IP address? Assuming the screenshot shown is from the Protege GX Server. What should a Controller with the IP address 192.168.10.2 have set as its Event Server IP address? 192.168.10.1 192.168.10.100 192.168.1.1 192.168.1.100 450 Review Questions and Answers | Module 131: Hardware Programming Module 132: User Management What are Access Levels used for? To control which elevator levels they have access to To control what users can do, where they can go and when they can do these things To control how a door responds to a user To provide a way to rank users In an Access Level, what are Door Groups used for? They define which doors a user has access to They allow a number of doors to be unlocked with a single card read They are used for scheduling multiple doors to unlock They define which Area a door belongs to What happens if the Import Users Wizard has an Access Level mapped that doesn't exist in the Protege GX database? The wizard will crash The wizard will skip the user The wizard will import the user but leave the Access Level unset The wizard will import the user and create a new Access Level to match What must you do to ensure a schedule does not operate on a holiday? Nothing. By default, the schedule will not operate on a holiday. Program the holiday into a holiday group. Apply that holiday group to the schedule. Program the holiday mode of the applicable periods to 'Disabled on Holiday'. Program the holiday into a holiday group. Apply that holiday group to the schedule. Program the holiday mode of the applicable periods to 'Enabled on Holiday'. Program the holiday into a holiday group. Apply that holiday group to the schedule. Program the holiday mode of the applicable periods to 'Ignore Holiday'. Level One: Protege GX Installer Study Guide | August 2013 451 How do you program a schedule to run from 11pm on Monday through to 2am on Tuesday? Program period 1 from 23:00 to 00:00 and check Monday. Program period 2 from 00:00 to 02:00 and check Monday and Tuesday. Program period 1 from 23:00 to 23:59 and check Monday. Program period 2 from 00:01 to 02:00 and check Tuesday. Program period 1 from 23:00 to 00:00 and check Monday. Program period 2 from 00:00 to 02:00 and check Tuesday. Program period 1 from 23:00 to 23:59 and check Monday. Program period 2 from 00:01 to 02:00 and check Monday and Tuesday. How do you program a schedule to be valid from 09:00 to 17:00 Monday to Friday if the day is not a holiday? Program period 1 from 09:00 to 17:00 and check Monday-Friday. Select 'Disabled on Holiday'. Program period 1 from 09:00 to 17:00 and check Monday-Friday. Select 'Enabled on Holiday'. Program period 1 from 09:00 to 17:00 and check Monday-Friday. Select 'Ignore Holiday'. Program period 1 from 09:00 to 17:00 and check Monday-Friday. Program a qualify output for holidays. How do you program a schedule to be valid from 09:00 to 17:00 on normal days and 10:00 to 16:00 on holidays? Program two periods. Set the holiday mode of the 09:00-17:00 period to 'Enabled on Holiday' and the 10:00-16:00 period to 'Disabled on Holiday'. Program two periods. Set the holiday mode of the 09:00-17:00 period to 'Ignore Holiday' and the 10:00-16:00 period to 'Enabled on Holiday'. Program two periods. Set the holiday mode of the 09:00-17:00 period to 'Ignore Holiday' and the 10:00-16:00 period to 'Disabled on Holiday'. Program two periods. Set the holiday mode of the 09:00-17:00 period to 'Disabled on Holiday' and the 10:00-16:00 period to 'Enabled on Holiday'. 452 Review Questions and Answers | Module 132: User Management Module 133: Basic Intruder Detection A short time after creating a new area, a health status message appears on the controller. What is this likely to be? The area is missing an Input Type The Controller requires a module update The new area has its Tamper or 24 hour area disarmed The area has no inputs programmed yet Which characters from the area name programming will be shown on the keypad? The last 16 characters of the programmed name The first 20 characters of the programmed name The last 20 characters of the programmed name The first 16 characters of the programmed name Explain the result of the setting shown in this image The output will never be activated as the pulse times are both set to 0 The output will be activated constantly when an entry delay input is triggered The output will be activated constantly while the area is arming The output will pulse rapidly while the area is arming How many areas can an input be programmed to? One Two Four It depends on whether it is on a Reader Expander Level One: Protege GX Installer Study Guide | August 2013 453 What does the Input Type setting do? It sets how the input operates in the specified area It sets how the input operates in all areas It sets the Input name displayed in the keypad It sets whether input to use for an on-board expander Which of the default input types should be used for a PIR that is covering the keypad at the main entry? Instant Delay Trouble Silent 24 Hour Alarm 454 Review Questions and Answers | Module 133: Basic Intruder Detection Module 134: Basic Access Control If a door has been created by the Add Controller Wizard with no additional configuration and it is the Forced Open state, which input must be open? The REN (Request to Enter) Input The REX (Request to Exit) Input The Bond Sense (Lock State) Input The Door Sense (Reed) Input Which inputs are configured by default as bond sense (lock state) inputs on a Reader Expander? 1 and 5 2 and 6 3 and 7 4 and 8 What does this event mean? A card has been read that was programmed incorrectly at the factory The Reader Expander has the wrong format programmed A new card has been assigned to a user An unknown card has been read on Port 1 If a new area is created but it is not added to any area groups, who will be able to disarm it? Nobody The Installer The Manager Anyone with the 'All Areas' disarming area group Level One: Protege GX Installer Study Guide | August 2013 455 If a new door is created but it is not added to any door groups or access levels, who will have access to it? The Installer Anyone with the 'All Doors' door group Nobody The Manager If a user is automatically logged out of a keypad after a period of time, which option do they NOT have checked in their menu group? Installer (4) Advanced Installer (4, 8) Installer Menu Group Time (6) What do Door Types do? They define which lock outputs to use They set double badge arming They define the reading mode used to gain access All of the above For Offline Operation on a Reader Expander to allow a cached user through a door in offline mode, what items must be configured? The Controller must have the Enable Automatic Offline Download option checked and the Reader Expander offline operation mode must be set to First 10 Users + Cache The Reader must be programmed for Intelligent offline mode and the user must have the Super Rights option checked The Reader must be programmed for Intelligent offline mode and the Reader Expander offline operation mode must be set to First 10 Users + Cache The Controller must have the Enable Automatic Offline Download option checked and the user must have the Super Rights option checked Two Readers are going to be wired to Port 1 of a Reader Expander. To configure multiplexing, what must be done? The exit reader must have D0 wired to reader port 2 and Multiple Reader Input Port 1 must be checked The exit reader must have D0 wired to reader port 2 and Multiple Reader Input Port 2 must be checked The exit reader must have D1 wired to reader port 2 and Multiple Reader Input Port 1 must be checked The exit reader must have D1 wired to reader port 2 and Multiple Reader Input Port 2 must be checked 456 Review Questions and Answers | Module 134: Basic Access Control Module 135: Integrating Intruder Detection and Access Control Which of the following is a good example of where a Qualify Output should be used to validate a schedule? To change a Doors entry reading mode when an area is armed To keep a door locked on a holiday To turn on the keypad red LED when an area is armed To unlock a door when an area is disarmed To enable automatic disarming of an area when access to a door is granted, which of the following must be configured? Area Inside Door (Set in door programming) and Disarm Users Area On Valid Card (Set in reader expander programming) Reader One Arming Mode (Set in reader expander programming) and Disarm Users Area On Valid Card (Set in reader expander programming) Area Inside Door (Set in door programming) and Disarm Area For Door On Access (Set in reader expander programming) Reader One Arming Mode (Set in reader expander programming) and Disarm Area For Door On Access (Set in reader expander programming) If the first door on a reader expander has in and out readers, which of the following statements are correct? D0 of the entry reader must be wired into D0 of reader port 2 D1 of the entry reader must be wired into D1 of reader port 2 D0 of the exit reader must be wired into D0 of reader port 2 D1 of the exit reader must be wired into D1 of reader port 2 Level One: Protege GX Installer Study Guide | August 2013 457 Module 136: System Monitoring How many areas can a trouble input be assigned to? 1 4 None - Trouble inputs are automatically assigned to the System area None- Trouble inputs are automatically assigned to the Trouble area When do you need to set a Reporting ID for a Trouble Input? Only if you want to use a different Reporting ID from the default reporting map Only if you need offsite monitoring for that trouble input Always Never When manually adding a trouble input, where can you find the Module Address to use for a particular trouble input on an expander? You can assign any address as long as it is within the memory profile In the installation manual for the expander module Trouble inputs don't have a module address The server automatically assigns the next free module address Which of the following statements about offsite monitoring are true? Contact ID is supported on all ICT Controllers with onboard dialer All ICT Controllers support IP monitoring onboard SIA is supported on all ICT Controllers with onboard dialer All of the above Which of the following things can Contact ID transmit? The account number that identifies the site The type of event that has occurred The area that the event occurred in All of the above Level One: Protege GX Installer Study Guide | August 2013 459 Which of these configuration examples are valid for IP Monitoring? They are all valid A is not valid B is not valid D is not valid Which of the following statements are true for ALL IP Monitoring Protocols? No copper phone lines required No copper phone lines required, displays additional, accurate information from site No copper phone lines required, displays additional, accurate information from site, they are essentially 'always online' No copper phone lines required, they are essentially 'always online', alarms are transmitted instantly 460 Review Questions and Answers | Module 136: System Monitoring Module 137: System Commissioning What is the Usage tab used for? It shows which items are linked to the current item It shows when a change was made to the current item It shows the events associated with the current item It shows which operator made a change to the current item If an Output was on and I needed to know what turned it on, what would be the best way to figure this out? Go to the Usage tab of the output Use the find tool Run a usage report Use the 'Load Events' function for the output What is the best way to take information such as a list of inputs from the Protege GX databases for use in project documentation? Run a report Take a screenshot Use the Export Tool to create a CSV file Take a database backup The Protege Keypad can be used for which of the following things? Viewing events Viewing events and changing the Controller IP address Viewing events, changing the Controller IP address and changing PIN codes Viewing events, changing PIN codes and programming users Which of the following statments are true for the Protege GX Keypad? The states of inputs, outputs and doors can be viewed The states of inputs, outputs and doors can be viewed and doors can be controlled The states of inputs, outputs and doors can be viewed and outputs can be controlled All of the above Level One: Protege GX Installer Study Guide | August 2013 461 Can a database that has been backed up from one server be restored to another? Yes, any Protege GX database will work with any Protege GX Server No, it can only be restored to the Server it was taken from Yes, as long as the Server is running the same or newer version Yes, as long as the Server is running the same or older version How do you upgrade a database after it is restored to a newer Server version? By running the software installer and choosing the repair option It is not possible to restore an older database to a newer Server The upgrade process must be completed using SQL Server Management Studio The software will upgrade the database next time it is run If a database has been restored from a different server, what additional step or steps must be taken to get the Server running? Restart the PC Change the name of the Event Server and Download Server to match the PC name Run the software installer to upgrade the database Relicense the Server 462 Review Questions and Answers | Module 137: System Commissioning TRN-13-1908-08